Do-it-yourself turbine diagnostics and repair
Nothing lasts forever, no matter how sad it is, the units and components on our favorite cars become unusable, and the question arises: either replace it with a new one, pay a lot of money, or try your luck and apply the knowledge to repair it yourself.
Nevertheless, if you carry out timely care and maintenance of components and mechanisms, then that unpleasant moment will come when you have to repair the turbine yourself or with the hands of craftsmen. Still, not much about prevention.
timely replacement of the oil with synthetic oil and its filter, it is advisable to avoid kinks in the oil line, installation of a turbo timer as well as a Blow Off bypass valve - these rules are the most relevant for increasing the service life of the turbine.
Self-diagnosis of the turbine
Carry out a self-diagnosis of the faulty turbine, based on the following factors: a decrease in power and pressure of the turbocharger, after which all possible initial causes of failure of this unit are excluded. We do the following: open the throttle valve completely, this way you will check the turbo boost pressure.
To do this, you need to fully press the gas pedal so that the engine reaches maximum speed. This is the only way you can check whether the turbo boost pressure is reaching maximum. If no current is observed, this does not mean that this unit has become unusable.
Failure to obtain the maximum permissible turbo boost occurs due to excess back pressure. The reason is often a clogged catalyst. In this case, you just need to check the catalyst.
If the catalyst feels normal and the operating condition is stable, continue the diagnostics further, moving on to diagnosing the wastegate, known as WestGate.
If you are a fan of aggressive and sporty driving, then the wastegate does not close completely, which leads to a small part of the gases escaping past the valve. This means that the turbine does not have the required amount, which does not allow it to take advantage of its full operating potential. So diagnostics of the damper is also necessary.
DIY turbine repair
With your own hands at the turbocharger, you can diagnose the internal WestGate, while controlling the thrust to make sure that the valve is closed or not closed, its resistance or jamming during operation. If you are unsure of your diagnostic results, then you should contact a specialist. Remove the external WestGate when the mode is not working.
Turn the assembly over and check that the WestGate valve has completely closed the gate. Perform a full pressure test on the WestGate with compressed air after seeing how it works. But the need for such work is that the WestGate may not withstand the hundred psi pressure that a brand new air compressor can easily produce. To do this, you need to reduce the pressure to 50 psi.
This pressure is quite enough to diagnose the performance of WestGate without damaging the diaphragm. The cause of turbine failure can also be a vacuum leak. This is the reason why when the turbine produces the nominal amount of required pressure, it passes it through the intake tract. By determining the amount of boost pressure from the sensor, you can determine whether you have a vacuum.
When the engine is idling, a maximum amount of vacuum of 0.75 bar is generated. If it is less than the minimum pressure which is 0.54 bar, then you have a leak. The leak can appear in two places, the connection behind the manifold and behind the throttle valve.
If the check does not show negative phenomena, then the turbine supercharger itself should be checked, paying special attention to the shaft bearings. Rotating at a speed of about one hundred and twenty thousand revolutions per minute. If there is an imbalance or play, the consequences can be severe. Such units are balanced to within a fraction of a millimeter.
When you try to straighten the blades of a bent impeller yourself, you weaken the metal, which can later break off and jam the unit.
It is possible to repair the turbo compressor yourself, but there is only one BUT! You can’t unscrew it without a special wrench to unscrew the nut on the impeller, you have to have the skill!! Otherwise, the shaft or impeller will easily bend; denting will not be difficult; you can also knock off the threads. Repair kit is difficult to find. Also equipment for repairs, a stand for checking and balancing.
Or buying a new cartridge costs 13-15 rubles. If the impeller has worn off against the volute, then you cannot do without replacing it with another impeller and balancing the shaft, immediately assembling it (cartridge). And the required balancing is impossible to carry out in a garage.
To begin with, you need to put marks in those places where the cast iron is pressed against each other, as well as the middle and the joints of the volute and the middle, this operation is so that after assembly and installation you do not have to redo the turbine or cast iron on the machine. We put a mark on the side of the shaft where the thread is located and the same procedure on the nut and on the impeller, after which you can unscrew the shaft. These marks are made in order not to disturb the position of the impeller relative to the shaft, this is very important, and the mark on the nut is needed so as not to overtighten the nut and thereby jam the shaft.
We disassemble the turbo unit with our own hands
The turbine snail can get stuck. In order to remove it, use a bolt to secure the snail; this will help to gently move it away. The snail is located on a cone and this requires little effort. Unscrew it carefully, gradually, crosswise, just as you tighten the wheel.
You also need to pay attention not to deform the turbine wheel. This method may seem difficult due to the unique design of the turbine. Sometimes you can use a wooden mallet. Check the shaft for play when you finally manage to disassemble the volute. The play should not be longitudinal.
And the transverse play may be noticeable, but the play should not exceed a millimeter. But even if you have no play, this does not mean that the turbine will not consume oil. Next, you need to remove the compressor wheel using pliers whose jaws move apart. The opposite end of the shaft must be clamped with a shaped mandrel.
The compressor shaft has a left-hand thread.
To remove the compressor wheel, use a regular universal removable wrench. Mark the position of the wheel and nut in relation to each other. To maintain balance. O-rings hold retaining rings. The shaft bushings are removed by unscrewing three T15 bolts. As you understand, the bushings become the cause of the play.
An insert that holds one retaining ring on the compressor side, and two rings on the turbine side. We clean the cartridge and wheel very carefully. Remove the sealing ring from the shaft. We use a repair kit for TKR. The standard kit includes a full set of rings, washers, seals, liners and hardware.
If you have play on the nominal liner, then grooving and balancing the shaft will save you from this. Also, the set of belts includes inserts of different sizes. The inserts need to be cleaned and lubricated with oil. Install the internal retaining ring into the cartridge. We make sure that we get into the grooves completely. We install the turbine liner. Initially, lubricate it with oil.
Secure with a locking ring. Then we insert the compressor liner. Lubricate the bushings, put oil on the removable ring on the bushing, install the plate, and tighten the T15 bolts. We tighten it enough, but not to the point where the thread breaks. We install the dirt protection plate and secure it with locking rings. Then install the oil scraper ring. This process is very long.
since putting on a ring is not so easy. Lubricate and insert the shaft. We tighten the nut to a torque of 2.5 Nm - 5 Nm. We put the stripped snails in place. Next we install WestGate.
Congratulations, you have an almost new turbine, made with your own hands, at the lowest price.
Source: http://remontauto.by/infocar/1179-diagnostika-i-remont-turbiny-svoimi
Do-it-yourself turbine repair
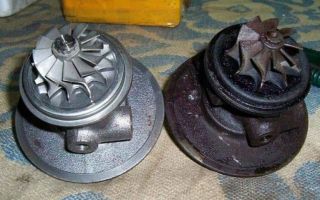
At first glance, there is nothing overly complicated in the design of a turbocharger. The supercharging unit consists of only three parts - a turbine, a compressor and a bearing housing located between them or, as professionals call it, a cartridge. The rotor shaft passes through the cartridge.
The rotor itself is manufactured integrally with the turbine wheel, and a compressor wheel is mounted on the opposite side of the shaft.
To regulate the boost pressure, the turbocharger is equipped with a mechanism located on the compressor or turbine housing, which, using levers, controls the bypass valve in the turbine.
There are also o-rings and an oil deflector that seal the internal cavity of the bearing housing, but this, in general, is all that a turbocharger consists of. With such apparent simplicity of the device, there is a temptation to repair the faulty unit yourself. And getting to know the price tags for new ones (on average 500 - 1,000 USD)
depending on the model), “used” (200 – 400 USD) and refurbished (150 – 450 USD) turbines, as well as a shortage of repair offers from specialized workshops not only in the periphery, but also in the Belarusian capital this temptation only intensifies.
However, do DIY enthusiasts realize the pitfalls that await them?
Like clockwork
I, for example, had to be convinced once after one of the publications in the newspaper that not all the nuances are known even to technically savvy motorists.
First one friend called, followed by another, and both were intrigued by what was meant by the damping function of oil in turbine bearing bushings.
Perhaps this issue would not need to be discussed in detail now, but it is associated with one of the common mistakes made during self-repair.
The need to dampen the rotor shaft is due to the fact that exhaust gases do not pass through the turbine part as a continuous flow, but hit the turbine wheel blades with pulses in accordance with the opening and closing of the exhaust valves in the engine cylinders.
The thin rotor shaft does not have sufficient rigidity, and in order to compensate for the impact of impulses on it, turbochargers installed, at least on cars common in our country, usually use floating type bushings.
Such plain bearings rotate together with the rotor, albeit much slower than it, and at the same time the oil supplied to the bearing under pressure creates two layers - on the inner and outer surfaces of the bushing. These layers, like shock absorbers, dampen the rotor vibrations that arise from the impact of exhaust gases on the turbine wheel blades.
During self-repair, having determined that there is a large play in the rotor bearings, new bushings are machined from bronze, which are then, due to their functional similarity with other bushings, for example, in the upper head of the connecting rod or in the starter, pressed into the holes of the cartridge housing. As a result, there is less oil in the shock-absorbing layer, damping is lost, and this leads to the fact that the new bushings quickly break, and it happens that the rotor breaks.
Crushing imbalance
In order not to risk being misunderstood regarding balancing, I will use an analogy with car wheels, for which this procedure is mandatory after each tire replacement or repair.
If you do not balance the front wheel, then after the car accelerates, unpleasant vibrations begin to be transmitted to the steering wheel, sometimes so strong that it becomes difficult to hold the steering wheel in your hands.
The imbalance of the rear wheels is not so noticeable outwardly, but sooner or later it will remind itself of itself with the characteristic “spotty” wear of the tire tread and premature failure of suspension parts.
The tiny wheels of a turbine and compressor are, of course, not comparable in weight to car wheels. However, loads from inertial forces are proportional not only to the mass, but also to the square of the speed at which this mass rotates.
In other words, the loads increase exponentially as the wheels turn, faster and faster.
And the rotor in a turbocharger rotates, let me remind you, at a speed of over 100 thousand rpm, reaching 200 and even 300 thousand rpm in some designs!
As soon as the first nut on the cartridge is unscrewed, and without this the bearing assembly cannot be disassembled, you can say goodbye to rotor balancing.
After reassembly, the rotor inevitably becomes unbalanced, and the loads generated by it turn out to be excessive for both the rotor shaft and its bearings, and provide a repaired but not balanced turbine with rapid failure.
Why not
The imbalance can only be overcome with special equipment. Moreover, during professional repairs, balancing has to be done at least twice.
First, the “bare” rotor is balanced, and then, after assembling the cartridge, the same procedure is repeated on another balancing stand for the entire “equipment” rotating in the turbine.
The second stand simulates the real operating conditions of a cartridge in a turbocharger with hot oil supplied to its bearings under pressure.
There is no need to talk about something like this in an ordinary garage or even a general auto repair shop.
But without careful balancing, one cannot hope for a positive result of the repair, even if it is carried out with the replacement of all components with the exception of only the turbine housings, compressor and cartridge.
Therefore, it is not even errors with the floating fit of the bushings, but precisely balancing, or, more precisely, its impracticability in artisanal conditions, that makes successful repair of a turbocharger in a garage impossible even theoretically.
What is allowed?
The only thing the owner can save on is the cost of independently removing the faulty turbocharger from the engine, and after repairs in a specialized workshop, installing it in its old place.
It is only necessary, before installing the repaired unit, to rinse the oil supply pipe to prevent dirt from entering the turbocharger, and to pour 10 - 20 g of clean motor oil of the same brand used in the engine into the oil supply hole. Then you should turn the turbocharger rotor several times by hand. It is useful to replace the engine oil, oil and air filters at the same time.
After connecting the oil lines and air lines to the turbine, you need to start the engine and let it idle for 10 - 15 minutes. During this period, it is necessary to check the tightness of all connections. A repaired turbine needs to be run in: a run of at least 1,000 km at a speed of no more than 100 km/h and without sudden changes in speed conditions.
Verdict
A simple-looking unit requires qualified repairs. Relying on your own strength and even on the help of an ordinary car service means overestimating your and his capabilities. Repairs should only be entrusted to workshops specializing in turbochargers. The hallmark of such a workshop is that it is equipped with stands for preliminary balancing of the rotor and final balancing of the cartridge.
© Sergey BOYARSKIKH
Source: http://turbominsk.by/informaciya/samostoyatelnyj-remont-turbiny
DIY diesel engine turbine repair (video)
Summary of the article:
- Turbine design
- Signs of a turbocharger malfunction
- Removing the turbine
- Repair work
Just a decade ago, a car turbocharger was considered a luxury item that was only installed on select and expensive car models. Today, the turbine is an integral part of almost every vehicle. This is a device that can increase the power of a car and at the same time reduce fuel consumption. When choosing a car, buyers began to pay special attention to the presence of a turbocharger in the car. To feel confident, you should understand the principle of such a mechanism. Knowing some of the nuances, each driver will be able to diagnose engine problems in a timely manner and fix the problem on their own. Thus, this article will help everyone who wants to repair a diesel engine turbine with their own hands.
Turbine design
A modern turbocharger consists of the following elements:
- A metal housing in which the bearings are located;
- Wear-resistant turbine wheel that can withstand operation at temperatures above 700 degrees Celsius;
- Bypass valve for releasing excess exhaust gases;
- Turbine and compressor volute (housing);
- Rotor shaft;
- Sliding bearing (the axial bearing surface in it slides along the working plane of the bearing itself);
- Well, the compressor wheel itself, most often made of aluminum alloys.
So how does a diesel engine turbine work? Everything is very simple.
The engine exhaust gases, hitting the turbine wheel, set the compressor wheel in motion, which in turn begins to build up pressure and supplies compressed air directly to the cylinders.
In other words, the same portion, only of already compressed oxygen, enters the engine, which allows you to burn more fuel and increase the power of the power unit by up to 50%, along with more efficient combustion of diesel fuel.
Signs of a turbocharger malfunction
If the desire to learn how to repair a turbine with your own hands on a diesel engine persists in you, then first you should learn to recognize the signs of incorrect operation or breakdown of this mechanism. The following “symptoms” most often indicate a malfunction of the turbocharger:
- Black smoke is pouring out of the chimney, and the engine is not able to reach maximum speed. Such a violation is caused by air deficiency, which may be a consequence of contamination of the air line or loss of sealing of the exhaust distributor. Often a pressure leak occurs due to a loose connection between the main turbine body and the manifold.
- Exhaust gases have a bluish tint. The cause of this phenomenon is usually oil in the exhaust distributor.
- There are known cases where a faulty turbocharger was indicated by a loud engine, so you need to know how your car “purrs” in good condition, and start to panic when the key of such “music” changes.
All of the above signs indicate that it makes sense to look for a turbocharger repair kit in the garage and get ready to check all additional engine devices to make sure they are in good working order.
Do not forget that the trouble-free operation of a diesel engine turbine is influenced by the power plant itself, or rather its normal functioning. A healthy engine is a happy turbocharger, so to speak.
Removing the turbine
When repairing a diesel turbine with your own hands, you must initially gain access to the components of the device itself. Of course, for this it is better to dismantle the turbine itself. This procedure consists of the following steps:
- Step one - we find the fastening bolts on all snails and unscrew them one by one (counterclockwise!). Separating the part where the compressor wheel is located will not be difficult, but the turbine part may stick and you will have to tinker with it a little. This can be done using the same bolts that secure the snail, using them to turn the part in any direction.
- Having dealt with the turbine part, we move on to removing the compressor scroll. As already mentioned here, everything should go smoothly, the only thing you need to take into account is the different ways of attaching it to the case, depending on the specific model of the device.
- Ultimately, the compressor wheel is dismantled.
At this step, the disassembly of the turbocharger can be considered complete.
Repair work
After successful dismantling of this mechanism, we proceed to a thorough inspection of each of its component parts. It doesn’t matter at all whether repairing a diesel turbine with your own hands concerns a regular model of the device or a biturbo, the sequence will not change.
If there are no obvious mechanical damages on the impellers of the turbine and compressor parts, as well as on the surface of the volutes, they must be thoroughly cleaned with fine sand.
It also helps to use small glass beads when cleaning.
When analyzing other structural elements, you can encounter the following defects:
- Damage to one or more blades on the compressor wheel. It is not advisable to level or solder the blade yourself; it is better to simply purchase a new part. In addition, it is advisable to replace the air filter and check the intake manifold for integrity and leaks.
- A similar problem, only with the turbine wheel. It is also better to buy a new part, replace the old one, and evaluate the integrity of the intake tract.
- Defective condition of additional small elements, such as support bearing, rings, bushing, etc. To eliminate the malfunction, you need to purchase new parts, notice them, and install a new shaft.
You can and should repair a turbocharger yourself, but only when you fully understand its structure and operating principle.
All nuances should be taken into account when assembling this mechanism, since the quality of operation of the entire power plant as a whole depends on this.
If you still have some doubts, it is better not to skimp and entrust the repair of the turbine to the specialists of the service station.
Turbine repair from Rover:
Do-it-yourself repair of a turbine from a diesel engine:
Leave the first comment - the author tried
Source: http://autoshaker.ru/remont-turbiny-dizelnogo-dvigatelya-svoimi-rukami.html
DIY car turbine repair
There is no car in which nothing breaks. And such a miracle of technology will not appear soon, so the car owner has to put up with the inevitability of repair work.
Contacting specialists for every issue is not a way out. You need to be able to do something yourself, learn and improve your skills.
For example, repairing a turbine with your own hands can be done if you show a little patience, gain new knowledge and adopt the experience of craftsmen.
Getting to know the turbine
Before you begin repairing any equipment, you should familiarize yourself with its design and operating principle. This is logical and correct.
The design includes the following set of parts:
- impeller with turbine;
- centrifugal air pump;
- compressor;
- an axis with a rigid structure for connecting the component elements;
- a set of small parts (bearings, valves, seals, rings, etc.).
The gases produced as a result of engine operation are directed to the turbocharger impeller. Their energy is kinetic in nature, and thanks to the impeller it becomes mechanical.
The synchronous operation of the pump and air filter ensures the supply of air inside the compressor. The air is compressed and directed into the engine.
This increases engine power and fuel efficiency.
This is roughly how a turbine works. Now you need to determine the nature and cause of the breakdown. We begin to inspect the unit and diagnose it.
Discounts on new cars! Advantageous loan from 9.9%
Installment plan 0%
Identifying the problem
You can judge that something is wrong with the turbine by the following signs:
- noticeable reduction in engine power;
- change in exhaust color (black or dark blue);
- increased oil consumption;
- the appearance of extraneous sounds when the engine is running.
Turbocharger repair steps
All the preparatory work has been completed, the information has been assimilated, you are full of determination and enthusiasm - it’s time to proceed to the most important and responsible stage. We study in detail and carefully how to repair a turbine without the involvement of specialists.
Removing and disassembling the turbine
- We prepare in advance the minimum set of required parts that may be required during the repair process (liners, seals, screws, rings, washers).
- We remove the turbine from its mounting location.
- We unscrew the fasteners, marking each of them, remembering and writing down their original location.
This step is very important because disassembling is easier than assembling. Don’t forget about the “snails”, which will also have to be removed.
- Let's focus on the turbine and compressor. If they become unusable, then replacement with new parts will be necessary, since these components cannot be repaired.
- To remove the compressor wheel, you must use pliers that have sliding lips. Please note that the compressor shaft has a left-hand thread.
- In a good way, it is necessary to check the shaft play for admissibility, but this requires special equipment for repairing turbines.
In the absence of one, you will have to hope for the best and contact the appropriate service at the first opportunity.
- Our task is to remove the compressor wheel, which is mounted on the shaft. A universal puller will help with this.
- We pay special attention to the shaft bushings, the failure of which can cause backlash.
- We wash every part very carefully and thoroughly. Remember that the slightest grain of sand can damage the entire unit. Some parts will require new lubricant, which can be car oil.
Possible faults
The catalyst may become clogged in turbines, which leads to a decrease in turbocharger pressure. To avoid this situation, you will need to fully open the throttle, pressing the gas pedal all the way, thus forcing the engine to operate at maximum speed.
If such a check does not produce results and the cause of the breakdown remains unknown, it is time to start checking the bypass valve. It is also called WestGate. Most often, this part becomes unusable among lovers of aggressive driving with a sporty character. The damper simply does not have time to close, allowing some of the processed gases to pass through.
Checking for vacuum leaks deserves due attention. The sensor readings show the boost pressure, which can be used to judge the presence of vacuum. When the engine is idling, the vacuum indicator should not fall below 0.54 bar. Otherwise, we can safely say that there is a vacuum leak. It may appear behind the manifold or behind the throttle valve.
Let's assume that this check did not shed any light on the problem with the turbine. This means that you need to focus on the turbine supercharger and shaft bearings. There should be no imbalance or play in the operation of these elements. In this process, the main thing is extreme and maximum accuracy.
Drivers often encounter impellers that have become unusable and require replacement. To successfully complete this task, you must follow the following instructions:
- we mark the places where the parts are connected, the middle position of the cochlea and its joints;
- We carry out the same actions with the shaft, nut and impeller.
If you have not neglected these tips, then installing a new impeller will be easy.
Repairing diesel engine turbines is not much different from repairing the turbocharger of gasoline units. You will need to observe the same precautions, remember, or better yet, outline the location of each detail, and exercise maximum caution and attentiveness.
Expert opinions differ regarding the advisability of doing turbine repairs yourself. On the one hand, this unit is complex, capricious and expensive, so amateur efforts can render the turbine unusable. But, on the other hand, you still need to learn how to help your faithful iron friend. After all, it is not always possible to turn to specialists.
Source: http://CarExtra.ru/remont/remont-turbinyi-avtomobilya.html
How to repair a turbine yourself?
Over time, parts in a car begin to wear out. And then the moment comes when they need to be replaced or tried to be repaired. However, if you periodically inspect parts and do preventive maintenance of mechanisms, you can delay their repair for some time.
But if you have not regularly changed the oil to synthetic, have made kinks in the oil line, etc., which caused a turbine breakdown (by the way, we read about what turbocharging is here), then you are interested in the question: “How to repair a turbine yourself ", to which I will answer you now.
Turbine diagnostics
One of the very first signs of turbine failure is that during inflation, the maximum pressure (boost) shows a decrease in performance (significant decrease). At such a moment, unnecessary noise appears in the unit, oil consumption increases, and rapid deterioration of spark plugs occurs due to contamination, which, by the way, can be seen by the bluish smoke coming from the exhaust pipe.
If you are diagnosing a malfunction of this unit, and a significant reason for this is a decrease in power and boost pressure, excluding other reasons for poor performance, then when you open the throttle, you can check the boost pressure. Why do you need to fully press the gas pedal in the car, so you get maximum engine speed.
If you have not obtained the maximum boost pressure value, this does not mean at all that it is necessary to change the turbine. After all, the reason for such pressure may be. For example, the appearance of excess back pressure, which occurs as a result of catalyst clogging. If this part is in good condition, then you need to move on to checking the bypass valve.
Yes, you can independently diagnose internal wasting; in this case, you need to control the draft to make sure that the valve is closing correctly. Here resistance or jamming may occur during operation. If you are not completely sure of the correctness of the work you have done, then it is better to take the turbine to a stand at a service station. I advise you to read my article on how to check the operation of a turbine.
Turbine repair
You should know that in order for the turbine to be repaired efficiently, it must first be carefully and correctly dismantled.
To do this, you need to unscrew the bolts securing the turbine and compressor parts of the unit.
At the same time, take a close look at the location of the snail on the cone: it must be unscrewed evenly from all sides so as not to damage the turbine wheel.
When the turbine is removed, you first need to check the play. If the side play is noticeable, this is normal. But there should be no longitudinal play.
Otherwise, it is recommended to remove the compressor wheels and check the shaft bushings and retaining rings, as they may cause play. Know that on the compressor side the liner is held in place by one retaining ring, but on the turbine side by two.
If significant vibration of the liners is felt, then the shaft must be balanced and sharpened, and the liners themselves must be cleaned and lubricated with oil. After which you can install everything in its place.
But before installing the retaining rings into the cartridge, you need to make sure that they are completely seated in the grooves. And only after such a check can the turbine liners be inserted, but they must first be lubricated with machine oil. Please note that the T15 bolts must be tightened very well and be sure to install a dirt protection plate.
Thus, any car owner can repair the turbine with his own hands, but for the first time such repairs, it is advisable to contact a more experienced car owner so that errors are minimal.
Do-it-yourself turbine repair video
I recommend reading:
Source: http://autoepoch.ru/remont-i-obsluzhivanie-avto/kak-sdelat-remont-turbiny-svoimi-rukami.html
An amateur's article - reassembling the turbine on your own. don't do that!
On the removed turbine, unscrew all the fittings and unscrew the bolts securing the volutes of the compressor and turbine parts.
The compressor scroll can usually be removed without any problems; the turbine scroll usually sticks tightly. There are not many ways to remove it. The first is in Russian with a mallet, but it is better to use the bolts securing the snail and slowly move the snail away.
The snail itself sits on a cone, so you will have to work hard. Unscrew gradually, a little at a time and evenly on all sides. Make sure that the turbine wheel is not deformed.
The complexity of this method depends on the design of the turbine; on the GT17 I had to use a mallet.
Removing the compressor scroll is done in different ways. On the GT25 it is secured with a locking ring, on the GT17 it is secured with bolts. The main thing is not to lose the pucks!
After unscrewing the bolts or removing the locking ring, carefully so as not to damage the wheel, remove the volute...
When the cartridge is already in our hands, we check the shaft play. There should be no longitudinal play, transverse play can be felt, but it also shouldn’t hang a millimeter back and forth. Although a loose or non-lofting TKR does not mean that the turbine will not consume oil as much or that oil consumption will be equal to gasoline consumption.
Next you need to remove the compressor wheel. To do this, you need to use pliers with sliding jaws, while the other end of the shaft is clamped with a shaped mandrel or whatever is suitable. It should not be forgotten that the threads on the compressor shaft are mainly LEFT.
The compressor wheel is unlikely to come off the shaft on its own, so you will have to use a regular universal puller.
Be sure to mark the relative position of the nut and wheels relative to each other so as not to disturb the balancing, although as practice shows, with used turbochargers the balancing is already disturbed, and this is a job for specialists!
O-rings are in special grooves on the rotor and the cold part tablet, and the thrust bearing is fastened (in this case with three bolts, and usually it is this that is the cause of the main play.
At the end, the liners (sliding bearings) are held in place using retaining rings; there will be no problems with this.
The bushing (sliding bearing) on the compressor side is held by one retaining ring, and the bearing on the turbine side by two retaining rings.
Thoroughly clean the cartridge from dirt, carbon deposits and deposits. Clean the wheels and remove the O-ring from the shaft.
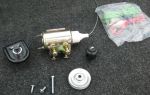
Next, you should already have a repair kit for your TKR. A typical repair kit contains a full set of oil seals, rings, hardware, washers, and liners.
If the nominal liners are loose, you will have to grind and balance the shaft. Repair kits usually come with inserts of at least two sizes. Clean and lubricate the bearings with engine oil. Install the inner retaining rings into the cartridge, making sure they are fully seated in the grooves.
Next, insert the turbine bearing (sliding bearing), pre-lubricated in engine oil, and secure it with a retaining ring.
Also insert the compressor liner, lubricate the bushing (thrust bearing) and put the oil ring on it, place the plate and tighten the bolts, tighten, but not to the point of stupor. Once assembled, everything looks very glamorous.
Next, install the dirt protection plate and secure with retaining rings.
Installing o-rings is very tedious and time-consuming because it is quite difficult to put them on the shaft. Especially if the grooves are coked to death, and the grooves themselves are not always in perfect condition and when cutting them, rings of a different size are needed.
Next, insert the lubricated shaft and tighten the nut with a torque from 2.5 Nm to 5 Nm . And we put the snails in place, which does not cause any difficulties. After which we install the wastegate and that’s it, we have a new turbine at a price of about 150 euros 😉 This is the usual cost of a repair kit.
But there is no guarantee that it will work normally. because a single case is described for one type of turbine!!!
Source: http://masterturbo.ucoz.ru/publ/1-1-0-12
Turbine repair
Turbine repair may be necessary on any engine due to a number of reasons, which will be described below. And turbocharger repair is a fairly popular service in car repair shops, and not a cheap one at that.
But with a skillful approach, you can repair a turbocharger yourself.
In this article we will take a detailed look at the design of the turbine, the common causes of its breakdowns, how to extend the life of the turbine and whether it is possible to repair it yourself in your garage.
A turbocharger (turbine) used to be installed only on sports cars, but now it can be found under the hood of any diesel car, and even on production gasoline cars. After all, a turbine, despite its simple design, is capable of significantly increasing the power of a diesel engine, which without it will be much weaker than a single-capacity gasoline engine.
The principle of operation of the turbine is quite simple and it uses the energy of exhaust gases. There are, of course, other more progressive turbine designs (for example, this article describes a turbine that has no failures at all, and its shaft and bearings operate without oil), but the most common is the one that uses waste exhaust energy.
The principle of operation of such a turbine is very simple: exhaust gases enter a cast iron volute and spin an impeller, the blades of which are installed in their path. But on the same shaft there is a second impeller, separated by a partition and located in a separate scroll - the compressor.
And this second impeller begins to pump air into the intake tract, thereby increasing the air pressure in it. The higher the speed of the shaft with the impellers, the higher the air pressure in the intake manifold and in the combustion chambers of the engine. This significantly improves the combustion process of the fuel mixture and significantly increases engine power (by 20 - 40%).
In words, everything seems simple, but the design of the turbine, despite its simplicity, is made with great precision. Accuracy is needed because, firstly, the gaps between the shaft and the sliding bearings are very small, and the shaft and bearings must have a very precise and smooth surface of the rubbing pairs.
And secondly, the shaft speed reaches about two hundred thousand revolutions per minute (and on sports cars even more), and any inaccuracy in the manufacture of the shaft or impellers mounted on this shaft will lead to imbalance and destruction of the turbine.
But it is much easier to prevent a breakdown than to fix it, so before describing the repair of a turbocharger, you should familiarize beginners with the reasons that can lead to turbine failure and significant expenses for its repair.
The main reasons that lead to turbine failure and repair.
- Untimely oil change. Changing the oil and oil filter should occur within the time limits established by the engine manufacturer, but it is better to do it a couple of thousand earlier than the deadline. After all, oil becomes contaminated with wear products (metal dust) over time, which is an abrasive. In addition, the oil loses its anti-seize properties over time. These unfavorable factors will quickly damage the turbine plain bearings.
- Filling the engine with motor oil of the wrong class and quality as recommended by the engine manufacturer. Do not forget that the turbine shaft speed is enormous, which means its plain bearings must be lubricated with high-quality and clean oil.
- Kink or blockage of the oil line that supplies oil under pressure to the turbine plain bearings. When the oil line is bent, oil starvation occurs and friction pairs (sliding bearings) rub dry and instantly fail.
- A sharp increase in engine speed when the engine is not warmed up, especially in winter or after the car has been idle for a long time. In winter or when the car has been standing for a long time, the oil does not immediately enter the lubrication system, but after some time. Therefore, it is not recommended to increase the speed immediately after starting the engine.
- After a trip, you cannot immediately turn off the engine, and this is precisely why a turbo timer is installed on newer diesel engines, which turns off the engine after some time when the turbine speed decreases.
- Engine overheating, which leads to significant dilution of the oil and a decrease in pressure in the oil system.
How do you understand that something has happened to the turbine and requires repair?
- The acceleration dynamics of the car noticeably deteriorated, the father-in-law's engine lost power.
- Oil consumption has become noticeably higher than usual (a working turbocharged engine should consume no more than 1 liter of oil per 10 thousand km.
- The exhaust color has become black or gray (blue smoke).
- The sound of the turbine during its operation became different from usual (especially on a cold engine), for example, a grinding or whistling sound, or there was no sound at all (there is no sound when the shaft is jammed).
- It also happens that the body of a cast-iron (high-temperature) volute cracks (on gasoline engines they use not just a cast-iron volute, but an alloy of cast iron with nickel - a more heat-resistant alloy), for example, from driving a car through a deep puddle and getting water on the hot volute. Cracks are detected by external inspection.
- When inspecting, it is helpful to separate the turbine from the manifold and look inside the volute(s). There should be no traces of engine oil on the inner walls of the volute and on the impeller. If oil is present, then disassembly and repair (replacement of seals) is required.
- Carefully inspect the inside of the snails. If there are burrs on the walls, it means the plain bearings are too worn, so much so that the impeller clings to the housing. This is confirmed by increased shaft looseness (play) - felt by hand.
More details about turbine malfunctions are shown in the video below.
Many people wonder whether it is possible to repair a turbine with their own hands, in a garage. It is possible, but it depends on the type of repair and this will be written in more detail below. But first you need to remove the turbine from the engine by unscrewing the oil wires leading to it. Well, then the bolts are unscrewed, pressing the flanges of both volutes (aluminum and cast iron) to the collectors.
Disassembly and repair of turbine (turbocompressor).
Some faults can be identified before disassembly. For example, increased shaft play can be detected if you grab one of the impellers with your hand and try to shake it, and as a rule, the increased play can be clearly felt.
But leaks (damage) of seals can only be detected after disassembly.
Yes, and you don’t need to try too hard to determine the suitability of the seals, and once disassembly is done, then in any case you will have to replace the seals with new ones.
Before disassembling the turbine, I advise beginners to take pictures of everything after each removed part (at least on a mobile phone) - this will help later quickly assemble the turbocharger without problems.
To disassemble the turbine, you need to unscrew the clamp or screws that fasten its three main parts: the middle part (cartridge) and two volutes, one so-called hot (made of cast iron), and the second cold - made of aluminum alloy. Many turbines can be disassembled by unscrewing the tightening clamp in the center, shown by the red arrow in the photo on the left.
Usually a cold aluminum (compressor) volute easily separates from the middle part, but a high-temperature cast iron volute can become tightly stuck. Before disassembling, be sure to soak all stuck joints with a penetrating liquid (for example, WD-40, brake fluid or kerosene) and let the parts sit for a while.
I don’t recommend using brute force when disassembling, since cast iron or aluminum are already quite fragile metals, and under the influence of temperature changes, they lose their strength even more over time.
If the snail is strongly stuck to the body, but for better removal, it is useful to heat it with a gas burner.
After this, you can lightly tap the snail in a circle with a plastic mallet and separate the snail from the body.
Some turbines have threaded holes and by screwing bolts into the holes, you can move the impeller from the cone (move it away from the housing). Of course the bolts are screwed in evenly. And on some turbines, before separating the volute, you need to remove a special locking ring, and after that you can separate one of the volutes from the middle part.
It is necessary to separate the snail(s) from the middle part carefully and evenly, since the gap between the impeller blades and the inner walls of the snails is very small, and if the snail is unevenly separated from the middle part (with a skew), the impeller blades can be damaged.
After separating both volutes (aluminum and cast iron) from the middle part, you can already pick up the middle part (the cartridge) and more accurately check the shaft play by holding one of the impellers with your hand.
There should be no radial runout (play) of the shaft at all, and barely noticeable axial play is allowed.
To accurately measure the backlash (their exact value), the turbine housing (cartridge) should be secured in a vice (through an aluminum gasket).
And by installing an indicator stand on the workbench nearby, you can rest the indicator probe against the end of the shaft and, turning the shaft and swaying from side to side, accurately measure the backlash. Acceptable values of axial runout are a couple of hundredths.
But usually there is noticeably more play and natural wear during turbine operation gradually increases the gap between the shaft and the plain bearing.
And the main type of repair is grinding the shaft (to remove scuffing and uneven wear) to the size of the repair bushings (sliding bearings with a smaller internal diameter).
To remove the shaft for subsequent grinding or replacement with a new one (depending on the degree of wear), you must remove at least one of the impellers (preferably the compressor one, which rotates in an aluminum volute - it is easier to remove).
After unscrewing (usually the thread is the other way around and when unscrewing you need to turn the nut to the right) the nut holding the impeller on the shaft (or removing the retaining rings - this happens less frequently), in order to further remove the impeller from the shaft, you should use a small puller.
But before this, it is advisable to flood the impeller and shaft (especially high-temperature ones) with penetrating liquid.
Before pulling the impeller from the shaft with a puller, mark with a marker or scriber the location of its blades relative to the shaft, so that later (during assembly) you do not disturb the factory balancing. It is also advisable to mark the location of the nut relative to the shaft and impeller. But still, after assembling the cartridge with the restored shaft, it must be balanced.
The bushings themselves on most turbines are held in place by retaining rings (usually two rings on the cast iron side and one on the aluminum side), which must be removed with a special tool, such as this one. In addition to the bushings, all seals (oil seals) should also be replaced with new ones. All these parts are included in the repair kit for repairing turbines and are available for sale.
Should you repair the turbocharger yourself or contact a service center?
It depends on which repair option. A repairman who decides to repair the turbine himself must make a choice from two options. The first option allows you to do the repair yourself if you order a new cartridge and replace it.
The cartridge is a completely new middle part of the turbine (but without volutes), with a shaft, bearings, seals, and impellers.
Or the second option is to restore the original shaft by grinding it, followed by replacing the bushings and seals with new ones (repair ones).
And it is precisely the second option that cannot be realistically carried out in an ordinary garage, since in addition to grinding the shaft for repair bushings (sliding bearings), the shaft and the cartridge itself assembled with new bushings must be balanced on a special balancing stand.
When selecting bushings, one nuance should be taken into account - the working gap (for the oil film) is not only between the inner hole of the bushing and the shaft journal, but also the outer diameter of the bushing must have a working gap relative to the housing. That is, during turbine operation, an oil film is created not only between the inner hole of the bushing and the shaft, but also between the outer diameter of the bushing and the bushing seat in the housing.
Many unaware repairmen do not take this into account and press new bushings into the body with an interference fit, and not with a working gap. As a result, such turbine repairs lead to its rapid failure.
Replacing a worn cartridge with a new one is much easier than disassembling it and restoring the shaft by grinding, but you need to look for a new cartridge so that it is suitable specifically for your turbine (it’s easy to find by markings on the turbine body, for example from the company “Turbo Rail” - Italy). But the new assembled cartridge is not so cheap (from 19 thousand rubles, sealing rubber bands - rings are also included with the cartridge).
But such repairs can be done with your own hands, without the help of specialists. But before installing a new cartridge, I advise you to sandblast the volutes, especially high-temperature ones (cast iron). You can see the replacement of the cartridge in the video below.
And the second option (with grinding the shaft), as I already said, cannot be done in an ordinary garage. You will have to turn to specialists to sharpen and grind the shaft for repair bushings, and then, having selected the bushings, you must balance the shaft together with the impellers.
After all, the rotation speed of the turbine is very high, and any shaft imbalance will lead to rapid wear of new parts.
In addition, the shaft with the impellers must first be balanced, and then the cartridge is assembled with new parts and after assembly the balancing is performed a second time. A modern balancing stand for cartridges during balancing supplies hot oil to the sliding bearings and simulates the operation of a turbine in real conditions (under load).
In addition, the volutes, the middle part (cartridge), and the impellers too (especially the high-temperature volute) will need to be sandblasted and painted. But a workshop that will undertake the repair of the shaft separately is not so easy to find, since most workshops undertake the repair of turbines from the beginning (from disassembling the turbine) to the end (to complete assembly).
Some tips after repairing the turbine.
After restoring the shaft, replacing the plain bearings (bushings), thrust bushing and seals with new ones (from the repair kit), or after installing a new cartridge, everything is assembled in the reverse order. Be sure to lubricate new plain bearings (bushings) with fresh engine oil before installing them on the shaft (it is also advisable to lubricate the shaft).
After assembling the turbine and before installing it in its place, I advise you to remove and thoroughly rinse with kerosene the oil supply and drain lines to the turbine. It is possible that dirt has accumulated on the walls of the tubes over many months of work. When installing pipes, never use sealant, but only new gaskets for the flanges (fittings) of the pipes.
Otherwise, particles of sealant may accidentally get into the oil passages and cut off the oil supply. The consequences will be disastrous, and the money to repair the turbine will be wasted.
In general, cleanliness during repairs and especially during turbine assembly is the main factor for successful repairs. Therefore, carry out the assembly on a table covered with clean white paper or cotton. cloth.
Of course, before assembly, all turbine parts (volutes, impellers, casing, if not new) must be sandblasted and washed.
Before connecting to the turbine, I advise you to fill the oil supply pipelines (using a medical syringe) with fresh engine oil. Having assembled and installed the turbine in place, start the engine and let it idle for five to ten minutes. At the same time, do not waste time and watch the hoses and gaskets and make sure that oil is not leaking anywhere.
Having set out on the road with a repaired turbine, I advise you to drive quietly for about the first thousand kilometers, not exceeding the hundred-kilometer mark on the speedometer, and especially not allowing the tachometer needle to enter the red zone. After starting the engine, never increase the speed sharply until the engine is warmed up.
And after the trip, if you do not have a turbo timer, do not turn off the engine immediately, let it idle for a couple of minutes. However, it is advisable to always follow this rule not only for repaired or new turbines, but also for those that have traveled a fair amount. And in order not to forget to do this, it is advisable to install a turbo timer if it is not installed on your car from the factory.
That seems to be all. After proper repair of the turbine, it will serve its intended life no worse than a new turbocharger, good luck to everyone.
Source: http://suvorov-castom.ru/remont-turbin/