Valve cover gasket - keeping the engine clean + Video
If the valve cover gasket located under the hood of a vehicle begins to leak, the driver should be prepared for serious trouble.
Why do you need a valve cover gasket?
An insignificant part of the car - a gasket under the valve cover - is not capable of radically changing the technical characteristics of the vehicle or worsening the parameters of the normal functioning of its engine. At the same time, any car enthusiast carefully monitors its condition, replacing the gasket at the first sign of a leak.
The valve cover has a neck through which engine lubrication is added to the system. Its task is to cover the gas distribution unit of the machine, to which it is bolted. The gasket, made of rubber, is directly mounted between the fastening elements and the timing head.
This situation occurs because the gasket becomes hard and much less elastic. This leads to the appearance of microcracks on it, which begin to leak oil.
If the gasket is not replaced in time, the outside of the car engine will begin to become covered with dirt, which will be almost impossible to clean.
Naturally, a dirty crust on its surface will not add stability to the “heart” of the vehicle.
How and when to change the gasket
When the vehicle is actively used, the valve cover gasket must be replaced quite often. As a rule, in such situations:
- carrying out major or routine repairs of the engine;
- leakage of lubricant at the junction of the head and cover;
- removal for the purpose of timing belt repair or maintenance of this mechanism.
Some particularly scrupulous car enthusiasts, who are very responsible about the condition of their “swallow,” change the oil and gasket at the same time. Thus, they completely eliminate the risk of leakage. And during the process of replacing the seal, it is possible to once again inspect the components of the gas distribution device for damage or wear.
To replace the part we are interested in, it is necessary to prepare a high-temperature high-quality sealant for the valve covers, a new gasket, gasoline or any other composition for degreasing surfaces. The replacement process is simple:
- The air purifier housing is removed;
- bolts are unscrewed along the entire perimeter;
- Attachments are also removed (if any);
- the remaining sealant between the cover and the cylinder head is removed, after which the joint is treated with a degreasing compound.
The new gasket is lubricated with sealant on both sides and mounted in its proper place.
Features of gasket replacement
As can be seen from the previous section, the process of replacing the seal itself is not particularly difficult. At the same time, drivers performing this procedure for the first time may encounter an unpleasant phenomenon - oil leakage from under the new product becomes even greater than before. Most often, this situation occurs when:
- misalignment of the cover bolts, which is caused by uneven tightening of its fastenings;
- using a low-quality sealing composition or applying it unevenly to the joint line;
- using a gasket whose quality leaves much to be desired.
Solving these problems is not difficult. Buy a quality gasket and a good sealant, use a torque wrench to tighten the bolts to the correct torque according to your vehicle's service manual, and there will be no surprises when replacing an old product.
Source: https://carnovato.ru/prokladka-kryshki-klapanov-zamena/
Changing the valve cover gasket with your own hands
When the valve cover gasket, which is located under the hood of the car, begins to leak oil, the motorist should prepare for serious problems. Valve covers are the first parts that the eye immediately falls on when the car hood is opened. Some motorists prefer to paint the covers along with the air cleaner in bright colors.
The valve cover performs a fairly simple task - it closes the gas distribution mechanism and the neck for filling the engine oil. This element is attached to the valve head with several bolts or nuts. The valve cover gasket must be placed between these elements.
Why do you need a valve cover gasket?
The valve cover gasket is a detail that, at first glance, is insignificant and especially does not affect the power characteristics of the car or impair the normal functioning of its engine. Every responsible car enthusiast is obliged to monitor its condition, replacing it at the first signs of leakage.
The gasket is made of a special rubber composition that retains its properties even with sudden temperature changes, and also does not interact with engine oil.
But over time, the element still loses its properties and becomes hard, covered with microcracks through which oil leaks.
Even the most insignificant leak can lead to external contamination of the power unit, which is subsequently very difficult to clean. And, naturally, such a phenomenon will not add stability to the operation of the internal combustion engine.
How and when should the gasket be changed?
If you actively use your car, you will not avoid frequent replacement of valve cover gaskets. This often happens in the following situations:
– when carrying out current or major repairs of a vehicle;
– during a lubricant leak at the connecting point of the cover and head;
– when dismantling the gas distribution mechanism for the purpose of its repair or maintenance.
When should you change the gasket? Some very scrupulous motorists, who are quite responsible about the condition of their four-wheeled pets, replace the valve cover gasket along with the engine oil.
There is a very sound calculation in such seemingly paranoid behavior. They completely protect the engine from leaking.
Also, in the process of replacing the gasket, you can once again diagnose the components of the gas distribution mechanism for wear and damage.
How to change the valve cover gasket? Before replacing the part you are interested in, prepare a high-quality lid sealant that can withstand high temperatures, a new gasket and a degreasing compound. Replacing the gasket is an extremely simple process:
– remove the air purifier housing;
– Unscrew the bolts around the entire perimeter;
– remove attachments, if any;
– remove any remaining sealant and treat with a degreasing material;
– the new gasket should be lubricated with sealant on both sides and mounted in its appropriate place.
Features of replacing valve cover gaskets
As the previous section shows, replacing the valve cover gasket is not particularly difficult. But those who are going to perform this operation for the first time may encounter such an unpleasant phenomenon as an oil leak from under the new gasket, which has worsened even more. This situation often occurs when:
– the cover bolts are skewed due to uneven tightening of its fastenings;
– a low-quality sealing compound is used or it is applied unevenly to the joint line;
– a low-quality gasket is used.
These problems can be solved in a simple way. Simply purchase a quality replacement gasket and a good sealant, and use a torque wrench to properly distribute the torque when tightening the bolts, according to your vehicle's owner's manual. And then there will be no complications when replacing the gasket.
Source: https://auto.today/bok/3592-kak-pomenyat-prokladku-klapannoy-kryshki.html
Replacing the valve cover gasket on a VAZ 2110 on your own
Replacing the gasket
Surely, many have encountered a problem when oil begins to ooze under the valve cover. In this case, the valve cover gasket must be replaced.
As a rule, this happens after a certain mileage of the car. To prevent such a problem, you need to replace the gasket in a timely manner.
The process itself, called replacing the valve cover gasket of a VAZ 2110, is not that complicated, but it is not feasible without some knowledge and skills.
Pad
Replacing the valve cover gasket on a VAZ 2110
In fact, the valve cover gasket is a minor element; it does not affect the performance of the engine or other technical parameters.
But if this gasket starts to leak, you need to prepare for some trouble. The main sign of taking care of your car is a clean and dry engine, which is also reflected in the condition of various gaskets, seals and seals.
Replacing the 8th valve cover gasket of a VAZ 2110
The valve cover immediately catches your eye when you open the hood of the car.
Most car enthusiasts paint this accessory and the air cleaner body in bright colors. So:
- The cover is designed to cover the gas distribution mechanism; it has a neck for changing engine oil. This neck is attached to the cover itself using several bolts. There must be a special gasket between these parts.
Sooner or later, the gasket loses its elasticity and becomes hard.
Later, microcracks form through which oil leaks. Even due to minimal leaks, the engine quickly becomes covered with dirt, which is difficult to wash off.
Perhaps many are interested in the question of how often valve gaskets need to be replaced.
It is worth noting that such a procedure should be habitual for the driver, especially in cases where the car is actively used. Replacing the valve cover gasket on a VAZ 2110 should be carried out in the following cases:
- if traces of oil appear outside along the connection line between the cover and the cylinder head;
- during current or major engine repairs;
- when removing the head cover for technical inspection or for timing belt repair.
- Some drivers change the gasket under the cap constantly when changing the engine oil. There is a rational explanation for this. Oil leakage will be completely eliminated. When opening the cover, the driver inspects the timing parts to detect wear or damage.
In many cases, the gasket is changed in a garage environment. You can quickly change the gasket on your own; all you need is desire and a set of simple tools.
In addition, you need to acquire consumables.
Such materials include a new gasket, a good high-temperature engine sealant and a degreaser (this can be gasoline, solvent or anti-silicone).
Replacement process
Removing the old gasket is very easy.
Let's get started:
- To do this, remove the air cleaner housing and unscrew the mounting bolts around the entire perimeter.
- The contact points between the cylinder head and the cover are cleaned of worn sealant and then degreased.
- The gasket is lubricated on both sides with sealant, placed in place and covered with a lid.
All parts must be assembled in reverse order. This video will help you do everything correctly.
Errors after replacing the gasket
Photo of incorrect gasket replacement
Of course, the gasket replacement process is not always carried out perfectly, and some common mistakes may be made. Despite the fact that this is a simple procedure, many car owners may encounter certain difficulties. For example, after installing a new gasket, oil may still flow.
Errors during replacement can be different, but the most common are:
- use of low quality gasket;
- uneven application or use of old sealant;
- Incorrect tightening of the bolts, which may result in the cover being skewed.
- socket or socket wrenches;
- torque wrench;
- a little turpentine;
- universal screwdriver;
- automotive sealant;
- new gasket.
In order to avoid mistakes when replacing the gasket, it is recommended to follow certain instructions:
- First, the mounting bolts from the valve cover are unscrewed. For these actions you will need a key set to “10”. The unscrewed bolts can be completely removed. The corner of the valve cover is carefully picked out with a screwdriver. The cover is lifted and dismantled.
- All edges of the part are thoroughly cleaned of oil. In this case, you can use turpentine, which is sold at the pharmacy. In addition, the old sealant is removed.
- The tightening of the cylinder head bolts is rechecked, especially for situations where major repairs were carried out relatively long ago. If necessary, they are tightened with the correct torques and in the correct sequence, which is indicated in the machine manual. If for some reason there is no manual, the information can be read on the Internet.
- The lid is thoroughly washed; the same turpentine is suitable for this. More attention needs to be paid to the oil separator.
- The old gasket is removed. Perhaps it will burst into pieces. Using turpentine, wash the groove under it.
- A new gasket is inserted into the corresponding groove, after which sealant is applied to the cylinder head and cover.
- To make installation of the cover as convenient as possible, it is better to remove the timing case.
- Now you can install the cover; you need to hold it level and lower it slowly. The holes for the candles are centered so that they fit exactly.
- Bolt tightening should start from the center and end with the outer bolts. Please refer to the manual for the tightening sequence. Typically, the first tightening should be 5 Nm and the second tightening should be 10 Nm.
- After this, oil is added to the engine and a test run is performed. At the final stage, you can evaluate how well the work was done by testing the gasket for leaks.
Of course, it is difficult for an inexperienced technician to change the gasket only in theory; it is advisable to watch a training video, but if there is no other choice, you have to limit yourself to useful tips that will save a lot of time on repair work.
- First you need to find out the true cause of the malfunction. This is perhaps the most difficult task, since one faulty part of the mechanism can cause the failure of other parts. For example, a careful inspection can determine that worn valve gaskets are the cause of increased fuel consumption.
- After this, you need to decide what spare parts you need to acquire. As practice shows, when changing the valve cover gasket, you need to remove the EGR pipe (this is the name of the exhaust gas circulation system). If you don’t have some experience, not everyone will be able to remove it without damage, so you need to buy at least one spare pipe. Ideally, it is better to buy two pieces just in case.
It is better to read the instructions for replacing the gasket in the machine manual. As a rule, many car owners skip this point.
It is recommended to purchase only original gaskets. This point is also neglected by many drivers and mechanics, believing that there is no difference between rubber products.
Even if everything is done correctly and carefully, a poor-quality gasket cannot guarantee a good result. Practice shows that most problems arise due to the use of “non-original” auto parts.
There is no need to skimp on the little things, since it’s the little things that play an important role. You also need to pay attention to the sealant, namely its proper use.
Not many people know that incorrect application of sealant can undo all the efforts spent previously. So, in order for the repair to be completed safely, the composition must set well, and this will take approximately 10-12 hours.
That's all.
After you replace the gasket yourself, you can breathe a sigh of relief. If you do everything as the instructions advise, no difficulties should arise. The price of the gasket sold in stores is not that high, so the entire replacement process will not cause any special costs.
Source: http://MasteraVaza.ru/dvigatel/obsluzhivanie-dvigatelya/zamena-prokladki-klapannoj-kryshki-na-vaz-2110-437
Replacing the valve cover gasket with heater 🙂 — logbook Chevrolet Lacetti 5D 2008 on DRIVE2
Hi all!
BACKGROUND:
Last August, when replacing spark plugs, I noticed a lot of oily deposits on their upper surface, contacting the service station, I found out that the Lacetti has a disease such as the valve cover gasket, which over time becomes tanned, breaks and begins to leak oil onto the spark plugs, or out. Then I changed this gasket at the same service station.
Now:
A little less than a year has passed, I began to notice that oil traces began to form under the valve cover bolts, I unscrewed the spark plugs, and the same oil deposits were again on them. This time I decided to change this gasket on my own! We did everything with 4 hands, with my girlfriend’s brother.
What was purchased: 1. original valve cover gasket;2. O-rings for fastening bolts (original);
3. Sealant that will not wash away with oil, is safe for oxygen sensors and is naturally heat resistant.
The process itself: We did not remove the protective cover from the timing belt, we simply unscrewed the 2 upper bolts and bent it.
We remove the armored wires, unscrew the 15 bolts securing the valve cover (we do this with a 10 head), disconnect the 2 tubes in the upper part, also do not forget to disconnect the sensor, which is located on the left (I used a flat screwdriver, just press the clip and pull it up), now pull the lid up with a little effort, EVERYTHING COME AWAY EASILY.
In my case, the old gasket turned out to be intact, but it still leaked oil into the spark plug wells.
I remembered that a year ago at the service station where I changed the gasket for the first time, they offered me to file the legs on the valve cover, the whole point here is that after filing the legs, the cover should fit tighter and the engine should stop snotting (at that service station they called it with a grinder, and they were going to grind down the legs with a grinder)
After some discussion, it was decided to grind the legs with a grinding wheel with a diameter of 50, fixed this wheel on the table, took the lid in their hands and began to move it along the disk back to front, while the legs were ground more or less neatly and evenly. The first time I did not grind them down to the very base, I grinded them down about 1.5 mm.
Then the cover was washed in gasoline 3 times in order to remove any remaining chips and oil. We install a new gasket in its place, this is done easily and it is unlikely to make a mistake there, because The gasket fits exactly into the grooves on the cover. I also replaced all the O-rings under the bolts.
Next, we clean the plane on which the valve cover will sit from sealant and traces of oil (I did this using a craft knife and acetone).
Then we apply a layer of new sealant around the perimeter, let it dry for 10 minutes and carefully install the lid, tighten the bolts and pull them in the sequence shown in the figure below (I used a torque wrench with a force of 10 Nm), and assemble everything in the reverse order.
You can’t start the engine right away , you need to let the sealant dry completely, in my case we waited 6 hours, then we did a test drive on the highway, after checking, no leaks were found :)
At the same time I replaced the spark plugs and washed the engine as much as possible, it’s nice when you open the hood and it’s clean :)
Thank you all, I look forward to your comments and advice on how you solved this problem.
Ps I want to say a huge thank you to Uncle Zhenya and Kolya for your help, without whom I couldn’t have done it!
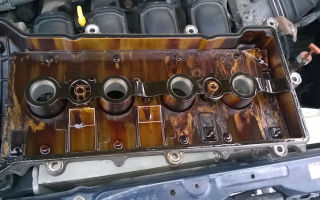
What happened BEFORE! The lid shows signs of oil leaks.
In the process of cleaning from traces of old sealant and oil
Cover immediately after removal
I used this disc to grind off the valve cover legs.
This is what each leg looked like after grinding on the disk.
I used this sealant under the gasket
after cleaning and installing a new gasket
sealant around the entire perimeter
stretch the bolts
purity and beauty :)
Source: https://www.drive2.com/l/1373223/
Replacing the valve cover gasket on a VAZ-2114 8 valves: video
Even a novice motorist who just bought a VAZ-2114 is trying to master the art of self-repairing a car. Replacing the valve cover gasket is the first step in learning how to repair an engine. This process is not complicated and will require 20-30 minutes of time.
Below is a detailed video about replacing the valve cover on a VAZ-2114
Design features of the engine on the VAZ-2114
Valve cover gasket replacement process
Before moving directly to the process, you need to know some structural elements of the VAZ-2114 engine.
So, first, let's look at what the engine consists of:
Diagram of internal combustion engine components
| № | Detail number | Part name |
| 1 | 2108-1003298 | screw |
| 2 | 2108-1003278-01 | Washer |
| 3 | 2108-1003277-01 | Sleeve |
| 3 | 2108-1003277-02 | Sleeve |
| 4 | 2108-1003274 | Cover pin |
| 5 | 2111-1003260 | Cylinder head cover |
| 6 | 2108-1003271 | Bolt M12x1.25x135 |
| 7 | 2108-1003265 | Washer |
| 8 | 14328201 | Plug 10 cup |
| 9 | 14329101 | Plug 30 cup |
| 10 | 1118-1003011 | Cylinder head |
| 11 | 2101-1002042 | Sleeve |
| 12 | 14329201 | Plug 36 cup |
| 13 | 10158601 | Plug 16 spherical |
| 14 | 11183-1002011-10 | Cylinder block |
| 15 | 14234330 | Bolt M10x1.25x65 |
| 16 | 2108-1003284-10 | Ring sealing |
| 17 | 2111-1003284 | Ring sealing |
| 18 | 2111-1003286 | Bolt |
| 19 | 2111-1003288-10 | Stub |
| 20 | 10725911 | Nut M6 low |
| 21 | 11197773 | Conical spring washer 6 |
| 22 | 13541221 | Hairpin M6x22 |
| 23 | 2108-1003270-10 | Cover gasket |
| 23 | 2108-1003270-11 | Cylinder head cover gasket |
| 24 | 21083-1003020-10 | Head gasket |
| 24 | 21083-1003020-11 | Head gasket |
| 25 | 2112-3855020 | Knock sensor |
| 25 | 2112-3855020-01 | Knock sensor |
| 25 | 2112-3855020-02 | Knock sensor |
| 25 | 2112-3855020-03 | Knock sensor |
| 26 | 2101-1002040 | Sleeve |
Now that all the elements are known, you can proceed directly to the replacement process.
Valve cover replacement process
Valve cover removed from a VAZ-2114 engine
So, in order to replace the valve cover gasket on a car, you will need certain tools. What exactly is needed? Let's consider this question: a ratchet with an extension, a 10-mm socket, a screwdriver with a Phillips head.
Now that everything is ready, we buy a new gasket from the list recommended below and we can get to work.
Don't forget about the new sealant.
Let's consider the sequential stage of performing replacement operations:
- Loosen the clamps and remove the hoses shown below.
Shows which hoses need to be removed
- After removing the locking plate, disconnect the accelerator cable.
Remove the locking plate and dismantle the throttle cable
- Unscrew the mounting bolts securing the accelerator cable bracket to the receiver.
The process of dismantling the accelerator cable bracket
- Unscrew the nuts securing the valve cover.
Unscrew the valve cover mounting bolts
- We remove the rubber seals.
When the nuts are unscrewed, it is necessary to remove the seals
- Remove the valve cover upwards.
Pull the lid up
- Now you need to clean the oil separator screens. To complete the process, you need to unscrew the valve cover. Unscrew the oil separator fasteners. Remove the oil separator cover. Oil separator screens that need to be cleaned
- If the nets are dirty, they need to be washed.
During the cleaning process
- We install a new gasket. When performing the process, we use a sealant.
Applying sealant
- If everything is tightened correctly, the gasket will fit perfectly and prevent oil leakage.
Place the gasket on the sealant
- We carry out the assembly in the reverse order.
Gasket selection
The choice of gasket must be approached carefully. Thus, a low-quality rubber product must have good chemical and technical-physical properties. So, let's consider possible options for purchasing a valve cover gasket for a VAZ-2114.
Original (item)
Original valve cover gasket produced by AvtoVAZ
2108-1003270 – original catalog number of the valve cover gasket manufactured by AvtoVAZ. It fits perfectly with the landing mounts and does not require any modifications. The average cost is 300 rubles.
Analogues (manufacturers)
Valve cover gasket made by Goetze
Of course, the manufacturer and many automotive experts recommend installing the original valve cover gasket, but, as practice shows, substitutes are often of higher quality and have a much longer service life.
So, let's look at which analogues of the original part are recommended for installation on a car:
Manufacturer's nameCatalog numberCost in rubles| Glaser | X08964-00 | 300 |
| Goetze | 50-025881-00 | 750 |
| Ajusa | 56021200 | 1000 |
| Trialli | GZ 101 7022 | 1500 |
Valve cover gasket made by Elring
Reasons for gasket failure
When all the processes have been sorted out and the choice of valve cover gasket has been decided, it is necessary to consider the reasons for the failure of this element:
- Wear . Perhaps the most common reason is that during use this element tends to crack because it is constantly exposed to hot oil.
- Stretching . Constantly high temperature negatively affects the rubber product, which loses its physical properties and stretches, which entails a loose connection and the passage of lubricant.
- Oil streams . Occurs due to gasket breakdown. This usually happens after the engine overheats severely. Oil stream
- Pressure . Excessively high pressure can squeeze the gasket out of its seat, which will cause oil to flow like a river.
Consequences of untimely replacement
Dirty valve cover and filter elements
There are not many consequences, but they are quite compelling to change the gasket in time. Firstly, this is directly related to oil leakage, which reduces the volume in the engine. Even if the loss is insignificant, it may just be enough for the internal parts of the power unit to wear out faster.
Secondly, air constantly gets under the valve cover, which can affect the quality of the air-fuel mixture and the engine will begin to “eat” a sufficient amount of fuel.
Thirdly, dirt and foreign objects, as well as water during winter and rainy periods, can enter through the resulting cracks. This can negatively affect the operation of the power unit, cylinder head and other elements, as well as affect the performance of the entire system as a whole.
Fourthly, leaked oil contaminates the outer part of the block, onto which dirt clings. It can also affect the operation of the power unit and other elements.
conclusions
Replacing the valve cover gasket on a VAZ-2114 is quite easy and simple. The process itself will take 20-30 minutes, which even a novice motorist can handle.
Source: http://carfrance.ru/zamena-prokladki-klapannoj-kryshki-vaz-2114/
How to change the valve cover gasket on a VAZ 2114: when is it necessary and how to do it
Any car enthusiast makes sure that his car is in perfect condition. If there are any problems with transport, they must be resolved promptly. So, if you see that there is a leak between the valve cover and the engine block, then you should suspect that the cover gasket is leaky.
Such an element does not have a global function in the operation of the system. But if problems arise with the gasket, then you should not turn a blind eye to them, despite the fact that the motor will work properly.
Replacing the valve cover gasket
The faulty part must be replaced, otherwise oil will leak from under it. This point can cause a number of problems.
So the valve cover gasket of a VAZ 2114 can be replaced independently without the involvement of specialists. Some craftsmen are of the opinion that the gasket needs to be changed every time the cover is removed.
This point must be taken into account when carrying out various works.
What do you need to know about the motor?
Before the valve cover of the VAZ 2114 is removed and the gasket is replaced, it is worth talking about the features of the engine. If you don’t know anything about design features, then the best solution would be to turn to specialists. Remember that to carry out such work you will need a certain tool.
| № | Detail number | Part name |
| 1 | 2108-1003298 | screw |
| 2 | 2108-1003278-01 | Washer |
| 3 | 2108-1003277-01 | Sleeve |
| 3 | 2108-1003277-02 | Sleeve |
| 4 | 2108-1003274 | Cover pin |
| 5 | 2111-1003260 | Cylinder head cover |
| 6 | 2108-1003271 | Bolt M12x1.25x135 |
| 7 | 2108-1003265 | Washer |
| 8 | 14328201 | Plug 10 cup |
| 9 | 14329101 | Plug 30 cup |
| 10 | 1118-1003011 | Cylinder head |
| 11 | 2101-1002042 | Sleeve |
| 12 | 14329201 | Plug 36 cup |
| 13 | 10158601 | Plug 16 spherical |
| 14 | 11183-1002011-10 | Cylinder block |
| 15 | 14234330 | Bolt M10x1.25x65 |
| 16 | 2108-1003284-10 | Ring sealing |
| 17 | 2111-1003284 | Ring sealing |
| 18 | 2111-1003286 | Bolt |
| 19 | 2111-1003288-10 | Stub |
| 20 | 10725911 | Nut M6 low |
| 21 | 11197773 | Conical spring washer 6 |
| 22 | 13541221 | Hairpin M6x22 |
| 23 | 2108-1003270-10 | Cover gasket |
| 23 | 2108-1003270-11 | Cylinder head cover gasket |
| 24 | 21083-1003020-10 | Head gasket |
| 24 | 21083-1003020-11 | Head gasket |
| 25 | 2112-3855020 | Knock sensor |
| 25 | 2112-3855020-01 | Knock sensor |
| 25 | 2112-3855020-02 | Knock sensor |
| 25 | 2112-3855020-03 | Knock sensor |
| 26 | 2101-1002040 | Sleeve |
In particular, a car enthusiast needs to have on hand the following details:
- ratchet with extension;
- head at 10;
- screwdriver with Phillips head.
Why do you need a gasket?
It is clear that without such a gasket the car will work as before. But you need to understand that it plays a certain role, even if it does not affect the technical features of the car. It is important that when a leak occurs, a number of serious problems can arise.
If we consider the main task of this part, then it is worth saying that it is to ensure the tightness of the connection. In order for the connection between the valve cover and the engine part to be tight, a gasket is needed. You don’t need any special skills to find the cap, because it has a neck for filling engine oil.
When to replace?
It is worth figuring out exactly when it is necessary to replace the valve cover gasket on a VAZ 2114. The plant tries to use only high-quality gaskets, which is why the initial part lasts for a long time. After a certain period of time, parts lose their elasticity and may harden. This is why cracks and leaks can form.
Even a small leak can cause dirt and dust to enter the motor. Many car enthusiasts change the part when changing the oil. This is an excellent solution to the problem, as leaks can be completely eliminated.
Cases when it is worth replacing include:
- We noticed a clear oil leak at the junction.
- The motor is undergoing routine repairs, in which case a replacement can be performed.
- Carrying out technical inspection.
- Removing the cover.
How to replace?
Domestic cars are not perfect; over time, you may notice that oil is leaking from under the gasket. In this case, it is simply necessary to make a replacement.
Of course, you can try to tighten the bolts more tightly, but this is unlikely to help solve the problem. If you are wondering how to change the valve cover gasket on a VAZ 2114, then you should proceed sequentially.
Anyone can cope with such a task as replacing the valve cover gasket 2114.
The sequence of your actions should be as follows:
- First you need to loosen the clamps and disconnect the hoses.
- The next step is to remove the locking plate and remove the end of the cable.
- You will need to unscrew the bolts that allow you to tighten the cable bracket.
- You will see two nuts that will also need to be unscrewed and removed, as well as the rubber bands that are used for the seal.
- The valve cover can be removed.
- The old part is removed and the new one is installed.
Removing the accelerator cable
Unscrew the valve cover nuts
Self-replacement - what needs to be taken into account?
The replacement process is considered quite simple, but you need to understand that it is not always possible to carry out the work smoothly.
That is why when carrying out work you should follow simple tips that will help you avoid mistakes:
- When removing the lid, you should wash it in turpentine.
- The optimal solution would be to use high-quality gaskets.
- All parts used must be clean; when carrying out work, experts advise wiping the edges of parts to remove any existing oil.
- During installation, you can use a sealant; it is applied to the joints.
- After the replacement is completed, you need to check the oil level.
- To check the system, you need to start the car; carry out a second inspection after making the first trip.
- The groove under the gasket should be cleaned as thoroughly as possible.
Source: https://VAZremont.com/kak-pomenyat-prokladku-klapannoy-kryshki-na-vaz-2114
Replacing the Valve Cover Gasket VAZ 2109
How to change a valve cover gasket yourself
Welcome, friends, to the DIY auto repair website. Periodic inspection of the car is a matter of principle.
It is advisable to open the hood before each trip, check the levels of main fluids (brake, coolant, engine oil), pay attention to the external condition of the engine and the operation of all systems.
In this case, special attention should be paid to the motor - at least to its appearance.
The appearance of a leak at the junction of the valve cover and the main block indicates that the valve cover of the VAZ 2110 has ceased to perform its functions and requires replacement.
The main purpose of the valve cover gasket
The gasket under the valve cover can hardly be called a vital element of the car. But it's not that simple. On the one hand, it really does not affect the technical characteristics and performance of the power unit.
On the other hand, the appearance of a leak can lead to a number of other, more serious problems.
Attention! The gasket is made of rubber, and as you know, it also has its own service life, so as they say, nothing lasts forever.
The main task of the gasket is to ensure a tight connection between two components ( valve cover and the rest of the engine). At the same time, the cap itself is not difficult to find - it has a neck for filling engine oil.
When to change the valve cover gasket?
As a rule, high-quality gaskets are installed at the factory. But over time, they can lose elasticity and harden.
Under conditions of long-term operation and high temperatures, cracks appear through which the lubricant flows.
Moreover, even with a small leak, the engine quickly becomes covered with dirt and dust.
The VAZ 2110 valve cover gasket is replaced in the following cases:
Replacing the valve cover gasket on a VAZ 2114 1.5i 8 valve
About the tracks. Write in the comments. I’ll write the name.
Leaking valve cover gasket VAZ 2109 , 2114, 2110
How to fix a valve cover gasket on an 8 valve VAZ 2108, 2109 , 2110, 2112, 2114, 2115 engine. Video.
- When dismantling the cover for any repair or technical inspection;
- during repair of a power unit (current, major);
- when a clear oil leak appears at the junction between the cover and the rest of the engine.
Most car enthusiasts replace the gasket at every engine oil change. This is the right decision, because you can completely eliminate the possibility of a leak.
How to Replace a Valve Cover Gasket: Step by Step
As practice shows, replacing a valve cover gasket is a matter of 10-15 minutes, so spending money at a service station is pointless.
The sequence of actions itself looks like this:
1. Gather all the tools you will need - an extension (a small one is fine), a ratchet handle (a wrench will also work), a ten-point socket and a Phillips screwdriver.
2. Engine type (injector, carburetor) is not particularly important. The only difference is in the way the throttle cable is attached.
On an injection engine it is secured with three nuts. In the case of a carburetor engine, it’s even easier - just loosen the nut to “thirteen” and take out the cable.
3. Loosen the retaining clamps and discard all pipes that fit the valve cover.
4. Unscrew the nuts that secure the cover to the cylinder block.
5. Carefully lift the housing until it is completely free from the studs.
6. After removing the cover, remove the gasket.
7. Take a dry and clean cloth. Use it to wipe the groove on the cover and the rib on the cylinder head itself
Install a new gasket and return everything to its place (strictly follow the reverse sequence).
Knowing how to replace a valve cover gasket, you will do this job quickly, saving money at the service station. The main expense in this case is the purchase of the gasket itself, which costs no more than a hundred rubles.
Basic recommendations
Despite the simplicity of the process, the work does not always go smoothly. But this is easy to avoid. The main thing is to follow a few simple tips:
- Buy only high-quality gaskets (preferably original);
- be sure to wipe the edges of the parts from any existing oil;
- rinse the lid (this can usually be done in turpentine);
- try to clean the groove under the gasket as carefully as possible;
- After installing the rubber product, be sure to apply a little sealant to the joints. In this case, the maximum layer should not exceed 2-3 mm;
- upon completion of the replacement, check the oil level in the power unit (top up if necessary);
- start the engine and check the quality of the work done (oil should not squeeze out from under the gasket). Do another inspection after the first trip.
You can do any job. The main thing is to strictly follow the instructions, be careful and never rush when repairing a car. Good luck on the roads and of course no breakdowns.
Source: http://avto-melvin.ru/zamena-prokladki-klapannoj-kryshki-vaz-2109/