Do-it-yourself restoration of car interior plastic
Content:
The condition of the car interior worries car enthusiasts no less than the appearance of the body paint. And since plastic is one of the main materials on which the interior is based, its restoration is an important issue for vehicle owners.
Doing such work with your own hands will not be difficult if you know the basic methods that are used to repair the interior.
You can simply replace the part, but some plastic elements are very expensive, so in many cases it is more profitable to return them to their original appearance yourself.
Among car enthusiasts, there are several popular ways to extend the life of plastic interior parts. Many people prefer to turn to specialized services, where restoration of the appearance of plastic is entrusted to professionals. However, if you wish, you can do a lot with your own hands. There are three main ways to restore an attractive appearance to plastic parts:
- applying special paint;
- upholstery with leather or its substitute;
- pasting with film;
- heated grinding.
Each of these methods should be considered in more detail.
One of the easiest ways to make your car's interior plastic look attractive again is by painting. To carry out such repairs yourself, you will need the following materials:
- special paint for plastic;
- primer;
- varnish;
- fine grain sandpaper;
- special putty for plastic;
- a set of tools for disassembling the interior.
First, you need to dismantle the part to be restored. In this case, it is preferable to use special tools so as not to add new scratches and abrasions to the surface of the plastic. The dismantled parts are thoroughly cleaned of dirt and dust, after which they are degreased with a plastic-safe product.
If there are very deep scratches on the surface, they can be carefully repaired with putty. After this, the car interior parts are cleaned with fine-grain sandpaper.
Each part is primed, painted and varnished. The primer is applied in two or three layers, and after applying it, you should carefully inspect the surface in good lighting.
If there are defects, they are either sanded or eliminated using putty. Paint, like varnish, is applied in several layers.
At the end of the work, the parts are dried, installed in place and polished.
One of the most expensive ways to restore the plastic of a car interior is to reupholster it with leather or its substitute. To work you need to prepare:
- covering material;
- special glue;
- stationery knife and scissors;
- tool for removing plastic parts from the interior.
The interior, as in the previous version, must be disassembled. Individual elements are washed, dried and degreased. After this, you should cut out the material for covering, for which the leather or its substitute is applied to the part and marked with a marker along the contour. In this case, you need to leave a margin of a couple of centimeters at the edges.
The skin is then cut out and glued onto the plastic. It is convenient to level the material laid on the glue with a rubber roller; the edges of the leather are folded and glued on the back side, the excess is cut off. After installation, the parts are left to dry and then carefully installed in the car interior.
Another simple way to restore interior plastic is to cover it with vinyl film. For work you need the following materials and tools:
- vinyl film of the desired color or carbon look;
- sharp stationery knife;
- construction hair dryer with power adjustment;
- plastic or silicone spatulas;
- rubber roller.
The interior is disassembled and prepared in the same way as described above, after which the material is cut out. To apply the film to a part, the backing is removed from it, after which it is applied to the surface.
Then, using a construction hair dryer, the material is heated and smoothed either with special spatulas or with a rubber roller.
The further sequence of actions is similar to repairs when painting or reupholstering.
The cheapest and fastest way to restore plastic parts of a car interior is grinding with heating. This method is only suitable for slightly damaged surfaces. Particular care should be taken if the plastic has a corrugated structure. For this work you will need:
- construction hair dryer;
- sandpaper;
- terry towel;
- means for cleaning and degreasing plastic.
You need to start work by cleaning the surface - the plastic is thoroughly washed and degreased. Next, sandpaper comes into play - if there are deep scratches and abrasions, then it is better to use a coarse-grain abrasive, and small defects are matted with P 1200 sandpaper.
After this, the plastic is heated with a hairdryer, while a small area should be treated at the same time if the part is very large.
When working with a heat source, the main thing is not to overdo it and not melt the material.
If you have no experience in such work, then it would be better to use a regular household hair dryer to dry your hair - its temperature will not be enough to damage the parts, but it will be quite enough to achieve the desired effect.
After warming up the surface, it is polished with a regular terry towel, and it is important to observe the direction of the movements - they should be circular.
If the work is carried out with a construction hairdryer, then rubbing with a towel should begin slowly and carefully. If the plastic is overheated, then give it time to cool a little.
After this treatment, any shallow scratches and abrasions will disappear, and the plastic will look like new.
Source: http://AutoKuz.ru/pokraska/salon/vosstanovlenie-plastika-salona-avtomobilya.html
Car plastic repair: do it yourself (Part 1)
Probably every car enthusiast has encountered the problem of damage to the plastic of the car interior.
You always want to correct the unsightly appearance of your car as a result of these damages as soon as possible. Today we will learn how to do car plastic repairs with our own hands.
DIY plastic repair
In our example, we will look at minor damage to plastic and the process of repairing it on our own. Where to begin?
At the starting stage, a strong knife, like a stationery knife, will be suitable, with the help of which we will need to thoroughly clean the damaged area, removing all the burrs and smoothing the surface as much as possible. It is necessary to remove and clean the convex pieces of plastic around the perimeter.
Next, the damage should be cleaned with an abrasive sponge P600-P1000. The work must be done very carefully so as not to spoil the undamaged surface. At the end, we wipe the repair area with a dry cloth, removing the remnants of the stripped plastic.
The next stage is repairing the damage. It is necessary to fill the hole with a special composition called B Gel . After this, using B Activator , we cure the composition.
The minimum amount of application is two to three times (pressing the button of the can). After this, you need to sand everything flush with the surface again. Next, using Degreaster Spray, you need to degrease the surface.
The process of filling the damage with a bigel must be repeated until the hole in the plastic is completely filled. Don't forget to apply the curing agent. Again we clean and wipe the damaged area with a rag.
Preparing the surface for painting
The next step is to prepare the repair area for painting. To do this, mask off all unrepairable areas using masking tape. Using Texture Coating, you need to restore the surface texture. To do this, apply it to the damaged area.
Preparation of paint. Sequencing
Next we need to prepare the paint. The sequence of actions should be as follows:
- Select the desired color by layout number;
- Mix the pigments in the ratio indicated in the formula. You will need to add a little water to this mixture, about 5%, for ease of mixing and the correct consistency;
- Having tested the paint on an inconspicuous area of plastic, we bring the color to full compliance with the sample (this means adding pigments that are missing to the paint, for this we use a step of 0.5 ml, which is equal to approximately 2-3 drops).
Next you will need to prepare a paint additive. For this, a clean container is suitable, into which you need to add Cross-Linker Plastic, in an amount of 2% of the paint volume, and water, approximately 8% of the paint volume, at room temperature.
Mix it all (without paint). The additive should be 10% of the paint volume, that is, 10 ml. This additive improves the properties of paint and makes it more resistant to abrasion. Add this additive to the paint and mix thoroughly (1 minute).
In addition, you will need to prepare a matte or glossy additive. Depending on the texture of the plastic element, which can be glossy, semi-glossy, semi-matte or matte, the required additive is used in a certain proportion. For example:
- glossy texture (High Gloss) no more than 10% of the amount of paint;
- semi-gloss (High Gloss) no more than 5% of the amount of paint;
- semi-matte (Low Laster) no more than 10% of the amount of paint;
- matte (Satin Gloss) no more than 10% of the paint volume.
The process of preparing the additive: pour the selected additive into an empty container in the amount described above. We also add no more than 10% water at room temperature. Mix well (1 minute). Add this additive to the paint and mix again for the same amount of time. The paint is ready.
You should get paint with a catalyst and a texture additive. Pour paint into the gun. You can use paint on plastic.
Painting plastic parts
We paint the repair area in 4-5 layers until completely painted. Dry between layers for 5-10 minutes at a temperature of 20-25 degrees. If necessary, you can apply several more layers. The result should be wonderful. It is recommended to use the painted element after 24 hours. Remove the masking tape and see the result.
Source: http://vsepoedem.com/story/remont-plastika-avtomobilya-vypolnyaem-svoimi-rukami-chast-1
Restoring the plastic of a car interior - methods and solutions
Each driver of his vehicle, in one way or another, tries to take care not only of the appearance of his iron horse, but also pays a lot of attention to the interior decoration - the interior of the car.
As practice shows, not only leather interiors deteriorate under the pressure of daily trips to work and at least a couple of trips to the country house and to the store. The interior of a car is where we spend a lot of time, so it’s worth paying special attention to its condition.
Many owners of cars with high mileage in this case prefer to contact special services, but in this article we will tell you how to restore the plastic of the car interior with your own hands.
Why shouldn’t you immediately resort to services?
Many car enthusiasts categorically refuse to care for the car interior on their own. This is due to the fact that today on the market you can find a huge selection of automotive chemicals, which are by no means always of high quality.
Some drivers are afraid of ruining the interior of their car by using one or another cleaning product incorrectly. In fact, these fears are quite justified, because cases of damage to the interior using some cheap and, as the manufacturer claims, universal remedy are quite common.
But don’t sound the alarm right away!
Exactly the same people work in car services. Therefore, if you want to learn how to care for the interior of your car yourself, then all you need is a little patience and desire.
In this article, we will introduce you to restoring the plastic of a car interior with your own hands, where we will tell you in detail what and how to do.
The main thing in this matter is to clearly and impeccably follow all the instructions, then nothing bad will happen to the interior of your car, and the old plastic will again delight you and your passengers!
Car interior plastic repair and its types
Today, there are several methods that can be used to achieve good results when restoring plastic in the car interior.
As mentioned above, you can contact a special service where professionals will do all the work for you. But we will take a different route and try to restore the previous appearance of the salon ourselves.
First you need to decide on the recovery method:
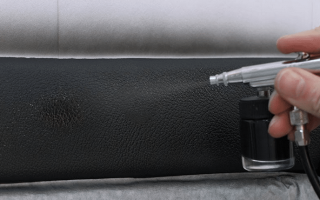
- Spraying paint for plastic
- Reupholstering an old part with artificial or natural leather
- Pasting the part with a special film
- Grinding a plastic product with heating
All of these four methods are used today by professionals in automotive services, but this does not mean that the work of the master cannot be repeated. Let's look at each of the recovery methods in more detail.
Spraying paint for plastic
This is perhaps the simplest and most straightforward method you can use. Restoring the plastic of a car interior using this method has been practiced for quite a long time, and during this time professional craftsmen have managed to draw up a certain algorithm of work.
First you need to dismantle the damaged plastic panels using the appropriate tools. Then the parts should be thoroughly washed, cleaned of accumulated dirt and degreased with a product so as not to spoil the plastic.
In the case where there are deep scratches on the part, when restoring the element there is no way to do without putty. The corresponding places are puttied and then cleaned with fine-grain sandpaper. However, it should be noted that if the part has a corrugated surface or any pattern, then it is better to avoid the putty process. Or you need to do this very carefully!
Having completed the above manipulations, you can begin priming the part, painting it and varnishing it. The primer is applied in 2-3 layers, if necessary, after the primer, the surface is additionally sanded. All that remains is to apply paint and varnish. Both procedures must be performed in several layers. The part is ready for installation!
Restoring the plastic of a car interior - leather reupholstery
Upholstering parts with natural or artificial leather will cost you a little more, and the complexity of the work in this case increases several times. Here the main attention must be focused on accurate calculations and accuracy in carrying out restoration work. Only in this case, the restoration of the plastic interior of the car will go smoothly.
As in the previous method, it all starts with disassembling the interior, dismantling the parts necessary for restoration and cleaning them of dirt.
Next, you need to cut the leather for the parts to be reupholstered. To do this, the leather product is applied to the part and a mark is made along the contour with a special marker.
It is also worth noting that it is necessary to leave a couple of centimeters for allowances from the contours made.
All that remains is to cut out the skin for each part and glue it onto the plastic. For maximum quality, it is necessary to use a rubber roller, which will help to properly smooth the skin during the gluing process. Excess leather is folded under the piece, and the remainder is trimmed off. After these steps, the parts should be allowed to dry and only then carefully begin installation into place.
Vinyl film
Repairing the plastic of a car interior cannot always be done efficiently, since the part is already noticeably “tired” and restoring the appearance is an extremely difficult task.
That is why vinyl film, which is used to restore the plastic interior of a car, has recently been gaining popularity.
The good news is that film manufacturers offer a huge selection of films of varying quality, color and density, so there are no problems with the choice.
Restoring the plastic of a car interior using vinyl film is reminiscent of covering it with leather. After dismantling the necessary parts, they also undergo the cleaning and cutting process as described above.
However, in this case, the film is removed from the substrate and glued using a hair dryer. To ensure that there are no bubbles or other irregularities left, a rubber roller or spatula is also used to level the film.
All that remains is to let the part dry and you can safely install it in its rightful place!
Heat sanding
It so happened that the most affordable and fastest way to restore the plastic of a car interior ended up at the end of our list, but this does not mean that it can be neglected. If the plastic in the interior of your car is not so badly damaged, then this method will be the best solution for restoring the interior to its previous appearance.
It’s worth saying right away that in this case we don’t need to disassemble the interior, which is what makes this restoration method so simple. However, no one has canceled the process of cleaning parts! To work you will need a hair dryer.
You need to work with it carefully, trying not to overheat the part. It is necessary to warm up the surface of the part and polish the plastic in a circular motion using a terry towel.
The first results will be visible almost immediately - the plastic will look fresher, and minor scratches will completely disappear.
Source: http://avtomoto-best.ru/vosstanovlenie-plastika-salona-avto.html
How to polish interior plastic from scratches with your own hands?
The interior of a car is no less susceptible to mechanical damage than the body. One awkward move and a scratch appears on the plastic.
How to eliminate this annoying defect with your own hands, without resorting to expensive car service services? The most common and effective way is to restore the interior plastic using restorers and gel plasticizers and then polish the plastic.
The effectiveness of the procedure depends on the depth of the scratch, the type of plastic and the type of surface. Let's take a closer look at the subtleties and nuances of car interior restoration.
Methods for eliminating damage to plastic parts of the interior
You can remove scratches on plastic using the following methods.
Restoration using plastic restorers
The green gasket under the iron is a cast with a pattern from an undamaged area of plastic.
A universal product used to update and restore not only plastic, but also vinyl upholstery with your own hands.
The principle of its operation is as follows. After applying plastic to the damaged area, the restorer penetrates deep into the scratch and fills its entire volume, displacing dirt from there.
When the product dries, the surface is polished with special napkins.
Treatment with gel plasticizer
The gel serves to imitate the surface texture of the area being restored. To do this, it is applied to the undamaged surface of the plastic part of the interior. After hardening, a texture pattern is imprinted on it. This gel impression is then placed over the area to be restored and pressed against it. The restorer dries, and the design is “imprinted” on the surface.
Polishing with preheating with a hairdryer
Removing scratches from plastic with a hairdryer
The method is convenient for restoring the interior dashboard, since it is difficult to dismantle it with your own hands.
The idea is to heat the damaged area with an industrial hairdryer. Under the influence of high temperature, the surface of the plastic (and with it the scratches) is melted and leveled.
Contraindications to this polishing method are the presence of:
- paint coating of a plastic part;
- large scratches.
In addition, you need to act very carefully, increasing the air temperature gradually so that the plastic does not “float”. Using a hairdryer does not provide a 100% restoration result and requires subsequent rubbing of polish into the treated area using a lint-free rag.
Polishing
After restoring a scratch using one of the methods listed above, the final stage follows - polishing the plastic with special polishes to create a glossy and smooth surface. Separate types of polishes are produced for pearlescent, light and silver plastics. The coloring pigments they contain additionally mask defects.
Technological sequence for self-removal of interior plastic scratches
Before starting restoration work, you should prepare the necessary materials and tools.
Materials used
In order to eliminate scratches and polish the car interior with your own hands, you will need the following tools:
- restorative composition for filling scratches;
- polish (anti-hologram for plastic of dark shades);
- gel plasticizer for filling scratches;
Polishing and restoration of the plastic of the car interior with your own hands is carried out in the following order.
- Clean the plastic parts of the car interior from dirt.
- Cover with masking tape the interior parts adjacent to the workpiece that fall into the polishing zone.
- Apply a restorer appropriate to the type of plastic to the scratch area. Wait until it is absorbed.
- Carefully polish the surface with fine-grained sandpaper, removing excess restorative compound.
- Make an impression of the texture of the undamaged area using a gel plasticizer.
- Transfer the surface pattern to the area to be restored. Lightly press the cast onto the scratch so that the design is imprinted on it.
- Spread the polish over the plastic and sprinkle it with a small amount of water.
- Polish with a machine at low speed, rubbing the polish into the entire surface of the part.
- Polish the interior with anti-hologram polish (if the plastic is dark in color)
- Wash the surface of the restored area of the interior.
With the right choice of materials, restoration and polishing of a car interior with your own hands can be successfully completed even by a novice. If you use available means, such as a plasticizer gel and a hair dryer, then a good result in the form of an updated car is guaranteed.
Source: http://KrasimTachky.ru/polirovka/polirovka-plastika-salona-ot-carapin-svoimi-rukami.html
Repair of car interior and plastic parts
During the operation of a car, the interior is exposed to certain influences. In particular, one of the most destructible parts of the interior are plastic parts. Many car enthusiasts are interested in how to repair minor structural defects in plastic products.
Today we will find out how to restore the plastic elements of the interior. The repair technology is a simple procedure available to every car owner.
One of the simplest ways to restore the affected area is gluing. This method will require a small amount of materials and a little patience. Repair of plastic products has its own characteristics.
For high-quality restoration of the element, it is necessary to follow the gluing technology.
The good condition of the decorative parts of the car gives it an appropriate appearance. Every car owner cares not only about the good condition of the working parts, but also about the attractive appearance of the car.
After all, the condition of the car and, in particular, the interior speaks volumes about the care and accuracy of the owner. Modern cars are constantly being modernized both technically and externally. Some parts do not have a special role in the functionality of the car, but are undoubtedly dear to their owner.
As a rule, the exterior decoration of a car is constantly exposed to destructive factors.
One of these elements is the car bumper. Like any part, it requires timely care. If the plastic parts of your vehicle have become unusable, do not worry.
After all, they can be easily restored using an effective technique. If the site is restored responsibly and correctly, the car part will serve its owner well for a long time.
Let's talk about how to carry out quality repairs and be satisfied with the result.
Restoring plastic elements of a car with your own hands
If you constantly replace the affected parts of the car, you can spend a significant amount of money. Therefore, car enthusiasts are constantly looking for effective restoration methods.
Today, we know several of the most popular methods for repairing plastic parts.
The first method involves gluing the affected area of the car. Second, solder the affected part with a hair dryer. Unfortunately, the second method will require special equipment, which not every car owner has.
In addition, soldering parts requires some experience and sufficient knowledge. With sufficient qualifications, equipment and self-confidence, you can successfully restore the damaged area.
Let's look at a simpler and more affordable method of restoring plastic, in more detail.
Bonding plastic car surfaces
To successfully carry out the operation, we will need the following materials:
- Fiberglass (fabric).
- Primer for plastic surfaces.
- Sandpaper. Depending on the area and sensitivity of the part being restored, it is necessary to select the appropriate grain size.
- Glue (epoxy).
The choice of glue is one of the most important stages of restoration. For high-quality repairs, you must use good glue from a trusted manufacturer.
You won’t be able to save on glue, and there’s no point in doing so. If you use little quality material, the part will quickly become unusable and require secondary repairs.
To save money and time, you should take a responsible approach to choosing glue.
Once you have all the necessary materials, you can begin restoration.
First of all, you need to remove the damaged element (if possible). Next, we cut out the required amount of special fiber and impregnate it with epoxy.
First, you need to thoroughly clean the damaged surface with sandpaper. For greater strength, do not seal the entire area at once. Adhesive fabric must be applied sequentially, in small sections. Each subsequent layer should slightly touch the previous one (the new material is applied slightly over the old one).
Next, you need to wait until the surface is completely dry.
repair
After the fabric has dried, you need to clean it a little (with fine sandpaper). This way you will get a uniform surface on which the soil will lie well.
Now we proceed to applying the primer, if necessary. It is necessary to take into account the drying rate of the soil. Most plastic primers dry quickly. After the material has acquired a solid structure, it is necessary to level it. To do this, sand the element with sandpaper.
To create density, you can add a special solution consisting of varnish to the soil. Next, it remains to restore the color of the part.
Painting plastic car parts
Coloring is also one of the most important stages of restoration. Of course, high-quality paint restoration requires special equipment and certain skills. But every car enthusiast can paint a plastic element. Small areas are the easiest to paint. To save time and money, there is a need to do it yourself.
However, this is not particularly difficult. The modern car enthusiast has a wide selection of polishes that match the color of the surface. Small scratches, easy to color using special markers. Before painting, it is necessary to thoroughly clean and degrease the surface. The painting process is not complicated, nor is repairing plastic parts.
Happy restoration!
Source: http://carmend.ru/body/brush/1446.html
Classicautoclub.ru Resuscitation of plastic elements of a car
What to do if a plastic molding or other part of an oldtimer made of plastic has lost its appearance, color, or is completely cracked and begins to collapse? Despite the strength of ABS plastic, it is highly susceptible to the negative influence of the external environment.
Plastic elements in the interior and exterior of cars began to appear in the second half of the 20th century. For example, in the American auto industry, the plastic era began to actively develop in the 1970s. From an economic point of view, this was a real discovery - the material was quite strong, durable, and inexpensive to produce.
However, nothing lasts forever, and time still takes its toll. Under the influence of ultraviolet rays, plastic gradually fades in the sun, becomes faded and “worn,” and in the case of external decorative elements of the body, there is another aggressor - reagents that are sprinkled and watered on roads in the cold season.
In addition, during active use, scratches and cracks will inevitably appear.
As a rule, plastic body elements are made of a material called acrylonitrile butadiene styrene, or simply ABS plastic. It is an impact-resistant resin that is resistant to moisture and oil.
Interior parts are also made from this polymer, which is very popular in the automotive industry. However, the material does not tolerate ultraviolet radiation quite well, and some types of this plastic are even destroyed when exposed to sunlight.
In 1998, this led to one of the largest car recalls in US history - the seat belt buckle button, made of UV-unstable ABS plastic, broke and blocked the seat belt buckle, preventing the seat belt from being inserted or, more dangerously, unbuckled. As a result, 8,800,000 vehicles were subject to recall.
It’s good if the part has retained its integrity, but has simply faded with time. In this case, you can get by with updating the top layer. For this purpose, a whole series of products has been developed that restore the color of the part and extend its service life.
Some even add flexibility to parts that are lost over time, reducing the risk of breakage. The American publication Consumer Reports conducted its own research, studying the characteristics of products on the market.
Depending on their characteristics (and, accordingly, cost), the drugs provide protection for parts for a period of two weeks to two years. It is worth noting that Consumer Reports analysts only considered products for black plastic elements, although choosing the required color is not difficult today.
The test was carried out in a rather amusing format: the plastic body trim was divided into several parts (according to the number of products that took part in the test), treated with test compounds and... placed for 10 weeks on the roof of the building in which the Consumer Reports editorial office is actually located.
Every week the panels were removed, washed, dried and put back on the roof. Best of all, according to experts, the samples coated with ReNu Finish and Wipe New withstood the harsh test of the scorching sun and heavy rains - the parts coated with them retained a bright black color throughout the entire 70 days of the test.
The disadvantage of both products is that they are sold in small bottles, and at the same time they are noticeably more expensive than their analogues. Although experts recognized the difference in results as noticeable. The rest of the products (Turtle Wax Premium Grade, Meguiar's Ultimate Black, Mothers Back-to-Black) showed a strong start, but by the end of the test all the parts they treated had faded.
You can also return the plastic to its former color with a hairdryer: with careful, uniform heating, the color appears on the surface of the part. For black plastic parts, you can use a bumper ink (for example, Hi Gear or Astrochem), however, judging by the reviews, the part quickly loses its attractive appearance again.
But what to do if a plastic element of your car has received a serious crack, and we are not talking about a molding, but about an entire body panel? In this case, welding will help, but here everything is much more complicated, and it would be better to turn to specialists.
The fact is that ABS plastic unites a whole family of materials, the characteristics of which depend on the proportions of the components - aconitrile, butadiene and styrene. Depending on the proportion, each type of plastic has its own melting temperature, and therefore its welding temperature.
If you select too high a temperature when welding and overheat the plastic, the material will begin to foam and harden into a porous state, which will make the weld seam brittle and short-lived. It is logical to assume that if the temperature is insufficient, the plastic will melt very poorly, and a strong seam will not work.
Therefore, when welding, a special hair dryer is used, on which you can manually set the exact temperature value depending on the type of plastic.
However, if thorough strength is not required from the part, then you can get by with simpler methods, which are actually sufficient: for example, use epoxy resin, glue the damaged area with fiberglass, or reinforce it with metal mesh.
A simplified restoration method also includes soldering, which must be distinguished from welding. Actually, the difference lies precisely in the fact that when soldering it is extremely difficult to “get” to the desired temperature, so the seam turns out to be fragile and porous. Enough to visually hide the defect, but will not provide strength and durability.
In any case, the first step is to thoroughly rinse the part using a cleaning agent designed to remove tar, salts and other dirt. To do this, you can use a special bitumen stain cleaner. There are a lot of offers on the market: AC-395, Hi Gear Buster Bug, Pingo Tar Remover, Liqui Moly Teerentferner and others. By the way, you can use the old-fashioned method - white spirit or kerosene. It would also be a good idea to go over the part with a brush. A horsehair brush is best suited for this purpose.
Finally, a very “hard case” - if the part cannot be easily restored, and it is easier to replace it than to restore it. It’s good if we are talking about a mass-produced car model, for which it is easy to find the necessary parts.
But what if you have a rare specimen for which it is almost impossible to find components? Today, in addition to fiberglass, 3D printers are gaining popularity.
Over the past two years, a host of initiatives have taken place at the industrial and scientific level to embrace 3D printing technology in the automotive industry.
Recently, Techmer PM, a company specializing in polymer modification, even presented a full-fledged copy of the legendary Shelby Cobra, completely printed on a 3D printer. Thus, the company demonstrated that this technology can be used in restoring old cars.
True, in this case the authenticity of the car is lost, which is undesirable when working with classic cars, and the technology itself is still only developing and is therefore quite an expensive pleasure. However, the increasing use of 3D printing in the automotive industry gives hope that this option will become more accessible over time.
The plastic parts of the interior do not have an easier time: the interior is protected from road chemicals, but suffers from the sun, large cargo and careless passengers, earning abrasions, scratches and cracks.
However, it is possible to update plastic parts and return them to their former novelty using budget funds.
If the car is no longer young and has a certain historical value, with the right approach you can increase its value by $500, while spending ten times less. Although, of course, everything depends on the scale of the problem.
First, the surface of the plastic interior part must be properly cleaned. A number of American experts, in particular, American restorer and presenter Stacey David, advise using trisodium phosphate, a compound that forms the basis of various detergents and cleaning products.
The next step in preparing for painting is to ensure that the surface has sufficient adhesion to the paint you are about to apply. To do this, you can use a special adhesion promoter (Stacy David recommends Duplicolor), which will provide reliable adhesion, acting as a primary primer layer before applying the base paint.
If this is not done, then the new coating will fall on the old paint and will not adhere well - pretty soon the part will have to be repainted again. The first, rough layer of paint is also used as an additional binding agent.
In the case of interior plastic, a very popular solution is vinyl paint (so-called liquid vinyl) such as Plasti-Kote or Duplicolor. Which of these brands is better is a controversial issue, and Western restorers have differing opinions on this issue. The paint is applied in several layers for reliable fixation.
It is at this moment that the magic happens: the old part turns into a new one, just like from the factory, and all the years of its service are hidden under a layer of fresh paint. The final touch is to treat the part with a special restorer to add shine and additional protection. Armor All and Black Magic are in demand.
You can refresh a part without painting. To do this, after the washing stage, the part is dried and then treated with sandpaper, sanding all small irregularities.
However, don’t get too carried away - the most “gentle” of the coarse grits, 6-H, is enough, which is usually used for final sanding of soft wood. After this, the part is carefully and evenly heated with a regular hairdryer, while wiping the element with a clean rag without much pressure.
After such treatment, the part will noticeably look younger, but in case of severe abrasions, the homogeneous texture of the plastic cannot be completely restored.
If, in addition to everything else, there are still cracks on the parts, they can be dealt with using simple superglue, which is applied along the entire length of the crack. For additional rigidity and durability, you can go over the same place from the inside with a glue gun - this will guarantee that the crack will not spread. Excess dried glue is sanded with sandpaper.
The situation is somewhat different with steering wheels with a plastic rim. The varnish layer is sanded off, after which all cracks and scratches are drilled out and expanded to make it easier to fill the damaged areas with epoxy resin.
Many people use a standard two-part epoxy resin at this stage, but you can use, for example, a filler called Bondo - a brand manufactured by 3M. It has almost become a household name in America; in fact, it is an automotive grinding mastic.
When the mastic hardens to the state of melted cheese, the author recommends treating the pouring area with coarse 25-H sandpaper. The main thing here is not to waste time and not miss the right moment: fully hardened Bondo mastic is very difficult to sand with sandpaper.
Source: http://classicautoclub.ru/manual/8
Instructions for restoring car interior plastic
Painting is the most effective way to repair plastic. If the operations are performed correctly, the car interior will look like new. But this method is also the most labor-intensive. First of all, when doing the work yourself, you will need a spacious box in which you can place plastic car interior elements for painting. A cramped garage is not suitable for these purposes.
The room needs to be thoroughly cleaned, washed from dust and dirt to prevent it from getting on the surface of the parts after painting. Another suitable location may be used. For example, in a country house under a canopy. Then you should wait for dry and windless weather. Otherwise, the painting may be damaged by wind and dust.
Repairing plastic with auto painting requires several operations with each part: cleaning the part from dirt, dust and grease, priming, puttying, sanding, painting, varnishing. Therefore, all plastic parts of the car interior must be dismantled. It is impossible to perform all of the above operations otherwise.
When removing parts from a car yourself, you need to be careful as they can be easily damaged. Particularly affected during dismantling are the fastening elements of parts: clamps, latches, pistons. To avoid this, it is recommended to purchase a special kit for removing interior elements, made of polyurethane.
After removal, the parts must be thoroughly washed and cleaned. In addition to wiping with a damp cloth, it is necessary to remove grease using a cleaner. The cleaner must be neutral and not dissolve the plastic. Otherwise, its appearance will only worsen. White spirit or its equivalent can be recommended.
The next step in doing a DIY repair is priming. But there is one nuance here. On some types of plastic you can do without this operation. As a result, a significant amount of time and money is saved. This is not difficult to determine.
It is enough to get a small piece of plastic, taking it in a place inconspicuous to the eye, and carry out the following operations: set it on fire and throw it into the water. If it smokes when burning and sinks in water, you can do without the priming process.
And, if it burns without smoking and floats in the water, then you will need to purchase primer and apply a primer.
After applying the primer in one or two layers, which is done using a spray or brush, the parts must be dried. Drying time is determined by weather conditions and is indicated in the instructions for the primer.
Then, those elements of the car interior that have cracks and scratches need to be puttied. This type of repair requires quickness. Putty usually consists of two components that are mixed before use.
After mixing, the finished putty must be applied to the surface within 5-6 minutes. After this time, it begins to thicken and grouting of scratches and cracks should be stopped. Otherwise, roughness will form that will take a long time to remove using sandpaper.
However, it is impossible to do without repairing seriously damaged surfaces.
After drying, the primed surface is sanded with waterproof sandpaper with a grit of 300-400 using water, which will provide the best result. Then the parts are dried and primed again. In order to better adhere the paint, you can use zero sandpaper to matte the surface. After this, you can proceed directly to painting.
Paint can be applied in three ways: from a spray can, using a spray gun, or manually with a brush.
The can must be shaken thoroughly before use to achieve uniform distribution of the coloring pigment.
It is necessary to place the can at such a distance from the part that drips do not form and the paint is distributed equally everywhere. It is advisable to apply at least two layers of paint.
This will give an even shade over the entire surface of the part. After applying each layer, dry according to the paint instructions.
When using a spray gun, you can use acrylic paint. It has better qualities compared to spray paint. However, not everyone may have a spray gun, and purchasing one for one-time painting is irrational.
Painting by hand with a brush requires certain skills and dexterity. However, when repairing small interior elements, you cannot do without a brush, since a spray can and a spray gun will be ineffective in this case. You don't need to put a lot of paint on your brush. Then the paint is evenly rubbed over the surface. This ensures good adhesion.
The final stage of repair using painting is the application of a special protective varnish, which is most often exposed to external influences. There should be at least two layers of this varnish.
It should be noted that when performing such repairs yourself, it is necessary to paint all elements of the car’s interior.
Otherwise, there will be a noticeable difference in appearance between painted and unpainted parts of the car interior.
Padding
This type of do-it-yourself car interior repair will also require dismantling interior elements that need to be reupholstered. The removed parts must be cleaned and washed from dirt. Then the final cleaning of the surfaces from grease is carried out using a cleaner. As mentioned above, the cleaner should not dissolve the material of the parts.
Leather or leatherette purchased in advance is cut out along the contour of the parts to be glued with a small margin of a few centimeters. The glue is applied to the surface of the parts and the inside of the leatherette (leather). The gluing technology depends on the type of glue and is indicated in the instructions for the glue.
The pasting operation should be performed quickly, straightening the leatherette and removing air bubbles, in strict accordance with the instructions. Otherwise, after the glue hardens, it will be very difficult to eliminate defects. Tearing off leatherette or leather may damage it.
The edges of the artificial leather (leather) are folded up and glued to the inside of the part. If these parts are very close to each other, tucking may prevent the parts from fitting into place. Then simply trim the leatherette (leather) along the contour of the element.
Pasting
Carrying out car interior repairs using wraps is similar to the previous case. It will also require careful preparation of the car interior elements, including dismantling. It will be necessary to wash off dirt and dust, clean the surface to be pasted from grease using a cleaner that does not destroy our plastic.
Then we cut out the film to the size of the element with a small margin so that the edges can be wrapped. The film can be carbon or any other color you need.
Having made the necessary cut of the film for each element of the car interior to be pasted, remove the protective layer from it and place the adhesive layer up. After this, place the desired element on top of the film, and perform preliminary gluing.
Having straightened the film over the part, we take a hair dryer and plastic spatulas in our hands and make the final shrinkage of the film under the influence of a hot stream of air. Smoothing and removing air bubbles is done with plastic spatulas.
The edges are bent to the inside of the part and also warm up well.
This film successfully hides scratches and other defects in the car interior. Despite this, before gluing, the surface of parts with defects must be smoothed using sandpaper.
Heated grinding
The car parts to be repaired must be washed and cleaned with a degreaser. Scratches are sanded and then heated with a hair dryer. The plastic softens and the defects heal. The advantage is that the parts do not need to be removed from the car. Be careful when warming up, otherwise the plastic may leak.
Other means
You can get rid of small scratches with a lighter. This method is similar to the hairdryer method described above.
You can renew faded plastic with ink. The surface must be washed and cleaned. Color restoration occurs by applying ink. Then, after a certain time, excess ink is removed with a napkin. The disadvantage is that the ink washes off or wears off after a short time.
Video “Car update”
The video shows how interior plastic is repaired on your own at home.
Source: http://MineAvto.ru/tyuning/salon/vosstanovlenie-plastika-salona-avtomobilya-4011.html