Replacing the cabin filter yourself
Replacing the cabin filter is a simple operation that will take no more than five minutes (to remove the old filter and install a new one). However, in specialized salons they charge considerable sums for this, which is absolutely unjustified.
You can purchase a filter at any auto store or service center. It is necessary to pay attention to the quality of the product. It is recommended to purchase parts from authorized dealers, this way the components will last longer, and the need for frequent repairs is completely eliminated.
Let's look at how to replace the cabin filter in Toyota Corolla and Mazda 3.
In almost all cars, the cabin filter is located under the glove compartment. Toyota engineers decided not to swim against the flow, and placed it there.
So, the process itself! Initially, you should pull out the glove compartment and unscrew the fixing fastener on the right side of the structure. Next, the entire glove compartment is dismantled; to do this, the side walls are slightly compressed and it is pulled out.
Replacing the Toyota Corolla cabin filter is carried out by removing the plastic cover, which is attached to the niche. The lid latches unfasten and the filter is removed. The new one is inserted so that its edges are slightly pressed. Once the structure is in place, it snaps into place.
Now all that remains is to install the glove compartment. Its walls, as was the case during dismantling, are compressed so that the pins fit into the grooves, after which the nut is tightened.
Replacing the Mazda 3 cabin filter is also quite simple. First of all, it is necessary to disconnect the battery, since the work will be carried out near live circuits.
In the glove compartment of the car, use tools to snap off the panel and remove it by moving it to the left. There are fasteners under it; they should be unscrewed, and the glove compartment body will slide out.
There is a plastic protection under the glove compartment, it is fixed on two fasteners.
After dismantling it, another clip is removed to the left of the passenger seat, this time the protective panel is removed and access to the fuse box mounts is gained.
Next, replacing the cabin filter is carried out by dismantling the fuse box, its connector is disconnected, and finally, you can remove the filters. Mazda 6 has two filters. Before installing new ones, you need to thoroughly wipe the compartment, remove accumulated debris and reassemble everything in reverse order.
After the work is completed, you need to connect the battery terminals and check the functionality of all devices. When power is restored, it is recommended to set the initial position of the power windows.
To do this, the motor starts and each window is raised completely using a button. To do this, you should hold it for at least 3 seconds (after completely closing).
When you hear characteristic clicks, you need to release the button and perform the operation for the lower position of the glass.
If you replace the cabin filter yourself, it is recommended to cover it with additional foam rubber sealant, which is used for insulating household windows. This allows you to conveniently mount the product, eliminating gaps between the part and the body.
There's no need to spend money when it's so easy to do it yourself!
Unforgivable Movie Mistakes You Probably Never Noticed There are probably very few people who don't enjoy watching movies. However, even in the best cinema there are mistakes that the viewer can notice.
How to look younger: the best haircuts for those over 30, 40, 50, 60 Girls in their 20s don’t worry about the shape and length of their hair. It seems that youth is created for experiments with appearance and daring curls. However, already last.
What does your nose shape say about your personality? Many experts believe that you can tell a lot about a person's personality by looking at their nose. Therefore, when you first meet, pay attention to the stranger’s nose.
20 photos of cats taken at the right moment Cats are amazing creatures, and perhaps everyone knows this. They are also incredibly photogenic and always know how to be in the right place at the right time.
9 Famous Women Who Have Fallen in Love with Women Showing interest in people other than the opposite sex is not unusual. You are unlikely to be able to surprise or shock anyone if you admit it.
These 10 little things a man always notices in a woman Do you think your man doesn’t understand anything about female psychology? This is wrong. Not a single little thing can be hidden from the gaze of a partner who loves you. And here are 10 things.
Sources: http://fb.ru/article/61468/zamena-salonnogo-filtra-svoimi-rukami
Source: http://master-informa.ru/remont-vaz/zamena-detalej/6903-zamena-salonnogo-filtra-svoimi-rukami
Replacing the cabin filter on a VAZ
A modern car uses a large number of filters, which are designed to replace a large number of parts and mechanisms of the car. The cabin filter also plays a significant role. In this article we will tell you what it is, how often does such a filter need to be changed and how is the cabin filter replaced?
The principle of operation of the VAZ cabin filter
Almost every car has its own ventilation system. It is designed to supply air to the cabin and further circulate it during the summer period of operation and to heat the cabin in the winter.
In summer, there is a lot of dust on the roads, which easily penetrates the ventilation system and clogs the interior of the car.
To prevent this from happening, car designers have provided a special filter that cleans the air entering the cabin from various particles, including dust.
The use of a filter is due to the fact that everyone in the cabin inhales much more harmful substances than pedestrians.
As the car moves, large amounts of exhaust gas and dust raised from the road surface are concentrated near the passenger compartment. Dust can contain about 200 types of various toxic substances.
An example is the particles of tire rubber that remain on the road and mix with dust particles.
The filter can be installed either in the cabin or under the hood. This parameter depends on the make and model of the car. In any case, regardless of the installation method, it is located before approaching the heater fan.
This requirement is related to protecting the electric motor from foreign particles entering it.
In addition, such a filter is an excellent protection for the heater radiator and reduces the frequency of cleaning the latter by almost several times.
Any cabin filter is a filter element in the form of a rectangle, which is filled with absorbent material.
The first filters were in the form of a triangular mesh, which was stretched over the channel of the air intake device.
The compact dimensions of such a product allow it to be installed even on cars that do not have such a part. The price of a cabin filter is relatively cheap and does not put much pressure on a car enthusiast’s pocket.
How to replace the cabin filter on a VAZ 2110
It is recommended to replace the cabin filter element in accordance with the manufacturer's instructions. Most often, this parameter varies between 10 -15 thousand kilometers.
However, cleaning the old element is also allowed. To do this, a stream of compressed air is directed into the filter part until the filter is completely cleaned.
Despite all the savings, this method does not guarantee complete cleaning of the filter and only extends the life of the part for a short period of time.
The filter element can be replaced in a number of other cases: the appearance of unpleasant odors in the car interior, poor performance of ventilation and heating of the interior, in particular, poor airflow or fogging of the car windows (manifests itself when the filter element is completely dirty).
Before replacing the filter, you need to prepare a standard set of tools and thoroughly wash the car. To do this, it is recommended to use water pressure devices for car washing.
Particular attention should be paid to the engine compartment on the interior side. To do this, the battery is removed, and the engine and the partition between the passenger compartment and the hood are washed.
Try not to direct a direct stream of water at electrical devices, especially the injector and generator. After washing, remove water particles with compressed air.
After washing, you can proceed directly to replacing the filter element. On the windshield wiper, remove the protective cap and unscrew the fastening nut. Remove the lever, remembering to mark its position using, for example, chalk.
If the lever cannot be removed, then there is no need to make sudden movements. Screw the nut in half and gradually use pliers to lift the lever up to the nut.
After this, the nut is turned out a little, and the procedure is repeated until the lever is completely removed.
Now, unscrew all the screws intended for fastening the facing part. To remove it, it is not necessary to dismantle the windshield washer jets.
All you need to do is turn them the other way and remove the lining by prying it up with a screwdriver. Immediately after you remove the trim, the cabin filter will be visible inside the heater. To remove it, reach inside and grab the filter.
Turn it clockwise until it comes out of the compartment smoothly.
Video - How to remove and change the cabin filter of a VAZ
Installing a new filter occurs in the reverse order. This means that you need to push it in at one angle and install it at another. Installation is carried out across the channel until it rests against the foam edges. Thus, its reliable and tight fixation in the ventilation system is achieved.
A new type of filter (injector “tens”) is installed in the outer part of the channel under the facing part. To remove it you will need a Phillips screwdriver. Unscrew the 4 screws securing the cover with the grille and remove it. After this, remove the old filter and install a new one. All parts are assembled in reverse order.
This completes the replacement of the VAZ 2110 cabin filter. As you can see, this procedure is not complicated and is performed using a simple screwdriver.
Source: http://VipWash.ru/sistema-ohlazhdeniya/zamena-salonnogo-filtra-na-vaz
Replacing the cabin filter
Replacing the cabin filter is an important procedure that you should learn to do yourself. It is located directly under the plastic trim, below the steering wheel, for example, on Renault Koleos and other cars.
Although changing this accessory yourself is a little problematic, we’ll still try to figure something out. And yet - having changed it once, then everything will go like clockwork.
Let's start with the fact that the interior cleaner is replaced every 5,000 km. During this time, it becomes polluted and its throughput deteriorates significantly.
A little history, or What is a cabin filter
Now, in order. The first copies of these solutions appeared recently. In the mid-eighties of the last century, when they first came out, their design was quite simple. The devices of that time consisted of a frame and the so-called non-fabric.
What did the filter do and why was it invented? So here it is. It retained the largest particles of dust and plant pollen that were constantly floating in the air.
The interior cleaners of the eighties, consisting of only two components, did their job well, but they were nevertheless replaced.
They were replaced by two-layer filters. These are real vacuum cleaners with a complex system and very high efficiency. In such models, not only large dust particles got stuck, but also small ones, up to 0.5 microns in size.
Video about the purpose of cabin filters:
But progress did not stand still, and the designers moved on. They guessed to connect activated carbon to the filtration process. This helped that soot and some types of gases began to be purified.
The last stage in the creation of cabin filters, which are still used today, were hybrid options. They consist of ordinary sandpaper, an antimicrobial reagent, a carbon layer and an electrostatic discharge.
A real layer cake that is much more effective than its predecessors. Such a purifier is capable of trapping microparticles a fraction of a micron in size, aromatizing the air and even disinfecting it.
A real car gas mask!
As mentioned above, it is necessary to change the cabin filter because it periodically becomes clogged. An accessory clogged with dust and dirt is not only ineffective, but also harmful. The process is already going in the opposite direction and the old purifier, which has not been replaced, begins to release into the air everything that it has successfully swallowed for a long time.
When to change the filter
Now let’s talk about how to change this very filter itself and when to do it. As mentioned above, it is located below the steering wheel. It is advisable to change it every 5 thousand kilometers, but high-quality coal models can last as long as 50 thousand kilometers. But this is not in practice, but just like that. And in order not to worry, change it every five thousand miles, and everything will be fine.
There is also such a thing as a car driving zone. In other words, replacement times may vary. So, if the car is operated in the southern lane, where there is a large amount of sand and dust in the air, its interior cleaner is changed more often. But on cars operated in the northern lane, on the contrary, the cabin filter can be changed less frequently.
In addition, if the car is driven more often in urban environments with dense traffic flow, the cleaner will again have to be changed more often. But cars that often travel outside the city and don’t sit in traffic jams for hours have an advantage. And it turns out that cabin filters on “city” cars should be changed once a year.
How to determine that the cabin filter has become unusable
It is possible to determine that an element has become unusable by indirect signs. For example, if the air outside is clean and fresh, but the air inside feels stale, it’s time to change the filter. Or if the driver turns on the oxygen ventilation system at maximum power, but does not feel strong airflow, again the problem is the filter has become unusable.
Changing the filter yourself
So, having decided that it’s time to change the device, let’s get started. Let's find out where the cabin filter is located, since on different models it can be anywhere. This can be done using the car's service book. First, remove the side panel, which is secured with latches. After this, unscrew the two panel bolts and remove the lower steering column panel.
We find the protective cap of the device. To remove it easily, you will need to press the brake pedal all the way, as it will get in the way.
How much does it cost
As mentioned above, cabin filters can be different. And some of them are oh so expensive. Large-sized products designed for buses and SUVs are especially expensive. By the way, it is not at all necessary to change the filter to the original one. You can also purchase a duplicate, which costs much less.
And one moment. If the replacement of the device is entrusted to professionals working in a car service, or they themselves offer to replace it, it is recommended to check a few things. As they say, trust, but verify.
A dismantled filter, if it has truly become unusable, will not look very good in appearance. You will see a dirty accessory containing everything you could possibly want.
Here you can see branches, leaves, insects, soot and much more.
Installing a cabin filter on a VAZ
Installing a new filter is done in reverse order. As for domestic cars, on a VAZ, for example, it is installed instead of the standard heater motor casing.
Here you will need to experiment a little. You can even make a homemade filter and prepare standard holes for fastenings.
For ease of installation in such a limited space, it is advisable to make the filter from two halves.
The main thing during installation is the cabin filter adapter, which is recommended to be cleaned of debris that accumulates over time if there is no protection on the standard housing. As for the bottom of the stove body, debris and dust can easily be sucked up by a standard vacuum cleaner. To do this, you will need to remove the stove motor and insert the vacuum cleaner tube inside the opened hole.
Knowing where the cabin filter installed by the previous owner is located, you should only dismantle it and replace it with a new one. But if the VAZ has a type “B” heater, in order to reach the stove, you will need to move the central damper to the “hot air” position.
Video showing how to replace the cabin filter:
It is also recommended to clean the heater radiator, because if it is clogged and the cabin filter is working properly, the car windows may fog up.
365cars.ru
What is the frequency of replacing the cabin filter?
The cabin filter that every passenger car is equipped with is designed to clean the air that enters the cabin of your car through the heating system.
If your car is equipped with a carbon filter, it will also protect the driver from unpleasant third-party odors.
Since this component collects dust and dirt entering the car from the street, replacing the cabin filter is an integral part of the technical work.
Today, most of these components are installed on the inside wall of the glove compartment or under the instrument panel on the driver's side - it all depends on the manufacturer.
As for domestically assembled and produced cars, the cabin filter is installed under the windshield or under the hood in a special cassette.
To find out where the cabin filter is located in your car, you need to read the operating instructions for the car.
Filter location
What types of filters are there?
The first air cleaning system elements began to be installed on cars in the early 90s. Back then they were almost identical to standard engine air filters. A little later, the structure was improved and they became two-layer.
The first layer was intended to prevent dust from entering the interior, and the second layer was intended to eliminate the consequences of the penetration of harmful microscopic particles into the car’s cleaning system.
A few more years later, components appeared whose structure contained activated carbon.
Conventionally, these components are divided among themselves according to the method of air purification. They can be:
- Mechanical. In this case, the air passes through a mesh made of special thin fibers.
- Adsorption. The functionality of such components is based on the ability of activated carbon to absorb various harmful substances and unpleasant odors.
New cabin filter
Component arrangement
Using the example of the most complex in its structure - a multilayer air component - let's look at its structure. The top paper layer of the cleaning system element is designed to retain large harmful particles.
Under the paper base there is an electrostatic layer, which is needed in order to trap smaller particles. This is followed by a layer based on activated carbon, which prevents exhaust gases from entering the cabin from the outside.
The last, fourth layer of the component is an insurance layer that traps all other remaining harmful particles.
What is the price?
Every motorist has asked the question “how to replace the cabin filter?” and how much will it be?". As for the cost of the elements, it all depends on the brand. If you are the owner of a minibus or SUV, then, firstly, the filter will be larger in size, and secondly, it will cost more. If you decide to buy or replace it from an authorized dealer.
Filter location in Audi
If you compare them with prices on the market, they can cost two or even three times more from an official supplier.
Note that the purchase of original products in this case is not necessary, since the service life of both the Chinese and the original air purification product is the same.
Components made in China may not only be as good as, but even better in quality than the originals.
When to change?
The frequency of replacement of such elements varies depending on the manufacturer and operating conditions of the vehicle.
Manufacturers advise changing the cleaning system component at least every 20-25 thousand kilometers. To find out the exact timing, you need to read the recommendations for using the car.
If the machine is used in urban areas or, for example, in the desert, then the service life of the element will be shorter (about 10 thousand km).
Misted glass
How do you know when it's time to change?
The first sign that it is time to change the cabin filter is a decrease in air flow through the heating system. For example, by setting the maximum ventilation level, there will be less air than it should be. Signs by which you can determine whether it needs replacement:
- An unpleasant odor is a reason that the component needs to be replaced.
- If in the summer the air conditioner barely works in the car, and in the winter the heater blows weakly, then it’s time to change the cleaning element.
- Humidity persists in the cabin and the windows fog up, this is a sign of a component failure. Humidity in the cabin appears as a result of water entering the component, so domestic and Chinese cars are at risk of such a “sore” than foreign cars.
If a car with a climate control system is used for a long time with a clogged component (or without it), then get ready to shell out a tidy sum at the service station.
Deterioration of the air system as a result of a breakdown of the cleaning element in 98% of cases provokes freezing of the evaporator radiator.
Frozen dirt caught in frost, as it thaws, will contribute to the formation of a favorable environment for microbes and a disgusting odor.
Old filter
Here it is no longer possible to solve the problem by replacing the component alone. The dust and dirt that the cleaning element “missed” has apparently already reached the stove or air conditioner, so you need to dismantle the evaporator and clean it yourself. You can go to a service station, where it will cost more.
Component replacement
If you don’t know how to remove the cabin filter, then you don’t have to go to a car service station. Don't know how to change the cabin filter? This can be done easily without using special tools.
Whatever the car, and wherever this component is located, you will need a universal set of tools: wrenches and screwdrivers.
Correctly replacing the cabin filter is possible at home, so we suggest that you read the articles on replacing the filter on our website.
Video “Replacing an element of the cleaning system in a Daewoo Lanos car”
AvtoZam.com
As it is written in the operating and maintenance instructions (Publishing House Third Rome) of the Lada Kalina, the cabin filter should be replaced at least every 15,000 km, and under severe operating conditions - even more often, once every 8,000 km.
I somehow missed this moment on my car and drove 40,000 kilometers with the factory cabin filter for two years. Not long ago I began to notice that the stove began to blow somewhat weakly, and the windows fogged up a little.
I bought the necessary consumables in the store and chose a regular one made by AvtoVAZ for 146 rubles. The entire procedure is described in a little more detail below.
Replacing the air intake filter
To do this we need a screwdriver with an asterisk profile. Fits this T20 bit perfectly. See its appearance below; such screwdrivers are found in almost all decent tool sets.
Source: http://autoprivat.ru/remont_avto/zamena_salonnogo_filtra.html
How to replace the cabin filter?
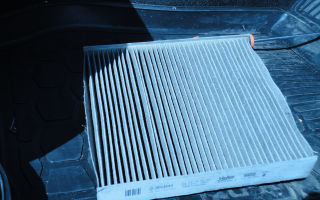
The cabin filter is a rectangular frame that can be made of high-density cardboard, plastic or non-woven material. In the middle of the frame there is a filter element made of different materials, for example, paper or fine-fiber non-woven material. And along the perimeter of the frame there is a seal.
Experts and car manufacturers recommend changing the cabin filter every 10,000 kilometers. They explain this by saying that over time, a layer of dust accumulates on the surface of the filter paper, which is an obstacle to the heater fan drawing in the required amount of air.
So, the fact that your cabin filter is dirty may be indicated by the lack of fresh air in the cabin, fogging of the windows in the car, poorly functioning air conditioning in the summer, or poor supply of warm air to the deflectors in the winter.
An unpleasant odor in the cabin can also be a consequence of a dirty cabin filter or water getting into it (in both cases it needs to be replaced), this situation is especially typical for cars of the domestic automobile industry.
This happens less often in foreign cars due to the fact that many automakers, especially Japanese ones, simply do not install a cabin filter in their cars to avoid glass fogging and other problems.
But this does not mean that there won’t be dirt - there will be, it will just penetrate deeper - into the air conditioner evaporator, and installing a cabin filter yourself won’t help here anyway. The only thing that can be done in such a situation is to dismantle the air conditioner and clean it, having first pumped out the freon from it.
If the cabin filter is present in your car and is dirty, then it is better to replace it with a new one.
How to replace the cabin filter with your own hands, instructions
The first step is to start by dismantling the windshield wiper arms and plastic “protection”. For injector “ten” engines, you initially need to remove the sound insulation (it’s located on the left), located between the engine compartment and the heater, but on the right side, dismantling is not required.
Then you should get rid of the mounting brackets, for which we unscrew the two screws located at the bottom and move the air collector cover to the left and remove it.
On the front side of the heater you will see a rounded protrusion, which is located in the center, and at the top there is an air collector hole. Older car models in this location have a recirculation switch cover, which also needs to be removed. Now you can begin to directly remove the old cabin filter and install a new one.
The entire procedure described applies to domestic cars. In foreign cars, the procedure for replacing the cabin filter is even simpler. The only thing you need to do to access the filter is to remove the glove box (and sometimes this is not necessary).
Replacing the cabin filter video
I recommend reading:
Source: http://autoepoch.ru/remont-i-obsluzhivanie-avto/kak-zamenit-salonnyj-filtr.html
Replace the cabin filter with your own hands on Renault Duster
Such a thing as a cabin filter is a very important element in every modern passenger car, including the Renault Duster 2.0 model. The purity of the air that enters the cabin directly from the street depends on this element.
The device cleans the air from dust and various foreign pollutants. However, the cabin filter will still need to be replaced soon. In this article we want to tell you where the cabin filter is located in Renault Duster 1 cars.
6 and how to replace it, what you should initially pay attention to, and so on.
Which filter is better to choose?
No matter how strange it may sound, the main difficulty seems to us not to be the process of replacing the cabin filter, but its correct choice when purchasing. Yes, indeed, for Renault Duster 2 cars.
0 There is a huge selection of filter models from many manufacturers on the modern market. These devices differ from each other solely in quality and cost.
In any case, preference should be given to the original filter, which in catalogs has the article number 272775374R.
This device is a regular carbon cabin filter, which has a porous accordion-like structure and does not have any other properties, although its cost is quite high.
Owners of Renault Duster 1.6 cars often wonder whether it is worth choosing and buying only an original filter? Many experienced car owners believe that the choice should be made by the car owner himself.
Although, if we analyze the majority of reviews from the owners of this model, and the results of official examinations, the conclusion is obvious: when replacing the cabin filter, there is no fundamental difference in whether it is original or not, and, therefore, you can safely purchase a cheaper element.
How to make a replacement?
At first it seems to many that replacing the cabin filter itself is something incredible, and this is an extremely difficult procedure, and that replacing it yourself is unacceptable; only a professional can do this, since most novice drivers do not even know where the cabin filter is, or how to remove it he's right, that's what scares them. Everything is extremely simple, just watch a short training video, or read in our article how to do everything, and then you will understand that there is absolutely nothing complicated about it. The time spent replacing the cabin filter will not exceed half an hour, plus it will help you save money on a visit to the car dealership.
In the French model Renault Duster 2.0, the consumables are located under the dashboard on the left side. Replacing it yourself is not difficult, you just need to unclip the filter lock and pull the housing towards you. This needs to be done in several stages, first press the tab located in the very corner, after which the latch should be pulled out, and only then pull out the filter.
After you have removed the old consumable filter, experts recommend thoroughly cleaning the heater cavity from dust and dirt. Otherwise, the newly installed filter will become clogged much faster than expected and will need to be replaced again. The new filter is installed in the reverse order.
Practice shows that for those people who changed the filters themselves for the first time, this stage caused the most difficulties. This is due to the fact that the removable consumable is made of paper and bends quickly.
Trying to get into the special grooves, the paper immediately becomes deformed and therefore correct installation becomes difficult.
But a short practice in this matter quickly makes the task easier and does not cause absolutely any difficulties when changing.
Let's sum it up
Replacing the cabin filter on the most popular Renault Duster model does not require special skills or any specific skills; everything can be easily done by yourself. If you carefully read the part in the article that describes the replacement, then the procedure will not cause any difficulties for you, and you will not have to contact the service center with this problem.
Source: https://ZamenaRenault.ru/duster/obshhee/salonnyj-filtr-svoimi-rukami.html
Where is the cabin filter located and how often does it need to be changed, basic rules for replacing the cabin filter
Air into the car interior is constantly supplied from the environment through the fan ducts to maintain a sufficient amount of oxygen inside the car for the driver and passengers.
In a dense stream of cars, air mixed with exhaust gases coming out of the oncoming vehicle is directed towards the vehicle.
It is unsafe to breathe such air, and a cabin filter is installed to retain harmful impurities.
Why is a cabin filter needed in a car?
Many drivers underestimate the importance of the element that filters the air that enters the car interior.
According to studies, the cabin filter is capable of retaining up to 99.5% of harmful impurities contained in the incoming air.
In the absence of a filter element, the driver and passengers have to breathe fuel combustion products, which contain: soot, oxides of nitrogen, sulfur and carbon, heavy metals, aldehydes and more than 200 other substances harmful to the body.
According to research by environmental monitoring services, in large cities, air pollution on highways exceeds established standards by 20-40 times.
Spending several hours a day in a car, the driver runs the risk of developing chronic diseases of the respiratory tract and nervous system.
In addition to exposure to toxic substances, microparticles of dust from tires, soot, asphalt and other things cause harm to the driver’s respiratory organs.
In addition to preserving the health of the driver, the cabin filter performs the task of slowing down the aging of the car. By preventing dust and fumes from entering the cabin, the filter element helps prevent clouding of the glass.
How often to change the cabin filter
There is no clear answer to the question of how often the cabin filter needs to be replaced.
Each car manufacturer sets its own recommended time frame for replacing the filter element, which, in most cases, varies from 20 to 25 thousand kilometers of the car.
It should be noted that these values are set for European cities, where the environment is better than in large Russian cities. Russian environmental experts recommend that drivers change cabin filters every 10-15 thousand kilometers.
Since it is quite difficult to navigate based on such scattered recommendations, it is easier to determine whether the cabin filter is clogged by obvious symptoms:
- When the air ventilation system is turned on, dust appears in the cabin;
- While driving the car, an unpleasant odor began to be felt in the cabin;
- The windows often began to fog up from the inside.
If you are concerned about the listed problems, the right solution would be to remove the cabin filter and make sure it is dirty or clean.
Important: A dirty cabin filter has a negative impact on the air in the cabin. Over time, harmful bacteria, mildew and mold develop in the filter. If the filter cannot retain microelements due to contamination, they will begin to enter the cabin, having a negative impact on the driver’s health.
Where is the cabin filter located?
Car manufacturers can install the cabin filter in various places in the cabin, but they try to take into account the fact that the filter element has to be changed quite often, and accordingly, access to it should be easy. Only the operating book for a specific car model, in which this information should be displayed, can clearly say where the cabin filter is located.
Most often, the cabin filter is installed behind the glove compartment or under it.
You can find cars in which the filtration element entering the cabin is installed on the driver's side, for example, under the dashboard.
Some car manufacturers install a filter at the air inlet, that is, they place it under the hood in a special housing or recess, in which case it is easiest to replace.
How to replace the cabin filter
The cabin filter is very easy to replace; you just need to find its location in the car and get to it.
When removing the plastic inserts behind which the filter element is located in the cabin, it is important not to damage the latches that hold them in place.
It’s better to once again look in the car’s instructions on how to remove the fastener than to restore it or completely change the part due to a breakdown.
After removing the old cabin filter, do not rush to install a new one in its place. It is recommended to vacuum or otherwise clean the area where the filter element was installed. Next, install the part in place of the old one, paying attention to the signs on it, which will tell you which side to insert the cabin filter correctly.
Types of cabin filters
When choosing a filter, you should first focus on its size.
Depending on the car model, the sizes of cabin filters differ, and on the packaging with the consumable element, manufacturers indicate for which cars it is suitable.
At the same time, cabin filters differ not only in size, but also in the materials from which they are made. Depending on the filter materials, the following types of filters can be distinguished:
- Paper . The most common filter models are made of porous paper, which limits the passage of small particles while allowing air to penetrate into the cabin. Filtration occurs only at the mechanical level, and such filters are the cheapest;
- Coal . Carbon filters are also made of paper, but with a special coating that can eliminate unpleasant odors coming from the air, as well as absorb harmful gases. The problem with carbon filters is that they show their benefits until the absorbent properties of the carbon are depleted, which happens faster than the recommended time for replacing the element. Accordingly, after several thousand kilometers, the properties of a carbon filter become equal to that of a conventional paper filter.
- Carbon-polyphenolic . Common filters among people who have allergies to various particles that may be in the air. Such filters are partially coated with activated carbon and partially with polyphenol, which is an antioxidant and is able to fight allergens, preventing them from entering the cabin;
- Electret . Expensive cabin filters that are rarely installed in cars by manufacturers. These filters differ from other options in that they contain not only a layer of sprayed paper for mechanical filtration, but also a separate layer of electrically charged fine fibers. Electric charges allow you to attract microscopic particles, preventing them from entering the cabin. Manufacturers of such filters claim that their efficiency in retaining impurities measuring tenths of a micron reaches 99%, and 30% for particles measuring hundredths of a micron.
Important: Cabin filters of any type are disposable elements that must be replaced when dirty. Cleaning the filter elements with a vacuum cleaner and other means will not remove retained microparticles and, accordingly, will not give any results.
(331
Source: https://okeydrive.ru/salonnyj-filtr-gde-naxoditsya/
Replacing the cabin filter with your own hands – Automotoguru
Car filters play a big role in protecting certain car mechanisms from mechanical particles. The cabin filter serves to clean the air inside the cabin.
How often should the cabin filter be changed?
The air filter installed to purify the air in the cabin plays a very important role in maintaining a healthy microclimate inside the car. A conventional ventilation system does not clean the air entering the cabin from dirt, dust, heavy compounds and soot.
The driver and passengers of a car inhale several times more exhaust and dust than an ordinary pedestrian. The air on the road contains particles of tire rubber, asbestos from brake pads and more than 200 types of toxic substances contained in the exhaust gases of a modern car.
A dust cabin filter installed in the ventilation system or air conditioning system prevents dust from penetrating into the car, and a carbon filter, the filter element of which consists of layers of molded carbon and fiber, is capable of retaining nitrogen oxide, sulfur and substances of the benzonal group.
In urban use, the cabin filter should be replaced every 10,000 or 15,000 km. Timely replacement of the cabin filter is as important as replacing the air filter.
A clogged filter can not only cause serious consequences for human health, but also cause failure of the heater fan, the replacement of which is much more expensive than replacing the cabin filter.
One of the signs of its malfunction is constant fogging of the windows and a musty smell in the cabin. If you decide to change the air filter yourself, it is best to replace it in the warm season.
Replacing the cabin filter of a Citroen C4 is a fairly simple procedure, even a beginner can handle it. To carry out the work, first of all, we need a new filter. It is advisable to purchase a branded product that can be purchased or ordered at almost any auto parts store.
In order to choose the right filter, you need to know exactly the year of manufacture of the car, body number and engine make. All this information is indicated on the vehicle registration certificate.
Or you can try to briefly extend the life of your cabin filter - if, after dismantling the old one, all its parts are intact and there are no oil stains on its surface, then you can blow it out from both sides using compressed air.
Replacing the cabin filter
To replace the cabin filter, it is enough to have a standard set of tools: a straight-tipped screwdriver, a plastic clip remover or pliers. To make the replacement, we need to open the hood and find the location of the filter.
In a Citroen C4 car, the cabin air filter is located in the engine compartment, on the right side under the sound insulation. Using a special clip remover, we need to unfasten the sound insulation cover, which is secured with three clips.
To dismantle the clip, pry it up with a screwdriver, and then carefully, trying not to break it, remove it using a puller or ordinary pliers. After removing the clips, take out the soundproofing cover.
The filter compartment cover is located in the engine bulkhead; to open it, you need to pull the handle and pull out the cover, being careful not to damage the lock latches. After dismantling the old filter, a new one is installed in the vacated niche.
We install the new filter so that the slots are at the top and the opening valves are at the bottom. We insert it into the niche until it stops, checking the strength of the installation. After this, we install the cover in place, checking the tightness of its fit.
The last step is to secure the sound insulation, and you need to make sure that the slots on the sound insulation cover coincide with the plastic protrusions on the cabin filter cover. We insert the clips into place, and the filter replacement can be considered complete.
Source: https://avtomotoguru.ru/zamena-salonnogo-fil-tra-svoimi-rukami/