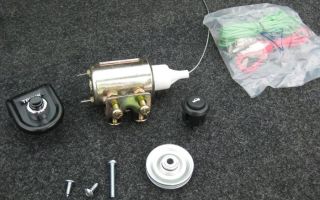
The design of the Solex carburetor 21073
Carburetor 21073 1107010 DAAZ was developed for Niva cars VAZ-2121 with an engine capacity of 1.6 liters and VAZ-21213 with a 1.7 liter engine.
Solex 21073-1107010 is an emulsion, two-chamber carburetor with a falling flow (flow movement from top to bottom). The throttle valves are opened mechanically, sequentially using the gas pedal.
The carburetor has the following components and systems:
- There are two main dosing systems, for the first and second chambers, respectively.
- The float chamber is equipped with a double float and is balanced to prevent tilting, for example when the car is turning, from affecting the operation of the carburetor.
- Crankcase gas suction system.
- A mechanism that blocks the opening of the throttle valve of the second chamber.
- The idle system is connected to the first chamber.
- Idle speed economizer.
- Two transition systems, one for each chamber.
- Power mode economizer.
- Acceleration pump.
- Starting device.
- Heating device.
The location of the main carburetor components is shown in the figures:
The carburetor consists of two halves, the more massive lower one - the body, and the upper one - the carburetor cover. At the bottom of the carburetor, in each of the chambers there are mechanically controlled rotary throttle valves.
In the first chamber in the upper part there is an air damper intended for cold starting of the engine.
The air damper is controlled by a cable going into the car interior (choke lever) and a vacuum trigger.
Through the inlet fitting, fuel, passing through the carburetor strainer and needle valve, enters the float chamber. The chamber consists of two sections that communicate with each other, so the fuel level in them is the same. The two-section design reduces the effect of vehicle roll on the fuel level and, as a result, on engine performance.
Emulsion tube with air jet
As the float chamber fills, the float, pushing the valve needle up, shuts off the flow of fuel, thus maintaining a constant fuel level in the carburetor.
From the float chamber, fuel is supplied through the main fuel jets to the emulsion wells, and air enters there through holes in the upper part of the emulsion tubes (air jets).
In the wells, when fuel and air are mixed, an emulsion is formed, which enters the small and large diffusers of the carburetor. This is the main metering system of the carburetor.
At different engine modes, certain carburetor systems are activated.
Operation of the Solex 21073 carburetor
a starting device comes into operation , controlled from inside the car by a choke handle.
In the maximum extended position, the choke handle turns the lever through the drive cable, completely closing the air damper (first chamber).
In this case, the throttle valve of the first chamber opens slightly to the size of the starting gap, which can be adjusted with the adjusting screw for slightly opening the throttle valve of the first chamber on the lever.
The starting device consists of a cavity connected by a channel to the space of the intake manifold, a diaphragm and a rod connected to the air damper. After starting the engine, the vacuum in the intake manifold acts on the diaphragm and the rod opens the air damper to the amount of the starting gap (regulated by the starting device screw).
When the handle is returned to its normal, recessed position, the starting gaps decrease. The gaps in intermediate positions are completely dependent on the geometry of the lever and do not require adjustment.
The throttle valve of the second chamber is blocked through a system of levers, when the choke is extended, so when you press the gas, the second chamber does not participate in the operation to avoid engine failures.
The idle speed system (IAC) is designed to power the engine at minimum speed, preventing it from stalling when there is no load.
Fuel enters the CXX through the main fuel jet of the first chamber, then the idle jet, mixed with air entering through the idle air jet, as well as from the wide part of the diffuser of the first chamber.
Such an air supply system to the CHS ensures a stable transition to this mode. The resulting emulsion enters the first chamber through an opening located under the throttle valve. The channel leading to the idle speed outlet closes the quality screw.
The engine speed is regulated by the so-called quality screw, which determines the amount of throttle clearance in chamber number one in idle mode.
the transition system of the first chamber is activated . Its throttle valve partially opens, and additional fuel begins to flow from the gap in the transition system, which is located above the valve, enriching the mixture. The transition system of the first chamber does not allow failure when transitioning from idle mode when starting the car.
The transition system of the second chamber is designed in a similar way, with the only difference being that it enriches the mixture during the transition from medium to heavy loads, and its outlet is round. This system helps to avoid dips when the vehicle is moving.
, the power mode economizer comes into operation . The economizer takes fuel directly from the float chamber and is controlled by the vacuum in the intake manifold.
When the damper is closed, the vacuum is high, and the economizer diaphragm does not act on the ball valve, which blocks the fuel flow.
When the damper opens, the vacuum decreases, the spring acts on the diaphragm, and it acts on the valve ball, opening the way for fuel through the economizer jet into the emulsion well, and, bypassing the main fuel jet, enriches the fuel mixture.
When operating at maximum loads, the engine requires additional fuel. It is supplied by an econostat directly from the float chamber, through a system of channels to the sprayer in the second chamber.
The accelerator pump is another carburetor component. The accelerator pump enriches the fuel mixture when accelerating the vehicle. It consists of a lever, a diaphragm and a spray.
The cam mounted on the throttle valve axis, when it opens, acts on the pump lever, which acts on the diaphragm, which pumps fuel through the nozzle into the first chamber of the carburetor. The pump design has two check valves.
The first is located in the channel connecting the float chamber and the pump cavity, and opens when the latter is filled under the action of a spring that removes the diaphragm, like a syringe piston. The valve closes when fuel is pumped into the atomizer (when the gas pedal is pressed). The second valve is located in the accelerator pump nozzle.
When fuel is pumped, it opens; if fuel stops flowing, it closes the nozzle channel, preventing air from leaking in and preventing fuel from leaking out. The accelerator pump's cam profile determines its performance.
Forced idle speed economizer (EFS)
The idle system was mentioned above. The CXX carburetor 21073 is equipped with an electromagnetic valve, which is part of the forced idle economizer (EFI).
This valve closes the channels of the idle speed and transition system of the first chamber, and is designed to stop the fuel supply when the engine is turned off, as well as in forced idling mode (engine braking), to reduce the toxicity of exhaust gases and save fuel.
EPHH consists of a limit switch (see the carburetor picture), an electromagnetic valve and a control unit.
When the ignition is turned on before starting the engine, when the throttle valve of the primary chamber of the carburetor is closed, the thrust screw (quantity screw) with the limit switch is closed to the car body. In this case, voltage is supplied to the solenoid valve and it opens the fuel jet of the idle system.
When the engine starts and idles, the solenoid valve receives power from the control unit.
As the crankshaft rotation speed increases to 2100 rpm (when the gas pedal is pressed, the connection between the limit switch and the vehicle body is broken), the control unit is disconnected from controlling the solenoid valve, but power continues to be supplied to the solenoid valve until the limit switch is restored will not short to ground. When the throttle valves are abruptly closed (forced idle), the limit switch closes to the car body and the power to the solenoid valve is turned off, and the valve needle cuts off the supply of the fuel mixture.
When the crankshaft rotation speed decreases to 1900 rpm, the control unit is turned on again and voltage is applied to the solenoid valve, the fuel nozzle opens and the supply of mixture from the idle system begins.
This carburetor has a similar design to all carburetors in the Solex line of the Dimitrovgrad Automotive Aggregate Plant (abbreviated DAAZ), but it also has some differences. Since it is installed on engines with a large displacement, the characteristics of its systems have been changed.
The accelerator pump nozzle is equipped with only one tube going into the first chamber. The strainer is removed after unscrewing the fuel supply fitting.
Carburetor 21073-1107010 is equipped with an exhaust gas recirculation control system through fittings pressed into the body, which are connected through channels to the space of the first chamber above and below the throttle valve.
From the table below you can find out what jets are on Solex 21073 1107010.
Calibration data 21073-1107010
Source: http://karburater.ru/ustroistvo/ustrojstvo-soleks-21073.html
Jack of all trades: tuning the Solex 21083 carburetor
Mercedes will release a mini-Gelendevagen: new details Mercedes will release a mini-Gelendevagen: new details
The new model, designed to become an alternative to the elegant Mercedes-Benz GLA, will receive a brutal appearance in the style of the Gelendevagen - Mercedes-Benz G-Class. The German publication Auto Bild managed to find out new details about this model. So, if you believe insider information, the Mercedes-Benz GLB will have an angular design. On the other hand, complete...
Mercedes owners will forget what parking problems are Mercedes owners will forget what parking problems are
According to Zetsche, cited by Autocar, in the near future cars will become not just vehicles, but personal assistants that will greatly simplify people’s lives, ceasing to provoke stress. In particular, the CEO of Daimler said that soon special sensors will appear on Mercedes cars that “will monitor the body parameters of passengers and correct the situation...
The Ford Transit was missing an important plug on the door. The Ford Transit was missing an important plug on the door.
The recall concerns only 24 Ford Transit minibuses, which brand dealers sold from November 2014 to August 2016.
According to the Rosstandart website, on these machines the sliding door is equipped with a so-called “child lock”, but the hole in the corresponding mechanism was not covered with a plug. It turns out that this is a violation of the current...
Photo of the Day: Giant Duck vs. Drivers Photo of the Day: Giant Duck vs. Drivers
The path for motorists on one of the local highways was blocked by... a huge rubber duck! Photos of the duck immediately went viral on social networks, where they found many fans. According to The Daily Mail, the giant rubber duck belonged to a local car dealer. Apparently, an inflatable figure was blown onto the road...
Russian assembly of Mazda: now they will also make engines Russian assembly of Mazda: now they will also make engines
Let us remind you that the production of Mazda cars at the facilities of the Mazda Sollers joint venture in Vladivostok started in the fall of 2012. The first model that the plant produced was the Mazda CX-5 crossover, and then the Mazda 6 sedans entered the assembly line. At the end of 2015, 24,185 cars were produced. Now Mazda Sollers Manufacturing LLC...
How to properly respond to street flooding. Video and photo of the day How to properly respond to street flooding.
Video and photo of the day
The fact that this thesis is more than just beautiful words is clearly proven by videos and photos that appeared after the flood that occurred in Moscow on August 15.
Let us remind you that the capital received more than a month's worth of precipitation in less than a day, as a result of which the sewer system could not cope with the flow of water, and many roads were simply flooded. Meanwhile...
In the Moscow traffic police there was a crush of people who wanted to appeal the fine. In the Moscow traffic police there was a crush of people who wanted to appeal the fine
Source: http://AvtoMotoSpec.ru/remont-avtomobilya/nastrojka-karbyuratora-soleks-21083.html
Do-it-yourself Solex 21083 carburetor adjustment
There are a large number of varieties of Solex carburetors on the market. The carburetor is one of the most important parts in the fuel supply process, ensuring the quality of the car.
The Solex 21083 carburetor is a very popular model that can be found on a large number of domestic cars
The Solex 21083 carburetor is a basic version, equipped with diffusers of a minimum cross-section, thanks to which this series has gained immense popularity, as it allows for various types of modifications, such as grooving.
Where to begin
You should start setting up the Solex 21083 carburetor by adjusting the fuel level in the float chamber. This involves directly starting the engine and warming it up for five minutes. Then the motor is turned off and the following steps are performed:
- The fuel supply hose is carefully separated to prevent gasoline from entering the chamber during further operation.
- The five screws securing the cover are removed.
- The choke system cable is removed.
- The lid is lifted horizontally with extreme caution so that the floats are not damaged.
- In the chamber itself, the fuel level is measured using a ruler or caliper.
The distance from the top level of gasoline to the edge of the sealing surface of the lid should be from twenty-three to twenty-five millimeters.
It is necessary to select an average value, since the fuel level is not able to be in a constant state due to the manifold, which itself does not have the ability to be in a horizontal position all the time.
If there is a deviation from the norm in the parameters set earlier, then it is enough to bend the float holders to correct the situation.
Some gasoline is then removed and the reverse carburetor assembly process begins. The key word here is reverse, which means performing the same process, but starting from the end.
Discounts on new cars! Advantageous loan from 9.9%
Installment plan 0%
At the stage of the engine control check, it is necessary, of course, to start it, and then for about thirty seconds observe the flow of fuel into the chambers from the small diffusers, using a small flashlight for a better view. If gasoline arrives, then there is an overflow and another adjustment of the fuel level is required. To carry it out, you need to turn off the engine and re-carry out fuel measurements in the chambers.
If the parameters are within the permitted standards, then the adjustment of the Solex carburetor ends here. Then the transition to the next stage occurs.
Idle mode - second stage
Having completed adjusting the fuel level in the float chambers, the engine again warms up, coming into working condition. Further work proceeds as follows:
- The mixture quality screw is located in the recess of the lower part of the carburetor, and then screwed in counterclockwise all the way.
- When tightening this part, it is very important to control your own strength, since excessive persistence can lead to thread failure.
- Make five or six turns clockwise to remove the screw.
- The engine starts again and the choke is removed.
- The quantity screw allows you to set the minimum frequency for the motor to operate without interference.
- If the device is working properly, then the revolutions are made in an amount from five hundred per minute to one thousand two hundred.
- The quality screw is turned at a fairly slow pace until unstable motor operation begins.
- Then, in one or one and a half turns, it turns back again for stable frequency activity.
- The idle speed is regulated by a quantity screw ranging from eight hundred and fifty to nine hundred pieces per minute; if it is not possible to establish the process, then the quality screw comes to the rescue.
The result of adjusting the idle speed is a competent ratio, where the engine operates extremely steadily and with a minimum vacuum.
Problems that occur when adjusting the idle speed
Under the right circumstances, the engine should reduce the number of revolutions, and eventually stall completely. But if the quantity screw does not cause any kickback in the engine, then this directly indicates a problem. And it lies in the excessive flow of fuel into the idle channel, which does not allow the quality screw to block it.
Factors that caused the problem:
- The installed idle jet is larger than necessary.
- The plug is not screwed in well enough or the solenoid valve is not securely fastened, which causes gasoline to leak past the fuel metering hole.
- The jet itself or the place for it is deformed.
To find the problem, you need to disconnect the wire from the valve while the engine is running and look at the result. If the engine stalls, then the real problem lies in the incorrectly selected nozzle size. When the engine is running, the defect lies in the fuel bypassing the idle system.
To overcome these difficulties, we get rid of the valve with a plug and look at the condition of the jet, as well as the place where it should sit, to find various local distortions.
The carburetor cover must be replaced if it is possible to detect places of deformation in the area of the seat. If damage cannot be detected, the jet is placed on the valve and the O-ring is coated with oil.
After this, the nozzle is screwed in with a wrench without using force.
Correct jet for Solex 21083
The selection of the appropriate jet for adjusting the Solex 21083 carburetor is influenced by the volume of the engine itself. For the primary chamber, fuel samples should be purchased, only then the necessary air analogue is selected for the found model. And finally, it is recommended to start looking for a device for the secondary camera.
The jets that come with the original carburetor are considered exemplary models for further purchases. Experienced craftsmen advise taking them with you in search of new parts.
It is necessary to take into account the fact that to lean the mixture, a nozzle of a larger diameter is taken by one position, and to enrich it, by the same position less.
To control the composition of the fuel mixture in relation to engine speed, emulsion hoses are used. There are three types:
It should be noted that such a mechanism is not installed on engines with volumes of 1.5 liters or more. This causes malfunctions at excessive speeds.
Problems with the accelerator pump
The accelerator pump serves to consistently and timely supply a fuel stream through an uncovered carburetor valve. A weak flow or dripping is not considered normal. Spreading fuel along the walls of the diffuser is also taken as a deviation.
The acceleration pump nozzles are inserted into different chamber compartments. However, for speed, they can only be installed in the primary, which in exceptional cases will result in excessive overflow.
Problems in applying the transition regime
Under special conditions, an area of high vacuum forms under the closed carburetor flaps. When they open sharply, the vacuum can instantly decrease, which causes disturbances in the operation of the primary chamber, forming a failure, since at idle speed gasoline was sucked out of the channel through the nozzles.
To eliminate the consequences, the idle jet or pump nozzles are adjusted, changing in order of rotation, in order to eliminate the resulting difficulties with dips and delays when pressing the gas pedal quickly and abruptly.
It is always worth remembering that this kind of manipulation is carried out exclusively with a preheated engine.
What troubles can happen with the second camera?
The secondary chamber system cannot be regulated due to the original jets produced at the factory, as well as the econostat located in its planes, since it is this that supplies additional fuel to enrich the mixture when a vacuum forms in the carburetor caused by high speeds.
The acceleration pump nozzle is perhaps the only element that can undergo slight changes in cases where the flow of gasoline does not reach its intended place.
Further maintenance of the carburetor
To prevent the carburetor from seriously malfunctioning in the future, it is necessary to carefully monitor its operation and not run it to a critical state, which precludes independent repairs.
It would be appropriate to purchase the necessary parts of a similar carburetor model, disassembled into parts specifically for these purposes.
For better engine performance, it is recommended to get rid of the forced idle economizer. And timely prevention and precisely selected jets will ensure the most reliable operation of the unit.
The article fully reflects the main goal of adjusting the Solex carburetor starting device, based on many years of practice and consisting in a stable start of the engine at idle, which ensures standard operation of the starting system.
Source: http://CarExtra.ru/remont/regulirovka-karbyuratora-soleks-21083.html
Setting up and adjusting Solex carburetors
In general, you have already weighed the pros and cons, compared all sorts of parameters of the OZONE and Solex carburetors, read a lot of reviews about both of them, and decided to opt for the Solex carburetor.
Congratulations - in our opinion, you have made the right choice, although this opinion may sound somewhat biased. Solex has already been purchased and you are planning to install it on your car.
I hope you have thoroughly approached the choice of Solex modification for your engine, depending on its volume... Well, that’s a completely different story 😉
So you have purchased a carburetor, and you want to quickly install it on your car, configure it and enjoy a comfortable, fast and economical ride.
But despite the fact that the manufacturer swears to us that the carburetor is perfectly tuned at the factory, divide this statement by three and get ready for tuning. And we will start by setting the correct fuel level in the float chambers.
Speaking of birds - if you have lost the ignition key of your car - do not worry, you can make a duplicate at originalkey.ru
Don’t forget that some people make a full return to the tank, some people cut it into the line in front of the fuel pump, some turn it off completely (by the way, I absolutely don’t recommend doing this, overflow is guaranteed), everyone has different fuel pumps in different states, and in order to adjust level is correct, do the following:
You need to start the engine, warm it up for about 5 minutes, while revving it up, listen to see if it shoots into the silencer or back into the carb, and test.
Let us note that the Solex is such an unpretentious carburetor that even with crookedly selected jets and a completely misaligned one it will start your car. Warm up the engine, turn it off. Unscrew the fuel supply hose from the carburetor and move it to the side.
Remove it carefully so as not to pour gasoline from the hose into the chambers, you will collect all the readings and this is not good) Remove the upper part from the carburetor by unscrewing 5 screws and the choke cable with the gas drive. Carefully, without tilting, remove the top part of the carburetor horizontally.
And then, using a bar (very convenient) or a ruler (extreme cases), we measure the distance from the mating plane of the carb to the fuel level in the chambers.
This distance, indicated in red in the photo, should be equal to 24 mm. in both chambers. Well, plus or minus a millimeter (that’s why we recommend using a caliper for measurement accuracy). However, you will not place the car on a perfectly flat surface, and the collector itself is not perfectly level, so the readings will vary.
We measure the level in each chamber and calculate the average. Depending on the measurement results, we bend the tongue of the floats in one direction or another, partially remove gasoline from both chambers for repeated measurements, put it all back together, start it, and take a look.
We look carefully, shining a flashlight into the carburetor chambers, for a minute, at least during this time we should not see a single drop of fuel falling from the diffusers, otherwise an overflow is guaranteed. After this, after letting the engine run, we repeat the above-described measurement procedure.
If everything is normal and the level is within the acceptable range, then congratulations, part of the job is done, if something is wrong, the operation will have to be repeated. If everything is fine, the readings are normal, we proceed to adjusting the idle speed on our Solex . Let us remind you that this procedure is performed on a warm engine, at its operating temperature.
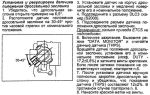
We are now interested in two screws - the quality screw and the quantity screw. The quality screw is indicated by a red arrow, the quantity screw is indicated by a blue arrow.
We approach the quality screw with a thin screwdriver and carefully tighten it until it stops, do not overtighten it! Then unscrew it 6 turns back, counterclockwise. That's all with him for now.
We remove the choke, start it, then adjust the quantity screw (blue) with our hands - we achieve stable engine operation with a minimum vacuum in the vacuum advance fitting.
Then we tighten the quality screw (red) very slowly until the engine starts to run unstably, then back one turn, maybe one and a half, to return the engine to stable operation. Then we set the idle speed screw to within 900 - this is optimal. If the engine begins to operate unstably again, slightly unscrew the quality screw. And so on until we find their optimal ratio.
Congratulations, this completes the BASIC adjustment and tuning of the SOLEKS Carburetor. Provided that all the jets from the factory are installed correctly and you have correctly decided on the choice of carburetor for your engine, you can drive safely.
However, if you want to fine-tune your carburetor even more finely or the car does not behave as you would like, we will publish in the following articles manuals on the selection of jets and many other nuances on setting up the Solex for a specific engine.
Below we describe the problems you may encounter when adjusting the idle speed and the possible causes.
The engine does not respond to tightening the quantity screw. (As the screw is tightened, the engine should lose speed, run unstably and eventually stall). This is an indicator that too much gasoline is entering the idle channel and the quality screw is not able to close it.
The reasons for this may be the following: – The XX jet is installed too large (we have a separate manual for jets) – The solenoid valve is not screwed in tightly, so fuel is sucked in bypassing the XX jet – The seat of the XX jet or the jet itself is deformed. What needs to be done: – With the engine running at idle, remove the wire from the EMC - the engine should stall immediately.
If it stalls, most likely a very large XX jet is installed and you need to install a smaller jet
If the engine does not stall (this is an obvious overflow), it means that gasoline is flowing past the XX jet or even past the idle system (the latter if the level is incorrectly set).
We unscrew the EMC and look at the XX jet as well as its seat for deformation. If deformation of the seat is detected, the upper part of the carburetor will have to be replaced.
If there is no deformation, put the jet on the valve, lubricate the O-ring with oil and tighten it with a wrench without much effort.
Source: http://www.vazdriver.ru/nastroyka_i_regulirovka_soleksa/nastroyka_i_regulirovka_karbyuratorov_soleks.html
How to set up a Solex 21083 carburetor
The Solex carburetor is one of the main components in the fuel supply system, on which the efficiency of the entire vehicle depends. These carburetors are very popular today.
The main reasons for their popularity are fuel efficiency and high efficiency of your power unit. However, to achieve such indicators it is necessary to configure it.
Setting the float chamber level
First of all, you need to pay attention to the fuel level in the float chamber.
Even on a new carburetor, this procedure must be carried out, since each car has a different fuel pump, the number of gaskets under them can also vary, which can lead to different pressure levels on the carburetor shut-off valve or needle, and this in turn leads to an overly rich mixture ( overflow).
The adjustment procedure is as follows:
- It is necessary to start the engine and carefully apply gas to check the efficiency of the carburetor;
- Remove the air filter from the carburetor and the fuel hose.
- Unscrew the 5 bolts and remove the carburetor cover. Be sure to vertically so as not to damage its floats. Place this cover on a flat surface.
- When removing the carburetor cap, the fuel level should be at the red lines. The fuel depth must be measured. This figure should be about 29 mm. The procedure should be carried out immediately after removing the carburetor cap, since gasoline tends to evaporate.
- The height of the floats needs to be adjusted. We measure the distance from the cardboard gasket of the carburetor cover to the top of each float.
- The recommended figure is 34 mm. If necessary, you need to bend the levers and float tongue.
- Let's start adjusting the full stroke of the floats.
The permissible lift of the lower angle of the float is 15 mm, and the full stroke of the float is 25 mm. Make sure that the edges of the floats are parallel to the sealing surface of the cover.
Idle speed setting
After setting the level in the float chamber, we assemble the carburetor and warm up the car engine to operating temperature. In this video, they will tell you and show you how to set the idle speed in a Solex carburetor, as well as the main reasons for its absence.
Next, we turn it off and carry out the following operations:
-
- Using a flat-head screwdriver, tighten the mixture quality screw until it stops (position 7).
- We turn it back from this position 4 - 5 turns.
-
- We start the engine, do not forget to completely remove the choke, and using the mixture quantity screw (position 6) set the minimum engine speed to about 800 per minute so that the engine runs stably.
-
- We tighten the mixture quality screw until the engine starts to run unstably. Then we turn it back 0.5 - 1 turn, which should bring the engine to a relatively stable position.
-
- Using the mixture screw, set the engine speed to about 800 - 900 per minute. If the engine starts to stall, unscrew the mixture quality screw a little more.
When setting the idle speed, some problems may arise:
The engine does not slow down when the mixture screw is tightened (a lot of fuel gets into the idle channel and this screw cannot shut it off).
Causes:
- large jets installed;
- the solenoid valve is not tightly screwed in, and fuel is sucked past the nozzle;
- deformation of the nozzle seat or itself.
So, for example, if the engine stalls when removing the wire from the solenoid valve, this means that the jet is installed too large.
Selection of jets
Some parameters of serial carburetors are far from the standard ones, since the dimensions of some parts have manufacturing deviations. An interesting and very useful video from which you will learn how to modify the Solex 21083 carburetor.
Thus, the spread in the parameters of some serial carburetor parts can reach up to 5%. Therefore, when adjusting the carburetor, make sure that the jets are in good working order. The selection of jets is carried out taking into account the working volume of the car.
If the engine has a large displacement, then it is necessary to install small jets, since an increase in volume requires more air passing through the diffuser, which affects gasoline consumption. Their adjustment should begin with the fuel jet, and then, if necessary, move on to the air jet.
You need to have several jets available with higher and lower productivity than the installed one.
Our actions:
-
- Using a wire, secure the throttle valve of the second chamber to eliminate its influence.
- Next, we select the jets, for example, the jet marked “107.5”, which is our basic one, change to “105”, and then “97.5”. We reduce the throughput of the jets until dips appear when the throttle is open or twitching when driving. When these signs appear, you should unscrew this jet and replace it with the previous one, which had a slightly higher performance.
- If dips occur when starting the car, you should enrich the mixture slightly by adjusting the idle system.
If you are trying to increase the efficiency of your car, then it is not recommended to reduce the flow area of the main fuel nozzle of the second chamber, since the acceleration process will be much longer, and all savings will be reduced to zero.
Adjusting the accelerator pump
Accelerator pump metering systems
The main task of the accelerator pump is to supply a smooth and powerful stream of gasoline through the open throttle valve of the carburetor (dripping and sluggish streams are not allowed). The stream of gasoline should enter directly into the manifold, without touching the walls of the diffuser and throttle valve.
Flowing of gasoline down the diffuser stack or throttle valve is not allowed, since the car will become very blunt and jerky when you press the gas sharply.
An accelerator pump with two spouts must be installed in different chambers. You can insert two spouts into the primary chamber - this can increase the agility of the car, but also lead to excessive “overflow”.
Setting the transient mode of carburetor operation
At idle speed, the carburetor throttle valves close and a high vacuum area is created under them, which allows gasoline to be “sucked” out of the idle channel through the nozzle. If the damper is opened sharply, the vacuum decreases sharply, which disrupts the normal operation of the main dosing system of the first chamber and a failure appears.
To eliminate these symptoms, adjust the idle jet or accelerator pump nozzles. The adjustment must be made on a warm car engine.
The idle jets or accelerator pump are changed one by one to prevent dips and delays when you press the gas sharply.
You may need to adjust the idle speed a little. Over-enrichment is not transiently displayed as black smoke coming from the exhaust pipe.
It is recommended to install an accelerator pump with 40x40 nozzles, and an idle nozzle with parameters from 35 to 40. If there are dips from a lean mixture and it is not possible to adjust the idle speed due to the idle nozzle being too large, then both accelerator pump nozzles can be placed in the first camera as shown in the picture.
Setting up a second camera
As a rule, the second chamber of the carburetor is not adjustable, since all the shortcomings of the factory jets are compensated for by the econostat. The fact is that at high speeds, when a vacuum occurs in the carburetor, additional gasoline is supplied through the econostat, which makes it possible to enrich the mixture.
Only the accelerator pump nozzle can be adjusted if its jet does not fall between the diffuser wall and the throttle valve.
All of the above techniques for tuning the carburetor are basic in its regulation, however, some craftsmen can additionally drill channels and throttle valves, and solder epulsion tubes.
Based on many years of experience of our drivers, Solex carburetors are a reliable design that perfectly performs the tasks assigned to it, even without any modifications.
We also recommend watching
Source: http://natapku.ru/ustrojstvo/nastroyka-karbyuratora-soleks.html
Repair and adjustment of the Solex carburetor
Before VAZ 2108-21099 and 2110 cars began to be produced with an injection engine, they were equipped with a carburetor power system. The carburetor for the Lada 2108-99 and 2110 family uses a Solex unit, manufactured in the city of Dimitrovgrad (DAAZ). In order to properly repair and configure, I will tell you how it works.
The work of the carburetor is to prepare fuel and air, subsequently combining into a mixture that should ensure stable engine operation.
The unit consists of two main parts:
- housing in which diffusers, UN, economizer, GDS are located;
- the top cover, where there is an air damper for suction, two chamber floats, a starting device and an idle air valve (IAC).
The carburetor is equipped with two chambers, between them there are fuel jets, and above them there are air jets. The carburetor has a heating system from the coolant. The two throttle valves, located at the very bottom, open sequentially parallel to the increase in engine speed. "Solex" is equipped with a fuel return system to the tank, significantly reducing the pressure of the fuel system.
Jets and selection
When buying carburetor repair kits, you can see jets with a flow rate set by the manufacturer for a specific engine size. Often, car owners install jets with higher flow rates, wanting to get more power, but only get increased fuel consumption.
The lack of positive changes in dynamics should be sought for the following reasons:
- insufficient compression;
- the ignition angle is incorrectly set;
- weak spark;
- current leakage from high-voltage wires.
Install only those jets that are recommended for your engine size.
The selection of jets using the random method is often used, so use the calibration data table.
About adjustment
Solex adjustment consists of three types:
- setting the fuel level;
- idle speed adjustment acceptable for stable engine operation;
- mixture composition (quantity and quality of fuel), regulated by the idle screw.
Regulation is carried out in a simple way.
The first thing you need to do is warm up the engine to operating temperature, and use the fuel quantity screw to set the crankshaft speed within 700-800 rpm. The tachometer needs to be connected to an electronic one.
Further:
- you should tighten the quality screw so that the engine strives to stall;
- We turn the screw in the opposite direction so that the engine runs stably at minimum speed (watch the tachometer readings).
Often, car owners are faced with a problem when adjusting the idle speed with a screw does not give any results, and the reason for this may be:
- the solenoid valve jet is clogged;
- the idle channel located behind the quality screw is clogged;
- Solenoid valve malfunction.
To check the operation of the EC, you should:
- turn off the engine and remove the wire from the valve;
- unscrew the valve;
- remove the jet from the EC;
- turn on the ignition;
- connect the wire to the valve - at this moment a click is heard and the EK rod is recessed. This indicates that the valve is working properly.
Fuel level in the chamber
Setting the fuel level is one of the primary operations for adjusting the carburetor. An incorrect level can lead to overflow or lack of fuel in the cylinders.
The exhibition is carried out as follows:
- remove the upper part of the carburetor, which is secured with five screws;
- The carburetor cover should be upside down and horizontal.
There should be a gap of 1-1.5 mm between the two floats and the surface of the carburetor cover;
- if the gap is outside the tolerance, then the adjustment is carried out by bending or bending the plate on which the floats are held.
The fuel level in the chamber should be 25 mm ±1 mm. Check the level using a caliper.
General Solex setup
If the above settings are followed, the Solex carburetor should work properly, but there are still points that need to be paid attention to. The idle speed solenoid valve may have a jet with a capacity of 39-42mm.
The accelerator pump nozzle is available with a capacity from 35x35 to 40x45. By selecting the XX jet and the UN “spout”, you can achieve confident engine operation when you sharply press the accelerator pedal without failures.
The selection of these elements is extremely individual, and is selected strictly for each car and needs.
Regarding the accelerator pump nozzles: the factory “spouts” are directed into the primary and secondary chambers. A common mistake is to direct two “spouts” into one channel. It is recommended to bend the nozzles so that the stream of gasoline does not hit to the side, but strictly in the center.
Another common mistake is an incorrectly installed choke cable. Incorrect installation results in incomplete opening of the air damper, which is felt when starting a cold engine.
About the main faults and repairs of Solex
- Fuel and air jets are clogged. The issue can be solved by cleaning carburetor fluid.
- Deformation of the housing plane due to engine overheating. The issue can only be resolved by replacing the lower part.
- The UN diaphragm does not work.
The diaphragm may rupture due to clogging, so the issue can only be resolved by replacing it.
- The fit of the diffusers is loose. To do this, you will need to place a metal spacer under the seats.
- Failure of the solenoid valve. Most often the valve does not work due to a clogged nozzle.
In order to properly repair the carburetor, it must be completely disassembled, the internal surfaces and channels washed until clean. The plane of the lower part should be sanded to avoid air leaks. This also applies to the intake manifold seat.
It is not recommended to use sealant, as excess of it can block the fuel or air passage. For repairs, a repair kit is purchased, consisting of gaskets, jets and a membrane.
Following the calibration data, you can independently select the size of the jets to suit your needs (savings or power).
Do not forget that in addition to adjusting the carburetor, in parallel adjust the ignition.
If you are going to purchase a new carburetor, then from personal experience, buy a product exclusively made by DAAZ, since the Chinese analogues are completely impossible to adjust and tune, and also often fail.
Advertising space
Source: https://autoburum.com/blog/918-remont-i-nastrojka-karburatora-soleks