Changing the oil in an automatic transmission Toyota Corolla — DRIVE2
Timely oil change in an automatic transmission (automatic transmission) is a procedure that must be carried out on a regular basis. Some motorists completely mistakenly believe that the oil has a very long service life and are in no hurry to change it. Other car owners simply forget to carry out this procedure.
automatic transmission failure than their more competent and less forgetful colleagues at the wheel.
This fact becomes especially offensive for the motorist when it turns out that costly repairs to the gearbox or its complete replacement could have been avoided by immediately changing the used oil.
So, within the framework of this article, detailed instructions will be given with the help of which you can independently change the oil in a automatic transmission in a garage.
The service life of the oil used when operating an automatic gearbox depends on two indicators: the oil temperature during various vehicle driving modes and the ambient temperature.
If the car is used in ideal conditions in terms of temperature, then the oil is changed only once after driving as much as 160 thousand kilometers .
In reality, the automatic transmission oil of a Toyota Corolla is changed every 40-60 thousand kilometers .
Experts recommend changing the oil by removing the pan. Otherwise, about half a liter of the dirtiest oil will settle on the pan and on the two magnets. This shouldn't happen. In addition, removing the pan will provide an excellent opportunity to replace the filter.
Changing the oil in the gearbox of a Toyota Corolla is carried out using: - a funnel with a thin neck; - a set of tools; - special automatic transmission fluid (type T-IV) - 4 liters; - gasoline - 1 liter;
- garage compressor.
To change the oil, you need to perform the following sequence of actions:
1. Warm up the car, and then unscrew the gearbox plug.
It should be noted that many motorists confuse an automatic transmission plug with a 4WD transfer case. 2. Carefully unscrew the bolts that secure the tray.
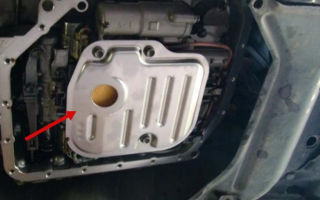
The two bolts that are located opposite must be left “baited”.
3. Using a wooden spatula, which will not damage the gasket or wrinkle the pallet, remove the pallet. It will hang on two bolts that were not completely unscrewed. Under no circumstances should the gasket remain in your hands.
Ideally, it will remain on the gearbox housing or on the pallet.
4. The pallet must be slightly lifted up, and then the two remaining bolts must be unscrewed. The tray has been completely removed. It should be noted that the pan is hot, since the car was previously warmed up. Therefore, it is advisable to hold it with gloves or a cloth.
You need to act extremely carefully, because... there is about half a liter of hot oil in the pan. It is quite possible to get burns.
Next, unscrew the differential magnetic plug, which is located vertically on the right, i.e. it is located in the housing from which the car drives come out. About 100 milliliters of oil will drain from this place. The magnetic plug must be thoroughly washed using gasoline or kerosene.
The next step is replacing the filter. It is worth noting that there is oil in the filter housing that has not drained completely.
Magnets and all parts should be thoroughly washed in gasoline (kerosene), and then wiped with a dry cloth to remove any remaining fuel.
It is necessary to carefully install the magnets back to where they were removed.
Then you need to moisten a cloth with gasoline and wipe the gasket and seat with it.
Afterwards the pallet is installed in its place. First, one bolt is tightened, then the bolt located diagonally, and then all the others. Bolts should be tightened carefully and accurately. It's important not to overdo it. The fact is that the metal from which the pallet is made is very thin and can be deformed with extreme ease.
You need to screw the plugs back in.
Oil should be poured through the dipstick hole. You should fill in exactly the same amount of oil as was drained earlier, i.e. approximately three and a half liters. It is advisable to fill even less - adding the missing oil is much easier than subsequently pumping out the excess. If too much oil has been poured in, then it must be pumped out using a regular large syringe and dropper.
The car engine should be warmed up to operating temperature.
The automatic transmission selector alternates between RND-2-L modes and back. At each position you should make a short delay, no more than ten seconds. This procedure must be performed three times.
Next, the fluid level is checked. The car engine in which the oil level is checked must not only be running, but also warmed up to operating temperature. The machine itself should be located on as level a surface as possible. If there is a lack of oil, it needs to be added.
And at the very end, you should carefully check the automatic transmission pan gasket for leaks, which may well occur if the bolts are over-tightened.
So, within the framework of this article, it was described in as much detail and exhaustively as possible about how to change the oil in a Toyota Corolla automatic transmission in a garage. It seems that even a novice driver can successfully cope with this task, not to mention motorists with solid experience in repairing their “iron friend”.
Source: https://www.drive2.ru/b/1856700/
Changing the oil in automatic transmission Toyota Corolla 120, 150
Changing the oil in a Toyota Corolla automatic transmission is not a complicated procedure, but it is very important for the full operation of the car. Such work must be performed regularly, preferably by specialists, in order for the car to work properly. Our service centers are located in Moscow; we serve residents of the capital and region.
If you need to change the oil in a Toyota Corolla automatic transmission, you need to understand that it should be done when the pan is removed, since it is impossible to completely change the oil with the pan.
In some cases, it is possible to remove the old used oil without removing the pan, but in this case, a certain amount of old substance will remain in the transmission.
This will negatively affect the composition of the new liquid.
It is also very important to replace the filter during the process of replacing used oil.
As a rule, after a run of 40 or 50 thousand kilometers, the filter element is no longer suitable for further use, and therefore is not able to optimally perform its functions.
It is necessary to periodically (about every three thousand km) check the oil level using a dipstick. If the level drops, it is necessary to add fluid.
If you change the oil in an automatic transmission regularly and on time, this will prevent premature wear of the clutches. In addition, the unit will be cooled better. The procedure itself is not complicated.
It does not require a large investment, but will allow you to avoid serious problems in the future. Our experts recommend changing the oil when the first problems appear, otherwise serious damage may occur.
- Warm up the car engine to operating temperature,
- We put the car in a pit; a lift or another suitable place will be needed, it must stand level,
- It is necessary to substitute a tray for draining the waste;
- The drain plug in the pan of the box is unscrewed;
- Carefully drain the old ATF; since he might be hot
- Unscrew the bolts securing the pallet to the box, remove it. The remaining oil is drained;
- Carry out cleaning and rinsing;
- Be sure to clean the magnets from metal particles;
- Install a new gasket on the filter;
- Aligning the hole, place a new filter on the box;
- After which we put the pan (necessarily with a new gasket, I think that a comment here will be superfluous, since they become unusable due to temperature) in place.
- Then we tighten the gearbox drain plug;
- We insert the funnel prepared for changing the oil into the hole for the dipstick and begin to fill in the liquid. The main task is not to overfill it, periodically checking the level,
- The system level is finally checked when the box is warmed up. To do this, with the engine running, you need to slowly shift the automatic transmission lever back and forth several times. Of course, you need to keep your foot on the brake during this procedure. At the end, we check the level, if it is less than necessary, you just need to add oil, if more than the norm will have to be removed.
It should be noted that when changing the oil in an automatic transmission, you will need the oil itself (for the automatic transmission of your model) and a list of consumables, namely: a filter, pan and filter gaskets, as well as a drain plug gasket. It is advisable to have a set of good tools
Questions that you may have if you decide to change the fluid yourself:
What kind of oil and how much should I fill? The answer is 4 – 5.5 liters recommended by the manufacturer.
The transmission oil needs to be changed regularly, especially if the car is operated in city conditions. Thus, it will not only serve better, but also much longer. This should also be done for prevention purposes.
Our advantages
The oil change procedure is not complicated, but requires certain experience and knowledge from the performers. Our service center employs qualified specialists who have performed this work many times.
For replacement, we use high-quality oil from certified manufacturers. All installed consumables are only from this model and year of manufacture, verified by VIN code, only from trusted manufacturers with a well-known name.
We carry out the work promptly and at an affordable cost. There is a complete hardware oil change service for automatic transmissions.
Source: http://sto-avtoservis.ru/zamena-masla-v-akpp-toyota-corolla
Changing automatic transmission oil in Toyota Corolla
The service life of a transmission depends on many factors. Timely oil change in a Toyota Corolla automatic transmission is a mandatory procedure. Its frequency is set out in the vehicle maintenance instructions. Once the mileage reaches 48 thousand km, it is necessary to change the oil in the Toyota Corolla automatic transmission, making sure to install a new filter element.
If you do not follow the recommendations prescribed by the manufacturer, the resource of this unit is significantly reduced. And this can lead to expensive repairs. It is possible to reduce the oil change period for a Toyota Corolla automatic transmission if the car has been operated in harsh conditions.
In addition to observing the frequency of replacement, the choice of oil and a new filter must also be taken with full responsibility. Japanese cars are very susceptible to changing the manufacturer of transmission and other technical fluids. Therefore, it is necessary to use the brand prescribed by the manufacturer.
In order to determine the brand of oil, it is necessary to remove the automatic transmission dipstick. It indicates the name of the technical fluid that is used in this vehicle.
What do you need to have on hand and how to change the oil in a Toyota Corolla automatic transmission yourself under normal conditions? To completely replace the fluid you will need:
- new filter element for automatic transmission;
- sealing ring for the drain nut;
- gear oil in a volume of 10 liters;
- sealing gasket under the automatic transmission pan cover.
From the tools, prepare a torque wrench, a set of sockets and a container with a volume of at least 7 liters. Follow the precautions specified by the manufacturer. Wear rubber gloves and safety glasses. Prolonged contact of transmission oil with skin can lead to cancer.
Operating procedure
Changing the oil in an automatic transmission of a Toyota Corolla 120 or 150 series practically does not differ in the procedure for carrying out the work. Place the car on a viewing hole or lift, and lock the parking brake. Next, it is necessary to carry out such operations.
- Place a container for used oil.
- Unscrew the drain plug located in the pan.
After waiting for the technical fluid to drain, do not remove the container, since a certain part of the oil will be in the pan.
- Unscrew the bolts holding the automatic transmission pan.
They are located along its perimeter. After unscrewing the pan, lower it without changing its position, since there is oil inside. Drain. - Remove the three bolts holding the oil filter.
- Clean the inside of the pan and the magnets from any remaining oil and small particles.
- Install a new filter.
- Tighten the oil filter bolts to 11 Nm.
- Install the pan gasket without distortion on a clean, grease-free surface.
- Tighten the bolts holding the pan to 5 Nm.
Less force can lead to oil leaks, and more force can lead to overtightening of the rubber gasket, which will also lead to leakage. - Install a new O-ring under the drain plug and tighten it to a torque of 17 Nm.
- Using a funnel and hose, pour in about 4.5 liters of technical fluid.
- Disconnect the hose connecting the crankcase and the oil cooler.
- Place a transparent hose on the end of the metal tube coming from the automatic transmission.
- Start the car and drain until fresh raspberry-colored oil comes out.
- Fill in exactly as much as was drained the second time.
The oil change presented above in a Toyota Corolla 150 automatic transmission assumes a small residual technical fluid inside the box. Therefore, it most likely cannot be classified as a complete replacement procedure. To extract 100% oil from an automatic transmission, it is necessary to use factory vacuum devices, but this is not practical.
If the material was interesting or useful for you, publish it on your social network page:
Source: http://jrepair.ru/to-toyota/zamena-masla-v-akpp-na-toyota-corolla
Changing engine oil and automatic transmission fluid on a Toyota Corolla Fielder
Good day to all!
So, I’m posting for your consideration my next photo report on the scheduled maintenance of my Toyota Corolla Fielder . You can see the list of everything purchased for maintenance in THIS ENTRY of my Logbook.
It was one of the warm spring Saturdays. The weather turned out to be simply wonderful for this task: sunny and warm.
It turned out to be a great joy that the hole in my uncle’s garage turned out to be dry (it was expected that it would be filled with water from melted snow, as usual in the spring) and we went there instead of looking for some other shelter for our manipulations with the car or It’s even worse to do it right on the site, jacking up the car.
But it’s good that we didn’t have to suffer so much)))
So, let’s start the report... The primary task for me was replacing the liquid in the box, because... The color of the liquid, even on the dipstick, was very far from pink and was no longer even brown, but closer to black, which indicates that it is unlikely that this liquid was replaced by anyone before me.
Like we went and didn’t worry. The last owner did not hide the fact that he did nothing at all to the car except changing the oil in the engine. This is the task my dad and I started with.
Here is an incomplete arsenal of our supplies for work)))
So, let's start the photo report...
The work begins. We climb into the hole and conduct an initial inspection of the car: what is snotty, what is hanging out, where there are traces of falling into holes on our roads, etc. and so on.
Next, take the hexagon and unscrew the drain plug on the automatic transmission pan, having previously substituted a container of at least 4 liters for the old fluid.
Here is the pallet.
And at the bottom you can see a dirty drain plug)))
Watching the drain, we are very surprised by the color of the liquid, which is significantly different from pink.
We drain the old, not even brown, but closer to black liquid from the box
Next, take a 10mm wrench/socket and unscrew all the bolts from the pallet, leaving only a couple so that the pallet doesn’t fall on our heads. Then, holding the pallet, unscrew the remaining bolts and carefully remove the pallet
Then we take the pan outside for cleaning, after draining the remaining liquid from it.
We wash the pan with gasoline/solvent and wipe it dry.
Next, we climb into the hole again and, after unscrewing three bolts, remove the old automatic transmission filter.
The sponge inside the filter is in terrible condition. I did not regret at all that I bought a new original filter to replace it.
Gently wipe everything dry with a clean cloth.
We put a new gasket on the filter and fix it in place
It was decided to leave the old pan gasket (I will say in advance that I later changed it anyway).
Next, we secure the pallet: first we fasten it on two bolts without force so that it does not fall, then we tighten all the remaining bolts, and then we begin to tighten them diagonally, pressing the pallet. The main thing is not to overdo it, because...
it doesn't require much effort.
The gasket is cork, not rubber, and it is not recommended to squeeze it. Upon completion of this step, we get out of the hole and fill in ~ 4 liters of new pink TOYOTA ATF Type-IV (Art.
0888681015 )
It was decided to do a partial fluid change twice, instead of completely bleeding the system and replacing it completely (as we did on the Toyota Sprinter Marino).
That is, first drain the old one, replace the filter, add new fluid, then drive a little and repeat the procedure, but without replacing the filter. That's all with the box.
Next, change the engine oil . I won’t describe anything in particular here, because... everything is elementary. First we try to pull off the oil filter. Having pulled it out of place, unscrew the drain plug and drain the old oil by unscrewing the filler cap. When the oil has completely drained, unscrew the old oil filter and throw it away.
We put a new one in its place, pour a little oil into it and moisten the filter gasket with oil.
We tighten the drain plug and fill in ~ 4 liters of new semi-synthetic oil 5W-30 TOTACHI (Art. 4562374690356 ).
That's all for now with replacing fluids.
Looking ahead, and having missed the report on replacing other consumables, which will be discussed in a separate post, I will say that the next day I took a special ride, covering about 30-40 km, to pass the fluid through the entire box.
Then, driving into the garage and looking at the automatic transmission pan, a snot was found on the pan.
After which it was decided to re-replace the fluid, and at the same time the pan gasket.
The re-drained liquid was much cleaner and more like pink, only darker pink in color. But I think that after the repeated partial replacement, the box began to work much better.
This was felt while driving: the response to the gas pedal became faster, gear shifting was practically not felt (only a noticeable drop in speed on the tachometer).
In general, the procedure is clearly necessary and useful. Finally, here are the results of replacing the fluids.
About 3 liters drained from the engine, about 4 from the box
We make a note in a notebook or somewhere else about the mileage at which the replacement took place.
This concludes this entry.
Stay tuned for more. Good luck to everyone on the roads!!!
All information is taken from my logbook dedicated to this car.
For more detailed information on this topic and others, visit my car's page on DRIVE2.
Source: http://obo-vsem-2013.blogspot.com/2013/09/zamena-masla-toyota-corolla.html
Changing automatic transmission oil Toyota Corolla
Changing automatic transmission oil Toyota Corolla
When automatic gearboxes began to appear in Toyota Corolla cars, it created a huge sensation for most motorists.
Especially for women who are inexperienced in the automotive business, this was a significant relief.
After all, earlier, using a manual transmission, many women did not always have time to change gears, the transmission often jammed, and so on, but an automatic transmission is a relief from monitoring engine speed, from constantly changing gears and similar problems.
Of course, using mechanics, you interact more closely with your car; after years of practice, it will not be difficult for you to change gears if necessary, since this will happen automatically.
But why do you need years of practice when you can choose calmness and easy driving? However, it is worth saying that a car with an automatic transmission costs a little more than its predecessor, but it’s worth it.
Automatic transmission oil change intervals
Despite the fact that the Corolla is considered a practically indestructible car, some problems may occur periodically in the form of failure of parts. The automatic transmission on a Toyota Corolla sometimes takes on too many functions and can fail, so this mechanism requires an oil change.
This procedure is usually carried out every 150 thousand km, but for more comfortable driving of the car it is better to carry it out every 50 thousand km. Changing the oil yourself is not difficult even for a person ignorant of the automotive industry.
It is enough to find out how much oil needs to be poured into the automatic transmission and what technology is used to do this.
Required Tools
To change the oil you need to use the following tools:
- Pan gasket
- Filter element
- Filter O-ring
- Torque wrench
- Transmission fluid suitable for your car.
Changing automatic transmission oil
The work is performed in the following sequence:
- Before starting work, be sure to warm up your car and place it on a pit, lift or overpass.
- Next, you need to unscrew the drain plug, which is located in the automatic transmission pan.
- Carefully unscrew the bolts securing this pallet, and then remove it. Remember that it contains very hot liquid, about half a liter, so beware of burns.
- Now you need to unscrew the differential magnetic plug, then drain all the fluid.
- Finally, we replace the filter, before which we must install a new O-ring for it.
- It is necessary to thoroughly scrub and wash all the parts you removed.
- Next, reassemble everything in reverse order, replacing the old pan gasket with a completely new one.
- Now, pour oil through the hole in the dipstick. The main thing is to stick to the same or as close as possible amount of transmission fluid, equal to the one that was drained.
- Warm up your car's engine to its operating temperature, then move the gearbox selector to the maximum number of positions with a delay of about 10 seconds, about two or three times.
- Finally, check the oil level; if it is not enough, you need to top it up.
But in any case, you should be aware that changing the oil in an automatic transmission yourself is a partial operation; it is still better to carry it out in a specially designated place - in the studio.
Also, it should be noted that many automatic transmissions on Toyota Corolla are critical to exceeding the oil level. This can lead to slipping, foaming and even failure of the components of the box itself.
That is why, if the liquid level is exaggerated, then you need to take out a little of the excess using a syringe or tube.
Read also
Source: http://grandrepairauto.ru/zamena-masla-akpp-toyota-corolla.html
Changing the oil in the automatic transmission of Toyota Corolla
Automatic transmission repair with a 15% discount, ask the manager for details. Promotion time is limited!
Our technicians use only certified equipment!
Over our long history since 2003, we have repaired more than 10,000 automatic variable transmissions
You will receive a warranty on the automatic transmission of your car - 30,000 km or 14 months.
This is the key to reliable operation of your car, saving nerves, money and time!
We provide free car evacuation for repairs in our car services!
Some of the best masters in Moscow will work on your car, who have already repaired more than 100 gearboxes during their careers.
The appearance of automatic transmissions marked a special revolutionary breakthrough in the automotive industry. Driving a car with an automatic transmission is much more convenient; in addition, the automatic transmission allows you to pay more attention to the driving process and the situation on the road itself.
No big deal, you say. But this is far from true, because with the advent of automatic transmission, motorists no longer need to constantly look at the tachometer needle and change speed in time. This is important in heavy traffic conditions in city traffic.
What can we say about the fact that driving in traffic jams has become easier. However, do not forget that an automatic transmission is much more complex than a standard manual transmission and must be serviced much more often than a manual transmission.
| Works | Price, rub. | A comment |
| Oil change (your oil) | from 2 000 | excluding the cost of consumables |
| Oil change (our oil) | from 1 500 | from 600 rub. per liter of oil (various) |
| Car evacuation | for free | free for repairs |
| Automatic transmission diagnostics | 1 000 | free for repairs |
If you have questions or need advice, call!
Changing the oil in a Toyota Corolla automatic transmission
An oil change in a Toyota Corolla automatic transmission should be done every 500,000 km so that it doesn’t take you by surprise somewhere in the middle of the highway. However, if you still prefer an automatic transmission to a manual transmission, you will have to pay more not only for the car itself, but also for its maintenance.
Procedures such as changing the oil in a Toyota Corolla automatic transmission are becoming a routine task for any owner of this car. The thing is that an automatic transmission is a complex mechanism that works like a clock. And if something goes wrong in it, the entire device may become unusable.
Therefore, it is very important to undergo timely maintenance of your car, which can identify all the faults of its components and elements. Replacing consumables in an automatic transmission must be carried out in full accordance with the regulations and it is not recommended to do it yourself.
Procedure for repairing your car at “AKPP Service”
Step 1. Call us and we will find a convenient time to repair your car. If your car is not drivable, we can deliver it to our car service using a tow truck, and we also have secure parking on our territory.
Step 2. Before we begin work on diagnosing and repairing the automatic transmission, we wash the car at a car wash and cover the seats with covers so as not to contaminate the interior during repairs.
Step 3. Our specialists carry out diagnostic work, during which the causes of the malfunction are identified and the cost of the work is determined.
Step 4. A repair plan and a list of spare parts required for repair are drawn up.
Step 5. A preliminary calculation of the cost of repairs is made. After agreeing on the estimate with the client, repair work begins.
Step 6. Repairs are carried out in full accordance with the manufacturer's requirements.
Step 7. After the repair, the machine is run-in to check the quality of the work performed.
Step 8. The technician delivers the repaired car to the client, and the functionality is checked after repair.
Step 9. Signing documents, including a certificate of completion of work and a warranty card.
Step 10. The work is done, and you leave our service center with a repaired car.
Changing the oil in an automatic transmission of Toyota Corolla
A complete oil change in a Toyota Corolla automatic transmission is a job that is best left to professionals. Despite the fact that technically this work is quite simple, there are several specific points that you should pay more attention to so as not to make your car worse.
It must be remembered that poor-quality maintenance of an automatic transmission can lead to serious costs for its repair, which is several times higher than the cost of changing the oil in a Toyota Corolla automatic transmission in a specialized service center. Before visiting a car service center, you need to decide on its choice.
After all, the price of changing the oil in a Toyota Corolla automatic transmission can vary significantly from one workshop to another. We have reasonable prices that fully correspond to the quality of service. Changing the oil in a Toyota Corolla automatic transmission in our service will save you from unnecessary headaches and allow you to drive your favorite car with comfort and increased safety.
Source: https://akpp-servis.com/zamena-masla-v-akpp-tojota/474-zamena-masla-v-akpp-tojota-corolla.html
1.4 Frequency of replacement of operating fluids and lubricants
Engine oil must be changed every 10,000 km.
For a new car, it is necessary to change the oil after the break-in period (after 2500 km).
When changing the oil, you must install a new oil filter (ZMZ-4062 engine) or its filter element (all engines). For the procedure for changing the oil , see subsections 2.3.2 , 2.3.2.
2 And 2.3.3.3.
the engine crankcase with the same brand of oil that was in the engine. If you fill in oil of a different brand, you must first flush the engine lubrication system with oil of the same brand that will be poured into the engine.
To do this, drain the old oil and fill in new oil 2–4 mm above the “0” mark on the oil level indicator (dipstick). Start the engine and let it idle for about 10 minutes.
Then drain the oil, replace the oil filter or its filter element and add fresh oil.
The coolant must be changed once every 2 years or after 60,000 km (whichever comes first). For the procedure for replacing coolant, see subsection 2.4.4 .
It should be borne in mind that the coolant is poisonous, so you should not suck it into your mouth when pouring it. When working with coolant, it is recommended to use safety glasses and not to smoke or eat.
If the liquid gets on exposed skin, wash it with soap and water.
The gearbox oil must be changed after 60,000 km. the oil change procedure , see subsections 3.3.2 and 3.4.2 .
Every 20,000 km, you need to check the oil level in the gearbox and top up if necessary. The oil level in the crankcase should reach the edge of the filler hole.
If the drained oil contains metal particles or is very dirty, the box should be washed. To do this, pour 0.9 liters of fresh oil into its crankcase. Raise the rear of the car with a jack. Start the engine and, engaging first gear, let it run for 2-3 minutes.
Then drain the oil and refill with fresh oil. When checking the oil level, you need to clean the surface of the breather from dirt and turn its cap several times to remove any dirt trapped under it.
The oil in the rear axle housing must be changed after 60,000 km. The oil is changed in the same way as in a gearbox. After 20,000 km, you need to check the oil level in the crankcase and top up if necessary. The oil level should reach the edge of the filler hole. When checking the oil level, you need to clean the breather from dirt in the same way as you did for the gearbox.
Do not reuse drained brake fluid.
The brake fluid in the clutch and brake drives must be changed once every 2 years, regardless of the vehicle’s mileage.
Clutch and brake drives use domestically produced brake fluids “Rosa”, “Rosa-3”, “Tom”, “Neva” or their foreign analogues on a non-petroleum basis, the quality level of which is not lower than DOT-3.
The use of other brands of fluids, especially petroleum-based fluids, is prohibited .
Brake fluid is hygroscopic, so it should not be stored in open containers.
The procedure for replacing brake fluid is as follows:
1. Remove the brake master cylinder reservoir cap.
2. Remove the rubber protective caps from the air release valves on the wheel cylinders and place rubber hoses on the valves, the ends of which are lowered into glass containers.
3. Unscrew the valves no more than one turn and, pressing the brake pedal all the way, drain the fluid. As soon as liquid stops flowing out of the hoses, tighten the air release valves.
4. Pour the drained brake fluid out of the vessels and put them in place.
5. Pour fresh fluid into the master cylinder reservoir, unscrew all air release valves one turn and, pressing the brake pedal all the way, fill the brake system. In this case, you need to constantly add fluid to the master cylinder reservoir. After clean brake fluid begins to flow out of the hoses placed on the air release valves, tighten the valves.
6. Bleed the brake system to remove air from it ( see subsection 6.9 ).
7. Close the brake master cylinder reservoir with a plug. Remove the hoses from the air release valves and put protective caps on them.
The fluid in the clutch hydraulic drive is replaced in the same way.
Source: http://automn.ru/toyota-corolla/toyota-35750-10.m_id-4475.m_id2-4632.html