Replacing front brake pads with your own hands (when and how to change them)
Good day, dear car enthusiasts! Nothing lasts forever, and it’s hard to disagree with this statement. Especially when the question concerns car parts that operate in constant extreme conditions.
These are exactly the parts that include brakes.
Good day, dear car enthusiasts! Nothing is eternal, and it is difficult to disagree with this statement. Especially when the question concerns car parts that operate in constant extreme conditions.
These are the parts that include car brake pads, which together with brake discs perform the task of ensuring our safety. And the front brake pads experience especially heavy loads during braking.
It is the front brake pads that take on the weight of the car multiplied by the speed, and their task is to quickly and effectively stop this cocktail of various physical forces.
How often to change brake pads
The life and replacement of front brake pads, as well as the replacement of rear brake pads, depends on several factors. Some of them are completely within the power of the driver to influence, while some of these factors do not depend on the driver.
- company producing brake pads. Taking into account the fact that brake pads, like brake discs, are our safety, when choosing them you cannot be guided only by pricing policy. Yes, brake pads from well-known brands are more expensive, but they are not more expensive than your health;
- The quality and wear of brake pads directly depends on the manufacturer's brand. If you buy them at a branded auto store, where first of all you require product certification;
- driving style. This factor is in your hands.
Brake pads wear out much faster if you move around the city with an incomprehensible desire to show someone something. Otherwise, why do some drivers try to reach maximum speed from traffic light to traffic light, and then use emergency braking?
For fans of extreme driving styles, replacing front brake pads occurs several times faster than specified by the manufacturer.
When to change brake pads
Naturally, no one gives the exact mileage or time in the case of replacing brake pads. But, for each car brand, the exact parameters of the condition of the brake pads are indicated, which require their replacement.
You will find these numbers both in the instructions for using brake pads from the manufacturer and in the operating manual for your model of car. It is advisable to ensure that the brake pads are replaced at the specified thickness.
Replacing brake pads, like replacing brake discs or replacing shock absorbers, must be carried out on both wheels of the same axle. There is no difficulty in replacing, if you do not know how to change brake pads, then we will help you with this.
How to change front brake pads
The technology for replacing brake pads is no different on any car model. There are, of course, nuances associated with the designs of brake mechanisms or their types. The disc brake caliper differs in design from the standard brake system.
When replacing the front brake pads, as well as the rear ones, do not forget to diagnose the parts, components and mechanisms of the entire brake system. Brake disc diagnostics are a must. Just pick up a caliper and measure its thickness.
In addition to the thickness, visually verify the absence of mechanical damage on the surface of the disk and its plane geometry.
When purchasing brake pads, try to choose them so that they are from the same batch. This is important based on the characteristics of the friction lining material during the production of different batches of products. Pads from the same batch have less difference in the physical and mechanical properties of the brake lining material.
Practical tips: how to replace front brake pads
Equipment and tools for replacing brake pads - standard set:
- jack;
- “goats” (lifting support);
- wheel wrench;
- standard set of plumbing tools: screwdrivers, wrenches, hammer, etc.
We are preparing the car to replace the front brake pads. We hang the “front” on a support using a jack, remove the wheel, turn the steering wheel and evaluate the amount of work, while simultaneously checking the condition of the caliper, brake discs, and the connection points of the brake hoses and pipelines.
Technological operations for replacing brake pads:
- remove the brake hose from the mount;
- Using a balloon or a pry bar, press out the brake piston; do not forget that at this moment the brake fluid level rises. Pay attention to the expansion tank.
- unscrew the bolt securing the caliper bracket, remove the bracket.
- We are replacing brake pads.
That's probably all. The front brake pads have been replaced successfully. Test them immediately, but without overdoing it.
And remember. The increased load on the front brake pads requires you to constantly monitor their condition. This is your guarantee.
Good luck with your front brake pad replacement and on your journey.
Source
Source: http://vintasik.info/remont/tormoznaja-sistema/zamena-perednih-tormoznyh-kolodok-svoimi-rukami-kogda-i-kak-pomenjat.html
How to change brake pads: step-by-step instructions :: SYL.ru
In contact with
Google+
Classmates
The braking system is one of those that is used more often than others, and therefore the closest attention is paid to it even at the design stage. Manufacturers do everything possible to make it last as long as possible.
But sometimes there comes a time when the brake pads require replacement. The rate of wear depends on many factors: type of gearbox, operating conditions, manufacturer, driving style, etc. The main thing is to remember that you should never delay replacing brake pads.
Not only your own life, but also the lives of those around you depends on it.
When to change?
Before asking yourself the question of how to replace the front or rear brake pads, you should definitely determine that this moment has come. How to do it? Yes, very simple.
As a rule, they are equipped with a special wear sensor, which begins to emit a nasty metallic squeal when braking, which is almost impossible not to hear. In any case, it is necessary to perform periodic visual inspection of the brake pads.
If their thickness has become less than 3 mm, and there is no squealing, you can safely proceed to replacement.
Which ones to choose?
Before replacing brake pads, you need to decide on their choice. It is advisable to buy original parts, choosing them from special catalogs depending on the car make, year of manufacture, body type, etc., or purchase goods from well-known manufacturers. Otherwise, you can easily run into a fake.
How to replace brake pads
First, you need to lift the car using a jack (after installing the thrust blocks) and remove the wheels. It is better to remove two wheels at once, because when working with one, you can always turn to the other as a reference.
After this, you need to unscrew the caliper mounting bolt. Before replacing the brake pads, you should carefully check the condition of the guide boots and cylinder.
If there are defects, they must also be replaced.
At the next stage, you should remove the guides from the disk bracket, thoroughly clean them with fine sandpaper and lubricate them with lithol. After this, you need to return the guides to their place, after putting on the anthers.
Now you need to get the old pads out. Before replacing the brake pads, the grooves where they are located should be thoroughly cleaned of dirt. When installing new pads, it is necessary to put a special graphite-containing lubricant under them.
After this, you need to return the tin damper pads to their original place. Now you need to install the brake caliper in its original place and tighten all the bolts. That's all. All that remains is to install the wheel and perform the same operations with the other one.
After completing the work, use a jack to lower the car.
Upon completion, it is imperative to bleed the brakes to get rid of the gaps that form between the pads and disc, as well as the brake caliper piston. To do this, simply press and immediately release the brake pedal several times.
Usually, even an inexperienced motorist takes no more than an hour to complete the work. Speaking about how to replace rear brake pads, it is worth additionally noting that it is better to perform all work on an overpass. In addition, it is necessary to loosen the tension on the handbrake cable.
No matter how simple brake pads seem to be, their production is complex and time-consuming. An important aspect in the manufacture of brake pads is the development of a friction material that satisfies all requirements.
Large companies test hundreds of materials a year, but only a few of them are tested and subsequently used to make brake pads for cars and motorcycles. We recommend that you familiarize yourself with the range of brake pads for motorcycles on the website http://r5.ru/kolodki-tormoznye, and car brake pads are shown in the photographs below.
Of course, before going into production, new brake pads are tested in the laboratory on dynamometer stands. At the same time, the braking distance is checked under various conditions (speed, load) in order to achieve high levels of safety and braking quality. Simulation of pressing the brake pedal all the way is carried out during the strength test.
A separate test checks the noise level of the brake pads. To reduce noise, anti-creaking plates are used, and chamfers are also removed. After installation on the car, brake pads are also tested for efficiency, comfort, and noise level.
Pads are of particular importance to the braking system of any car. It is with their help that the speed of the vehicle is reduced and stopped.
Brake pads are one of the most significant elements that directly affect the safety of a vehicle. But, like any other part, sooner or later they wear out and become unsuitable for further use.
In this case, they need to be changed urgently. And today we will look at how to properly change brake pads with your own hands.
What affects wear?
To begin with, let’s note a couple of significant factors that reduce the service life of these parts in a car:
- Company manufacturer. Most often, it is dishonesty and the desire to earn more money that pushes manufacturers to produce low-quality pads. Therefore, when choosing these spare parts, you should not be guided by the principle of greater savings, trusting your choice to unknown companies. Yes, brake pads from famous brands are many times more expensive. But on the other hand, by overpaying for this, you will be confident in your safety.
- Driving style. This is also a significant factor affecting the service life of brake pads. Parts wear out much faster if the driver uses a sporty and aggressive driving style (especially in the city), trying to prove something to someone. At the same time, if you brake with an engine instead of pads, the service life of the elements can reach 80 thousand kilometers. But we’ll talk about the resource later, but for now let’s look at how to change brake pads with your own hands.
Preparing the tools
For a successful replacement, we need to prepare the following set:
- Jack.
- Lifting support.
- Standard set of wrenches.
- "Ballonnik."
Having prepared all the above tools, you can safely get to work. We also note that this operation is divided into two stages. First, the front pads are replaced, and then the rear ones. Let's start with the first one.
How to change front brake pads?
Here we will look at the installation of parts on cars with drum brakes. First, you need to remove the car from the handbrake, put chocks under the wheels and jack up the front part.
Next, you need to remove the brake hose from the mount and, using a cylinder (alternatively, you can use a wrench and a pry bar), press out the piston. Please note that at this moment the brake fluid level may rise. Next, the bolt securing the caliper bracket is unscrewed. The penultimate part is also removed.
After this, the old pads are taken out and new ones are installed in their place. The elements are assembled in reverse order.
How to change rear brake pads?
Here we will also give an example of how elements on the “drums” are dismantled and installed. Note that this operation is somewhat different from the previous one.
So what should you do? To begin with, we put special stops under the wheels (now the front ones). This can be either a rubber brake shoe, or an ordinary brick or a piece of thick wood.
The main thing is that the car rests its wheels against this object and does not move further.
How to change brake pads with your own hands next? At the next stage, we jack up the car, remove the bolts and unscrew the wheels. Then remove the brake drum. To do this, you need to unscrew the guide bushings.
If this element is difficult to remove, we try to rotate it 30-45 degrees and tighten the guide bushings one by one. Next, using pliers with narrow noses, we pull out the flat springs from the pads. Then remove the upper horizontal spring.
This can be done using a large minus screwdriver.
How to change brake pads next? Now we move the block to the side and take out another, lower spring. To finally remove this part, remove the spacer plate and pull out the cotter pin from the handbrake rod. Then we take out the lever with the springs and install a new block in its original place.
Features of replacement on cars with disc brakes
Here, unlike working with a drum system, we will need special pullers, which differ in type and marking for each machine model. So what needs to be done? First, loosen the handbrake cable and release the parking brake lever.
Next, special pins are knocked out and the locking spring is removed. After this, the pads themselves are removed. Next, the pistons are pushed into the cylinder and new brake pads are installed in place of the old ones.
In this case, both sides of the gasket should be lubricated with a layer of silicone grease.
Completion of work
Upon completion of all work, both disc and drum vehicles are checked and, if necessary, brakes are bled. It is also important to monitor the brake fluid level before driving. If possible, add it to the required level.
The service life of brake pads is ambiguous. Depending on the place of application (front or rear of the car), they last from 20 to 50 thousand kilometers. And again, the resource depends on the quality of the build and the type of driving of the driver himself.
As for the first point, there have been cases when, after 3-5 thousand kilometers, the upper friction layer of the pads simply crumbled and turned into powder. All that was left of them was a metal plate. If this problem is not noticed in time, this part will simply stick to the brake drum or disc. Then wheel blocking is inevitable.
In general, you need to control the wear of these elements not by mileage, but by the thickness of the remaining top layer. All pads have special indicators - recesses. They just signal wear. If the top layer has reached these beacons (usually 1.5-2 millimeters thick from the plate), then the brake pads need to be changed.
How much does such a service cost at a service station?
Prices for such work in auto repair shops can reach 1 thousand rubles. But, as you can see, it is quite possible to perform such an operation yourself, without expensive tools and assistants.
So, we figured out how to change brake pads with your own hands.
I decided to change the brake pads, and at the same time the discs, because the wear was great;
the discs were taken by Bosh, and the pads were ate
There were no particular difficulties during parsing;
the parsing process itself
and what's the matter? I notice already on the second car that the pads are NOT installed correctly!
one side set
and actually, the result of the work
The disc is new, unusually matte - sandblasted...
Price: 6,500 ₽ Mileage: 213,000 km
Audi A6 2000, petrol engine 2.8 l., 193 l. p., front drive, CVT — consumables
Source: https://sovetydljavseh.ru/ustanovit/kak-pravilno-ustanovit-perednie-tormoznye-kolodki.html
Do-it-yourself replacement of front brake pads on a Kia Rio 3
Category: Repair and maintenance | Published date: July 14, 2016 | no comments
Nowadays, fewer and fewer car owners understand the structure of the car. Most live in the city, and in this age of urbanization, a few have garages in order to have space to repair their swallow.
Some people think that everyone should mind their own business, while others think that this is too complicated a science and they can’t afford to replace any part. But we would like to show that in fact anything is possible. Today we will tell you in detail and show you how to replace the front pads on a car.
In our example, this is on the Kia Rio 3, but the principle is the same on all cars.
To buy a spare part, contact the store http://azia-ek.ru/katalog_zapchastey and let's get started!
To replace the front brake pads on a Kia Rio 3, you need:
- Front brake pads 58101-4LA00
- 17 mm wrench
- 14 mm head
- Screwdriver
- Gloves
Before replacing, we put the car on the handbrake, but it is better to install anti-roll mechanisms under the rear wheels.
Open the hood and unscrew the brake fluid reservoir cap to check the brake fluid level.
We put the car on a jack and unscrew the front wheel.
We take a 17 mm wrench and make a grip, and with a 14 mm socket we unscrew the bolt.
We also unscrew the bolt on the caliper.
Remove the caliper and place it on top of the brake disc.
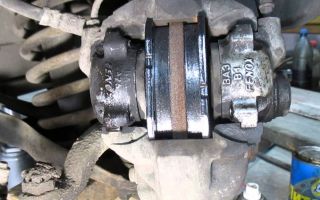
After removing the caliper you will see the brake pads. We remove the pads.
This is what an axle with pads looks like.
This is what the axle looks like with the pads removed.
Comparing new and old brake pads. The wear and tear is obvious.
On the inside of the block you will see a plate that should be removed. We insert it onto the new brake pads.
Now we insert the new brake pads into the caliper.
Now you need to press out the brake cylinder on the caliper cover. This is done so that it can be placed on the brake disc.
Read Removing the VAZ 2106 gearbox
And we put the caliper on the brake disc.
We screw the caliper first from below, then from above with a 17 mm wrench and a 14 mm socket.
That's all. The whole process usually takes 45-60 minutes. This is not a difficult procedure, you will definitely succeed even the first time.
After replacement, you need to start the car and press the brake pedal until it becomes elastic. Remember that the pads must get used to, so do not brake sharply for the first 100-150 km.
For a complete understanding, you can watch the video:
Source: http://drivedrom.ru/remont-i-obsluzhivanie/zamena-perednix-tormoznyx-kolodok-na-kia-rio-3-svoimi-rukami.html
How to replace front brake pads
Hello, dear visitors of our project. This article is devoted to issues related to replacing car brake pads. We will help you not only figure out how to change brake pads if necessary, but also tell you when to do it.
The braking system is a very important component of any vehicle, because our health and even life depend on its performance. Experts recommend paying special attention to monitoring the condition of the front brake pads, because they wear out more quickly.
How often to change brake pads - main factors
The service life of brake pads depends on various indicators. Some of them are determined by driving style, while others do not depend at all on who is driving the car. Let's try to understand what affects the frequency of replacing brake pads.
- Manufacturer of the product. Since brake pads, as well as brake discs of a car, directly affect the safety of its operation, we advise you to buy products that are not the cheapest. Of course, you will have to pay more money for brake pads from popular brands, but only in this case you can rest assured of the quality.
- Driving style. Brake pads wear out very quickly if the driver constantly accelerates and brakes while driving around the city. As a rule, this is especially noticeable on straight sections with a large number of traffic lights.
If you like this driving style, be prepared for the fact that you will have to replace the front brake pads, as well as the rear ones, much more often than the manufacturer advises.
When to change brake pads
Of course, no one can provide specific data on mileage or time period. However, the manufacturer of each car mentions certain parameters in the operating instructions, with the help of which you can understand when to change the brake pads on time.
If your car already uses non-original pads, the relevant information can be found in the instructions for the purchased product. It is very important to change the brake pads immediately after reaching the appropriate indicators.
If you decide to change the brake pads, you need to understand that the procedure must be performed on two front or two rear wheels at once.
The advice on how to replace brake pads is the same no matter what kind of car you drive. True, there are some small nuances that need to be taken into account.
Replacing the front brake pads, and the rear ones too, requires a mandatory check of the remaining components of the brake system. It is extremely important to take a little time to check the condition of the brake rotor. It's very easy to do. You need to determine the thickness of the disc using a caliper. It is also necessary to check it for visual damage.
Brake pad replacement procedure
You need to prepare:
- spanners;
- hammer;
- “goats” for lifting;
- balloon wrench.
How to prepare your car for replacing pads:
- Raise the car using stands and a jack. Remember safety!
- Remove the wheel.
- Turn the steering wheel so as to gain access to the brake mechanism.
- Replace brake pads.
The replacement itself is performed in the following order:
- Press out the brake piston using a wheel wrench. Monitor the amount of fluid in the expansion tank. Brake fluid must be prevented from leaking.
- Bend back the outermost part of the bolt stopper that connects the caliper to the guide pin.
- Pull the brake hose out of the bracket.
- Unscrew the fastening bolt of the bracket and remove the bracket itself down.
- Check the brake caliper. If the previous pads are worn unevenly, you need to remove the protective elements of the guide pins from the rubber, clean them with gasoline and lubricate them with graphite lubricant.
- Replace the brake pads and reassemble the entire mechanism in reverse order.
Advice! It is advisable to select new brake pads from a single production batch, which can be determined using markings. In this case, the brake elements will work as efficiently as possible, since their characteristics will be completely identical.
Now you know how to change brake pads. Of course, if the procedure is performed for the first time, you need to spend a lot of time and effort, but this decision will help you save money and gain new skills. Do-it-yourself car repair and maintenance is within the power of every motorist!
Source: http://autoprivat.ru/remont_avto/kak_zamenit_perednie_tormoznye_kolodki.html
Replacing front brake pads - we do it ourselves!
Try to count how many times you press the gas pedal while driving from home to work - you will be surprised. The brakes especially suffer for those who like to drive fast, and the front pads wear out especially quickly - firstly, they work faster than the rear ones, and secondly, when braking, the entire weight of the car presses on the wheels and brake discs.
It hardly needs saying that brake pads must be of high quality and there is no need to skimp when choosing them - high-quality spare parts can save your life in a difficult situation. And lovers of extreme driving should pay special attention to the degree of wear of the pads and change them much more often than the manufacturers recommend.
Not a single manufacturer will tell you exactly the number of kilometers that a particular model of brake pads will last, so when purchasing, you should not think that they will last you for the specified kilometer. The packaging shows very average indicators.
It is worth noting that each car brand has its own recommended pad replacement period. Most modern luxury cars have sensors on the brake discs.
They are the ones who display information on the car’s on-board computer and notify about wear of the brake pads.
Front brake pads
- They will protect the chassis and save you money, increasing ground clearance by 3 cm.
It is very important to observe the permissible wear thickness of the pads and not to exceed this value, because with further use the brake discs will wear out, which are much more expensive than completely replacing the front brake pads. On average, during intense driving, high-quality pads fail after a year of use. For car owners who rarely use their vehicle, brake pads may last for several years.
It is very rare for front brake pads to wear unevenly. This depends on proper bleeding of the brakes after replacing the pads, as well as on the chassis of the car. When replacing the front pads, it is very important to properly bleed the car’s brakes, as well as monitor the amount of brake fluid, which will be discussed further.
The principle of replacing front brake pads for all makes and models of cars is almost the same and differs only in the type of brake mechanism. Front brake pads should be replaced on both wheels, even if one side is not worn as much. To replace the front pads, it is best to use an inspection hole.
Step 1. Preparatory stage
We position the car in the center of the overpass so that the sides of the wheels can be approached freely. Next, you need to put the car on the handbrake and put something under the rear wheels. After this, loosen the bolts on the wheel on the side where we will replace it, and jack up the car so that the wheel can rotate freely. After unscrewing the bolts, remove the wheel completely.
Removing the wheel
Step 2: Removing the brake pads
The hardest part at this stage is pushing out the brake piston, so additional effort may be required.
Pads to be replaced
Step 3. Caliper
Next we proceed to disassembling the caliper. To do this, you need to unscrew the lower bolt securing it and remove the upper lock of the block.
The upper caliper bolt does not need to be unscrewed, since it only serves as a fastener.
After this, the car caliper should be raised to the upper position, as in the video; if necessary, use a pry bar. Next, you can safely remove the old brake pads.
Unscrew the lower caliper bolt
We take out the pads
Open caliper
Step 4: Installing the pads
Before reassembling the brake mechanism, clean the caliper and lubricate its elements; the brake pads do not need to be lubricated. Next, install the pads in order in the caliper mechanism and secure them with new clips that come with the kit.
Installing new pads
Insert the pads into the grooves
Step 5: Reassembly
After this, you need to return the upper part of the caliper to its original position and tighten the lower mounting bolt (without much effort). After replacing the brake pads, press the brake pedal in the car several times, then rotate the car's brake disc with your hands and check whether the pads are rubbing too much. If severe friction occurs, loosen the lower caliper mounting bolt slightly.
For ease of work, when replacing pads on the left side, turn the steering wheel to the left, and vice versa for the right side. Now you can begin reassembling the wheel and move on to replacing the pads on the other side of the car.
Putting the caliper in place
Completion of work
Putting the wheel in place
At the initial stage after replacing the front brake pads, a slight unpleasant sound may occur. It occurs if the pads are not of sufficient quality and goes away after they are ground in.
Before replacing the front brake pads, be sure to conduct a full inspection of the remaining brake mechanisms. It is necessary to make sure that the brake hoses are sufficiently clamped and secured with clips.
There should be no mechanical damage on the brake disc. You can also measure its thickness; for this you will need a caliper.
The thickness of the disk should be the same on all sides, as in the video.
Source: http://tuningkod.ru/master-klassy/zamena-perdnih-tormoznyh-kolodok-svoimi-rukami.html
Instructions for replacing brake pads with your own hands: procedure
It is usually quite easy to understand that the front or rear brake pads are already worn out and require replacement. This is indicated by the unpleasant sound that appears due to the grinding of metal during braking.
If you notice that your car begins to make similar sounds when you press the brake pedal, then you should not neglect replacing the brake pads, as, otherwise, increased wear on the discs may occur.
Many foreign car manufacturers install systems on their cars that notify the driver of the need to replace the brake pads due to their increased wear.
Brake lining structure
The car trim has a very simple structure. It is made in the form of a thin steel strip attached to a base cast from metal.
Brake pad wear occurs according to the following principle: as soon as the friction material of the lining wears out, a strip of metal begins to cling to the brake disc. Accordingly, the metal begins to emit a specific sound, signaling to the car owner that the pads are worn out, which must be urgently replaced.
A number of cars from foreign manufacturers have built-in electronic systems that notify about lining wear. They are based on the closure of the sensor contact to the entire mass of the car during braking, caused by approaching the brake disc, which is isolated from the mass of the car.
Brake pad replacement process
In order to replace the rear or front brake pads with your own hands, you do not need any specific tool, except for a special wrench that is designed to unscrew hidden bolts. Such bolts are often used by owners of expensive foreign cars to protect the wheels of their car from intruders.
One of the front wheels is hung out, and a support is placed using a strong jack. After this, the wheel is removed, using a screwdriver or spatula, the brake pads are moved to their original position. These steps are repeated for each overlay.
When the brake piston returns to its original position, the bolt that secures the brake caliper with the bracket is unscrewed.
On the caliper there are two similar fastening bolts, which have caliper brackets.
It is necessary to unscrew the bolt, unscrewing which makes it possible to remove the brake caliper along with the bracket to the side. In normal situations, this will be prevented by the brake hose.
When the brake caliper is moved to the side, the old pads are removed. They need to be carefully examined; this is a very important point. Pay attention to how much wear they have, even or not.
If not, and one pad is worn out, and the second still has some reserve of friction layer, this may indicate that the brake caliper is sticking during braking.
This can also be determined by a torn boot of the guide bushings.
The pads must be replaced with new ones, and be sure to put any graphite-containing lubricant under them. When you install the new pads, don't forget to also install the damper tin pads. Some craftsmen consider them unnecessary and throw them away. Or they are simply put in a bag with tools, and they are stored there for a long time after the next shift.
Usually, various additional materials are offered with the linings, such as bags of special lubricant; you need to pay attention to this when purchasing. After you have replaced the front trims, reinstall the bracket and tighten the mounting bolt.
On some machine models it must be additionally fixed using a bent tin plate. After this, the wheel is installed in place, and the car is lowered from the jack.
The same work is carried out on the other side of the car.
As soon as you have completed replacing the brake pads on your car yourself, you need to press the brake pedal a certain number of times to remove the gap that was formed by the pads and the disc.
When choosing brake pads for your car, you should not save money. Keep in mind that you will have to replace low-quality pads soon, but good expensive ones will last you for at least 40 thousand kilometers, provided that the car is used in urban conditions.
By installing low-quality pads on your car, you seriously risk not only the occurrence of a strong squeak when braking, or their rapid wear, but also something much more expensive - the safety of your loved ones and your own.
When choosing covers for your car, first of all, pay attention to the quality of packaging and price. Please note that a set of expensive high-quality linings usually includes lubricant, plates, etc.
Changing the pads yourself - lubricate the caliper video
Source: http://shokavto.ru/zamena-tormoznyx-kolodok/
Replacing brake pads
Over time, there comes a time on any vehicle when the friction linings of the rear or front brake pads wear out and the brake pads need to be replaced.
And despite the fact that there may be some differences when replacing them on different cars, they are not so significant as to warrant writing separate articles on replacing pads on each car.
In this article we will look at how to change worn pads, both front and rear, and what is required for this.
In general, the front pads wear out about two to three times faster than the rear ones, this is natural, since when braking the main load falls on the front brakes.
And most often it is the front ones that need to be replaced, and always on both front wheels, and all the pads, even though some pads are less worn than others.
But still, beginners should clarify whether they need to be changed or whether they are still “similar”.
Signs of worn pads that need to be replaced include:
- A gradual (not sudden) increase in the braking distance of a car.
- The thickness of the friction lining is less than what the manufacturer recommends.
- Cracks, chips, delamination or peeling of the friction material from the metal base.
- Creaking noise when braking.
- Knocking sound when pressing hard on the brake pedal.
- When inspecting the brake disc, it was not dust from the linings that was found on it, but metal shavings.
- Gradual increase in free play of the brake pedal.
To begin with, it is useful for beginners to consider the design of the front brakes, it will be easier to work, although if you are not interested in this, you can skip a couple of paragraphs. On most modern cars, the front wheel brake mechanism has a movable (floating) caliper (see figure on the left).
There are others, of course, but this design is widespread and allows the brake pads to be compressed using one or more pistons (located in the cylinders), but these pistons only apply pressure on one side.
The brake pads themselves are installed in guide 10 (see figure), which is mounted on the steering knuckle of the front wheel. And the caliper is attached to the flange of the wheel cylinder 5 and has a stop B for compressing the brake pads and an inspection window A, through which the wear of the pads (more precisely, the wear of their friction linings) is determined.
To ensure mobility (floating) of the caliper and working brake cylinder (you can read about repairing the cylinder here) relative to guide 10, the caliper along with the cylinder and piston are not rigidly connected to the guide, but using guide pins 13, which are secured with bolts 6 (or nuts) to the flange of the working brake cylinder.
A rubber protective cover 12 is put on the grooves made in guide 10 and in pin 13, which protects the smooth polished surface of the pin from moisture and dirt. If you neglect to replace the torn cap, then pin 13 will corrode and become stuck due to moisture and dirt.
As a result, the caliper stops freely “floating” along its guides and this causes more intensive wear of the pads. Therefore, when replacing the pads, you still need to pay attention to the condition of this cover, and if there are cracks on it, and even more so ruptures, be sure to replace it with a new one and restore the mobility of the guide pin (clean it from corrosion and lubricate it with copper grease).
Sequence of actions when replacing front brake pads.
Before starting work, open the cap of the brake fluid reservoir, since during the work you will need to remove excess brake fluid using a syringe. Indeed, as the brake pads wore out, they gradually became thinner and thinner, and as a result, the piston in the working brake cylinder gradually moved outward more and more. This made it necessary to constantly add brake fluid.
But when you remove the worn and thinned brake pads, in order to be able to insert thicker new pads, you will need to push the piston back into the cylinder (for example, using a block and a clamp that presses the piston back, as in the photo on the left). When the piston is pressed back into the cylinder, the brake fluid level will certainly rise and the excess will need to be pumped out using a medical syringe.
- So, first, loosen the wheel bolts, and then, after jacking up the front of the car, unscrew the bolts completely and remove the front wheels.
- Next, we turn the wheel hubs to the side with the steering wheel to make it more convenient to work, but this is not necessary if there is a lift or inspection hole in the garage.
- Disconnect the friction lining wear sensor, if any, from the inner pad.
- We bend the plate that locks the bolt 6 and unscrew this bolt 6 (see the figure above).
- We lift the caliper up (as in the figure above) and fix it in this position, for example, with a rope (make sure that the brake hose does not have a sharp bend or twist).
- Having removed the pad retainers (they can be plate or wire), we remove the worn pads from their places.
- We clean the pad seats from dirt using a brush and brake disc degreaser, or alcohol.
- We insert new pads instead of the old ones (check that the pad with the wear sensor is on the inside), and fix them with clamps (preferably new ones).
- Having placed the old block (or board) on the piston, we compress it with a clamp to push it into the cylinder (as in the photo above).
- We return the caliper to its place, and if it does not fit on the new thicker pads, then we compress the piston with a clamp a little more and return it to its place.
- We insert and tighten bolt 6 (see figure above) and tighten it with a torque wrench with a torque of approximately 30 - 35 N.m., fix it with a lock washer, and if it is not there, then use a thread lock.
At the same time, as I said above, pay special attention to the integrity of the corrugated covers 12 of the guide pins 13. If possible, replace them with new ones if they have cracks, or even more so, breaks.
You should also check the mobility of the guide pins, and if they have become sour in their places and have lost mobility (from corrosion), then they should be carefully knocked out and sanded to remove the corrosion.
Then lubricate them with copper grease and return them to their place (with new rubber covers).
Pay attention to the surface of the brake discs, which should not have deep scratches, much less chips. Also pay attention that there is no step from the excavation along the outer edge of the disk.
If it is, then check the thickness of the brake disc with a caliper and check with the minimum thickness recommended by the manufacturer.
It happens that the disc is so worn out that even new thick pads do not restore normal braking.
Replacing rear brake pads.
On newer cars, the rear brakes are disc, and when replacing the pads we proceed in exactly the same way as with the front ones, only we naturally hang (jack up) the rear part of the car and remove the rear wheels. But most cars still use rear drum brakes, and we’ll look at replacing their pads next.
Rear brake device.
1 — handbrake cable, 2 — handbrake cable return spring, 3 — rear cable tip, 4 — protective housing mounting bolt, 5 — shoe stand (pin), 6 — strut spring, 7 — support washer, 8 — handbrake cable lever, 9 — lever pin, 10 — rear brake casing, 11 — friction lining, 12 — brake pad, 13 — working (wheel) cylinder, 14 — upper spring, 15 — wheel cylinder protective cover, 16 — piston stop, 17 — rubber spacer bar cushion (for the spring), 18 — spacer bar, 19 — parking brake cable shell, 20 — lower pad compression spring, 21 — guide plate, 22 — rivets, 23 — support plate.
On most cars, it is much easier to replace rear drum brake pads than front disc brake pads, since the design of drum brakes is very simple - see the picture on the left. There is no caliper and the working cylinder on each side has a separate piston that directly presses on each pad. The only complication is the parking brake (handbrake) mechanism.
On most cars, in order to understand whether the rear pads need to be changed, there is a special inspection hole (window), which is closed with a rubber plug. By removing the plug, you can see the thickness of the friction lining and, by checking the manufacturer’s recommendations, find out whether the thickness of the friction linings is sufficient, or whether they are very worn out and need to be replaced.
- To replace, you will need to loosen the wheel bolts.
- Then jack up the rear of the car and, after unscrewing the wheel bolts completely, remove the rear wheels.
- Next, we remove the brake drums; on many foreign cars you need to unscrew the fixing bolt with a special bit - an “asterisk” (type T27). If the brake drum is soured and cannot be removed, you can press it out using a pair of bolts (for this purpose, there are two special threaded holes in the drum) or use a brake drum puller.
- Next, you need to disconnect the tip 3 of the parking brake cable from lever 8 (see figure above).
- Then we press on the support washers 7 and, turning them 90 degrees, remove them and the springs, thus releasing the fixation of the pads. The pins—the struts of the block 5—do not need to be removed.
- We insert a steel rod between the brake pad (where the piston presses on the pad) and the wheel hub, and pressing the rod on the pad (like a lever), we remove the end of the pad from the groove of the piston stop 16. We do the same with the second pad to release them from grooves of the brake cylinder pistons.
- Now you can carefully remove both pads along with the handbrake lever 8, the spacer bar 18 and two springs - the top 14 and the bottom 20. On many foreign cars there is also a third spring (indicated by the arrow in the photo below) that tensions the wear compensator.
- Having removed the pads with the above parts, we remember how these parts are connected to the old pads, since now we will need to connect all the parts to the new pads in the same way and return the whole thing to its place.
- To begin with, we insert the spacer bar 18 into the new pads together with the handbrake lever 8 into the new pad (and the wear compensator, if there is one).
- We insert the handbrake cable lever into one of the blocks (the left one) and secure it with a cotter pin (see the bottom photo).
- Then we put on the upper spring and connect the second block to it (on some machines there are two upper springs, if there is a second one, we put it on too).
- We tighten and connect the wear compensator spring, if there is one (the spring is indicated by the arrow in the photo on the left).
- Now you can “link” both pads with the last lower spring 20 (see figure), hooking it to the corresponding holes below, in both pads.
- Now all that remains is to return the assembled structure to its place, first by getting the upper part of the pads into the grooves of the 16 piston stops, and then, by slightly tensioning the springs, getting the lower part of the pads into place, snapping the pads behind the guide plate 21.
- We put springs 6 and washers 7 (photo on the left) back in place and, pressing slightly on the washers, turn them 90 degrees, fixing the pads.
- We put the tip 3 of the handbrake cable in its place.
- We return the brake drum to its place and lock it with the screw.
- We put the wheel in place and do everything exactly the same with the brake mechanism of the second rear wheel.
Here's something else to consider: before installing new pads (along with springs and other parts), you should slightly pump out the brake fluid from the reservoir with a syringe, and then compress the pistons in the cylinder using a clamp or hand vise. Otherwise, the brake drum may not fit on the new thicker pads.
After all, as I said above (about the front brakes), because the old pads were worn out and were much thinner than the new ones, the pistons came out of the cylinder (the brake fluid was added) and now the pistons need to be returned back.
Although on some machines the spacer bar is adjustable in length, and this can be used to spread or compress the pads, thus adjusting the gap between the lining and the brake drum, but even with this design it is useful to return the pistons back, since adjusting the compression (shortening) of the spacer bar can not enough, and the brake drum may not fit.
After all work, check the brake fluid level in the reservoir and, if necessary, add the missing fluid. After all the work, it won’t hurt to bleed the brakes if the brake pedal has become less elastic. It should be taken into account that any brake fluid has a lifespan of a couple of years, and it may be time to change it.
Read how to do this and then bleed the brakes by clicking on the link just above. And although it describes the process of changing the fluid and bleeding the brakes on a motorcycle, everything is done in a similar way on a car.
And lastly: for the first 300 - 500 kilometers, the new pads will break in and at this moment the brakes will not be as playful as we would like. Keep this in mind and, if possible, increase the distance in front of cars in front.
In addition, during this run, you should not brake very sharply, since the new pads are not yet accustomed to the high temperature, and during sharp braking (especially on a descent), the friction material may burn (“glaze” as some mechanics say).
And subsequent braking with such pads will be ineffective.
That seems to be all. Of course, in one article some small design features of the brakes of a particular car cannot be taken into account, and each mechanism of a particular car model may differ slightly, but these are very insignificant differences.
After all, the design itself is almost the same, and replacing brake pads is almost the same on many cars, and the main thing for novice drivers is to remember how everything was before disassembly (I advise beginners to use a camera) and assemble everything in the same way, but with new parts, good luck to everyone.
Source: http://suvorov-castom.ru/zamena-tormoznyx-kolodok/