How to change the clutch on a Toyota Corolla (robot 2007)
Repairs at a robot service station are expensive, so it makes sense to purchase the clutch yourself and replace it yourself.
Which clutch is better to choose?
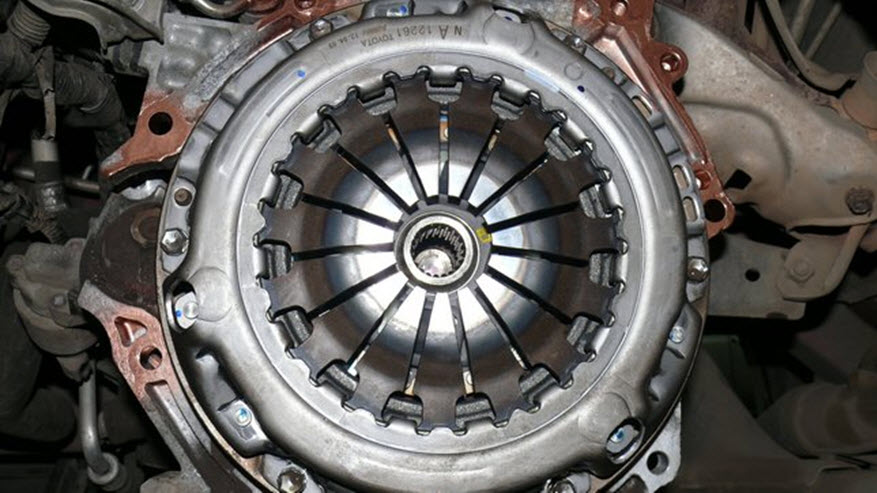
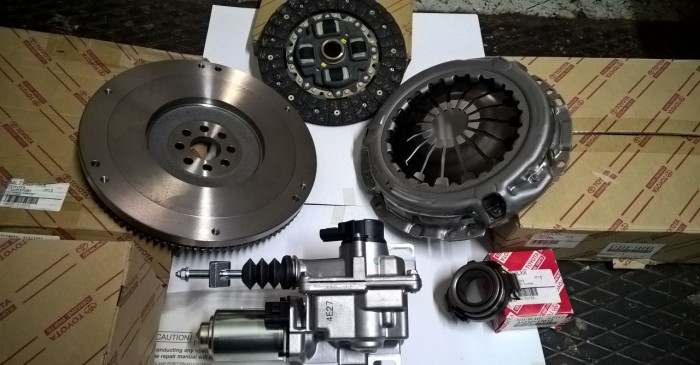
New clutch basket for Toyota Corolla
Many car owners who use Chinese clutch kits for robotic gearboxes for cars produced in 2007 and 2008 speak positively about them. They performed well in our operating conditions, but their cost is much lower. Installing a Chinese-made robot clutch kit will cost much less.
Replacement instructions
Saving on repairing a robotic gearbox for a 2007 and 2008 Toyota Corolla is, of course, a tempting prospect. But first of all, you need to carefully read the instructions we provide and strictly adhere to the sequence of operations performed.
Required tools and materials
- a set of keys;
- screwdriver;
- Toyota Corolla 2007 or 2008 clutch kit;
- container for draining oil.
Stages
After you purchase a replacement kit and prepare the tool, you can proceed directly to the replacement work.
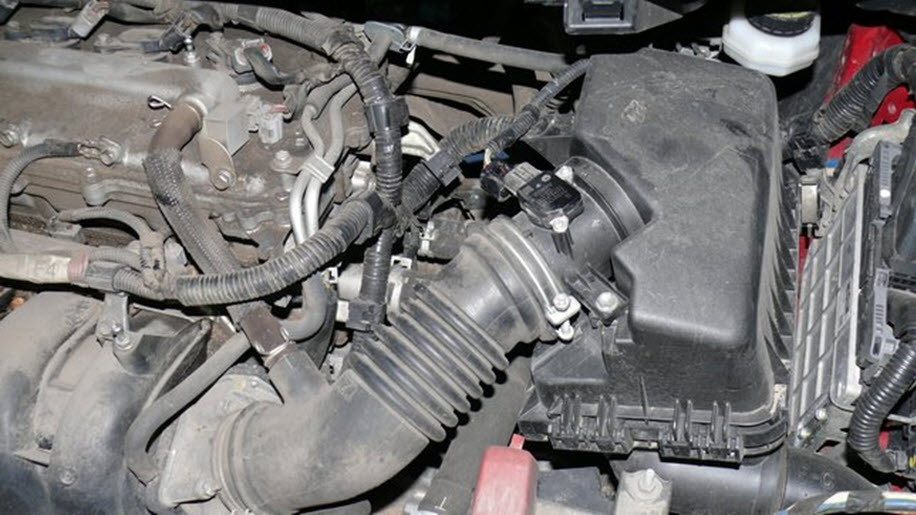
- First of all, disconnect the air sensor.
- After loosening the clamps, remove the air ducts.
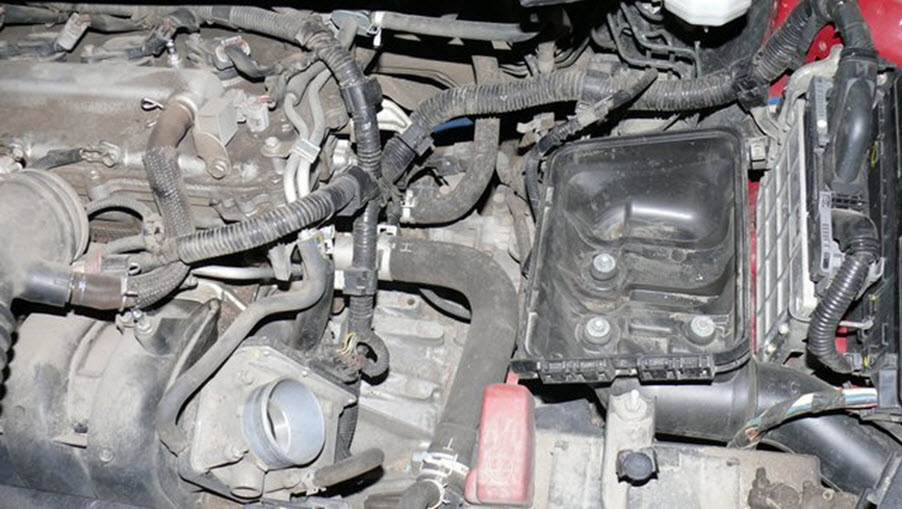
- We dismantle the air filter element. Disconnect the sensor, air ducts and filter
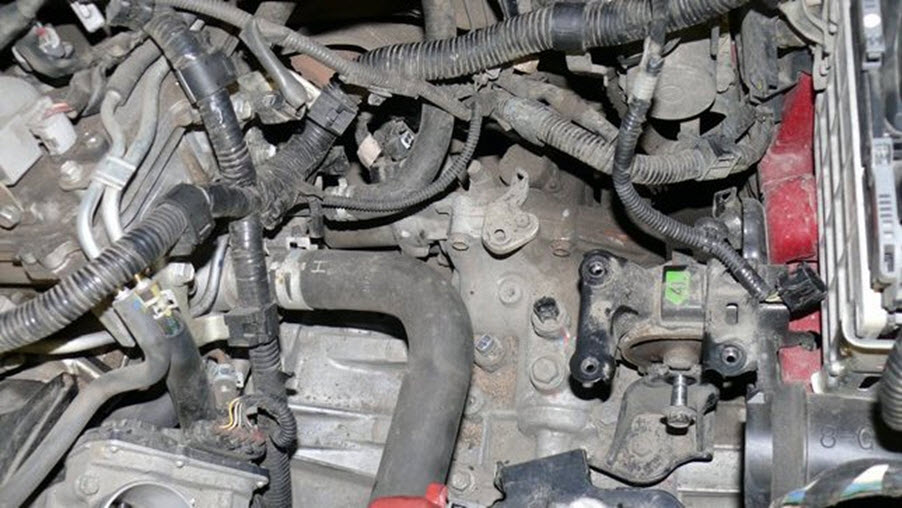
- We unscrew, but do not remove the bolt securing the gearbox cushion.
- We disconnect the connectors from the box.
- Unscrew the fastening bolts. Disconnect the connectors and unscrew all the fastening bolts
- The next step is to disassemble the ball joint.
- We drain the transmission lubricant mixture from the robot box.
- Unscrew the hub nuts.Hub nuts
- We remove the ball mounts going to the lever, this will make it possible to dismantle the drive shafts. Ball mount
- Unscrew the front gearbox mount.
- We take the drive shafts out of the box.
- We lift the gearbox so that the bolt located at the top of the box can be easily removed. If you haven’t figured it out yet, this is exactly the bolt that was unscrewed at the beginning, but not removed. Pay attention to the oil seal; if it wears out, it needs to be replaced.
- We unscrew the remaining bolts that secure the gearbox robot.
- Pull it away from the engine a little. Removed box
- Remove the clutch from the flywheel.
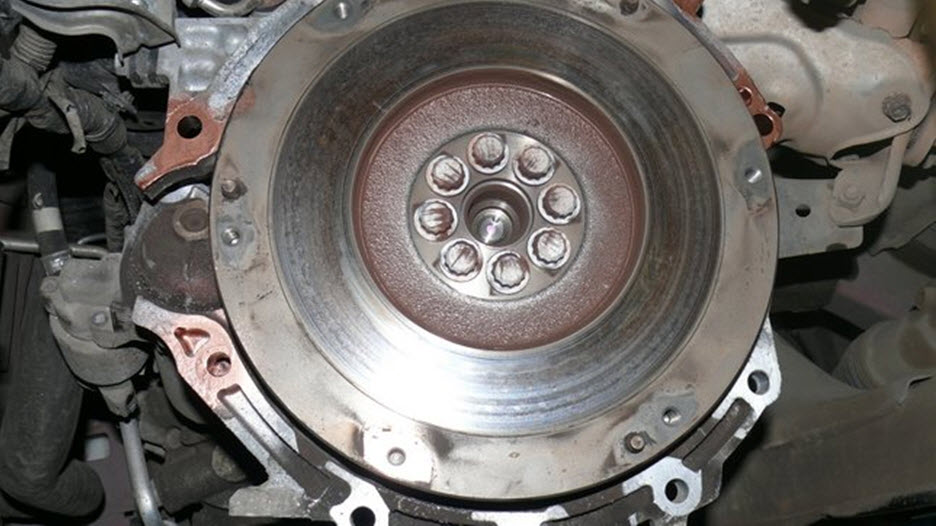
- Checking the flywheel. Wear should not be more than half a millimeter. There should be no irregularities or roughness to the touch. Otherwise, it changes. Gearbox flywheel
- We install a new clutch kit for Toyota Corolla 2007 or 2008. New clutch kit
- Center the clutch disc.
- We change the bearing.
- At this point, the process of replacing the clutch robot on a Toyota Corolla can be considered complete.
- We put the dismantled components in place in the reverse disassembly sequence.
Initialization
When all the components are in place after replacement, you need to initialize the clutch to change gears correctly. If you have not done this before and have no idea what we are talking about, then it is better to contact a professional. After initialization, your Toyota Corolla car can be considered ready to drive.
If you don’t have a friend who can carry out initialization on the spot, then you will have to get to the service station on your own. This is possible, but you need to follow some rules.
- Turn off the ignition, depress the brake pedal, and set the gearbox to neutral.
- Turn on the ignition, leave the handbrake in position N. Wait about 45 seconds, turn off the car.
- Turn it on again and wait another 20 seconds. Turn it off.
- This time, together with the ignition, we start the Toyota Corolla engine, without releasing the brake pedal. The N indicator should flash on the dashboard; wait until it stops flashing - this means that the system is configured.
- If the indicator continues to flash, it means that the actuator rod is not tensioned. To tighten it, you need to move it or place washers under it, a couple of millimeters is enough.
As you have seen, there is nothing difficult in replacing the clutch; if something is not clear, then watch the video, or ask a question in the comments.
Loading …
Video “Repairing a robotic transmission”
This video shows the process of replacing and repairing the clutch on a Toyota Corolla with a robotic gearbox.
Source: http://AvtoZam.com/toyota/corolla/zamena-stcepleniia/
Replacing the clutch on a robot - logbook of the 2007 Toyota Corolla on DRIVE2
Hello everyone, I decided to share my experiences after repairing my corolla.
After purchasing the car, everything was fine with it, but a Russian person cannot use a car without problems, and I decided (after reading some forums and articles) to initialize the robotic box (supposedly for smoother switching and in short everything will be fine) after the manipulations the car I began to drive, or rather, almost not drive, as if a trailer without wheels and also loaded was hooked onto it. I suffered like this for about 2 months until one fine day, or rather morning, rush hour on a steep climb, she (the gearbox) threw me into the neutral, I immediately remembered all those who write on the global Internet that it is necessary to initialize the gearbox every 40 thousand km. ( DO NOT DO THIS ) Well, of course, I haven’t forgotten that I’m not a good person who fell for all these fairy tales.
After some thought and conclusions, I decided to initialize the clutch so as not to continue driving on the tow truck ( Put the car on the parking brake. Jumper pins 4 and 13 in the diagnostic connector, then wait 15 seconds. Turning on the ignition, quickly press the brake pedal 7 times (2 beeps should then sound). While pressing and holding the brake pedal, move the gear selector to the following positions NEM + M - M + M - E N. Release and then press the brake pedal again (3 beeps should sound). Within Press the brake pedal 3 times for 2 seconds. If the procedure is successful, 2 short beeps should sound. Turn off the ignition and disconnect the inserted jumper from the diagnostic connector.
If the buzzer does not emit sound signals or the interval between them is more than 0.5 seconds, turn off the ignition, wait at least 15 seconds and start again
).
I decided to replace the clutch, or rather just the disc ( Valeo TY-17 ) and the release bearing ( SACHS 3151 899 001 ). The work was carried out according to the article described HERE , but all this did not go according to plan, since the previous owner installed a clutch kit from a manual transmission and the dancing began with a tambourine in search of a clutch kit that was priced adequately and was available. The options were as follows: original used clutch kit price 7,500 rubles (for a used one it’s not justifiably expensive), a new clutch kit ASIN KT316R almost original (supplied to the Toyota assembly line with their nameplate) price 9,500 rubles, and of course the original TOYOTA 31250-19095 (same as ASIN but more expensive))) marketing ploy) price 14,500 rubles. I purchased ASIN.
Full size
There is even a visual difference in the baskets, not to mention that from the robot it is self-feeding (eliminates the gap between the disk and the basket)
Well, of course I put everything back together in reverse order. I initialized the ECU as this is required to reset the number of clutch connections in the ECU memory (17 connections in total).
initialization of the electronic control unit follows the algorithm described HERE Next, the clutch was initialized as described at the very beginning.
Everything seemed fine, it went fine, but still the gear shifting caused discomfort, I thought it would rub in and everything would be fine.
No matter what, I drove for literally 2 days and again the same problem with the departure to the netral. The only thing left to blame is the clutch release actuator. Car for a tie and to the garage.
It didn’t take long to remove it; it required removing the battery and the platform under it, then two chips from the sensor and electric motor and 3 actuator mounting bolts.
The opening and modernization of the actuator is shown HERE . In my case, the opening showed that the electric motor was clogged with dust from the brushes and its bearings already required replacement; as a result, the motor lost the necessary power to rotate the actuator mechanism and, accordingly, squeeze the clutch fork. The work is described HERE and HERE I didn’t go deep into the actuator itself, I just applied additional grease and put it back together. Performed clutch initialization. The car drove as if it had an automatic transmission.
Anyone who has encountered the same problems should do as I described and not encounter them again))). All the best!
Here HERE is no less interesting information on spare parts for our robots, I am sure it is very useful.
Issue price: 11,800 ₽ Mileage: 149,000 km
Source: https://www.drive2.ru/l/461316872059486274/
How to replace the clutch disc on a Toyota Corolla?
According to the manuals, the frequency with which the clutch on a Toyota Corolla should be replaced is approximately 45-55 thousand kilometers. The average cost of this procedure, if you take the car to a special service, will cost around $500-700 including a clutch kit.
It is not a fact that the craftsmen who will make the replacement will not install a Chinese analogue on the robot instead of the original kit, but for the same money. Therefore, given all these facts, it is not surprising that an increasing number of motorists are deciding to carry out this procedure on their own.
Moreover, there is nothing more complicated about it!
I would like to immediately note that, in principle, there is no fundamental difference between the original Toyota Corolla clutch kit and its Chinese counterpart.
Both the first and second have proven themselves equally well in field conditions, but the price for them will differ significantly, and not in favor of the original.
Replacing a robot clutch with a Chinese kit will cost approximately half as much.
Where do problems with the clutch of a robotic gearbox begin?
Like any mechanism, the clutch of a robotic gearbox on a Toyota Corolla has its own natural reserve of wear, sooner or later it runs out. When this happens, the car becomes very unpredictable:
- at high speeds the clutch begins to slip;
- the car begins to accelerate more difficultly, or even cannot gain sufficient speed at all. At the same time, a very characteristic smell of burnt metal appears;
- sometimes this is expressed in the other extreme - the car may start too sharply from a neutral position.
This is another reason why you shouldn’t fly to the service station headlong.
If we are talking about replacing only the clutch disc, then the entire repair can be reduced from $700 to 100-150, depending on which disc is purchased: Chinese or Korean.
How to replace the clutch disc on a robot yourself
Naturally, before replacing the clutch on a Toyota Corolla robot begins, it needs to be removed. There is no need to do any tricky procedures at this stage, everything is quite simple: unscrew everything that can be unscrewed and remove the box along with the basket. Some people prefer to leave it, but this is not important.
After removing the box, remove the basket from it. Outwardly, it is very similar to ordinary baskets from manual transmissions, but that’s where all their similarities end. It is somewhat more difficult to disassemble it, since the clutch basket is self-adjusting, and its design, in addition to the pressure plate, includes an adjusting ring and a locking comb.
What happens when the pressure plate starts to wear out? As the working surface of the pressure disk decreases, it begins to put even more pressure on the basket until the comb, which fixes the position of the disk and the adjusting ring, moves away, as a result of which the pressure disk is released and begins to slip onto the tooth. Because of this, the discs move apart, which affects their joint thickness. As a result, this affects the entire basket as a whole.
Toyota Corolla clutch basket
When replacing the pressure plate, the entire structure must be returned to its original position when the distance between the pressure and adjustment disk is minimal.
There are many ways to do this, but the easiest way is to fix the basket and, simulating squeezing the clutch, separate the discs. How to do it?
- First of all, find a surface on which you can fix the clutch basket on the Toyota Corolla robot. This can be a regular wooden tabletop or a 20 mm thick fiberboard sheet. But it is best to make a special stand, since it will definitely come in handy in the future.
- Several holes are drilled in the tabletop for bolts in order to secure the basket to it. Plus, when the robot clutch basket is secured, a hole of at least 22 mm is drilled in the center. You will need to place a bolt or pin of the appropriate diameter in it, and secure it on both sides using two washers and two nuts. It is important that the washers are larger in diameter than the hole between the clutch petals.
- Once all the holes are drilled and all the bolts are in place, the fun begins. On the central stud we begin to tighten the nut, which presses on the washer. That, in turn, will press the petals, thereby simulating squeezing the clutch.
- As soon as the pressure is sufficient, the adjusting ring will be released, which will allow you to disconnect the comb that connects the ring to the disk and turn it to its original position.
- Once this has been achieved, the nut can be released because the basket is cocked. Now it can be unscrewed and assembled to be installed in place.
Assembling the basket and adjusting it will also occur in several stages. The most important thing that will happen when assembling the basket on a Toyota Corolla robot is replacing the clutch disc with a new one, adding it and connecting the actuator. Step by step, it looks like this:
- A new Chinese or Korean disk, which was purchased as a replacement for the old one, is lowered into a basket, which is attached to the flywheel, and centered. This is done by lightly tapping the disk while turning the flywheel. If done correctly, the disc will find its center very easily.
- Return the basket to the box and tighten it. After this, you can connect the actuator.
- By the way, at this stage it would be wise to replace the old oil.
The last stage is setting up and initializing the clutch on the Toyota Corolla robot, after the used disc has been replaced. You can do it in the same way as a robot clutch was replaced - on your own, although at this stage it is better to trust everything to professionals, well, not everyone is strong in all these initialization algorithms.
Toyota Corolla clutch disc
You can easily get to the service station if you simply set up the box, without initialization. How to do it?
- The ignition is turned off, squeeze the brake and put the gearbox in neutral.
- We turn on the ignition, the handbrake is in the same position N. We wait 40-45 seconds, after which we turn off the ignition.
- We turn on the ignition again and wait another twenty seconds. Turn it off.
- This time, together with the ignition, we start the engine, all this time the brake pedal is to the floor, we do not release it. In this case, the N indicator on the panel should blink, as soon as it stops blinking - this means that the clutch has been adjusted.
We figured out the mechanics. What other problems could there be with the clutch on a Toyota Corolla robot?
Malfunctions in the electrics of a robotic gearbox
How can you tell if clutch problems are actually electrical and not mechanical? First of all, there are manuals for Toyota Corolla for this. They describe in great detail what errors can be displayed on the electronic display and what they can mean.
For example, error P0810 is typical for both mechanical failures and those that occurred in electronics. But error P0900 clearly indicates that the electrical circuit has broken and there is no contact with the actuator motor.
Therefore, it’s even useful to periodically look into these sophisticated books, you’ll see that less money will start to go away. After all, it is very beneficial for the mechanic at the service station to have the clutch replaced completely, and not its individual components.
Therefore, as they say: – Forewarned is forearmed!
How else can you understand that they are making electricians and not hardware? Listen to the symptoms. If during operation the clutch suddenly automatically resets to neutral, this is 100% an electrical problem.
But on the electronic display it will look like problems with the transmission.
And if problems with mechanical components can be solved on your own, then it is better to have electronic problems resolved by a well-tested technician.
Source: http://autodont.ru/transmission/cohesion/disk-scepleniya-na-tojota-korola
Toyota Corolla robot clutch replacement / Corolla clutch replacement – cost
Almost half of the Toyota Corolla, also known as Toyota Auris (hatchback) models sold in the Russian Federation in recent years are equipped with a robotic gearbox.
Despite the fact that the Toyota Corolla is an extremely reliable car, this particular unit turned out to be a weak point, causing unexpected problems for the owner.
Look at the PHOTO REPORT on replacing the clutch robot Toyota Corolla
- Signs of an upcoming Toyota Corolla clutch replacement / robot clutch repair? Before replacing the clutch on a Corolla It is highly recommended to conduct computer diagnostics to check for errors. This is explained by the fact that in addition to wear of the clutch disc itself, the actuator or Toyota Corolla clutch drive, the electromechanical device that presses the clutch fork, may fail. Each malfunction has its own error code, which can be used to immediately make a diagnosis. In half of the cases, it is necessary to change both the clutch and the non-working Toyota Corolla / Auris clutch actuator. After s Replacing a Toyota Corolla robot clutch kit a learning/initialization procedure must be carried out. Without this, the car will move jerkily or not at all. This procedure can be carried out both without special software equipment and with it. At the service station this is done only by software, which ensures the highest quality and correct procedure for initializing the Toyota Corolla clutch.
Cost of replacing a Toyota Corolla robot clutch at the Orbita service station:
-
- Sometimes a worn clutch does not show itself until the very end, and at the last moment the “gear” symbol lights up on the dashboard and when the gear is engaged in neutral, the “N” symbol begins to flash.
- Shocks and shocks when switching.
- Car slipping, that is, gearbox shifting at high engine speeds.
- Extreme degree of wear - the car goes into neutral - the “N” icon flashes, the car does not move.
- Replacement work, including adaptation (“training”, initialization) – 7,000 rubles .
- Clutch kit (manufactured by Aisin (Japan) – 10,000 rubles (this kit is in the “original” packaging)
- Release bearing (original Toyota) - 2,500 rubles .
- Additionally (we recommend, but the client decides), it is advisable to change 2 drive oil seals (they may leak after removing / installing the drive shafts) and fill in new gearbox oil 2 liters, Toyota original (the old one is drained in any case before dismantling the gearbox) - this will add another 3,700 rubles .
- The price does not include diagnostics of errors before work - 950 rubles . Highly recommended!!!
-
| Main works | PRICE | A COMMENT |
| Replacing the clutch kit (regular manual transmission) | 6 000 rub. | Cost of replacing a clutch kit: disc, basket and release bearing |
| Replacing the clutch kit (robotic gearbox) | 7 000 rub. | Includes clutch learning/adaptation procedure |
PARTS REQUIRED
Here you need to briefly describe the operating principle of a robotic gearbox.
In principle, this is the same manual transmission, in which instead of the components responsible for shifting gears (cable, clutch pedal and conditional driver’s foot), there is a clutch drive (Toyota Corolla clutch actuator), position sensors and an electronic control unit (a kind of brain that based on incoming data, makes a decision to change gears).
The clutch drive (actuator), upon command from the control unit, presses the clutch fork, which, accordingly, turns the Toyota Corolla clutch on or off.
This scheme is the reason for the early replacement of the Toyota Corolla robot clutch. If a person, while operating a pedal, smoothly depresses (turns on and off) the clutch mechanism, then artificial intelligence cannot fully take into account all the nuances.
Namely, over time, the clutch disc becomes thinner as a result of natural wear, and a gap appears between the disc and the actuator end switch.
Because of this, shocks and impacts appear when switching the gearbox, which leads to further accelerated wear of the clutch disc.
According to the mind, it is necessary to periodically (every 20,000 - 30,000 km) initialize the Toyota Corolla clutch.
That is, “set” the zero point again - bring the limit switch to the clutch disc, which eliminates the gap, makes operation smoother, and prolongs the life of the clutch.
However, almost no one does this procedure and as a result, after 50,000 - 60,000 kilometers, the Toyota Corolla robot clutch has to be replaced.
Source: http://orbita-toyota.ru/remont/clutch_e150/40105_e150/
Replacing the clutch on a Toyota Corolla
Transmission options installed on a Toyota Corolla may vary significantly depending on the year of manufacture and the type of power plant. Motorists are well aware of delicate robotic CVTs and more reliable five-six-speed manual transmissions. Both options are accompanied by a mandatory attribute - clutch.
Once you reach the mileage limit of 100 thousand km, you should be careful with the clutch, as the first signs of malfunction may appear:
- “driving” the clutch at high speeds;
- Extraneous noise emitted by the release bearing;
- unstable gear shifting (extraneous sounds, shocks when shifting).
Over time, a specific smell may appear, which also indicates a malfunction of the unit.
You should not ignore these signs, since failure to correct the problem in a timely manner may result in more serious repairs. The manufacturer provides diagnostics for this unit. It can be done using special software from official dealers.
The results make it possible to determine the exact number of clutch connections, as well as the serviceability of the unit and whether the clutch in Toyota Corolla really needs to be replaced. The mileage indicator is conditional, since much depends on driving style and operating conditions of the car. If the car is driven only in the city, the clutch will wear out the fastest.
Basic preparatory activities
When replacing the clutch, you must purchase the following original spare parts:
- clutch disc;
- clutch basket;
- clutch release bearing.
Sometimes it is necessary to replace the flywheel if its wear is more than 0.5 mm. However, before measuring, which can only be carried out after dismantling the box with a high-precision measuring instrument, this part should not be purchased
In order to change the clutch in a Toyota Corolla robot, place the car on a viewing hole or a lift (the latter is preferable). And also stock up on a traverse for hanging the box. Then perform the following operations.
- Remove the battery and pad.
- Drain the transmission oil.
- Remove the plastic protection of the engine and fender liners on the driver's side.
- Release the two shift cables and the speedometer cable.
- Unscrew the clutch slave cylinder and pipes.
- Remove the starter by disconnecting the electrical wiring from it.
- Remove the front wheels.
- Disconnect the right and left axle shafts by removing the ball joints.
It is advisable to completely dismantle the axle shaft on the driver's side. This will provide enough space to remove the gearbox.
- Remove the reverse speed sensor and the negative wire coming from the box.
- Unscrew the central bolt securing the front engine mount.
- Unscrew the two bolts and remove the engine mount.
- Remove the cross member holding the engine.
- Unscrew the bolts holding the gearbox.
To do this, jack up the engine and select its position in such a way that it is possible to remove the box. After removing the gearbox, it is necessary to inspect the flywheel for mechanical damage and blue spots. Their presence may indicate overheating of the part. Because of this, it may change its shape, which will require replacing the flywheel.
Removing the clutch
To make it more convenient, lock the flywheel in a stationary position. To do this, insert a pry bar between the teeth. Place it against the pin screwed into the hole connecting the box to the engine.
- Unscrew the bolts holding the clutch housing diagonally.
- Remove the clutch disc.
- Remove the clutch release bearing by moving the retaining tabs to the sides.
- If necessary, remove the clutch release fork.
It is recommended to replace the crankshaft rear oil seal even if no traces of oil leakage were found.
Clutch installation
- Orient the clutch disc so that the protruding part faces the pressure plate.
- Install a centering mandrel of the appropriate size into the hole in the driven disk hub.
- Tighten all the bolts holding the clutch cover one by one. Tighten diagonally with the appropriate torque.
- Remove the centering attachment.
- Install the box, as well as assemble the remaining components and parts in the reverse order.
Initialization
Replacing the clutch on a Toyota Corolla robot will be done correctly if initialization is necessary after installing new parts.
The process of resetting the transmission ECU to zero is called initialization.
This operation is required when:
- failures in the operation of the checkpoint;
- partial and complete disassembly of the gearbox;
- replacing parts, sensors, ECUs.
It is important to carry out this only for those elements of the gearbox that have been replaced. This procedure should not be carried out unless absolutely necessary, as it significantly reduces the life of the clutch.
If the material was interesting or useful for you, publish it on your social network page:
Source: http://jrepair.ru/remont-toyota/zamena-stsepleniya-na-toyota-corolla
Replacing the clutch on a robot Toyota Corolla, Yaris and Auris – Car diagnostics
If the car moves jerkily when starting off or does not reach maximum speed (even though the engine speed increases), this indicates wear of the clutch elements (usually the friction disc) or the need to adjust the clutch engagement point.
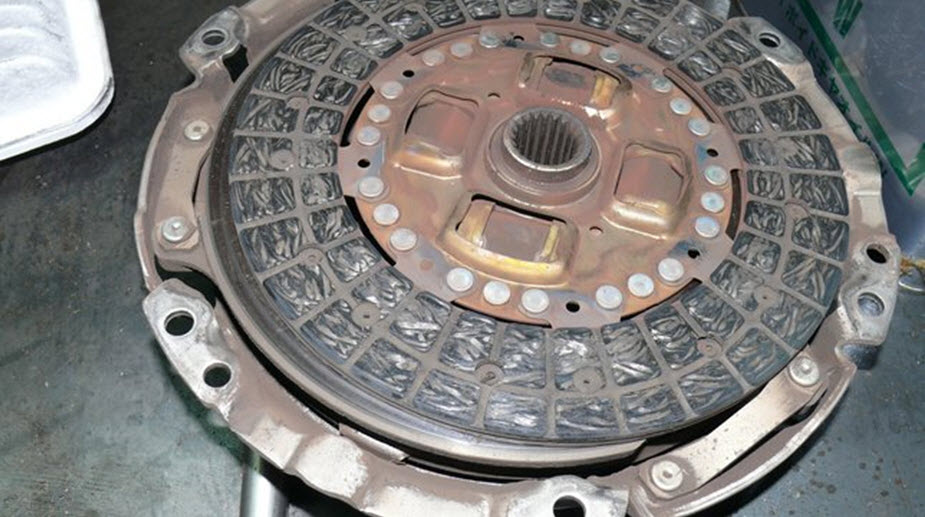
The photo shows wear on the clutch friction disc. For this reason, the clutch slipped and overheated, especially in traffic jams. The red gear icon lit up. The car went into emergency mode and stopped driving.
After 10-15 minutes of “rest” everything returned to normal, after which we could move on. Corolla, Auris and Yaris are equipped with robotic gearboxes, under the brand name MMT (Multimode manual transmission).
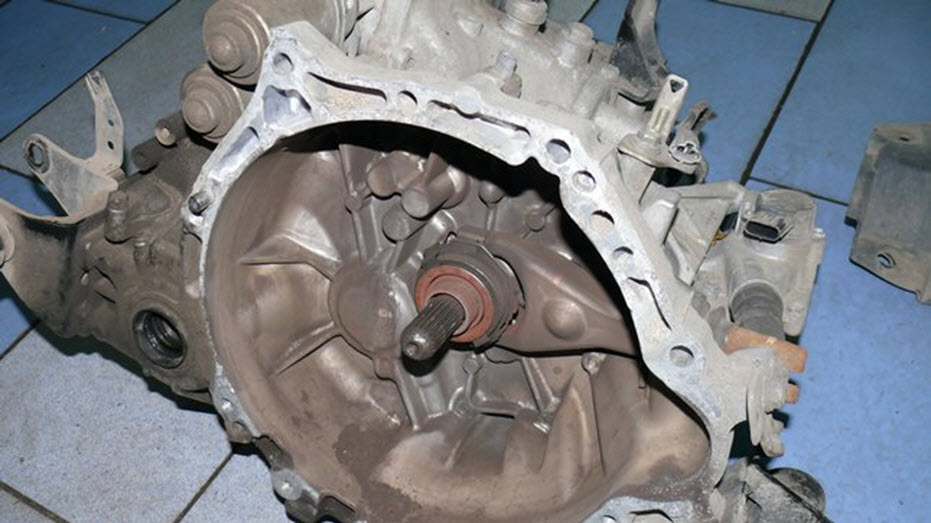
The Corolla and Auris use the C50A models, and the Yaris the C60A. The only difference between a robot and a manual transmission is the presence of gear selection and clutch controls located on the gearbox housing. The clutch fork is controlled by the clutch actuator, and gear selection is controlled by solenoids.
All robot actions are controlled by sensors, the readings of which are sent to the computer.
Manual transmission C50A
After replacing the clutch on the robot, it is necessary to train the control unit for the new parts, because the thickness of the new disk and the height of the basket have changed. We provide training using a computer and Toyota Techstream . On the Internet you can find instructions for initializing the clutch using a jumper and special codes.
Codes are entered using the gear shift lever and brake pedal. But this method can hardly be called professional. In our service, you can replace the clutch on a robot on the day of your call. Cost of work: Yaris 6500 RUR Corolla, Auris 7000 RUR All you need is to buy a clutch kit (basket, disc, release bearing).
Call and make an appointment for repairs.
What do I want to say about the clutch? Everyone handles it differently, because some people drive calmly on the highway, some drive in the city, while others get stuck in snow or mud and burnt it in 5-10 minutes of slipping. But on average it is 50-60 thousand for the city. It is advisable to do the actuator connection, initialization and training every 10-20 thousand km.
When replacing, it is better to change the oil at the same time. There is no need to pour expensive stuff. TNK 75W-90 is suitable, it makes less noise and switches on more smoothly. The oil in the box is changed every 60 thousand km. You can also replace the drive shaft seals, but this is not at all necessary. It is recommended to change drive seals when they become fogged.
After replacing the clutch kit - basket, disc and release bearing, always after 5-10 thousand km. drive in and re-adjust the clutch actuator and initialize and train the robot. Because new parts quickly change their position after the first grinding in.
And therefore, the parameters under which the training took place are no longer relevant. Unfortunately, you won’t be able to completely adjust the clutch on Toyota robots the first time. Since the clutch actuator has a mechanical connection with the release bearing.
The situation is different with robotic boxes that use a hydraulic circuit. These are Opel and Fiat robots. In the case of hydraulics, the clutch is supplied automatically as the friction disc and basket wear.
This can be compared with conventional mechanics, where the hydraulic drive does not need adjustment, but the cable had to be tightened.
Source: http://www.cardiagnos.ru/posts/detail/zamena-scepleniya-na-robote-toyota-corolla-yaris-i-auris
Instructions for adjusting the clutch with the MMT sensor on a Toyota Corolla
Toyota Corolla is a very popular car, which is considered not only high quality, but also reliable. However, no matter how reliable a car is, certain parts sometimes fail or require some kind of adjustment.
One of these parts is the clutch. If you have changed it, or changed related components, the clutch must be adjusted.
Fortunately, this is very simple to do and the operation should not cause any difficulties even for those people who do not understand cars.
Clutch adjustment
The most interesting thing is that the entire adjustment process is carried out without any special diagnostic equipment. Naturally, the first thing you need to do is adjust the clutch position.
This is easy to do and at the very beginning you will have to prepare the car for the subsequent operation. To do this, you will need to shift gears to position N with the engine running, then turn off the engine and put on the handbrake.
The next thing you need to do is jumper the contacts in the DLC3 connector for diagnostics. You can see the detailed location of all connectors in the car manual.
If you are not ready to view it, then just remember the following location: jumper the 4th connector on the left in the top row and the 5th connector on the left in the bottom row. The effect will be achieved only after 10 seconds of pressing.
Without pressing the brake pedal, turn on the ignition, but do not start the engine, as this may prevent proper adjustment. Then, within 3 seconds, quickly depress the brake 7 times, after which the buzzer will emit several short beeps.
When the signal ends, press the brake pedal and, without releasing it, make the following gear changes: NEM + M + M + M + ME N. Be careful when making these changes. When you turn on the plus, you do not need to return to neutral or any other mode.
The box can be switched to the neutral position only after the last step. You can now release the brake pedal.
After a few seconds you will need to press the brake pedal again. In this case, the buzzer will again begin to emit short beeps at short intervals. Be careful at this stage.
If the buzzer does not signal, or the break between signals reaches 1 second, all actions, starting from the very beginning, will need to be done again.
At the same time, do not forget about the need to turn off the ignition and wait 15 seconds.
If everything is in order, then press the brake for 2 seconds at least 3 times. As in the first case, the buzzer should emit two short beeps with an interval of 0.25 seconds.
Next, you should follow the already familiar procedure of squeezing the gas pedal. In this case, the gear selector will need to be set to minus and the brake released. After this, turn off the ignition completely and after a break of 10-15 seconds, disconnect the contacts from the previously bridged contacts.
Clutch initialization
After adjusting the clutch using the MMT sensor, it is necessary to initialize it. This procedure also does not require any additional equipment from you.
As in the previous case, you will need to prepare the car. This process involves shifting the gear to neutral and turning off the vehicle's ignition.
Next, you need to close the same contacts as in the previous case and wait at least 10 seconds, then turn on the ignition, but do not start. As before, within 3 seconds you need to quickly press the brake pedal 7 times.
The buzzer will emit 2 short beeps at 0.25 second intervals.
Immediately after this, hold down the gas pedal and, without releasing it, change gears in the following sequence: NEM + - + - ME N. At the end of the shifting procedure, release the brake pedal and press it back.
In this case, the buzzer will emit two beeps every half second. If you do not receive any signals or they sound at too long an interval, turn off the ignition, wait 10 seconds and repeat all over again.
If everything went well, then release the brake pedal and press it 3 times within 2 seconds. As a result, the buzzer will emit two short beeps. After this, turn off the ignition and wait 10 seconds. The device initialization process can be considered complete.
The contacts from the diagnostic connector can be removed and proceed to direct adjustment of the clutch.
Clutch adjustment
With this operation, you will no longer need to bridge the contacts, so you will find it somewhat easier. The process of preparing the car, as in previous stages, consists of switching the gearbox to neutral and turning off the ignition.
As for the actual setup procedure, first turn on the ignition and wait 40-50 seconds. After this, turn off the ignition and wait another 20-25 seconds.
Now don’t just turn on the ignition, but start the engine with the gearbox in neutral. Be careful, because when you turn on the engine, the N indicator will light up on the information panel.
Do nothing and wait until the indicator stops flashing. If the indicator starts to light constantly, the setup can be considered complete.
Source: http://autoremka.ru/transmissiya/instrukciya-po-regulirovke-scepleniya-s-datchikom-mmt-na-toyota-corolla.html
Toyota Corolla clutch replacement - robot and mechanics
Clutch failure, like any other breakdown in a Toyota Corolla, is a fairly rare occurrence.
Therefore, not every driver can easily identify the signs that indicate that the car is faulty and it’s time to replace the clutch disc.
But, in fact, it is quite possible to prevent this trouble; you just need to be more attentive to the behavior of your car on the roads and sometimes do diagnostics. This will protect you from getting into unpleasant situations on the roads.
Sounds when there is a clutch problem
- Extraneous creaking
- Crunchy sound
- Excessive noise
- An ear-piercing grinding noise that clearly manifests itself when shifting gears
- Slipping effect
- Unnatural vibration of the car when changing speeds
If there is a problem with the clutch on the Corolla, the car may start to jerk when the drive is active. Also, the disc linings, like the discs themselves, are subject to wear, and the pedal will begin to fail. To begin with, it will simply sink, and after a while it may even fail.
Basically, only specialists working in showrooms can understand the very essence of the problem of clutch failure, but anyone can fix this part, and on their own, because replacing or repairing a clutch on a Toyota Corolla will cost you more than any maintenance.
What mainly breaks in the clutch?
- Bearing
- Cylinder
- Fork
- Basket
A malfunction in the clutch assembly may not occur if you use the machine in a gentle mode.
Replacing the clutch mechanism
A mechanical malfunction is the wear and tear of some clutch parts; in most cases, it is overheating, causing it to stop functioning normally, which is very dangerous.
The main sign of clutch failure is slipping; it can lead to a loss of torque when driving at high speed or during a sudden start.
In such cases, the system provides an emergency mode and setting of neutral speed, after which an error with code P0810 is displayed on the display.
To get rid of this type of malfunction, it is necessary to replace the complete clutch set: bearing, clutch disc and basket.
How this will happen:
- First, you need to remove the ball from the lever and carefully remove it from the gearbox, then unscrew the wheels on both sides and remove them.
- Next, remove the box using a pry bar so that you can conveniently get to the flywheel with the clutch.
- Unscrew the clutch itself, you will see a worn out disc, which is where the whole problem lies.
- Replace the clutch disc and return everything to its place in reverse order.
Replacing the clutch on a robot
Electrical system malfunction has several causes. Firstly, this may be a problem in the settings, and secondly, the initialization of the clutch may be disrupted. It will not be difficult to notice the breakdown; the car will jerk at the start.
Also, with such a problem, the speed is set to neutral and a red sign on the display lights up, indicating what kind of malfunction has appeared in the transmission. After some time, the system will start working again.
When a clutch position control error P0810 occurs, a mechanical and electronic malfunction of the clutch occurs. If a motor circuit break error occurs - P0900, a circuit break occurs in the wire, or the clutch motor itself fails.
The clutch is replaced as follows:
- You need to purchase a kit: clutch disc, basket and release bearing.
- In the mass air flow sensor, it is necessary to disconnect the connector, as well as the latches of the housing cover. Then you need to unscrew the lower part of this same air filter.
- Next, you need to unscrew, without removing, the gearbox mounting bolt, and then disconnect all connectors.
- Unscrew the top bolts of the fastenings.
- Now proceed to unscrewing the hub nuts and the ball mount. After draining the oil from the gearbox, remove the shafts.
- We proceed to unscrewing the front gearbox mounting cushion, after which it is necessary to remove the drive shafts from the box.
- The following: you need to install thrust stands on the engine and gearbox, then lift the same gearbox and remove the upper bolt of its fastening, which was previously unscrewed.
- Later, you need to unscrew the gearbox mounting bolts strictly in a circle and pull the box (you can use a pry bar) from the engine, where it is pressed tightly. After the work has been done correctly, the gearbox will be on the floor.
- The old, inoperative clutch must be removed from the flywheel, and then the flywheel should be checked for its functionality; its surface should be smooth and without bumps.
- Now you can proceed to installing the new clutch on the flywheel, after which we center the clutch disc.
- Last steps: replace the bearing with a new one, and install the gearbox in reverse order.
Read also
Source: http://grandrepairauto.ru/zamena-scepleniya-toyota-corolla-robot-i-mehanika.html