Clutch master cylinder VAZ 2107: device, principle of operation, replacement and repair, instructions with photos and videos

In all classic VAZ models, the clutch is controlled using a hydraulic drive. An important role in the hydraulic drive system is played by the clutch master cylinder.
Clutch master cylinder VAZ 2107
The VAZ 2107 hydraulic clutch drive is the best option for rear-wheel drive vehicles. An important role in the hydraulic drive system is played by the clutch master cylinder (MCC).
Purpose of the GVC
The GCS converts the force of pressing the pedal into working fluid pressure (WF), which is transmitted through pipelines using the working cylinder piston (WCC) to the fork rod. As a result, the latter rotates on a hinged support and moves the pressure bearing, turning the clutch (MC) on or off. Thus, the GVC performs two functions:
- converts pressing the clutch pedal into fluid pressure;
- transmits pressure to the working cylinder.
Operating principle of the GCS
To create pressure in the hydraulic system you need:
- working environment;
- cylinder with piston;
- the force that causes the piston to move.
The VAZ 2107 MS drive uses brake fluid (ROSA DOT-4 is recommended), which practically does not compress and does not have a negative effect on rubber products.
The piston moves through a rod connected to the clutch pedal.
The pressure in the system is created by analogy with a medical syringe due to the fact that the piston and the hole through which the gas is ejected have different diameters.
The system differs from a syringe in that the GCS provides for the forced return of the piston to its original position. In addition, the heating of the fluid and moving parts during operation is taken into account.
The pedal moves the pusher, which, in turn, moves the piston and creates pressure in the hydraulic drive system
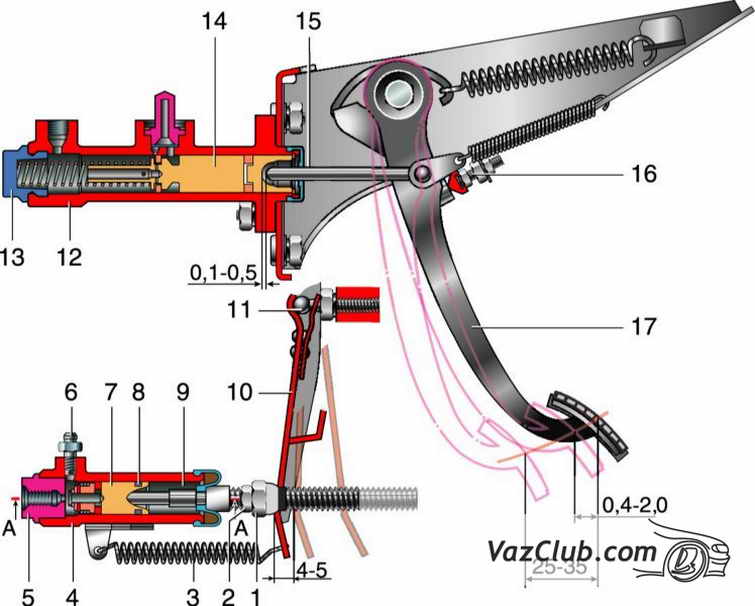
The GCS works as follows. Working fluid through hole 19 is supplied from the tank into the working cavity 22 in front of the piston. When you press pedal 15, pusher 16 moves and, resting against piston 7, moves it forward.
When the piston closes holes 3 and 19, the pressure of the liquid in front of it will begin to increase sharply and will be transmitted through the pipelines to the RCS piston. The latter will turn the fork through the pusher, and its front ends will move the clutch with the release bearing (VP) forward.
The bearing will press on the friction spring of the pressure plate, which, moving towards the VP, will release the driven disk, and the clutch will disengage.
When the pedal is released, the reverse process will begin. The pressure on the piston will disappear, and due to the return spring 23 it will begin to move to its original position. At the same time, the RCS piston and the fork return spring will also begin to move in the opposite direction and create pressure in front of it, which will be transmitted back to the RCS through the pipeline.
As soon as it becomes greater than the force of the return spring of the GCS piston, it will stop. Through the bypass channel in piston 21, the inner surface of the floating sealing ring 20, which acts as a check valve, will be under pressure. The ring will flatten and block the bypass hole 3 in the cylinder body.
As a result, a slight excess pressure will remain, which will remove all the play resulting from wear of the pushers, fork eyes and release bearing. As the temperature in the working chamber of the cylinder increases, all parts and working fluid will expand.
The pressure in front of the piston will increase, and it will move back a little, opening compensation hole 3, through which excess liquid fluid will flow into the tank.
Location of the GVC
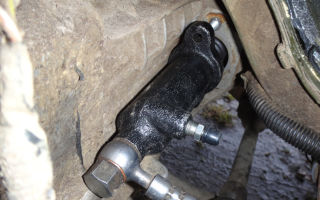
Since the pusher must be positioned horizontally and fit exactly into its piston, the GCS is mounted on the front partition of the engine compartment on the left side. It is impossible to install it any other way - it is screwed onto two studs welded to the partition. No additional conditions are required to dismantle it.
Access to the fastening nuts, pipeline fittings and reservoir hoses is provided by simply lifting the hood lid. At the same time, the main brake cylinder should not be confused with the main brake cylinder (MBC), which is located nearby, a little further from the sidewall of the left wing.
The GTS is larger and more complex; more tubes fit into it.
Selection of GVC for VAZ 2107
The best option for replacement is to purchase a GCS designed specifically for classic VAZ models. Clutch master cylinders from UAZ, GAZ and AZLK vehicles are not suitable.
The same applies to foreign analogues - foreign cars with rear-wheel drive are equipped with GVCs, which only highly qualified specialists can adapt to the VAZ 2107 (different sizes, different threads for pipelines, different pipe configurations).
However, you can easily replace the original cylinder with a GCS from a VAZ 2121 and from a Niva-Chevrolet.
Manufacturer's choice
When purchasing a new GVC, you should focus on products from trusted Russian manufacturers (AvtoVAZ JSC, Brik LLC, Kedr LLC), the Belarusian company Fenox, which is adapted to our conditions and is affordable. The average cost of GVC is 600–800 rubles.
Table: comparative characteristics of GVCs from different manufacturers
Recently, there have been many counterfeits of well-known brands on the market. They can be distinguished by their low-quality workmanship and low price relative to their original analogues.
Repair of clutch master cylinder VAZ 2107
If problems arise with the GVC, it must be removed from the car, disassembled, defects eliminated, assembled and reinstalled. The work can be performed by any car owner with minimal plumbing skills. If you don’t have such skills, it’s easier to change the cylinder assembly. To repair and replace the GCS, you will need the following tools and materials:
- a set of open-end and ring wrenches;
- set of heads with ratchet;
- long thin screwdriver;
- round nose pliers;
- 0.5 l of brake fluid ROSA DOT-4;
- water repellent WD-40;
- a small container for draining the fuel;
- bleeding hose;
- syringe 22–50 ml.
Dismantling of the main central circulation system
To dismantle the VAZ 2107 GCS, you will need to perform the following steps:
- Unfasten the fastening belt of the expansion tank and move it to the side. To provide access to the main circulation system, you need to unfasten the belt and move the expansion tank to the side
- Unscrew the tank cap.
- Pump out the working fluid with a syringe. Before removing the main fluid pump, you need to pump out the working fluid from the cylinder tank with a syringe.
- Using a 13-size open-end wrench, unscrew the fitting of the tube going down to the working cylinder. To dismantle the main circulation pump, you will need to use a 13-size wrench to unscrew the fitting of the pipeline going down to the working cylinder and move the tube to the side
- Release the clamp, remove the hose from the GCS fitting and pour out the remaining fuel from it into a previously placed container. In order to remove the hose from the fitting, you need to loosen the clamp with a screwdriver
- Using an extension and a 13mm socket, unscrew the two fastenings on the studs. The two nuts securing the main control center are unscrewed with a 13mm socket and an extension with a ratchet
- Use your hands to pull the main circulation center out of its seat. To dismantle the main circulation center, you need to press the clutch pedal, move the cylinder from its place and carefully pull it out
Disassembly of the main central circulation system
Before disassembling, you need to clean the GCS from dirt, smudges, and dust. The disassembly itself is carried out as follows:
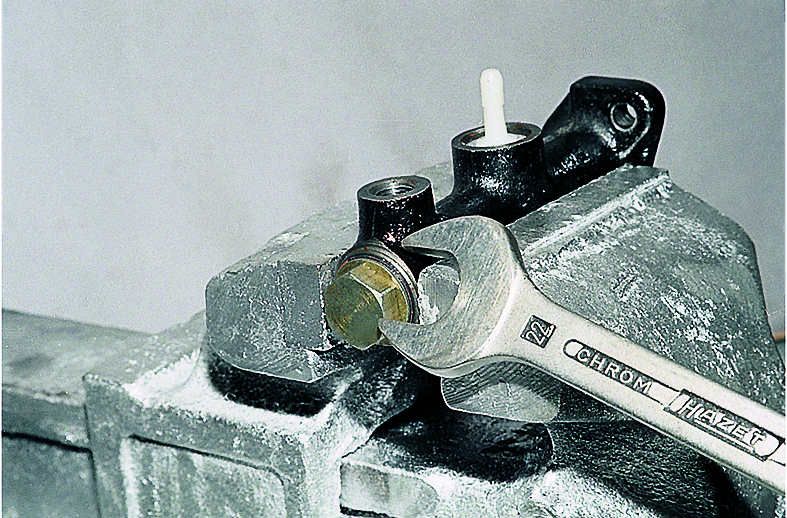
- Clamp the GCS in a vice, use a 22mm wrench to unscrew the plug and pull out the spring that returns the piston to its original position. When disassembling the GCS, you must first clamp it in a vice and use a 22mm wrench to unscrew the plug
- Use a screwdriver to remove the protective cap.The protective cap is removed using a screwdriver
- Using round nose pliers, pull out the locking ring. To remove the locking ring, you will need round nose pliers
- From the side of the plug, use a screwdriver to carefully push the piston out of the cylinder and lay out all the parts of the main circulation system on the table. The individual elements of the main circulation center are laid out on the table
- Use a screwdriver to pry off the lock washer and remove the fitting from the socket. To remove the fitting from the socket in the main body housing, you need to pry off the lock washer with antennae with a screwdriver
- Clean the compensation and inlet holes with wire.
Replacing rubber o-rings
It is recommended to change the rubber O-rings each time the GCS is disassembled. To do this you need:
- Carefully pry the sealing ring with a screwdriver and pull it out of the groove. To remove the sealing ring, you need to carefully pry it with a screwdriver and pull it out of the piston groove
- Wash the piston in clean brake fluid. It is not recommended to use solvents and motor fuel, as they can damage the rubber. The cuff and replacement O-rings are included in the repair kit
- Use a screwdriver to put the cuffs in place (matte side towards the pedal, shiny side towards the plug).
GCS assembly
- Rinse the cylinder mirror with fresh working fluid ROSA DOT-4.
- Lubricate the piston and sealing rings with the same liquid.
Assembly of the clutch master cylinder is carried out in the reverse order of disassembly.
- Insert the pistons into the cylinder in the reverse order of disassembly.
- Install the retaining ring into the groove in the housing.
Insert the return spring on the other side of the housing.
- Tighten the plug, first placing a copper washer on it.
Installation of GCS
Installation of the GCS is carried out in the reverse direction of removal. Pay special attention to the correct installation of the pusher in the piston and uniform tightening of the fastening nuts.
Bleeding the clutch
After repairing or replacing the VAZ 2107 GCS, the clutch needs to be pumped. This will require an inspection hole or overpass.
Selecting and filling working fluid
ROSA DOT-3 or DOT-4 brake fluid is used as the working fluid in the VAZ 2107 hydraulic clutch drive.
The hydraulic clutch system of the VAZ 2107 is filled with ROSA DOT 4 brake fluid.
RJ is poured into the GCS tank, located in the engine compartment on the front bulkhead.
To correctly fill the system, before filling, you need to loosen the air bleeder fitting on the working cylinder by one or two turns and tighten it after the liquid begins to flow out without gas bubbles.
The tank must be filled to the appropriate level.
Bleeding the hydraulic clutch
It is advisable to use two people to bleed the hydraulic drive - one presses the clutch pedal, the other unscrews and tightens the air bleeder fitting on the working cylinder, having previously put a hose on it. You will need to do the following:
- Press the pedal firmly several times and hold it pressed.
- Unscrew the fitting and drain the liquid along with the air.
Continue the operation until all air has been removed from the clutch hydraulic drive.
Video: replacing the VAZ 2107 clutch master cylinder
The clutch master cylinder fails quite rarely. The reasons for its malfunction may be dirty or low-quality working fluid, a damaged protective cap, or worn out seals. Repairing and replacing it with minimal plumbing skills is quite simple. You just need to follow the instructions of the professionals exactly.
Source: https://bumper.guru/klassicheskie-modeli-vaz/stseplenie/glavnyiy-tsilindr-stsepleniya-vaz-2107.html
Installation, repair and replacement of the clutch master cylinder
If we simplify the formulation of the actions performed by the clutch drive, it will sound like this - the transmission of torque from the motor to the corresponding gearbox shaft with the ability to disable and then softly engage after switching to the desired gear.
Nowadays, designers have not yet come up with anything more effective for achieving this goal than a hydraulic clutch drive.
The diagram and principle of operation of the described device is simple: a depressed pedal acts on the clutch cylinder rod, which, accordingly, using hydraulic fluid located in the tank through tubes, activates, through the working cylinder, the fork and the release bearing.
Failure of the clutch drive occurs for several reasons, one of which may be a faulty clutch master cylinder; in order to repair it, it is advisable to understand its structure, signs indicating the inoperability of the mechanism, methods of repair, and if repair is not possible, then how to make it replacement.
Clutch master cylinder design
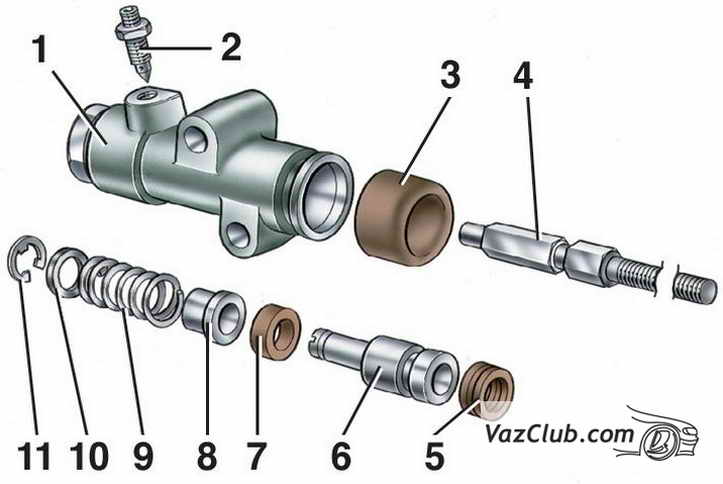
The principle of the clutch master cylinder is not particularly complicated. The clutch master cylinder consists of the following main parts:
- a tank located on the body, in some cases next to it;
- bypass fitting;
- protective case;
- pusher rod;
- outer cuff;
- rod (piston);
- internal sealing collar;
- cylinder body;
- return spring.
Possible malfunctions and their diagnosis
Signs indicating malfunctions in the clutch drive can be diagnosed based on the following:
- The level in the clutch reservoir has dropped significantly, this indicates that brake fluid is leaking somewhere in the system; if the connecting pipes are intact, this may be due to worn cuffs or a faulty piston in the master cylinder.
- A visual inspection showed the presence of places where fluid was leaking: tubes, cuffs, etc.
- When pressed, periodic failures of the pedal occur, this indicates that there is air in the clutch drive, this happens when hoses are cracked or when the level in the reservoir drops below “nowhere”.
- When shifting gears, a characteristic sound is heard in the gearbox, reminiscent of a “crunch”; the cause may be a malfunction of the piston or spring of the master cylinder.
Source: https://avtodoc24.ru/ustroistvo-remont-i-zamena-glavnogo-ts/
Repair and replacement of the VAZ 2107 clutch slave cylinder on your own
Nobody wants to experience discomfort while driving, especially if it is associated with problems in driving.
Owners of domestic “classics” have to devote more time and effort to the condition of their car, because they are used to doing everything with their own hands.
We can say with complete confidence that if a car owner has already mastered the process of wheel alignment adjustment , then he can also repair the hydraulic drive of the transmission clutch, just study the technology.
General information
In order for the replacement of the VAZ 2107 clutch slave cylinder to be justified, it is good to know its purpose and the first signs of a malfunction. The torque transmission system on classic VAZ models is driven by a hydraulic drive, the main task of which is to transmit force when pressing the clutch control pedal.
In turn, the hydraulic drive consists of two cylinders: the main and the working. When the pedal is applied, pressure is created in the main center, as a result of which the brake fluid is pumped through the valve into the working cylinder (WC). The latter activates the rod, which squeezes the fork, thereby selecting gears.
Traditionally, the control center is located on the gearbox housing and secured with two bolts, so it can only be reached from under the bottom of the car. The operation of both cylinders depends on the presence of brake fluid, so you need to monitor its level, especially since this is not difficult to do - the container is located in the engine compartment.
When is it necessary to replace a faulty clutch slave cylinder on a VAZ 2107: signs and causes
In most cases, clutch control problems are associated with loss of tightness, when the pedal loses its elasticity when pressed. However, this fact is not so bad, but the inability to engage the gear is already serious.
If we put together the signs indicating the need to replace the clutch slave cylinder on a VAZ 2107, we get the list:
- A drop in the level of brake fluid in the reservoir, which indicates a loss of tightness of the hose or brake fluid. The breakdown is also determined by the spots under the car.
- Periodic “failures” of the pedal or its soft movement indicate air entering the system. Failure may be the result of a worn cuff or cracks in the working cylinder body.
- A gradual loss of pedal stiffness and difficult gear shifting indicate a broken RC spring. In this case, the fluid level remains unchanged, and adjusting the pedal does not produce any results.
Liquid leakage from the master cylinder is signaled by similar signs, so during inspection you need to pay attention to its condition.
How to change the Lada slave cylinder yourself?
To work you will need the following set of tools:
- Pliers.
- Open-end wrench “17”.
- Head "13".
It is more comfortable to carry out the repair process on an inspection pit or overpass. If this is not possible, the front part of the machine must be jacked up and placed on supports, having previously secured the rear wheels with shoes. Further work is carried out on the following transitions:
- Loosen the nut of the hose tip in the RC plug using a 17-mm open-end wrench.
- Using pliers, disconnect the tension spring.
- Unbend and remove the cotter pin at the end of the pusher using pliers.
- Using a 13mm socket, unscrew the two bolts securing the cylinder to the gearbox housing.
- Disconnect the bracket that was secured with bolts.
- Having removed the pusher from the fork, take the RC in your hand and, using a 17mm wrench, completely unscrew the tip nut and remove the hose.
- Replace the clutch slave cylinder on a VAZ 2107, and immediately tighten the hose tip to avoid loss of brake fluid.
- Attach the new part in reverse order.
A certain part of car enthusiasts prefer to drain the old brake fluid before surgery, believing that this will allow them to get rid of dirt in the system. Be that as it may, you will have to bleed and adjust the clutch in any case.
How to bleed the clutch control system?
For the quality of transmission operation, the absence of air in the system is important, which is why bleeding is done. The procedure is similar to bleeding the brakes. An assistant is needed to complete the work:
- Fill the reservoir on the master cylinder with brake fluid.
- Place a rubber hose of the appropriate diameter onto the fitting. Place the other end of the hose in a container with some liquid.
- Ask an assistant to press the pedal 5-6 times and hold it in the pressed position.
- Using a “10” wrench, unscrew the fitting half a turn and release air bubbles, then tighten the fitting and repeat the procedure until the air in the liquid completely disappears.
During work, it is important to monitor the fluid level in the tank and replenish it in a timely manner.
How to repair the working cylinder of a classic “seven” clutch?
In certain cases, car enthusiasts prefer to independently purchase not only repair kit , but also spare parts for cylinder restoration on their own. This option allows you to save some money if you follow the following points:
- Clamp the part in a vice and unscrew the plug at the back.
- Remove the rubber cap.
- Remove the retaining ring from the plug side.
- Extract the internal elements of a node.
- Using a 10mm wrench, unscrew the bleeder fitting.
In order for the replacement of a repaired clutch slave cylinder on a VAZ 2107 to be of high quality, you need to:
- Inspect the condition of the spring and replace it if necessary.
- Replace all rubber seals.
- Inspect the node mirror.
- Clean the fitting.
Before assembly, all parts should be lubricated with brake fluid. You cannot use gasoline or diesel fuel, because the rubber will lose its quality. Change the gasket under the plug only if there are leaks. Having assembled and installed the unit, we finish the process by bleeding the system.
Source: http://autobann.su/kak-zamenit-rabochiy-cylinder-vaz-2107.html
VAZ 2107: clutch repair in a garage
And again we are repairing the VAZ 2107
Clutch problems? Does it not engage completely, is the clutch pedal “soft” or does it fail altogether? All this will tell us that the time has come to repair the clutch - the master and slave cylinders! How this is done will be discussed in this article. Here you will find: instructions for repairing the clutch on a VAZ 2107 car, a useful video, tips and features of this type of work. Here you will find information on how to change cylinders, repair and bleed them.
Work process
This:
- Preparing for clutch repair
- Clutch replacement
- Replacing the clutch master cylinder
- Replacing the clutch slave cylinder
- Master cylinder
- Working cylinder
- Bleeding the clutch on a VAZ 2107
What you need to prepare in order to repair the clutch yourself:
- A set of keys
- Screwdriver (preferably thin)
- Special pliers-pullers
- WD-40 or similar rust remover
- Knife
- Brake fluid
- Bleeding hose
- Bleeding container
- Syringe
That's probably all that is needed.
Expanding pliers (circlip pliers)
Clutch replacement
Often, car owners prefer to simply replace clutch parts, since the cost is low and time can be saved significantly. Therefore, you can first consider the process of replacing clutch parts.
Replacing the clutch master cylinder
So:
- First you need to drain the fluid from the clutch reservoir. This can be done using a syringe - select the liquid and pour it into another container.
- You can also remove the hose from the master cylinder fitting and insert it into the same container. Slightly bend the clamp on the fitting to make it easier to remove the hose. Do whatever is more convenient for you.
- After this, you need to unscrew the pipe fitting that fits the clutch slave cylinder.
- Then spray the two studs that secure the clutch master cylinder to the car body with WD-40 or an equivalent to prevent breaking them when unscrewing the nuts.
- Take a 13mm wrench or a socket with extensions (whichever is more convenient) and unscrew the two fastening nuts one by one.
Removing the nuts securing the main brake cylinder VAZ 2107
- Remove the clutch master cylinder.
Ready!
Withdrawal completed. Now let's install the new cylinder:
- First you need to get the drive rod from the clutch pedal into the hole in the new master cylinder. For convenience, ask a friend to press the clutch pedal a little.
- Then install the clutch master cylinder onto the mounting studs.
- Tighten the fastening nuts with a 13 mm wrench or a socket with extensions.
- Using a 10mm wrench, connect the pipeline from the clutch slave cylinder.
- Install the clutch reservoir flexible hose.
- Fill the reservoir with brake fluid to the filler neck.
The master cylinder has been replaced.
Replacing the clutch slave cylinder
Clutch slave cylinder for VAZ 2107
Now we will change the clutch slave cylinder on a VAZ 2107:
- Remove the spring from the slave cylinder.
- Next, you need to unscrew the tube that connects the main and working cylinders using a 10mm wrench. Brake fluid will flow from it - put the cap on the end of the tube, which is located on the bleeder fitting of the working cylinder.
- Unscrew the two bolts securing the working cylinder using a 13mm wrench and remove them together with the plate.
- Remove the slave cylinder.
Removed.
Now we will install a new clutch slave cylinder on the VAZ 2107:
- To begin, unscrew the adjusting nuts in approximately the same way as they were set on the old cylinder. This will help you either avoid clutch adjustments altogether or reduce them to a minimum.
Clutch adjustment VAZ 2107
- Then insert the slave cylinder push rod into the transmission fork.
- Screw the two bolts together with the plate. As practice shows, it is most convenient to tighten the upper bolt first, and then the lower one.
- Connect the fluid supply tube. Screw it into the cylinder with a 10mm wrench.
- Put the spring back on.
After replacing the working cylinder, it must be bled.
If both the clutch master and slave cylinders were replaced at the same time, then read the bleeding method below:
- Unscrew the bleeder fitting 1 turn.
- Wait until liquid flows out along with air bubbles.
- When the air bubbles come out, tighten the fitting until it stops.
- Put on the cap.
- The pumping is over!
Clutch repair
Now let's consider another option - using a repair kit for the clutch cylinders - main and working.
Master cylinder
So, we have removed the main cylinder and now we begin to disassemble it.
VAZ 2107 clutch master cylinder repair
So:
- We start by removing the fitting. Use a screwdriver to remove the retaining ring.
- After which you can easily remove the fitting with the gasket.
- Now remove the rubber boot (protective cap) by simply prying it with a screwdriver or other convenient object.
- Now, using a 22 key on the other side, you need to unscrew the plug of the VAZ 2107 clutch master cylinder.
- You also need to remove the retaining ring from the boot side. This can be done using two screwdrivers or special pliers. It is more convenient to use expansion pliers.
- Now you can easily remove all the insides of the cylinder.
Now about damaged parts and their replacement:
Clutch master cylinder of VAZ 2107 disassembled
- All rubber seals should be replaced. 2 rubber rings - on the piston and pusher rod, one on the fitting, and we also replace the protective cap if necessary.
- If necessary, replace the spring. If it is deformed or damaged.
- Also pay attention to the internal mirror of the cylinder. It should not have burrs or chips.
- If the piston is damaged or the pusher is bent, then it is better to replace the cylinder with a new one.
Assembly:
- When assembling, all parts should be washed very thoroughly.
- Put all retaining rings back.
- Tighten the clutch master cylinder plug tightly!
Then install the cylinder back on the car. This is how the clutch master cylinder is repaired on a VAZ 2107 car.
Working cylinder
VAZ 2107 clutch slave cylinder repair
So:
- Clamp the VAZ 2107 clutch slave cylinder in a vice and unscrew the rear plug.
- Remove the protective rubber cap.
- Remove the retaining ring from the plug side and remove all internal parts of the working cylinder.
- Using a 10mm wrench, unscrew the bleeder fitting.
About details:
- Check the condition of the spring.
- Replace all rubber seals of the VAZ 2107 working cylinder.
- Check the condition of the working cylinder mirror.
- Wipe the inside with a clean cloth if necessary.
- Clean the bleeder fitting. If the edges on it are “licked”, replace it.
Assembly:
- Wash all parts in brake fluid.
- Lubricate each part with brake fluid during assembly.
- Reassemble all parts in reverse order.
- Install the retaining ring, protective cap and plug.
Install the VAZ 2107 clutch slave cylinder on the car (see above).
Bleeding the clutch on a VAZ 2107
For clutch performance, it is very important that there is no air inside the system. To do this, you need to bleed the clutch. This is done on the principle of bleeding the brakes. Two people will be required.
So:
- Pour brake fluid into the clutch reservoir.
- Place a hose of suitable diameter onto the bleeder fitting of the working cylinder. Place the other end in a bottle (or other container) with brake fluid.
- Unscrew the bleeder fitting approximately half a turn.
- At this time, the second person, at the command of the first, presses and releases the clutch pedal.
- Repeat the last step until all the air has left the system and only brake fluid comes out without bubbles.
- Next, you need to press the clutch pedal and, without releasing it, tighten the bleeder fitting.
- Put a cap on it.
Thus, we pumped the clutch and completed the repair of the VAZ 2107 clutch.
The attached photos clearly show some details of the process. We really hope that this article helped you repair clutches on a VAZ 2107 with your own hands!
Source: http://MasteraVaza.ru/transmisiya-sceplenie/remont-scepleniya-transmisiya-sceplenie/vaz-2107-remont-scepleniya-67
Repair of the hydraulic clutch, part I - restoration of the master cylinder - logbook IZh Moskvich 412 “St. Spiridon” 1981 on DRIVE2
We are glad to welcome you again, dear friends. =) Another break in our stories is behind us, quite a long one, but what can we do, we can’t keep up with everything...Nevertheless, I hope that even in such a belated vein, our story and our experience will find a response and interest on your part.
=) Well, after the break we are back with new ideas regarding the content of our in-flight recordings. The fact is that the volume of almost each of them is quite considerable, as I can see in comparison with the records of other DRIVE2 participants. I really love talking, reasoning and communicating, as well as sharing ideas, experiences and just thoughts.
But at the same time, I am aware that not every respected guest or even subscriber is interested in reading some of our personal circumstances, nuances, remarks, which I also present along with a description of the repair work.
That is why, based on all of the above, wanting to make reading our logbook more interesting and understandable, starting with this entry, the content will be divided into several small sections or paragraphs, I don’t know how to define them exactly. While I came up with two of them, I’ll immediately explain the essence:
Section 1 - the beginning of the recording, the introduction so to speak, the place just for my stories about how I love my car, various kinds of personal circumstances, as well as emotional remarks regarding upcoming events, for example - it was getting dark... nothing foreshadowed trouble... etc .P.;
Section 2 - the repair itself, clearly on the topic, trying not to get carried away with thoughts (but still I can’t promise 100%, sorry))). Well, something like this. =)) I hope I’m not tired yet? Then let's get started! =)
Section 1 - Preface (for those who are directly interested in repairs, see Section 2)
So, our restoration work was far from limited to starting the engine and its regulations. Despite the fact that there were no more than 2 weeks ahead until we were required by plans to enter service, there was still a lot of work ahead.
I think many people well imagine how great our desire was to get out of the fence as soon as possible, well, at least to our dear and dusty street, which had not seen asphalt for 30-40 years... To drive along it back and forth with sparkling happiness in the eyes, measuredly and slowly swaying on numerous bumps, holes and mounds.
Spiridonushka wanted this no less than I did, especially in connection with our recent launch and preparation of the engine. Now our common desire to see the road as quickly as possible became unbearably difficult to restrain... But we had to fight this, because I know well that there is no need for excessive haste. If you hurry now, you will certainly have to pay for it later.
Let me remind you of the reason for the established deadlines; it is that after the specified time, the insurance of my driving car, Tatyana, VAZ 21043, expired.
Spiridon, in addition to satisfying my interest and passion for Muscovites, also pursues a very practical goal - to replace Tatyana as a running car for a period of one year, thanks to which the latter, with whom we worked for four whole years, must undergo serious repairs. These are the plans, God willing, we can cope.
Spiridonushka starts up, purrs cheerfully and joyfully, increasing the crankshaft speed, but from a standstill - well, no way... he forgot how to walk after 6 years of hibernation in a damp garage... we need to help him quickly! =)) Don’t be sad old man, we’ll fix everything with God’s help - that’s what I told him then, and patted the hood and got down to business...
Section 2 - Repair of the hydraulic clutch.
Troubleshooting. Following the fuel system, the hydraulic clutch was the next system to suffer during downtime. The clutch pedal was in place, this is already good, but when you act on it, it simply fell to the floor, completely freely, without making any pressing (disengaging the clutch). By the way, here I would like to touch a little on terminology, since not everyone understands the essence of the processes occurring in the clutch mechanism. Sometimes, in the absence of experience, the phrase “disengaging the clutch” is perceived by beginners as releasing the pedal, and “engaging the clutch” - on the contrary, pressing the pedal. Forgive me, experienced repairmen, for abstract explanations for beginners, but this really happens. Like, I press the clutch pedal, that is, I turn it on... But in reality, everything is exactly the opposite, by pressing the pedal we turn off the clutch, disconnecting the gearbox (gearbox), then we turn on the speed and release the pedal, the clutch turns on again, but he already has to rotate the corresponding gearbox gears - the car starts to move. Without understanding these processes, repairing both the clutch itself and its hydraulic drive is problematic, to say the least. I hope that for those who have never dealt with a clutch, but are determined to learn how to repair it themselves, my explanations will help them get the right idea, because the entries in my logbooks are aimed more at such people. =)
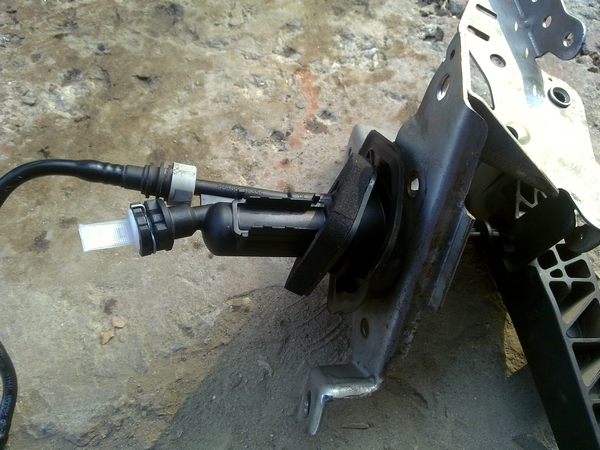
Well, it’s time to look for the cause of the “failed” pedal. In my case, this was not particularly difficult; it was enough to open the hood and look into the master cylinder reservoir - it was completely empty and all you could see in it was the same boring rust:
Zoom
Well, another consequence of a long downtime...
Apparently, 6 years of inactivity of the car did not leave this unit without consequences. The seals and cuffs dried out, after which there was no working fluid in the hydraulic drive.
And although the chances were negligible, I could not resist trying to fill and bleed the hydraulic drive, fortunately there was old brake fluid in the garage for this. But this made it possible to immediately see which of the system elements were leaking. There are only two of them - the aforementioned GCS and the RCS (clutch slave cylinder).
All attempts, as expected, were in vain; moreover, no stroke of the pistons appeared in both cylinders, and liquid slowly but surely oozed from both cylinders. Therefore, the pistons have become acidic to the walls of the latter; at a minimum, disassembly and repair cannot be avoided, and in the worst case, the components will have to be replaced.
Of course, it is now popular to immediately change such units entirely, without bothering yourself with unnecessary troubles, but it is clear that this is not suitable for us, loving and enthusiastic people.
Isn't that right friends? =)) As always, trying to keep as many original parts as possible on the car, and what’s there to hide, given the by no means low cost of new cylinders, I will try to do everything to restore these components. I decided to start with the GCS, since this is where the transmission of force to disengage the clutch begins. Well, as always, with God! =)
Step 1 - Removing the clutch master cylinder.
Since there is no need for us to drain the remaining old brake fluid from the system (almost all of it has leaked out), we can immediately begin to remove the main brake fluid. First, let’s disconnect it from the rest of the system by unscrewing the hydraulic drive tube:
Zoom
I also have the same tool - an IKEA adjustable wrench, this is not some service station around the corner! =))
At its other end, the cylinder is attached to the cross member of the body (the partition between the passenger compartment and the engine compartment), and its rod passing through the hole in the cross member is connected to the clutch pedal.
Thanks to the interaction of the pedal and the rod, after pressing the pedal, the single piston of the master cylinder is actuated. He, in turn, pushes the working fluid to the working cylinder.
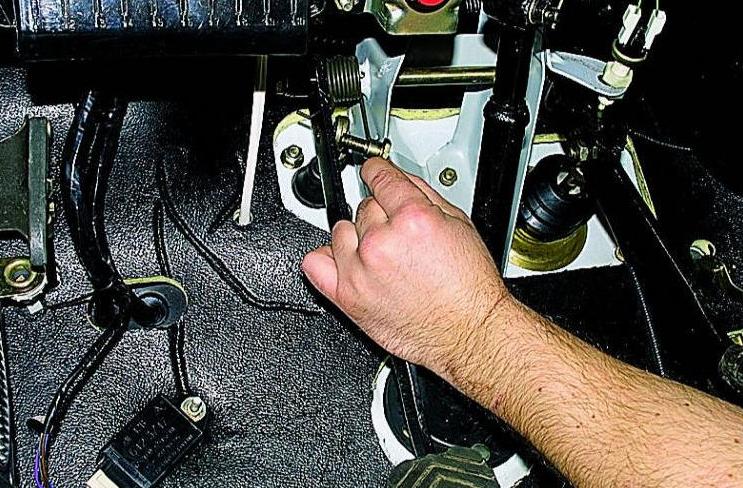
Therefore, now we need to disconnect the clutch pedal and the clutch rod:
Zoom
The connection is very simple - using an axial pin, two washers and cotter pins.
Use pliers to remove any cotter pin from your finger and remove it along with the washers:
We lift the pedal up to free up space for maneuvering with the keys. Now the cylinder is disconnected, you can begin to dismantle it. Using a 17mm socket, unscrew the two nuts securing the main center coupling to the body cross member:
Well, now we dive under the hood again and remove the unscrewed main clutch from the cross member:
Done, master cylinder removed. For clarity, I offer an improvised diagram of its fastening:
Stage 2 - Disassemble the clutch master cylinder.
I disassembled and repaired the cylinder at work, fortunately I had free time. Along with it, I took with me a tube - a hydraulic drive line, for blowing with compressed air:
Zoom
At its other end, which has a characteristic loop, the tube is attached to the working cylinder. It unscrews in the same way.
In order to get to the insides of the cylinder, you need to unscrew its rod (pusher), this is where disassembly begins:
- armed with special pliers for dismantling the internal lock rings, remove the lock ring that secures the pusher with the washer in the cylinder body
Zoom
If there are no ticks, this can be done using improvised means, but sometimes this is extremely problematic. It is much more useful not to skimp on a special tool that will allow you to work quickly, efficiently and conveniently. =)
- now the pusher can be removed from the cylinder and put it aside, but for now we will clamp the cylinder in a vice, placing it with the free end up.
The soured piston is already visible inside, but in order to try to remove it without damaging the internal cavity of the cylinder (mirror), you must first pour fresh brake fluid inside and allow time to acidify.
Brake fluid has good penetrating and cleaning properties, which is why it should not be spilled on the paintwork of the body:
Of course, I can’t say about the time required for souring; the longer, the better, more precisely, the more certain. =) Although everything is individual, in particularly severe cases it may not help.
Well, I was still not at home, so it was necessary to act quickly.
And this circumstance prompted me to make a mistake - after the acidification procedure, I decided to “move” the piston that had not yet been released using compressed air, but underestimated its power...
Zoom
The cylinder is upside down.
The piston literally shot out like a champagne cork or even stronger... if there had been some cat sitting below, I would probably have shot it with the piston... And although there was no one “under the barrel” of the cylinder, the piston hit the concrete floor hard and was damaged...
Zoom
Of course, I should have taken care of its soft landing, which I did not do...
So, trying not to damage the cylinder mirror, I damaged the piston... well now, this is still experience, don’t repeat my mistakes, friends! =)) However, as can be seen in the photo, there is damage only on the edge of the piston, and not along the entire length of the working surface, so after carefully sanding the resulting tubercle, the piston was returned to service. =) Fortunately, no bending of the piston body occurred.
One way or another, not without errors, of course, but thank God the main task was completed - the piston was released/removed. The diagram of the insides of the cylinder looks like this:
Zoom
The piston is assembled with a cuff - behind it is a washer that acts as a valve - another cuff - a return spring. All. =)
However, disassembling the cylinder does not end there; the unit must be restored completely and efficiently, so we continue... Now we proceed to removing the tank, secured to the cylinder with a special nut that has a square recess in the center.
The relevant technical literature indicates the use of a special wrench with a square end to dismantle the tank, however, it was enough for me to select a large flathead screwdriver with a wide blade, which approximately corresponded to the size of the diagonal of the square:
Zoom
With some effort, the nut was successfully unscrewed.
We take out the tank with the gasket underneath and put them aside with the rest of the parts.
All that remains is to disassemble the pusher rod, for which it should be secured in a vice, if available, and loosen the nut securing the bracket to the pusher rod:
Zoom
The cylinder boot is turned in the opposite direction.
After loosening the nut, you can unscrew the rod itself from the bracket, fit the nut along the threads and pull out the boot with the limit washer. At this point, the disassembly of the GCS is finally completed, you can rest a little and gain strength for the next stage. =)
Stage 3 - Repair of worn parts, replacement of rubber products (RTI).
At this stage, everything is quite simple, but at the same time, all work should be performed with special care and thoroughness.
First of all, as is perhaps customary in any restoration work, you should thoroughly wash all the removed parts with fresh brake fluid, clean off all external rust (this does not apply to the inner surface of the cylinder) and remove all old rubber parts - carefully remove the seal on the piston, throw away the boot cylinder and cuff with return spring.
The sterility of the work done is of key importance , since any, even the smallest piece of debris or hair that gets inside the cylinder can lead to a leak of brake fluid. By the way, this requirement equally applies to repairs of the brake system.
The use of ordinary rags and even paper that leaves lint is unacceptable! So, after painstaking work, all thoroughly washed parts lie on polished sheets of paper. What's next? And then you should pay close attention to the condition of the working surface of the cylinder and its mirror.
We take the cylinder in our hands, turn it, examine it carefully, and feel the inner working surface with a clean(!) finger. The presence of grooves, potholes, nicks and longitudinal scratches is unacceptable, as this will also inevitably lead to brake fluid leakage. Such a cylinder cannot be restored.
Thank God our cylinder passed the test, which means restoration work will continue. =) Now you can work on the piston - you need to put a new sealing collar on it. I’ll say right away that the task is not easy. When installing it is important not to stretch the cuff too much, so for this operation I used a very thin flat head screwdriver as leverage. It is also necessary to lubricate the installed parts with brake fluid in advance, which will ensure the necessary sliding of the installed parts.
The cylinder rod limit washer also required some intervention. As a result of long-term operation, deformation occurred in the center due to constant loads from the pusher:
However, a light hammer with sandpaper helped to quickly and easily eliminate this defect:
There are a few more nuances at this stage.
The first of them is associated with an additional check of the size of wear of the piston and cylinder relative to each other using a caliper, but I did not do this, since even if the check had revealed extreme wear in their connection and, accordingly, the unsuitability of the GCS for further use, the lack of funds for purchasing a new cylinder would still force me to try to install this cylinder back... Fortunately, as subsequent events showed, everything was within the normal range. =)Another nuance is associated with the return spring - its elasticity is also subject to fatigue degradation. But one way or another, as it seems to me personally, a slight artificial stretching of the spring should improve its elasticity. =)
Well, dear friends, in general, all our interventions end here, all the parts are ready for assembly. =)) But what kind of restoration can do without the most important, especially pleasant aesthetic component! =) We are, of course, talking about painting, without this the joy of restoration will be far from complete - then what’s the matter, let’s get to work!
Zoom
The photo of the not yet assembled cylinder is lost somewhere...
We install the repaired and cleaned parts onto the painted cylinder, generously wetting all the insides with brake fluid - perhaps this is one of the most pleasant moments in our work, isn’t it?
=)) Well, here’s the finale, brothers, our next small victory - the restored clutch master cylinder =)
Zoom
=) =) =) BEAUTY! =) =) =)
Afterword
Source: https://www.drive2.com/l/9271339/