Lada Priora relay and fuse diagram

- January 15, 2015 LadaOnline 849 594 The relay and fuse block is also called a mounting block or a black box. In the event of a car breakdown related to electrical equipment, the fuses and relays are first checked. If a fuse is blown, you must first determine the cause of its blown before replacing it.
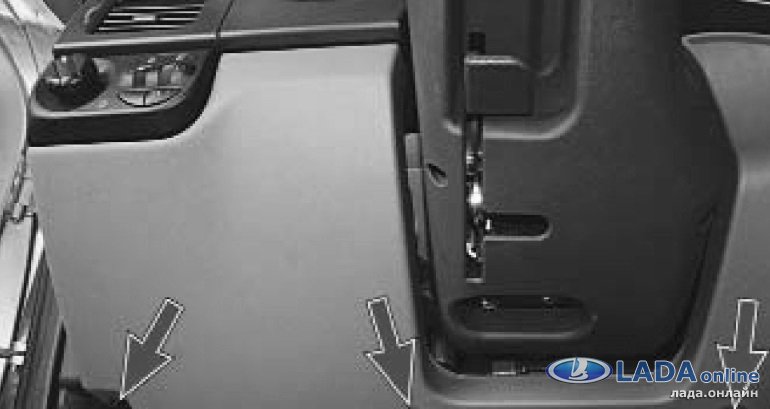
- The main mounting block of the Priora is closed with a lid and located at the driver’s left foot. To open it, you need to turn three latches 90° and unclip the lid.
- The fuse box is under the hood, which is located near the expansion tank.
- Another mounting block, which is located near the left foot of the front passenger. To gain access to the fuses and relays, unscrew several screws with a Phillips screwdriver.
- F1 (30 A) – power supply fuse for the electronic engine control system (ECM);
- F2 (60 A) – fuse for the power supply circuit of the engine cooling system fan (power circuit), additional relay (ignition relay), rear window heating, electrical package controller;
- F3 (60 A) – fuse for the power supply circuit of the electric fan of the engine cooling system (relay control circuit), sound signal, alarm signal, ignition switch, instrument cluster, interior lighting, brake light, cigarette lighter;
- F4, F6 (60 A) – generator power circuit fuses;
- F5 (50 A) – fuse for the power supply circuit of the electromechanical power steering
- right electric fan power supply fuse (30 A);
- fuse for the power supply circuit of the left electric fan (30 A).
- right electric fan relay;
- additional relay (sequential activation of
left and right electric fans); - left electric fan relay;
- heater fan power supply fuse (40 A);
- compressor power supply fuse (15 A);
- heater fan relay;
- compressor relay.
- Heater fan maximum speed
- Right fan
- Fan sequential relay (low speed)
- Left fan
- Left fan fuse (low speed)
- Right fan
- Heater fan
- Compressor
- Heater fan
- Compressor
- F1 (15 A) – main relay and starter interlock circuit fuse;
- F2 (7.5 A) – fuse for the power supply circuit of the ECU (controller);
- F3 (15 A) – Priora fuel pump fuse;
- K1 – main relay;
- K2 is the place where the Priora fuel pump relay is located.
- Fuse and relay block Lada Largus
- Lada Granta fuse box design
- Fuse box design for Lada Kalina 2nd generation
Where are the fuses on the Priora?
Below is a description of each fuse and relay block in order.
Priora fuse box diagram
Fuse No. Current, A “Standard” and “Norma” “Norma” with air conditioning and “luxury”| F1 | 25 | Engine cooling radiator fan | Reserve |
| F2 | 25 | Heated rear window | Mounting block, rear window heating relay (contacts). Electrical package controller, contact “10” of XP2 block. Rear window heating element. |
| F3 | 10 | Right headlight, high beam | Right headlight, high beam lamp. Instrument cluster, headlight high beam indicator. |
| F4 | 10 | Left headlight, high beam | |
| F5 | 10 | Sound signal | Mounting block, horn relay. Sound signal. |
| F6 | 7.5 | Left headlight, low beam | |
| F7 | 7.5 | Right headlight, low beam | |
| F8 | 10 | Alarm signal | Mounting block, alarm relay. Alarm sound. |
| F9 | 25 | Priora heater fuse | Reserve |
| F10 | 7.5/10* | Interior lighting, instrument panels, brake light | Instrument cluster, pin “20”. Brake light switch. Brake light bulbs. Interior lighting unit. Interior lighting. The door sill light on the right front door. Additional brake signal. |
| F11 | 10/20* | Wiper | Mounting block, high speed windshield wiper relay. Switch for wipers and washers, contact “53a”. Wiper and washer switch, contact “53ah”. Heated rear window switch. Mounting block, rear window heating relay (winding). Windshield wiper motor. Rear window wiper motor (2171,2172). Windshield washer motor. Rear window washer motor (2171,2172). Airbag control unit, pin “25”. |
| F12 | 20/10* | Terminal 15 devices | Instrument cluster, pin “21”. Electrical package controller, contact “9” of block X2. Electromechanical power steering control unit, contact “1” of block X2. Reversing light switch. Reversing lamps. Parking system control unit, contacts “11” and “14”. |
| F13 | 15 | Cigarette lighter fuse Priora | |
| F14 | 5 | Left headlight, parking light, license plate light, trunk light | Side light lamps (left side) Instrument cluster, main light indicator License plate lights Trunk light Electrical package controller, pin “12” of block X2 |
| F15 | 5 | Right headlight, parking light | Side light lamps (right side) Glove compartment lamp |
| F16 | 10 | Terminal 15 ABS | Hydraulic unit, contact “18” |
| F17 | 10 | Left fog lamp | |
| F18 | 10 | Right fog lamp | |
| F19 | 15 | Seat heating | Seat heating switch, contact “1” Front seat heaters |
| F20 | 5/10* | Immobilizer control unit | Recirculation switch (switch on) Mounting block, relay for low beam headlights and parking lights (automatic lighting control system) Heater electric fan relay Automatic lighting control switch Windshield wiper and external lighting control unit, contacts “3”, “11” Automatic climate control system controller installation, pin “1” Automatic window cleaning system sensor (rain sensor), pin “1” |
| F21 | 7.5/5* | Rear fog lights | Light switch, pin “30” Diagnostic block, pin “16” Clock Automatic climate control system controller, pin “14” |
| F22 | -/20* | Reserve | Windshield wiper motor (automatic) Mounting block, windshield wiper relay and windshield wiper high speed relay, (contacts) |
| F23 | -/7.5* | Reserve | Windshield wipers and external lighting control unit, pin “20” |
| F24-F30 | Reserve | ||
| F31 | 30 | Electrical package control unit | Electrical package controller, terminal “2” of block X1 Electrical package controller, terminal “3” of block X1 Driver’s door module, pin “6” Door sill lamp of the left front door |
| F32 | Reserve |
* – for the “Norma” configuration with air conditioning and “luxury”
Relay “Norma” “Norma” with air conditioning “Lux”| K1 | relay for turning on the electric radiator fan of the engine cooling system | Reserve | Relay for turning on the low beam and side lights of the headlights (automatic lighting control system) |
| K2 | rear window heating relay | ||
| K3 | starter activation relay Priora | ||
| K4 | additional relay (ignition relay) | ||
| K5 | space for backup relay | ||
| K6 | windshield washer and wiper relay | ||
| K7 | headlight high beam relay | ||
| K8 | horn relay | ||
| K9 | alarm relay | ||
| K10 | Reserve | Fog light relay | |
| K11 | Reserve | Front seat heating relay | |
| K12 | Reserve |
Location of Priora fuses under the hood
Relay and fuse box for Halla air conditioner
Panasonic air conditioner relay and fuse box
Additional mounting block Priora
Attention! The relay and fuse diagram may differ depending on the configuration and production date of the vehicle. Current diagrams of the mounting block are presented in the operating manual for the date of manufacture of the vehicle (download from the official website).
Let us remind you that on our website you can find detailed instructions for repairing the Lada Priora with your own hands.
Keywords: Lada Priora mounting block | Lada Priora torpedo
00Found an error? Select it and press Ctrl+Enter..
Similar materials
Source: https://xn--80aal0a.xn--80asehdb/do-my-self/repair/repair-lada-priora/218-shema-rele-i-predohraniteley-priory.html
Fuses and relays in Lada Priora. Electrical faults VAZ-2170, -2171, -2172
Fuses and relays in Lada Priora, electrical diagrams
Lada Priora is another car in the line of new VAZ cars, which is gaining popularity among segments of the population.
External similarities with the 10th model attract the attention of young people; the relatively low price is also a reason for purchase for most car enthusiasts.
Along with the growth in popularity, the owners of this model are gaining experience in repair and maintenance, which is becoming more and more every year.
If your Priora has electrical problems, do not rush to get upset; first, check the fuses and relays in your Lada Priora. These are the ones that will be discussed in this article.
Block in the cabin
The fuse box in Priora is located at the bottom of the dashboard, on the left side of the steering wheel. To get to it, you need to open the cover, which is held on by three latches. Rotate each locking knob 90 degrees and pull the lid down and it will snap open.
Fuses in the interior mounting block
1, 2 – tweezers.
F1 (25 A) - radiator cooling fan .
If your fan does not work, check its motor by applying 12 V directly to it from the battery. If the engine is working properly, then most likely the problem is in the wiring or connectors. Check the serviceability of relay K1.
The fan in the Priora usually turns on at a temperature of 105-110 degrees. Do not allow the engine to overheat, watch the arrow of the temperature sensor.
If the fan runs constantly and does not turn off, check the coolant temperature sensor located on the thermostat. If you remove the connector from the working sensor, the fan should turn on. Check the wiring to this temperature sensor, as well as the contacts of relay K1, move this relay, clean the contacts. If this is the case, replace it with a new relay.
F2 (25 A) - heated rear window . Check together with fuse F11 and relay K2. If the rear window does not fog up, the heating element threads may have broken. Inspect all the threads and if you find a break, seal it with special glue or varnish, which can be bought at car dealerships for 200-300 rubles.
Check the connection contacts at the terminals to the heating elements at the edges of the glass, as well as the switch on the dashboard and the wiring from it to the rear window.
F3 (10 A) - high beam, right headlight .
F4 (10 A) - high beam, left headlight .
If the headlights do not shine on high beam, check the K7 relay and the headlight bulbs. The steering column switch, wiring or connectors may also be faulty.
F5 (10 A) - sound signal
If the signal does not work when you press the steering wheel button, check relay K8. The signal itself is located under the radiator grille; you can get to it by removing the plastic casing from above. Check it by connecting the voltage to 12 V. If it doesn’t work, try turning the adjusting screw, or replace it with a new one.
F6 (7.5 A) - low beam, left headlight .
F7 (7.5 A) - low beam, right headlight . When replacing lamps, be careful; there are separate lamps for the low and high beams, so they can be easily confused. It is better not to install lamps in high-power headlights; the reflectors may melt and the desired effect will not be achieved.
Most low beam headlight problems that cannot be corrected by conventional means can be related to the light control module (LCM). The low beam relay is only available in cars equipped with a light sensor, it is located in the place of relay K1; on most cars this relay is not in the mounting block; the low beam circuit goes through the MUS block.
It happens that the tracks in the block burn out; if there are problems, it is better to replace it with a new one.
If the windshield wipers turn on spontaneously when the low beam is not working correctly, the problem is most likely in the windshield wiper control unit, located in the center of the dashboard, the topmost block, next to the radio, is best reached from the glove compartment, or by hand through the removed console covers at the feet.
Source: https://vmiredorog.ru/tehpomosch/183-rele-i-predohraniteli-v-lade-priore-neispravnosti-elektriki-vaz-2170-2171-2172/
Fuses and relays Lada Priora
Most electrical circuits are protected by fuses. Powerful consumers (rear window heating element, heater fan, engine cooling fan, sound signal and others) are connected via a relay.
Most of the fuses and relays are installed in three mounting blocks. Two mounting blocks are installed in the engine compartment, and one is installed in the vehicle interior, in the instrument panel.
Six high current power fuses are located in the fuse box located in the engine compartment next to the battery. Three fuses and two relays of the electronic engine control system (ECM) are located in the vehicle interior, under the instrument panel console.
The sockets for fuses and relays are marked on the housing of the mounting block.
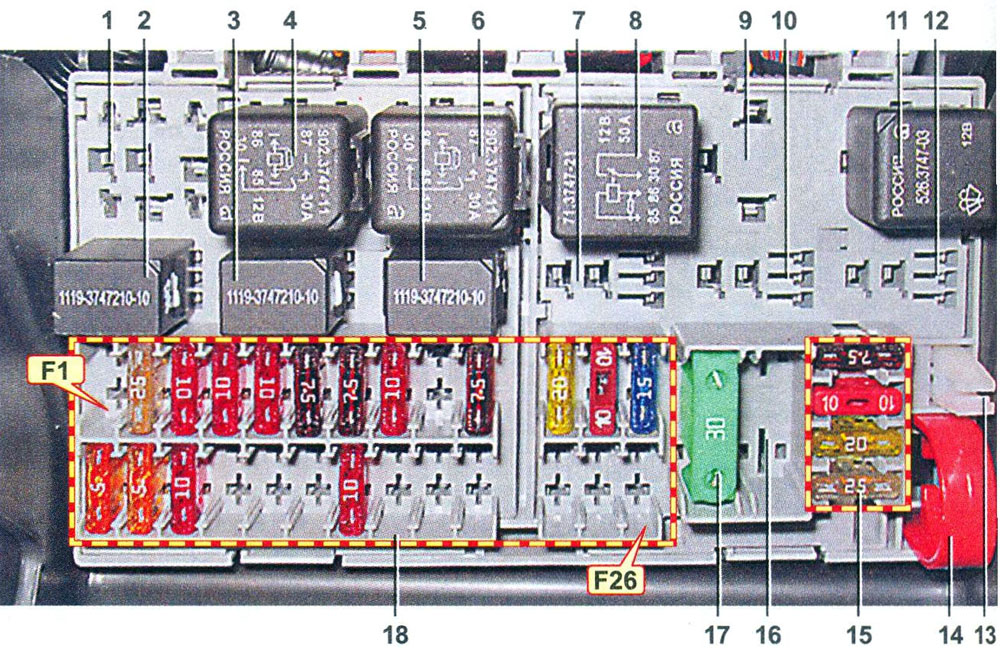
| Mounting blocks in the engine compartment: 1 – power fuse block; 2 – fuse and relay block; F1-F6 – fuses K1-K5 relay |
| Power fuses for the mounting block in the engine compartment | |
| Fuse designation (rated current, A) | Protected elements |
| F1 (60) | Generator power circuit (generator to battery connection) |
| F2 (50) | Electric power steering power supply circuit |
| F3 (60) | Generator power circuit (generator to battery connection) |
| F4 (30) | ABS control unit |
| F5 (30) | ABS control unit |
| F6 (30) | Engine control circuits |
| Mounting block fuses in the engine compartment | |
| Fuse designation (rated current, A) | Protected elements |
| F1 (15) | Air conditioning compressor electromagnetic clutch circuit |
| F2 (40) | Heater fan motor |
| F3 | Not used |
| F4 (50) | Heated windshield element |
| F5 (30) | Main cooling fan motor |
| F6 (30) | Additional cooling fan motor |
| Mounting block relay in the engine compartment | ||
| Designation | Name | Switched circuits |
| K1 | Cooling system fan control relay (on a vehicle with air conditioning) | Electric motors of the main and additional cooling system fans |
| K2 | Low speed cooling fan relay (on vehicle with air conditioning) | Electric motors of the main and additional cooling system fans |
| K3 | High speed cooling fan relay (on vehicle with air conditioning) | Electric motors of the main and additional cooling system fans |
| K4 | Air conditioner relay | A/C compressor clutch |
| K5 | Heater Fan Relay | Heater fan motor |
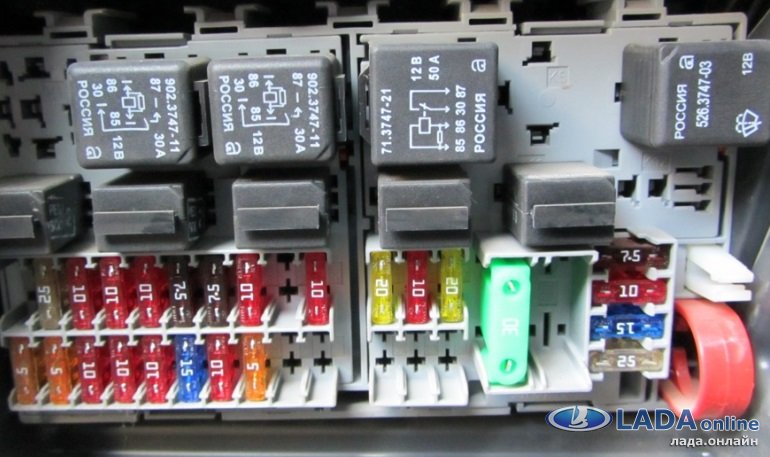
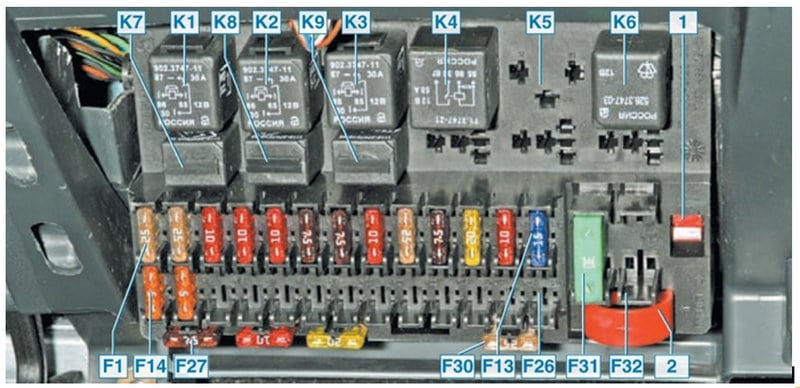
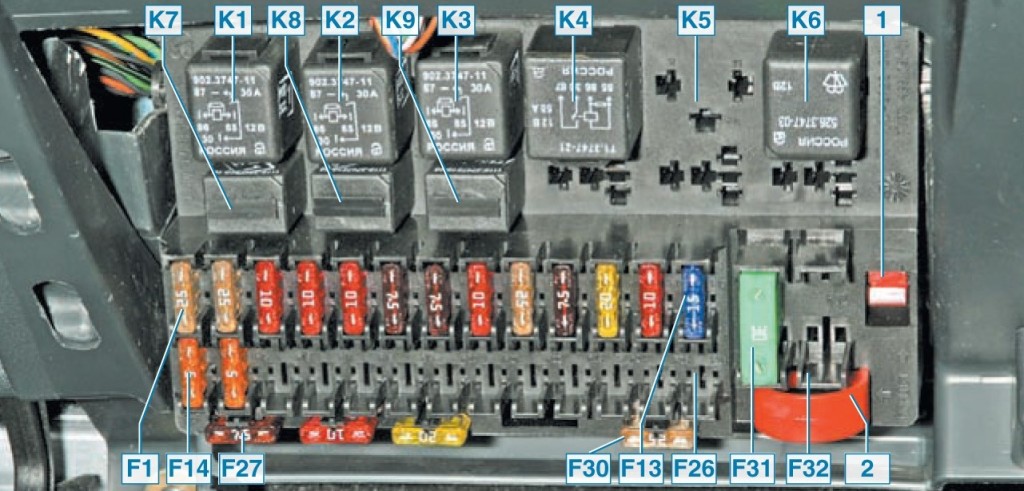
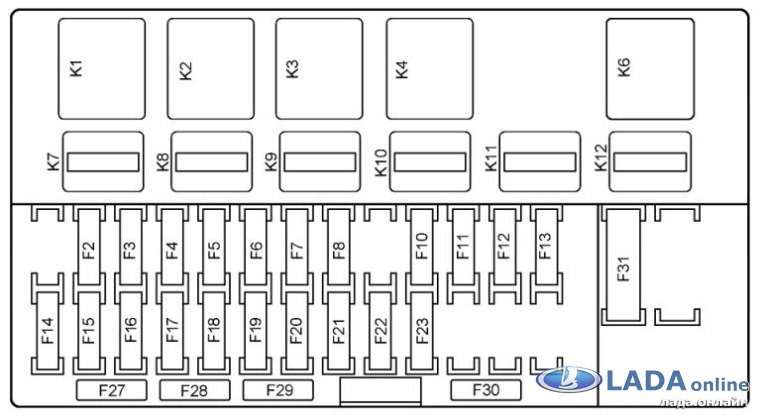
| Mounting block of fuses and relays in the car interior: F1-F28 – fuses; K1-K12 – relay; 1 – tweezers for removing fuses; 2 – tweezers for removing the relay; 3 – spare fuses |
| Fuses of the mounting block in the car interior | |
| Fuse designation (rated current, A) | Protected elements |
| F1 (30) | Not used |
| F2 (25) | Rear window heating element |
| F3 (10) | Right headlight high beam lamp |
| F4 (10) | Left headlight high beam lamp |
| F5 (10) | Sound signal |
| F6 (7.5) | Low beam lamp for left headlight |
| F7 (7.5) | Low beam lamp, right headlight |
| F8 | Not used |
| F9 | Not used |
| F10 (10) | Brake lights, instrument cluster lights, warning lights in the instrument cluster |
| F11 (20) | Windshield washer |
| F12 (10) | Instrument cluster |
| F13 (15) | Cigarette lighter |
| F14 (5) | Side light bulbs in the left headlight and left rear light, license plate light bulbs |
| F15 (5) | Side light lamps in the right headlight and right rear lamp, glove compartment lamp, trunk lighting lamp |
| F16 (5) | ABS control unit |
| F17 (10) | Left fog lamp |
| F18 (10) | Right fog lamp |
| F19 (15) | Front seat heating elements |
| F20 (10) | Heating, ventilation and air conditioning control unit, electric door mirrors, heated door mirrors |
| F21 (10) | Electrical package control unit (central locking, electric windows, hazard warning lights, direction indicators, high beam headlights, high beam alarm, heated seats, heated rear window, windshield wiper, automatic exterior lighting control unit) |
| F22 (5) | Driver's door switch block |
| F23 (5) | Daytime Running Lights |
| F24 (15) | Airbag control unit |
| F25 (20) | Windshield wiper |
| F26 (5) | Fog lamps in the rear lights |
| F27 (30) | Electrical package control unit (electric windows, central locking) |
| F28 | Not used |
| Relay of the mounting block in the car interior | ||
| Designation | Name | Switched circuits |
| K1 | Cooling fan relay (on vehicle without air conditioning) | Cooling fan motor |
| K2 | Heated rear window relay | Rear window heating element |
| K3 | Starter relay | Starter traction relay |
| K4 | Additional relay | Windshield wiper and washer, seat heating elements, exterior lighting control unit in manual mode (low and high beam headlights, fog lights, fog lamps in the rear lights) |
| K5 | Not used | |
| K6 | Not used | |
| K7 | High beam relay | Main beam lamps |
| K8 | Horn relay | Sound signal |
| K9 | Relay for automatic control of external lighting | Automatic control unit for external lighting (high and low beam headlights, fog lights, fog lamps in the rear lights, headlight beam direction control) |
| K10 | Fog relay | Fog lamps |
| K11 | Fog light relay | Fog lamps in the rear lights |
| K12 | Not used |
The information is relevant for the Priora 2170 2013-2018 model year, 2172/2171 2013-2015 model year.
Source: https://carpod.ru/predohraniteli-i-rele-lada-priora-s-2013-g_790.htm
We understand the structure of the fuse box in the Lada Priora
To protect the electrical circuits of the Lada 2170 car, it is equipped with fuses with fusible links. Fuses are designed for the maximum current of the electrical circuit and are pin-type elements with a fuse-link that burns out when the permissible current is exceeded.
The wiring diagram provides that particularly powerful consumers, such as a rear window surface heater, an electric motor for a heater fan, a power unit cooling system fan, a car horn, and others, have an electromagnetic type relay in the connection diagram.
These elements are installed in the Priora fuse box.
Owners of a Lada Priora need to know where the fuses are located. This will help them in troubleshooting electrical circuits.
The vast majority of Priora fuses are built into the mounting block installed in the car interior.
To get to the installation site of the elements that protect car chains, it is enough to open the protective cover of the unit installed on the left side (in the direction of travel of the car), in the instrument panel at the bottom.
This niche of the Lada Priora car houses a fuse and relay block responsible for lighting devices, auxiliary systems of the power unit, as well as safety and comfort systems. This arrangement of fuses has already become traditional and tested by AvtoVAZ not only on the VAZ 2170 Priora, but also on many cars over more than half a century of history.
By opening the cover of the fuse box of the Lada Priora car, you gain access to the protection elements of the following devices (the original numbering of the safety elements F1-F32 is retained):
- Radiator fan of the power unit.
- Heating element on the rear window.
- Starboard main beam.
- Main beam on the left side.
- Car horn sound.
- Low beam on the left side.
- Low beam on starboard side.
- Hazard warning light indicator.
- Electric motor for interior heater.
- Dashboard, interior lighting, brake lights.
- Windshield wipers.
- Terminal No. 15 of the instrument panel.
- Cigarette lighter.
- Side lights (left side).
- Side lights (right side).
- Anti-lock braking system control (terminal No. 15).
- Fog lights (left side).
- Fog lights (right side).
- Seat heating system.
- Immobilizer.
- Rear fog lights.
- 22-30, 32 – reserve sockets (in case of expansion of the configuration).
- Electrical package (power supply).
When repairing Priora electrical circuits, it is important not only to know where the fuse box is located, but also to have information about the power of certain fusible elements in order to correctly replace them.
All fuses are color coded depending on the power for which their fuse links are designed:
- The fuses for the cooling system fan (F1), heated rear window (F2), and the interior heater motor (F9) are designed for a current of 25 A;
- fusible elements of the high beam headlight fuses (F3, F4), sound signal (F5), hazard lights (F8), 15th terminal of ABS (F16), fog lights (F17, F18) protect circuits designed for a rated current of up to 10 A ;
- 7.5 A fuses protect the circuits of low beam lamps (F6, F7), instrument panel, interior lighting, brake lamps (all F10) and rear fog lamp (F21);
- side lights (F14, F15), immobilizer (F20) – 5 A fuses;
- wiper motor (F11) – 20 A fuse element;
- heated seats (F19) – protected by a 15 A fuse;
- the most powerful fuse is 30 A - protection of electrical circuits (F31 or F27).
Replacing fuses of a higher rating with a smaller one, as well as the reverse replacement, is not allowed.
If a fuse protecting the light signal or active safety circuits of the vehicle blows, it is allowed to replace it with a similar one removed from the socket of the circuit responsible for comfort or others that do not affect the safety of the vehicle when it is moving. If possible, the protection of electronic circuits must be restored in accordance with the requirements of the vehicle manufacturer.
The mounting box installed in the interior of the Lada Priora contains not only fuses, but also electromagnetic relays, the switching circuit of which provides for connecting a high-power load.
By using such relays, the manufacturer has achieved a reduction in the current load on the switch contacts. This prevents burning of the contact pairs installed in them.
Therefore, if a certain circuit malfunctions, it is necessary to check not only the integrity of the fuse, but also the serviceability of the relay installed in the Priora fuse box and responsible for the device switching circuit.
Before removing the Priora fuse box in further searches for faulty circuits, be sure to disconnect the positive terminal of the battery. If a faulty fuse is found, it must be replaced.
The outer elements installed in the VAZ Priora fuse block can be pulled out with your fingers, overcoming the resistance of the spring-loaded contacts.
Fuses installed between other elements can be conveniently removed using tweezers installed on the right wall of the box.
Having replaced the parts with similar ones, connect the “plus” of the battery and check the serviceability of the equipment in this circuit. After this, close the mounting block with a protective cover.
In case of emergency, on the road, you can correct the situation with a broken fuse using a piece of copper wire of the required diameter, wrapping it around the contacts of the fuse element. It is necessary to replace this “handicraft” at the first opportunity.
To find out where the fuses are located on the Priora, you need to find out which wiring circuits they belong to. If problems arise with the electrical part of the car, check the corresponding power circuits. In Priora, the search begins by opening the fuse box in the passenger compartment.
If the radiator fan malfunctions, connect 12 V directly from the battery to its “positive” terminal using a separate conductor. If the device works, then most likely the reason should be sought in malfunctions of relay K1, wires or poor contacts in the connectors.
If the fan rotates constantly and does not turn off, you should check the sensor located on the thermostat. The fan should start rotating when the antifreeze temperature is not lower than 105 ° C. Using a multimeter, check the heater filaments for breaks.
In the event of a malfunction, repair the defective area using a special electrically conductive varnish. If the heater is not supplied with power, check fuse F11 and relay K2. Replace faulty parts. After checking the serviceability of the lamps themselves, pay attention to the connector contacts, the serviceability of the wires and the K7 relay.
The malfunction may also be a broken steering column switch. The sound signal is powered through relay K8. It should be checked first. To access the signal, remove the plastic cover located under the radiator grille. To check if the signal is working properly, apply +12 V to it (supply voltage from the battery).
When changing lamps, do not confuse them with the main beam. Check the control module. If your car is equipped with a light sensor, then the low beam lamps are powered through relay K1. Otherwise, control occurs with the participation of the above-mentioned light control module.
If the alarm fails, first check the K9 relay and associated power circuits. Check if the stove operates in different modes. If the fan fails completely, apply power to it.
In case of failure to operate at a reduced speed, the cause of the malfunction is the resistance that is installed in the engine compartment on the fan motor scroll.
Lada Priora equipped with air conditioning may have a blown thermal fuse installed in the engine compartment fuse box, located next to the fan fuse. A typical malfunction that leads to sensor failure is poor contact of the instrument panel connector or burnt out tracks on its printed circuit board. If all brake lights fail, check the limit switch installed near the brake pedal. In case of partial failure, check the lamps and contacts. If the wipers fail, check the gear motor by applying +12 V to it, and also inspect the steering column switch.
Check the light control module. If the dashboard backlight is working, the malfunction is most likely due to poor contact, open circuit or burnt-out lamps.
The circuit elements that protect the dimensions are installed in the same place as the Priora cigarette lighter fuse (F13). First of all, try replacing the battery in the key.
If the immobilizer has blocked the fuel pump and ignition circuits, then the fault may be a breakdown of the electrical package control unit, which is installed above the radio.
To access the additional fuse box, remove the cover that is installed on the tunnel, near the front passenger's feet. In the tunnel, where the fuse box is located, an electronic control unit for the Priora power unit is also installed. It can only be removed with the car de-energized. The following fuses are installed in the mounting block:
- Power supply to the starter interlock relay circuit (F1 at 15 A).
- Power supply to the engine control unit (F2 at 7.5 A).
- Power supply for the fuel pump (F3 at 15 A).
If there is no sound of the fuel pump running when the ignition is turned on, relay K2 should be checked. Next, check the serviceability and operation of the immobilizer.
Check the wiring and check for contacts in the connectors. If all circuits and devices are operational, then the cause is a faulty fuel pump.
You can find out where the Priora fuel pump fuse is located by looking at the coding on the cover of the mounting block.
The fuse box for a vehicle with air conditioning is located above the ABS unit. Power fuses are located on the panel near the left support in the mounting block. To access them, remove the protective cover by pulling the latch:
- ECU circuit fuse (F1 30 A). The fusible element burns out due to short circuits, malfunctions of the electronic engine control unit, etc.
- On-board circuit (F2, F3 for 30, 40 A, respectively).
- Generator circuit (F4, F6 at 60 A).
- Electric power steering (F5 50 A).
If there are problems in electrical circuits, consistent troubleshooting is important. To do this, a search for a weak link is made by eliminating sections of the chain and their elements, starting from a non-working device or unit. In this case, it is important to follow the diagram of electrical circuits and fuses of the Lada Priora car and have a multimeter and a test lamp on hand.
Source: http://avtovx.ru/elektrooborudovanie/blok-predohraniteley-priora-212/
How to replace the heater fuse in Lada Priora
Electronics in any car is a complex system that consists of many parts. An important issue is occupied by the issue of protection, the essence of which lies in fuses and relays.
Many drivers know that if a problem occurs with a mechanism that is powered by current, it is necessary to check the protective parts for burnout. The same applies to the heater.
Therefore, the topic of our conversation is the relay and fuse of the Priora stove: where it is located, how to remove and install a working element.
An introductory word about protective elements
Electrical circuits on Priora require protection, the functions of which are performed by fuses. These elements are equipped with fusible inserts. They are designed for a maximum current rating, which is different for each fuse.
These protective elements are located in a special block on the left side of the driver, at the bottom of the instrument panel. The fuse for the Priora stove, as well as other protective elements, has a pin shape, inside of which there is a fuse-link.
It is this insert that tends to burn out at the moment when the current exceeds the permissible value.
The structure of the electrical wiring diagram contains another protective element: a relay. They are installed on the most powerful current consumers.
These include the rear window heating system, heater fan motor, engine cooling fan, and car horn. Such protective parts are also placed in a common block.
Priora heater relays are necessary to reduce the current load that is applied to the switch contacts. With such a protection system, contact pairs do not burn out.
In case of malfunctions with the heater, you must also pay attention to the relay. Now that we have found out where the Priora stove fuse is located, we can move on and get acquainted with other aspects of replacing this important element.
Discounts on new cars! Advantageous loan from 9.9%
Installment plan 0%
How to get to the protective parts?
So, we have already found out where the fuse and relay of the Priora stove are located - this is a special block. Now you need to figure out how to get directly to the protective elements.
The unit is equipped with a protective cover that can be easily removed. To do this, you need to turn the three locking locks on the lid 90 degrees. There are latches on the lid that create resistance.
It is enough to apply a little force and the cover will be dismantled.
Which fuses are responsible for the operation of the heater?
Under the cover there is a large number of protective parts, each of which is marked. It is with the help of markings that you can determine the necessary part that is responsible for a specific circuit. Since we are interested in the heater, there is simply no point in considering all the elements; we need to find out which fuse is responsible for the stove on the Priora.
Attention should be paid to the element marked F1, which is responsible for the operation of the engine radiator fan. It is rated at 25A. A non-working fan may indicate a malfunction. To prevent damage to the fan itself and the motor, it is necessary to directly supply voltage from the 12 V battery. If the motor is working properly, it is worth examining fuse F1.
Element F9, which is also rated at 25A, is responsible for the operation of the heater fan. Not all problems with the stove can be attributed to a faulty fuse. If the heater does not work in all modes, you must first check the speed controller and the engine by applying a voltage of 12V to it.
If an engine malfunction is detected, it is worth inspecting the brushes, which are often the cause of the inoperative condition. The heater can only operate in the last mode, and in the first mode it does not show any signs of life. In this case, the problem is the heater resistance; the resistor will need to be replaced.
In cars with air conditioning, a common cause of heater malfunction is the thermal fuse. You can find it near the additional resistance.
As you can see, the Priora heater fuse does not always cause the stove to break down. Therefore, you should not rush to change it to a new one. Moreover, if the protective element burns out frequently, it is worth looking for the true cause, which may be in the electrical circuit. This work is long and painstaking, but it must be completed.
Subtleties of replacement
When replacing protective parts, some car owners choose an element with a lower or higher rating. Doing this is strictly prohibited. It is necessary to choose a similar element so that there are no problems with the car in the future. Another mandatory and important point is to disconnect the terminal with the “+” sign from the battery.
The fuse located on the side can be removed without the use of any tools. It is easily pulled out with your fingers; it is enough to overcome the resistance created by the spring-loaded contacts.
But the elements that are located between other fuses cannot be easily reached. Special tweezers are provided for these purposes. It is located right there, in the block, on the right side.
After replacing the faulty element with a working one, you can connect the terminal and check the functionality of the stove. All that remains is to install the protective cover and turn the locking locks.
None of us are immune from breakdowns on the road. It’s clear that no one carries a set of spare elements with them.
There is a way out of this situation, but it can only be used in extreme cases, when you just need to get to the nearest populated area to buy a replacement for the faulty element.
You will need copper wire, which must be wrapped around the contacts of the fuse link. Such repairs are only temporary and should only be used as a last resort.
We tried to answer all the questions related to replacing the heater fuse in the Lada Priora. Follow the advice provided, be careful and do not put off repairing your car.
Source: https://remam.ru/vozdsys/zamena-predohranitelya-pechki-lada-priora.html
Cigarette lighter fuse on Priora
Not so long ago, a cigarette lighter was a mandatory attribute of the interior of any car. Its very name indicates its direct purpose - lighting cigarettes, although for the most part it is not used for this, but for connecting various electrical devices. This could be a car vacuum cleaner, refrigerator, compressor, navigator, DVR, etc.
Today, some modern foreign cars are not equipped with such a device as standard. The place of the cigarette lighter is taken by various kinds of sockets and connectors, with which you can connect and charge anything. You just can't light a cigarette.
Cigarette lighter
The domestic auto industry is in no hurry to replace the cigarette lighter with sockets, so all our cars are equipped with its classic version. Lada Priora is no exception. Here it is located in a place of honor - the central floor tunnel, next to the parking brake handle.
This arrangement of the device was not chosen by chance. It is always in sight, you can reach it with your right hand without bending, it does not interfere, and it is impossible for your pant leg to get caught on it. For greater convenience, it is also equipped with a backlight, which makes it easier to find in the dark.
It is worth noting that the Priora’s cigarette lighter differs from previous models not only in location, but also in configuration: its socket is somewhat smaller than that of other VAZs.
Design and operating principle
The Priora's cigarette lighter is no different from the cigarette lighters of other cars. Structurally, it consists of a socket (a hollow metal cylinder) and a metal cartridge with a nichrome spiral inside.
The cartridge is equipped with a plastic button, when pressed, the “plus” is connected to ground through the spiral.
The principle of heating the coil here is exactly the same as in an electric stove or iron, but unlike the latter, the Priora cigarette lighter does not have a thermal relay.
Its task is performed by bimetallic “ears” inside the cartridge, which, when heated, expand, and the spring ejects the cartridge, setting it to its initial position.
Malfunctions
Like any other electromechanical device, the Priora cigarette lighter tends to break. Sometimes this can be caused by design defects, sometimes by malfunctions in the machine's on-board circuit, and sometimes by the fault of the user himself. Common cigarette lighter malfunctions include:
- sinking of those same bimetallic “ears”;
- burnout of the spiral;
- broken contact in the connector;
- fuse blown.
Malfunctions can also include the burnout of a backlight lamp, however, this is more related to a decrease in the level of comfort than to serious breakdowns. In addition, it does not in any way affect the operation of the device itself and can be easily eliminated by replacing the lamp.
The sinking of the lugs is characterized by the lack of fixation of the cartridge in the pressed position. It can be caused either by the low quality of the metal from which they are made, i.e. defect, or high intensity or long period of use of the cigarette lighter.
The problem is solved by bending the “ears” inward using a thin screwdriver, naturally after de-energizing the on-board circuit. If after a short period of use the problem occurs again, it is better to replace the cigarette lighter.
When the spiral burns out, the cartridge is fixed when pressed, but does not heat up. The fault is diagnosed by ringing it using a car tester. It is not recommended to restore the spiral, as this may lead to a decrease in its resistance, which will make unwanted adjustments to the operation of the on-board circuit. In this case, the cigarette lighter also needs to be replaced.
Contact failure can be easily determined by removing the tunnel lining and checking the condition of the connector. This malfunction is not critical and can be fixed independently in a few minutes.
But as for the fuse, it makes sense to consider this malfunction separately, since its malfunction is most often caused by the human factor.
Replacing the cigarette lighter and its backlight
The cigarette lighter itself is not difficult to replace, you just need to pry the antenna inside the cigarette lighter with a screwdriver and pull out the inner part, and then we take out the plastic itself with the lamp, prying it with a thin screwdriver on both sides and pressing on the antenna. In principle, if you have already purchased a new cigarette lighter, you can simply look at how it works and everything will become clear.
Fuse
To ensure the safe operation of the cigarette lighter and devices connected to it, its electrical circuit is protected by a fuse. It is located in the mounting block located in the car interior under the dashboard. In the diagrams it is marked F-13 , and is designed for a maximum current of 15 A. Its body is usually blue.
Why does a fuse blow?
The cigarette lighter fuse in a Priora may blow out due to:
- connecting to the socket of devices whose plug is structurally smaller than the socket;
- discrepancies between the calculated current values of the cigarette lighter circuit and the connected device;
- malfunctions of connected devices.
The diameter of the Priora cigarette lighter socket is 21 mm, and the diameter of the plugs of some electronic or electrical devices powered from the cigarette lighter is 18-20 mm. In other words, such a plug will dangle in the socket, and loosely pressed contacts will spark.
Sparking leads to charring of contacts and increased load on the circuit. As a result, the least that awaits us is replacing the blown fuse. The same thing will happen if you insert the plug into the socket incorrectly (at the wrong angle). This, by the way, is the most common reason why the cigarette lighter fuse blows.
Another “popular” reason is the difference in calculated currents. As already mentioned, the maximum fuse current is 15 A , and if you connect, for example, a compressor that consumes a current of 20 A to the cigarette lighter, it is no wonder that the fuse will burn out. Long-term operation of the same compressor, vacuum cleaner, refrigerator, or electric kettle can also lead to this.
Most modern electronic devices designed to operate from a cigarette lighter have their own fuse located in the plug.
It allows you to protect the device itself from possible interruptions in the machine’s network, as well as the network from gadget malfunctions.
But, if the device is faulty (for example, there is a short circuit) and is not equipped with a fuse, there is a reverse risk for the on-board circuit.
How to replace
- Open the cover of the mounting block by turning the 3 plastic latches half a turn and remove it.
- We find the fuse in the socket marked F-13 and pull it out of the socket. At the same time, we verify that it is not working visually or using a tester.
- We install a new fuse in its place.
- Install the lid and close it.
- We check the results of our work.
To prevent problems with fuses from catching you by surprise, it is advisable to have a spare set of them in the glove compartment.
This applies not only to the cigarette lighter, but also to other devices that are most susceptible to overload. Buying spare fuses won't impact your budget at all, but will give you confidence on the road.
The cost of one fuse is about 5-7 rubles, and a set of 10 pieces is 40-60 rubles.
And, of course, in no case should you use various kinds of “bugs” instead of a fuse, be it a coin, a piece of wire, or your wife’s hairpin. Their use changes the parameters of the electrical circuit, and its overload may adversely affect the operation of any system that uses electricity.
In addition, the use of a jumper is fraught with the occurrence of a short circuit not in the cigarette lighter circuit, but in the car circuit. The result of this can be anything, including fire.
Conclusion
Undoubtedly, a cigarette lighter in a car is a necessary and useful thing. But in order for it to work and not bring problems instead of benefits, it must be monitored and undue stress avoided.
And please listen to the advice about a spare set of fuses. It will help maintain not only the functionality of all systems, but also your time and mood.
Source: http://mylada.net/remont/predoxranitel-prikurivatelya-na-priore.html