Replacing the rear wheel bearing

The ease of rotation of wheels on a car is ensured by the presence of rolling bearings installed in the hub.
But these elements experience heavy loads during operation, since they must not only ensure high-speed rotation of the hub and the wheel attached to it.
Both the hub and the bearing must also bear the weight of the car, since only this bearing is located in the connection between the hub and the axle, so it bears the entire load.
The front hubs of front-wheel drive cars usually use a bearing designed to withstand significant loads. But the rear one is somewhat inferior in this regard, and in addition, in the front part of the car, the load on this element is almost always the same, since this bearing only bears the weight of the front part of the car along with the engine and gearbox.
But the rear wheel bearing often has to work with a changing load, which depends on the load in the cabin, as well as the luggage compartment, so the rear wheel bearings fail much more often.
Signs of bearing wear
Signs of wear on the rear wheel bearings are very easy to recognize. When driving, a hum appears in the cabin at the rear of the car. At low speeds, a creaking noise can be clearly heard.
In cases where the bearing has begun to fail, a crunching sound may occur when the wheel rotates, indicating that broken pieces of the bearing have begun to fall between the rollers.
Checking the condition of this element is also not difficult. It is enough to jack up the rear wheel and check for axial play by rocking the wheel.
Then the wheel should be rotated, listening for the presence of squeaks. If the bearing begins to deteriorate, the wheel will most likely bite when rotating.
Further actions depend on the element used. The design of the bearing may differ on different cars.
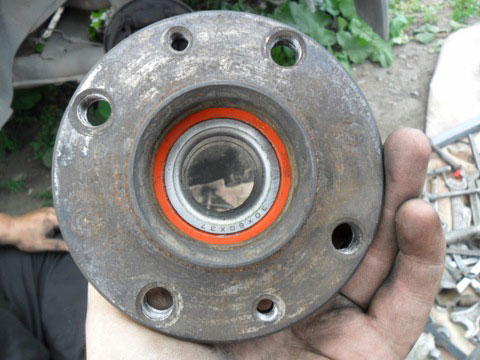
For example, on the VAZ-2110, an angular contact double-row ball bearing of a closed type is used on the rear hub; in appearance it is similar to the front hub bearing.
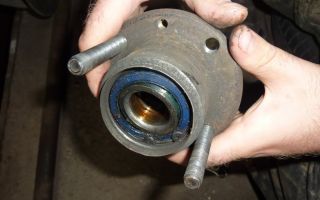
But Daewoo Lanos uses a tapered roller bearing consisting of two halves. Further we will consider everything using the example of these two cars.
So, if the VAZ-2110 wheel bearing shows signs of wear, it is simply replaced.
In Lanos, you can try to eliminate the hum, squeaks and play by tightening the hub nut. Often it is enough to carry out this operation to eliminate play and hum.
But if a crunching sound is heard when the wheel rotates or tightening the hub nut does not produce results, the rear hub bearing is replaced.
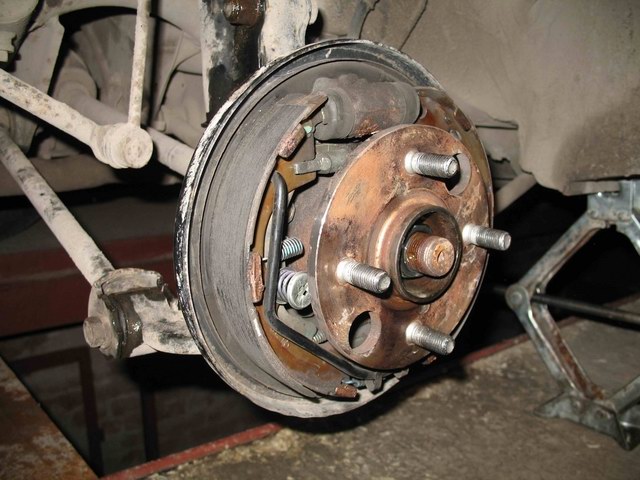
Replacing a bearing using the example of a VAZ-2110
Rear hub with bearing VAZ-2110
First, let's consider replacing this element on the “Ten”. The tools that will be needed are not so many, but specific ones will also be required. In total you will need to have:
- Jack;
- Car supports;
- Balloon wrench;
- Socket wrench “30” or a socket with a wrench of the same size;
- Pliers for removing retaining rings;
- Key for 12;
- Special puller for pressing out the bearing;
- Hammer;
- Chisel;
- Mount;
Having all this, you can start replacing. The car is placed on a flat surface, the gearbox is engaged in 1st gear. While the car is on its wheels, it is better to immediately loosen the hub nut. Often this nut is too tight, so it may be necessary to extend the wrench with a pipe.
Then the wheel bolts are loosened, the wheel is jacked up, and the car itself is placed on supports. Next, the wheel is removed from the car.
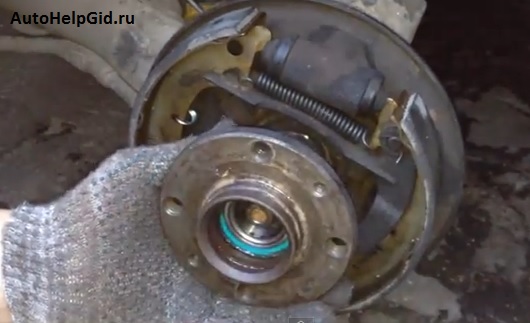
Before removing the hub, the brake drum will need to be removed. To do this, you first need to unscrew the guide pins. After this, the drum is removed from the hub. Sometimes it can only be removed by knocking down the drum with a hammer and a wooden handle.
Next, the hub nut is completely unscrewed to allow the hub to be removed from the axle. Since the bearing sits tightly on the axis, you cannot do without a hammer and a wooden adapter. You need to knock it down carefully, constantly turning the hub so that it comes off the axis evenly.
Video: replacing the rear wheel bearing on a VAZ-2110
Then everything depends on how the hub came off the axle. The fact is that with severe wear, the inner race of the bearing may remain on the axle, and the outer race, together with the balls, may remain in the hub.
In this situation, you will have to additionally remove the brake pads in order to “rip” the inner race out of place, and then pull it off with a puller or using a chisel and hammer. The method of tightening the inner race is not important, the main thing is to remove it without damaging the surface of the axle. If the bearing comes off the axle completely assembled, you can begin further work.
The bearing needs to be pressed out from the removed hub. To do this, the retaining rings are first removed. Then using a special puller. If there is none, you can simply knock it out.
But putting a new element in place by hammering it in is strictly prohibited. It should be pressed in either with the same puller, or using a powerful vice, using the outer race of the worn bearing as a straightener.
After the new element is seated, its retaining rings are installed, and the replacement of the rear wheel bearing is completed and you can begin assembly, which is performed in reverse order.
Replacing the rear wheel bearing using the example of Daewoo Lanos
On Lanos this operation is performed slightly differently, and fewer tools are needed:
- Jack;
- Car supports;
- Balloon wrench;
- Open-end wrench set to “24-27”;
- Pliers;
- Screwdriver;
- Bearing puller;
- Hammer;
- Chisel;
- Mount;
The initial stage of work is almost the same as described above - the car is jacked up and the wheel is removed.
Video: Lanos, changing rear wheel bearings and rear pads
Next, use a hammer and screwdriver to knock off the protective cap of the hub. To unscrew the nut, first remove the locking pin using pliers.
Then the hub nut is unscrewed with a wrench and the support washer is removed. After this, it will be possible to remove the brake drum along with the bearings. Often the inner race of the inner bearing remains on the axle. To remove it you will have to use a puller or a hammer and chisel.
Next, you need to press the outer race of the inner bearing and the outer bearing out of the drum. For ease of work, special recesses are made inside the drum, making it easy to knock out the outer races of the bearings with a hammer and chisel.
Then you need to press the outer races of the new bearings into the drum seats. It is better to do this using a vice and old clips as guides.
Then the inner race of the inner bearing is put on the axle and carefully hammered with a hammer and a pipe equal in diameter to this race. The main thing is that it sits on the axle all the way.
The next step is to install the drum in place, and after that the inner race of the outer bearing is installed. All that remains is to replace the thrust washer and tighten the hub nut. It must be tightened all the way, and then unscrewed a third of a turn to ensure the wheel rotates. Before installing the protective cap, the nut must be secured with a cotter pin.
After complete assembly, you should drive the car a little, and then make sure that the bearing does not heat up. If it gets hot, you need to remove the cap again, pull out the cotter pin and loosen the nut a little more.
Source: http://AvtoMotoProf.ru/svoimi-rukami/zamena-podshipnika-zadney-stupitsyi/
Replacing the rear wheel bearing - getting rid of unpleasant sounds
Sometimes, before an upcoming trip, you hear similar expressions from passengers: “the main thing is that the wheels don’t fly off,” but in fact, no one puts serious meaning into these words, but in vain.
This could very well happen! Poor fastenings and worn parts do not have the best effect on ensuring safe movement, so it is very important to identify and eliminate the problem in time, even if, at first glance, it seems insignificant.
For example, many drivers do not take due responsibility for diagnosing wheel bearings, despite the fact that this particular part is an important element of the rotating mechanism of a car wheel.
We will tell you about the characteristic signs of a hub failure and how to replace it in today’s article.
1. How to find out about problems with the hub?
The hub is an important part of any vehicle. It has a hole created to allow it to be attached to an axle or shaft, and the main purpose of this part is to transmit torque from the crankshaft to the wheel, due to which the latter begins to rotate and the car starts to move.
Along with the hub, an equally essential element of the chassis assembly is the hub bearing, presented in the form of a double-row ball or single-row roller bearing.
Together they are aimed at observing safety measures while the car is moving, so it is clear that failure of any part of them cannot guarantee this.
Today, the rear wheel hubs of any vehicle are subject to significant vertical and axial loads, and on vehicles with rear- or all-wheel drive, high torque is added to this.
Unknowingly, the car owner himself can contribute to the rapid wear of the wheel bearing during the process of replacing wheels.
When tightening the fastening bolts, you may not calculate the force and tear them off, but this does not mean at all that you should not fix the wheel rim well. In this matter, it is important to find a “golden mean” and then you will not have to think about the possible consequences.
To tighten the bolts, it is best to use an electric wrench, as it better “feels” the limit of permissible force.
It affects the rapid wear of the bearing unit (rear wheel) and moisture and dust entering it from the road. Penetrating into the hub, dust acts as an abrasive substance, gradually squeezing out the lubricant through the sealing parts, as a result of which the hub bearing is destroyed by heat.
It is not difficult to notice the need to replace the wheel bearing; you will be informed about this by a characteristic knock coming from the rear of the body, which intensifies when driving on uneven roads or when hitting bumps and holes.
If the car moves on a flat surface, a hum occurs and, although this is not noticeable, the brake drum gets very hot.
Also, when turning the steering wheel, quite often an uncharacteristic braking is noticeable - another sure sign of a faulty bearing.
Usually, to determine the cause of bearing failure, just a visual inspection is not enough; the condition of adjacent parts, the quantity (quality) of lubricant and the conditions of use of the vehicle should also be taken into account.
Among the main factors influencing rear wheel bearing failure are:
• reduction in the service life of parts due to long-term operation in extreme conditions (the average service life of this type of bearings is calculated at approximately 1,000,000 km, which in reality often does not correspond to this indicator);
• unreliability of lubricants: their excess (shortage) or poor quality (70% of cases);
• contamination when moisture or solid particles of various debris get inside the part (18% of cases);
• incorrect wheel installation: incorrect adjustment, excessive force, over-tightening of the bushing, overheating, inaccurate clearance, etc. To avoid costly damage and take precautions, manufacturers recommend that wheel bearings be inspected every time the brake pads are replaced, regardless of the age of the vehicle.
2. Check whether the rear wheel hub bearing needs to be replaced
Most often, there are only two reasons for the failure of the rear wheel hub bearing: poor quality of the road surface (in some places it can hardly be called a road at all) and poor quality of the materials of the part itself.
In these cases, if warning signs of the need to replace the rear hub appear, it is worth doing it. This process is simple, so you can do it yourself, at home.
But before you start work, you should know for sure whether the whole issue is a faulty bearing or, perhaps, there is another reason.
To do this, you will have to use a jack and lift the rear axle. After this, the wheel in which the hum is heard is rotated and rocked to check the play.
If it is detected, and a dull tapping or crunching sound is heard when performing rotational movements, the bearing should be changed immediately, since if it falls apart while the car is moving, it can damage other parts of the hub system.
One of the success criteria when replacing a rear wheel hub bearing is the quality of the new part. All those who like to buy “cheaper” should remember the saying “The miser pays twice.”
It is definitely not worth demanding from a cheap and low-quality bearing many years of good service, and it is quite possible that you will soon have to make a similar purchase again (God willing, if only for this part).
3. Step-by-step instructions for replacing the rear wheel bearing
At the preliminary stage of replacement, it is necessary to prepare the appropriate tools. It includes: a jack, a set of screwdrivers, a wheel wrench, a wheel nut remover, lithol, a pry bar and a chisel (the latter may not be useful, but it’s better to have it at hand).
The direct replacement stage includes the following points:
• having put the car in first gear, use a jack (lift) to lift its rear part and, having unscrewed the fastening bolts, remove the desired wheel from the hub (if using a jack, to prevent the car from rolling forward, special supports called " should be placed under the front wheels shoes");
• by unscrewing the guide pins, remove the brake drum (although usually they just knock it off), followed by the brake pads;
• the hub fastening nut is unscrewed with a special puller (before this, the plug is removed from it), and the hub itself is knocked off the axle. It must be removed together with the bearing ring, and if this does not work, then this part is dismantled using a chisel and a pry bar during gouging and pulling out. This process is quite lengthy, so you should be patient;
• pressing out the old bearing. To do this, use special pliers to remove the retaining ring and then knock off the metal boot. If, during the “mental” work of the hammer and chisel, the edges of the hub were severely knocked off, then in addition to a new bearing, it is worth purchasing a new hub, so the further proper operation of the “crippled” one comes into question;
• the new (or old) hub is lubricated with lithol and the replaced bearing is pressed into it using a special puller. Notice! It is highly undesirable to hammer it in to avoid damage.
• the boot and retaining ring are installed in their original place;
• the hub is put back on the axle, while slightly tapping the inner ring of the bearing, after which the axle is tightened, and its sides are crumpled as best as possible;
• ultimately, the brake pads, drum and finally the wheel itself are installed in their places. There are also a number of recommendations to obtain optimal results:
• To avoid damage to the rear wheel bearing seat, you should use only professional pullers specifically designed for this purpose, taking into account the required diameter of the race.
• To improve the process of installing a new bearing and seal, various types of presses are used. It is highly not recommended to use the impact method of pressing new parts (for example, using a hammer).
This can damage the oil seal and it will begin to leak lubricant, and will also create microcracks in the bearing race, causing it to heat up more and, accordingly, fail faster.
• Reassemble the rear hub assembly in the reverse order, after which, using the bleeding method, air is removed from the brake system and the parking brake is adjusted.
• On some models, the rear hub bearing can only be replaced together with the hub.
• It is better to immediately change the wheel bearings of both rear wheels, since they are subject to the same load and wear out in the same way.
Source: https://auto.today/bok/2430-zamena-podshipnika-zadney-stupicy.html
Replacing the rear wheel bearing on a Grant
The rear wheel bearing for the Lada Granta is a very important element. It is important because it ensures proper rotation of the wheel.
As a result of its operation, the bearing experiences significant loads, which is why wear-resistant materials are used in its manufacture. However, no matter how durable materials are used, over time the part fails.
Due to the high importance of the unit, its replacement is mandatory as soon as the first signs of malfunction appear.
Signs of a faulty rear wheel bearing on a Grant
In order to replace an element in a timely manner, you need to know the symptoms that indicate its inoperability. Below are some of the most common:
- Vibration during vehicle driving conditions. Vibration can be felt both in the car body and in the steering wheel when driving. If such signs appear, a thorough diagnosis and (or) replacement of the unit is immediately carried out.
- The appearance of a specific hum, crunching noise when moving. Such sounds indicate mechanical damage and destruction of the hub mechanism (spherical elements).
Causes of breakdowns
Below are the 2 most common reasons for element failure:
- Loss of bearing tightness. The fact is that the product body contains a certain amount of lubricant to reduce friction between the internal elements. The lubricant is retained by special protective covers made of rubber or plastic. Accordingly, these materials deteriorate over time, which leads to a gradual loss of lubrication and failure of the hub element.
- Large production resource. No matter how carefully you operate your car, over time most components and elements become unusable. Each part has its own service life. The bearing, whose service life is about 60 thousand kilometers, is no exception. In some cases (regular or periodic driving through potholes, under conditions of increased wear), the element fails much earlier than the above indicators.
How to change the rear wheel bearing of a Lada Granta
Work related to the removal and installation of the element will require special tools, namely: - a special hub puller; - chisel; — retaining ring remover (or pliers with round ends); — a “30” head, or a key of the same size; - vice; — a puller for pressing and pressing out bearings;
- a flat-tipped screwdriver.
So, let's get started, below are 14 detailed stages of the work:
- Remove the plastic protective cap from the rear wheel.
- We move the gearbox lever to the “1st gear” position. To prevent the car from rolling away under the front wheels, we place supports.
- We loosen the tightening torque for the hub nut (it is most convenient to use a long lever). Unscrew it a little and loosen the bolts holding the wheel.
- Using a reliable jack, we lift the rear side of the car, where the bearing is actually changed.
- Unscrew the nuts and remove the rear wheel from the studs. We dismantle the brake drum.
- Unscrew and remove the hub nut, take out the thrust washer.
- We take the previously prepared puller in our hands and carefully press the hub from the axle.
- Now we take the hub, install it and clamp it with a vice. Remove the retaining ring (use a puller).
- Press the bearing out of the rear hub. Then, using a brush with metal bristles, we clean the inside of the hub from dirt. We press the new product back in. Don't forget to install the special retaining ring correctly.
- Taking advantage of this opportunity, we clean the brake system elements from rust and contaminants.
- We put the hub back on the axle element. We return the brake drum to its place and put the wheel back on.
- Tighten the wheel bolts. Let go of the raised part of the car until the wheel is firmly in contact with the ground.
- Tighten the hub nut securely using a long-lever wrench (or a special hub wrench). We return the protective plastic cap to its place.
- In order to check the results of the work performed, we start the car engine and start driving.
This completes the replacement of the rear wheel bearing (Lada Granta). As you can see, the process is not too complicated. All you need is a good specialized tool and some free time.
Source: http://ladaservice.info/lada-granta/hodovaya-chast/zamena-zadnego-stupichnogo-podshipnika-na-grante/
How to change the rear wheel bearing on a VAZ-2114: video, photo
Replacing the rear wheel bearing on a VAZ-2114 is quite difficult, but you can do it yourself.
So, a motorist needs to know the design features of the car, as well as have some experience in suspension repair, but even a novice car enthusiast will be able to understand the process by reading this material. The article will tell you about all the features of the operation, and also show step by step how the procedure is done.
Video about quick and easy replacement of the rear wheel bearing on a VAZ-2114
Rear suspension and chassis design
Bearing produced by AvtoVAZ
Before proceeding directly to the replacement process, it is worth considering the rear suspension structure in order to understand the location of the part, as well as determine what needs to be removed in order to change the rear wheel bearing.
Sectional view of the rear chassis
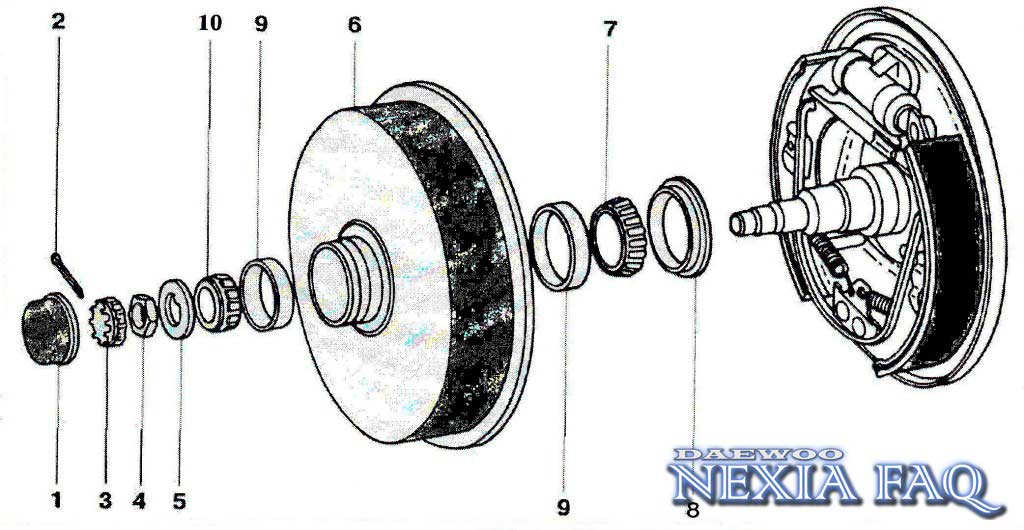
1. Rear wheel hub; 2. Rear suspension arm; 3. Suspension arm mounting bracket; 4. Rubber bushing for the lever hinge; 5. Lever joint spacer; 6. Rear suspension arm mounting bolt; 7. Body bracket; 8. Support washer for fastening the shock absorber rod; 9. Upper suspension spring support; 10.
Spacer sleeve; 11. Suspension spring insulating gasket; 12. Rear suspension spring; 13. Shock absorber rod mounting pads; 14. Compression stroke buffer; 15. Shock absorber rod; 16. Shock absorber protective cover; 17. Lower support cup of the suspension spring; 18. Shock absorber; 19. Lever connector; 20. Hub axle: 21.
Cap; 22. Wheel hub nut; 23. O-ring; 24. Bearing washer; 25. Wheel bearing; 26. Brake shield; 27. Retaining ring; 28. Mud deflector; 29. Suspension arm flange; 30. Shock absorber bushing; 31. Lever bracket with eye for mounting the shock absorber; 32.
Rubber-metal hinge of the suspension arm;
Bearing replacement process
Now that we have sorted out the design features, we can move on to the actual replacement process. First you need to collect the tools. What you will need: a jack, a set of open-end and socket wrenches, a wheel wrench, rags, a 30mm socket wrench, round nose pliers for removing retaining rings, VD-40 (as needed), and a new bearing.
When everything is assembled, you can consider the step-by-step instructions for replacing the rear wheel bearing on a VAZ-2114 car:
- Place the car on a flat surface.
- We set first gear to the gearbox and place wheel chocks (shoes) under the front wheels.
Let's put it first
- We dismantle the protective cap of the hub.
- Using a 30mm socket and an extension, we tear off the wheel bearing tightening nut.
- We tear off the wheel rim mounting bolts.
- We jack up the car.
- We dismantle the wheel.
View of a removed wheel from a car
- Unscrew the rear drum mounts.
- Remove the front brake drum cover.
Removing the top brake drum cover
- Remove the hub nut.
Unscrew the hub nut
- We install the hub puller and begin dismantling the part.
Rear hub puller classic
- When the hub and bearing are removed, you can proceed directly to dismantling the internal element.
- Using pliers, remove the retaining rings.
Removing the hub
- There are two ways to remove a bearing from a hub. The first is to knock the product out of its seat. The second, less barbaric, is to use a press to press out the bearings. As practice shows, all motorists use the first one, since the press is not stored in every garage.
Pressing out the bearing
- Now that the old product has been dismantled, you can proceed to installing a new part. View of the hub with the bearing removed
- Before pressing, it is necessary to lubricate the inner surface of the hub with oil. This is necessary so that the spare part fits better into the seat. Using special tools, we press the new bearing. Special tools for installing bearings.
- Once the bearing is in place, the snap rings can be installed. Bearing installed in the hub Rear view of the bearing and snap ring installed
- Now, with light blows of a hammer, install the hub in its place.
- The rest of the assembly process is carried out in reverse order.
Part selection
Not original Kroner rear wheel bearing
Choosing a spare part is always not an easy task, since there are many factors that influence it.
It is worth noting that you must choose a high-quality product and check for certificates, original packaging, and holograms.
In addition to the main original product, there are a number of analogues that are recommended for installation. Let's consider all possible options for purchasing a spare part.
Original
2108-3104020 and 2108-3104020-02 – original catalog numbers of the VAZ-2114 rear wheel bearing. The spare part under this article is produced at the AvtoVAZ plant. It's ideal to sit in a seat. The average cost is 2000 rubles.
Analogs
Rear wheel bearing
In addition to the original, there are a number of substitutes recommended for installation. As practice shows, they are chosen by most motorists, since the quality of workmanship and service life are much higher.
So, let's look at all the options for purchasing a wheel bearing:
Manufacturer's nameCatalog numberCost, in rubles| Weber | BR 2108-4020 | 500 |
| Master-sport | 2108-3104020-ST-PCS-MS | 500 |
| Finwhale | HB321 | 750 |
| Coram | CR 001 | 750 |
| Hola | NB722 | 750 |
| Meyle | 214 633 0001 | 750 |
| SCT | SCP 1307 | 750 |
| Cx | CX 081 | 750 |
| Kroner | K151208 | 850 |
| Optimal | 802 658 | 1000 |
| Pilenga | PW-P 1307 | 1000 |
| Mapco | 26081 | 1100 |
| Flennor | FR891547 | 1200 |
| Herzog | H10 1206 | 1200 |
| ABS | 200068 | 1300 |
| Patron | PBK1307 | 1300 |
| Moog | LA-WB-11604 | 1400 |
| Trialli | CS 256 | 1500 |
| GKN-Spidan | 26727 | 1500 |
| Torque | DAC 30600037 | 1500 |
| EGT | 554312EGTk | 1500 |
| SNR | R172.04 | 1500 |
conclusions
As can be seen from the article, replacing the rear wheel bearing on a VAZ-2114 car is not as difficult as it seems at first glance, but not all motorists are able to cope with this task, so they often turn to a car service center. It is worth noting that special attention must be paid to the choice of product, because the service life of the hub itself depends on the quality of the spare part.
Source: http://carfrance.ru/zamena-podshipnika-zadnej-stupicy-vaz-2114/
Replacing the rear wheel bearing of a VAZ 2110 on your own
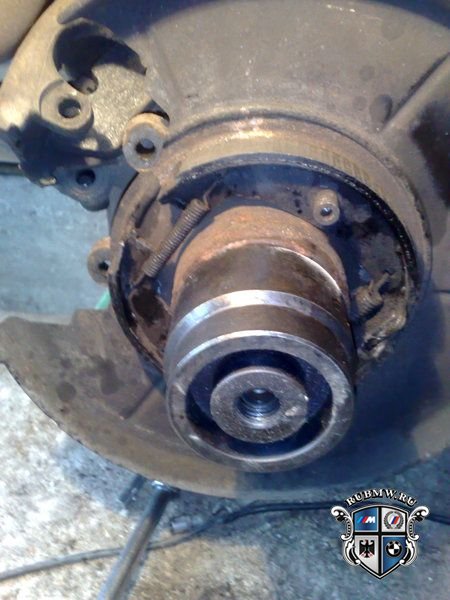
Rear hub with axle and bearing
As a rule, replacing the rear wheel bearing of a VAZ 2110 is not carried out very often. The service life should be equal to a relatively long mileage (at least 100 thousand km). But due to the state of modern roads, this period is significantly reduced, as a result, an early replacement of the rear wheel bearing of the VAZ 2110 will be required.
When a part needs to be replaced
Replacing the rear wheel bearings of a VAZ 2110
If you hear a noise, hum or howl from the rear that increases significantly when cornering, this indicates that it is time to check the rear hubs.
Modern verification methods are quite simple:
- Having stopped the wheel diagonally - opposite to the jacking point, you need to hang the two rear wheels alternately.
- The raised wheel needs to be spun as much as possible. If you hear extraneous sounds similar to a hum, in any case you cannot do without replacing the part;
Replacing the rear wheel bearing of a VAZ 2110
- if you still have some doubts, you can look at the lateral play. You need to take the wheel by the edges and roll it away from you - towards you. If the bearing is bad, you will feel the movement of the wheel on its axis.
Today, stores sell individual bearings and assembled hubs. In fact, there is no point in buying an assembled unit (except in individual cases), since replacing the bearing is not as difficult as it immediately seems.
Replacing the rear wheel bearings of a VAZ 2110
So:
- The car stops at the front.
- Wheel bolts break off.
- The nut in the center of the hub breaks off, and you must first remove the cap.
- The required side is jacked up and the trestles are positioned.
- The wheel is removed.
- The area for installing the disc brake is filled with WD-40 or other special liquids.
- The guide bolts are unscrewed, which it is recommended to first tap with a hammer.
Replacing the rear wheel bearing of a VAZ 2110
- Carefully remove the brake drum. If removal is difficult, you need to screw special bolts into the threads on this drum, tighten it and lightly knock it with a hammer. Usually such measures give positive results.
- The central nut is completely unscrewed. Of course, you can unscrew it immediately and remove the hub, wheel and drum together, but in this case there will be a high risk of damaging the brake pads.
Rear wheel bearing VAZ 2110
- The hub tightens. If one of the bearing races remains on the axis, you need to move it out of place using a puller or sharpened chisels.
- The axle is inspected for the presence of marks from bearing rotation; if such marks are present, the assembled hub will need to be replaced.
- The brake cylinder is assessed for leakage, and the pads are assessed for wear.
- The retaining ring is removed from the hub using pliers or screwdrivers.
- The edge must be cleaned of rust, after which it must be moistened with WD-40 or a similar liquid that is at hand.
VAZ 2110 rear wheel bearing
- There are three ways to press out a bearing: using a special press, a puller or a heavy hammer (sledgehammer). The third method may seem aggressive, but it is preferred by most service station technicians, so let’s look at it in more detail.
- The hub is securely installed on a hard surface, and the bearing is dislodged from its place through the mandrel with several blows of a hammer or sledgehammer. After this, the hub is installed on a vice.
- A couple more blows are made, after which the bearing comes out.
VAZ 2110 rear wheel bearing
- The bearing seating surface must be carefully inspected, any existing rust should be sanded off and lubricated with plain motor oil.
- The purchased bearing must be screwed using a selected bolt through a washer, which must be selected in accordance with the internal races. Since the bearings are double row, they will have to be disassembled during installation.
- The hub is installed on a hard surface.
- A twisted bearing is installed on top, but first you need to lubricate its installed plane with oil.
- Use a one-kilogram hammer to slightly level the element in a plane.
- Take a suitable mandrel, for example, a pry bar, which is used to hit the part to press the bearing.
Brand rear wheel bearing VAZ 2110
- When the bearing is about halfway through, you can hit harder.
- When reaching the cut part of the hub, you need to use the old clip as a mandrel.
Easy to replace rear wheel bearing
- You need to push it all the way, after which the stopper is installed; if it is not possible to install the last element normally, then most likely the bearing was not finished completely.
Bearing assembly procedure
So:
- Now it's time for assembly, the hub is put on the axle, and you need to remove the bolt used to tighten the cage.
Wheel bearing rear
- The central nut is tightened and tightened as much as possible. In this case, we mean installing a new nut. We also install a thrust washer.
- The previously removed brake drum and wheel are put on and screwed on.
- The rotation is evaluated, if there is no noise, then all actions were performed correctly. The car is removed from the jack.
- The wheel with the central nut is tightened.
- The hub nuts are closed and the wheels are tightened securely.
Final tightening of wheel nuts
For a better explanation of the process, it is recommended to watch the video. A photo will also help as a visual aid.
Using step-by-step instructions, you can quickly and easily replace the rear wheel bearing with your own hands, without spending money on repairs at a service station.
By doing everything as required by the instructions, you can even save a lot of money, because the price of repairs in this case will be much lower.
You can also find out about replacing the front wheel bearing on our website.
Source: http://MasteraVaza.ru/hodovka/stupica/zamena-zadnego-podshipnika-stupicy-vaz-2110-541
Rules for replacing the rear wheel bearing on a VAZ 2109, 2110

The service life of wheel bearings should have a fairly long mileage (at least 100,000 km). But the condition of our roads can lead to a fairly early replacement of the wheel bearing on the VAZ 2109, 2110.
How to determine the need for replacement?
Strong noise, humming of the rear hub bearing of VAZ 2109, 2110, “howling” from the rear, which intensifies when turning, clearly indicates the need to check the condition of the rear hubs. The verification methods are quite simple:
- Be sure to stop the wheel diagonally opposite from the jacking side, and then jack up each rear wheel one by one. (Why each? The fact is that very often there are errors in determining the side of the hum, and even more often there is a need to replace both bearings).
- When the wheel is raised, you need to try to spin it as much as possible. If at the same time you hear extraneous sounds similar to a hum, you don’t have to check further - replacement is necessary.
- If in doubt, you can also check the lateral play of the bearing by grasping the edges of the wheel and rocking it towards you - away from you. If you feel the wheel moving on the axle, the bearing needs to be replaced.
Step-by-step method for replacing the rear wheel bearing on a VAZ 2109, 2110
- stop the car from the front;
- tear off the wheel bolts;
- tear off the central nut (7) of the hub, having first removed the cap (9);
- jack up the side and set the trestles;
- remove the wheel;
- fill the brake drum mounting area with WD-40 or other special liquids (you can use diesel fuel or brake fluid);
- unscrew the guide bolts (it is advisable to lightly tap with a hammer);
- we try to carefully remove the brake drum (if it doesn’t work, we screw the appropriate bolts into a special thread on the brake drum, apply tension and very lightly try to knock it out with a hammer. In most cases, the result will be positive. There are special drum pullers on sale, just for that case , if all else fails);
- unscrew the central nut completely (of course, it is possible to unscrew it immediately, and even remove the hub along with the wheel and drum, but then there is a high probability of damage to the brake pads);
- we tighten the hub (if one of the inner races of the bearing remains on the axle, you need to use a puller or just a sharpened chisel to try to move it from its place);
- inspect the axle for signs of bearing rotation (if there are any, we replace it, it is advisable to replace the hub assembly);
- inspect the brake cylinder for leaks and pads for wear;
- remove the retaining ring from the hub using pliers and/or screwdrivers.
- Be sure to clean the edge from rust, moisten it with WD-40 or whatever you have on hand.
There are three options for pressing out the bearing:
- A special press (not everyone has one).
- A puller (not expensive, can be purchased, will be useful for the future).
- Using a heavy hammer (at least 2 kg) or a sledgehammer. AT first glance, the method may seem a little aggressive, but it is practiced by an overwhelming number of masters and service stations, and we will consider it.
- The hub must be firmly installed on a hard surface, and with several sharp blows through the mandrel, the bearing must be moved from its place. When this happens, you need to install the hub, for example, on a yew tree (so that there is a stop for the hub and free space for the bearing to exit)
- a few more blows and the bearing will come out (don’t rush to throw it away);
- We inspect the seating plane under the bearing, clean off the rust with sandpaper, lubricate it with regular engine oil (you can polish it off);
- the new bearing must be screwed with any suitable bolt through washers (washers must be selected according to the inner races, the bearing is double-row and during installation there is a high probability of its disassembly);
- install the hub on a hard surface.
— we place a twisted bearing on top, and lightly lubricate its mounting plane with oil (a new good bearing usually does not need to be lubricated inside, but if you have doubts and a little experience in assembling and disassembling, you can use Litol -24 lubricant)
- using an ordinary 500-gram hammer, very lightly, we try to align the bearing in the plane;
— we take a suitable mandrel (for example, a pry bar), and try to press the bearing in with gentle blows.
- the basic rule is no strong blows, if it doesn’t work, it means it’s crooked
- after the bearing has passed halfway, you can no longer apply much force, since it can no longer warp.
-when we reach the cut of the hub, it is necessary to use the old clip as a mandrel (no strong impacts, the metal is high-carbon, and with a strong impact it can burst and cause very serious injury)
— we push it all the way and install the stopper (if there are problems with installing the stopper, then most likely you did not finish it all the way) the stopper should easily spring into the groove;
Assembly
— that’s it, we begin the process of assembling the rear hub bearing on the VAZ 2109, 2110. To do this, we put the hub on the axle (by removing the bolt with which we tightened the cages);
— tighten and tighten the central nut (be sure to install a new one), not forgetting to put the thrust washer;
— put on and screw on the brake drum and wheel;
— check the rotation (there should be no extraneous noise);
— if all is well, lower the car from the jack;
— tighten the wheel and the central nut (the tightening torque of the hub is about 20 kgm, this is quite a strong tightening, if you don’t have a torque wrench, you need to use a lever of at least a meter to tighten the nut with a force twice the tightening force of the wheels);
— tighten the hub nut, tighten the wheels.
Source: http://avtooverview.ru/remont/pravila-zameny-podshipnika-zadnej-stupicy-na-vaz-210821102115-i-ix-modifikacij/