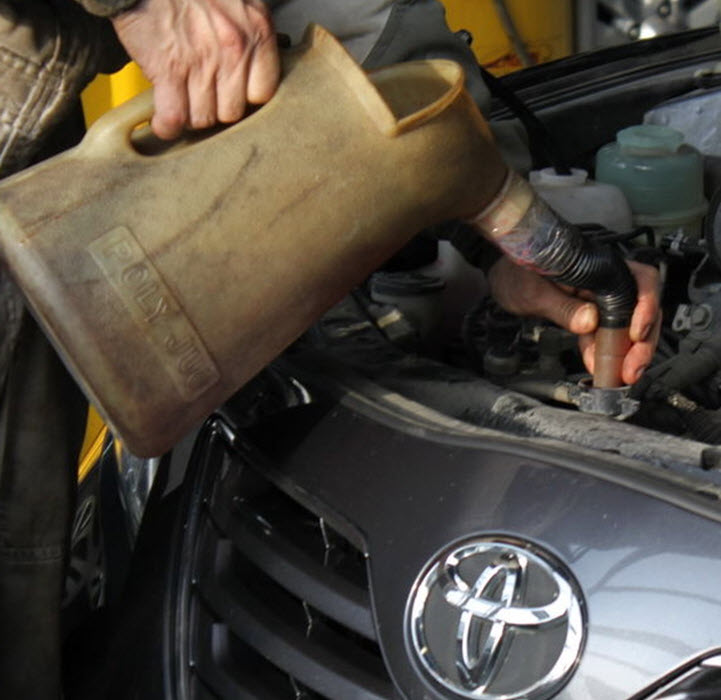
Replacing the thermostat on a 4zz-fe E150 with your own hands - logbook of the 2007 Toyota Corolla Dolphin on DRIVE2
Last winter, the thermostat malfunctioned - the car took a long time to warm up, and the efficiency of the stove decreased. Covering the radiator grille with improvised means was not successful.
It was decided to prepare to replace the thermostat, and at the same time replace the antifreeze.
I haven’t found a detailed report on this work on my engine, but maybe mine will do for someone. So, let's begin.
We open the hood and see a very unsightly picture:
Full size
And where does this dirt come from?)
To make it more fun to work, we take the Karcher out of the stash and, working without fanaticism, covering the vulnerable spots, we bring the engine compartment into something like this:
Full size
It's much nicer this way!
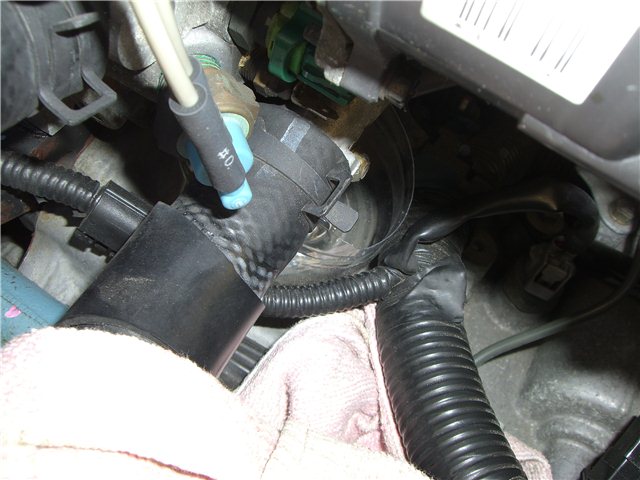
We put on white gloves), reset the minus from the battery and use a 19 key to loosen the belt tension, remove it from the generator pulley:
Full size
The key is placed on the ebb in the form of a 19mm bolt head.
We turn off two chips on the generator:
Unscrew the two generator mounting bolts:
Full size
Top at 12, bottom at 14.
We pull out the generator and see this picture:
Now that all the bolts have given way, you can drain the antifreeze. To drain the antifreeze on the left in the direction of travel, there is a special yellow lamb at the bottom of the radiator, and on the engine block there is a 10-point bolt under the manifold (it was possible to get it with your right hand without a hole), unscrewing which you can drain the antifreeze. Because
I was preparing to replace the antifreeze, but I didn’t care about the cleanliness of the drained liquid. And if the liquid is poured back, you need to put a hose on the pipes and you can carefully drain it. Unexpectedly for me, I managed to drain only about 4.5 liters, and after draining the radiator, about a glass leaked from the block, with a filling volume of 6.5 liters.
Can someone correct me why this is so?
Full size
Everything that we managed to squeeze out.
It’s good that I didn’t immediately dilute the concentrate. We will change the filling strategy. In the meantime, unscrew the two 10mm nuts from the pipe and take out the hero of the occasion:
Full size
When removing it, some more antifreeze spilled out.
Full size
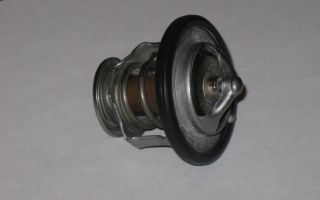
We compare it with the previously purchased one - both are cousins.
Out of sporting interest I decided to compare the operation of thermostats.
Full size
Cooked. Salt, pepper, bay leaf to taste.
The opening temperature of the thermostats turned out to be approximately equal, but the valve opening value on the new one with the pink pimple was significantly greater; the complete closure of the new thermostat occurred 8-10 seconds earlier.
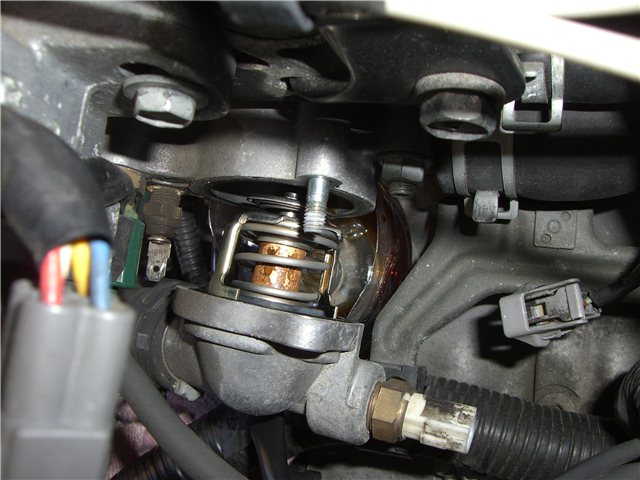
We install the thermostat in place, not forgetting about the gasket (number 1632562010). We orient the bypass valve towards the top.
Full size
Here he is, handsome!
We put everything back together in the reverse order and begin the tedious flushing of the system: fill in distilled water, massage the hoses, start the engine at idle, wait for the fan to work, increase the speed and expel the air lock from the stove, monitoring the appearance of a hot breath from the deflectors.
Cool the engine, drain the water and fill it, etc. I found it sufficient to do 4 washes.
Full size
The first bottle contains drained SLLC, the rest contain the mixture as it is diluted with water. The level is different, because there were losses.
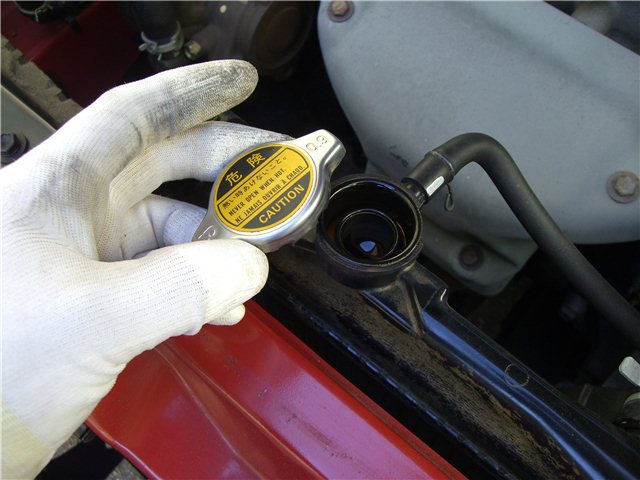
Based on the fact that there are about 2 liters of distilled water in the engine as a non-draining residue, fill in 2 liters of LLC concentrate and add antifreeze diluted in a 1:1 ratio to the required level. I read somewhere that the concentrate is diluted with deionized water, such as in the photo:
I didn’t bother, I added regular distilled water obtained by distillation (not filtration).
We warm it up, drive it out, top it up, wash off traces of antifreeze and enjoy the result:
What were the difficulties: 1. Couldn't drain the antifreeze completely.
2. With great difficulty I unscrewed the lower bolt of the generator; apparently it was on the thread lock. In a good way, it was also necessary to smear it during assembly. So stock up on good keys.
Smooth roads and clean antifreeze to everyone.
If
Source: https://www.drive2.ru/l/10551373/
Replacing the thermostat in Toyota Corolla
If the coolant overheats, one of the most likely causes of the problem may be a malfunction of the thermostat.
As a rule, in cold weather there are no complaints about the operation of this device, but with the onset of heat, overheating occurs more and more often. In this case, replacing the thermostat in the Toyota Corolla is mandatory.
The procedure can be performed independently if you have basic tools and skills.
The thermostat is a device that is part of the engine cooling system. It is designed to maintain a constant coolant temperature.
At low ambient temperatures, the technical fluid moves in a small circle. This helps the engine heat up faster. As the temperature of the antifreeze rises, the valve of the device opens and the liquid flows through a large circuit, which contributes to faster cooling of the entire volume.
Overheating is only one sign of a thermostat malfunction, as the valve can become stuck in any position. In practice this means that:
- in winter, the engine will take much longer to warm up;
- the temperature in the cabin will not be high enough;
- increased fuel consumption will occur.
Before changing the thermostat, you should make sure that there is enough coolant and that the coolant temperature sensor (CTS) is working properly. You should also keep in mind that signs of a malfunctioning thermostat may occur periodically.
Good or bad
The thermostat response temperature on a Toyota Corolla, at which the fluid is released in a large circle, is 80°C; full opening occurs at 95°C. In this case, the liquid flows through the radiator.
To determine its functionality, you need to dismantle the device and place it in water. By using a thermometer and heating the liquid, you can accurately determine the valve's response temperature. This type of fault detection is the most reliable.
There is an easier way. When warming up the engine, you need to constantly monitor the temperature of the pipes. The following options are possible, indicating a malfunction of the thermostat:
- at the initial stage of engine warming up, the coolant temperature in all pipes rises evenly;
- Once the temperature reaches a high temperature (more than 80°C), the pipe going to the radiator continues to remain cold.
Replacement features
Replacing the Toyota Corolla 120 (150) thermostat requires draining the coolant. However, depending on the type of engine, the process may differ. So, in power plants of the 1ZZ-fe-4ZZ-fe series, which were equipped with both generations, the thermostat is located on the generator side, and in cars with 1ZR-FE engines - on the opposite side. Let's consider both options.
General measures for replacing the thermostat for motors of types ZZ and ZR.
- Place the car on a level surface.
- Remove the negative terminal of the battery.
- Remove the plastic protection from the bottom of the engine.
- Drain the antifreeze through the radiator.
The further procedure for replacing the thermostat in a Toyota Corolla 150 equipped with ZR engines is as follows.
- Remove the top air filter cover.
- Disconnect the electrical connectors from the air filter cover.
- Unscrew the two 10mm nuts holding the thermostat in place.
When removing the part, it is necessary to place a 0.5 liter container under the hole in which the thermostat is installed - there is still coolant there. - Remove the thermostat.
Replacement procedure for cars with a ZZ type motor.
- Remove the drive belt from the generator.
- Remove the generator block.
- Remove the coolant inlet pipe;
- Unscrew the two nuts holding the thermostat in place.
a) disconnect the wire holder from the clamp on the rectifier stand;
b) disconnect the generator wire by removing the rubber cap and unscrewing the nut;
c) remove the generator connector;
d) remove the two bolts holding the generator.
When replacing the thermostat in a Toyota Corolla for both engine options, it is necessary to correctly position the part in the power plant housing. To do this, the swing valve must be directed upwards. A deviation of up to 10° in both directions from a conventionally drawn vertical line is allowed. Also be sure to only use a new rubber O-ring.
Reassemble the unit in reverse order. When installing the generator, follow the recommended tightening torques. After you have changed the thermostat on your Toyota Corolla, fill in the coolant and do not forget to check for leaks.
If the material was interesting or useful for you, publish it on your social network page:
Source: http://jrepair.ru/remont-toyota/zamena-termostata-v-toyota-corolla
Diagnostics and replacement of the thermostat Toyota Corolla 2007-2010
While operating the car, we suddenly notice that it takes a very long time to warm up to operating temperature. This manifests itself especially in winter.
Even, as it seems to us, and according to the instrument readings, the temperature has returned to normal, after a while, especially at high speed, the needle drops down.
This is an indicator that diagnostics and replacement of the Toyota Corolla 2007-2010 thermostat with a new one is required.
What is a thermostat for?
The thermostat is designed to ensure that the car is constantly warmed up and maintains the required mode all the time. The failure of this important device has unpleasant consequences.
It’s one thing if it is constantly ajar and constantly circulates coolant in a large circle. It's not very scary, but it's not entirely pleasant either. The car does not work properly, gasoline consumption increases, the heater blows cool air. In a word, complete discomfort.
It will be worse if the thermostat does not open. The car begins to warm up, the antifreeze goes into the expansion tank, then comes out of the tank. That is, as they say, the machine boiled.
If this happens in the summer and on the road, experienced drivers know that they need to turn the heater on full mode and at the highest temperature. You can lower the glass on the windows so as not to feel the effect of the steam room. This way you can get to the nearest service station.
If the time has come, and the car needs diagnostics and replacement of the Toyota Corolla 2007-2010 thermostat, then it is better to change it to a thermostat with higher parameters. It usually comes from the factory at 78 degrees, and many people complain that it is cold in the car. Therefore, a thermostat with a temperature of 82-88 degrees is the optimal solution.
Removing the thermostat
First of all, disconnect the negative cable from the battery. Then you need to drain the coolant from the radiator into a clean, prepared container if you intend to use it again. It is not necessary to drain the engine block.
Now loosen the clamps on the hose going from the radiator to the thermostat and remove it. To do this, use pliers to grab the ends of the clamp, squeeze them and move them five centimeters away from the landing site.
We take the hose at the place where it sits on the pipe and gently begin to rotate it until it is disconnected from the thermostat.
Once you have access to the thermostat, loosen the cover bolts and, hitting it with a rubber hammer, remove it. You need to remember how the thermostat was set, this is important. We plug the hole in the engine with a rag and thoroughly clean the seat from traces of the old gasket and sealant, if any.
Installing the Thermostat
We install a new thermostat in the housing so that the spring faces the engine. Then we lubricate both sides of the gasket with sealant and install it on the body. Carefully, so as not to move the gasket, put the cover in place and tighten the mounting bolts.
Having pulled them up by hand and making sure that nothing has moved, we tighten them with a 10mm socket wrench. Now we install the hose on the thermostat pipe and on the radiator pipe. For easier installation, you can lubricate the seats with lithol, grease, or oil. Using pliers we put on the clamps.
They should fit into the old, compressed places on the hose. After this procedure, we begin to fill the system with antifreeze.
Now you are convinced that diagnosing and replacing the Toyota Corolla 2007-2010 thermostat is not such a difficult matter, and this work can be done without resorting to service.
After replacing the thermostat, you will again feel like your car is back to its previous new car state.
Sergey Demin specially for the Avtoliteratura website
Source: http://myautobook.ru/publ/toyota_remont/toyota_corolla_2007_2010g/diagnostika_i_zamena_termostata_toyota_corolla_2007_2010/8-1-0-45
Replacement and repair of thermostat 4E-FE

If you have nothing to do and are terribly interested in the principle of operation of a thermostat, then this is for you.
You can just buy and change the thermostat, but it also happens, there is no money, for example)))))
In short, I want to repay my debt to this car, since it has never let me down, for so long (7 years!), I have not kept the car (always for two or three years and for sale) and I am not going to sell it, it will be so in the family, now my wife is already riding it, then my son will take over the baton, which is why I am making this report.
The tribute, so to speak, may be useful to someone. You can buy a new thermostat, I’m crazy, and have it repaired. In short, let's go.
What is a thermostat? Two springs, a wax cylinder, a pin and yes))))))) How the thermostat works: http://www.youtube.com/watch?v=IiFUetHVDI8
What to do there, clean it and that’s it. The first symptom is that the stove doesn’t heat (it warms, but not very much) and the temperature stays here and doesn’t rise any higher.
The thermostat works, but does not close completely, that is, the engine is warm. The coolant immediately circulates in a large circle and the stove takes a very long time to heat up.
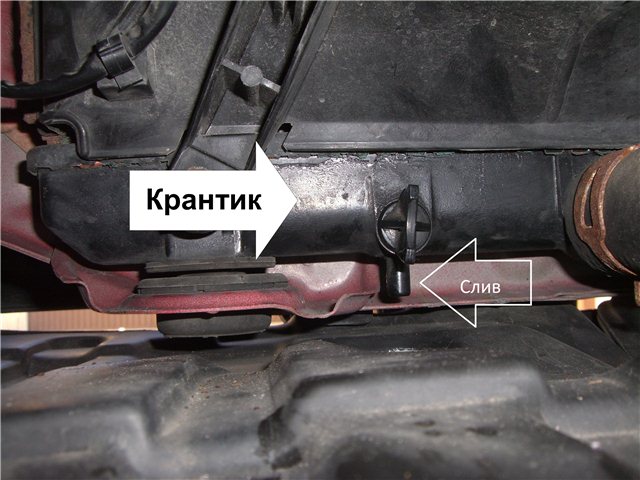
And so, drain the coolant (Coolant). Here again, respect to the Japs, they came up with a faucet and a drain hole in the radiator. Well done Asshole!!! ))))) I was so happy!!!
True, this crap, you’ll find horseradish if you don’t know about it! I'm such a jerk, I saw from this photo that my head couldn't fit in there, I even stuffed my hand into a spruce tree to take this photo, respect Casio! (again, the Japanese mother gave birth to them)
Bottom view, drain hole and hole in the protective casing
View from the top, there he is, under the fan
The faucet unscrews like a bolt, closed clockwise and vice versa. We substitute the container and remove the radiator cap. I warmed up the car a little. Drain.
The thermostat is located under the distributor, remove the upper casing of the air filter and the filter itself, disconnect the two connectors from the temperature sensors, there is no need to disassemble or disconnect anything else, just unscrew the two 10mm nuts from the thermostat cover.
Before unscrewing the cap, cut the bottom from a plastic bottle, no more than 5cm high. And insert it under the bottom of the thermoblock, when you remove the cover, 150 grams of coolant will flow out (this is inevitable), use a bulb or something else (enema)))))
And pump out the coolant from the bottom. I did this, loosened the nuts, moved the lid and pumped it out with a special bulb (like a large pipette).
I didn’t lose a drop, well, maybe I dropped a couple of drops. In short, if you don’t care whether it’s nature or the purity of the engine, don’t worry, unscrew it and let it flow, you’ll make up for the loss.
We drained it, now we take out the thermostat, I immediately saw (note), or rather I didn’t see, the bypass valve, that is, my thermostat was set incorrectly!
The valve should be positioned at the top + - 10 degrees, but mine was positioned in the front (bypass valve, such a tiny little thing).
We take it out, look, outwardly everything is in order.
That's it for those who are installing a new one! Reassemble in reverse order, fill in coolant, don’t forget to tighten the tap and don’t forget about the valve
Repair. First of all, we look at what is sticking, where it is jammed, it is the thermostat that practically cannot break, but nothing lasts forever, so there are no guarantees.
So, first of all, cleaning, some cook it in a special one. anti-scale solutions for dummies (literally and figuratively).
I took it and disassembled it, removed the retaining ring, pushed the internal mechanism (wax sleeve) to the side and pulled out the pin. That’s when I saw the problem, there was scale on the pin.
I put all the dials in……… I don’t even know what it’s called in Russian))))))
In short, this is an ultrasonic thing, in which all the dirt falls off with the help of ultrasonic vibration.
I set it for 600 seconds and it’s done, but if you don’t have this thing, then to hell with it, you can scrape the pin with a knife, for example.
Next, I lubricated the pin with bearing and extreme temperature lubricant, such as petroleum jelly.
The pin began to move smoothly.
We collect. For convenience, clamp it in cleats, tie it with wire so that it does not spring out of the vice, and install a retaining ring.
Examination. We put the thermostat in a ladle, and on the stove, the thermometer and look at 80-84 it should open.
Everything opens and closes.
We put in a rubber gasket/ring. Ready!
I drained the glass of coolant, specially poured it into a 3-liter jar, and then strained it in one go.
Source: https://corolla.ws/zamena-i-remont-termostata-4e-fe
Replacing the thermostat and flushing the system Corolla ae100 5afe — logbook Toyota Corolla 1993 on DRIVE2

Having bought the car, the former owner told me that he had changed the main radiator. But he didn’t say anything about what he filled in and whether he changed the thermostat. because I didn’t have antifreeze, so I added antifreeze to it.
1) The former owner aired the system. 2) I don’t know what kind of coolant was there... either antifreeze or antifreeze. 3) when driving around the city a large circle opened up... this is good.
when leaving the city it did not close... and the temperature dropped below half.
4) The solution was to rinse everything. Replace the thermostat and add new red antifreeze.
Zoom
Overboard 25. Driving from the city along the highway. And the temperature is below operating. In my opinion, this is not a buzz... When I stopped and turned off the car. After starting it 10 minutes later, I drove along the same highway with the same temperature outside. The arrow was strictly in the middle... This is a buzz, but it shouldn’t be like that. It doesn't matter how or where I go. it should always be in the operating range...
Zoom
I bought this type of washing. 70 rub. costs
Zoom
After 1 flush, there was residual sealant for the cooling system in the expansion tank... This means when the main radiator was leaking. 1kg was poured in there. powder and stuffed everything tightly... The layer in the expansion tank was 2-3 cm. And after flushing, all sorts of crap came out of the radiator. I washed it with distilled water along with the rinse.
Zoom
I have a drain valve on the left side near the generator. Then I washed everything with a hose and regular tap water. Stupidly opened the water. I inserted it into the radiator and pumped the pipes, filling them with water. At the same time, the drain valve was open. because There was a lot of foam, I washed everything for about 1 hour.
Zoom
Next, we disassemble the air supply system. Remove the air filter pipe. Air filter housing and smoothly approach the thermostat cover.
Zoom
Next, pull off the large circle pipe from the thermostat housing. Using a 10mm head, unscrew the housing itself and remove it. We see the thermostat.
Zoom
That's how badly the building itself was damaged. Deposits, scale, etc. We clean everything.
Zoom
We wipe everything down. pipe, seat. Remove the O-ring from the old thermostat and install it on the new one. and install it. The pin on the thermostat is looking straight up.
Zoom
After cleaning the body. Lubricate it with a thin layer of car sealant and fasten it back.
After reassembly. We fill in antifreeze while pumping the pipes. First I bled the lower pipe. As soon as the bubbles stopped coming. I bled the upper pipe and the stove pipes. Next, I parked the car nose up. I added antifreeze to the expansion tank and started the car.
I pumped the lower and upper pipes manually. When the stove was open, the stove pipes were cold. I pumped them by hand until they began to burn my fingers. The next day I again added antifreeze to the radiator because... the level has dropped. and into the expansion tank. and that's all. The system is bled, there is no air.
Total: 1) Antifreeze 10 liters - 680 rubles. 2) Thermostat Kroner K203211 - 293 rubles. 3) Flushing Flex - 70 rubles. Now the stove fries as it should... Carlson does not turn on at all because Engine cooling copes without it. So sometimes in traffic jams turning on once is enough. In general, I'm happy and the engine is good.
Do it yourself, cheaper, more interesting, more useful. Beaver everyone! ^(o_0)^
Price tag: 1,043 ₽ Mileage 3001000 km
Source: https://www.drive2.com/l/10577048/
Toyota Corolla Forum
Engine operation (and everything on it), problems, repairs and spare parts
St88 Honorary Korollov Messages: 1803 Registered: May 13, 2013, 12:57 Car: Toyota Corolla 2013, manual transmission, comfort +, sedan, white. Location: Tagan Thanked: 1 time Thanked: 1 time
#2
Post by St88 » 16 Sep 2013, 08:36
Is the tidy optitron or with arrows?! It’s just that there’s always one cube per optitron (in winter and summer) and that’s it….
“”noname:
I don’t understand – is it a 2-stroke jerker? Cylinders 1 and 4, 2 and 3 operate in one stroke. “”
Vladimirovich from RnDP Honorary Korollov Messages: 721 Registered: March 28, 2013, 15:53 Car: corolla 2008 1.6 silver manual transmission 5 speed. Location: Rostov-on-Don Thanked: 32 times Thanked: 22 times
#5
Message from Vladimirovich from RnD » 16 Sep 2013, 09:21
Yes, I didn’t warm it up, I was writing while I was cleaning the glass with a water cleaner...., I only heat it up when frost sets in and then not for long, I don’t even wait for the first cube.... it will warm up on the way!48RONINModerator Messages: 2629 Registered: 07 Jan 2013, 17:42 Car: May 2007
1.6 manual transmission 17 Location: Lipetsk Thanked: 39 times Thanked: 65 times
#6
Post by 48RONIN » 16 Sep 2013, 14:54
Of course there is a thermostat. Yoperny theater, why have we lost this topic since Maytoyota, there was something there. You need to dig in the direction of the insulation of the engine compartment. In the coming days, under similar conditions, I will try to track the time the engine reaches mode.GeneralIII Messages: 85 Registered: Jan 15, 2013, 12:49 Thanked: 1 time
#7
Post by GeneralIII » 16 Sep 2013, 15:46
It seems that the insulation is not intended to speed up warming up, but to reduce the cooling of an already warmed-up engine. Or is it not?
Corolla 2011, manual, maximum speed.
Vladimirovich from RnDP Honorary Korollov Messages: 721 Registered: March 28, 2013, 15:53 Car: corolla 2008 1.6 silver manual transmission 5 speed. Location: Rostov-on-Don Thanked: 32 times Thanked: 22 times
#8
Message from Vladimirovich from RnD » 16 Sep 2013, 16:10
Thank you... but I think that right now in my particular case, insulation has nothing to do with it! I’ll explain why..., I live, one might say, in the South (Rostov-on-Don), I haven’t insulated anything before and haven’t even covered the radiator grill...
, perhaps this is due to the fact that for the last two weeks the car has been parked on the street, before that it was not parked underground, where it is always much warmer, but on the underground, I didn’t warm it up at all, even in winter, and it subjectively seems to me that it warmed up faster! I would be grateful if you write about the results of your experiment in similar conditions! And also, today after work, I will conduct such an experiment, the car will be completely cold, after standing for 9-10 hours on the street, I will set the temperature regulator to “0” - in the middle of the white zone, I’ll start it and, without moving or pressing the accelerator, wait until the temperature rises to the first cube, at the same time I’ll note the time and the temperature outside! Tomorrow I’ll write about the results, if anyone makes an analogue measurement, it will be possible to compare the data obtained!
Forgot to add..., V engine - 1.6
48RONINModerator Messages: 2629 Registered: 07 Jan 2013, 17:42 Car: May 2007
1.6 manual transmission 17 Location: Lipetsk Thanked: 39 times Thanked: 65 times
#9
Post by 48RONIN » 16 Sep 2013, 17:02
So, I meant to cover the access of cold incoming air.
This is not at all necessary, the stove is powered by constant circulation of coolant, it’s enough just not to turn on the fan. If I have time I will do the same.
ON-Vladislav Honorary Korollovod Messages: 382 Registered: Jan 08, 2013, 01:43 Car: Corolla 2007, 1.4L, manual transmission Location :
Azov RO Thanked: 2 times Thanked: 1 time
#10
Post by ON-Vladislav » 16 Sep 2013, 21:40
Vladimirovich from RnD, I’m from Azov, I can conduct the same experiment, but only tomorrow evening, because... We are not driving to work in Rostov in my car. Engine 1.4l.
By the way, I park the car on the street all the time, and somehow I didn’t think about the engine warm-up timeDyushaHonorable Korollovod Messages: 11430 Registered: March 30, 2013, 13:53 Car: Corolla, 2011, 4 automatic transmission, 1.6 l petrol diesel, Comfort+, drank more than 9700 l/Ai92, Toebta 0W20 Location: 133, Kovrov Thanked: 7 times Thanked: 24 times
#11
Post by Dyusha » 16 Sep 2013, 22:03
In order to find out who lives where and how, it would be better to create a profile. I don’t see a problem from the description yet. IMHOtep. I think that you are simply not giving the command to the engine to produce more heat.
The command is the position of the heater temperature handle at MAX and any position of the heater fan switch, except 0. I didn’t lose your situation, I warm up the interior at MAX, then turn it down.
IMHOtep, of course, but I think that if these conditions are met, the engine will raise the speed a little and begin to warm up faster.
48RONINModerator Messages: 2629 Registered: 07 Jan 2013, 17:42 Car: May 2007
1.6 manual transmission 17 Location: Lipetsk Thanked: 39 times Thanked: 65 times
#12
Post by 48RONIN » Sep 16, 2013, 10:24 pm
So, the initial data: - air temperature +14C - the car stood outside for 9 hours, the weather is rainy - the crank is in the middle position, the fan is off - rpm 1200-1050
Warming up to the first cube for 2 minutes 30 seconds, then immediately moving at a speed of 40-60 km/h, after about 30 seconds the second cube, warming up to operating temperature for 5 minutes 30 seconds.
SergeyModerator Messages: 3873 Registered: 07 Jan 2013, 14:33 Car: RAV-4 2l, 158 hp. 3ZR-FAE, 6 manual transmission, 4WD, 08/18/2011 Location: Novokuznetsk Thanked: 1 time Thanked: 5 times
#13
Post by Sergey » 17 Sep 2013, 05:25
When I had the Corolla, I often noticed that it warmed up much more slowly to normal temperature compared to the VAZ 21074 - there was nothing else to compare it with.
Before the first cube, it was still warming up in the garage, and then, depending on how long I was driving, how many people were in the car and on the air temperature, until it warmed up the speed was kept to no more than 2500. Sometimes I would drive 5-7 km until it warmed up completely.
Yes, I almost forgot, the radiator was not covered and the engine compartment was not insulated.
But the RAV only needs to travel 1 km from the garage to the house to fully warm up.
leoHonored Korollovod Messages: 1040 Registered: 02 Feb 2013, 12:23 Car: Corolla 2012, manual transmission Location: Sverdlovsk region. Kamensk-Uralsky Thanked: 105 times Thanked: 91 times
#14
Post by leo » 17 Sep 2013, 07:16
This morning I also looked, the car was parked outside at a temperature of 7 degrees, I didn’t turn on the heater, and after 3 minutes a second cube appeared. Then I turned the heater on to speed 2 and started driving, after 1 km the operating temperature was reached. I read somewhere that engine warming up also depends on the oil poured in, I have 0-w20, it seems to reach operating temperature faster.
St88 Honorary Korollov Messages: 1803 Registered: May 13, 2013, 12:57 Car: Toyota Corolla 2013, manual transmission, comfort +, sedan, white. Location: Tagan Thanked: 1 time Thanked: 1 time
#15
Post by St88 » 17 Sep 2013, 08:38
Damn, I drove all summer and now, my scale doesn’t rise beyond one cube...(((What should I do?!
“”noname:
I don’t understand – is it a 2-stroke jerker? Cylinders 1 and 4, 2 and 3 operate in one stroke. “”
Vladimirovich from RnDP Honorary Korollov Messages: 721 Registered: March 28, 2013, 15:53 Car: corolla 2008 1.6 silver manual transmission 5 speed. Location: Rostov-on-Don Thanked: 32 times Thanked: 22 times
#16
Message from Vladimirovich from RnD » 17 Sep 2013, 08:43
I would be very grateful!
Below I will post the results of my experiments!)
Vladimirovich from RnDP Honorary Korollov Messages: 721 Registered: March 28, 2013, 15:53 Car: corolla 2008 1.6 silver manual transmission 5 speed. Location: Rostov-on-Don Thanked: 32 times Thanked: 22 times
#17
Message from Vladimirovich from RnD » 17 Sep 2013, 08:44
I’ve never thought about this... but I don’t think the machine is really that smart!) I’ll try it and report back! Thank you! Vladimirovich from RnD Honorary Korollovod Messages: 721 Registered: March 28, 2013, 15:53 Car: corolla 2008 1.6 silver manual transmission 5 speed. Location: Rostov-on-Don Thanked: 32 times Thanked: 22 times
#18
Message from Vladimirovich from RnD » 17 Sep 2013, 08:46
Along the way, I have about the same song, so this is at positive temperatures, and what will happen at minus!))! SergeyModerator Messages: 3873 Registered: January 7, 2013, 14:33 Car: RAV-4 2l, 158 hp. 3ZR-FAE, 6 manual transmission, 4WD, 08/18/2011 Location: Novokuznetsk Thanked: 1 time Thanked: 5 times
#19
Post by Sergey » 17 Sep 2013, 08:57
Nothing will happen at minus temperatures, drive for 15-20 minutes and the car will warm up as it should, especially in traffic jams. It’s worse on the highway in cold weather; without closing the radiator, the temperature will not rise to normal levels. However, don’t worry too much, I drove a Corolla on the highway at minus 32, I didn’t have enough ordinary cardboard, if I had, it would have been there.
What do you mean it doesn't rise? It should, not quickly, but roughly speaking, in an hour it must. St88 Honorary Korollovod Messages: 1803 Registered: May 13, 2013, 12:57 Car: Toyota Corolla 2013, manual transmission, comfort +, sedan, white. Location: Tagan Thanked: 1 time Thanked: 1 time
#20
Post by St88 » 17 Sep 2013, 09:04
Well, the car sits on the street at night, then in the morning I start it, the temperature scale is empty, then after 3-5 minutes one cube appears and that’s it.
No matter how much you drive, no matter how much you drown, there is still ONLY one cube on the temperature scale...
https://www.youtube.com/watch?v=YYNh55utLJk
Isn’t that right for you?! What should I do now - contact the OD under warranty?
I’ve had this kind of nonsense since I bought the car, I thought it was supposed to be like this (well, I don’t know what the Japanese were up to...).
“”noname:
I don’t understand – is it a 2-stroke jerker? Cylinders 1 and 4, 2 and 3 operate in one stroke. “”
Go
Source: http://tc-club.ru/viewtopic.php?t=958&start=80
General check, thermostat test – Tech Doc Toyota
1 Before blaming the thermostat for all the ills of the cooling system, check the coolant level (see “Weekly checks”), the tension of the water pump drive belt (where it is used) (see Chapter 1A or 1B), and the operation of the temperature gauge and its sensor.
2 If the engine takes too long to warm up (judging by poor heater performance or temperature gauge readings), most likely the thermostat valve is stuck open. Replace the thermostat with a new one.
3 If the engine is overheating, feel the lower radiator hose with your hand: if the hose is not as hot as the engine, the thermostat valve may be stuck closed or not opening fully, preventing fluid from being pumped through the radiator. Replace the thermostat. Warning. The engine cannot be operated without a thermostat. The computer may freeze in a bypass program, which will lead to increased fuel consumption and exhaust emissions.
4 If the lower radiator hose is hot, this means the thermostat is open and fluid is circulating. To troubleshoot, refer to the Troubleshooting Applications section.
Note. If there is a problem with the thermostat, the best thing to do is replace it - it won't cost too much. For a thermostat that has served for more than five years, we can safely say that its best times are already behind us.
5 The thermostat can only be fully checked by removing it from the engine (see below). If the thermostat remains open at room temperature, it is faulty and must be replaced.
6 For a complete check, hang the thermostat (in the closed position) in a container of cold water and prepare a thermometer to measure the water temperature.
7 Heat the water and watch the thermometer and thermostat. Neither the thermometer nor the thermostat should touch the walls of the container (see Fig. 3.7).
Rice. 3.7. A method for accurately checking the thermostat: hang the thermostat in a container of water and, while heating the water, measure the temperature at which the thermostat begins to open and fully opens.
8 Note the temperature at which the thermostat begins to open and the temperature at which it opens completely. Compare the measurement results with the Specifications in this chapter.
The number stamped on the thermostat body usually indicates the full opening temperature.
Some thermostats come with specifications that indicate the start-opening temperature, the full-opening temperature, and sometimes the amount by which the thermostat valve should open.
9 If the thermostat does not open or close at the temperatures prescribed by the Specifications, or freezes in any position, it must be replaced.
Source: http://avto-remont-toyota.ru/obshhaya-proverka-ispytanie-termostata.html
How to change a Toyota thermostat yourself
A faulty Toyota thermostat can cause serious problems with the engine cooling system. Signs of this breakdown may include a longer warm-up of the car, boiling antifreeze and improper operation of the stove.
Therefore, if a malfunction is detected, you should immediately replace the old part with a new one.
What’s positive is that this process is not very difficult and does not require special skills, so today we will look at how to change a Toyota thermostat with your own hands.
Tools
All we need for replacement is a Phillips screwdriver, a socket and a 10mm wrench. Also, before replacing, you should prepare 1.5-2 liters of new coolant and, of course, a new thermostat.
Where to look for a thermostat?
Toyota locates this part under the distributor, so getting to it is not very difficult.
Dismantling and installation process: stages of the procedure
To be able to change the thermostat, the Toyota must be cooled (that is, its engine temperature must not be at operating temperature). Otherwise, you may burn your fingers.
So, when our engine has cooled down, open the hood and remove the air filter housing. To do this, you need to remove the cover, unfasten the clamps, unscrew the clamp and use a socket to unscrew several bolts.
It is important to remember that the air sensor must be disconnected before this step.
Next, using a 10mm wrench, unscrew the two bolts and disconnect the temperature sensor terminal. It is possible that antifreeze will leak at the moment, so when you change the thermostat, the Toyota should have new coolant. Now we get to the main detail. We remove it from the mounts and install a new one in its place.
You can assemble an electronic thermostat in a similar manner, but here you should remember a few nuances. After this part is completely secured and all sensors are connected, you need to start the engine and check the tightness of the connections. After 1-2 minutes, turn off the ignition and pour new antifreeze into the radiator (no more than one liter).
We will need to pour about the same amount into the expansion membrane tank. You need to pour until the coolant reaches the Full level. A few minutes after the engine is running, this indicator will normalize and the needle will drop to the middle. There is no need to pour anything into either the radiator or the expansion tank.
After replacing a device such as a thermostat, Toyota will regain its previous qualities. The car will warm up quickly, and the engine will not boil.
A normal flow of warm and hot air will be ensured in the cabin.
By the way, on all “Japanese” cars the stove, when in good condition, is so efficient that after just 15 minutes of operation you can safely open the windows and drive along the road, even if it’s minus 20 outside.
In total, we spent 500 rubles and 15 minutes of time to replace the thermostat. The engine operating temperature does not exceed 95 degrees Celsius and does not fall below 83 degrees. As you can see, self-replacement is not only simple, but also economical (relative to the price of a service installation).
Source: http://fb.ru/article/118142/menyaem-termostat-toyota-svoimi-rukami
4.3 Thermostat
Service and operation
Manuals → Toyota → Corolla (Toyota Corolla)
Until the engine has completely cooled down, it is forbidden to unscrew the radiator cap, remove the thermostat or drain the liquid from the cooling system.
Examination
| EXECUTION ORDER | |||||
|
Replacement
| EXECUTION ORDER | |||||||||
|
Source: http://automn.ru/toyota-corolla/toyota-23172-0.html