Various schemes for deceiving a lambda probe

Removing the catalyst is a topic that worries many car owners; often instead of catalytic converters, car owners install flame arresters, stingers (“spiders”), this solution allows you to avoid purchasing expensive parts and spend less time repairing the exhaust system. But on cars with two oxygen sensors, physical exclusion of the catalytic element does not give the desired results, and to get rid of errors in the engine control system, an electronic lambda probe is often used.
In this article we will look at how you can deceive the control unit and which methods are most effective. It should be noted right away that not all methods are suitable for a specific car model; each car must be approached individually.
Mechanical snag of the lambda probe
Any automobile catalyst is a muffler can containing metal or ceramic honeycombs coated with a precious metal (gold, platinum, etc.). Thanks to the oxidation reaction, the exhaust gases passing through such a device are cleaned of harmful impurities, and the level of exhaust toxicity is reduced.
The catalytic converter (CN) operates at high temperatures, so its resource is relatively short.
The service life of the part is further reduced when low-quality fuel is used - the honeycombs become clogged with carbon deposits resulting from incomplete combustion of the fuel mixture.
Buying a new exhaust system is quite expensive, and since it has to be changed quite often, many car owners try to get rid of this element of the exhaust system by installing a flame arrester or stinger.
Simply removing the CN has a side effect: on cars with Euro-4 and higher engines, the oxygen sensor installed behind the catalyst detects that the exhaust toxicity standard is exceeded, as a result of which the Check Engine lamp lights up on the instrument panel. There are three ways to get rid of the error:
- install an additional mechanical spacer;
- make changes to the electrical circuit of the oxygen sensor;
- reprogram the engine control unit.
A mechanical blende is a metal sleeve of a certain length, with a small diameter hole inside. Also in the inside of this device is ceramic chips with a catalytic coating.
In essence, the bushing is a mini-catalyst, but here only those exhaust gases that enter the oxygen sensor are purified. It should be noted that there are also simple fakes, made in the form of an ordinary sleeve with a hole, inside which there are no elements.
Any turner can make a basic spacer; in this case, it is not necessary to buy a factory product. Advantages of such devices:
- inexpensive price (on average from 400 to 1000 rubles);
- ease of installation;
- reliable and simple design.
However, mechanical blende also has its drawbacks - on some car models it is not possible to install the device (there is not enough space due to design features), the device does not always give the desired effect (the error does not completely disappear). It should also be noted that on cars with Euro-5 engines, the electronic system cannot be fooled with the help of an additional spacer; the Check Engine here still continues to light up.
Do-it-yourself electronic “cheating” circuit
The oxygen sensor electronic blende is a circuit included in the electrical circuit of the ECM. By installing additional components, the signal supplied to the control unit is corrected, and the ECU receives data from the sensor as if a catalyst were installed on the car and there were no changes in the exhaust system.
Usually, four-pin lambda probes with an electric heater are upgraded with your own hands; the heating element is necessary to warm up the oxygen sensor on a cold engine - the thing is that the catalyst is activated only after the exhaust system is heated to a temperature of at least 360 degrees Celsius. The heating of the oxygen sensor is powered by the ECU (control unit), and the polarity of the wires does not matter (usually white wires are connected to the heater).
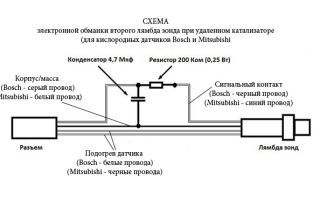
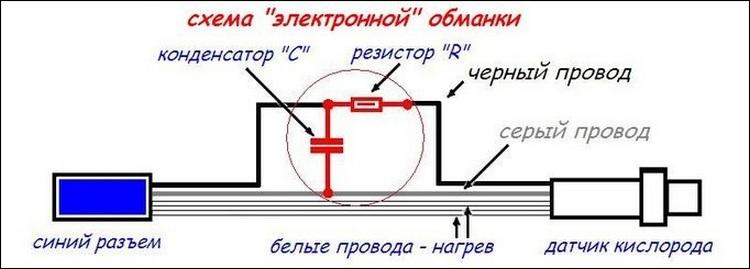
In electronic blende, the electric heater is not subject to modernization; all changes concern only the signal contact. The simplest circuit contains two main components - a high-resistance resistor and a capacitor with a capacity of approximately 1 Microfarad, and it usually looks like this:
- the resistor is connected to the signal wire break;
- The capacitor is installed between the ground connector and the signal.
The capacitance of the capacitor and the resistance of the resistor can be different; their value largely depends on the car model and the type of engine installed.
How to make electronic deception on an Opel Zafira car
The deception circuit on the Opel Zafira car is made according to the same principle as described above; to install the decoy you will need a non-polar capacitor of 1 microfarad and a resistance of 1 mOhm 0.5 W. We carry out the installation of a simple device in the following order:
- we find the lambda probe connection block, disconnect the plug, partially free the wires from the outer insulation;
- cut the signal wire;
- We connect a resistor to the ends of the wires by twisting them, then solder the joints with a soldering iron;
- we expose the insulation of the ground wire, and also secure the capacitor leads by twisting - we connect one end to ground, the other to the wire in front of the resistor (closer to the detachable plug);
- After soldering, we isolate the wiring, connect the plug, and check the car’s operation.
Before starting testing, it is necessary to reset all ECU errors. It should be noted that installing a fake does not always give positive results; in some cases, the error may appear again. The most reliable way is to reprogram the control unit, but here it is important to find the correct firmware version.
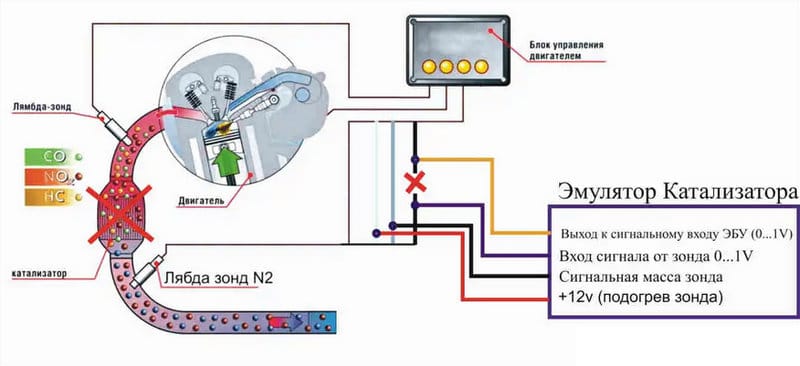
Oxygen sensor emulator
The lambda probe simulator is effectively used on cars with a removed catalyst or on cars with installed gas equipment; the device is connected to the electrical engine control circuit and quite reliably emulates the operation of a real lambda probe. Ready-made factory emulators can be found in retail sales; the basis of the simulator circuit is an electronic timer, in the role of which the popular NE555 microcircuit is most often used.
Basically, industrial emulators are installed after the car is switched to gas - after installing gas cylinder equipment (LPG), the composition of the fuel mixture changes, so the lambda probe detects an increased content of toxic substances in the exhaust gases, and an error appears. Let's look at how to install a Zond-4 model oxygen sensor simulator on a car with LPG.
Probe-4 is equipped with a three-color LED indicator that indicates the state of the fuel mixture (lean or rich). The indicator light means:
- green color – lean mixture;
- yellow light – the fuel/air ratio is normal;
- red indication – mixture is over-enriched.
The emulator is mounted in the engine compartment and connected to the car's electrical circuit using four wires. Using Zond-4 is very simple; we connect the wires like this:
- blue – with the plus of the gas gas solenoid valve;
- black – with the vehicle’s weight;
- then cut the lambda probe signal wire,
- We connect the yellow wire to the outlet of the oxygen sensor itself;
- white - with the other end of the cut wire (it goes to the engine control unit);
- We isolate all exposed wiring.
After connecting, you should check the operation of Probe-4: the indicator should not light up when running on gasoline; when operating on gas, it should glow green, yellow or red.
Scheme of deception of a lambda probe with a diode
You can deceive the second oxygen sensor on a car in another way, only in this circuit, instead of a resistor, you need to install a diode, for example, brand 1N4148. The trick here is done as follows (using the example of a Mazda 323 with a 2.0 L gasoline engine):
- cut the signal wire (on Mazda it is black);
- connect the anode of the diode to the lambda probe;
- We connect the other signal output going to the control unit to the cathode;
- We also connect one of the terminals of a non-polar capacitor with a capacity of 4.7 microfarads to the cathode;
- We connect the second capacitor tap to the ground wire (on Mazda it is gray), of course, we solder all the wires.
This scheme allows you to quite effectively get rid of errors in the oxygen sensor circuit, but you need to keep in mind that the lambda probe itself must be in good working order.
Quick check of oxygen sensor functionality
Many car owners have repeatedly confirmed that electronic deception works normally only if the lambda probes on the car are working properly. It’s quite easy to quickly check the functionality of the sensors; for diagnostics you only need a multimeter. We perform the check in the following order:
- move the multimeter switch to the DC voltage measurement position with an upper limit of 20 Volts;
- we connect the probes of the device: with the red wire - to the signal connector of the oxygen sensor, with the black wire - to ground;
- we start the engine, on a cold engine the voltmeter should show a voltage of approximately 0.45-0.5 V;
- on a warm engine, the voltage should constantly change from 0.1 to 0.9 Volts, and all this data indicates that the sensor is generally working.
But it is worth noting that such a check does not give an idea of 100% serviceability of the sensor; it only confirms that the lambda probe is in working condition.
Source: https://avtobrands.ru/razlichnye-shemy-obmana-lyambda-zonda/
Let's modernize: do-it-yourself catalytic converter and design options
 At the present time of strict Euro standards, only outdated models do not experience any problems associated with the exhaust system. The situation is completely different with cars that meet Euro-2 and higher standards.
The oxygen sensor in such systems is an integral part that monitors the quality of the mixture and the amount of toxic substances in the exhaust.
In cases where the neutralizer is removed or replaced with a flame arrester , the ECU begins to malfunction, causing emergency operation.
At such moments, experienced motorists use a corrector for the operation of the oxygen lambda probe, which allows them to avoid mistakes and continue operating the car.
Do you need an oxygen sensor emulator?
Before you learn how to make a fake catalyst with your own hands, it would not hurt to familiarize yourself with the arguments in favor of this operation.
Vehicles that are structurally compliant with Euro-4 or Euro-5 standards are equipped with two oxygen controllers installed before and after the catalytic converter.
The sensors compare the readings, and if they do not match, the on-board computer concludes that the autocatalyst is faulty or missing altogether. This situation leads to the following consequences:
- The ECU puts the engine into emergency mode when the engine operates according to the specified fuel maps without taking into account the readings of the oxygen sensors.
- The “Check Engine” indicator lights up on the dashboard and an enriched fuel mixture enters the cylinders.
- Soot on the spark plugs increases, the power of the internal combustion engine decreases and the oil becomes contaminated.
- Increased fuel consumption entails extra financial costs.
Almost all automakers recommend replacing a faulty converter. But not every car owner will do this, because the price of some copies, for example, for VAZ, reaches 60,000 rubles. It is also worth adding the cost of installing the device. Therefore, many car enthusiasts are interested in what a do-it-yourself catalyst blende is and the scheme for its implementation.
The essence of the emulator's operation is to change the real sensor readings, after which the ECU switches to normal operation. In this case, the neutralizer itself can be cut out or replaced with a flame arrester. The procedure for installing a simulator is no more complicated than increasing the ground clearance of a Renault Duster.
How to make a do-it-yourself lambda probe for a car catalyst
To change the readings of the exhaust system oxygen sensor, our car enthusiasts use several methods; the choice depends on the design features of the car and the capabilities of the motorist himself:
- Mechanical spacer for lambda probe.
- Spacer for the sensor with built-in minicatalyst.
- Use of electronic simulators.
Any of the methods copes with the task quite effectively. Another option not listed here is flashing the on-board computer. The fact is that to independently implement such a project, you need not only specific knowledge, but also equipment and software.
How to make a mechanical corrector for the exhaust system?
To implement a mechanical blende for the catalyst with your own hands, it is recommended to use blanks made of heat-resistant steel or bronze. This way the parts will not be deformed due to high temperature. There are two designs, but both options require a lathe or the help of an experienced turner.
First option
It is a sleeve 40-100 mm long. On one side, a standard sensor is screwed in, and on the other, the circulation of gases is limited by a small diameter hole. The essence of the “device” is that the composition of the exhaust mixture is averaged, because the lambda probe is removed from the gas stream itself and, accordingly, catches fewer toxic substances. Due to this, it is possible to deceive the ECU.
A typical drawing with spacer dimensions can be changed in terms of dimensions, it depends on the model and brand of the car. The optimal inlet diameter remains unchanged - 1.5-2 mm. In some cases, the length of the bushing may not allow it to be installed in its original place. As a result, you have to weld the mount elsewhere in the exhaust pipe.
Second option
Similar to the first, but the spacer has a built-in minicatalyst. The platinum-rhodium catalytic element helps accelerate the afterburning of toxic substances. The essence of the method is as follows:
- Exhaust gases enter the bushing body through a small diameter hole.
- In the volume of the spacer, excess CH and CO are subject to oxidation by oxygen, as a result of which the concentration of harmful substances decreases.
- The ongoing processes change the shape of the sinusoid, and the electronic system believes that the catalytic converter is operating normally.
A do-it-yourself catalyst blende made according to the above diagram has advantages similar to the previous option. Here the standard probe will be raised by 32 mm, although this is less than 40-100 mm.
Features of spacer installation
The installation procedure is not difficult, and begins with placing the car on an overpass or lift. Further actions occur according to the following scheme:
- Disconnect the negative terminal of the battery.
- Unscrew the controller.
- Screw the bushing onto the probe.
- Screw the upgraded unit into place.
- Connect the battery.
After the first start, the Check Engine light should go off. The motor will now operate normally.
Do-it-yourself electronic catalyst blende and emulator circuit
A real electronic emulator is a microprocessor device consisting of a single-chip microcircuit.
The principle of its operation is based on the formation of an output signal, which in shape corresponds to the information in the working neutralizer.
This option is difficult to do on your own, so you should immediately consider a simpler method. To implement it you need to prepare:
- Electric soldering iron.
- Solder and rosin.
- Knife and side cutters.
- Resistance 200 Kom, power 0.25 W.
- The capacitor is non-polar with a capacity of 4.7 microfarads.
The principle of operation of the system is to average the readings of the oxygen sensor, which is installed after the converter. The method of connecting emulator components is simple and universal. All elements are connected directly to the vehicle’s on-board network conductors.
Before connecting the electronic trick to the catalyst with your own hands, you should disconnect the battery to eliminate the possibility of a short circuit.
After the implementation of the project, the car demonstrates good dynamics. However, the effect of over-enrichment of the combustible mixture may occur, which causes the deposition of a layer of soot in the exhaust manifold.
In addition, on some models error P0133 appears, indicating a low response rate of the lambda probe.
What do spare parts manufacturers offer?
On the shelves of auto stores you can find all kinds of parts for tuning the exhaust system. The production of mechanical simulators of the normal operation of the catalytic converter is made of bronze or chrome-plated steel. The price of such devices ranges from 400 to 800 rubles, and a standard installation at a service station will cost about 500 rubles.
A spacer with a minicatalyst is offered much more expensive than its elementary counterpart, its cost is 1,500-4,000 rubles. Simple electronic emulators of industrial production are sold for 1,500-3,000 rubles. The range of prices for flashing ECU software is quite wide - from 1,000 to 30,000 rubles.
Source: http://autobann.su/obmanka-katalizatora-svoimi-rukami.html
DIY lambda probe emulator circuit

Publication date: January 16, 2017.
Lambda probe (also called oxygen controller, O2 sensor, DC) is an integral part of the exhaust system of vehicles that meet EURO-4 environmental standards and higher.
This miniature device (usually 2 or more lambda probes are installed) monitors the O2 content in vehicle exhaust mixtures, thereby significantly reducing the emission of toxic waste into the atmosphere.
If the DC is not operating correctly or if the lambda probe is disconnected, the functioning of the power unit may be disrupted, causing the engine to go into emergency mode (the Check Engine light will light up on the panel). To prevent this from happening, the car system can be outsmarted by installing a decoy.
Mechanical snag of the lambda probe (“screw-in”)
“Vvertysh” is a bushing made of bronze or heat-resistant steel. The inside of such a “spacer” and its cavities are filled with ceramic chips with a special catalytic coating. Due to this, the exhaust gases are burned faster, which, in turn, leads to different indicators of pulses 1 and 2 DC.
Important! Any snag is installed only on a working lambda probe.
A homemade lambda probe decoy, the diagram of which is presented below, is easy to manufacture. To do this you will need to prepare:
- workpiece;
- screwdriver;
- a set of keys.
The blende is made on a processing lathe. If there is none, then you can contact a specialist by providing him with a drawing.
The resulting part is compatible with most exhaust systems of both domestic and foreign cars.
Installation of the lambda probe blende is carried out as follows:
- Lift the car onto the overpass.
- Disconnect the negative terminal on the battery.
- Unscrew the first (upper) probe (if there are two of them, then remove the one located between the catalyst and the exhaust manifold).
- Screw the lambda probe into the spacer.
- Reinstall the "advanced" sensor.
- Connect the terminal to the battery.
Healthy! Typically, mechanical blending of the second lambda probe is not performed, since this DC is protected by a catalyst and only controls its condition. The most sensitive is the first sensor, which is installed closest to the collector.
After this, the “Check Engine” system error should disappear. If this method does not work, you can use a more expensive deception.
Electronic snag
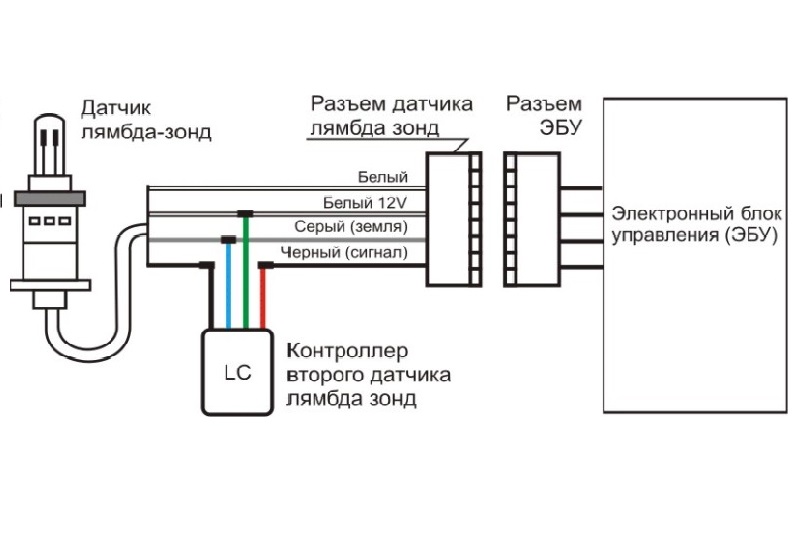
Another way to eliminate problems with the DC is to use an electronic decoy of the lambda probe, the diagram of which is presented below. Since the oxygen sensor transmits a signal to the controller, a decoy circuit connected to the wiring from the sensor to the connector will “crude” the system. Thanks to this, in a situation where the lambda probe is faulty, the power unit will continue to operate correctly.
Healthy! The installation locations for such deception may differ depending on the PBX model. For example, it can be mounted in the central tunnel between the seats, in the dashboard or in the engine compartment.
The decoy circuit is a single-chip microprocessor that analyzes the processes in the catalyst, receives data from the first DC, processes it, converts it to the indicators of the second sensor and issues a corresponding signal to the car processor.
To install this type of snag, you will need a lambda probe connection diagram, which looks like this.
As you can see, there are different pinouts of the lambda probe (4 wires, three and two). The colors of the wires may also vary, most often there are products with 4 pins (2 black, white and blue).
To make a deception device, you will need:
- soldering iron with a fine tip and solder;
- rosin;
- non-polar capacitor with a capacity of 1 µF Y5V, +/- 20%;
- resistor (resistance) 1 mOhm, C1-4 imp, 0.25 W;
- knife and insulating tape.
Healthy! Before installation, it is best to place the circuit in a plastic case and fill it with epoxy.
Next, the electronic snag is mounted on the lambda probe with your own hands as follows:
- Disconnect the negative terminal of the battery.
- “Dissect” the wire that goes from the DC itself to the connector.
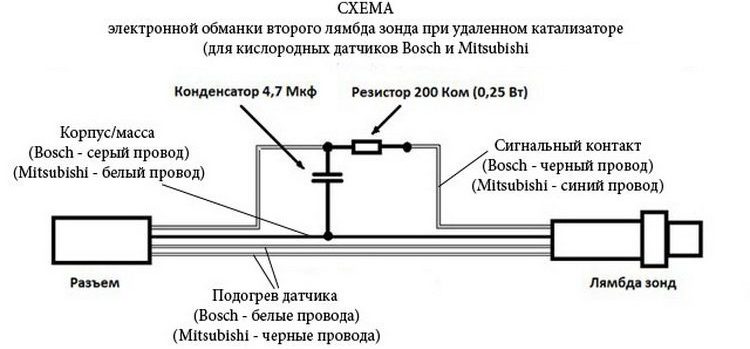
- Cut the blue wire and connect it back through the resistor.
- Solder a non-polar capacitor between the white and blue wires.
- Insulate connections.
Below is a do-it-yourself diagram of a lambda probe for pinout into 4 wires.
At the final stage, the following should happen.
Such manipulations should not be performed if you do not have the proper experience. Today, stores offer ready-made decoy circuits that even a novice driver can easily install.
Reflashing the controller
Some particularly sophisticated car owners decide to reflash the control unit, which blocks the processing of signals from the second oxygen sensor.
However, it must be taken into account that any changes to the system operation algorithm can lead to irreversible consequences, since returning the factory settings will be almost impossible and costly.
Therefore, it is not recommended to perform such manipulations yourself. The same applies to ready-made firmware that is sold on the Internet.
Healthy! When flashing the lambda probes, they are removed.
If you still want to flash the system, then contact a competent specialist who can disable receiving DC data using specialized equipment.
It is also worth considering that almost any intervention in the operation of systems can lead to not the most pleasant consequences.
What are the consequences after installing decoys?
You need to understand that any deception is installed at the risk of the car owner. If the installation was carried out incorrectly, you may encounter the following problems:
- Due to the fact that the on-board computer cannot regulate fluid injection, engine malfunction may occur.
- If the circuit is not properly soldered, it may damage the wiring.
- In the process of installing the decoy, you can damage the oxygen sensors, after which you will not even know about their malfunction (since you will already have the decoy installed).
- After such interventions (not only during flashing), the on-board computer may fail.
Any inaccuracy will lead to disastrous consequences, so it is better to install a safer ready-made emulator.
Unlike deception, it does not “deceive” the control unit, but only ensures its correct operation by converting the DC signal.
A microprocessor is also installed inside the emulator (as in a homemade electronic decoy), which is capable of assessing exhaust gases and analyzing the situation.
In custody
Many car owners install homemade decoys on their cars to save on the purchase of new oxygen sensors. However, in such a pursuit of profit, you may well face large financial costs if a homemade device affects the operation of “vital” systems. Therefore, it is recommended to install decoys only if you understand such work.
Source: https://avto-moto-shtuchki.ru/zapchasti/135-kak-sdelat-obmanku-ljambda-zonda-svoimi-rukami.html
Making a lambda probe with your own hands – Leading auto portal
One of the reasons why the Check Engine light comes on is a malfunction of the oxygen sensor, the so-called lambda probe. Depending on the make of the car, there can be from two to four such sensors.
Which one is faulty is determined using a car error scanner and replaced immediately.
If this is not done, then over time the catalytic converter (in everyday speech - a catalyst), the cost of which on some car models reaches 100 thousand rubles, will also fail.
It’s another matter if the catalyst is already faulty or removed (cut out) by the owner who does not want (cannot) spend money on expensive repairs of the oxygen sensor. In this case, it is necessary to deceive the lambda probe, otherwise it will send a command to the computer unit about a malfunction in the exhaust system.
As a result, the electronic injection control unit receives a signal that the engine is running with a lean combustible mixture and will increase the flow, filling the injectors with fuel. This worsens the acceleration dynamics of the car and increases gasoline consumption.
In addition, failures in engine operation at idle speed appear and the CO content in the exhaust gases sharply increases to 3 - 7% (at a standard of 0.5%).
Causes of lambda probe failure
1.Low compression.
2.Use of leaded gasoline. Sulfur, lead, silicone and other fuel additives gradually destroy the oxygen sensor.
3. Overheating of the sensor by exhaust gases, which is associated with malfunctions of the ignition system.
4. Break in the supply wire and short circuit in the on-board electrical circuit.
5. Mechanical damage to the lambda probe.
6. Exceeding the service life of the oxygen sensor (untimely replacement).
It is not difficult to cut out the catalyst, but instead you will need an alternative device, that is, a flame arrester.
Advantages of a flame arrester compared to a catalyst:
1.Durability.
2.Cheapness.
3. Reliability in operation.
The flame arrester has one drawback - deterioration of environmental properties due to increased toxicity of exhaust gases, which threatens with a fine when traveling to EU countries. The video will tell you how a faulty catalyst “kills” the engine.
Types of oxygen sensors and timing of their planned replacement
| Sensor type | Description | Replacement timing by mileage |
| Without heating | With one black wire | 50-80 thousand km |
| Heated sensors | With two, three or four wires | 100 thousand km |
| Planar | Two-element current limit sensor | 160 thousand km |
It will be necessary to install a “false” even in the event of a malfunction of the lambda probe itself, even with a working catalyst.
For those who want to try to revive a lambda probe installed on their own car, it is suggested to perform the following steps:
- Remove the sensor protective cap. Sometimes there are two. We remove (saw off) both.
- To remove the active layer of carbon deposits, soak in phosphoric acid. Instead of acid, you can use a rust converter. It is not recommended to clean the oxygen sensor by mechanical means. Acid treatment time is from 15-20 minutes to two hours.
- Clean with a brush or an old toothbrush.
- Rinse thoroughly with water.
- Heat the sensor over an open fire using a gas burner. Do this operation several times
- Weld back the protective cap. To do this, we grab the caps in several places using camp welding.
- Install the lambda probe in its original place and check operation after warming up.
- If there are no changes in engine operation, then buy and install a new oxygen sensor.
Types of oxygen sensor decoys
1. Mechanical “trick”.
The simplest and most accessible way to deceive a lambda is a probe. A corrector adapter is machined into which an oxygen sensor and a mini-catalyst are inserted. Then the entire assembly assembly is installed in its regular place in the exhaust system of the car.
In the event of failure of the catalyst and (or) lambda probe installed after the catalyst, a signal is sent to the controller warning that the CO content in the exhaust gases is higher than the permissible values. The electronic control unit perceives the situation as an emergency and increases the fuel supply, enriching the mixture.
When installing the “blende”, exhaust gases enter through a small hole in the adapter into a mini-catalyst filled with ceramic chips, which are covered with a catalytic layer. The concentration of toxic substances in the gas decreases, which is perceived by the control unit as normal operation of the oxygen sensor and standard catalyst.
To make a mechanical “blende” you need a lathe, a drawing, and a workpiece material (steel or bronze). You can order the “blende” or buy it ready-made. The price for resolving the issue is within 1 thousand rubles.
2. Emulated lambda probe.
The electronic decoy is a microprocessor that connects directly to the wires running from the oxygen sensor to the controller. The emulator's task is to deceive the control unit by converting the signal from a faulty catalyst and sensor into a signal that corresponds to the parameters of normal engine operation. To make a “fake” yourself, we assemble the device according to the diagram.
But first you will need to take an oscillogram of the voltage output signal of the lambda probe from your own car with a working catalyst.
Depending on the magnitude of the pulse, select the values of capacitor C and resistor R experimentally. Then we place the assembled device in a thermotube and fill it with poxypol. We connect the four wires according to the diagram.
3.Changing the standard ECU firmware.
Making changes to the memory of the electronic engine control unit (ECU) is possible only with the help of special expensive equipment, so it is difficult to reflash the unit yourself. You can buy firmware on the market, but there is a risk of harming the engine or the ECU will behave inappropriately.
Important! If flashing the ECU is not provided by the manufacturer, then it is better to replace the lambda probe than to risk the engine.
Almost all BMW models have the ability to reprogram the ECU to operate without a catalytic converter.
After correct firmware, the control unit does not take into account the signal from oxygen sensor 2 in the event of its failure and a faulty catalyst 4. The control unit only reads the signal from the lambda probe 1.
Nuances in the manufacture and installation of “decoys”
- It is better to dismantle the lambda probe when the car is warm.
- Depending on the design of the exhaust system, the mechanical blende can be straight or angular.
- Older cars have only one lambda probe (located before the catalytic converter), while most cars have two or more oxygen sensors. If you decide to replace the lambda probe, it is better to replace both. A purchased new oxygen sensor may fail due to inconsistency with the lambda probe installed before the catalyst.
- A universal drawing offered on the Internet may not fit your vehicle. Choose a proven version of the mechanical “trick”, taking into account your car brand.
- When using Nitron type economizers, the installation of a mechanical “blend” will be required. In this case, the ECU reacts inadequately to the operation of the economizer and enriches the mixture, which negates the effect of the device.
- After removing the catalytic converter, the installation of “bleeders” is mandatory.” In addition to fuel savings, there is an increase in engine power of up to 30% when working together with an economizer.
Replacing the catalytic converter with a flame arrester, and the lambda probe with a “blende”, violates the standards for CO content in the exhaust gases, which can complicate the passage of maintenance and obtaining a compulsory motor liability insurance policy.
Source: http://miravto24.ru/obmanka-lyambda-zonda-svoimi-rukami/
Lambda probe decoy: electronic, mechanical or engine firmware - which is better?
 string(10) “error stat”
Modern environmental standards require the installation of additional means of monitoring and purifying exhaust gases from vehicles with internal combustion engines.
The most common devices include a catalyst installed in the exhaust system of a car. The quality of exhaust gases is monitored using lambda probes installed on the catalyst (before and after it).
The effectiveness of the catalyst cleaning system is indicated by changes in the parameters of the output signals of the lambda sensors.
During the operation of the car, the catalyst becomes contaminated. In this case, engine operation is disrupted, the control unit displays an error message, and sometimes switches the engine to emergency operation.
Replacing an expensive catalyst, whose cost can reach more than 100,000 rubles for 1 catalyst, and there are usually several of them, is beyond the means of many car enthusiasts, so they resort to conventional mechanical cleaning of the catalyst from contaminated ceramic or metal filters.
However, the catalyst does not always simply become dirty; during operation it often begins to deteriorate (melt or crumble), which can lead to small parts getting into the cylinder block, scuffing them, increased oil consumption and, as a result, major repairs of the internal combustion engine. The only option to protect yourself is to remove the catalyst and replace it with a flame arrester or stronger, whichever you prefer.
Mechanical way to deceive lambda sensors
The lambda probe (oxygen sensor) records the concentration of oxygen levels in the exhaust gases. The principle of monitoring the efficiency of the catalyst system is based on measuring the parameters of the output signals of lambda probes.
When the catalyst is removed, exhaust gases with the same composition of impurities will enter the first and second oxygen sensors. The engine control unit will receive a signal indicating that the catalyst is not working efficiently, or rather, not working at all.
In order to comply with EURO standards, the engine management system will “choke” the engine, display an error message, and go into emergency mode.
The mechanical trick of the lambda probe consists of installing a second lambda sensor in the exhaust gas exhaust system through an adapter fitting. Drawings of fittings for various car brands can be found on the Internet.
The principle of operation of mechanical decoys is that exhaust gases will not be supplied to the second oxygen sensor in full.
The design of the fitting adapter, in some cases, provides an additional small ceramic filter, which further reduces the concentration of harmful impurities.
The adapter can be made using conventional turning equipment or purchased at a store specializing in tuning or exhaust systems. It is better to take beryllium bronze as a material. It is resistant to high temperatures and is not subject to severe corrosion.
The process of installing a mechanical lambda sensor is simple:
- with the ignition off, the negative terminal of the battery is removed;
- the second oxygen sensor is removed, the sensor is cleaned, and, if necessary, replaced with a new one;
- a decoy adapter is installed;
- an oxygen sensor is installed;
- The negative terminal of the battery is connected.
After mechanical work, diagnostic equipment is connected, errors are read and deleted. Then a check run is performed and errors are diagnosed again.
If the adapter corresponds to the optimal mode, the control unit will not generate engine errors.
Otherwise, you can adjust the seating depth of the adapter fitting and an additional small filter.
Electronic snag instead of a catalyst
The electronic catalyst blende provides for changing the parameters of the output signal by changing the electrical circuit for connecting the second lambda sensor. By installing an additional RC filter, the signal level received at the input of the engine control unit is weakened.
Thus, a signal corresponding to the “cleaned” exhaust is artificially generated. The electronic catalyst circuit includes a capacitor with a capacity of 1 to 5 microfarads and a resistor with a resistance of 10 kOhm to 1 Mohm.
Specific parameters are selected for optimal operation of a particular engine; they can be found on the Internet.
The process of installing and debugging a lambda decoy is similar to connecting a mechanical decoy. Requires minor electrical installation skills, a soldering iron, solder, electrical tape, a capacitor and a resistor of appropriate values.
Setting up electronic blende consists of selecting the values of radio elements (capacitor, resistor). A significant disadvantage of this decoy method is the instability of the oxygen sensor parameters. During operation, the lambda probes' own characteristics change, the parameters of the output signals will also change, and over time the error message may appear again.
Chipping (flashing) of the engine control unit
One of the most effective ways to deceive the sensor is to reflash the engine control unit. It is carried out using special equipment with the appropriate firmware programs.
Experienced auto electricians who specialize in flashing electronic control units have a bank of firmware corresponding to common engine models.
If you have programming skills, you can do chipping yourself by purchasing the firmware (program) on specialized websites.
Installation of new firmware into the engine control unit can be done using special diagnostic equipment such as LAUNCH or KTS through the vehicle diagnostic connector. Experienced auto electricians upload the firmware directly into the memory chip or microprocessor in the engine control unit.
If the correct firmware is installed, adaptation of oxygen sensors is not required. The process itself involves:
- connecting a laptop with the necessary software to the diagnostic connector;
- installation of an updated engine control program;
- control tests and diagnostics.
There are cases when initial tests show no errors in engine operation. However, during actual operation of the vehicle, the engine error signal appears again.
Catalyst emulator
An electronic catalyst emulator is the safest way to cheat.
It is an additional electronic unit installed in the electrical circuit of the vehicle's engine control system.
For each engine type, special electronic emulator units are sold. There are universal emulation blocks in which adaptation to the engine type is made by installing jumpers.
General recommendations
The choice of a specific method for solving the problem of lambda sensor deception depends on financial and technical capabilities. It is better to start with the simplest methods: mechanical or electronic. If you do not have the appropriate skills, it is better not to resort to more complex methods without the help of a specialist.
Source: https://SwapMotor.ru/vyhlopnaya-sistema/obmanka-lyambda-zonda.html