Replacing Toyota Corolla headlights and bulbs
Replacing Toyota Corolla headlights and bulbs
The heroine of this article is the Toyota Corolla headlight unit and, specifically, the Toyota Corolla front headlight. If we touch on the topic “how to remove a headlight”, it also suggests replacing Toyota Corolla light bulbs. Replacing the light bulbs will wait for now, let's look at the new headlights for a Toyota Corolla, which my client went to buy a headlight for a Toyota Corolla all the way to Moscow. Let's unpack...
New headlight for Toyota Corolla
Manufacturer: Taiwan. The price of the headlight is 2350 rubles. Standard headlight. The original headlight costs several times more.
Carefully placed in a box, protected with backings, there is a film on the glass of the headlight, of course there are no light bulbs in it, only the headlight itself and a meager photocopy of the instructions.
And, as it turned out, it is extremely difficult to buy headlights for a Toyota Corolla 2008 in our Volgograd and neighboring Saratov regions.
Toyota Corolla front headlight
Instructions for the Toyota Corolla headlight
To remove the headlight. you will have to release the bumper on the sides.
toyota corolla headlight
Here we will unscrew the first bolt with a 10mm wrench.
Toyota Corolla front headlight
Then, unscrew the two upper headlight bolts and use a curly screwdriver to unscrew the self-tapping screw securing the radiator grille.
How to remove the headlight of a Corolla
Under the radiator grille, the headlight snaps into the “TV” eyelet with a side mount.
Replacing the front headlight of a Toyota Corolla
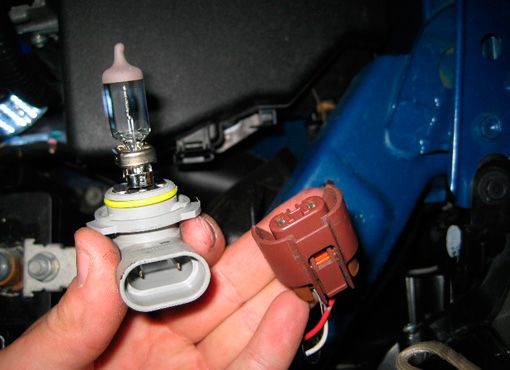
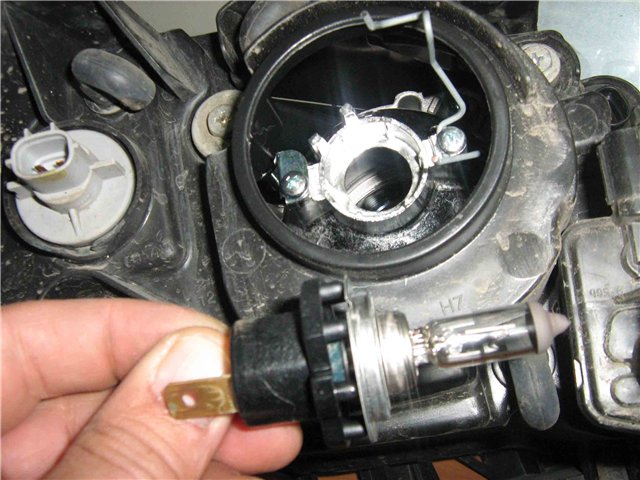
After that, disconnect the 5 power plugs.
Replacing Corolla headlights
In order to remove the plug, you need to press the tab and pull it towards you.
Corolla headlight replacement
Now, you need to install all the bulbs and the light corrector on the new headlight. In the photo below they are indicated (let's go from right to left):
- Low beam light (red arrow)
- Marker light (green circle)
- Headlight range control (yellow arrow)
- High beam light (red arrow)
- Turn signal light (red arrow)
Replacing Toyota Corolla headlight bulbs
On the new headlight there are plugs in the bulb cells. They, like light bulbs, need to be turned counterclockwise to pull them out.
Replacing the low beam light bulb on a Corolla
Replacing Toyota Corolla light bulbs
We unscrew the headlight corrector and also screw it onto the new headlight.
Toyota Corolla headlight leveler
Toyota headlight range control
Turn it very carefully, first checking whether the thread of the corrector bolt and the thread of the internal element of the headlight match, its thread is plastic.
Replacing the headlight adjuster for Toyota Corolla
Replacing light bulbs!
Replacement of low and high beam bulbs must be done carefully. Do not touch lamp bulbs with bare hands - they may burn. Wear gloves and after installation, wipe the bulb bulbs with a soft, lint-free cloth (preferably lightly moistened with alcohol). Naturally, until you install the bulbs and wipe them down and let them dry, you cannot connect the power plugs to them.
Replacing Corolla headlight bulbs
The Corolla 2008 has low and high beam bulbs with non-removable blocks.
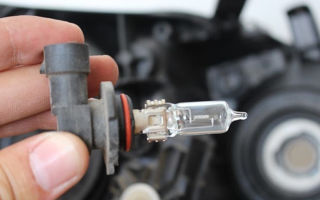
And so, replacing the low beam bulb. The Toyota Corolla lamps that were on the old headlights were made in America.
Toyota Corolla low beam lamp: SYLVANIA 9005 HB U 22N12V6OW DOT LO607 USA
Replacing a Toyota Corolla low beam bulb
There are three guides on the light bulb sockets, two of the same size and one of a smaller size... In the headlight, the light bulb socket has similar grooves. Insert the light bulb and turn it clockwise until it stops and the light bulb is locked.
Replacing a Toyota Corolla high beam bulb
Replacing a Corolla headlight turn signal bulb
The high beam bulb is also changed, and the turn signal bulb is also replaced. The marker lights also change. But, unlike the low and high beam bulbs, the side light bulb (like the turn signal bulb) comes without a socket. Replacing side light bulbs:
- Rotate and remove the light bulb socket from the headlight
Replacing side light bulbs for Corolla headlights
2. Remove the light bulb from the socket and insert a new one
Replacing headlight bulbs on a Toyota Corolla
3. Insert into the socket and turn clockwise until it stops.
Replacing the Toyota headlight bulb
Just like replacing the side light bulb, the turn signal bulb is also replaced.
Headlight adjustment
Adjusting the headlights. It is produced along the vertical and horizontal axes using two bolts. See the photo below...
Adjusting Toyota Corolla headlights
The upper bolt, to which the 8 key is directed, adjusts the headlight reflector along the horizontal axis, and the lower one – along the vertical axis (since the reflector is solid). It would be better to adjust the headlights, of course, at a car service center. With maximum machine load, etc. But, you can also adjust the headlights yourself using a circuit.
Toyota Corolla lamps
http://arbi-idirisov.ru
Source: http://legkoe-delo.ru/remont-avtomobilya/avto/86411-zamena-far-i-lampochek-tojota-korolla
Replacing the low beam lamp Toyota Corolla 2008

Replacing a low beam lamp on a Toyota Corolla 120 (2000–2006) and 150 (2006–2013) does not require professional knowledge of an electrician. This operation is not at all complicated, and if you follow the instructions below, you won’t have to wonder how to change the light bulbs.
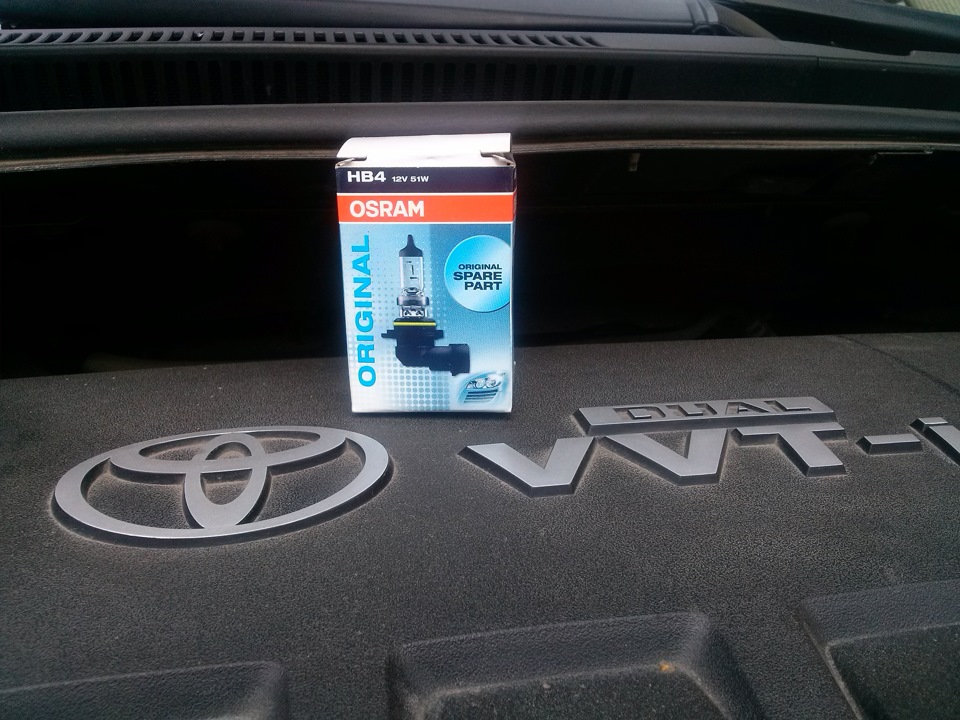
Before purchasing new lamps, you need to know which ones are included in the Corolla optics.
For clarity, below is a picture indicating suitable light bulbs for the Corolla.
Important! Middle HB4 not to be confused with H4
Lamp selection
Only certain types of lamp bases are suitable for Toyota Corolla optics. The base itself is designed to fix the light bulb in the housing, as well as transmit current to it.
The best option for the Toyota Corolla 2013 of all is the HB4 Koito Whitebeam 12V 55W from the Japanese manufacturer. This lighting is reliable and very bright. It is especially recommended to buy this brand for high beams. The only disadvantage of Koito is the high price.
The Philips Crystal Vision HB4 is another great option that will glow a very bright white light.
For Toyota Corolla there are several types of lighting that can be supplied, depending on your consumer needs:
- All-season.
- Durable.
- With increased light output.
- Blue lighting.
Let's consider the main features characteristic of each of these types of lamps.
All-season
All-season, or all-weather, lamps are best installed by car owners who drive a lot outside the city at night. A special feature of all-season models is that their bulb is covered with a yellow layer.
It turns out that the luminous flux of the lamp becomes yellow, which is much more effective than white in humid weather.
If white light is scattered from moist particles in the air, then in yellow light this problem will not be so acute: yellow light has a scattering coefficient of 20 percent less. This will give you greater visibility in fog, snow or rain.
Durable
Recommended for those who spend a lot of time driving at night. Such lamps can work as much as twice as much as ordinary ones. Durability is ensured due to the vibration resistance of the base and the special gas contained in the flask. Manufacturers designate such headlights as Long Life.
With increased light output
Replacing old lamps with these is recommended for people whose headlights have lost their transparency and are less capable of transmitting fire. A more powerful light stream (30 percent stronger than conventional ones) is achieved due to the higher filament temperature. It may seem that such a thread will burn out much faster, but this will not happen, because a special gas is introduced into the flask, which protects it.
Blue color
In fact, their color is close to blue, but sellers still call them blue lamps. Unskilled people confuse their light with xenon, because it is really similar, just not as powerful. This illumination is achieved by blue coating on the bulb. The advantage of such light is that it tires the eyes much less than ordinary light.
The selection of lamps with HB4 socket is limited.
To replace the low beam bulbs, you must first open the hood. In its space you will see a plastic protection that is held on by six clips. Each clip has a plug in the middle that you need to lift up by pressing on its core. This is best done with a knife with a thin blade.
Remove the entire protection panel and set it aside. Now we have access to the low beam headlight unit and the sidelights. Looking there, you can see that each headlight has a chip with two wires.
Carefully remove it, trying not to damage the wires. The chip came to the base of the light bulb, which was unscrewed with a quarter turn counterclockwise.
The headlight with low beam lamp on the Corolla E120, E150 and Fielder may have a rubber plug that can also be unscrewed counterclockwise.
As soon as you unscrew the base with the light bulb and install a new one, do not hold onto the light bulb itself, because it may fail.
The fact is that if finger oil gets on the glass, the thread can burn out. The low beam bulb for the 2008 Toyota Corolla is now installed. Similar operations are performed for versions of other years. This instruction is suitable for both right and left headlights.
Important: replacing headlight bulbs should be done in dry weather. Because if moisture gets on the lamp contacts, it may fail. In bad weather, it is better to install in a dry garage.
If the low beam still does not light after replacing the bulb, then the problem lies in the rest of the electrical part: pay attention to the fuse, relay and whether the base is inserted all the way.
Low beam not lit: reasons
If your lights don't turn on, this doesn't mean the problem is with the lamps. There are several reasons for this malfunction:
This problem can be solved simply: by replacing it with a new one, but be sure to install a fuse of the same rating as the burned one, otherwise it will immediately fail.
With prolonged use, the lamp bulb dims. The problem is that this process occurs gradually, and the car owner does not notice the difference. For example, in 2004 the headlight shines brightly, in 2007 it is a little worse, and in 2011–2012 it is very bad, but over such a period of time it is difficult to notice gradual changes.
Replacing rear lights
To carry out this operation, we will need to open the trunk and pay attention to the plastic cover, which is located directly behind the headlight. We open it by lifting the two latches on which it is fixed. By opening this cover we have direct access to all the rear lamps.
The next step: removing the chip from the one we want to replace.
When removing, you must pull not by the wire, but by the plastic head.
Next, simply unscrew the rear marker socket ¼ turn counterclockwise and replace the light bulb. This technique is also typical for the Carolla 160 body, produced since 2016.
LED dimensions
Installing LED side lights is a justifiable solution because these lighting elements consume much less energy and have a pleasant glow color reminiscent of xenon. LED lamps have the same dimensions as conventional lamps, so they are installed in the same way. These dimensions look much better and are more reliable.
Conclusion
The process of replacing lamps is not complicated. The main thing in this matter is to follow the instructions given above and buy high-quality lighting devices. To replace the lighting in the front optics, many people practice removing the front bumper of the car. This makes more space for replacement, but also takes twice as long.
Watch an interesting video on this topic
Source: https://eurasia-avto.ru/zamena-lampy-blizhnego-sveta-toyota-korolla-2008.html
replacing a low beam bulb on a Toyota Corolla – A selection of excellent videos from YouTube
5 months ago
All about body repair! Any cars, training materials. Your own business, tuning, free lessons. And also, disassembly of different cars, in detail. Removing and adjusting car optics, “headlights, flashlights, turn signals, fog lights” and replacing all lamps. Repair and painting of lanterns.
2 years ago
We polish the headlights on a Fiat Grand Punto with our own hands in 5 minutes, using what everyone has at home: a toothbrush and toothpaste. I don’t pretend to be exclusive, I’m polishing for the first time, and the result is noticeable! 0:58 – our weekend transport, the car is fire! 4:01 – the main expert talks about the progress of work!
2 years ago
Which LED headlight bulbs shine better, and which bulbs to put in fog lights. https://goo.gl/2EUwQZ – DOWNLOAD THE MASTER OF TIME. Once you know this, you will begin to live better.
See for yourself! The story of how simple video tutorials made it possible to build a million-dollar business: Here: https://goo.gl/GT5pvd -Click on the Link Here: http://vid.frb.promotionalurl.
com – Course “100% vision without glasses and operations” Get the video course for free and check the results in practice! Subscribe to the channel, like: https://www.youtube.com/channel/UCurMgdEuSog9rJooX47GSTA
3 years ago
Video about how you can independently remove a squeak in the area of the dashboard of a Toyota Corolla 2011 car.
2 years ago
The European debut of the tenth generation Toyota Corolla took place in 2007. When purchasing a used Toyota Corolla, you should avoid models with MMT. We find out the weaknesses of the Toyota Corolla and the cost of operation.
Toyota Corolla – is it worth the money? The Toyota Corolla E140 is a car that can be accused of lacking a memorable design, weak dynamic performance and insufficient driving performance. However, he cannot be accused of unreliability.
Failures, of course, happen, but so rarely that you won’t even notice them. But only if you choose a car with a gasoline engine. The high level of ergonomics of the Toyota Corolla also deserves special praise. https://vk.
com/club125500696 Many thanks for providing information to the portal vvm-auto.ru Our group is in contact https://m.vk.com/club125500696
5 years ago
Simple example video how to release the bumper to take out the headlight unit.
6 years ago
Read more about the test drive here: http://www.kolesa.ru/article/2012/10/18/test-drayv_ford_focus_iii_i_toyota_corolla_bitva_bestsellerov
2 years ago
Kit 9006 HB4 3000LM 12 V White https://ru.aliexpress.com/item/2015-NEW-32W-CREE-LED-Headlight-Headlamp-Auto-Conversion-Car-COB-Kit-9006-HB4-2800LM-12V /32313141248.html?spm=2114.13010608.0.0.8vIEbs
4 years ago
Hi all! Test of second generation LEDs in headlights, with lenses. Part 2 with a more detailed test of diodes, including in reflective optics - http://youtu.be/04qGsoTv07k The light bulbs themselves - http://ad.admitad.com/goto/1e8d114494dbed96894216525dc3e8/?ulp=http%3A%2F %2Fru.
aliexpress.com%2Fitem%2F1set-Cree-CXA1512-car-Auto-HB4-9006-LED-car-headlights-cree-9006-HB4-led-head-light%2F1648581864.html Detailed review of 1st generation diode lamps, review not mine – https://www.youtube.com/watch?v=-IsD4Qfpdnc Polishing plastic headlights – http://youtu.
be/fp0Dqw1YkIY My name is Vlad. Like any man, I love cars! On this channel I want to share with you my knowledge and information on interesting cars that I had the opportunity to “touch”.
If you are in Almaty and want to provide your car for review, write in the comments!
2 years ago
We turn off the sound of an unfastened seat belt on a Toyota through the computer. Subscribe to the VK group – https://vk.com/romanautoreview
Source: http://AlexKolobok.ru/watch/kaOmgr7DTrE
Replacing a Toyota Corolla low beam lamp
Some Toyota Corolla car owners complain that the factory-assembled low beam of the latest car model does not suit them; the minions shine dimly, not providing the necessary visibility. This problem is easily solved. The lighting in the Corolla headlights can be easily changed.
To do this, you just need to change the light bulbs, in our case the low beam. Burnt out minions also need replacing. This process is simple and takes from 2 to 5 minutes if you know how to do it. The only problem is that the lighting fixtures are located in hard-to-reach places. But this can also be solved.
First way. Replacing lamps from the inside
So, we are changing the low beam lamp in a Toyota Corolla. To do this, open the hood of the car from inside the car.
The front part of the hood is covered with a plastic casing (cover), which complicates access to the internal components.
This cover provides some degree of sound insulation, softening the sounds of operating components and the closing of the hood. We first need to remove this cover, and to do this we take out the clips.
- The clips are removed in two ways. Either by pressing the middle button down, as a result of which the spring inside the mechanism is activated and the clip pops out, or they can be lifted by picking them up with a knife and then calmly pulled out. Once you have pulled out all the clips, the cover can be removed very easily.
- In the left headlight of a Toyota Corolla, replacing the lamps is much easier than in the right one. To begin with, the low beam lamp is disconnected from the power source, whose plug with wiring is inserted directly into the base, which has a special socket. You remove the plug from the base by moving it towards you, not forgetting to press the latch first, then move the lamp itself from its socket with a slight turn counterclockwise and calmly remove it.
- Holding it by the base, take the new one out of the box and insert it into its place. It is equipped with guides that will help you install it correctly. By turning it slightly clockwise until it clicks, the minion base is fixed in the socket. Connect the power supply. That's all. It is done. You can check how the new lamp works. Is it burning? This means everything was done correctly. Now you can replace the cover, insert and secure the clips, and close the hood.
To replace the low beam on the right headlight of a Toyota Corolla, in addition to the casing, it is necessary to remove the engine expansion tank.
- To do this, unscrew 2 bolts (you will need a #10 wrench) and remove the tank from the car.
- Another obstacle on the way to the lamp is the washer neck. It blocks the view, the lamp socket is not visible. But you should not touch the washer, as it will not interfere with the work. To see the lamp socket, use an ordinary small mirror. Bring it to the side and it will show you where the lamp is. Next, perform the same manipulations as with the left lamp.
After replacement, install the expansion tank in its place and tighten the bolts. You also put the casing in place. The whole job may take you no more than 5 minutes.
Second way. Replacing lamps outside
Replacing the low beam on a Toyota Corolla can be done in another way. For this you will need a jack or a hole in the garage to unscrew the front bumper. The Toyota Corolla has a low landing and therefore, in order to get under the body, the car must be lifted. The bumper is removed to provide access to the headlights, or rather, to the headlight mounts.
- Using a No. 10 pipe wrench, unscrew the bolt under the headlight and the two bolts on the sides. Using a figured screwdriver, unscrew the self-tapping screw. When removing the headlight, do not forget about the latch located near the radiator grille. There are wires running to each lamp and they will not allow you to remove the headlight without problems. You need to remove 5 power plugs. To do this, you need to press the latch and simply pull the plug towards you.
- The headlight of a Toyota Corolla car consists of 5 bulbs, two of which - low beam and high beam bulbs - are larger than the others. The low beam is located at the edge of the headlight. We take it out of the nest. How to remove and insert the lamp into place, see the first part of the article.
- Further, all operations are performed in reverse order. Insert all the plugs into the sockets, insert the headlight into place, screw in the bolts and self-tapping screw. Install the bumper.
A little about security
During the replacement process, follow some safety rules:
- When replacing, do not touch the glass of the new lamp with your hands. There may be particles of fat from your fingers or oil left on it, which you may inadvertently stain your hands with. The thin glass of the lamp heats up to very high temperatures and grease that gets on it will easily damage the lamp. Before installation, it is advisable to wipe it with a dry, lint-free cloth.
- Never work under voltage. In addition to the fact that you may receive an electric shock (and this in itself is unpleasant), there is a danger that even a burnt-out minion may shatter into small pieces (and there have been such precedents). Therefore, whenever possible, wear safety glasses.
- First of all, they should not blind oncoming drivers. Respect on the road comes first.
- must provide illumination of the road for a distance of up to 40 meters in complete darkness, in the absence of external light sources.
You should not skimp on lighting. These savings can come at a cost. There are certain requirements for them:
Experienced drivers recommend installing Koito WHITEBEAM III bulbs in the low beam headlights of a Toyota Corolla.
These are halogen lamps and are made in Japan. With a standard power of 55 W, the Koito lamp provides light brightness one and a half to two times greater than, for example, a lamp containing xenon.
However, Koito does not have a negative impact on the headlights, since the power corresponds to the standard power for headlights.
The manufacturer of these lamps is part of the Toyota Group holding company and its products are focused primarily on Toyota cars.
How to change the low beam light bulb on a Toyota Corolla Link to main publication
Source: http://CorollaCar.ru/remont/elektrooborudovanie/zamena-lamp-blizhnego-sveta.html
We carry out repairs, adjustments and tuning of low beam lamps and other Toyota Corolla optics
The lighting system of the Toyota Corolla car includes front and rear optics. The head optics include headlights, fog lights, and daytime running lights. Rear optics include taillights, brake lights, license plate lights and others. There are markers and turn signals installed at both the front and rear.
Headlight Toyota Corolla 120
Selection options
The entire lighting system consists of signaling and lighting devices. Over time, lighting elements fail and require replacement (video author: Remontiruem Svoe Avto).
When choosing new products, you should purchase originals or light bulbs that match the characteristics of the old ones. Recently, standard lamps have been replaced with xenon and LED lamps, which have better performance, a long service life, and consume little electricity.
Do-it-yourself dismantling and replacement of low beam lamps
To replace light bulbs on a Toyota Corolla, you need to remove the headlight.
The procedures for removing and replacing lamps consist of the following sequence of actions:
- First you need to dismantle the bumper to have access to the optics.
- To remove the headlight, you need to unscrew the mounting bolts.
- When dismantling the headlight unit, you need to disconnect 5 power connectors.
- In order to remove the lamp, you need to turn it to the left.
- Next, install the new light bulb without touching the glass with your bare hands.
- Insert it into the socket and turn it to the right to secure it.
- We connect the plugs and check the operation in 5 modes.
- If everything is fine, we reassemble in reverse order.
This completes the replacement process and you can use the car.
Photo gallery “Replacing low beam bulbs”
1. We study the location of the bolts.2. By pressing the latch, disconnect the plug.3. We fix the light bulb in the socket.
How to change PTF?
Replacing fog lights is a simple procedure consisting of the following steps:
- First we dismantle the mudguard.
- After removing the mudguard, the PTF housing will be accessible.
- By pressing the latch, you should disconnect the plug with the power wires.
- We take out the light bulb by turning it counterclockwise.
- Next, you need to insert a new element and turn it clockwise.
- After connecting the plug with wires, you need to check the operation of the lamp.
- At the final stage, the mudguard is screwed on.
This completes the replacement of the fog lights.
Features of optics adjustment
Before adjusting the headlights, the car should be prepared by creating operating conditions. Then the machine should be placed on a flat horizontal plane 5 meters from the wall on which markings are applied to adjust the optics.
The headlights are adjusted using adjusting screws. First, one headlight is adjusted, and the second is covered with dark material that does not transmit light. You should adjust the horizontal and vertical glow. The second one is configured in the same way.
Tuning ideas
Many drivers, after several years of use, want to change the appearance of their car by tuning it.
Tuned Toyota Corolla
Tuning options may be different. Often replace standard light bulbs with xenon ones. The light from the updated optics is more powerful, and the view of the road increases significantly. The use of LED lights adds originality to the car's exterior. You can decorate the headlights with overlays in the form of “angel eyes”.
Loading …
Video “How to change low beam lamps on a Toyota Corolla”
How to replace lamps on a Toyota Corolla is demonstrated in this video (the author of the video is Romanautoreview).
Source: http://AvtoZam.com/toyota/corolla/remont-regulirovka-i-tyuning-optiki/
Replacing lamps and headlights of Toyota Corolla
Replacing lamps and headlights of Toyota Corolla
As you know, car light bulbs burn out every two years, but replacing them is quite possible if you rely on yourself.
When working with low and high beam headlights, you need to be careful, since glass halogen lamps should not be touched with your hands due to the fact that they heat up very quickly, and traces from your touch can damage the product, but if you do touch it, you must Wipe immediately with a cloth moistened with alcohol.
So, when replacing lamps, you need to make sure that the corresponding switch is not active, as well as the ignition, after which you can proceed to the work process itself.
Replacing low beam headlights
To replace the low beam headlights, do the following:
- It is necessary to disconnect the connector and remove the battery cover; if it is difficult to remove, try rocking it.
- Next, you need to disconnect the wire from the terminal, loosen the spring securing the lamp and remove the lamp together with the socket. Then you take a new light bulb and install it in the socket, returning the spring to its original position. To install the lamp you will need to align its ears with the slots in the holes.
- Everything must be done without touching the headlight glass. After all this, we move on to installing the rubber headlight cover, attach the connector and make sure that the cover fits tightly to the base of the mounting surface.
Replacing high beam headlights
To replace the front high beam headlights you will need:
- For the left headlight: you need to remove the clamp and move the air cleaner tube to another location.
- Press the latch to disconnect the connector, wiggle it if necessary.
- Next, twist the lamp counterclockwise and then remove it.
- Now you can proceed to installing the lamp, and the hole special for this, turning it clockwise.
Replacing the turn signal lamp
In order to replace the front turn signal lamp you must:
- Disconnect the wire from the battery (terminal) and remove the socket with the lamp from the middle of the turn signal housing; this must be done by turning the socket counterclockwise.
- Next you need to press the lamp, turning it clockwise, and then remove it from the socket.
- In the end, all that remains is to insert the new lamp, turning it clockwise all the way, and fix it.
Fog lights are necessary for a car to illuminate the road during fog; they shine with a horizontal beam above the road and are displayed in white or light yellow.
Replacing fog lamps
To replace the fog lamp bulb you need:
- Disconnect the wire from the terminal, as described earlier, take a screwdriver and press the two clamps in the required places, and then remove the grille from the buffer.
- Next, you need to unscrew the headlight mounting screws; when doing this, pay attention to the topmost screw on the left; it secures the air temperature sensor.
- Now you need to remove the headlight and remove the plug.
- The next step is to disconnect the wire end and then remove the retainer from the hooks in the headlight.
- Next, you need to turn the lock and remove the lamp with the wire.
- Insert the newly purchased light bulb without touching its bulb with your fingers to avoid further failure.
- And now it’s almost over, you need to turn the latch back into place and attach it to the block with the wire, and then install the plug.
- The last step involves installing the fog lamp, as well as the ventilation grille in their rightful place.
So, you should still replace the headlights sometimes, especially since you yourself will notice when the time has come for this work.
The inner surface of the headlights can sometimes fog up, but this is due to the temperature difference between the two surfaces of the lenses, mainly after rain or after washing the car.
But when you see large drops of water inside the lens surfaces, it means it's time to change them and as soon as possible, otherwise the lamps will simply fail.
Replacing taillight bulbs
How to replace tail light bulbs:
- As usual, disconnect the wire from the terminal and open the trunk lid.
- Remove the cover that blocks access to the lamp from the trunk lining.
- Next, you need to unscrew the fasteners, and then remove the lamp holder from the flashlight body itself.
- Now, pressing on the old lamp, turn it counterclockwise and pull it out.
- Next, insert the new lamp and fix it in the holder, turning it clockwise to the very end.
- Ultimately, it is necessary to install and secure the holder in the headlight, and then attach the cover to the place of the upholstery.
Replacing interior lamps
As for the light bulbs that illuminate the interior, replacing them is also not difficult:
- You will need a small screwdriver with which you can remove the light diffuser. Then remove the light bulb by prying it up with a screwdriver, but be careful to do this around the edges of the lamp so that the glass does not crack or break.
- After the work has been done, simply insert a new light bulb in place of the old one and use it for a very long time.
None of the above procedures for replacing headlights and lamps will take you much time, but will bear fruit. It is not at all necessary to go to expensive salons for this, when all this can be done quickly and independently. The main thing is to have the desire and strictly follow the instructions, then the replacement of these parts will happen quickly and flawlessly.
Read also
Source: http://grandrepairauto.ru/zamena-lamp-i-far-toyota-corolla.html