Heating, Air conditioning Toyota Corolla, Replacing the cabin filter
The heating, air conditioning and ventilation system is a single complex that provides the most comfortable conditions inside the car, regardless of weather conditions and driving conditions.
The system includes a heater (increases the air temperature in any mode of operation of the system), an air conditioner (reduces the temperature and humidity of the air), an air blower (fan) and air ducts with a filter (provide air exchange in the cabin, clean the air from dust), as well as a unit control (controls all elements of the system to obtain specified comfort parameters). The control unit for the heating, air conditioning and interior ventilation system is installed on the center console of the instrument panel. The ambient temperature sensor is installed in front of the condenser (air conditioner radiator). The sensor determines the ambient air temperature by changing the resistance of the built-in thermistor and transmits the corresponding signal to the air conditioning system control unit. The outside temperature sensor, although located at the front of the vehicle behind the bumper in a solar-protected and ventilated location, is susceptible to factors such as warm air from the engine and radiation from heated asphalt. Therefore, its readings can sometimes be somewhat inflated, especially after a long stay in traffic jams. Outside temperature readings can be considered correct when driving at a speed of at least 40 km/h for at least 10 minutes.
Heating system Toyota Corolla
Schematic diagram of the movement of air flows in the ventilation, heating and air conditioning system : 1 – windshield blower deflectors; 2 – air flow distribution flaps to the windshield deflectors and instrument panel deflectors; 3 – instrument panel deflectors; 4 – air ducts for heating the driver’s and passengers’ foot area; 5 – damper for the distribution of air flows to the instrument panel deflectors and the heating air ducts for the driver’s and passengers’ footwells; b – heater radiator; 7 – cabin air filter; 8 – air recirculation system damper; 9 – air supply box; 10 – air intake in the car interior; 11 – fan impeller; 12 – fan electric motor; 13 – air conditioner evaporator; 14 – drainage hole for draining condensate; 15 – temperature regulator damper; 16 – housing of the heating and air conditioning system
The vehicle is equipped with a liquid-type interior heater. The heater radiator is connected to the engine cooling system by two hoses running in the engine compartment. The radiator is placed in a plastic casing of the climate unit, installed under the instrument panel.
The main components of the heater are the heat exchanger (radiator) 6 of the heater, designed to heat the air entering the cabin with the heat of the engine cooling liquid; – fan (air blower) 10.
Electric motor 12 of a fan with excitation from permanent magnets, providing a controlled supply of outside air to the heater and air conditioner dampers; – damper 15 for the air temperature regulator coming from the heater into the passenger compartment.
The amount of air passing through the heat exchanger of the heater, and the outside air passing bypassing the heat exchanger, depends on the change in its position; – dampers 2 for the distribution of air coming from the heater through the air ducts into the passenger compartment or for blowing the windshield.
Air conditioning system Toyota Corolla
Schematic diagram of the movement of refrigerant in the air conditioning system : 1 – combined pressure sensor; 2 – high pressure pipeline section; 3 – receiver-dryer; 4 – service valve of the high pressure line; 5 – condenser (air conditioner radiator); 6 – fan of the condenser and radiator of the cooling system; 7 – air conditioning compressor; 8 – low pressure pipeline section; 9 – service valve of the low pressure line; 10 – heater fan; 11 – evaporator; 12 – thermostatic valve
Toyota Corolla cars have a compressor-type air conditioning system. The heater components and the air conditioner evaporator heat exchanger are arranged in one unit. The air conditioning system controls are located on a panel common with the heater controls. The compressor is mounted on the engine cylinder block and is driven by a V-ribbed belt. The compressor circulates the refrigerant in the system. The compressor shaft is installed in the front housing cover on bearings and sealed on the drive pulley side with an oil seal.
The compressor drive pulley is mounted on a double-row ball bearing and rotates constantly when the engine is running.
The condenser (air conditioning radiator) of a multi-flow type is located in front of the radiator of the engine cooling system. It is attached using four rubber holders to the radiator of the cooling system.
The condenser honeycombs are made of flat, thin-walled aluminum tubes with internal longitudinal baffles for rigidity and external fins to improve heat transfer. Aluminum tanks, with flanges for connecting pipelines.
The height of the tanks is divided into sections, therefore, passing through the condenser, the flow of refrigerant changes direction several times. In the condenser, the vapors of the refrigerant compressed by the compressor are condensed and the heat released is removed into the surrounding air.
When the air conditioner is turned on, the engine control unit turns on the power circuit for the electric fan of the engine cooling radiator, which improves heat exchange in the condenser and reduces the pressure in the air conditioning system.
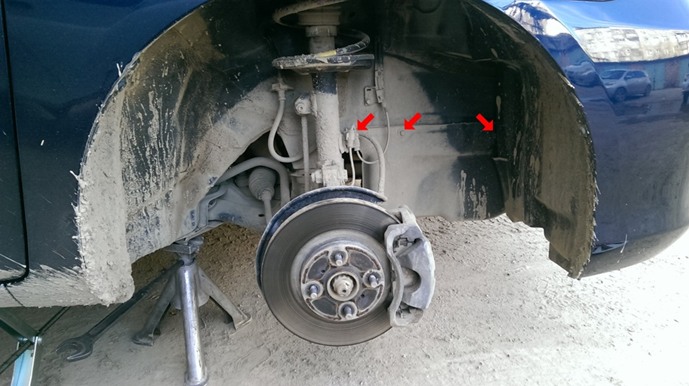
At least once a year, preferably before the start of summer operation, wash the fins A of the condenser honeycomb from adhering dirt, dust and de-icing agents 5. This will improve heat transfer, reduce pressure in the system and increase the service life of system elements. Do not use high-pressure water jets to clean the condenser.
This may cause damage to the B thin-walled fin plates. Even with regular cleaning, the need to replace the condenser arises much more often than we would like. The fact is that it is the first to absorb the flow of deicing agents, dirt and pebbles from the road. And the walls of the tubes are thin...
In most cases, the condenser is damaged by corrosion in the third or fourth year of operation. If the seal of the condenser is compromised as a result of corrosion, it will be more expensive to repair it. Even if an argon welder manages to patch the hole, a leak may soon appear in another place. By the way, the pressure in the system on hot days can reach 25-28 bar.
In addition, the complex structure of the condenser tube should be taken into account: along it it is divided by partitions into channels, so there is a high probability that after welding some of the channels will be blocked. Accordingly, the dissipated power will drop and the performance of the air conditioner will deteriorate, especially in traffic jams and in hot weather.
After each experiment with patching the condenser, you will need to pay for removal and installation, welding of the condenser and refilling the system with refrigerant. So it is better to immediately install a new condenser. Instead of an expensive original one, it is quite possible to buy a cheaper condenser from authorized manufacturers of spare parts.
The evaporator is located in the interior heating and air conditioning system unit, under the instrument panel. The evaporator is made of aluminum tubes with external fins to improve heat transfer. Passing through the evaporator tubes, the boiling refrigerant actively absorbs heat from the air blowing on the outer finned surface of the tubes.
The air is cooled and supplied by a fan to the vehicle interior. When the air passing through the evaporator cools, the water vapor contained in it condenses. The condensate is drained through a drain tube located on the bottom of the engine shield under the bottom of the car. At high humidity o
Source: http://toyoinfo.ru/news/1/2012-12-01-994
Toyota Auris, Toyota Corolla E150. HEATING, AIR CONDITIONING AND VENTILATION

-automatic control:
-manual control of the heating (air conditioning) and interior ventilation system.
NOTES
When the air conditioner is turned on, especially in the hot season, the moisture contained in the air supplied to the heat exchanger condenses on it, drains from the evaporator and is removed from the heater unit through a special hole.
The air conditioner will not turn on if the air blower fan mode switch is set to position “0” (fan off) or the ambient air temperature is below 0 °C.
This is not a sign of a malfunction, but is provided for by the design.
WARNINGS
Turning on the air conditioner while the engine is running under difficult conditions (long climbs, heavy city traffic, etc.) can lead to engine overheating.
Monitor the coolant temperature gauge: if the temperature exceeds the permissible value, turn off the air conditioner. During long trips in city traffic, the efficiency of the air conditioner may decrease due to the intense thermal conditions of the engine.
This is not a sign of malfunction; the air conditioner will operate effectively when driving under normal road conditions.
NOTE
In a variant of the vehicle, the heated rear window and rear-view mirrors can be equipped with an automatic timer that turns off automatically after 15 minutes.
NOTES
When the air conditioner is turned on, especially in the hot season, the moisture contained in the air supplied to the heat exchanger condenses on it, drains from the evaporator and is removed from the heater unit through a special hole.
The air conditioner will not turn on if the air blower fan mode switch is set to position “0” (fan off) or the ambient air temperature is below 0 °C.
This is not a sign of a malfunction, but is provided for by the design.
WARNINGS
Turning on the air conditioner while the engine is running under difficult conditions (long climbs, heavy city traffic, etc.) can lead to engine overheating.
Monitor the coolant temperature gauge: if the temperature exceeds the permissible value, turn off the air conditioner. During long trips in city traffic, the efficiency of the air conditioner may decrease due to the intense thermal conditions of the engine.
This is not a sign of malfunction; the air conditioner will operate effectively when driving under normal road conditions.
WARNING
It is not recommended to turn on the recirculation mode for a long time while the car is moving, as this usually leads to fogging of the windows.
Depending on the various combinations of switches on the control unit, the heating and ventilation system operates in the following main modes:
– the maximum cooling mode is used in hot weather and after a long stay in the sun to quickly cool the air in the cabin. In this case, before turning on the air conditioner, it is recommended to briefly open the windows to remove heated air from the cabin. The A/C and air recirculation switches must be turned on;
– normal cooling mode is used when traveling around the city and outside the city in moderately warm weather. The air conditioning switch must be on, the recirculation switch must be off;
– the maximum heating mode is used at very low ambient temperatures and to quickly warm up the air in the cabin after a long stay. The air conditioning switch should be off, the recirculation switch should be on;
– normal heating mode is used in the cold season to maintain optimal air temperature in the cabin after intensive heating in the maximum heating mode. The air conditioning and air recirculation switches must be turned off;
– the windshield and front door glass blowing mode is set to quickly eliminate glass fogging at high air humidity. The air conditioning switch can be in any position depending on the ambient temperature, and the recirculation switch must be turned off.
NOTE
To prevent the windows from fogging up in rainy weather, turn on the blower mode when the heater is off, since the difference in the temperature of the glass surface and the supplied air can cause moisture condensation.
USEFUL TIPS
For more efficient ventilation and heating when the vehicle speed is less than 50 km/h and when driving through particularly dusty sections of roads with the windows closed (to create excess air pressure in the cabin, preventing dust from being sucked in), we recommend turning the heater fan switch on to low or maximum speed. To quickly eliminate fogging of the rear window and free it from ice and snow, turn on the heated glass switch. If you do not use the air conditioner for a long time, you need to turn it on briefly once a week with the engine running to restore the layer of lubricant on the compressor parts and seals.
Source: http://sinref.ru/avtomobili/Toyota/008_Toyota_Corolla_Auris_2007_2011_remont_bez_problem/009.htm
Diagnostics and repair of Toyota car air conditioners
Air conditioners have long gained popularity as important components of a car. They control temperature, humidity levels and purify the air. This makes it possible to feel comfort while in the cabin of a Toyota car and to move comfortably even over long distances.
This sealed system is quite complex and sensitive, so many owners of Toyota cars are convinced that timely diagnostics of the air conditioner and scheduled refilling with freon make it possible to avoid serious breakdowns and significantly save on their repairs.
| Diagnostics, repair and refilling of air conditioners | Toyota | ||
| Auris, Yaris, Avensis, Carina, Corolla | Camry, Celica, Matrix, Sienna, RAV4 | Land Cruiser, Hilux, Sequoia, Tundra | |
| Refilling the air conditioner | from 1500 | from 1500 | from 1500 |
| air conditioner refilling (2-circuit system) | 1800 | 1800 | |
| Checking system tightness with vacuum | 600 | 600 | 600 |
| Finding Refrigerant Leaks | 1200 | 1200 | 1200 |
| Replacing the filling nipple | 300 | 300 | 300 |
| Replacing the O-ring | 500 | 500 | 500 |
| Replacing the condenser (radiator) of the air conditioner | 2000 | 3000 | 5000 |
| Replacing the air conditioner dryer receiver | 1,500 rub. | 2,000 rub. | 2000 |
| Replacing the air conditioner tube/hose | from 800 rub. | from 800 rub. | from 800 rub. |
| Replacing the air conditioning compressor | 2,500 rub. | 3,000 rub. | 4000 |
The most important thing when servicing your climate control system is choosing a reliable service center. Experienced service specialists near the metro stations Polezhaevskaya, Begovaya, Mezhdunarodnaya, Business Center, Khoroshevo, Molodezhnaya, Krylatskoye, Fili.
The quality of the air conditioner depends on the level of freon. If it is not enough, serious problems occur, increased loads, overheating and final failure.
If you don't keep your Toyota car clean, the tubes become dirty, eventually fungus occurs, corrosion occurs, and the elements fail.
Often breakdowns occur due to external influences, natural causes and manufacturing defects.
https://www.youtube.com/watch?v=b8zURierQfI
It takes time for the system to fail completely. For this reason, you can avoid serious problems and breakdowns if you carry out routine diagnostics and repair of the air conditioner .
If at least one of the listed symptoms appears, it means that the malfunction already exists and an unscheduled inspection and repair of the breakdown by a qualified technician is required:
- There is an unpleasant odor in the cabin;
- The Toyota air conditioner began to perform its functions poorly;
- The refrigerant is quickly consumed;
- Specific sounds, noise, buzzing appeared.
All these signs indicate that you urgently need to come to a service center and have the system repaired.
Repair of the climate control system in a Toyota car
Most often, technicians are contacted with the following breakdowns in the Toyota air conditioner:
- Depressurization. Occurs due to many factors. These include mechanical damage caused due to the inexperience of the refrigerant charger or a pebble on the road that bounced off unsuccessfully.
- Electronics failure.
- Tube repairs and hose repairs are often required
Regardless of the type of breakdown, the wizard’s algorithm of actions will be something like this:
- Full diagnostics. Identification and confirmation of a specific problem, as well as searching for possible minor faults that in the near future could cause a serious breakdown;
- Repair or replacement of parts;
- Elimination of the causes that contributed to the breakdown;
- Refilling the refrigerant and checking the tank, as a rule, all malfunctions arise due to them. Often the reason lies in low-quality freon or incorrect refueling, if the Toyota owner previously turned to unqualified people.
The cost of services is affordable, prices vary depending on the complexity of the required repair work.
Timely contacting a service center to repair problems that seem minor will protect the climate control system from failure. The sooner the car owner contacts the service, the less costs he will incur. Trusting your Toyota car air conditioner to professionals and regularly checking the system is a guarantee of comfort and savings.
We also recommend that you pay attention to the special promotion for refilling car air conditioners .
More information about the promotion
Refilling and repair of air conditioners for other brands:
Audi
Mitsubishi
BMW
Porsche
Ford
Toyota
Mercedes-benz
Volkswagen
Source: https://at-pro.ru/avtoservis-toyota/diagnostika-i-remont-avtokondicionerov-toyota.html
Diagnostics repair refilling air conditioner Toyota Toyota
Diagnostics of operation, refilling with freon according to the standard table, repair of the air conditioning system of Toyota cars of all models Avensis, Camry, Corolla, Prado 120, Rav 4, Land Cruiser 100 200, in the Auto Aircon service center located in Moscow, Southern Administrative District.
Nothing can ruin a driver’s mood on a hot day more than an air conditioner failing at the wrong time, when the cabin is filled with warm air instead of the desired coolness.
There is an exit! All you have to do is contact us for the repair of car air conditioning systems, and we will promptly solve the problems that arise at the best prices.
Range of services provided:
To begin with, our technicians will find out the reason why the air conditioner stopped turning on and does not work by performing a high-quality diagnosis of the air conditioning system of a Toyota car, using at least 3 testing schemes;
- Visual inspection of parts for oil leaks, which indicate a freon leak;
- The use of an electronic leak detector in the diagnostic process for the subsequent elimination of refrigerant leakage, the annual rate of which is 3 - 7 ml g;
- Using a universal dye, UV (ultraviolet) diagnostics. The principle of operation is quite simple: phosphor is poured inside, and then the necessary parts are illuminated with a special lamp.
After identifying the causes of the malfunction, our specialists will suggest the best option for repairing air conditioning parts installed on Toyota vehicles.
- After repairs and climate control come back to life, we will refill the system with freon.
- Refilling is carried out strictly according to the table of standards, in quantities up to the hollow volume with an accuracy of ± 5 - 10 grams.
- When refueling we use modern equipment, we use Du Pont Suva R-134A freon, which is intended only for car air conditioners. Before the refrigerant filling process, we will create a vacuum and add special oil to the compressor.
The main problems with the components of the climate control system that we most often encounter:
Repair and replacement of Toyota air conditioner hose tubes
Corrosion of aluminum pipes of the automobile air conditioning line, high low pressure at the joints of fasteners and the car body. We combat this phenomenon by appropriately using argon for welding aluminum tubes; the procedure for building up metal using a Dimet installation is also suitable. These two methods can easily eliminate unnecessary cracks and holes, etc. and so on.
Repair, or it would be more appropriate to say custom-made production of low-pressure rubber hoses for a car air conditioner. We manufacture and replace hoses using similar factory materials from the Good Year company.
It becomes extremely important in cases of replacing aluminum tubes with rubber hoses, restoring the operation of the rear circuit on the Land Cruiser 100, 200, Prado.
Repair and replacement of Toyota air conditioner condenser radiator
When repairing cracks in the honeycomb of the radiator core, thin tubes through which the refrigerant of a car air conditioner circulates, argon arc welding and Dimet metal spraying equipment will also be appropriate.
In case of impractical repairs, a service is provided - a service for replacing components; compressor if it is jammed, clutch pulley bearing, radiator, condenser fan, receiver - dryer filter, high pressure and speed sensors in the compressor, relay, thermostatic valve (thermal control valve) are completely new.
We also perform antibacterial cleaning of the evaporator located under the instrument panel of the dashboard, external washing of the condenser radiator from dirt and dust,
We service the air conditioning of Toyota Auris Auris, Avensis Avensis, Camry Camry, Corolla Corolla, Land Cruiser 100 200 Land Cruiser, Prado 120 150 Prado, Prius Prius, Rav 4 RAV, Yaris and others.
Useful tips for caring for climate control equipment installed on Toyota cars:
- Carrying out annual diagnostics prevents expensive repairs in the future;
- Immediate consultation with specialists in case of the slightest failure of the climate control operating mode;
- Cleaning the condenser - radiator from dust and dirt particles;
- Timely replacement of the cabin filter to get rid of unpleasant odors;
- Avoid prolonged depressurization, because If moisture gets inside, it will cause damage to the receiver, expansion valve or compressor; prior flushing from the inside is not excluded.
Note to clients!
All types of work are covered by a guarantee, the amount of which is affected by the general condition of the mechanisms.
If you have any additional questions regarding the cost of the service and other nuances, please contact our contact phone number. We will immediately provide you with the data you are interested in, and of course we will help you practically.
Source: http://www.avto-aircon.ru/toyota.html
TOYOTA COROLLA
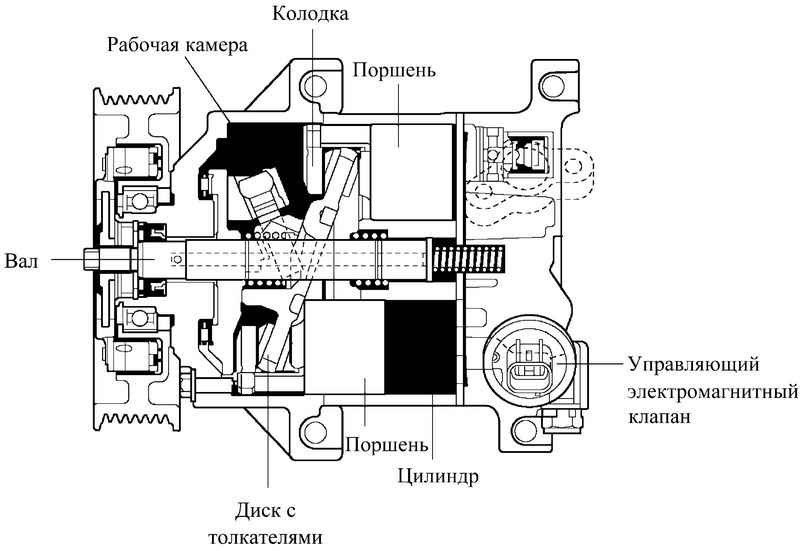
Toyota Corolla cars have a compressor-type air conditioning system. Heater units and heat exchanger: air conditioner evaporator are arranged in one block. The air conditioning system controls are located on a panel common with the heater controls.
Below is a schematic diagram of the movement of refrigerant in an air conditioning system.
Picture 1
Schematic diagram of the movement of refrigerant in an air conditioning system:
1 – combined pressure sensor;
2 – high pressure pipeline section;
3 – receiver-dryer;
4 – service valve of the high pressure line;
5 – condenser (air conditioner radiator);
6 – fan of the condenser and radiator of the cooling system;
7 – air conditioning compressor;
8 – low pressure pipeline section;
9 – service valve of the low pressure line;
10 – heater fan;
11 – evaporator;
12 – thermostatic valve.
The compressor is mounted on the engine cylinder block and is driven by a poly-V-belt.
The compressor circulates the refrigerant in the system. The compressor shaft is installed in the front housing cover on bearings and sealed on the drive pulley side with an oil seal.
The compressor drive pulley is mounted on a double-row ball bearing and rotates constantly when the engine is running.
Figure 2
The condenser (air conditioning radiator) of a multi-flow type is located in front of the radiator of the engine cooling system. It is attached using four rubber holders to the radiator of the cooling system.
The condenser honeycombs are made of flat, thin-walled aluminum tubes with internal longitudinal baffles for rigidity and external fins to improve heat transfer. Aluminum tanks, with flanges for connecting pipelines.
The height of the tanks is divided into sections, therefore, passing through the condenser, the flow of refrigerant changes direction several times. In the condenser, the vapors of the refrigerant compressed by the compressor are condensed and the heat released is removed into the surrounding air.
When the air conditioner is turned on, the engine control unit turns on the power circuit for the electric fan of the engine cooling radiator, which improves heat exchange in the condenser and reduces the pressure in the air conditioning system.
USEFUL TIPS
Figure 3
At least once a year, preferably before the start of summer operation, wash the fins A of the condenser honeycomb from adhering dirt, dust and de-icing agents B. This will improve heat transfer, reduce pressure in the system and increase the service life of system elements.
Do not use high-pressure water jets to clean the condenser. This may cause damage to the B thin-walled fin plates.
Even with regular cleaning, the need to replace the condenser arises much more often than we would like. The fact is that it is the first to absorb the flow of deicing agents, dirt and pebbles from the road. And the walls of the tubes are thin...
In most cases, the condenser is damaged by corrosion in the third or fourth year of operation.
If the seal of the condenser is compromised as a result of corrosion, it will be more expensive to repair it. Even if an argon welder manages to patch the hole, a leak may soon appear in another place. By the way, the pressure in the system on hot days can reach 25-28 bar.
In addition, the complex structure of the condenser tube should be taken into account: along it it is divided by partitions into channels, so there is a high probability that after welding some of the channels will be blocked. Accordingly, the dissipated power will drop and the performance of the air conditioner will deteriorate, especially in traffic jams and in hot weather.
After each experiment with patching the condenser, you will need to pay for removal and installation, welding of the condenser and refilling the system with refrigerant. So it is better to immediately install a new condenser. Instead of an expensive original one, it is quite possible to buy a cheaper condenser from authorized manufacturers of spare parts.
Figure 4
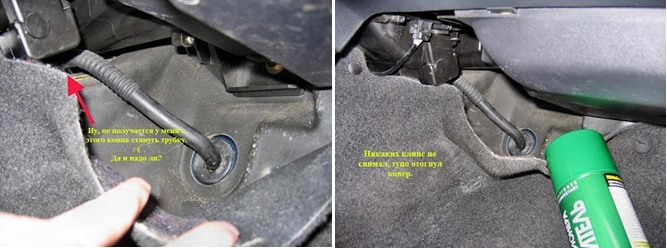
The evaporator is located in the interior heating and air conditioning system unit, under the instrument panel. The evaporator is made of aluminum tubes with external fins to improve heat transfer. Passing through the evaporator tubes, the boiling refrigerant actively absorbs heat from the air blowing on the outer finned surface of the tubes. The air is cooled and supplied by a fan to the vehicle interior.
When the air passing through the evaporator cools, the water vapor contained in it condenses. The condensate is drained through a drain tube located on the bottom of the engine shield under the bottom of the car. If the ambient air humidity is high, a puddle of water may form under the car, which is an indirect sign that the air conditioning system is working properly.
WARNING
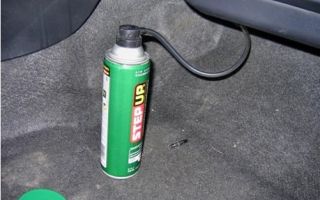
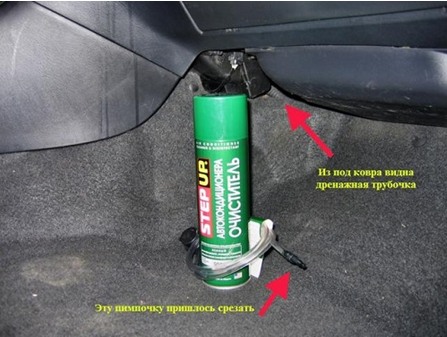
During vehicle operation, particles of road dust and dirt settle on the outer surface of the evaporator, damp from condensation.
Figure 5
This layer becomes an excellent environment for life and rapid reproduction of putrefactive bacteria and fungal cultures. Over time, an unpleasant odor appears in the car. It is felt especially strongly when the air conditioner is turned off and in humid weather.
In order to minimize the risk of this problem, when purchasing a new car, it is necessary to carry out preventive treatment of the evaporator with special chemicals, regularly replace the cabin filter and clean the drain tube. If, despite the measures taken, the smell still appears, contact a specialized car air conditioning repair service to disinfect or flush the evaporator. If the contamination is very severe, the evaporator will have to be replaced.
Figure 6
The block-type thermostatic valve is located in the middle part of the engine compartment shield and is connected to the evaporator. Having passed through the throttling hole in the valve body, the liquid refrigerant sharply reduces its pressure and begins to boil.
A control element is installed in the valve body, which changes the flow area of the throttling hole depending on the pressure and temperature of the refrigerant.
The control element is set at the factory and cannot be adjusted during operation.
The receiver-dryer is installed on the condenser on the left side and forms a non-separable unit with it. Inside the housing there is a replaceable filter element (cartridge) filled with desiccant granules (silica gel). At the bottom of the housing there is a hole for replacing the filter element.
WARNING
In case of repair or replacement of elements of the air conditioning system, if it was in an open state (any components were removed, pipelines were destroyed, etc.), the filter element (cartridge) must be replaced. Otherwise, after charging the system, the refrigerant will not be dried and acids may form inside the system, which will destroy the air conditioner parts from the inside.
Pipelines connect all elements of the air conditioning system into a single sealed circuit. The pipelines and their mounting flanges are made of aluminum alloys and secured to the body with rubber holders.
Figure 7
Protect metal sections of pipelines from dents and kinks. Any narrowing of the pipeline flow area leads to a decrease in system performance.
To connect mutually movable elements of the system, pipelines in some areas are equipped with flexible inserts made of synthetic materials.
O-rings made of neoprene are installed at the joints of individual elements of the system. When sections of pipelines are disconnected during system repairs, the O-rings must be replaced.
Service valves located on the pipelines serve to connect diagnostic and filling equipment. To prevent dirt from entering, the valves are closed with threaded caps with the symbols “L” and “H” for valves of low and high pressure pipelines, respectively.
NOTE
Figure 8
This is how the service valves of low pressure A and high pressure B lines are located on the pipelines.
Figure 9
The valves are equipped with spools, similar in design to the spools of wheel tires, but differing in size.
Figure 10
A special key is used to turn the spools in and out.
WARNING
Figure 11
It is prohibited to check the presence of refrigerant in the system by pressing the service valve spools, since after such a check the valve spool may not close completely and refrigerant will leak from the system!
Figure 12
The pressure sensor is installed in the engine compartment, in the same block as the high pressure pipeline valve. Based on sensor signals, the electronic engine control unit turns off the air conditioning compressor in the event of depressurization of the system or an emergency increase in pressure in it in order to protect the compressor from overloads.
The evaporator temperature sensor is installed in the interior heating and air conditioning system unit, under the instrument panel. The sensor determines the air temperature directly at the outlet of the evaporator by changing the internal resistance, which is read by the air conditioning control unit.
Refrigerant. The system is charged with HFC134a (R134a) refrigerant. The total filling volume is (440±30) g.
A special ND-OIL 8 oil has been added to the refrigerant to lubricate the compressor. It is strictly prohibited to use other types of refrigerants and oils in the system.
NOTES
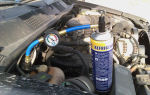
During the operation of a car air conditioner, situations periodically arise when the air conditioning system requires servicing or repair. For this purpose, modern diagnostic and repair equipment is used. The most common situation is the depressurization of the system and the release of refrigerant from it.
Figure 13
To detect leaks, highly sensitive halogen leak detectors with sound indication are used.
In some difficult cases, the so-called method is used. ultraviolet diagnostics of the tightness of the car air conditioning system.
Figure 14
The method consists of introducing a special dye into the system in microdoses.
In places of microleaks, the dye, together with the refrigerant, gradually reaches the outer surface of the system elements.
Figure 15
During inspection of the system, the dye begins to glow (fluoresce) under the influence of ultraviolet rays from a special lamp...
Figure 16
…and refrigerant leaks become visible.
It should be noted that the dye does not have any negative effect on the system. It can remain in the refrigerant and circulate through the system for as long as desired and will only serve its purpose if a leak occurs.
Figure 17
After repairing the car air conditioner, it is necessary to evacuate and charge the system with the appropriate refrigerant (R134a). The volume of refilling the car air conditioner is individual for each car model.
To carry out high-quality refilling of a car air conditioner you need:
Figure 18
– precision pressure gauge blocks with special connecting tips;
Figure 19
– two-stage vacuum pump to completely remove air and water vapor from the system;
Figure 20
– high-precision (division value no more than 5 g) scales for dosing refrigerant.
Due to the specific features of repairing the air conditioning system, this section describes only work on the removal and installation of individual elements and the system control unit. Work related to filling the system with refrigerant should be carried out in specialized service centers.
WARNING
The air conditioning system is charged with high pressure refrigerant.
Contact of liquid refrigerant on human skin causes severe frostbite, therefore, if possible, carry out all work related to the maintenance, repair or dismantling of air conditioning system elements in specialized service centers that have professional technological equipment. When carrying out work on your own, take precautions.
Source: http://ToyotAuto.net/corolla/osobennosti-ustroystva-sistemy-kondicionirovaniya.html
Toyota Corolla car air conditioner repair
 Choose another model
Passenger cars are becoming more and more comfortable every year; one of the main roles in creating a comfortable climate in the cabin is played by the car air conditioner, which is a rather complex device. Like any other automobile unit, the air conditioner equipped with Toyota Corolla is exposed to the harmful effects of the environment and can fail at the most inopportune moment.
The most common type of breakdown of a car air conditioner, including cooling equipment installed on a Toyota Corolla, is a refrigerant leak.
In order to eliminate a leak, sometimes a comprehensive diagnosis is required, which can only be carried out with specialized diagnostic equipment.
And even after the cause of the refrigerant leak is found, specialists will face another, even more difficult task - eliminating this cause.
This may require a whole range of different procedures, including such technologically complex operations as argon welding of aluminum tubes. The success of such an operation directly depends on whether the employee performing the repair has enough experience. If the technician is not sufficiently qualified, it may happen that your car air conditioner will soon need repairs again.
Very often, the reason for the failure of a car air conditioner is contamination of its radiator, which increases the load on the unit, which leads to breakdown. You can avoid such situations by regularly cleaning the radiator.
But you should not carry out such procedures yourself; it is better to turn to professionals who have modern equipment at their disposal.
If the car air conditioner is not properly serviced, some components of the unit can be damaged, in which case it may require expensive repairs.
The highly qualified employees of our technical center have everything necessary to diagnose, repair and service the air conditioner of a Toyota Corolla car.
Refilling of cooling units in our technical center is carried out only on specialized branded equipment, and only high-quality refrigerant from trusted manufacturers is used.
The technicians of our technical center have extensive experience in diagnosing, refilling and repairing Toyota Corolla air conditioners, which allows them to provide a full range of services for servicing units of this type in the shortest possible time.
You can get detailed information by phone
+7 (495) 506-08-33
+7 (495) 504-99-87
We are waiting for you at our CAR SERVICE IN KHIMKI!
Source: http://Jap4Drive.ru/models/remont_toyota/corolla/remont-avtokondicionerov-toyota-corolla
Maintenance and repair of Toyota Corolla 1992-1998: 4.10.2 Air conditioning system

4.10.1. Air conditioning system
The air conditioning system line is under high pressure. Until the refrigerant is completely removed, it is prohibited to disconnect any hoses or remove air conditioning system units.
Refrigerant removal must only be carried out by the dealer's service center or a specialized workshop.
Even after removing the refrigerant from the air conditioner line, disconnect the hoses only after wearing safety glasses.
Air conditioning system design
| 1. Compressor, magnetic clutch, compressor temperature switch 2. Condenser 3. Condenser electric fan
4. Receiver (moisture separator) |
5. Relay 6. heater, heater core 7. Cooling unit, expansion valve, evaporator, resistor unit, thermistor
8. Fan unit, fan unit motor |
The following is a list of procedures for maintaining the air conditioning system to ensure that it maintains normal operation over a long period of time.
| EXECUTION ORDER | ||||
|
It is recommended to turn on the air conditioner for at least ten minutes at least once a month. This should be done especially in winter, when due to long periods of inactivity, seals and seals harden and subsequently destroy.
Leaks in the air conditioning system are best detected when the pressure and temperature increase to operating levels. To detect leaks in the system, run the engine for five minutes with the air conditioning turned on. Stop the engine and inspect the air conditioner hoses and joints. Oily streaks will indicate a refrigerant leak.
Due to the complexity of the air conditioning system, and the fact that special equipment is required to diagnose the system, any maintenance or inspection work must be performed by specially trained personnel.
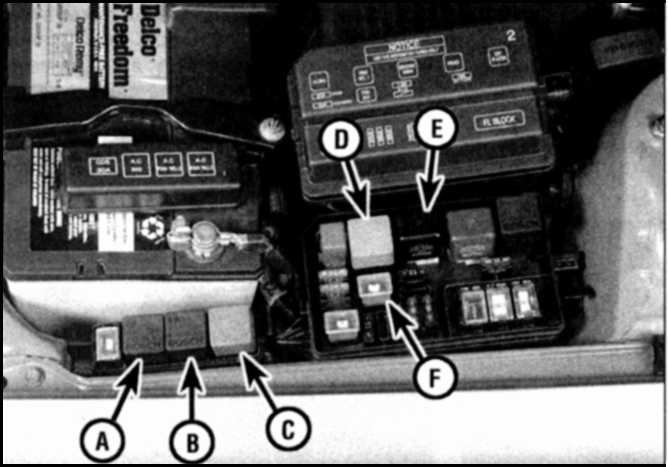
If the air conditioner does not work at all, then check the fuse panel (see subsection 12.1 ) and the air conditioner relay, which are located in the mounting block inside the engine compartment.
The most common cause of unsatisfactory operation of the air conditioner is insufficient refrigerant charge. If there is a noticeable increase in air temperature from the air conditioner, then check the completeness of the refrigerant charge using the method described below.
Checking the refrigerant charge
| EXECUTION ORDER | ||||||||
|
Heater If there is no air heating in the heater, then the reasons may be the following: either the thermostat does not close, as a result of which the liquid does not heat up enough and does not warm up the heater radiator well (in this case, replace the thermostat (see subsection 4.3 )), or the heater hose is clogged, which obstructs the flow of fluid through the radiator. In this case, flush the hose:
| EXECUTION ORDER | |||
|
If the fan rotation speed does not correspond to the switch position, then you need to check the fuses, wiring, switch, resistor block or electric motor (see subsection 3.3.14 ).
If air does not flow from the outlets of the air ducts, proceed as follows:
| EXECUTION ORDER | ||
|
If the carpet is wet or coolant vapor is leaking through the vents, there is a leak in the heater core. Replace the radiator (see subsection 4.5 ), since the heater radiator is usually not accepted for repair. Check that the heater/air conditioner drain hose, which is located on the right side on the partition of the engine compartment, is not clogged.
Source: https://AutoSovet.ru/library/manual/TOYOT/toyota-corolla/1440/17869/r16254