Replacing a Toyota Corolla wheel bearing
Replacing a Toyota Corolla wheel bearing
Every car sooner or later undergoes repair, even one as well made by a Japanese manufacturer as the Toyota Corolla.
Due to frequent off-road trips or simply poor-quality roads, there is a need, from time to time, to replace some parts in the car.
The worse the road, the faster the wear of suspension parts, stabilizer struts, even the steering and many other components of the car occurs.
When a Corolla car undergoes a scheduled wheel bearing replacement, this is a way to avoid accidents. And if you do not have the money or time to wait for this part to be repaired at a service center, you can replace the bearing yourself.
Miser pays twice
To avoid problems with your car, you don’t need to spare money on it; you should always buy only original parts, since their analogues do not correspond to reality.
Any non-original part will serve you 2 times less than the original, or even not fit at all.
This is where the saying “the miser pays twice” comes into play; it is easier to immediately purchase a part that suits your particular car model than to spend a long and painful time selecting similar ones, and then overpay due to their breakdowns.
How to independently determine which bearing is knocking
- If you cannot or do not want to go to a service center to diagnose the chassis, then you can check the performance of the wheel bearing yourself. To identify the noise of this element, you need to drive along a fence or wall, on the side of the machine that is in doubt about its performance.
If you have pinpointed the side where the bearing is knocking, the noise will become stronger and will produce an echo. If you are still in doubt, try driving past the fence on the other side of the car. If the machine operates quietly, we can conclude that you have absolutely accurately determined the direction of bearing wear.
- But there is another method, more effective. Since the first one does not always work, it is possible to determine where the bearing noise is coming from in another way. This method is a little longer, but more practical. First you need to find a flat area, put the car on the handbrake and remove the wheel that, in your opinion, is “stuttering”.
Now you need to disassemble the entire assembly, leaving only the hub intact. Then slowly turn the brake disc, you will hear single sounds, and the faster you turn the disc, the clearer and louder the sounds will be made.
When the car is moving, this sound manifests itself as a buzzing sound, and when you increase the speed, it produces an unpleasant whistle that you want to get rid of as quickly as possible. That's what we'll do now.
Unwinding and replacing the wheel bearing
To replace a faulty part, you must do the following:
- First, you need to put the car on the parking brake, after which we unscrew the bearing nut with a 32 or 36 wrench.
- You will need the help of a friend or any free person who will press the brake while you unscrew the nut using force.
- Then remove the wheel nuts and use a jack to lift the car. Unscrew the nuts completely and remove the wheel.
- Now, having removed the cotter pin, you need to unscrew another nut - the nut for the tie rod end.
- Next, unscrew the two nuts and two bolts under the hood that secure the hub, remove the strut with the spring.
- Remove the lower ball joint in the same way.
- Next, after disconnecting the brake hose, you need to remove the brake disc and secure the hub with a vice.
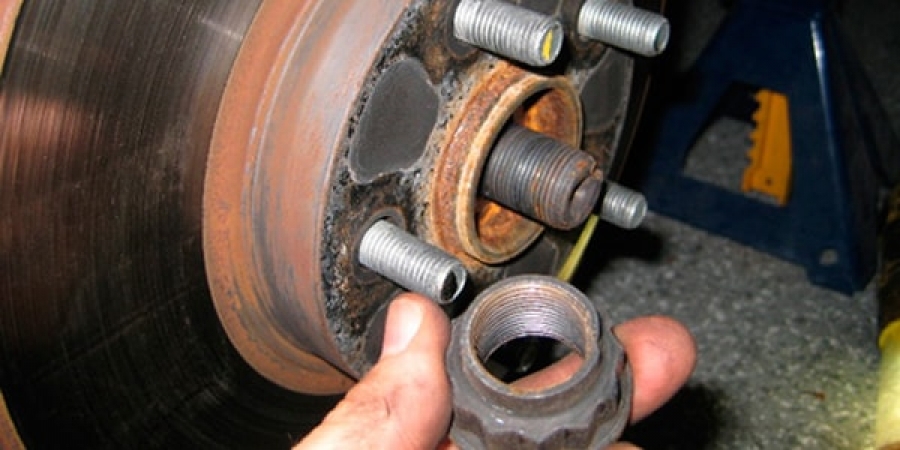
- The next step is to select a piece of small pipe equal to the diameter of the bearing, about 20-25 cm. Now remove the ax ring and press out the race of our bearing using pliers.
- After the work has been done, it’s time to move on to dismantling the worn bearing. One person should hold and guide a piece of pipe using a gas wrench, and the other should try to knock out the bearing with a sharp blow.
- Let's move on to installing the bearing. It is mounted into the hub and slowly pressed into place. Strike carefully to avoid bevels; strike in a circle.
- Once the bearing is in the hub, you need to install a retaining ring. If you did everything correctly, the ring will install quite easily.
- The last thing you need to do is reassemble the assembly in reverse order.
Read also
Source: http://grandrepairauto.ru/zamena-stupichnogo-podshipnika-toyota-corolla.html
Forum of auto repairmen Automaster himself
Masterclass – report on the work done with photographs. If you have something to share, go here.
Moderators: Brodin, Evgeny_Zh
solomon Messages: 128 Registered: 19 Feb 2011, 11:50
Post by solomon » 07 May 2011, 08:32
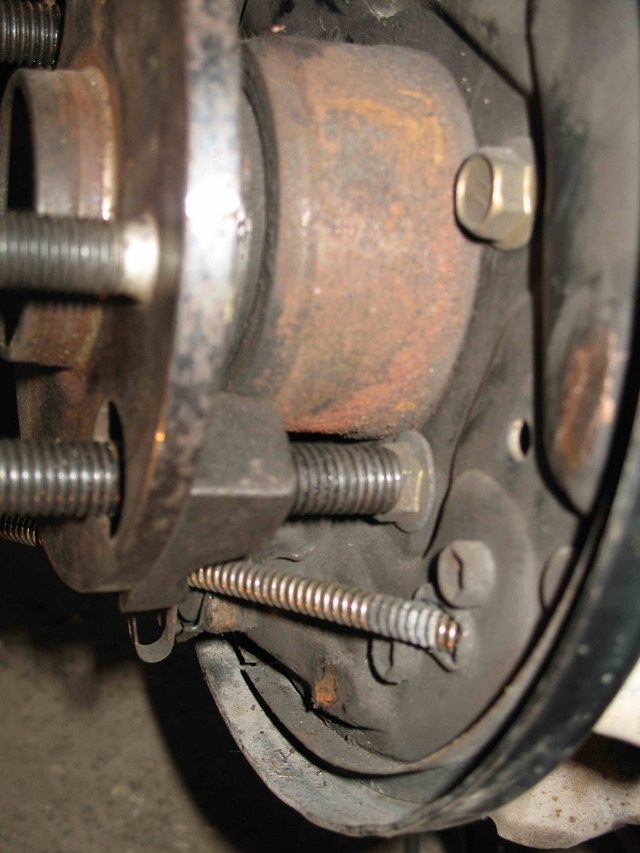
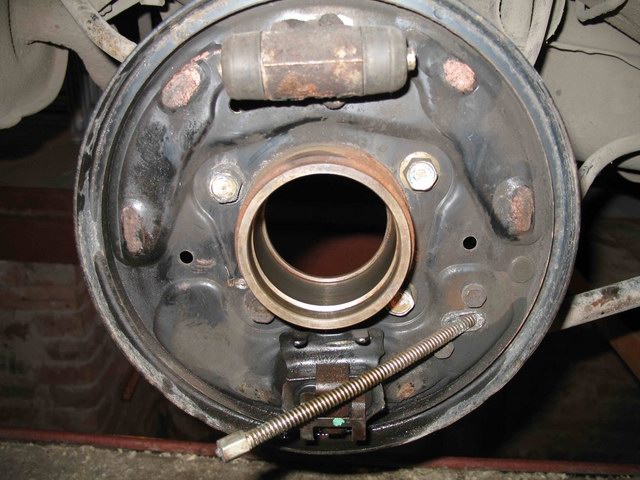
Hello, I’m writing for the first time, so if something goes wrong, don’t swear too much. Today I changed the rear wheel bearing on a Toyota, it doesn’t have ABS.
After the wheel and cap have been removed, we remove the cotter pin, lock nut and pressure washer, here in the photo everything has not yet been wiped clean of grease. We remove the brake drum, here it came off along with the hub, but this did not add any complexity. We remove the oil seals, take out the bearings, they are simply conical pulled out with your finger, wiped off the grease and we get this picture, there are outer races left inside. We knock the outer races out of the hub with a screwdriver and a hammer, it comes out easily, we knocked them out, wiped the seats and installed new outer races, before installing them I lubricated them with grease.
This is a hub with new races and new bearings and an oil seal. We fill the hub with new grease, there is room there, we put in a new bearing, a new oil seal. We assemble everything in the reverse order. We put the pressure washer, we tighten the hub nut, we put in a locking washer, a figured washer, we install a cotter pin.
This is what did you use; round nose pliers, maybe pliers, a Phillips screwdriver, maybe a simple one, a non-glamorous-looking hammer, a 30mm socket for the hub nut and a torque wrench. Before tightening the hub nut, I rotated the drum on the axle so that the bearings would fall into place, only after that I tightened the hub nut, here the tightening force is 29 nm, for this I used a torque wrench. Since the bearing is tapered, it is simply removed and put in place, along it NOT a single blow with a hammer was made. It took about 40 minutes to do everything, including removing the wheel and photographing, and they did it slowly. This was done in simple garage conditions, but with everything and everything washed off from the old lubricant, and the quality was no worse than at a service station, plus a certain amount of banknotes were saved.solomon Messages: 128 Registered: February 19, 2011, 11:50
Post by solomon » 07 May 2011, 09:03
Sorry, offset is normal. Or let's say as a joke it was marked well
Vadim Messages: 1696 Registered: May 25, 2009, 12:48 pm My car: VAZ 2106 for rent My Agent mail.ru: [email protected]
Post by Vadim » 07 May 2011, 09:22
write an article for the site! Pasha will give you some money! I'm not kidding.
Not the good master who does it well, but the one who smears beautifully!
solomon Messages: 128 Registered: 19 Feb 2011, 11:50
Post by solomon » 07 May 2011, 09:39
What's the joke? what article? And what the article is about, and what site, the questions may be stupid, but I’m new here, so please don’t make fun of me too much.
And so I’m ready to write, in case it helps someone PavelAdministrator Messages: 1988 Registered: 07 Dec 2008, 21:14 My car: Skoda Octavia Combi 4×4
Post by Pavel » 07 May 2011, 23:01
Good post solomon, well done, everything is clear.
solomon, just write which Toyota (model, year of manufacture) may be useful to someone. I'll add it to the title.
Giving advice to a fool only makes him angry.
Brodin Messages: 562 Registered: March 11, 2009, 08:04 My car: Renault Logan 1.4 SR 2006. LPG DIGITRONIC 3D Power Evolution
Post by Brodin » 08 May 2011, 08:44
The design is like that of most modern cars with rear drum brakes. The hub is made in a drum. I remembered both Renault Logan and Daewoo Matiz. Logan has only one double-row bearing.
Bakhchifontansky Saray...
solomon Messages: 128 Registered: 19 Feb 2011, 11:50
Post by solomon » 08 May 2011, 09:15
Source: http://www.sam-avtomaster.ru/viewtopic.php?t=2018
Toyota Corolla Wheel Bearing Replacement
Replacing the wheel bearing on a Toyota Kroll
From time to time there are moments when something starts to make noise or scrape in the wheels.
As a rule, if it is not brake pads or stones caught between the disc and pad, then it is a worn out wheel bearing that requires immediate replacement.
The noise can come from both the front and rear hubs, because their structure is almost identical to each other. This article will provide a step-by-step summary of how to replace bearing on a Toyota Corolla.
As we all know, the greedy person pays twice. This rule also applies to spare parts purchased for our car.
When replacing a bearing, it is best to choose an unusual spare part, because all others will become unusable quite quickly, and you will have to repeat the entire function again.
In addition, do not leave your safety and the safety of your loved ones in the background. After all, a stuck wheel can be a big failure at high speed, think about it, is it worth sparing a few hundred rubles for this?
So, having purchased a unique bearing, you can begin to replace it. This process is not very difficult, but it will take you several hours of time.
Replacing the front wheel bearing: step-by-step instructions
First, we need a garage; for repairs, it is best to use enclosed spaces, this will allow you not to worry about weather conditions during repairs. So let's get started. Having driven your Corolla into the garage, we approach it from the side from which you can hear the creaking and crunching noise when the wheel rotates.
Next we need to remove the plug that protects the hub nut from dirt and dust. As already mentioned, the bearing can be covered in both the front and rear hub. In our case, the bearing of the front right hub was covered. The following instructions are suitable for repairing other hubs - both rear or front left.
The view should be approximately the same as in the photo.
Next, we need to put the car in gear and tighten the handbrake all the way to prevent the wheels from turning while we unscrew the hub nut. We need a long head of 30. This can be seen in the photo below.
https://www.youtube.com/watch?v=2JP-5ZstZVQ
In order to unscrew our nut, we need a massive wrench, which will reduce your efforts and make it easier to tear off the nut. The photo shows the approximate length of the collar. You can adjust its length depending on the comfort and amount of strength in your muscles.
Having torn off the nut, remove the wheel and completely unscrew the hub nut, after which we immediately unscrew the two caliper mounting bolts.
After the caliper mounting bolts have been unscrewed, we need to remove the caliper itself, this is very easy to do. The photo shows what should happen.
Replacing the front wheel bearing of Toyota Corolla
A typical situation for our roads: the front wheel bearing . We replaced it with a Toyota Coroll...
Replacing a Toyota Corolla wheel bearing
We change the bearing ourselves.
Next we need to remove the brake pads and put them aside. By the way, you can also check the wear of the brake pads. On our car they turned out to be quite good. This can be seen in the photo.
Next, using a 17 key, we need to unscrew the two bolts securing the caliper bracket. This is not difficult to do, but you need to select a wrench in order to get to the bolts.
After unscrewing the two bolts, remove the bracket. After this, our workplace is freed up and we get access to the brake disc. The photograph shows everything clearly and clearly.
Next, you need to remove the brake disc; in our Corolla model it is not attached, so we simply remove it.
Next, you need to remove the ABS system sensor, of course, if such a system is available. We will need a 10mm wrench with which we will carefully unscrew the sensor mount; as a rule, they burn strongly and can be rolled up very easily.
Next we need to disconnect the steering rods. To do this we need to: pull out the pin that holds the nut, unscrew the nut itself. In order to break the steering nut, you need a lever and sudden movements, jerky movements. Unscrew the nut and disconnect the rod. Everything is clearly visible in the photographs.
After the rod has been removed, we begin to disconnect the ball joint from the lever. The fastening of these two units consists of two nuts and one bolt.
Next, we need to free the axle from the steering rod and lever. Having done this, the ball joint should remain on the hub. Photography will help you understand better what's what.
After this, we need to unscrew the two adjusting bolts (alignment) from the strut, after which we can easily remove the hub assembly from the drive, since nothing else holds it. The photos below will help you understand better.
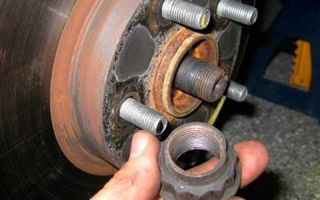
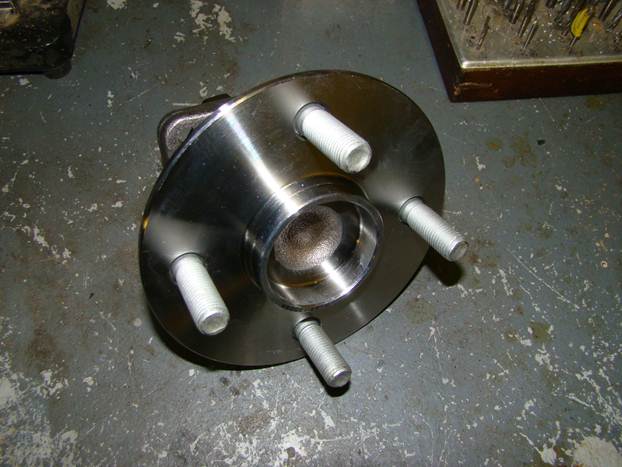
This completes all procedures for disassembling the car. Now we take our front hub, turn it over and place it on a flat surface. Our task is to pull out the retaining ring from the hub, which prevents the bearing from flying out of its place.
Next, we just have to pull out the old bearing, prepare the hub for the new bearing and insert the new bearing into its place.
In principle, this completes the procedure for replacing the bearing in the front hub. All we have to do is put everything in its place and tighten everything well. Do not forget about the pin, which should fix the rod, as well as the ring that holds the bearing.
Take the procedure for collecting your car with complete seriousness, as you will continue to drive it. If you need to replace bearings in the rear hub or on the other side of the car, don't worry.
We just need to carry out this whole procedure again, but only with the hub that is sick.
Source: http://autoruservis.ru/zamena-stupichnogo-podshipnika-tojota-korolla/
Toyota Corolla E150, Auris. REMOVAL AND INSTALLATION OF FRONT SUSPENSION HUB AND STEERING KNAKE
You will need: all the tools necessary to remove the front wheel caliper and brake disc (see “Replacing the front wheel brake disc”), as well as an impact screwdriver, two 22mm wrenches, a 32mm socket, pliers, ball joint remover.
1. Brake the vehicle with the parking brake and install wheel chocks (“chocks”) under the rear wheels.
1
2. Hammer and impact screwdriver...
2
3. ...unlock the nut and loosen the front wheel hub nut.
3
4. Raise and place the front of the vehicle on supports. Remove the wheel.
4
5. Disconnect the wheel speed sensor from the steering knuckle (see “Replacing Wheel Speed Sensors”).
5
6. Disconnect the tie rod end from the steering knuckle (see “Replacing the outer tie rod end”).
6
7. Disconnect the front suspension arm with the ball joint from the steering knuckle (see “Replacing the ball joint of the front suspension arm”).
7
8. Unscrew the front wheel hub nut.
8
9. Carefully, without damaging the threads, knock out the shank of the outer constant velocity joint from the front wheel hub using a drift or a suitable size wooden block.
9
10. Remove the shank from the hub and secure the constant velocity joint (for example, by tying it with wire).
10
11. Remove the brake caliper without disconnecting the brake hose from it (see “Replacing the front wheel brake caliper”) and tie it, for example, to the front suspension spring, avoiding tension or kinks in the hose.
11
12. Remove the brake disc (see “Replacing the front wheel brake disc”).
12
13. Unscrew the two nuts of the mounting bolts and disconnect the shock absorber strut from the steering knuckle (see “Removing and installing the front suspension shock absorber strut”).
13
14. Remove the hub assembly with the steering knuckle.
14
15. Unscrew the four bolts, remove the steering knuckle and the mudguard.
16. If it is necessary to replace the wheel bearing, replace the front suspension hub assembly.
17. Install the hub and steering knuckle in the reverse order of removal.
18. Check and, if necessary, adjust the wheel alignment angles in a workshop with special equipment.
Source: http://sinref.ru/avtomobili/Toyota/008_Toyota_Corolla_Auris_2007_2011_remont_bez_problem/144.htm
Replacement – Left front axle hub sub-assembly – Toyota Corolla Repair Manual (Toyota Corolla)
ADVICE:
Replace the right side in the same way as the left:
1. REMOVE FRONT WHEEL 2. REMOVE LEFT FRONT AXLE HUB
(a) Using SST and a hammer, unlock the locked part of the lock nut.
SST—09930—00010
(b) While holding the brake depressed, remove the lock nut.
3. DISCONNECT FRONT LEFT SPEED SENSOR
(a) Remove the bolt, speed sensor wire and flexible hose from the shock absorber.
(b) Remove the bolt and disconnect the speed sensor from the steering knuckle.
4. DISCONNECT THE LEFT FRONT DISC BRAKE CALIPER ASSEMBLY
(a) Remove the 2 bolts and disconnect the brake caliper from the drive shaft
5. REMOVE FRONT DISC 6. DISCONNECT LEFT TIE ROD END SUB ASSEMBLY
(a) Remove the cotter pin and nut.
(b) Using SST, disconnect the tie rod end from the steering knuckle.
SST 09628—62011
7. DISCONNECT LOWER LEFT SUB-ASSEMBLY NO. 1 OF THE FRONT SUSPENSION ARM
(a) Remove the bolt and 2 nuts and disconnect the lower control arm from the lower ball joint
8. REMOVE LEFT FRONT AXLE ASSEMBLY
(a) Using a plastic hammer, separate the drive shaft from the axle hub.
COMMENT:
Be careful not to damage the ABS speed sensor cover or rotor in any way:
(b) Remove the 2 bolts, nuts and steering knuckle with hub bearing.
9. REMOVE FRONT LEFT LOWER BALL JOINT ASSEMBLY
(a) Remove the cotter pin and nut.
(b) Using SST, remove the ball joint
SST 09628—62011
10. REMOVE FRONT AXLE LEFT HUB SLOTTEN RING
(a) Using circlip pliers, remove the circlip.
11. REMOVE LEFT FRONT AXLE SUB ASSEMBLY
(a) Using SST, remove the axle hub
SST 09520—00031
(b) Using SST, remove the inner ball bearing race (outside) from the axle hub.
SST 09950—40011 (09951-04020, 09952—04010, 09953—04030, 09954—04010, 09955—04061, 09957—04010, 09958—04010), 09950—60010 (09951— 00370)
12. REMOVE FRONT LEFT BRAKE DUST COVER DISC.
(a) Remove the 3 bolts and brake dust cover.
13. REMOVE FRONT AXLE LEFT HUB BEARING
(a) Install the inner race of the ball bearing (from the outside) onto the bearing.
(b) Using SST and a press, remove the bearing from the steering knuckle.
SST 09527—17011, 09950—60010 (09951—00640), 09950—70010 (09951—07100)
14. INSTALL FRONT AXLE LEFT HUB BEARING
(a) Using SST and a press, install the new bearing onto the steering knuckle.
09950-60020 (09951—00720), 09950—70010 (09951—07100)
15. INSTALL FRONT LEFT DUST COVER DISC BRAKE COVER
(a) Install the disc cover with 3 bolts.
16. INSTALL LEFT FRONT AXLE HUB UNIT
(a) Using SST and a press, install the axle hub.
SST 09608—32010, 09950—60010 (09951—00600), 09950—70010 (09951—07100)
17. INSTALL THE LEFT SLOTED RETAINING RING OF THE FRONT AXLE HUB
(a) Using circlip pliers, install the circlip.
18. INSTALL LEFT FRONT LOWER BALL JOINT ASSEMBLY
(a) Install the lower ball joint and tighten the nut.
Torque: 103 Nm (1050 kgfcm, 76 lbf)
(b) Insert a new cotter pin and tighten the nut to 60°.
19. INSTALL FRONT AXLE LEFT ASSEMBLY
(a) Install the 2 bolts, nuts and axle assembly to the shock absorber.
Torque: 153 Nm (1560 kgf cm, 113 lbf)
COMMENT:
Lubricate the threads of the nuts with engine oil only when reusing them:
(b) Push the front axle assembly away from the vehicle, align the spline portion of the drive shaft assembly with the spline portion of the front axle assembly, and insert the drive shaft assembly into the front axle assembly.
COMMENT:
• * Do not push the front axle assembly with excessive force. • * Be careful not to damage the drive shaft outer joint boot • * Be careful not to damage the speed sensor rotor. 20. INSTALL LOWER LEFT SUB-ASSEMBLY #1 OF FRONT SUSPENSION ARM
(a) Install the front suspension arm and lower ball joint with 2 nuts and a bolt.
Torque: 142 N·m (1448 kgf·cm, 105 lbf)
21. INSTALL LEFT TIE ROD END SUB-ASSEMBLY
(a) Install the tie rod end to the steering knuckle.
(b) Install the nut and insert a new cotter pin.
Torque: 49 N·m (500 kgf·cm, 36 lbf)
22. INSTALL FRONT DISC 23. INSTALL LEFT FRONT DISC BRAKE CALIPER ASSEMBLY
(a) Install the brake caliper assembly with 2 bolts to the steering knuckle.
Torque: 107 N·m (1090 kgf·cm, 79 lbf)
24. INSTALL FRONT AXLE LEFT HUB NUT
(a) Using a 30mm socket wrench, install the new hub nut.
25. DISCONNECT LEFT FRONT DISC BRAKE CALIPER ASSEMBLY 26. REMOVE FRONT DISC 27. CHECK BEARING CLEARANCE
(a) Using a dial indicator, check the clearance at the center of the axle hub.
Maximum value: 0.05 mm (0.0020 in.) If the clearance exceeds this maximum value, replace the bearing.:
28. CHECK AXLE HUB DEFLECTION
(a) Using a dial indicator, check the deflection of the axle hub surface beyond the bolt hub.
Maximum value: 0.05 mm (0.0020 in.) If the deviation exceeds this maximum value, replace the bearing.:
29. INSTALL FRONT DISC 30. INSTALL LEFT FRONT DISC BRAKE CALIPER ASSEMBLY
(a) Install the brake caliper assembly with 2 bolts to the steering knuckle.
Torque: 107 N·m (1090 kgf·cm, 79 lbf)
31. INSTALL FRONT SPEED SENSOR
(a) Install the speed sensor onto the shock absorber using the bolt.
Torque: TMUK production: 19 N·m (192 kgf·cm, 14 lbf) TMC production: 29 N·m (296 kgf·cm, 21 lbf)
(b) Install the speed sensor onto the steering knuckle using a bolt.
Torque: 8.0 Nm (82 kgfcm, 71 lbf)
COMMENT:
• * Be careful not to damage the speed sensor. • * Make sure that foreign objects do not stick. • * When installing the sensor, do not bend the sensor wire 32. INSTALL THE FRONT AXLE LEFT HUB NUT
(a) While holding the brake depressed, install a new lock nut.
Torque: 216 Nm (2200 kgfcm, 159 lbf)
(b) Using a hammer and chisel, secure the left axle hub nut
33. INSTALL FRONT WHEEL Torque: 103 N·m (1050 kgf·cm, 76 lbf)
34. CHECK AND ADJUST FRONT WHEEL INSTALLATION (see p. 26—2) 35. CHECK ABS SPEED SENSOR SIGNAL (see pp. 05—561 or 05—614 or 05—666)
Source: http://toyota-omg.ru/30_veduschiy_val/leviy_poduzel_stupitsi_peredney_osi/zamena.html
Replacing the wheel bearing Toyota Corolla 2007 - 2010

Method one:
If you do not have the opportunity to diagnose the chassis at a service center, then you can determine the malfunction in a garage or home environment.
How will it look like? You can detect noise or whistling noise from a wheel bearing by driving along a fence or wall on the side of the car that you suspect. And, as a rule, if the bearing is humming from this side, the noise will be reflected from the wall, fence and will be clearly audible.
For comparison, you can drive the other side of the car, and if you do not detect any extraneous noise, draw a conclusion and begin repairs.
Method two:
But this method does not always help. It can be very difficult to identify bearing noise. To know for sure the cause of the breakdown, you need to do the following: place the car on a level surface, put on the handbrake, remove the “suspect wheel”.
Then completely disassemble the entire assembly, that is, remove the caliper, drive, lever, leaving only the hub. By turning the brake disc very slowly at first, you should hear a single click. The faster you turn, the more often you will hear extraneous sounds.
Now imagine when the car is moving along the highway, this sound first appears as a buzzing sound, then with increasing speed it turns into an unpleasant whistle.
And so, replacing the wheel bearing of Toyota Corolla 2007 - 2010 will be successful if you have made the diagnosis using the second method for determining the malfunction.
We proceed directly to replacing the faulty part. For more successful work you will need an assistant. You need to place the car on a viewing hole (not many private garages have a lift), fix it (handbrake, wheel chocks), remove the wheel.
Then one person sits behind the wheel and presses the brake, and the other, having previously loosened the drive shaft nut, jerks it off. Unscrew the nut and move it to the side. To facilitate the bearing replacement procedure, we dismantle the caliper with brake pads. It is attached to the trunnion with two 17mm bolts.
Do not forget to unscrew the fastening of the brake hoses and ABC wires from the rack, otherwise they may be damaged during further disassembly. We unscrew the three 14mm nuts on the top cup of the strut, located in the engine compartment, and two 19mm bolts securing the strut to the axle. We remove it and put it aside.
Next, unscrew the nut on the lower ball joint and use a puller to remove the hub.
In almost all cars, the principle of replacing components and assemblies is the same, the only difference is in some design features of a particular model, so replacing a wheel bearing for a Toyota Corolla 2007 - 2010 will not be much different, for example, from replacing a bearing on a Nissan.
You will need a mandrel that is equal in size to or slightly smaller than the outer diameter of the bearing. Secure the hub on a hard surface. Then install the mandrel on the bearing, and with a sharp blow, move the cage from its place. After this, carefully knock out the old bearing.
Install the new bearing into the seat and press it into the hub using an aluminum or copper spacer. Assembly is carried out in reverse order.
This method of replacing a wheel bearing is used in a garage with your own hands, without the help of a car service.
Sergey Demin specially for the Avtoliteratura website
Source: http://myautobook.ru/publ/toyota_remont/toyota_corolla_2007_2010g/zamena_podshipnika_stupicy_toyota_corolla_2007_2010/8-1-0-22
Replacing a wheel bearing in a Toyota Corolla
The wheel bearing is not a part that can be repaired. If it fails, which happens extremely rarely, the manufacturer provides for replacing it. The hub of Toyota Corolla 120 and 150 is collapsible. This means that, if necessary, you can replace a failed bearing with a new one.
Replacing a Toyota Corolla wheel bearing requires dismantling the main chassis unit - the hub. This important car part performs several functions:
- holds the wheel securely;
- allows it to rotate and turn;
- rotational motion is transmitted to the wheel through the bearing.
The hub body is monolithic and made of heavy-duty material. This approach ensures high reliability and long service life.
In order to change the wheel bearing in a Toyota Corolla, you will need a special tool - a puller, a hydraulic press. It's a good idea to have a torque wrench on hand.
With its help, it is easy to tighten all bolts and nuts to the torque recommended by the manufacturer.
Replacement procedure
You can also make a replacement using a primitive tool - a sledgehammer, special attachments, a bench vice. In this case, the likelihood of damaging the new part, as well as the hub, is very high. Therefore, before you start replacing the wheel bearing of a Toyota Corolla 120 or 150, objectively evaluate your capabilities.
Before jacking up the front of the car, you need to remove the central hub nut. To do this, use a 30mm deep socket and think about a reliable lever. When unscrewing, you can ask an assistant to press the brake and engage 1st gear.
In order to unscrew the nut you will need to apply a decent amount of force. After this, you can place the car on the inspection hole and jack up the side where the repairs are supposed to be made. But experts recommend performing operations on a lifting device.
- Remove the two bolts holding the caliper.
- Remove the brake pads.
- Secure the caliper so that it does not hang on the brake hoses.
- Remove the bracket holding the caliper. To do this, unscrew the two bolts with a 17mm wrench.
- Remove the brake disc.
- Carefully remove the ABC sensor.
- Unscrew the tie rod end nut, remembering to remove the locking pin first.
- Remove the ball joint by unscrewing two nuts and one bolt.
- Remove the two bolts connecting the hub and shock absorber.
- Dismantle the part by removing it from the splines of the drive shaft.
The wheel bearing is fixed in the hub by a retaining ring, which must be removed.
Installation Features
To replace a failed Toyota Corolla 150 wheel bearing, use an attachment and a hydraulic press. In this case, the risks associated with damage to the seat will be minimal. Using this device, press in the new bearing. Do not forget to first clean the seat from dirt and rust, if any.
https://www.youtube.com/watch?v=xQZLH2gDT7Q
In rare cases, both bearings fail at the same time. Usually the right side is affected first. This is explained by the fact that it is more susceptible to roadside unevenness. It is better to change all paired parts at the same time. When purchasing, give preference to original spare parts over licensed ones. The price difference is not comparable to Japanese quality.
If the material was interesting or useful for you, publish it on your social network page:
Source: http://jrepair.ru/remont-toyota/zamena-podshipnika-stupitsy-v-toyota-corolla
Replacing a Toyota Corolla wheel bearing
Every car enthusiast knows that sooner or later his car may break down. The reasons are different. For example, if the car begins to make different sounds, similar to noise or grinding, then it may be a problem with the brake pads.
Or rather, in the stones that ended up between the discs and the pad. As for a car like a Toyota Corolla, most likely you will need to replace the wheel bearing. The question is, front or rear.
Or maybe both at once.
There is no need to neglect the replacement process, as this can lead to more serious consequences and breakdown.
Replacement features
The Toyota Corolla is quite easy to assemble, so a procedure such as replacing a wheel bearing can be carried out independently without resorting to an expensive tire shop.
You will need a new bearing of the original type and a special head. It will be needed at the moment when you unscrew the hub bearing. Also prepare the spark plug head in advance.
As for the original bearing, difficulties may arise here. The fact is that if you purchase a non-original bearing, the replacement may be performed poorly. You can buy original bearings only in the official Toyota store.
Replacement process steps
First of all, we need to put the car in the garage with the handbrake and place the car in some gear, preferably second. Only after this can you directly begin the process of replacing the hub. Replacing a wheel bearing will go much better if two people are involved in the procedure:
- Next, depending on which direction: front or rear you need to replace, you must put the car on a jack and then unscrew the wheel.
- After all the above steps have been completed, proceed to removing the caliper. You will need a 17mm wrench. It can be used to remove both caliper bracket mounting bolts. It is worth warning in advance that this procedure is quite difficult to carry out alone, since getting to the bolts is quite difficult.
- After you have managed to unscrew the two bolts, carefully and carefully remove the caliper and set it aside. The brake pads should also be removed and set aside for a while. Toyota Corolla has good pads that can not wear out for many years, which is a definite plus. You will notice how much space is freed up for future work. Replacement of the wheel bearing will proceed more easily at this stage. In addition, the path to the brake discs will be open.
- Replacing a wheel bearing cannot be done without a puller. With its help, the ball joint is pressed out.
- Then simply remove the brake disc. It may not come off right away; to do this, you need to lubricate everything with WD-40, and then loosen it by knocking on it.
- Then you need to disconnect the steering rods. Toyota Corolla has cotter pins that are quite easy to remove, but at the same time they hold very securely. We need to get them out.
- You also need to unscrew all the hub fastening bolts at the top and bottom.
- Once the rods are removed, remove the retaining ring and knock out the hub.
- And then knock out the bearing. Clean the car from dirt and install a new bearing.
After all the operations performed, we install all the parts in the same way as they were removed.
The entire replacement process on video:
As you can see, replacing a wheel bearing is not such a complicated procedure on a Toyota Corolla car, which every car enthusiast can do.
Replacing the wheel bearing on a Toyota Corolla Link to main publication
Source: http://CorollaCar.ru/remont/xodovaya-chast/zamena-podshipnika-stupicy.html
Toyota Corolla Forum
Toyota Corolla transmission problems, repairs and spare parts
SergeyModerator Messages: 3873 Registered: 07 Jan 2013, 14:33 Car: RAV-4 2l, 158 hp. 3ZR-FAE, 6 manual transmission, 4WD, 18.08.
2011 Location: Novokuznetsk Thanked: 1 time Thanked: 5 times
#1
Post by Sergey » 10 Jan 2013, 14:19
REMOVE THE FRONT WHEEL DISCONNECT THE FRONT FLEXIBLE HOSE Unscrew the bolt and disconnect the front flexible hose DISCONNECT THE FRONT DISC BRAKE CALIPER ASSEMBLY (for models with engines of the ZR, 4ZZ-FE series manufactured by TMC)1. Remove the 2 bolts and separate the front disc brake caliper assembly from the steering knuckle.
NOTE: The brake caliper should not hang on the flexible hose, so it should be secured with a wire or some similar device. DISCONNECT THE FRONT DISC CALIPER ASSEMBLY (except for models with TMC ZR, 4ZZ-FE series engines) Remove the 2 bolts and separate front disc brake caliper assembly from the steering knuckle.
NOTE: The brake caliper should not be hanging from the flexible hose and should be secured with a wire or similar device. REMOVE THE FRONT BRAKE DISC (for models with a ZR, 4ZZ-FE series engine manufactured by TMC) Remove the front disc.
HINT: Apply assembly marks to the disc and wheel hub. REMOVE FRONT BRAKE DISC (except for models with TMC ZR, 4ZZ-FE series engines) Remove the front disc. HINT: Apply assembly marks to the disc and wheel hub.
CHECK FRONT WHEEL HUB BEARING PLAYUsing a dial gauge, check for play near the center of the front wheel hub assembly. Maximum value: 0.05 mm (0.0020 in.) NOTE: The dial gauge should be mounted at right angles to the surface being measured. .
HINT: If the play exceeds the maximum value, replace the front wheel hub assembly. CHECK FRONT WHEEL HUB RUN-OUT Using a dial indicator, measure the runout on the surface of the front wheel hub assembly on the outside of the wheel-to-hub bolt. Maximum value:
0.05 mm (0.0020 in)
Last edited by Sergey 10 Jan 2013, 2:22 pm, edited 1 time in total. SergeyModerator Messages: 3873 Registered: 07 Jan 2013, 2:33 pm Car: RAV-4 2l, 158 hp 3ZR-FAE, 6 manual transmission, 4WD, 18.08.
2011 Location: Novokuznetsk Thanked: 1 time Thanked: 5 times
#2
Post by Sergey » 10 Jan 2013, 14:20
NOTE: The dial indicator must be mounted at right angles to the surface being measured. HINT: If runout exceeds the maximum value, replace the front wheel hub assembly.
INSTALL FRONT BRAKE DISC (for models with ZR series engine, 4ZZ-FE manufactured by TMC) Align the assembly marks on the disc and wheel hub and install the disc. NOTE: When replacing the disc with a new one, select the installation position in which the front disc has minimal runout.
INSTALL THE FRONT BRAKE DISC (except for models with TMC ZR, 4ZZ-FE series engines) Remove the front disc. NOTE: Apply assembly marks to the disc and wheel hub.
INSTALL FRONT DISC BRAKE CALIPER ASSEMBLY (for models with ZR, 4ZZ-FE series engines manufactured by TMC) Attach the front disc brake caliper assembly with two bolts to the steering knuckle.
Torque: 107 N*m { 1089 kgf*cm , 79 lbf-ft }INSTALL FRONT DISC BRAKE CALIPER ASSEMBLY (except models with TMC ZR, 4ZZ-FE series engines) Attach the front disc brake caliper assembly with two bolts to the steering knuckle.Torque: 107 N*m { 1089 kgf*cm, 79 lbf-ft} INSTALL FRONT FLEXIBLE HOSEConnect the front flexible hose to the steering knuckle and secure it with a bolt.Torque: 29 N*m{ 296 kgf *cm, 21 ft-lb } INSTALL FRONT WHEELTorque:
103 N*m{ 1050 kgf*cm, 76 lbf-ft}
Andrey_ka37 Honorary Toyota Driver Messages: 559 Registered: 08 Jan 2013, 14:29 Car: Rav4 2016, 6 manual transmission. Location: Ivanovo region Thanked: 6 times Thanked: 4 times
#3
Post by Andrey_ka37 » 12 Jan 2013, 17:17
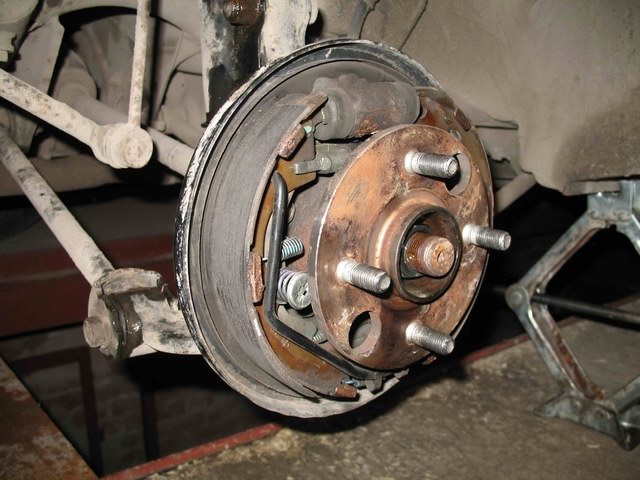
In general, they changed the bearing for me, everything is fine)) Now there is complete silence. Everything took about 40 minutes with a smoke break. As promised, I am posting photos, not a lot of truth, but everything was done quickly, and there was nothing special to photograph. Attachments: Comment to file: KOYO bearingComment to file: BoxComment to file: Hub nut
The replacement process itself.
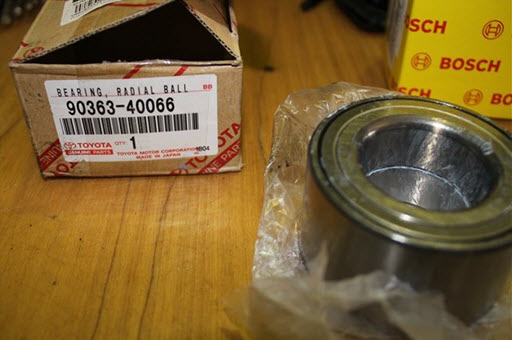
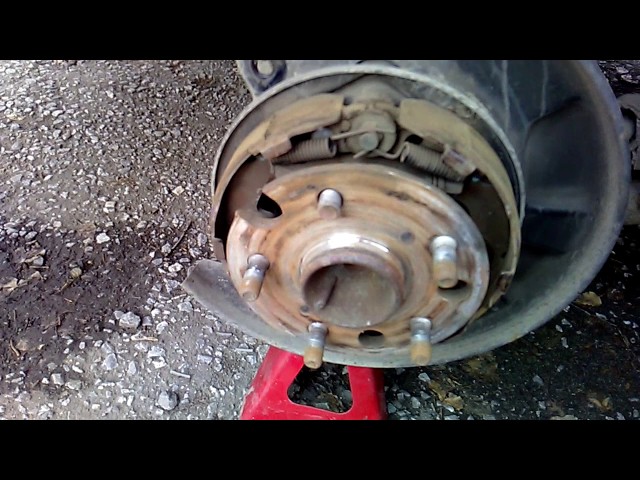
Comment to the file: We unscrew the nut until the wheel is removed, it is screwed tightly. Comment to the file: The bolts circled in green secure the caliper - we unscrew them first, those circled in red - the hub itself with the bearing, we unscrew them after. Comment to the file: We hang the caliper on a wire so as not to load the hose. Remove the brake disc.
File comment: Here is a patient. We take a sledgehammer and methodically hammer along the edge. It doesn’t climb well, they spent about 5 minutes pouring it with VeDashka. The drive came out of the bearing splines quite easily, and to prevent it from falling out of the box when knocked out, the large nut that is in the photo is unscrewed. I forgot to insert another photo - here it is.
Red arrows indicate where the bearing housing adheres to the axle. The axle itself is cast iron, and the hub is steel. Comment on the file: We install a new one, assemble it in the reverse order. Comment on the file: These are the bolts that secure the hub with the bearing. 1. Wheel bearing - 6600 rubles.2. Nut - 70 rubles.3. Replacement - 600 rubles. Total: 7270 rubles.
OD wanted 18,000 rubles from me.
Last edited by Andrey_ka37 on Sep 29, 2015, 11:48 am, edited 1 time in total. Vodka is soft, juice is good, cigarette is light. So why is the morning so bad?…
SergeyModerator Messages: 3873 Registered: 07 Jan 2013, 14:33 Car: RAV-4 2l, 158 hp. 3ZR-FAE, 6 manual transmission, 4WD, 18.08.
2011 Location: Novokuznetsk Thanked: 1 time Thanked: 5 times
#4
Post by Sergey » 12 Jan 2013, 17:17
Source: http://tc-club.ru/viewtopic.php?t=47