How to connect an amplifier in a car - tips, diagram, video
Many car owners without technical education do not know how to connect an amplifier to a car radio - for them it seems like too much of a time-consuming task. In fact, you shouldn’t rush to contact a car service center, because...
Installing a car amplifier is not that difficult. Maintenance by specialists will be expensive, so in order to save money, it is worth trying to understand the connection procedure, which this article will help with.
For high-quality operation of the amplifier you need:
- Give him good food;
- Make sure there is a signal from the car radio;
- Connect speakers or subwoofer.
More details on how to connect the amplifier can be found below.
Good nutrition is the key to success
The amplifier connection procedure begins with the power wires. Wiring is the most important element of a car audio system; the volume and sound quality depend on it. Amplifiers need a stable power supply, otherwise the power will not be enough and the sound will become distorted.
To understand why you need to pay attention to the quality of wiring and how it affects the sound reproduced by a loudspeaker, you need to know what a music signal is.
Some suggest that it represents a sine wave, however, the musical sinhala is characterized by a large difference between the normal and peak value. If sharp signal bursts are not important for car speakers, then in the case of an amplifier the situation is completely different.
If the signal exceeds the permissible power for even a second (or even a millisecond), then these “anomalies” will be audible even to those who cannot boast of a good ear for music.
If the car amplifier is connected properly, the signal will flow through the wires undistorted. Carelessly done work or incorrectly selected wire cross-section will result in the sound being more compressed, rough and sluggish. In some cases, wheezing may also be clearly audible.
How to choose a wire cross-section?
Wire is the most common metal with a certain level of resistance. The thicker the wire, the lower the resistance of the wire. To avoid sound distortion during large voltage fluctuations (for example, when playing powerful bass), you must install the correct gauge wire.
An amplifier is considered to be a rather electrically intensive device.
For its effective operation, high-quality grounding is necessary so that it is possible to receive the necessary energy from the battery. To choose the correct wire cross-section, you need to make some calculations.
First, look at the instructions for the amplifier (or directly at the box from the manufacturer, if there is no documentation, use the Internet) and find the rated power value (RMS) there. Rated power is the signal power an amplifier can deliver over an extended period of time to one channel of 4 ohms.
If we consider four-channel amplifiers, they usually have a power of 40 to 150 watts per channel. Let's say that the amplifier you purchased produces 80 watts of power. As a result of simple mathematical operations, we find out that the total power of the amplifier is 320 W. Those.
How did we calculate this? It’s very simple to multiply the rated power by the number of channels. If we have a two-channel amplifier with a rated power (RMS) of 60 W, then the total will be 120 W.
After you calculate the power, it is advisable to also determine the length of the wire from the battery to your amplifier and you can safely use the table to select the required wire cross-section. How to use the table? On the left side the power of your amplifier is indicated, on the right you select the length of the wire, go up and find out what cross-section you need.
The table shows the cross-sections of copper wires, remember that a large number of sold wires are made of aluminum coated with copper, these wires are not durable and have more resistance, we recommend using current copper wires.
Fuse selection
In order to secure the connection of the car amplifier, it is necessary to protect the power supply from the battery to the amplifier using a fuse. Fuses should be placed as close to the battery as possible. It is important to distinguish between a fuse that protects the device itself (whether it is an amplifier or a radio) and a fuse installed on the power wire.
The latter is needed in order to protect the cable itself, since a considerable current flows through it.
Make sure that the fuse ratings match, since if the wiring fuse rating is too large, the wire may burn out as a result of a short circuit.
If the rating, on the contrary, is less, then the fuse can easily burn out at the time of peak loads and then there will be no other choice but to buy a new one. The table below shows the wire cross-section and the required fuse rating.
We connect the interconnect wires and the manager (REM)
To lay the cable, you need to find the linear output on the radio. The linear output can be recognized by the characteristic “bells” that are located on the rear panel of the radio. The number of linear outputs differs in different radio models. Usually there are from one to three pairs.
Basically they are distributed as follows: 1 pair - you can connect a subwoofer or 2 speakers (labeled as SWF) If there are 2 pairs of them, you can connect 4 speakers or a subwoofer and 2 speakers (outputs are labeled F and SW), and when there are 3 pairs of linear wires on the radio, you can connect 4 speakers and a subwoofer (F, R, SW) F This is Front i.e.
front speakers, R Read rear speakers, and SW Sabwoorer, I think everyone understands that.
The connection will require an interconnect wire, which should never be skimped on. It is prohibited to lay the interconnect cable near the power wires, as various types of noise will be heard when the engine is running. You can run the wires both under the floor mats and under the ceiling.
The latter option is especially relevant for modern cars, in the interior of which there are electronic accessories that create interference.
You also need to connect the control wire (REM).
As a rule, it comes with interblock wires, but it happens that it is not there, purchase it separately; it does not need to be of a large cross-section - 1 mm2 is quite enough. This wire serves as a control for turning on the amplifier, i.e. when you turn off the radio, it automatically turns on your amplifier or subwoofer.
As a rule, this wire on the radio is blue with a white stripe; if it is not there, use a blue wire. It is connected to the amplifier to a terminal called REM.
Amplifier connection diagram
Connecting a two-channel and four-channel amplifier
We have combined this section because these amplifiers have a very similar connection diagram, one might even say more simply, a four-channel amplifier is two two-channel ones.
We will not consider connecting a two-channel amplifier, but if you figure out how to connect a four-channel amplifier, then you will not have any problems connecting a two-channel amplifier. Most car enthusiasts choose this option for their installations, because...
You can connect 4 speakers to this amplifier, or 2 speakers and a subwoofer. Let's look at connecting a four-channel amplifier using the first and second options.
Connecting a 4-channel amplifier to a battery is recommended using a thick cable. How to choose the right power wires and connect the interconnects, we discussed all this above.
Amplifier connections are usually indicated in the manufacturer's instructions. When an amplifier is connected to an acoustic system, it operates in stereo mode; in this mode, this type of amplifier can operate under a load of 4 to 2 ohms.
Below is a diagram of connecting a four-channel amplifier to speakers.
Now let's look at the second option, when speakers and a subwoofer are connected to a four-channel amplifier.
In this case, the amplifier operates in mono mode, it takes voltage from two channels at once, so try to select a subwoofer with a resistance of 4 ohms, this will save the amplifier from overheating and going into protection.
Connecting a subwoofer will not be a problem; as a rule, the manufacturer indicates on the amplifier where to get the plus to connect the subwoofer, and where to get the minus. Take a look at the diagram of how to bridge a 4-channel amplifier.
Connecting a monoblock (Single channel amplifier)
Single-channel amplifiers are used for only one purpose - connecting to a subwoofer. A notable characteristic of amplifiers of this type is increased power. Monoblocks are also capable of operating with resistances below 4 ohms, which is called a low-impedance load. Monoblocks are classified as class D amplifiers, and they have a special filter for cutting frequencies.
Installing a single-channel amplifier will not require much effort, since its connection diagrams are very simple. There are only two outputs - “plus” and “minus”, and if the speaker has only one coil, then you just need to connect it to it.
If we are talking about connecting two speakers, then they can be connected either in parallel or in series.
Of course, you don’t have to limit yourself to just two speakers, but before you connect the amplifier and subwoofer to the radio, will the latter cope with a high level of resistance?
Video on how to properly connect a four-channel and single-channel amplifier
Source: https://CarAudioInfo.ru/usiliteli/kak-podklyuchit-usilitel.html
How to connect a subwoofer to an amplifier? Connection diagram and installation of speakers and subwoofer in the car
The presence of a subwoofer can significantly improve the performance of a car's sound system, but this will only be possible if it is properly connected to an amplifier.
Unfortunately, this operation is not as simple as many people think. In order for everything to work correctly, it is necessary to take into account a number of quite important parameters.
In this article we will try to figure out how to properly connect a subwoofer to an amplifier.
Before you start connecting the active and passive subwoofer to the amplifier, it makes sense to compare the RMS values (the power at which the equipment can operate with a real sound signal for an hour without damage) of the subwoofer and amplifier.
You need to select equipment in such a way that this parameter of the amplifier is higher than that of the subwoofer. Otherwise, you may exceed the permissible power level (clip), which is one of the most common types of speaker failure.
For optimal operation, the power of the amplifier and subwoofer should be approximately equal.
What do you need to connect?
To connect a subwoofer to an amplifier, you first need to make sure that you have everything you need. To install a subwoofer and amplifier in a car you will need:
- Set of terminals and connectors;
- Audio output converter;
- Line fuse;
- Switch for remote power supply;
- Capacitor;
- A set of wires for connecting a subwoofer and amplifier, which are selected for a specific speaker system.
To purchase the required set of wires, simply contact any store that sells sound systems for cars and tell them the model of your car and radio.
The length of the wires is determined depending on the selected connection scheme of the subwoofer to the amplifier.
Wiring
Before installing the subwoofer and amplifier, you need to decide where exactly the car amplifier will be located. You need to place the end of the power wire in the selected location and lay it under the hood of the car. To do this, you will need to measure the wire with a margin of thirty centimeters.
Some machines already have holes with rubber or plastic inserts that are designed specifically for wiring the speaker system. If holes must be drilled, extreme care must be taken to avoid damaging important components and parts. In some places, the wiring needs to be additionally protected with electrical tape.
Amplifier power
Now you need to provide power to the car amplifier. To do this, you will need to disconnect the car's power cable from the battery and connect the amplifier's power cable to it. After this, without connecting the power cable to the battery, you need to insert it into a fuse of the appropriate amperage, and only then connect it to the battery.
Grounding
The next step in installing the subwoofer and amplifier in the car is to connect the ground.
To do this, you need to connect the selected wire to the amplifier and from it to a section of bare (degreased, unpainted and without signs of corrosion) metal.
Before connecting the wire, it is worth sanding the selected area. Most often, you simply unscrew one of the seat bolts, attach a ground wire to it, and tighten the bolt.
Connecting the amplifier to the radio
Naturally, connecting a subwoofer through an amplifier would be pointless without a sound source, which is a car radio.
First of all, it is necessary to provide remote power. Non-original car radios usually have a blue wire that you can simply cut and connect a cable of a suitable length instead.
If you have an original radio, you need to buy a suitable switch and find a place where you will place it and perform the following steps:
- Pull the wire from the amplifier to the switch;
- Cut it in half;
- Connect the ends of the wire to two terminals;
- Pass the cut part of the wire back, leaving a margin of 30 cm.
Next, you will need to connect a capacitor, which will prevent voltage surges due to the use of the backlight in combination with powerful bass. The capacitor should be located as close as possible to the amplifier using its grounding.
In order for the capacitor to perform its function, it must be charged. To do this, you need to use a resistor with a resistance of 1 kOhm. Charging will only take a few seconds, but it's best not to touch anything with your bare hands. Checking the charge of the capacitor is carried out using a voltmeter, which should show about twelve volts.
Next you need to connect the signal wires from the linear outputs of the radio. Their number can be up to six, although in multimedia centers there may be more. We select the appropriate outputs and connect them to the amplifier using interconnect cables. For two and four channel models, appropriate interconnects are required.
If the radio has only one pair of linear outputs, and the car amplifier used has four channels, you must use Y-adapters. However, most modern amplifiers have the ability to connect inputs in parallel, which makes it possible to do without them.
Connecting a subwoofer to an amplifier
In order to connect the subwoofer to the amplifier, we need an audio output converter - a small box with two RCA outputs and 4 wires. Two wires are used to connect the speaker, the remaining ones can simply be hidden from view. Wires for RCA output are connected to the amplifier.
How to connect a subwoofer to a single channel amplifier
Connecting a subwoofer to a single-channel amplifier is a fairly simple operation. You need to solder the “+” and “-” outputs to the “+” and “-” subwoofer.
Connecting several passive subwoofers is somewhat more difficult. For this, parallel or sequential circuits are used. However, it is necessary to correctly calculate the resistance.
How to connect a subwoofer to a two-channel amplifier
The connection is made using a “bridge” - this method works great with almost all two-channel amplifiers to which one subwoofer needs to be connected. To do this, you need to take “+” from one channel and “-” from the other, which we connect directly to the subwoofer.
An important point is that for this connection the resistance must be at least four ohms. In addition, it must be taken into account that in this case the output power of the channels will be summed up.
If the amplifier can switch mono and stereo modes, then you can simply connect the wires to the “+” and “-” of one channel. If you need to connect 2 subwoofers to an amplifier, then you just need to route them to different channels.
It is also important to remember that for the subwoofer to work correctly, you must enable an LPF filter that will cut frequencies above 50-100 Hz.
How to connect a subwoofer to a four-channel amplifier
The classic way to connect car audio to a four-channel amplifier is a circuit with two speakers and one subwoofer.
So, how do you connect the subwoofer and speakers to the amplifier in this case?
The standard option would be to connect two speakers and one subwoofer. Each speaker is connected to a separate channel, while the subwoofer is installed as a bridge. An important point is that the speakers will need to be connected to the front channels, and the subwoofer to the rear.
It is also possible to route two subwoofers into separate rear channels.
Source: http://jeepclubspb.ru/kak-podklyuchit-sabvufer-k-usilitelyu-v-avtomobile/
How to install a subwoofer: pitfalls and connection diagrams
True music lovers prefer to enjoy high-quality sound both at home and while driving a car. To listen to your favorite music in excellent quality, upgrade your speaker system.
A pumped-up speaker consists of: a standard radio, an amplifier, a subwoofer and speakers. A subwoofer helps you get surround sound. In this article we will look at the selection and installation of a subwoofer (LF).
You have decided to install a full-fledged sound system in your car. The first question that you have to decide before purchasing is the choice between a passive and active subwoofer. Let's give a small educational program.
The passive subwoofer has a simple design. This is a housing and one speaker or several low-frequency audio heads. It is advisable to connect such a sub through an amplifier .
There are two ways to install a subwoofer in a car audio system without an amplifier: directly or with a crossover filter. The second allows you to get a cleaner sound, without distortion. Using this method, many save money, but such a connection does not provide good sound and can lead to a short circuit and failure of the radio, speakers or subwoofer.
An active subwoofer is a combination of several devices in one housing. Its design includes:
- audio amplifier;
- frequency divider;
- LF heads.
The housing contains linear inputs and outputs, audio power controls and frequency dividers.
An active sub is easier to set up. Using standard settings you get good bass. A passive subwoofer requires an external amplifier. Setting up a passive subwoofer is painstaking work. But the result will exceed all expectations.
True music lovers achieve the best sound with passive subwoofers. Active costs 2-3 times more than passive. But the latter only works well with an amplifier that is purchased separately.
As a result, we get approximately the same amount of costs.
The process of connecting a subwoofer and speakers in a car rarely causes difficulties. The recommendations described below will help you install and connect correctly.
Passive
It is recommended to connect the passive low frequency through an audio amplifier . It has connectors for connecting a subwoofer. For switching, special acoustic wires are used. They come complete with a subwoofer. If they are not available, then we buy the required length in a specialized store or at the radio market. The ends must have RCA connectors (tulip type).
In the absence of an amplifier, a passive subwoofer is connected to the front speakers. The sound will become more voluminous, but it is difficult to call it quality. A low-pass filter will help correct the situation. Through it, sound is sent to a passive subwoofer.
The purpose of the filter is to suppress the high-frequency component of the sound signal and feed only the bass to the subwoofer. This device is sold in stores. But if you have the skills and ability to hold a soldering iron in your hands, then it’s not difficult to assemble the filter yourself.
Schematic diagrams of the device are available in specialized literature and on the Internet.
The signal from the standard radio goes to the amplifier, and from it is distributed to the speakers and subwoofer
Active
An active subwoofer does not require the use of an amplifier. Its body contains an additional module for sound amplification and frequency controls for fine tuning.
Modern car radios have a linear output for connecting a subwoofer. It is connected to the input of the active subwoofer using an speaker cable. Another wire is designed to control the subwoofer. It is designated as REM or System Remote Control. The cross-section of the control wire is not critical; a weak current flows through it.
The active subwoofer is connected directly to the standard radio. Power to the subwoofer falls from the car battery
A power cable from the battery is laid separately to power the active subwoofer. Be sure to install a fuse in the power supply circuit of the amplifier and active subwoofer. It protects the speaker system from short circuits.
Connecting the sub: important points and instructions
Let's look at the process of installing a subwoofer in a car with a connection to the standard radio. Before starting work, pay attention to a few points:
- The subwoofer housing and the amplifier itself are large devices. We need to think about where to place them. Most often, a place is allocated for them in the luggage compartment of a car.
- If the standard head unit does not have outputs for connecting a subwoofer and there is no control wire, then think about replacing the radio. This will protect you from possible short circuits, simplify connecting the subwoofer and allow you to get high-quality sound. An active woofer requires battery power. The power cable must be of appropriate length and cross-section. Consider where to route it from the engine compartment to the luggage compartment. It must be firmly fixed with plastic clamps.
- Check the presence of a line output for the subwoofer on the standard radio. If not, there is a way out. The subwoofer is connected to speakers or AUX output. This solution is not ideal and affects the quality of sound reproduction.
- To control the active subwoofer, a System Remote Control wire is required. Without it, the amplifier module does not work. If the radio does not have such an output, then you can directly supply constant +12 volts to the input of the active subwoofer. With this connection, the amplifier operates continuously and discharges the battery.
Required tools and materials
To successfully connect a subwoofer with your own hands, prepare the following tools and materials:
- wire cutters;
- knife;
- set of open-end wrenches;
- insulating tape;
- pliers;
- plastic ties;
- power cable;
- speaker cables;
- 60A fuse in the housing;
- plastic pullers for dismantling trim elements.
The length of the wire for powering the subwoofer and speaker cable depends on the specific car model and the possibility of laying the wiring under the trim. The cross-section of the power cable depends on the power of the active subwoofer or amplifier.
For example, the power of a subwoofer is 200 watts, divided by 12 (the voltage in the electrical circuit of the car), we get 16.7 amperes. The power cable must withstand this current and not overheat. Based on this, the wire cross-section is selected.
Step-by-step instructions for installing an active subwoofer
- Turn off the power to the car and remove the terminals from the battery.
- Route the power cable from the battery to the subwoofer installation location. The wire should not get under the pedals or interfere with the operation of other mechanisms .
- Install a fuse on the wire near the battery.
Do not connect the power cable to the battery terminal. The subwoofer is powered from the battery. Be sure to use a fuse to avoid wiring troubles
- Remove the original radio and inspect the rear panel. Locate the line output for the subwoofer and the control wire.
Find the linear output for the subwoofer and the control wire
- Route the speaker cables and REM (System Remote Control) wire from the radio to the subwoofer location. Place the wires under the trim elements and securely secure them with plastic clamps. All wiring is laid under the trim elements of the car interior.
It is securely fastened with plastic clamps
- Connect the control wire, speaker cable, power and ground wires to the subwoofer. Take the “earth” from the metal surface of the car body.
- Connect the sub and REM wire to the radio. Carefully insulate the twisted areas. Install the radio in its original location.
- Connect the power cable to the “+” terminal of the battery.
Video: The easiest way to connect an active subwoofer
To understand the details and installation sequence, watch the video. Perhaps it will help you evaluate your strengths and get an answer to the question: who will upgrade the sound system of your car?
Installation nuances in cars of different brands
The subwoofer and amplifier are placed in the luggage compartment in 99% of cases. But the trunk does not always have sufficient volume.
For example, in a VAZ 2114 it is problematic to place a passive subwoofer and amplifier and leave room for transporting something. Therefore, for 2114 it is better to choose an active subwoofer with a suitable housing.
Fortunately, car audio stores offer a wide selection of models of different power and configurations.
Take the installation of the power cable seriously. Look for a way to route the power wire through the factory holes. Use rubber or plastic couplings to move from the engine compartment to the luggage compartment. The wire should not come into contact with metal. This will help protect it from chafing and possible short circuits.
For the power cable, it is recommended to use plastic or rubber couplings for transition from the engine compartment to the passenger compartment and from the passenger compartment to the luggage compartment
Self-installation and connection of the subwoofer will take from 1.5 to 3 hours.
The procedure is simple, but requires care and precision. If you have doubts about your abilities, contact specialists installing speaker systems. They will select the speaker components and connect them.
And after 2-3 hours you will be able to enjoy high-quality surround sound in your car.
Source: http://autozam.ru/remont-i-obsluzhivanie/kak-ustanovit-sabvufer-podvodny-e-kamni-i-shemy-podklyucheniya.html
How to connect a subwoofer to a radio?
A subwoofer is an acoustic system for reproducing frequencies of 20-120 gigahertz in sound and it is connected to the car radio in the car.
This connection can be made at a service station or “garage” specialists. And if you have basic knowledge, which you can find in this article, connecting the subwoofer to the radio can be done by the car owner himself, by the way, I previously touched on this topic in the article - do-it-yourself subwoofer in the car. To do this, you only need to prepare some tools and consumables.
Necessary tools and materials.
- Fuse.
- Capacitor.
- Wiring.
- Wire cutters.
- Pliers.
- Insulating tape.
- Spanners.
- Adjustable wrench and tie.
- Directly subwoofer.
By the way, it can be passive and active. The only difference between them is that in the connection diagram of a passive subwoofer an amplifier is required, and an active subwoofer is connected directly to the radio. We will consider the first option.
Connecting a passive subwoofer to the radio, instructions
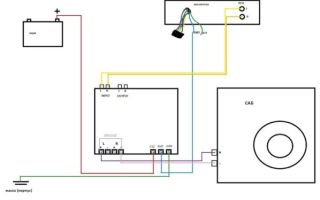
Connection diagram for subwoofer to radio
The connection diagram for a passive subwoofer is simple: it, together with the speakers, is connected to the amplifier, and the amplifier is connected to the radio.
The task of the amplifier in this chain is to transmit the signal received from the radio to the high-frequency and low-frequency speakers, where the last one is the subwoofer, and the high-frequency ones are the satellites (I advise you to read the article - DIY subwoofer amplifier).
Let me note: a subwoofer along with an amplifier requires a lot of space, so many people place them in the trunk of a car. As you probably guessed, to connect a subwoofer in this case, the wires have to be routed through the entire cabin - to the battery.
Attention!
Before you start connecting the car's speaker system, you must disconnect its battery (to prevent a short circuit from occurring).
Let's start connecting the passive subwoofer
All power wires must be protected, especially the “plus”. Corrugation or other material is suitable for protection. We install a fuse on the “plus” (you can also purchase a ready-made wire with a fuse) and do this closer to the battery.
First stage
For wiring, you will need to find a technological hole (in foreign cars it will most likely be closed with a rubber plug, but in domestic cars it may be without a plug). If there is no such hole in the car, you will have to drill it.
We pull the wires into the drilled hole and fill it with sealant. By the way, for a more durable use of the cable, it is better to use a rubber bushing instead.
Second phase
We stretch the wires in the engine compartment and bring the harness out into the cabin.
In the cabin, it is better to prepare places for wiring in advance, since it is better to hide it. And to do this you will have to remove the door sill trims and other interior trim elements here and there. After laying the wiring in the cabin, all dismantled trim elements can (and even need) be returned to their places.
Third stage
From the passenger compartment, the wiring goes to the trunk, also through a technological hole; if there is none, then it will have to be drilled again. After pulling the wires into the trunk, we connect them to the amplifier: plus to plus, minus to minus.
Now the amplifier is connected to the battery and all that remains is to connect it to the radio. To do this, you will need “tulips” and a thin single-core wire that controls the power supply to the amplifier (most likely, it will be blue).
To remove the radio, use special flat keys; they are easier and faster to work with. but if there are none, you can use a simple screwdriver or knife.
The fourth stage of connecting the subwoofer to the radio
“Tulips” are connected according to the colors of the connectors. However, it happens that the wire plugs can be red and black, while the car radio can be red and white. In such a situation, you need to connect white to black, and red to red.
After this connection, we conduct wiring through the interior with a power wire and connect the “tulips” to the amplifier ports.
All that remains is to connect the subwoofer to the amplifier. By the way, if you have a two-channel amplification device, then the subwoofer must be connected to both channels (needed for optimal signal distribution by the amplifier). Find out how to set up a subwoofer in your car here.
Video on connecting a subwoofer to a radio (passive)
Connecting an active subwoofer to the radio
When connecting an active subwoofer to the radio, we perform similar manipulations, only we connect this directly to the radio - without an amplifier. With this connection scheme, a capacitor is connected to the subwoofer. Just remember to observe polarity here.
(active)
I recommend reading:
Source: http://autoepoch.ru/avtogadzhety/kak-podklyuchit-sabvufera-k-magnitole.html
How to connect a subwoofer in a car: installation to a standard or analogue radio, diagrams and tips
You can spend a lot of money, buy the coolest subwoofer for your car, but not get the powerful deep bass you want. Error of choice? Not always. High parameters of car audio system components are only part of what is necessary. In order for a subwoofer to truly sound, it must be installed and connected correctly.
Active and passive subwoofers
As a rule, radios or other head units of car audio systems are not designed to connect subwoofers. This is because the quality of bass reproduction is mainly determined by the front speakers, which do not require a high-power signal.
Subwoofers come to mind when loud, powerful, deep bass, high sound pressure and new physical sensations are required. Typically, radio tape recorders are not capable of providing the powerful electrical signal required for this.
In principle, a low-power low-frequency speaker, using filters (crossovers) to divide the frequency load between speakers of different types, can be connected to the standard outputs of many head units (radio tape recorders), if they are capable of providing an output signal power of at least 20 W per channel. But if high bass sound pressure is required, additional amplification is indispensable.
Typically, passive subwoofers are connected to the sound source through an external amplifier. The advantages of such a scheme are, first of all, flexibility. To achieve the required sound quality or bass volume, you can change both speakers and amplifiers independently of each other.
https://www.youtube.com/watch?v=SxxC6v5vY2g
Passive subwoofer connection panel
Active subwoofers have an audio power amplifier built into the same housing as the speakers. This is a compact solution that saves space and time, as it is much easier to install and connect. In addition, an active boxed subwoofer usually costs less than a passive and external amplifier combined.
Active subwoofer with connection panel
Nevertheless, when choosing such a scheme, you should be prepared for the fact that pitfalls will reveal themselves over time. Sound quality depends on both the amplifier and the speaker. But replacing one of the components in an active device is almost impossible.
The second minus is the quality of the amplifier. Manufacturers of universal devices are focused on the maximum capabilities of their products, which expands the list of potential buyers.
The built-in amplifier is usually designed to operate in certain conditions. Such a device cannot be upgraded when the sound quality no longer meets increased needs.
Table: comparison of advantages and disadvantages
Video on the topic
Do-it-yourself subwoofer placement in the car interior
The sound quality depends on the placement of the speakers. However, there is too little space in the car to space them out properly. In addition, the characteristics of the propagation of low-frequency sound waves have an effect.
At a sound frequency of 100 Hz, the wavelength exceeds 3 meters, at 50 Hz - twice as much. Thus, the lengths of low-frequency sound waves are comparable and even exceed the dimensions of the cabin.
Under such conditions, the waves do not propagate in the usual sense of the term; vibrations of the speaker diffuser are perceived as pushes of a piston, alternately increasing or decreasing the air pressure in the cabin.
We perceive the direction of sound by analyzing the time difference between the wave reaching the left and right ears. And since there is no propagation, then the direction to the sound source cannot be determined.
This means that the location of the subwoofer in the car has virtually no effect on the sound quality. When choosing a suitable location for a low-frequency cabinet speaker, first of all take into account:
- ease of access,
- costs and effort for installation,
- interference with the intended use of the vehicle.
In the vast majority of cases, the subwoofer is placed in the trunk. Most popular places:
- behind the back of the rear seat with a diffuser in the trunk,
- in the wing niche (stealth subwoofers),
- in the rear parcel shelf there is a diffuser into the salon,
- behind the folding armrest there is a diffuser in the salon,
- in the floor
- in the spare wheel well.
Gallery: installation examples
Placing a cabinet subwoofer in the armrest niche. Placing a cabinet subwoofer in the center of the trunk with the diffuser facing out. Placing a stealth subwoofer in the rear fender niche. Placing a subwoofer in the trunk floor.
There is an excellent acoustic connection between the interior of a hatchback or station wagon and the trunk. In these bodies, the subwoofer can be installed in any of the places listed above.
In sedans, the trunk is better insulated, which can reduce the sound pressure in the cabin. To prevent this from happening, it may be necessary to cut additional holes to improve the acoustic connection. Their total area must be no less than the diffuser area.
In the rear shelf and in the armrest, subwoofers are installed, firstly, in such a way that there are no obstacles in front of the diffuser. Secondly, there are no gaps between the speaker body and the shelf (seats).
The natural place to place small powered subwoofers in a flat enclosure is under the seat. These devices perform best in small-class cars, where the miniature dimensions of the interior help “build up” the sound pressure.
Placing a flat subwoofer in a car under the seat
How to connect a sound amplifier: diagrams
Active and passive subwoofers are connected to the sound source using different circuits.
Passive
Connecting using filters (crossovers) directly to the acoustic outputs (not to the linear “tulips”) of the head unit (radio) via a bridge circuit makes sense if its output power is above 20 W per channel.
Using a bridge circuit, the subwoofer inputs are connected to the outputs of channels of different polarities
The subwoofer inputs are connected to the outputs of amplifier stages of different polarities. To avoid overload, filters are selected in such a way that the frequencies of the main channels and the subwoofer do not overlap.
Practical connection diagrams may vary depending on the head unit model. In any case, you should not connect one of the speaker terminals directly to the car body.
If the head unit (radio tape recorder) does not support a bridge circuit, the subwoofer is connected to the positive outputs of the left and right channels.
When the radio does not support a bridge circuit, the subwoofer is connected to the positive outputs of the channels
Connecting a subwoofer directly to the radio is the exception rather than the rule. Typically the signal reaches the speaker through an amplifier. For this purpose, devices with different numbers of channels can be used.
The amplifier input is connected to the linear output - to the “tulips” - of the head unit using an interconnect cable. Using the acoustic outputs of the radio to connect an amplifier is permissible if the latter supports this mode (equipped with a high-level input). However, it should be remembered that in this case the sound quality suffers.
When the amplifier has only one channel, the speaker is simply connected to its output. To do this, use either special speaker wires or the same ones as the one with which the amplifier is connected to the positive terminal of the battery. In any case, the cross-sectional area of the wire for transmitting a low-frequency audio signal must be close to the same parameter as the power one.
Monoblock for connecting a subwoofer
A passive subwoofer can be connected to a multi-channel amplifier via a bridge circuit. In this case, the total power is approximately four times the value of the parameter of one channel.
The frequency of the sound signal entering the passive subwoofer should be limited to the upper value of 50–150 Hz. If the filter is built into the amplifier, select the LPF switch position. The cutoff threshold is adjusted by ear according to the bass sound quality. When the amplifier is not equipped with filters, an external crossover is used.
Amplifier Low Pass Filter Controls
Active
An active subwoofer consists of an amplifier and a speaker. It is connected to the car battery with a separate wire through a fuse, observing the requirements for connecting amplifiers.
When choosing the caliber - according to the AWG standard - of the power wire, they are guided by the length and strength of the current consumed (amplifier characteristics). The greater the current value and the longer the wire, the larger the cross-sectional area required to transfer energy without loss, the smaller the gauge value. Recommendations for selection are given in the table.
Table: caliber of power wire depending on length and current strength
The power cable is laid close to the rest of the car wiring. To protect against short circuits and overloads, a fuse is installed in the circuit. Its rating must correspond to the caliber (section) of the wire. Recommendations for selection are shown in the table.
Table: fuse rating depending on wire cross-sectional area and AWG gauge
A dry and accessible location for installing the fuse is chosen near the battery, no further than 30 cm from the positive terminal. The fuse holder is rigidly fixed to the housing.
Installing a fuse in the engine compartment
It is recommended to use a capacitor. Its purpose is to suppress high-frequency interference (noise) in the audio path and smooth out on-board network voltage ripples due to peak surges in current consumption.
Car audio capacitor
A capacitor with a capacity of approximately 0.1 farad per 100 W of subwoofer amplifier power is installed between the positive power wire and the housing no further than 60 cm from the device or connected to a special connector, if available.
To connect the active subwoofer to the signal source (head unit), an interconnect (line) cable is used.
Interconnect cable for connecting to linear outputs
To reduce interference and interference, the line cable is laid as far as possible from the vehicle's on-board wiring. If the number of connectors on the radio is insufficient, splitters (Y-adapters) are used.
Branching of line outputs using Y-adapters
The REM control connector is connected to a similar output of the radio using any conductor.
Connecting computer and household active subwoofers
Automotive active subwoofers differ from computer and household subwoofers in design and power supply. As a rule, speakers and housings of devices intended for use in a car are adapted to vibrations, dust, changes in temperature and humidity. In addition, they are designed to be powered from an on-board DC network with a nominal voltage of 12 V.
Household devices are powered by AC power, so they cannot be connected to a car audio system without modification, with the exception of subwoofers with universal power supply.
AC Powered Household Subwoofer
The simplest modification is to remove the built-in amplifier along with the power supply, which turns the subwoofer from active to passive.
Due to the fact that household appliances are designed to operate in milder conditions than specialized ones, their service life in a car can be significantly reduced.
Video: installing a home subwoofer in a car
Instructions for proper installation
All installation work should be carried out with the negative terminal of the car battery disconnected. To install a subwoofer, you may need the following materials and products, the selection of which was discussed above:
- power wires of suitable cross-section,
- interconnect cable,
- fuse with holder,
- capacitor,
- crossover.
To perform subwoofer installation work, the following tools and consumables are required:
- screwdrivers,
- a set of keys,
- wire cutters,
- knife,
- drill,
- corrugated tube,
- plastic or rubber bushings for transitions,
- terminals,
- hardware.
Installing an active subwoofer
- Before starting work, disconnect the negative terminal from the battery.
Disconnecting the negative terminal from the battery
- Select the most suitable installation location based on the expected sound quality and minimal disruption to vehicle functionality.
- Determine where to install the fuse as close to the battery as possible. Attach the holder to the car body. Connect one terminal to the positive terminal of the battery. Protect the wire with corrugated tube.
- Place a subwoofer. If necessary, drill mounting holes and secure the column with bolts or self-tapping screws.
- Securely connect the GND ground terminal to the car body with a piece of the same wire that will be used to power the device’s amplifier. Clean the contact area from paint. For fastening, use stainless bolts, nuts and washers. Skip the screws.
Connecting the subwoofer to the car body
- Route the power wire between the subwoofer and the fuse. Place it together with the car wiring harnesses.
- Avoid laying near moving parts and do not allow them to be pinched by interior trim elements. Fix the wire where there is a risk of chafing due to vibration.
Laying the power wire of the active subwoofer into a bundle
- For transitions from the passenger compartment to the trunk and engine compartment, if possible, use standard holes; if this is not possible, drill new ones. Protect the transitions with rubber or plastic bushings and seals.
- Connect the subwoofer power connector and the free fuse terminal with a laid cable.
- Install a capacitor if desired.
Connecting a capacitor to an active subwoofer
- Lay the interconnect cable between the subwoofer and the head unit as far as possible from the car's power wiring, avoiding intersections with it if possible.
Laying the interconnect cable in the car interior
- If the interconnect cable does not have a control wire, lay it separately in any convenient place and connect the REM input of the subwoofer amplifier to the radio.
- Check the reliability of all connections, connect the negative terminal of the battery, supply power to the audio system and check its operation.
- If there are no defects, secure the cables and wires, and replace the casing.
Installing a passive subwoofer
- Select suitable locations for installing the subwoofer and crossover, and secure the devices.
- Taking into account the position of the filter, lay the speaker cable (wire) between the subwoofer and the amplifier or head unit.
- Connect the subwoofer with the laid wire to the amplifier output via a crossover or directly if the amplifier is equipped with a low-pass filter LPF.
- Check the connections, turn on the power and test the subwoofer.
- If there are no defects, secure the wires and restore the interior trim.
Installation video
Installing a subwoofer yourself is not a difficult task, but it requires care and precision. By following the recommendations given, anyone can cope with this task.
Source: http://autoclub.su/kak-podklyuchit-sabvufer-v-mashinu/