How to change a CV joint boot
 The procedure for replacing the boot on the CV joint.
CV joints are an almost eternal unit in a vehicle. But its protection is provided only by one rubber boot, which is constantly exposed to water and heat from the asphalt. It is for these reasons that it quickly becomes unusable and becomes covered with a network of cracks.
To replace the boot on the CV joint you will need:
– jack;
– a set with keys and screwdrivers;
– knife or scissors;
– CV joint lubrication;
– chisel;
- hammer;
– wooden mallet;
– wheel chocks;
– capacity;
– new anthers;
– solvent or kerosene;
– new clamps;
First, the car needs to be prepared for replacing the boot . This operation should be carried out if the rubber is severely worn out, cracks and cuts have appeared, or the seal has been compromised.
The hinge lubricant must be clean, free of water, dust and dirt. If there are foreign small and large particles in it, this can cause rapid wear of the CV joint.
It will be cheaper to inspect the condition of the anthers and replace them than to constantly fork out money to buy a new grenade. Installation should be carried out using only reliable and high-quality clamps.
The car must be placed in a pit and 2/3 of the oil must be drained from the gearbox . It is more convenient to start repairs on one side of the machine, then move to the other. You need to loosen the bolts and nuts on the wheels, then jack up the car.
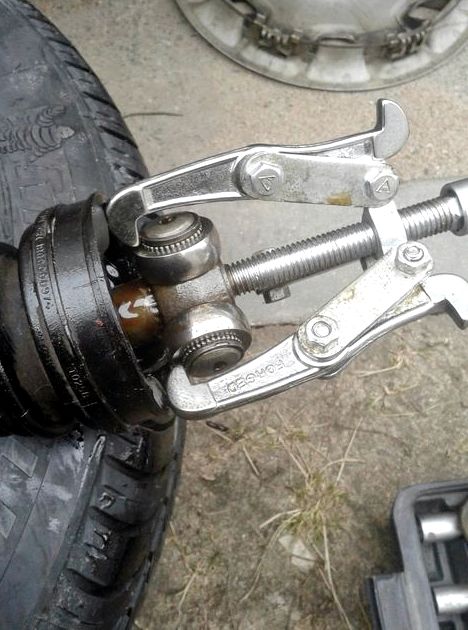
To be on the safe side, you need to place a special support under the threshold. The hub nut should be loosened with a screwdriver or chisel, then loosened slightly with a special wrench that has a long lever. In order for the transverse rod not to interfere, you need to unscrew the 3 bolts that secure the crab to the body.
You need to remove the pin from the hole in the tie rod end and first straighten it. Using a spanner, you need to unscrew the nut and remove the pin from the steering knuckle with a special puller.
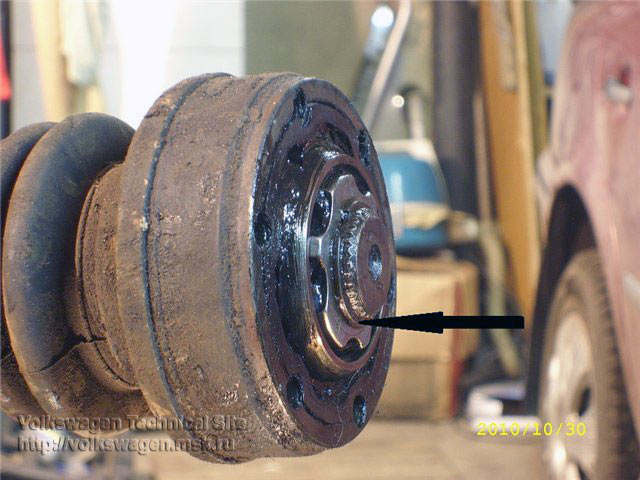
The next step is to unscrew the bolts securing the ball joint to the wheel hub. After this, the hub nut is completely unscrewed; as a result of such operations, the outer CV joint should come off the hub splines.
Otherwise, you need to strike the CV joint several times with a bronze hammer or wooden mallet. Then, from the gearbox side, knock out the CV joint using a chisel and hammer, or pry it with a crowbar and pull sharply to remove the CV joint along with the splines.
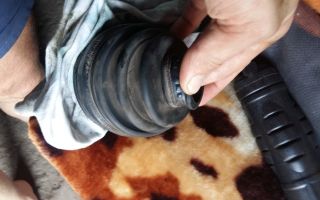
The old boot needs to be cut off with scissors. If there are cuts and holes in it, the CV joints must be washed with kerosene and wiped with a rag.
These steps should be performed after disassembling the unit. To do this, the drive is firmly clamped in a vice. Using a chisel and hammer, the CV joints are knocked off the shaft.
After which you can start cleaning them. Having completed this procedure, you need to install the retaining ring on the boot shaft and fill the grenade with a wooden mallet.
A special lubricant is squeezed out under the boot in the required quantity. Only after this can we begin to fix it with clamps on the CV joint and shaft. Then we add oil to the gearbox, which was previously drained before the repair.
Source: http://remcars.info/remont-i-texnicheskoe-obsluzhivanie-avtomobilej-svoimi-rukami/kak-pomenyat-pylnik-shrusa.html
How to change a CV joint boot
Hello again, dear readers! It’s been a while since I posted anything new on my website, but I found an extra minute and immediately sat down to write an article about how to change a CV joint boot, since in my opinion this topic is interesting and can save many car enthusiasts from premature expenses.
Let's start by finding out what a CV joint actually is and what the consequences of untimely replacement of the boot on it are. So, literally the abbreviation CV joint means “constant velocity joint”, designed to transmit torque between shafts, the axes of which can deviate relative to each other by a certain angle.
On a car, this angle depends on the rotation of the wheels (left-right) and the position of the suspension (higher or lower). I think everyone knows what a hinge is.
What does equal angular velocities have to do with it?
It seems to me that what is meant here is that the angular speeds of the shafts on both sides of the CV joint are equal (in other words, we have the number of wheel revolutions the same as the number of revolutions of the planetary gear in the gearbox). The earliest varieties of CV joints were cardan drives with crosspieces.
But they have a big drawback - with an increase in the angle of inclination between the cardan shafts, the power of such a transmission drops significantly, and the load on the connections increases significantly. A cardan drive can provide an angle between the shafts of 10-20 degrees, no more.
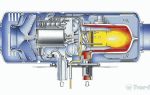
It is because of these shortcomings that constant velocity joints began to be installed on front-wheel drive cars in the way we see them on cars today. The principle of operation of such a hinge is slightly different than that of a cardan transmission; there are significantly fewer disadvantages; the angle of rotation reaches 70 degrees. The operating principle of cardan and modern CV joints can be understood from the figures below. The more modern one is often called a "grenade".
Operating principle and design of constant velocity joints.
It was a bit of theory. Now let's get down to business. “When do you need to change the boot on the CV joint,” you ask.
It is necessary to change the boot not when a crunching sound is already heard when cornering and when the gas pedal is sharply pressed, but immediately after cracks and tears appear on it, in general, if the sealing of the CV joint is broken.
A sure sign of damage is the presence of greasy traces of grease flying to the sides. If this is not done, then after a while the water and sand will do their job and crackling will begin when cornering and with a sharp increase in speed.
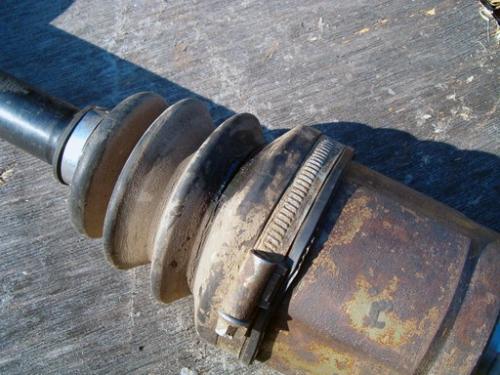
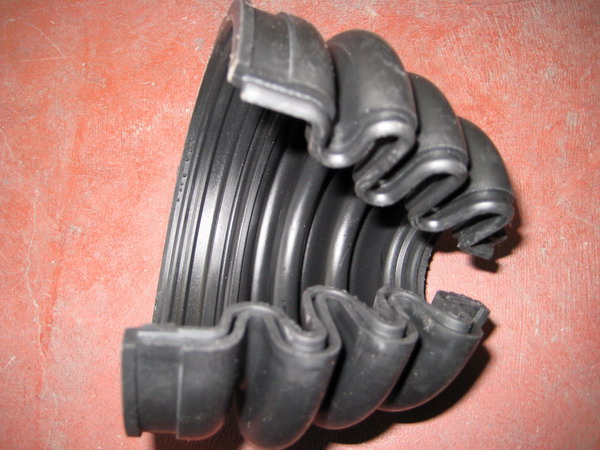
I will give advice from practice that if these signs already exist, then replacing the boot is not enough, you need to change the entire “grenade” or if there is no money, then you can change the boot, but this will be of little use. Possible boot defects are shown in the figure below.
Common defects of the CV boot are cracks and breaks. A mandatory replacement is required.
Let's go directly to the instructions on how to change the CV joint boot .
First, we need to drain the oil from the gearbox, for this we will need a 17 key, with which we need to unscrew the drain plug, having previously prepared a container of at least 5 liters for the oil. Next, we tear off the wheel mounting bolts, jack up the car, unscrew the wheel bolts to the end and remove the last one.
Now, to avoid injuries and accidents, we put some kind of support under the car (in my garage it’s a stump and a board), lower the jack a little so that the car rests on the support.
Next, we will need an assistant in the form of a person or a block to press the brake pedal and unscrew the hub nut using a corresponding 30 socket and an extension in the form of a pipe 1-1.5 meters long. This nut must be replaced after each unscrewing.
After the nut is unscrewed and the washer underneath it is removed, we proceed to unscrew the ball joint fastening with two 17mm wrench bolts. Then we move the strut to the side and pull out the shank of the outer CV joint from the hub. Next we move on to the inner CV joint.
Carefully resting against the box using a pry bar, we pick out our grenade and with some force it should come out. I note that there are times when the inner CV joint just doesn’t want to come out of the box.
In this case, you should not try to hit the assembly with a hammer; there will be no result. To remove the CV joint you just need a lot of force, but not blows.
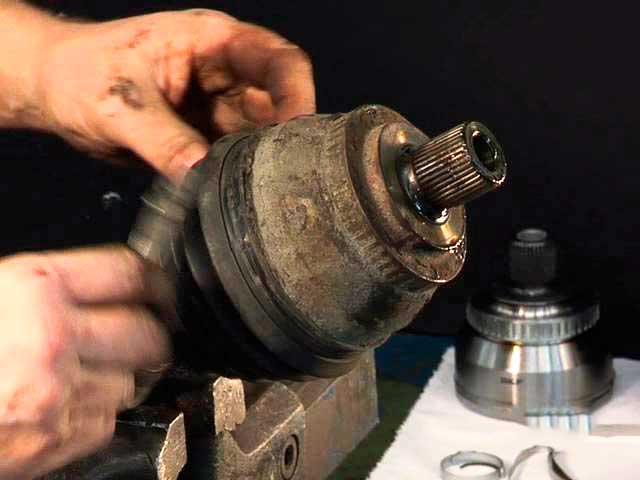
When everything is removed, we move on to how to change the CV joint boot . To do this, you will need to remove the grenade from the shaft using a brass or copper drift, striking it directly at the CV joint itself. First you need to loosen the clamps of the old boot and move it a little to the side.
The picture on the left shows how to remove the CV joint from the transmission. On the right is a clamp for clamps
After this, we wash the CV joint in gasoline or kerosene to remove the old lubricant. Next, we put the CV joint boot on the shaft, lubricate the grenade with a specialized lubricant and also place it on the shaft.
After this, we tighten the boot clamp located on the shaft and put on the second side of the boot. Now you need to put the CV joint in a position approximately corresponding to the middle of its stroke and protrude one edge of the boot with a screwdriver to release (or run) air from there (there).
This is necessary so that the boot in its normal working condition does not have dents or excessive pressure inside, which can lead to very rapid wear of the boot. After this procedure is completed, you can tighten the second clamp. Let's move on to assembly.
We insert the inner CV joint into the gearbox until it stops, after which the locking ring should snap into place (a characteristic sound is heard and free movement of the shank becomes impossible). If you can’t insert it, you can knock a little on the back side through a wooden block.
Next, insert the second end into the hub, screw on the ball joint, tighten the hub nut, install the wheel, fill the gearbox with oil, and the repair is complete.
Source: http://remontautovaz.ru/hodovaya/kak-pomenyat-pylnik-shrusa.html
Recommendations for replacing the CV joint boot on a VAZ 2110
The transmission of torque from the engine to the wheels is carried out through drive shafts and constant velocity joints, abbreviated as CV joints. The VAZ 2110, like many cars, has front-wheel drive.
Drive shafts go from the engine to the wheels. CV joints are attached to the shaft on both sides. The inner CV joint comes out from the box side, and the outer CV joint comes out from the wheel side.
Among car enthusiasts, these hinges are called “grenades” due to their external similarity.
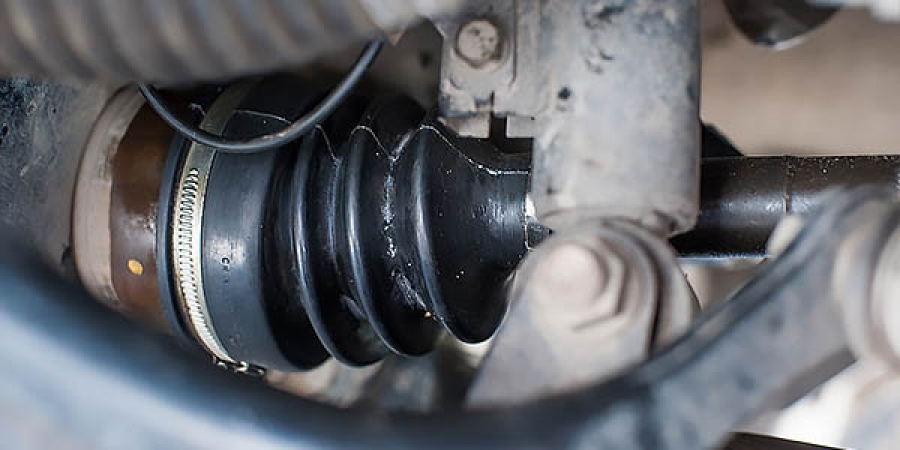
The grenades are protected by a rubber boot. It is mounted on an external and internal hinge. The boot prevents dirt from getting into the CV joint. Another of its functions is to retain lubricant; without it, the hinge will not work.
If the boot wears out over time or is torn, sand, small stones and dirt will begin to get into the joint. After some time, the CV joint will become unusable and the grenade will have to be replaced. Such repairs will cost much more. Therefore, it is important to monitor the integrity of the anther. If a defect is detected, replace the CV joint boot.
You can visually check the condition of the anthers yourself, without resorting to the services of service station workers. It is best to drive your car into the inspection hole.
First of all, you should pay attention to the boot of the outer CV joint. The VAZ 2110 has two boots on each outer side of the wheels. These anthers most often fail.
The inner boot needs to be replaced much less frequently than the outer boot.
You can check the integrity of the outer CV joint boot without a hole. We stop the VAZ 2110 on the road, preferably in a place where the car will not interfere with the movement of either cars or pedestrians. We turn the steering wheel to the right to the extreme position, this will be enough to diagnose the outer boot on the left side.
We similarly inspect the boot from the opposite side. If traces of grease are visible on the boot or there are cracks and cuts, then the boot should be replaced. The design of the VAZ 2110 allows you to cope with the replacement yourself.
Following the recommendations of experienced craftsmen, you should replace the boots of both the outer and inner CV joints at the same time. Even if the inner CV boot still looks intact and without cracks.
Required tools and spare parts:
- set of wrenches: ring and open-end wrenches for 13, 17, 19;
- WD-40, if you don’t have it, you can use brake fluid;
- brush with metal bristles;
- mount;
- screwdriver;
- hammer with lead or brass head;
- container for oil from the gearbox;
- a new outer joint boot and an inner CV joint boot - 2 sets in case of replacement on both sides.
The most convenient way to change CV joint boots on a VAZ 2110 is in the inspection hole. The car is first set to the parking brake. We install the wheel stop. It ensures the vehicle remains stationary during repairs.
We'll look at how to change CV joint boots in step-by-step instructions. It should be noted that this procedure can take about 2 hours even for a non-professional in car repair.
Instructions:
- After making sure that the car is stationary, we tear off the wheel studs. We jack up the side from which we are replacing. Remove the cap that protects the CV joint nut. Unscrew the wheel bolts and remove the wheel.
- If the crankcase protection is installed below, then remove it. Before dismantling, all threaded connections should be treated with WD-40 or brake fluid. We unscrew the plug in the gearbox and drain the oil into a prepared container.
- We unscrew the two bolts that hold the ball joint on the steering knuckle of the front suspension. To facilitate dismantling, spray the joint generously with WD-40.
- We ask your partner to press the brake pedal, then unscrew the nut securing the outer CV joint to the hub. If you replace the CV joint boot on a VAZ 2110 yourself, you can block the brake disc using a screwdriver.
- We turn the steering wheel to the right all the way if we are replacing it on the left side. Remove the outer CV joint from the wheel hub. To prevent the drive shaft from falling, we tie it up using a regular wire or rope.
- Holding the axle shaft with your hand, use a pry bar to remove the inner CV joint from the box. DO NOT REMOVE TWO DRIVE SHAFT AT THE SAME TIME. The gears in the box may shift, and installing the drive shafts back will be very difficult.
- We remove the clamps that secure the anthers. We clamp the axle shaft in a vice. Using a soft-head hammer, knock the grenades off the drive shaft. After washing the CV joints in gasoline to remove the old lubricant, we make sure that the joint is intact. We fill the hinge with new special lubricant. We install new boots and secure them with clamps. We press the CV joints onto the shaft.
- Having replaced the retaining ring on the inner CV joint, we insert the axle shaft into the box. To fix it in the box, carefully hit the axle shaft with a hammer through a wooden block several times.
- Install the drive shaft into the front wheel hub and secure it with a washer. Don't forget to put a washer under the nut. We attach the ball joint back to the steering knuckle.
- To replace the CV joint boot on the VAZ 2110 on the other side, repeat paragraphs. 1-9.
Timely replacement of the CV joint boot on a VAZ 2110 will allow you to save quite a large amount on car repairs. Since the cost of a grenade is much more than the cost of a CV joint boot.
Source: http://avtovx.ru/SHRUS/zamena-pylnika-SHRUSa-vaz-2110-20/
How to replace a CV joint, replacing a grenade, CV boot with your own hands
The constant velocity joint (CV joint, grenade) has a limited resource, so it has to be changed periodically. The technology for replacing CV joints on most cars is the same for both the front and rear axles. After reading the article, you will learn how to replace the CV joint and what tools you will need for this.
Types of CV joints
There are two types of hinges used on passenger cars:
The Rtsep type CV joint consists of a cage, a race and six balls. The advantage of this type of hinge is its low cost. The maximum angle at which joint operation will not cause serious loss of power is 40 degrees.
A tripod-type CV joint is more difficult to manufacture, but has a large range of axial movement (up to 2 cm). The maximum rotation angle of the tripod is 30 degrees. Both types of hinges are covered with a rubber boot, which protects the lubricant from dust or dirt.
If the boot is broken, then dirt gets inside, which reduces the service life of the hinge by tens of times.
Drive shaft
To transmit torque from the gearbox to the wheels, a structure consisting of two hinges, which are connected by a thick-walled steel pipe, is required. This design is called a drive shaft. The CV joint is placed on the splines of the tube and secured with a retaining ring.
The tripod is installed rigidly, the six-ball joint is placed so that the tube can move inside it. This is necessary to compensate for changes in the distance from the gearbox to the outer joint nut. The internal grenade and the gearbox oil seal form one leg of a right-angled triangle, the external hinge and suspension form the second.
The oil seal and the outer joint form a hypotenuse, the length of which depends on the distance between the box and the center of the wheel.
CV joint diagnostics
Diagnostics of hinges must be carried out every 2–3 thousand kilometers. It is also necessary to inspect the CV joint if you have driven on a gravel road or small crushed stone. This will allow you to replace a punctured or torn boot in time.
A pit or a lift is required for diagnosis, but you can use a jack and two supports. Raise the front right side of the car and use a safety stand. Then do the same on the front left side.
While turning the wheels, inspect each boot. If the boot is torn or has holes, it must be replaced.
Inspect the junction of the gearbox and the internal grenade - if droplets of oil are found, the oil seal must be replaced. Carry out the same diagnostics on the rear axle.
Lower the car to the ground, turn the steering wheel all the way to the right and slowly start driving. If the hinge crunches or knocks, it must be replaced.
What is needed to replace a CV joint?
To work you will need:
- new hinge to match the vehicle;
- new boot;
- molybdenum grease for CV joints (do not use graphite, it will greatly reduce the service life of the joint);
- new outer joint nut;
- a set of keys;
- hammer;
- chisel;
- steering pin remover;
- a jack and two supports (it is more convenient to change hinges on a pit or a lift, but not everyone has them);
- assistant.
How to change a CV joint on the front axle
- Loosen the wheel nuts and support the front of the vehicle as described above, then remove the wheels.
- Have a helper apply the brakes to secure the hubs and unscrew the outer joint nut, then remove the heavy duty washer.
- Remove the nuts or bolts connecting the ball joint to the lower control arm or steering knuckle, whichever is easier or more convenient (depending on the type of suspension and car model).
- Unscrew and unscrew the steering pin nut.
- Using a puller, remove the pin from the shock absorber strut.
- Press down the lower control arm, then pull the shock absorber strut toward you until it comes off the hinge.
- Using a pry bar or a wide, heavy-duty screwdriver, remove the inner joint from the transmission. If you are removing both drive shafts, insert pieces of rubber hose of suitable diameter into the holes in the box.
This will prevent the satellites from falling out. Do not insert a screwdriver or spatula deeply to avoid damaging the seal.
Retaining ring
- If necessary, replace the oil seal. On most cars, the oil seal is inserted outside the gearbox. Hook the oil seal with a metal hook, pull it out, insert a new one into the box and press it in using the appropriate mandrel.
- Clean the drive shaft from dirt.
- Remove the clamps and slide the boot along the shaft to provide access to the insides of the grenade.
- Remove the retaining ring that holds the cage in place, then remove it.
- Remove the retaining ring that holds the race to the drive shaft pipe.
- Remove the boot from the shaft tube.
- Install in reverse order.
- The inner hinge must be inserted by turning it slightly so that the splines align.
- After tightening the nut of the outer grenade, lock it.
How to change a grenade on the rear axle
- Hang up the rear of the car.
- Determine what is easier to unscrew - the fastening of the shock-absorbing strut arms or the gearbox (this operation is performed differently even on the same car, depending on who and how it is more convenient).
- Lower the gearbox or pull the stand towards you to remove the grenades from their seats.
On some vehicles, the external grenade sticks to the hub. If this happens, you will have to remove the strut, heat the hub with a gas cutter and knock out the hinge shaft from it.
- Replace the grenade in the same way as described in the previous section.
- Install the drive shaft in reverse order.
- Don't forget to tighten the outer grenade nut.
Conclusion
Now you know how to replace a CV joint and what precautions you need to take. This will help you maintain your car yourself.
Source: http://AutoLirika.ru/remont/kak-samostoyatelno-zamenit-shrus.html
Replacing the boot of the outer and inner CV joints
CV joint or constant velocity joint (popular name “grenade”) is a device that transmits torque from the engine to the wheels and simultaneously turns them. Most often, these designs are installed on front-wheel drive passenger cars.
But it can also be found in the rear wheels of SUVs. The boot, shaped like a corrugated “pear”, is a rubber cover that is put on the CV joint and protects it from dirt and dust.
The hinge itself is a rather complex device, and the ingress of foreign particles into it, acting as an abrasive, will sooner or later cause a breakdown. Boots are put on the outer and inner CV joints. However, most often the first one breaks.
Next, we consider step by step how to replace the boot of an external CV joint as well as an internal one in a garage.
How to inspect the case
This can be done without removing the wheel: just turn it all the way in any direction and shine a flashlight on the part for better visibility. Also feel it with your hands: you will feel the tears immediately.
The best inspection option is to remove the wheel (for example, when you are repairing a tube, a tire at a tire shop, or doing a seasonal tire change). Everything will be more noticeable here. Also, for one reason or another, you probably have to put the car in the inspection hole: for example, when changing the oil, adjusting the hand brake, etc.
Here also take the opportunity to inspect the CV joint covers: this can be done more carefully than in previous cases.
Cost of anthers
The price range is quite wide: from approximately 150 to 1000 rubles. and higher. It all depends on the make of the car and the manufacturer of the part. Non-original spare parts are cheaper. However, it also happens that the cost is unreasonably high: for example, because of the brand.
Thus, the price of covers for a Toyota Land Cruiser reaches 8,000 rubles. The same can be said about other prestigious car brands. But not all car owners are eager to pay that kind of money for essentially an ordinary rubber band, albeit of high quality.
Therefore, many simply select covers from other cars that are suitable in size and cost.
https://www.youtube.com/watch?v=nnnDLTbZJRs
Causes of boot rupture:
- constant driving through water and mud;
- high torsional load (regular sharp turns);
- careless (unprofessional) repair of suspension parts.
Replacing the boot of the outer CV joint
The process is the same for most front-wheel drive passenger cars. It is better to carry out work in a viewing hole. After purchasing new covers and (if necessary) clamps for them, prepare the tool:
- jack, wheel chocks and safety stands;
- keys (preferably heads) with a crank in accordance with your car model;
- hammer and wire brush for cleaning rust;
- mount;
- clean rags;
- special lubricant;
- gasoline for cleaning.
Drive the car into the pit, for insurance, engage 1st gear, raise the handbrake. Loosen the wheel bolts and, after removing the boot, unscrew the hub nut (usually a 30mm wrench). To do this, you need to open it up - remove the bends that fit into the groove. Place the car on a jack, place jacks and safety stands under the rear wheels and remove the wheel from the desired side. Further:
- if there is crankcase protection, it must be removed;
- unscrew the bolts securing the lower ball joint - usually there are two of them;
- turn the steering wheel all the way so that the CV joint becomes minimal in length;
- move the steering knuckle to the side and pull the drive out of the hub;
- remove the clamps and pull out the torn boot or cut it;
- remove old grease;
- knock the grenade off the shaft: the process is not easy, you need to hit its outer contour with a hammer, while simultaneously pulling the CV joint towards you with the other hand.
If you manage to do this, inspect the retaining ring at the end of the shaft: you may have broken it (you will have to replace it): if not, just fix the part. Now use a wire brush to clean the drive, especially where the boot was.
Fill the grenade with lubricant (for example, CV joint-4 or "Hado"). Next, put the boot on the shaft. Then hammer the grenade back through the wooden spacer and pull the boot over it, secure it with clamps. Reassemble everything in reverse order.
What to do if the grenade does not go astray
Screw the hub nut directly into the drive: when tightened, it will push the grenade out. If things get tight, ask an assistant to hold the shaft with a gas wrench so that it does not turn.
In the case when the grenade still does not come off the shaft (fanaticism is not welcome, because...
you can damage the bearings in the part that is located in the gearbox), there is a second way to replace the boot, which involves completely removing the drive, but this will be discussed below, in the section on replacing the inner joint cover.
How to replace the outer CV joint boot without removing it
This is also possible, at least on domestic cars, but you will have to acquire (or borrow) a special device that stretches the boot.
The device is a housing with movable arms attached to it and a connected hose for supplying compressed air. A rubber cover is put on them and they stretch it.
All that remains is to pull the device through the grenade removed from the hub and release the levers. The process is worth watching in more detail in the video.
Homemade device
But it is possible to replace the boot without removing the CV joint: using improvised means. To do this, you will need a cone (for example, a fire extinguisher pipe) of a suitable size.
The wide part of it needs to be put on the “disobedient” grenade. The boot is pulled onto the bell by turning it inside out. Pre-lubricate the CV joint on the outside. You will have to make an effort to push the boot through.
After this, it remains to turn it out as expected and secure it.
Replacing the inner CV joint boot
To do this, you will have to remove the drive shaft completely. But first you need to remove the outer CV joint, as described above, that is, pull it out of the hub without removing the grenade. Next, drain the oil from the box. After this, unscrew the nuts securing the inner joint (usually there are 6 of them) and insert a flat mounting between the gearbox and the CV joint - the part should come out of the socket. Clamp the part in a vice, then:
- remove the retaining ring using a flat screwdriver;
- pull out the inner CV joint housing and carefully pick out the balls located in the separator;
- remove the clip stopper and the clip itself;
- wash all parts in gasoline;
- install a new boot and, having generously treated everything with lubricant, reassemble in the reverse order;
- install the drive, tighten the drain plug and pour oil into the box.
What to do if the boot breaks on the road
The situation is not uncommon: you had to change a tire while on the road and you noticed that the boot was torn. It is highly not recommended to leave “everything as it is” and go to the nearest car service: CV joint is not a cheap part at all, especially if it is on an expensive foreign car. Options:
- Place the car on a jack (if it is not already on it), pull out the old contaminated grease through the hole and fill the boot with grease until it stops, and to prevent it from falling out when driving, wrap the problem area with a plastic bag and tighten it along the corrugation with a rope.
- Wrap the torn case with opaque tape or electrical tape. This “alternative” will last for 500 kilometers until the boot is changed.
On the road, check whether your “winding” is in place: getting dirt under it will sharply reduce the life of the CV joint.
conclusions
Both outer and inner CV joints operate under the same conditions. Therefore, if you notice that one of the anthers is torn, it makes sense to replace them all. And one more point: you should not simultaneously remove drives with CV joints on both sides: this can change the position of the gears in the gearbox. It is better to finish repairing one drive first, then work on the second.
Source: https://djago.ru/transmissiya/zamena-pylnika-naruzhnogo-shrusa/
Changing the inner CV joint boot
The importance of replacing the constant velocity joint (CV joint) boot is that this boot drives the front drive wheels by rotational force. It is thanks to it that the wheels turn following the manipulations of the steering wheel.
The function also provides that this device is specifically designed to transmit rotational movements from the steering wheel to the axle shafts, which are constantly at a variable angle relative to each other.
The designers of this mechanism provide that, ideally, it should outlive the car in which it is used, since the hinge is made from the strongest alloys. These alloys must withstand the entire load of the vehicle.
In order for this load to be withstood, the hinge must be of high quality and well maintained. Otherwise, the inner CV joint boot needs to be replaced.
There is a choice here - pay a lot of money for a replacement at a service station or do it yourself.
First, to make sure that the device needs to be replaced, you should check its condition and, in the event of a malfunction or poor condition, carry out the actions that will be described below.
Checking the condition of the CV joint
It should include checking the integrity of the boot, that is, whether it is torn. The boot of the inner CV joint is a protective cone-shaped rubber device that closes the CV joint as tightly as possible, which is responsible for the integrity of the latter under the influence of dust, sand, water, and dirt.
These substances enter the working part while the car is moving. Therefore, it is so important to have an intact boot and regularly check the condition. This can be verified by inspecting the part.
If during a technical inspection a torn inner boot is found or it has lost its elasticity, or it is cracked or folded, it should be replaced immediately.
Replacement instructions
For anthers it is very simple. The easiest way is to replace them not one by one. Initially, the internal boot is replaced (if there is a need), then the external boot (outer) when it wears out. But I don’t recommend doing this, as it is a waste of time and resources of the car.
It is best to replace the outer and inner ones at the same time by completely removing the shaft. The need for simultaneous actions is explained by the fact that, firstly, it is unlikely that parts installed simultaneously will wear out at different rates.
Secondly, in terms of time and physical costs, it is much more profitable to subject a car to one technical inspection and repair than twice.
In addition, when removing the inner CV joint boot, the outer one is much easier to remove than separately.
It is important to know that, despite the fact that replacing it is quite simple, if the driver has not yet dealt with mechanical repairs, then he should not diagnose and replace it on his own.
Firstly, to carry out diagnostics, you should very carefully examine the CV joint - all the accuracy and inaccuracies, all the scratches and frays. You should be able to distinguish normal from worn out.
You should also very carefully and correctly assemble and disassemble the mechanism. If they are not performed accurately, the car will soon end up in more complex repairs.
And no car owner wants this. During disassembly and assembly, the diagnostician must carefully monitor all small parts, trying not to miss a single one.
If everything is done correctly, the replacement will not take much time.
Instructions for replacing the inner boot:
- Initially, I remove the axle shaft with the damaged part, and then its clamps.
- Next, you need to remove the boot from the glass and pull out the retaining ring of the glass.
- The CV joint cage is pulled out of the glass, the axle ring is spread out and the cage with the balls is removed. It is advisable to remove the balls from the cage to thoroughly clean them of old grease. When returning the balls, it is important to make sure that they all return to their places.
- then after cleaning off the old grease, I use only new one. For two CV joints, an average of 250 ml of lubricant and 125 ml of repair lubricant will be required. Also, thanks to such lubrication, the original geometry is restored. These lubricants must be combined, new boots must be put on and lubricant must be filled into them.
- completion of the change procedure involves installing the cage with the retaining ring and balls in place. In this case, the glass must also be filled with lubricant.
- The CV joint cage is inserted into the glass, the inner CV joint boot is put on, and the clamps are clamped.
So, during a diagnostic inspection, it is necessary not only to inspect the condition of all working parts, but also to update the lubricant so that the functions of the boot after the diagnostic change are fully performed.
To do this, the car must be raised using a jack (if possible, the car should be installed above the repair pit or on an overpass).
In order to change the outer CV joint, you need to remove the wheel from the hub, unscrew the nut, remove the crankcase protection and, at the very end, remove the ball joint.
Then the stand is bent and the inner boot is removed. The “grenade” must be lubricated with a special aerosol or cleaning oil - these are cleaning products, after using which a new boot is put on and the entire structure is returned to its place (the assembly procedure is the reverse of that described).
Checking the condition and carrying out replacement will require a set of keys, a vice for removing both hinges, and also replacing the anthers.
Video “Changing the inner CV joint boot”
The recording shows how you can quickly and efficiently replace a car CV joint yourself at home.
Source: http://MineAvto.ru/remont/hodovaya/menyaem-vnutrennij-pylnik-shrusa-909.html
CV joint boot: how to change it, replacement with a universal silicone one, how to pick it up if it’s torn, do-it-yourself installation

The immediate purpose of the CV joint boot is to protect against dust and dirt getting into the complex joint of the joint at equal angular velocities. In addition, due to their design, the anthers effectively retain the lubricant necessary to ensure normal and long-term operation of the unit.
These protective parts are shaped like a cone and made of elastic injection molded polyurethane, rubber or silicone, and can often be found in stores under the name CV joint covers.
Silicone CV joint boots appeared on the market relatively recently and have gained popularity due to their excellent performance characteristics and high reliability.
If it turns out that the boot is torn or has obvious signs of depressurization, then the car owner should immediately contact a service station or replace it themselves.
The prices for anthers are quite low; the work involved in their installation can cost much more.
Replacing a CV joint boot with your own hands will significantly save the budget, and given the car owner’s possible experience in such car repairs, it will not take much time for such work - on average, if the CV joint boot is torn, using the correct algorithm, replacing it can take about 2-3 hours.
The first signs of the need for replacement
Every car enthusiast should make a rule of periodic visual inspection of all parts and components of the car. In this case, special attention should be paid to such protective elements of the chassis as anthers.
And if the question of replacing these parts in the event of an obvious break in the surface is clear, then the less noticeable signs of their imminent failure are worth highlighting separately.
So, a car will need to replace the CV joint boot with the following symptoms, which can be identified without removing the part, namely:
- The presence of microcracks, breaks and other minor damage on the surface of the rubber cover, which can be detected by squeezing or deforming the part;
- A clear change in the color of individual areas of the anther, which may indicate the presence of a negative chemical effect on the material from which it is made;
- Loss of elasticity of the entire part or its individual sections;
- Detection of oily smudges, stains, etc. on the surface of the boot or its connection with the CV joint.
Oily stains on the surface of the bootCrack on the surface of the rubber boot
Selection of anther
When choosing anthers, you should pay attention to their varieties. There is an outer and inner boot of the CV joint, while the dimensions of the inner one are slightly larger.
Also today on the automotive parts market you can find a universal CV joint boot, which can be installed on most cars.
The selection of the CV joint boot must be carried out depending on the category of the vehicle.
Sequence of operations for replacing a part
It is not possible to replace the boots without removing the CV joint, so the car owner needs to be thoroughly prepared for a complex technical operation involving the removal of the entire shaft. There are so-called detachable anthers, but their reliability is at an extremely low level.
Many theoretical information materials provide readers with not entirely correct information on how to change the CV joint boot, recommending separate replacement as the internal or external covers wear out.
According to many experts, such statements can only become a reason for fairly frequent repair work. It is recommended to carry out a comprehensive replacement, i.e.
It is necessary to change the outer CV joint boot together with the inner CV joint boot.
Audi Q7. Replacing the CV joint boot
Before replacing the CV joint boot, the car must be placed on an inspection hole or on a lift. At the same time, some car enthusiasts partially drain the oil from the gearbox, although many do without this operation. We change the CV joint boot, taking into account the universal algorithm below.
The assembly is removed after hanging and unscrewing the front wheel from which the replacement is being carried out. At the next stage, the hub nut is unscrewed, having first removed the protective cap from the seat. Then, using a socket or spanner of the appropriate size, unscrew the ball joint bolts that secure it to the steering knuckle.
Using a metal stop (small crowbar or pry bar), remove the drive from the mounting hole in the gearbox housing. While simultaneously pulling the wishbone down, it is necessary to move the steering knuckle with the strut outward and pull the splined end of first the inner CV joint, and then the outer one, out of the hub.
Having removed the CV joint, it is necessary to remove the clamps that hold the boot and carry out an external inspection of the unit. The damaged boot is removed from the seat, and the old lubricant is washed off using special solutions or regular diesel fuel.
Installation of the CV joint boot is carried out using a flat-head screwdriver, with which it can be pushed along the shaft, pulling it away from its surface. The working surface of the CV joint is generously treated with new lubricant.
In addition, it fills the internal cavity of the anther. At the final stage, clamps are installed that clamp the boot in a stationary position.
The remaining parts are assembled in reverse order.
Conclusion
As can be seen from the above material, the procedure for replacing protective boots is not so complicated, and if you have minimal plumbing skills, it allows you to save not only money, but also your own time.
Source: https://SwapMotor.ru/transmissiya/pylnik-shrusa.html