Do-it-yourself ABS block repair
Most modern cars are equipped with a set of systems aimed at driving safety.
To prevent wheel locking during heavy braking or on slippery roads, an anti-lock braking system (ABS) is used.
It is known that completely locked wheels increase the braking distance of a car, and if only a few wheels are locked, the car is likely to skid.
Composition and operation of the anti-lock braking system
ABS includes several systems - anti-lock braking itself, stability control and emergency braking. The entire complex is controlled by an electronic control unit, and the final device is the vehicle’s hydraulic system.
Signals for the operation of ABS systems come from a sensor installed on each of the wheels and controls the rotation of the wheel at each moment of movement. Based on the speed of the vehicle, the speed of rotation of the wheel, the condition of the road surface or the angle of inclination of the road, signals are generated at the output of the electronic unit for the control valves of hydraulic systems.
The ABS system is very important for the safe driving of a car, so before you undertake to repair it yourself, you need to carefully weigh everything. Diagnostics and repair of ABS system units in a car service, although it will cost a little more than doing it yourself, will guarantee that failures will not occur at the most inopportune time.
This is especially true for those who are accustomed to using ABS and rely on its performance.
Basic malfunctions, diagnostic methods and repairs
Like most electronic systems, ABS has initial self-diagnostic tools that operate when the key is turned. Diagnostics usually takes a few seconds. If after this time no system malfunctions are noticed, the alarm on the dashboard will go off.
When the vehicle is moving, the diagnostics of the ABS systems runs continuously, and if the parameters of the sensors or terminal devices are not within the tolerance zone, a fault alarm is triggered. When a malfunction is signaled, you need to be especially careful to find a convenient place to inspect the car or get to the nearest car service center, especially in cold weather when the roads are slippery.
Sometimes it happens that a malfunction can be fixed with your own hands in a couple of tens of minutes.
To repair ABS system units yourself, you must first measure the battery voltage. If the voltage is less than 10.5 V, the ABS control unit will not turn on to avoid operating errors.
If the voltage is normal, you will have to continue troubleshooting. Most of them are due to the electrical wiring of the sensors.
Moisture entering the connectors causes oxidation of the contacts, so first of all you need to evaluate the condition of the contacts of each ABS system sensor.
Very often, breakdowns of ABS systems are caused by a malfunction of the control unit sensors. To operate the ABS sensor, a gear wheel is attached to the hubs, and the sensor itself is an inductance coil located at a distance of 0.2–1.
5 mm from the teeth. If all the teeth are in place, then you need to measure the gaps between them and the sensors and, if necessary, adjust the mounting of the sensors. Dirt accumulated on the teeth and surface of the sensors can negatively affect the operation of the ABS.
The coils themselves are checked using an ohmmeter. The device should show a resistance of 1–3 kOhm, depending on the type of sensor. The main thing is that they are all the same on one car.
If the ABS sensor coil shows an open or short circuit, or is very different from the rest, then it needs to be replaced or repaired. We can only advise you to check the place where the connecting conductors enter the device.
Perhaps the wires are broken, and after removing a little insulation from the sensor, you can try to solder the break or short circuit. Many devices can be disassembled by heating them with a hair dryer and removing the plastic cover at the point where the wires are supplied.
It is under this cover that breaks most often occur. In this case, DIY ABS repairs will not be very serious. Considering the cost of the sensor, such a technique may have a right to exist.
We repair the control unit
If the sensors are in order, the condition of the wiring from them to the electronic unit is not satisfactory, then you need to inspect the control unit. Do-it-yourself repair of ABS control units is only advisable for those who are very well versed in electronics, know how to use a soldering iron, and have skills in repairing electronic devices.
The ABS control unit, as a rule, is non-separable and hermetically sealed with glue. The printed circuit board on it is filled with a special sealant. If you carefully open it, you can look at the wires soldered to the printed circuit board of the unit.
Very often they cannot withstand vibration and come off. The broken wire must be carefully unsoldered and another one soldered in its place. For soldering, you need to use an electric soldering iron with a power of no more than 40 W.
Rosin or its solution in ethyl alcohol is used as a flux.
It is prohibited to use soldering acid for soldering ferrous metals, as it will corrode printed traces and copper wires over time.
To check the hydraulic valve coils, you need to free their terminals from the sealant and apply a voltage of 12 V to them. A normal coil should work like an electromagnet, attracting steel objects to itself.
Rewinding coils and repairing the printed circuit board should only be performed by a specialist. It is very difficult to do this with your own hands and without any guarantee. In any case, after the repair is completed, you need to restore the sealant layer. To do this, you can use neutral silicone. Regular silicone contains acetic acid. It cannot be used categorically.
Some time after the repair, the printed conductors on the control unit board will be completely corroded. For the most part, the control unit needs to be replaced.
Instead of a conclusion
One more note. When replacing brake fluid in a car, it must also be drained from the ABS accumulator (pressure accumulator). This can be done by pressing the brake pedal several times with the ignition off.
When the ignition is turned on, the pump in the hydraulic unit will strive to replenish the loss of fluid.
To avoid damage to the electronics, during welding work on the car, the ABS control unit also needs to be disconnected from the power circuits by pulling out the connector.
Sources: http://portalmashin.ru/repair/remont-bloka-abs.html
Source: http://master-informa.ru/obzory/tekhno/52569-remont-bloka-abs-abs-svoimi-rukami
How we repair ABS blocks
Home → Articles → How we repair ABS blocks
We repair ABS and ESP blocks of any car brands using a special technology, which consists of soldering the finest platinum connections of these blocks, which guarantees quality and durability.
All repaired ABS units come with a one-year warranty. Also, repaired control units are sealed with a special control sticker. Attention, if it is damaged, the warranty does not apply!
Some information about the ABS ECU:
An anti-lock brake system exists in almost every modern car. During sharp braking, the system does not allow the car's wheels to lock, which eliminates the car skidding and loss of control due to wheel locking.
It has already been proven that thanks to the anti-lock system, the braking distance of a car is reduced by 2 times. Also, many cars have an ESP system, which will protect the car’s wheels from slipping on icy or wet roads.
The ABS/ESP electronic control unit is the “brain” of such a system, located mainly under the hood of the car next to the ABS pump (or combined with it).
This electronic control module is responsible for monitoring wheel sensors and analyzing speed readings, as well as braking force, and controls the ABS pump valves, ensuring normal braking.
If the ABS or ESP indicator lights up on the dashboard while the car is moving, it means that the anti-lock braking system has failed. Of course, you can drive such a car, but you should take into account that to lock the wheels you will need to press the brake pedal harder. If such a problem occurs, we first advise you to carry out diagnostics in order to identify and subsequently eliminate this malfunction. It is better if qualified specialists do this.
The main causes of malfunctions of ABS/ESP control units:
1) operation in severe environmental or weather conditions; 2) moisture or any other liquids getting inside the unit; 3) depressurization of the unit, as well as oxidation under the influence of moisture;
4) short circuit or mechanical damage.
If, after diagnostics, your control unit is found to be faulty, this does not mean that it needs to be replaced; most likely, the old unit can be restored. It should be noted that repairing a unit is much cheaper than buying a new one.
We repair ABS blocks from the following manufacturers: “Bosch”, “ATE”, “Wabco”.
The following vehicles and units are most often susceptible to malfunctions:
– ABS/ESP ATE MK20, MK 60, MK 70, MK 25, MK 50E, which are used on cars such as “VW”, “Volvo”, “Audi”, “Skoda”, “Seat”, “Ford”, “ Renault" and "Mercedes";
– ABS/ESP Bosch 5.0, 5.3, 5.5, 5.7, 8.0, which are used on cars from various global manufacturers;
– ABS/ESP Wabco, used on Rover cars.
We carry out repairs and complete restoration of almost any ABS/ESP control units. These are the blocks “Audi” and “VW”, “Mercedes” and “BMW”, “Opel” and “Volvo”, “Mazda” and “Ford”, “Toyota”/Lexus and “Honda”, “Skoda” and “Seat” "
During the repair process, we change absolutely all the conductors leading to the wheel speed sensors. When using this technology, the percentage of ABS/ESP units returned under warranty is practically zero!
← all articles
Source: http://www.el-cars.ru/articles/remont-ABS
Do-it-yourself ABS sensor repair – Auto electrician in Minsk
Do-it-yourself ABS sensor repair These days, anti-lock braking systems (ABS) have long ceased to be a luxury and are installed on almost all new cars.
Despite the fact that this undoubtedly useful system has a fairly high reliability (at least electronic units very rarely fail) and it has very vulnerable elements, which, first of all, include wheel sensors located close to rotating parts axle shafts or hubs.
Be that as it may, it is the breaks in the connecting wires, or even worse, the breaks in the internal windings of the sensors themselves, that in most cases are the main reasons for the failure of the ABS system.
Meanwhile, such a sensor costs a lot (its price can reach $200) and in some cases it is much more useful to show some ingenuity and try to repair the ABS sensor with your own hands. By the way, let’s immediately make a reservation that the appearance of a code command and the lighting of the ABS failure alarm does not always indicate the presence of a real malfunction.
The fact is that the performance of ABS is greatly influenced by the battery charge and if the voltage between its terminals drops to 10.5 V or less, the anti-lock braking system can be forcibly turned off using a special emergency relay (which is often triggered due to voltage surges in the on-board network) .
If everything is normal with the supply voltages and the continuity between the contact terminals of one or another sensor shows zero resistance, the reason is indeed in the sensor and you can begin to restore it (to avoid an annoying mistake, it is recommended to measure the resistance both at the terminals of the connector and directly at the sensor body using needles for this purpose). Quite often, the ABS sensor “sticks” in the mounting socket and in order not to damage the fragile case, you need to be patient and, when dismantling the sensor, slowly loosen it, periodically wetting it with WD40 liquid. Once the sensor is in your hands, the process of disassembling it begins, for which, using a metal file, the part of the sensor with the measuring coil inside is separated. We make a cut around the sensor and very carefully so as not to damage the fastening elements too much. The next step is to remove the plastic casing designed to protect the sensor coil. For this purpose, it is necessary to make a longitudinal cut in the outer part of the coil, after which it becomes possible to remove the shell (after prying it off with some sharp object). Again, we do everything slowly and carefully, so as not to damage the coil body with a careless movement.
Next, we carry out a rather tedious process of winding up the wire (at the same time we are looking for the break point), as a result of which we have an intact reel frame.
The next, very important step, is winding a new coil, and if you do not have a wire of a suitable diameter on hand, you can take a wire from the coil of a fairly common RES-8 relay. Winding will be much more accurate if you use an electric drill with smooth speed control to perform it.
Please note that the coil wire is very thin and breaks easily, and if there is the slightest mistake, you will have to start winding from the very beginning. It is better to wind the wire around the body to the maximum and then simply gradually reduce the number of turns, bringing the resistance to the required limits (usually from 0.92 - 1.22 kOhm).
Having achieved the required resistance, we solder new leads (for reliability from stranded wire) and insulate the coil.
In general, the worst is over and you can start assembling the sensor housing. If the old case is not too damaged, we try to restore it. Otherwise, we pour a new body using epoxy resin glue.
For these purposes, both domestic glue and imported glue with accelerated setting are suitable.
A mold for a new sensor can easily be made from the shell of an electrolytic capacitor of the appropriate diameter, into which glue is poured and the entire updated structure is immersed (a special hole is made for the coil rod in the lower part of the capacitor body).
After the glue has dried, the capacitor body is removed from the coil. We use the old sensor mount, simply gluing it in its original place.
Similar
Source: http://help4auto.com/2016/01/08/remont-datchika-abs-svoimi-rukami/
DIY abs repair
Accordingly, the broken unit should be repaired in a timely manner.
Check out - hydraulic pumps produced by Bezares include all the most popular types according to the method of connection.
Do-it-yourself ABS faults and repairs
This system has three components: there are wheel sensors, electronic and hydraulic control units. People call the service station mainly because of a malfunction of the wheel speed sensor, electrical wiring, or control unit. Only at the station can a malfunction be accurately determined.
The ABS system is considered reliable; it is capable of functioning for a long period. Electronic units are protected from damage; special relays and fuses are installed for this purpose.
Mostly the wheel sensors break; they are located near the rotating components of the hub and axle shafts. Any contamination or significant play in the hub bearings can cause problems in this system.
You should not repair ABS yourself. You can only remove the wheel sensors and install them. The equipment is located in the steering knuckles, as well as on the axle shafts of the rear suspension.
Do-it-yourself ABS malfunctions and repairs – The procedure for removing and installing sensors is carried out in this mode:
– turn off the ignition;
– remove the wheel;
– disconnect the sensor wire and connect a new one.
Do-it-yourself ABS faults and repairs
It must be remembered that the functionality of ABS is influenced by the voltage parameters that are formed between the battery terminals. If the voltage drops below 10.5 V, the safety electronics switches off the system. The safety relay will operate at the moment of large fluctuations, sudden “jumps” in voltage.
To avoid such a situation, you need to follow simple rules:
– when the engine is running, do not disconnect the electrical connectors;
– you should not start the engine from a third-party battery (it is advisable not to provide your own car for this);
– we monitor the state of the contacts on the generator;
– before starting welding work, it is necessary to disconnect the wiring from the electronic unit;
– when painting a car, we do not expose it to heat above 85 degrees for more than 2 hours.
Before replacing the brake fluid, the pressure accumulator present in the ABS valve body must be discharged. This is done by repeatedly pressing the brake pedal when the ignition is turned off. When the ignition is turned off, the electric pump in the valve body will operate. If the system is depressurized, the liquid will immediately leak out.
© 2012 – 2014, Sochi Auto Repair. All rights reserved.
Source: http://remtem.ru/remont-abs-svoimi-rukami.html
DIY ABS sensor repair video
Modern anti-lock brake systems (ABS) have long ceased to be a feature of luxury cars - they are installed on most new cars coming off the assembly line.
Although this useful equipment is quite reliable, it still has a number of problem points that can affect smooth operation.
The most vulnerable elements of the ABS include the wheel speed sensors located on the vehicle's hubs.
Main symptoms of a malfunction
The ABS sensor is an inductor that works in tandem with a toothed disk, which is also mounted on the hub. Together they measure the speed of rotation of the wheel. The first symptom of a device malfunction will be the signal from the warning lamp located on the car’s dashboard.
When the system operates stable, the controller goes out a few seconds after the engine starts. If the indicator continues to light or begins to blink randomly when the car is moving, the anti-lock brakes require immediate attention.
Along with the signal from the indicator lamp, a malfunction of the sensor is indicated by:
- alphanumeric error code of the on-board computer;
- absence of characteristic sound and vibration when pressing the brake pedal;
- constant wheel locking during emergency braking;
- light signal from the parking (hand) brake controller when the equipment is turned off.
The appearance of any of these symptoms requires a full diagnosis of the system. Please note that the help of car service technicians in resolving this issue is completely optional. There are various ways to check the ABS sensor, and in most cases this work is easy to do yourself.
Change or repair
As a result of diagnosing the device, it is possible to determine which sensor node is damaged.
If the tester readings tend to zero, this indicates a short circuit in the connection wires; “infinity” indicates a violation of the integrity of the coil winding.
There is an opinion that repairing wiring does not cause any problems, but a faulty sensor is easier to simply replace. It’s hard to disagree with the first thought, but the next “point” can be disputed.
The fact is that the cost of some sensors reaches 14–18 thousand rubles, and you will have to wait for their delivery for a long time.
Having certain skills, a reserve of patience and natural ingenuity, it will be much more useful and faster to repair the device than to pay for a long-awaited expensive order.
Please note that this advice is only advisory in nature - the final verdict remains yours. If the decision to repair has been made, we will be happy to help you carry it out correctly.
DIY sensor repair
After diagnostics and detection of a faulty element, the device must be dismantled for further repairs. The process of removing it is similar to the first stage of replacing the ABS sensor and is not particularly difficult.
Attention! Elements may stick to the seat; It will take a lot of patience to remove them from their mounting socket. Professional craftsmen advise generously moistening the metal around the device with WD-40 liquid and carefully removing the sensor, slowly loosening it.
What a dismantled sensor looks like (photo)
How to fix: step-by-step instructions
Having finished dismantling the device, we proceed to repair work:
- We disassemble the sensor, cutting off with a hacksaw the part of it containing the measuring coil inside. Carefully saw through the body of the device in a circle, trying not to damage the fasteners.
You should carefully separate the part with the fastening. This element of the sensor will become the object of repair work.
- We remove the plastic casing that protects the coil - make a longitudinal cut on its extreme part and remove the shell by prying it off with a sharp knife. We unwind the winding wire from the coil frame.
In order to rewind the damaged wire, you need to remove the coil casing. The reel is completely cleared of old wire
- We wind a new coil using copper wire of a suitable diameter - the winding of the RES-8 electric relay is quite suitable for this stage of work.
The process will be much less labor-intensive if you use a low-power electric drill or screwdriver with variable speed control to complete it. We wind the maximum number of turns of the wire onto the coil and gradually reduce them, bringing the resistance indicator to the desired values (0.92–1.22 kOhm).
We pay special attention - the wire used in the work is very thin, and if it breaks, you will have to start the whole process all over again. The number of turns of the wire must be controlled by measuring the resistance
- Having received the necessary resistance, we solder new leads from a stranded wire to the sensor and carefully insulate the coil body.
We protect the new winding from moisture by covering it with silicone sealant or wax. The copper winding of the coil must be carefully insulated
- We assemble the sensor by restoring the old housing (if it is not badly damaged).
In case of critical destruction of the shell, you can make it yourself using adhesives based on epoxy resins.
We make a new device body as follows: we take the shell from any electrolytic capacitor (suitable in size), make a hole in its lower part for the coil rod, insert the updated section of the device there and fill it with glue. The capacitor shell can be the mold for pouring the new coil body. This is what the new one looks like sensor housing made of epoxy adhesive
- After the epoxy has dried, remove the capacitor shell and glue the sensor mount in its original place. The sensor mount can be glued to the part with quick-drying glue. The device is ready for installation on the seat.
The repair of the sensor is completed, you can mount it on the hub, grinding the new housing with sandpaper for a better fit to the mounting socket. When installing a repaired device, be sure to comply with the following conditions:
- We position the sensor core parallel to the teeth of the response disk, making sure that it does not overlap two adjacent teeth.
- Leave a gap between the tooth and the core of 0.9–1.1 mm.
The final stage of repairing any of the ABS elements is to check the functionality of the system. We perform it by starting the car engine and making sure that the controller on the dashboard goes out 3-5 seconds after the start.
Attention! If the ABS indicator light periodically lights up when the car is moving after the sensor has been repaired, change the phasing of its connection wires.
Note that some sensors produced by the foreign auto industry can be disassembled without fundamentally compromising the integrity of the structure - the upper shell of the part can be removed by pre-heating it with a hair dryer or a blowtorch. An example of repairing such a device is presented in the video.
Video: Rewinding the Renault Megane ABS sensor coil
Restoring wiring integrity
There should not be any particular problems with the issue of replacing or restoring the sensor connection wiring. For these purposes, any two-core cable of a similar cross-section or two pieces of field wire of the required length will be suitable.
In your work, you must use only the soldering method and carefully insulate the joints with heat-shrinkable tubing or electrical tape.
Special attention should be paid to the rubber seals that are located at the points where the wiring is attached to the body parts - if the cord is completely replaced, they should be placed in the same place.
When replacing the wire, install rubber seals at the points of its attachment to the body
Attention! When connecting the wiring to the ABS sensor, you need to take into account that the device has polarity. The car's operating instructions indicate the color coding of the wires - the connector of the part has exactly the same designations.
The process of repairing the ABS sensor wiring is described in more detail in the video presented.
Video: How to repair a section of wire on a Chevrolet Aveo
Repairing an ABS sensor is a very time-consuming and troublesome task. If you are not persistent and patient, or simply do not have free time, you are unlikely to take on the business. Well, those who are used to solving all problems on their own and do not want to spend extra money can now easily do this work on their own.
Source: http://car-avz.ru/glavnaya/posobie/536-remont-datchika-abs-svoimi-rukami-video
How to repair an ABS sensor
ABS (anti-lock braking system) is a system that prevents the wheels from locking during braking. When your car's wheels skid, controllability drops sharply and the likelihood of an unfavorable outcome in an emergency increases. To eliminate sliding friction when the car stops, engineers developed this system.
To understand how to repair ABS yourself, it is important to know the principle of operation of the system: the driver presses the brake pedal all the way and the wheels immediately lock.
In a split second, the ABS control unit reads this information from the sensors and relieves the brake fluid pressure through the ABS hydraulic unit. As soon as the speed sensors “understand” that the wheel is spinning, the system turns off and the wheel is locked.
Since this happens in a split second, the wheels are held at the limit of skidding. This whole process can be felt by the vibration of the brake pedal.
Signs of a faulty ABS Lada Vesta
Before identifying a faulty anti-lock brake system and answering the question of how to fix the ABS, it is important to understand the signs of failure. And the first sign of an ABS malfunction is a special lamp on the instrument panel. If the system does not recognize the error, then the malfunction can be determined by several external signs:
- When you press the brake pedal all the way, the wheels are locked. This indicates that the ABS system is completely disabled and does not work.
- When you press the brake pedal all the way, vibration is felt, but the handling “leaves much to be desired.” This is an indication that ABS does not work on all wheels. The ABS sensors or hydraulic unit have probably failed.
If the sensors fail, you can get by with little expense by simply replacing them with new ones. If other parts of the system break down, repairs can cost a pretty penny. Let's look at how to repair ABS by dividing the system into 3 units.
Malfunctions of ABS sensors and related elements
How to repair an ABS sensor? Most often, the malfunction of the anti-lock braking system is associated with sensors. This is due to the fact that they are most often exposed to external factors and are in constant motion.
You can find out about sensor malfunctions by connecting a laptop to the diagnostic connector and deciphering the error codes. If this is not possible, then you can go through each sensor with a tester (it is better to use an oscilloscope).
To do this, you need to lift the car wheel on a jack and start measuring, simultaneously rotating the car wheel. By measuring the resistance on all 4 sensors, you can confidently identify the faulty one among them.
How to repair an ABS sensor with your own hands? It's simple: you need a TORX-T30 wrench with an extension cord and 20 minutes of time: you need to unscrew the sensor and disconnect the wire going to it. The sensors on the rear wheels of the car are replaced in the same way.
Malfunctions of the ABS hydraulic unit
In some cases, the cause of anti-lock brake system failure is the hydraulic unit.
The consequence of a malfunction of the hydraulic unit is a complete shutdown of the system, and repairs are required to return the system to working condition.
Sometimes the hydraulic unit cannot be repaired and requires replacement, but in any case the unit must be dismantled. In order to remove the hydraulic block of the anti-lock braking system, you need to perform the following steps:
- Place the car on a lift and remove the negative terminal from the battery.
- Disconnect the wiring harness from the hydraulic unit.
- Unscrew the brake pipes from the hydraulic unit and plug them to prevent dirt from entering.
- Remove the tubes and wires from the clamps.
- Remove the block by unscrewing the three nuts securing the bracket.
Assembly is carried out in reverse order. After assembly, it is important to program the parameters of the ABS control unit.
Checking the ABS control unit and electrics
How to repair an ABS unit with your own hands? The first thing to do is to understand the reasons. And one of the likely reasons for the failure of the anti-lock braking system is poor electrical contact.
This may be due to broken wires, blown fuses and relays, as well as failure of the ABS control unit itself.
Therefore, before you start replacing the ABS control unit, you need to make sure that the electrical circuits are in good condition: check the integrity of all wires and fuses, as well as the functionality of the relay.
After replacing the anti-lock braking system control unit, just like other elements of this system, it is necessary to perform the procedure for programming the system parameters.
(1 ratings)Loading…
Source: https://olade.ru/kak-otremontirovat-datchik-abs
How to repair an ABS unit with your own hands? – Automotoguru
Basically, the design of all ABS blocks and their repair are in many ways similar to other blocks, so if your ABS block , then in this article we will look at how to repair it yourself .
Here are the possible symptoms: - if, when connected to the diagnostic connector, there is no connection between the computer and the ABS unit or an error may appear:
- 01203 - Electrical Connection between ABS and Instrument Cluster
- 03-10 – No Signal – Intermittent
- When the car is running, the STOP (!) or ABS lamps are constantly on or come on periodically and the buzzer rings 3 times.
All operations that will be described in this article are for informational purposes only.
The ABS unit is part of the braking system and, according to traffic regulations, any interference with it is prohibited.
Our recommendations... I want to warn you that if you have never taken anything apart, then it’s better not to do it...
Several units were repaired using this method, and they all work and function perfectly.
So the description itself...
Any ABS block usually consists of 2 parts, the hydraulic unit itself and the electronic unit. The ABS block is a very smart thing, which even if it fails, you will never lose your brakes, no, they will work in simple mode, bypassing this block. Even when you take it out of the car, you can safely get in and drive and the brakes will work...
what it looks like in a car
So the repair itself...
We remove the electronic unit itself from the car, what is needed for this: Jack up the wheel on the left side, remove it and substitute some wood or bricks for your safety (you will have to climb inside under the wheel arch)
We remove the fender liner, of course if there is one, then unscrew the washer reservoir, it is fastened with 3 bolts, 2 from below and 1 under the hood.
Now, carefully move the washer reservoir to the side... disconnect the connector from the electronic unit
Under the abs electronic unit itself there is a connector for the return pump, we also remove it...
If you have a T20 torx, it is better to unscrew 6 screws with it, then remove our ABS electronic unit from the valve body
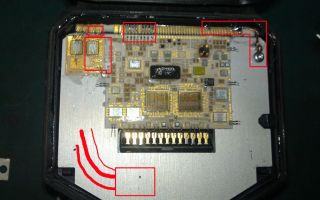
Now we arm ourselves with a cutter or something similar and carefully cut off the block cover (little by little we scratch along the plastic body, along the entire perimeter, make grooves in the end of the cover, as in the picture). Its thickness is approximately two millimeters.
When you have gone through this whole thing))), then take a flat-head screwdriver and try to pry off the cover, only on the side where the connector is, and on the other. With such movements, we will break it off from the body. When you break it off, you will see the board itself inside, filled with some kind of crap that looks like jelly... We are not picking anything there, there are very small radio components on the board and God forbid you get caught...
The dimensions of this box are 70 mm x 83 mm.
Now, to be careful, take tape and cover part of the electronic board, leaving only the place where the contacts on the board connect to the contacts on the pad of the unit itself.
Approximately in the middle of the contact pads there are two thick wires that connect the board to the contact pads on the block body. Now if you take, for example, a needle and slowly shake those same two wires, then you will see a bad contact... (in most cases from the side of the body)
So we have found the problem area that most ABS blocks suffer from, now we take a soldering iron and solder all the joints. Just remove the jelly first, carefully and slowly... If the places cannot be soldered normally, then take a wire about ten centimeters and approximately 0.3 thick and solder it. Once soldered, cut off the rest of the wire.
I hope you can be more careful...
When you are done with soldering the wires, you can check the functionality of our unit directly. so to speak, in disassembled form, you just need to attach its electronic part to the valve body, do not screw anything in, connect the connectors and turn on the ignition.
If everything is in order, that is, there is no buzzer and the lights show. that everything is in order, it means you did everything correctly... Now all that remains is to assemble everything and glue the lid with some epoxy.
That's all, I think that everyone can do this kind of repair... Good luck.
Tell friends:
≡ June 23, 2015 · Category:
E39 (1996-2003) DIY
The BMW E39, like most modern cars, is equipped with an anti-lock braking system (ABS). Its main task is to prevent the wheels from completely locking when braking in an emergency.
The anti-lock braking system increases vehicle control when the brake pedal is pressed sharply, especially when cornering and during icy conditions.
The ABS includes the following components: a hydroelectronic control unit, a system malfunction warning lamp located on the dashboard, and sensors on the vehicle wheels.
The main task of ABS is to prevent the wheels from completely locking when braking in an emergency.
An electronic device located in the control unit monitors the presence of defects in the system. If there are any, the malfunction indicator lights up and the system turns off.
At the same time, you can drive the car, but when braking, it behaves as if there is no anti-lock braking system.
Almost every BMW E39 owner can check and repair the ABS unit, including replacing sensors with his own hands. But there are differences in the models before and after restyling.
Differences between the ABS system in BMW cars before and after 1999
The BMW E39 was restyled in 1999. The modernization affected not only the body and power units, but also the anti-lock wheel system during braking. In models before restyling, the hydraulic unit and the electronic control device are located throughout the car body: the hydraulic part is located under the hood, and the electronic unit is in the car interior (behind the glove compartment).
Since 1999, the manufacturer has combined two blocks into one and placed it under the hood near the intake manifold.
Since 1999, the manufacturer has combined two blocks into one and placed it under the hood near the intake manifold. This solution turned out to be not entirely successful, because the electronic device turned out to be sensitive to temperature changes and strong vibrations. It was this design decision that became the main reason for the failure of the ABS system.
The sensors on the wheels have also been changed. Until 1999, the sensor was attached to the wheel hub with two bolts, and the connector was painted gray. After restyling, the sensor has one ear for mounting, and the chip is painted blue.
What to do if the ABS light comes on?
After turning the key in the ignition switch, system diagnostics start. The ABS light comes on for about 3 seconds and then goes off. If the indicator stays on longer or starts to glow while driving, follow these steps:
- Park the car, turn off the engine. Start the engine after 2-3 minutes.
- Check the voltage supplied by the battery. It should not be less than 10.5 volts.
- Make sure that there is good contact between the power wires and the battery terminals.
- Check the integrity of the wires coming from the sensors on the wheels.
If the anti-lock braking system light continues to light, then most likely you will have to go to a service station and carry out a full diagnosis there. Using a special device, you can read the error code and use it to determine the direction to eliminate the defect.
Self-check, replacement and repair of ABS sensors
ABS diagnostics should begin by checking the speed sensors. To get to them, you must remove the wheel, caliper and brake disc. The sensor is attached to the hub with two or one bolts; they can be unscrewed using a hexagon. Before dismantling, treat everything with WD-40.
ABS diagnostics should begin by checking the speed sensors
After removing the ABS sensor, disconnect the connector (it is located in the upper part of the wing). Before checking the sensor, make sure the wires are intact. If there is damage, the wires can be replaced.
In this case, it is important that the length of the wires remains the same and the electrical resistance of the sensor does not change. If you don’t quite understand what we’re talking about, it’s better to contact a radio electronics specialist.
The working sensor should have a resistance in the range of 0.9–1.3 kOhm.
Do-it-yourself ABS electronic unit repair
For the BMW E39, before restyling, there are practically no problems with the electronic part of the ABS, but the anti-lock braking system on models since 1999 is more capricious due to the unsuccessful placement of the control unit under the hood near the engine. You can try to revive the hydroelectronic unit from a car after 1999 on your own. For this, skills in working with a soldering iron will be useful.
The sore spot of the electronic control unit is the conductors connecting the connector and the device board. Contact is often lost in them due to frequent temperature changes and vibration. We'll look at how to fix this defect below.
The sore spot of the electronic control unit is the conductors connecting the connector and the device board
The procedure for repairing the ABS unit in the BMW E39 after restyling
- Cut off the cover from the removed block. This can be done with a sharp knife or hacksaw blade.
- Carefully remove the protective layer from the edge of the board. The entire surface is covered with it. There is no need to remove the entire layer. It is necessary to gain access to the aluminum conductors from the board to the connector. Taking the needle in our hands, we carefully check the contact.
To do this, just poke the needle into the conductor.
- Using tweezers, remove the conductor that does not have contact. We solder a new one instead. It is better to use thin copper wire. A wire from a broken mobile phone charging cord is perfect. Surely many people have one like this at home.
- Let's check the remaining conductors. There are 16 conductors going to the connector.
If there is a break, resolder the contact.
- We install the cover on the sealant. We install the unit in the car. We connect hydraulic tubes and sensor connectors.
If “experts” have already gotten into the control unit, then it will be almost impossible to repair it. It is better to immediately look for a replacement. It is not recommended to buy a disassembled ABS unit.
It may have defects that may appear later.
You can drive without ABS, but remember that the anti-lock braking system is a safety element of the car. Take care of yourself and those around you.
Video advice on finding an ABS failure in a BMW E39
Do-it-yourself ABS malfunctions and repairs - you can fix some things yourself, without a car service. Almost all modern cars are equipped with an anti-lock braking system. In this case, it is necessary to carry out ABS diagnostics regularly. As soon as the ABS and the ESP stabilization system fail while driving, the controllability of the car is immediately lost. This may lead to an emergency.
Accordingly, the broken unit should be repaired in a timely manner.
Check out - hydraulic pumps produced by Bezares include all the most popular types according to the method of connection.
Do-it-yourself ABS faults and repairs
This system has three components: there are wheel sensors, electronic and hydraulic control units. People call the service station mainly because of a malfunction of the wheel speed sensor, electrical wiring, or control unit. Only at the station can a malfunction be accurately determined.
The ABS system is considered reliable; it is capable of functioning for a long period. Electronic units are protected from damage; special relays and fuses are installed for this purpose.
Mostly the wheel sensors break; they are located near the rotating components of the hub and axle shafts. Any contamination or significant play in the hub bearings can cause problems in this system.
You should not repair ABS yourself. You can only remove the wheel sensors and install them. The equipment is located in the steering knuckles, as well as on the axle shafts of the rear suspension.
Do-it-yourself ABS malfunctions and repairs - The procedure for removing and installing sensors is carried out in this mode:
— turn off the ignition;
— remove the wheel;
— disconnect the sensor wire and connect a new one.
Do-it-yourself ABS faults and repairs
It must be remembered that the functionality of ABS is influenced by the voltage parameters that are formed between the battery terminals. If the voltage drops below 10.5 V, the safety electronics switches off the system. The safety relay will operate at the moment of large fluctuations, sudden “jumps” in voltage.
To avoid such a situation, you need to follow simple rules:
— do not disconnect the electrical connectors when the engine is running;
— you should not start the engine from a third-party battery (it is advisable not to provide your own car for this);
— we monitor the state of contacts on the generator;
— before starting welding work, it is necessary to disconnect the wiring from the electronic unit;
— when painting a car, we do not expose it to heat above 85 degrees for more than 2 hours.
Before replacing the brake fluid, the pressure accumulator present in the ABS valve body must be discharged. This is done by repeatedly pressing the brake pedal when the ignition is turned off. When the ignition is turned off, the electric pump in the valve body will operate. If the system is depressurized, the liquid will immediately leak out.
Source: https://avtomotoguru.ru/kak-otremontirovat-blok-abs-svoimi-rukami/