Replacing the electrolyte in the battery

 Publication date Apr 06, 2013, Categories Car battery |
Replacing the electrolyte in a battery periodically becomes a hot topic.
During the operation of the battery, the density of the electrolyte and its level may change; a hydrometer or glass tube is used to measure the indicators, respectively.
It is very important to monitor this data, since a deviation from the norm will significantly reduce the service life of the battery, and its discharge will become a frequent occurrence.
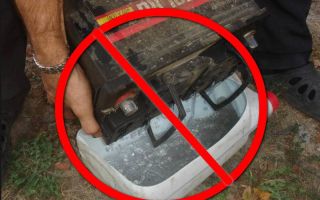
Let's look at cases when it is necessary to replace the electrolyte in the battery. If you notice that the color of the electrolyte has become brown, perhaps with a red tint, this indicates a large amount of sludge, plate oxidation products and is an indication to replace the solution in the jars.
How to perform this procedure correctly. Many experts believe that the process of replacing the electrolyte in a battery can be detrimental to it. But if there is an urgent need, this must be done very carefully so as not to permanently damage the battery. It is necessary to have a battery charger and a hydrometer on hand.
Before replacing the electrolyte in a battery, it is necessary to discharge it with a current equal to 5 percent of the nominal capacity of the battery in order to obtain 7 V at the terminals. This procedure allows a large number of oxides to separate from the plates. Now you can start the main task.
There is an opinion that draining the electrolyte is very simple, through drilled holes in the bottom with a diameter of 3 mm. And then just solder them. This method is effective, but there is a huge risk of simply ruining the battery.
The second method of replacing the “mixture of acid and distilled water” in the battery involves draining the liquid through the holes in the jars, using a glass test tube with a bulb, in order to complete the procedure without turning the battery over.
If the battery is turned upside down, the oxides can cause the plates to short out.
After the draining procedure is completed, a new solution is poured in corresponding to the density. After a break of a couple of hours, you can connect the charger and set the current to 10 times less than the rated capacity of the battery. This is the basic principle of replacing the electrolyte in the battery.
But you should remember that even if you change the electrolyte, the battery will not last much longer, and over time you will have to buy a new one. This procedure may be relevant if it is not possible to make a purchase in the near future.
Related posts:
More on the topic
Source: http://awtosowet.ru/zamena-elektrolita-v-akkumulyatore/
How to increase the density of electrolyte in a battery? Electrolyte replacement. What is battery density?
Car batteries are designed not only to start the engine, but also to power the car’s electrical devices when the ignition is turned off. Due to inattention, a driver can easily forget that the car's headlights are on or the radio is working, the volume of which is reduced to zero.
Returning to the car the next day, you may find that it will not start, and the reason for this is a dead power source. It is possible to start a car with a discharged battery, but after one or two emergency methods of starting the engine begin to get boring, and there is clearly a need to return the battery to working condition.
“Battery density” or the ratio of sulfuric acid and water in the electrolyte
In common parlance, the term “battery density” is common. It is essentially flawed because no one measures the density of the power supply directly.
Any car enthusiast will tell you that the term “battery density” refers to the density of the electrolyte that is poured into the battery.
The density of the electrolyte in the battery determines its ability to charge and store accumulated energy.
If the battery is discharged due to the driver’s carelessness or other reasons, you should try to return it to working condition using a charger. Before charging the battery, distilled water is added to it, which may have evaporated during operation of the power source.
The water in the battery is mixed with the finished electrolyte, which leads to a decrease in its density, that is, to a decrease in the percentage of sulfuric acid in the final solution. After some time, the density of the electrolyte in the battery, due to its constant dilution with distilled water, decreases and falls below a comfortable level.
Operation of the battery becomes impossible, and in such situations there is a need to increase the density of the electrolyte in the battery.
How to increase the density of electrolyte in a battery yourself?
The density of the battery, or more precisely, the electrolyte in it, can be increased quite simply without contacting service center specialists. First of all, it is necessary to carry out a number of preparatory procedures:
- Prepare containers that will be needed to drain some of the old electrolyte from the battery;
- Get personal protective equipment - gloves, glasses, clothes (which you don’t mind getting ruined). Remember: Battery electrolyte partly consists of sulfuric acid, which is dangerous and, if it comes into contact with the skin, can cause burns and seriously damage clothing;
- Take the tools you will need to increase the density of the electrolyte in the battery: hydrometer, enema bulb, measuring cup, funnel;
- Buy the necessary consumables: distilled water, battery acid or ready-made electrolyte.
To increase the density of the electrolyte in the battery, you will have to completely replace all the electrolyte that is already poured into the battery with a new solution. This is quite easy to do if you follow the instructions and take the necessary precautions.
How to change the electrolyte in a battery?
Most modern batteries are dismountable, and they provide the ability to replace the electrolyte yourself.
Non-separable batteries are very rare, and if necessary, it is impossible to unscrew the plugs in them to remove the old electrolyte and fill in a new one.
If desired, you can pour electrolyte into a non-separable battery, but to do this you need to make a hole in each can using a drill. After replacing the electrolyte, plastic is soldered in place of the holes, and the battery becomes operational again.
The electrolyte replacement process itself is quite simple, and it consists of the following points:
- The first step is to remove the battery from the car and find a suitable place to replace the electrolyte in it and charge it;
- Next, you need to remove the protection from the battery, if any, and unscrew the caps from the cans;
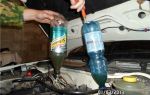
- After this, take the enema bulb and insert its end into one of the battery cans. Using this rubber device, we pump out the old electrolyte from the battery and pour it into a previously prepared container. Attention: Do not pour electrolyte on the ground under any circumstances if you are working outdoors;
- Having pumped out almost all the old electrolyte from all the cans, you need to clean the battery plates from its remains. This can be done using distilled water, which will not cause unwanted reactions inside the battery. To do this, distilled water is poured into each battery jar, after which it is lifted and shaken. Hold the battery well so that it does not fall out during shaking. After this, drain the resulting solution.
It is worth noting that some car enthusiasts recommend not only rinsing the future electrolyte in the battery with distilled water, but also using various solutions to “clean” the future electrolyte. For example, it is recommended to pour a solution of water and soda into the battery and leave it there for 4 hours. After this, it is also recommended to pour a solution of table salt into the battery for an hour.
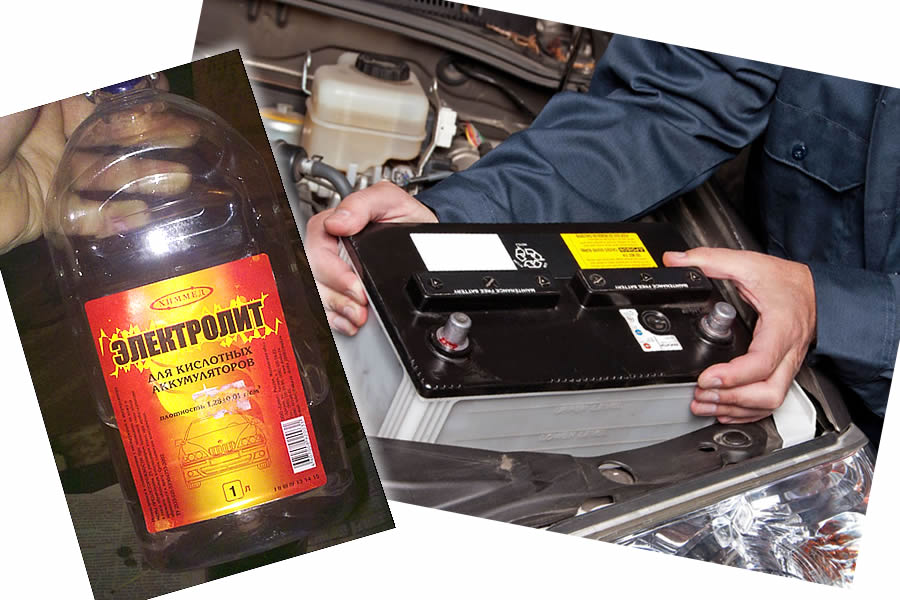
- After cleaning the battery jars from the old electrolyte, you need to fill it with new one. Well, if you purchased ready-made electrolyte in a store, then just pour it into each jar using a crank to the indicated edges. If you have battery acid and distilled water, you must first make an electrolyte solution with a density of 1.27-1.28 grams per cubic centimeter;
- After this, we close the jars and begin the process of charging the battery;
- After replacing the electrolyte in the battery, it is necessary to charge the battery according to the charge-discharge cycle with a current of no more than 0.1 Ampere until the battery density (electrolyte density) reaches operating values. Attention: You can finish charging and start using the battery only after 14 Volts can be measured at the ends of the battery terminals.
If you decide to change the electrolyte in the battery yourself, we strongly recommend that you take all precautions. The acidic environment, which is the electrolyte, is harmful not only if it comes into contact with the skin, but also in the respiratory tract. The electrolyte should be changed only in well-ventilated areas with extreme caution.
(344
Source: https://okeydrive.ru/kak-podnyat-plotnost-elektrolita-v-akkumulyatore-plotnost-akkumulyatora/
Changing the battery electrolyte with your own hands

Replacing the electrolyte in the battery is most often necessary:
- when the density of the electrolyte in the battery is much lower than it should be and it does not increase when recharging;
- when the electrolyte level in the battery is not normal;
- in the case when the driver does not have the opportunity to purchase a new battery for the car;
- when the car battery is no more than three years old;
- for the purpose of gaining experience.
In all other cases, it is advisable to purchase a new battery.
What do you need?
Before carrying out the replacement, it is necessary to carry out some preparatory work. In order for the replacement to take place with maximum safety for you, you need to purchase some materials and tools.
So, you need: an aerometer - a device for measuring the density of liquid in a battery, a special cup with a measuring scale, a new electrolyte, an enema or syringe, distilled water, liquid baking soda, battery acid, a soldering iron and a drill.
After purchasing a tool, you need to carry out a number of preparatory work. The first step is to find out its density.
The normal density of electrolyte in a battery should be in the range of 1.25-1.28 g/cm3. Measurements must be carried out at room temperature (+22º C).
You need to be as careful as you can hurt yourself with the acid, so you need to protect your hands and wear safety glasses.
Otherwise, a chemical reaction will begin, which will result in the release of a large amount of heat and steam, and you will not benefit from acid burns.
It is strictly forbidden to turn over a car battery if it contains working electrolytes, as weak plates may crumble, and this, in turn, will lead to a short circuit.
You need to prepare a container in advance for draining the old one and a container with the new electrolyte.
Replacement instructions
Of course, the first step is to remove the car battery from the car using a key. To make working with it more pleasant, clean its surface from dust and dirt.
The electrolyte in the battery is replaced at room temperature. When such a condition has been created, you can begin the process of replacing the electrolyte. The lids are removed from the jars that contain the electrolyte to drain it.
Replacement occurs using a rubber bulb, which is a very convenient means for removing electrolyte from cans. Everything is simple here: they squeezed the pear, lowered its nose into the jar and released the pear. Thus, it absorbs waste material. And such actions are carried out until all waste material is removed.
It is important to adhere to safety rules. Do not allow drops of liquid to come into contact with exposed areas of the body.
After the jars are cleaned, they must be rinsed with distilled water. You need to wash it thoroughly to remove the remaining old electrolyte; you can even shake the battery a little.
After treatment with water, baking soda is poured into the middle of the jars, which remains there for three hours and then drained. The next substance for treatment is a solution of table salt, which is filled with jars for an hour.
After the solution has been removed, the jars can be considered clean.
We take a new electrolyte and fill the jars with it to a certain level, while using a funnel. Now you need to wait a while until the air is removed from the batteries. Then add special additives that will remove excess sulfates.
This removal process lasts about two days, so it is better not to rush to the next step. The next thing to do is to charge and discharge the battery using a charger. The current supplied to the charge should be no more than 0.1 ampere.
Full charging will occur when the voltage shows 2.4 volts in each section.
After this, you need to discharge the battery and then charge it again. In this way, a special run of the battery is done in order to restore optimal capacity. In the case where the battery is not removable, the above-mentioned drill is used.
You need to use it to drill holes in the jars to drain the electrolyte. Plastic is needed to weld these holes using a torch. This completes the replacement of the electrolyte in the battery.
Now your battery works as good as new, but there is no way to say exactly how many more years it will last.
Video “How to fill a battery with electrolyte”
The video shows the process of charging the battery.
Source: http://MineAvto.ru/remont/elektrooborudovanie/menyaem-elektrolit-akkumulyatora-1076.html
How to replace the electrolyte in a car battery?

Most modern car batteries do not require frequent maintenance. However, one important and rather complex operation on them is performed quite regularly, namely, replacing the battery electrolyte.
Why is replacement needed?
A car battery is a special device that produces energy through chemical reactions that occur as a result of the interaction of sulfuric acid and distilled water. The mixture of acid and distillate is called an electrolyte, and it is this that needs to be replaced from time to time. Read about how to choose a battery for a car here.
As a rule, replacing the electrolyte in the battery is one of the main conditions for restoring old batteries. This procedure is also performed immediately before recharging them.
Instructions
You will need the following tools and accessories:
- hydrometer (a device for measuring the density of a liquid);
- funnel (for pouring electrolyte into the battery);
- car battery charger;
Electrolyte and a charger can be purchased at a car store. An aerometer will be useful to you if you do not buy a ready-made electrolyte solution, but decide to prepare it yourself.
Then you need to take sulfuric acid and distilled water, mix them and achieve a density of 1.28 g/cm³. In other words, a solution of sulfuric acid in distilled water should have a concentration of 30%.
It is to accurately determine density that an aerometer is needed.
Procedure:
- It is necessary to wash the inside of the battery to clean it of coal chips and salts deposited inside during operation. This must be done until all the coal chips come out, and only distilled water can be used for rinsing.
- Next, you should take a pre-prepared or purchased electrolyte solution. It needs to be poured into each “jar” separately, for which a prepared funnel is useful. Along with the electrolyte, you can also add a variety of additives that will help remove sulfates on the electrodes.
However, they are not at all mandatory and can be used as desired. It is important to remember that additives dissolve in the electrolyte within 40-48 hours and until they dissolve, you cannot proceed to the next step.
- The final step is to connect the battery charger to the battery.
Do not forget that the battery requires cyclic charging after replacing the electrolyte. This means that it is necessary to observe the “charge-discharge” cycle, while the current during charging should be 0.1 A, and the voltage should be 14-15 V at the terminals or 2.4 V for each section.
After reaching the rated current, the voltage must be halved. If the electrolyte density remains unchanged for two hours, you can stop charging.
When discharging, you need to apply a current of 0.5 A until the voltage reaches 10 V. Then you need to calculate the capacity from the duration of discharge and the amount of current available. If the result is below 4 amperes/hours, then the charge cycle must be repeated.
This procedure is quite complicated for beginners, so it is worth performing it for the first time under the supervision of a more experienced car enthusiast. And do not forget that each step described above requires careful execution and mandatory compliance with safety precautions when working with caustic substances.
Video
Source: http://autoepoch.ru/remont-i-obsluzhivanie-avto/kak-zamenit-elektrolit-v-akkumulyatore.html
Battery restoration - four effective ways to reanimate car batteries
The service life of a car battery is limited. When it fails, many people simply buy a new one. But almost every battery can be restored so that it can still serve.
- Sheinin: “I speak for myself, anyone can cure prostatitis, take the proven Prost...”
A closed plastic container contains positive and negative plates. A solution of hydrochloric acid, called an electrolyte, is poured inside, forming a galvanic couple with the lead plates.
The terminals are supplied with current from the charger or generator. When enough of it accumulates, the car battery becomes a source of electricity.
It is spent on starting the engine, operating instruments and lighting.
- They will protect the chassis and save you money, increasing ground clearance by 3 cm.
The generator replenishes energy losses, but over time, for various reasons, the accumulated reserve is not enough to start the engine normally. With proper use, there is a time factor: the plates age.
Under certain conditions, you can restore the battery and breathe new life into it. There are several methods of resuscitation. To choose the most suitable one, we first determine the reason for the inoperability.
The most common cause of death is sulfation of lead electrodes. The discharge is accompanied by the formation of plaque on the plates. If critical discharges are not allowed, the crystals will dissolve during charging. But the reasons for sulfation are not only deep discharges. It is also caused by other circumstances: constant undercharging, long-term storage in a discharged state.
Sulfation is quite easy to determine visually. We unscrew the plugs and inspect the plates. A light white-brown coating indicates the presence of a process. Other signs, including for maintenance-free acid batteries:
- when charging it begins to boil very quickly;
- a fully charged battery does not turn the motor, it runs out in a few minutes from a regular light bulb;
- white coating on the body.
The second common malfunction is broken plates and their shedding. It is easily identified by the black color of battery acid. If a lot of gratings have fallen off, it is unlikely that such a voltage source will be revived.
Adjacent plates may short out. This occurs as a result of their deformation or shedding and the sludge formed at the bottom. A short circuit usually occurs in one of the sections. A clear sign of a short circuit is that when charging the electrolyte in that jar does not boil or boils later, and the voltage indicator does not increase or increases very weakly.
Finally, the acidic electrolyte may freeze. This happens when a heavily discharged battery is stored in the cold. The ability to recover depends on the degree of frost damage.
If the formed ice tore the plastic casing, then the plates were probably warped and shorted, and after defrosting they will begin to crumble.
If the body is intact, defrost it in a warm place and you can try to restore it.
We start any repair with cleaning. We remove dirt from the surface, rinse with a soda solution to neutralize the electrolyte, which is almost always present on the lid. Using fine sandpaper, clean the terminals from plaque. By the way, try how a car battery works with cleaned terminals. Often their oxidized surface does not allow them to charge normally and release electricity.
If the battery is sulfated and the plates have not crumbled (the electrolyte is clean), then it can be restored using a simple charger. We need to break up the plaque on the plates. Serious literature recommends pulse charging, alternating with discharging, and strict adherence to regimens. It is quite difficult to do this manually, and special chargers are expensive.
In practice, everything can be done much simpler. We use the simplest memory with minor modifications. We discard the smoothing filters at the output of the step-down transformer. Instead, we install a diode rectifier. Each of the four diodes is rated for 10 A.
You will need a hydrometer to monitor the density of the electrolyte. We check it in all banks, recording the indicators. If there are 1.20 or lower, it's time to act. We look at the level: if it is insufficient, add electrolyte of standard density so that it covers the plates by 1 cm. Connect the charger, set the current to 10% of the capacity. If we have a 60 Ah battery, then 6 A, or less: 3–5 A.
On a simple memory without fixing parameters, the ammeter will first show a slight increase in current, then it will decrease, and the needle will freeze in a certain position. We monitor the process from time to time so as not to miss the beginning of boiling. After it, we reduce the current to 2 A, continue charging until it starts to boil again, and another 2 hours after that.
After finishing, we measure the density: it does not increase much. We leave the battery disconnected from the charger for the same amount of time that it was charged. We measure again and observe a slight increase in density. If it has not yet returned to normal, repeat the cycle. It takes a day for one, usually recovery occurs after 3-4, sometimes you will have to repeat 5-6 times.
Automatic chargers such as “Cedar” and similar are available for sale. During charging, they automatically turn off at the right time. First we fully charge to the highest possible level.
Then we turn it on in training mode for 3-5 days. In parallel with the charger, we attach the light bulb from the turning light and press the corresponding button. The process goes like this: charging for about a minute, then discharging for 10 seconds.
After training, we charge it completely.
Several circuits of homemade devices have been developed that, like factory ones, produce a short pulse charge current and conduct a small discharge in the gaps. The figure shows a diagram according to which it is not difficult to create such a device if you have knowledge of radio engineering.
We connect it to the terminals and observe the LEDs. A green glow indicates readiness for use, while yellow and red indicate the need for desulfation. We do it like this:
- We connect the device for a while until it is completely discharged (LED D1 goes out);
- connect the charger and charge;
- repeat desulfation until diodes D7, D8 light up green.
The charge-discharge process may have to be repeated many times. In particularly advanced cases, it takes a week or more. The peculiarity of the device is that it consumes only 20 mA and can be connected to the on-board network. It will constantly maintain the desired state of the battery without affecting the operation of the generator.
If there is no pulse memory, but we cannot do it ourselves, we try to use the manual mode. We take a simple charger with fixed settings. We set it to 14 V and 0.8 A, leave it for 8–10 hours. The voltmeter will show increased parameters. Be sure to leave it to sit for a day and charge it again, but with a current of 2 A. The voltage and density will increase slightly.
We start the desulfation process. We connect the high beam light bulb. In 6–8 hours we observe a voltage drop to 9 V, we don’t allow it any more - this is what we need. You'll have to check it with a voltmeter. We repeat the cycles:
- night – charge with a current of 0.8 A;
- costs a day;
- night again - charging current 2 A.
Depending on the degree of neglect, the process takes up to two weeks. A completely discharged battery is restored to 80%, which is enough to start the engine.
If the liquid in the jars has acquired an unknown color: cloudy, black, it will have to be replaced. This happens in very old batteries that have not been used for a long time and during a short circuit. In general, if a short circuit occurs due to warping of the gratings, then it can only be resuscitated through physical intervention.
On old batteries this was done simply: each bank was separate. The short circuit was opened and new plates were installed. Now all the individual elements are enclosed in a common body, and such intervention is difficult, but possible. We'll tell you how to do this later, but now how to change the electrolyte.
We determine a short circuit by the black color, as already mentioned, and by charging. All banks begin to emit gas, but this does not happen with the short-circuited one. Next, drain the electrolyte, pulling it out with a pear.
You can do it from one container, or better yet from all of them - filling it with fresh electrolyte won’t hurt. Next, fill in distilled water, slightly shake the body and carefully drain. Do not turn over so that the sludge does not get stuck between the plates.
Repeat until the water becomes clear.
In a bank with a short circuit we resort to a more radical method. We drill a small hole 4–5 mm in the bottom of the case, drain the electrolyte and rinse with distilled water. All the sludge goes away, nothing remains. We seal the hole with plastic using a soldering iron. If the plates are not warped, then it will be enough to change the electrolyte.
The further process goes like this:
- Fill in electrolyte with a density of 1.28. You can pre-dissolve a special additive for desulfation in it within two days. Let it sit for a day to let the air out.
- We charge with a current of 0.1 A until the density is completely restored, making sure that there is no violent boiling and strong heating of the case. If necessary, turn off and let cool. We charge up to 14–15 V.
- We look at the hydrometer readings, reduce the current and leave for 2 hours. If during this time the density has not changed, stop charging.
- We discharge with a current of 0.5 A to 10 Volts. If the indicator drops to this mark earlier than 8 hours, we repeat the cycle. If not, we simply charge it to nominal values.
And now about replacing the plates in a non-separable battery with your own hands. We cut the plastic around it from above. We disconnect the jumpers going to neighboring banks in any way: solder them or cut them. We take out the bag and rinse it well in water to remove any remaining acid. Now we are looking for where it shorts. We inspect the plates and dielectric. Task: discover the particle that connects two plates.
We found it - okay, let's remove it. First you should rinse, removing all the dirt, and put the bag back in place. We restore the jumpers, glue the cover using glue, epoxy resin, or melt it with a soldering iron. Fill with electrolyte and charge. If the plates are warped, you can use them from another old battery, choosing the least damaged package.
If there is a strong voltage drop in one of the six containers, the poles change their value when charging. A chain reaction is provoked, which leads to the same consequences in neighboring banks. The reasons for this situation are:
- excessive sulfation that cannot be restored;
- incorrect connection of the battery to the charger, which does not have reverse polarity protection;
- dirt on the body, causing constant self-discharge;
- the discharge is not controlled, a strong discharge has occurred repeatedly;
- errors in the operation of the generator and other power supply and consumption devices.
The polarity reversal technique is considered barbaric, but resuscitation is impossible by other means. If it ends in failure, there is nothing to regret; anyway, the battery had one way - disposal.
First, we select the electrolyte from all the cans with a hydrometer and look at the indicators. We identify fully working, sick and dead. As a rule, there are few deaths: one or two. By and large, you should only restore capacity from them. But the solid body does not allow for disassembly. You can use the technique described above to get to the faulty can.
We will tell you how to reverse the polarity of all containers at home, without resorting to disassembly:
- First, we discharge the old battery to zero by connecting some load, for example a car light bulb. We measure the voltage: if something remains, we close the terminals.
- We connect a ballast resistor to the negative terminal of the charger. A 50 kOhm resistor will do. It will protect the plates from short circuits.
- We connect the wires from the charger in reverse polarity. The positive one is to the “minus” of the battery, the negative one is to the “plus”.
- We charge with a current of 10% of the capacity. The charge is collected quite quickly, but the case gets very hot.
- We lower the current to 2 A and continue charging. Let it simmer at low current for 2 hours and turn it off.
We check the density: in normal containers it decreases, in dead ones it increases. Next we carry out a strong discharge by closing the terminals. Connect to the charger, observing the correct polarity. We charge according to the above scheme. To restore, it is recommended to reverse the polarity twice.
You should not resort to polarity reversal when the following signs of malfunction are present:
- in banks there is black electrolyte;
- short circuit;
- insufficient level of density.
First, we apply repair methods for a specific case, and if it does not help, we apply polarity reversal.
Source: http://tuningkod.ru/obsluzhivanie-avto/akkumulyator/kak-vosstanovit-akkumulyator.html
Drain the electrolyte from the battery yourself
The first sign that a car battery has become unusable can be indicated by its filling - electrolyte. If the battery fails, the electrolytic liquid changes its density characteristics and acquires a bright orange hue. A change in the color of the liquid indicates that it contains a large amount of oxides and sediment.
Of course, you can replace the entire battery with a new one, but why spend extra money if you can resort to another option - replacing the electrolyte. Although this procedure is quite complicated, even amateur drivers can do it.
Materials and equipment for draining electrolyte
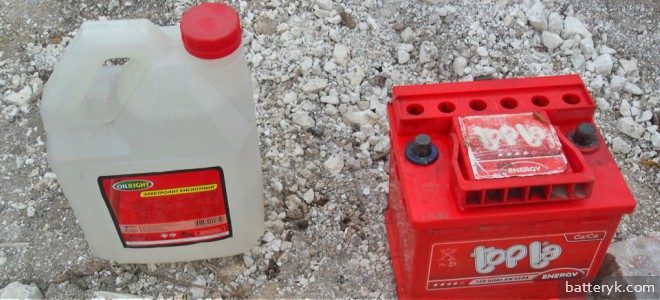
In order to carry out this procedure, you should stock up on the following equipment:
– electrolyte of appropriate density;
- distilled water;
– filler funnel;
– charger with power supply;
– hydrometer;
– container for spent electrolyte;
- baking soda;
– rags;
- protective glasses;
- latex gloves.
Distilled water and electrolytic fluid can be purchased at every automobile store, and you can find out the required volume from your sales consultant. Take the distillate with enough in mind for a couple of washes and a small reserve.
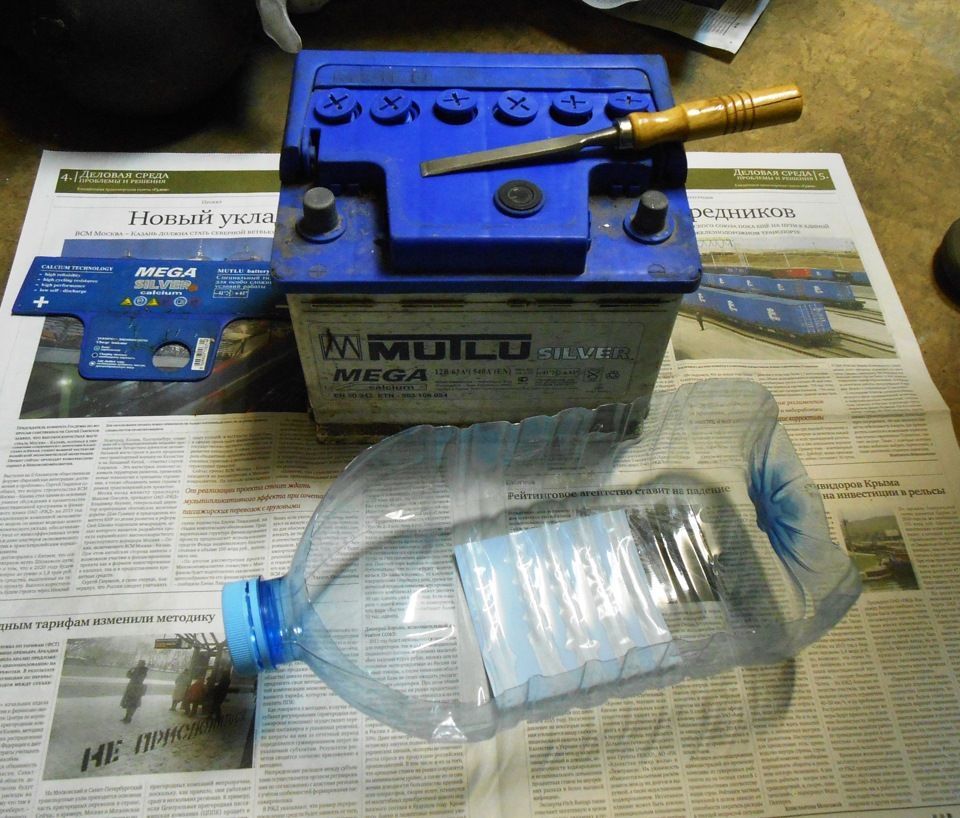
Take a glass funnel through which you will pour the material - this is a cheaper analogue of a porcelain one, which, in addition, is also quite difficult to find. Regular glass bottles are suitable for draining spent electrolyte.
Sulfuric acid does not affect them. The main thing is to inspect them for cracks.
Preparatory work
Remove the battery from the car and clean its surface from dirt. We recommend doing this using a rag soaked in soda solution.
Remember your school chemistry course: alkali (soda) neutralizes acid. To prepare this solution, take two tablespoons of baking soda and stir in a liter of water until completely dissolved.
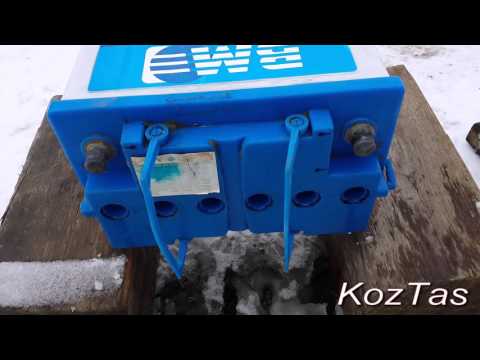
Unscrew the filler plugs and check the liquid level.
It should exceed the protective devices by approximately 10 mm. Check the battery charge level. If it is discharged, then you should charge it. After the battery is fully charged, allow it to cool for about two hours.
Draining electrolyte from the battery
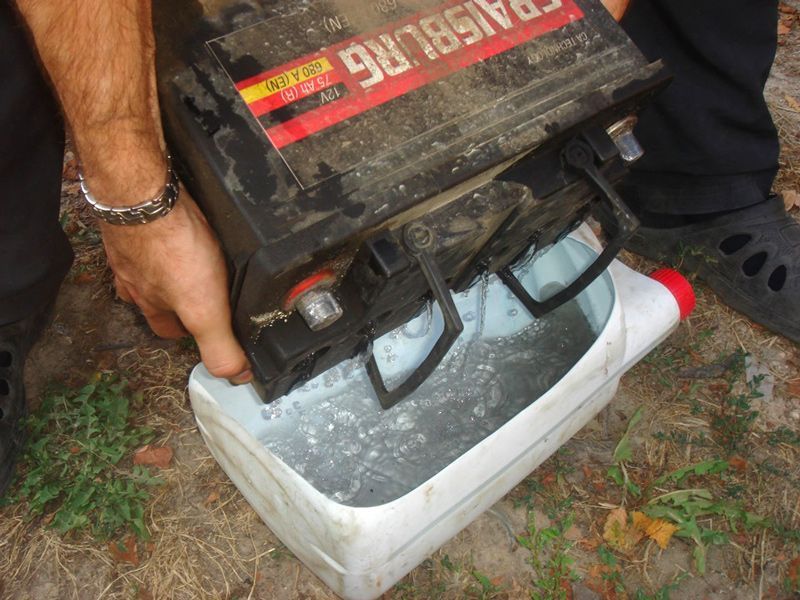
Electrolyte is pumped out from each container using a hydrometer . Next, pour it into a separate, specially prepared container. Please also understand that completely pumping out the electrolyte from the cans is impossible.
To remove the acid solution from the battery case as much as possible, you should gradually and carefully tilt the case, while simultaneously removing the electrolyte. To make your work easier, use reliable stops.
To ensure an even more complete collection of the electrolytic liquid, place a soft polyvinyl chloride tube on the spout of the hydrometer, which will fit very tightly on the device.
Under no circumstances should the battery be turned upside down when open! In this case, the accumulated sediment from the bottom of the cans will get stuck between the plates, which will lead to a short circuit, and, consequently, a complete replacement of your car's power supply.
After getting rid of the old electrolyte as much as possible, place the battery in its natural position and pour distilled water inside through a glass (if found, porcelain) funnel. Do not shake the battery. To rinse the jars thoroughly, just tilt the body smoothly from side to side. Drain the liquid using the method described above and rinse the battery again.
Source: https://auto.today/bok/3571-kak-slit-elektrolit-iz-akkumulyatora.html
Replacing electrolyte in a car battery: main steps
Over the centuries of its existence, the principle of operation of a lead-acid battery has not changed. And, despite many innovations in its design, including the use of a variety of filler materials, all batteries still cannot withstand constant recharging, as well as deep discharge.
There are hardly any car owners who have never encountered such a situation. Note that it is important to detect the problem before the battery fails. This can be done by simply looking at the electrolyte. Its cloudiness is the first sign of a malfunction. Replacing the electrolyte in the battery in this case will extend its service life.
Moreover, it is not at all difficult to carry out this procedure yourself.
How to replace the electrolyte in a battery?
For work we will need:
- electrolyte of the required density;
- distilled water;
- Charger;
- hydrometer
- filler funnel;
- baking soda;
- container for draining spent electrolyte;
- rubber gloves;
- safety glasses;
- rags.
The first two materials are sold at any auto store. To what extent they are needed can be found out from a consultant or on the Internet. Please note that you need to rinse the jars twice, so you should take extra distilled water. A glass funnel is suitable. And for draining the electrolyte, ordinary bottles that are resistant to sulfuric acid are quite suitable.
Preparing to replace the electrolyte in the battery
We remove the battery and wipe off dirt from its surface using a rag soaked in a solution of soda and water (1-2 tablespoons of soda per 1 liter of water).
Next, unscrew the filler plugs. The liquid level should be 1 cm above the protective devices. Then we check the battery charge. Charge if the battery is low and let it cool for 2 hours.
Replacing battery electrolyte at home
Using a hydrometer, we pump out the electrolyte from each jar one by one, carefully tilting the battery body. In this case, do not turn the battery over with the plugs facing down.
Otherwise, the sludge at the bottom of the cans may get into the plates, causing them to short out and the machine’s power source will have to be changed to a new one.
To better remove the electrolyte, you can put a soft polyvinyl chloride tube on the hydrometer, making sure to secure it tightly. Then pour the pumped out electrolyte into prepared containers.
Next, put the battery in its normal position and pour distilled water into its case using a glass funnel. Do not shake the battery. To wash the cans, it is enough to smoothly tilt the battery body alternately in both directions. We drain the liquid according to the instructions described above and re-rinse.
Fill the electrolyte of the required density into the battery jars to the required level. Note that most often high-density electrolyte is sold in stores and must be diluted with distilled water.
The final stage of replacing the electrolyte in the battery
After pouring electrolyte into the battery, tilt the body from side to side as smoothly as possible. This will allow air bubbles to escape from the jars. Let the battery stand for 2-3 hours. Then check the electrolyte level and, if necessary, add it to the required level. Recharge the battery with currents of 0.5-0.7 Amperes for 2 hours.
Ideally, after all these manipulations, you need to carry out a control-training cycle - discharge the battery halfway and charge it fully again. To do this, connect the power source to the battery terminals.
If replacing the electrolyte in the battery occurs at home, you can use ordinary incandescent lamps from a car with a power of 12 Watt. At the same time, monitor the battery voltage. During charging, it should not fall below 10.5 Volts.
Having fully charged the battery, screw in the filler plugs and, according to the polarity rules, install it on the car.
Safety rules when replacing electrolyte on a car battery
Remember that the electrolyte is a sulfuric acid solution that can cause serious chemical burns to the skin, eyes and mucous membranes. If liquid gets on your body, immediately wash it off with a soda solution, rinse the affected area with running water and contact a medical facility for help.
Electrolyte disposal should ideally only be trusted to companies that are licensed to dispose of hazardous waste. In artisanal conditions, you can neutralize sulfuric acid using baking soda.
We take a plastic bottle of the appropriate volume, cut off the neck and fill it with electrolyte to 1/3 of the container, carefully add soda. The process of neutralizing a dangerous substance occurs with a lot of heat and foam, so you should control the heating of the container and add soda in small portions.
When foaming stops, pour the liquid down the drain. Carry out all work wearing rubber gloves and safety glasses.
Source: https://autoakb-v-ekb.ru/novosti/2017-06-09/Zamena-elektrolita-v-avtomobilnom-akkumulyatore-osnovnyye-etapy
How to wash the battery and replace the electrolyte
Flushing the battery is one of the minor ways to restore it.
But as a rule, car services do not engage in this type of work, since it is believed that this does not lead to tangible results.
Car owners usually wash batteries and change the electrolyte at home, as they try to extend the battery life and save money.
When you need to wash your battery, signs
Signs that indicate not only the need to flush the battery, but also other problems:
The reasons for the above symptoms are:
It cannot be said that after washing the battery will restore its previous characteristics, most likely not, but this may temporarily extend its service life.
Also, the dark color of the liquid indicates that the active substance from the plates has already begun to crumble and the plates themselves have become thinner and you will not be able to restore their thickness.
Therefore, even after washing the battery and completely replacing the electrolyte, there is no point in talking about a long battery life.
And yet, you need to understand that modern batteries in a plastic case with a common cover, especially maintenance-free ones, when the plates short out, it is better to immediately replace them with new ones, since disassembling them, replacing the plates and subsequent assembly with sealing is a troublesome task.
To check for a closed circuit, a load plug is used; if the battery does not hold the load (the voltage constantly drops and drops below 10 volts), then at least one bank is closed.
Work progress
For washing you will need:
Completely discharge the battery in a way that is convenient for you. If the jars are not closed (i.e. there is no sediment at the bottom), then a special design or a rubber bulb can be used to remove the old electrolyte.
As for the design, the point is debatable, since experts do not recommend tilting the battery more than 45 degrees, since crumbled elements of the plates can short-circuit the latter.
But this does not stop our people, especially since many manage to drill holes in the battery case to drain the electrolyte, for washing.
Next, pour distilled water into each jar and drain again. Repeat the process until clean water flows from the battery (it will be removed with a pear).
At the final stage, add distilled water again and let it sit for 3-4 hours.
If you understand that there is sediment (the jar is closed), then you should not turn the battery over, as this will only worsen the situation.
Here, at the first stage, the liquid is extracted with a rubber bulb, then the battery is disassembled, cleaned of sediment and old electrolyte, assembled and sealed. Whether it is worth doing this, everyone decides for themselves.
Next comes the stage of replacing the electrolyte.
Don't go wrong with density
Before adding new electrolyte after washing the battery, analyze what situation led you to these actions, because a mixture of sulfuric acid and distilled water is sold with different densities - from 1.2 to 1.28 g/cm3. Which one should I fill?
For example, in winter the battery was discharged, was located outside and, as a result of a drop in density, the electrolyte froze. Of course, in this situation the car will not start.
At this moment, the battery is in a state of deep sulfation of the negative plates.
What does the driver do in this situation? That's right, it warms up the little one in a warm place and measures the density of the liquid, which is usually low 1.15 g/cm3. This leads to the erroneous idea of replacing the fluid by filling it with the same one, but with a higher density. And here, as a rule, a mistake is made.
An important point is not taken into account - the density of the old electrolyte. As a rule, in winter, with a fully charged battery, it is 1.27 g/cm3. A liquid with a density of 1.15 g/cm3 was drained. Where is the remaining 0.12 g/cm3? And they are on the negative plates in the form of sulfated plaque.
A person remembers the figure of 1.27 g/cm3 and, accordingly, buys an electrolyte with the same density for winter.
After new fluid has been poured into the battery, the latter usually charges immediately. So what's going on? As a result of charging and desulfation, the remaining 0.12 g/cm3 leaves the plates and is added to the total density of 1.27 g/cm3, resulting in a total of 1.39 g/cm3, and this is a figure close to the density of the correction electrolyte.
Therefore, in the case given as an example, it would be necessary to simply conduct a CTC of the battery.
Or, if the charger allows, turn it on a cyclic mode of short-term charge and discharge to bring the density of the liquid to real. You also need to connect some kind of electricity consumer to the battery, for example, a headlight lamp.
The high density of sulfuric acid negatively affects the condition of the plates and in this aggressive environment they begin to quickly crumble.
Therefore, after washing the battery, in order to avoid the situation described above (our battery is discharged), first fill in electrolyte with a density of 1.20 g/cm3.
Then charge the battery and repeat density measurements, adjusting if necessary for your region and temperature.
To increase the density, electrolyte is added, to decrease - distilled water. Pure sulfuric acid is never used.
Read on topic: How to restore a car battery.
And try not to deeply discharge the battery as this threatens the active mass with melting and sulfation.
How do you wash the battery and change the electrolyte? Write in the comments.
Source: http://plazaauto.ru/post/33084