How to make lighting under a car

Mitsubishi Lancer 4WD engine Evo X 374Hp › Logbook › The process of making underbody lighting
I've had a lot of cars since then. And here he is Lancer. Those who closely followed my logbooks know that the underbody lighting appeared on it at the very beginning of our acquaintance. I want to tell you right away about reliability.
MY LIGHT IS ALREADY ONE YEAR OLD! And this means a lot for those devices that are in the most difficult operating conditions! After all, the bottom of the car is always mercilessly exposed to road dirt, water, gravel, sand, heat, negative temperatures, etc.
How to make lighting in the car interior with your own hands
Then there will be no need to frequently redo the circuit or its individual components.
When the car interior lighting is manufactured and installed, you can select methods for activating it. Contacts coming from the door opening sensor are used for automatic on/off.
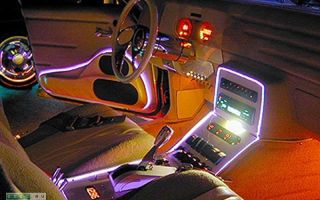
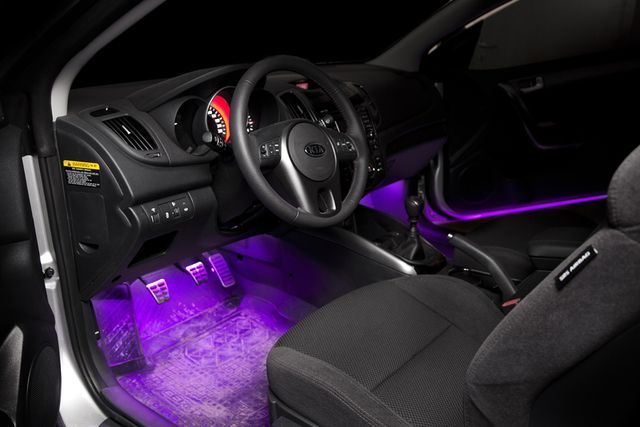
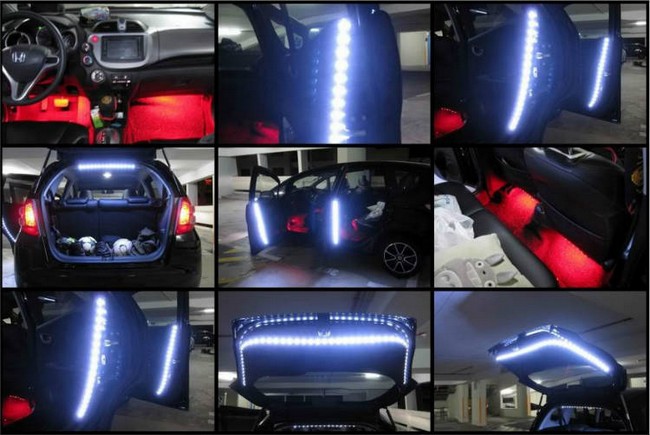
You can also use the remote control to turn it on at the right time for the driver. Light strips are placed around the perimeter of the opened door, under the feet of passengers, in the places of standard lighting devices, along the instrument panel, inside the trunk, as well as in other desired areas of the cabin.
DIY car underbody lighting
And the first thought that comes to mind is: “Shouldn’t I make such a miracle myself and diversify the look of my car?”
The very first lighting was created from neon lamps. That is why this type of lighting is called “neon”. Such illumination can transform even the most inconspicuous car.
noticeable on the streets of the city at night.
But, alas, among all these advantages, there are also some disadvantages.
Fine or deprivation of license for illuminating the underbody of a car?
Therefore, keep in mind that the light under the bottom should be directed strictly downward, but not to the sides.
Moreover, it is impossible to allow the red light from the backlight to go forward outside the car, and the white light to go back.
This condition is even separately stated in the new technical regulations of the Customs Union on the safe operation of wheeled vehicles. The same article, but in part.
3 for installing reflective devices or red lights in the front part of the car, as well as failure to comply with the provisions specified in the list of conditions and malfunctions prohibiting the operation of a vehicle, determines a slightly lesser punishment in 2018.
DIY LED illumination of the underbody of a car
Plus the cost of connection is 1000-2000 rubles (depending on the complexity).
At the same time, there is no guarantee that a Chinese luminous tube with LEDs inside will work for more than a year. The second way involves selecting all the lighting details separately, based on your own preferences.
As a result, costs are reduced several times. In both cases, you will have to tinker with installing the lamps and connecting them to the on-board network.
DIY underbody lighting
If previously it was necessary to solder circuits, install protection and carefully isolate all backlight elements, today completely ready-made systems are already available for sale.
Such devices can simply be fixed in the desired location and connected to the battery. If you decide to save money or make your own unique system, then illuminating the bottom with your own hands will be an ideal option for you. Before starting work, be sure to wash the car thoroughly, as dirt and sand will not allow you to do the job efficiently.
Installing undercar lighting – effective solutions!
Both options have both advantages and disadvantages, which should be discussed in more detail.
LED strip is much cheaper, it is more convenient to cut, model and install. In addition, the tape does not need to be additionally insulated and protected from water, dirt and cold.
But many car enthusiasts prefer spot illumination of the underbody, and this is almost impossible to achieve using an LED strip.
The design of the L-shaped profile allows you to hide the light source itself from external eyes, which, undoubtedly, is the main sign of quality work done.
Aluminum thresholds (L-shaped profile) 150 cm long, 3 pcs., were purchased at the nearest construction hypermarket.
We will use two of them for the thresholds, the third for illuminating the front bumper. The technology itself, the use of profiles, is very simple and will not require you much time to install the underbody lighting.
Let's start installing the backlight with the thresholds.
Source: http://consulting66.ru/kak-sdelat-podsvetku-pod-mashinoj-84439/
How to make backlighting in a car
Home » Repair and service » How to make car lighting
There are different ways to personalize your car. Some people reupholster the interior themselves, while others try to attract attention with homemade spoilers. But most often, do-it-yourself interior lighting makes an unforgettable impression on others.
The lights can burn statically or blink to the beat of the music playing in the cabin. You can experiment in different ways, the main thing is to use the necessary durable materials. Then there will be no need to frequently redo the circuit or its individual components.
Location of additional lighting in the car interior
When the car interior lighting is manufactured and installed, you can select methods for activating it. Contacts coming from the door opening sensor are used for automatic on/off. You can also use the remote control to turn it on at the right time for the driver.
Light strips are placed around the perimeter of the opened door, under the feet of passengers, in the places of standard lighting devices, along the instrument panel, inside the trunk, as well as in other desired areas of the cabin.
Materials used
High-quality car interior lighting is distinguished by the competent and appropriate use of lighting materials. The most popular light sources are LED and neon lights. Let's look at the characteristics of both light sources.
LEDs:
- often used due to its ease of installation;
- most blank materials come with the ability to be fixed using a built-in adhesive strip;
- each LED takes up very little space and can fit harmoniously into the internal area of standard lighting;
- The mounting strip with LEDs is made of durable material;
- LEDs have a long service life;
- quick response when starting allows them to be used as light and music.
You need to know that before installing additional lighting of any type, you must disconnect the battery from the network.
Neon lights:
- neon lamps have a bright, unusual light;
- with proper operation, the service life can be longer than that of LEDs;
- adapted for use in static conditions, without rapid on/off cycles;
- sensitive to mechanical stress;
- Installation takes longer than LEDs.
Source: http://autofluids.ru/remont-i-servis/kak-sdelat-podsvetku-v-avtomobil.html
DIY car interior lighting

Perhaps, any driver wants to somehow make his car stand out from the gray mass. One of the tools for this wish is tuning, with the help of which not only the characteristics of the car are improved, but also its appearance. Previously, we wrote about LED underbody lighting, and in this article you will learn how to make car interior lighting with your own hands.
Light sources in the car interior
Interior tuning is the least widespread, as it concerns only the interior design of the car. As a rule, the driver adjusts his car “to suit himself” and, first of all, this applies to the interior.
Some change the position of the buttons, others introduce some innovations into electrical equipment.
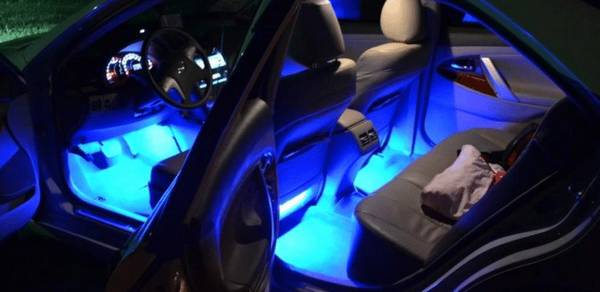
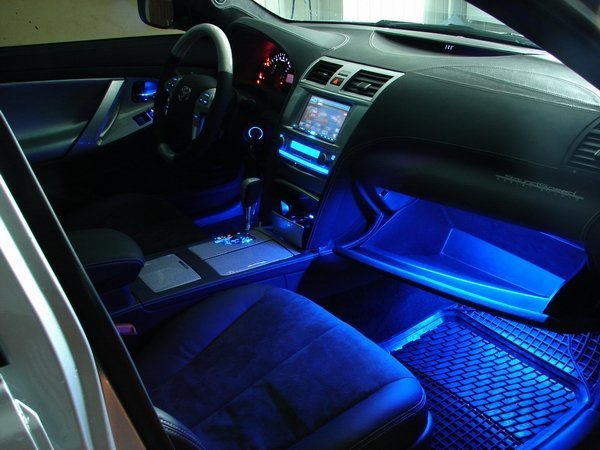
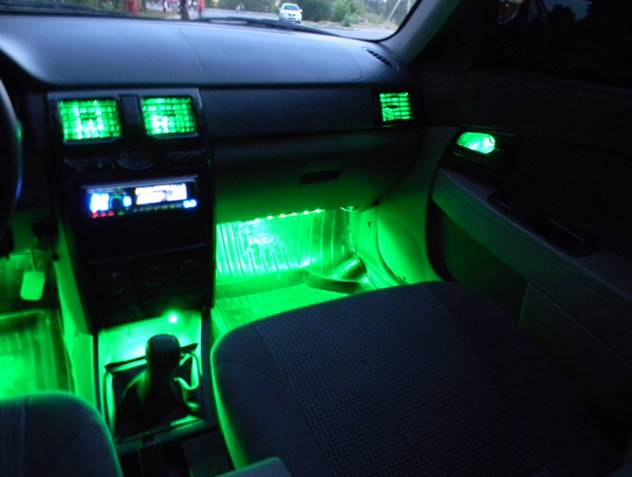
Our task is to transform the interior with new colors, namely to make LED lighting, which will not only be a decorative element, but also a rather practical addition to the interior, which will help you see better in the dark.
Not the least important is the length of the wire through which the power will be supplied. After all, it’s not yet clear exactly where the LED will be located, so a spare wire obviously won’t hurt. The most relevant today is a strip of LEDs, which will not be difficult to attach and connect.
The advantage of LEDs is their good light output and good efficiency, which will preserve the life of the battery and will not force you to charge it or push the car every now and then.
How to install interior lighting?
First you need to select the installation location. In this case, you can completely rely on your taste and imagination, but there are limitations.
The use of LEDs can be single or group. The first option involves installing them inside the buttons as a backlight, and the second involves installing lamps under any element of the interior as a lighting source. It is this arrangement of LEDs that allows them to achieve their maximum effect and will reduce the likelihood of glare to zero.
Places for mounting a group of lamps can be considered openings under the panels, the car dashboard, the space inside the glove box, as well as the space under the door opening and closing handles.
Installation of LEDs is quite simple: for this purpose, such tapes provide a special adhesive tape that is glued under them.
This tape will perfectly hold the lamp and prevent it from accidentally falling.
After installing the LEDs, it's time to think about electrical equipment.
First, you will need to install a special button or toggle switch in the instrument panel designed to control the lighting in the car's interior.
It should be placed so that turning it off, if necessary, does not cause difficulty for the driver. After this, wires are pulled to provide power.
The safest installation method is considered to be a wire pulled directly to the battery. Naturally, such a circuit must be equipped with a fuse to protect against short circuits.
To do this, you can use the free sections on the mounting block in the engine compartment.
At a minimum, the manufacturer has provided two sections designed for connecting various devices, which allows you to richly change the functionality of the car. Of course, this will be the positive wire.
As for the "mass", it is not difficult to find. If you have access to the under-panel space of the car, then you need to remove the ground wire and screw it to a metal part of the body. It is also not recommended to look for it on other wires.
All wiring can be hidden either under the car mats, under the panels or inside the ceiling. The more difficult it is to restore a broken ceiling to remove such wiring, the longer it will take, so this procedure will cost the craftsmen significantly more.
Video – Led tuning of interior lights with your own hands
Source: http://VipWash.ru/tyuning/podsvetka-salona-avtomobilya-svoimi-rukami
How to make lighting in the car interior with your own hands? – Automotoguru
In the evening, LED interior lighting becomes an analogue of an air conditioner turned on on a hot day. Not all car owners are satisfied with the classic lighting; they often want to make changes to it. The best option for solving this problem is DIY LED lighting for the car interior.
Let's try to figure out how to create relaxing and comfortable lighting inside the car, giving the interior uniqueness and individuality. Do-it-yourself interior lighting with an LED strip can handle this task.
Modern LEDs are capable of radically transforming the appearance of the interior in a matter of minutes. Currently, manufacturers offer various options for color combinations and glow saturation - the choice is up to the consumer.
Car interior lighting
Let's start with the fact that LED lighting in the car interior has distinctive characteristics:
- ease of installation of lighting;
- When installing emitters, there is no need to install mounting hardware. The backlight must be mounted on a special surface with a sticky base. In order to strengthen the LED strip inside the car, it is enough to get rid of the protective strip;
- small LEDs can be placed in standard sockets without any problems, after removing standard lamps from there;
- The LED lamp has high mechanical strength and is sealed. If the polarity is not reversed during installation, it is quite difficult to damage the lamp;
- The LED lamp lights up instantly; light bulbs can be used for light and music.
Specificity of neon lighting
Neon lamps provide rich and bright light. Installing them is more difficult than installing LED bulbs. In addition, during the operation of neon lighting, problems often arise. For example, such lighting is not designed to be constantly turned on and off. Lamps will have to be changed frequently.
How to make original lighting in a car with your own hands?
As soon as you choose the option for illuminating the car interior, start selecting the tools and materials without which you will not be able to realize your plans.
You will need:
- fuse;
- switch in the form of a button;
- screwdrivers of various types;
- insulating material for electrical wires;
- heads and keys for dismantling panels.
Instructions
Do-it-yourself LED interior lighting is performed according to a specific algorithm:
- First you need to remove the terminal from the battery.
- Next, we determine the location of the LED backlight. It can be installed above the torpedo.
Advice! In order for the lighting to be safe to use and not to be touched by passengers, we suggest strengthening it under the seats.
- It is necessary to prepare two wires that will connect to the battery, select a switch and fuse.
Attention! Try to place the fuse closer to the battery so that you can change it at any time.
- Place a special protective tube on the electrical wire. Solder the wire, then place a protective tube at the soldering site.
- The second wire needs to be brought out to the body and connected to the battery. Using the controller, you can change the color options of the LED backlight; on average, you can use 17 million different shades. The controller helps you choose colors and adjust the intensity of the glow. Using an LED strip mounted inside the cabin, you can illuminate the space at five speeds, with changing effects and colors.
Advice! When choosing a place to mount an LED lamp, we recommend applying tape and assessing the rationality of its mount in the chosen location.
- Next, we proceed to calculate the length of the wires. You also need to decide on the location of the switch. The location of the fuse near the battery allows you to protect the lamp from voltage surges and switching errors.
Places for mounting LED lighting
Among the convenient places where you can mount LED backlighting, we highlight:
- location under the glove compartment or dashboard;
- installation of LEDs under car seats;
- fastening the LED strip under the headrests.
Once the wires are attached to the battery, you can install a fuse for the backlight. You can pass the wire through the holes that are in the plate dividing the engine compartment and the car interior. If there is no hole, you can drill it yourself.
Attention! Be sure to put rubber insulation on the edges of the hole, otherwise the wires will break while the machine is moving. For such purposes, a rubber ring of the required diameter is suitable.
We connect the second wire to the battery terminal, throwing it through the hole in the plate. When connecting, be sure to observe polarity.
Advice! Make sure that there are no traces of rust, paint, or dirt on the wire.
When you install LED lighting in the interior yourself, you can significantly save your family budget.
Options for connecting lighting in the cabin
Ready-made lighting is offered in many automotive stores that sell spare parts. On average, a basic set of interior lighting, consisting of 4 neon emitters, costs 2-6 thousand rubles. After installing such lighting, the car will become “exclusive”, completely transformed and updated.
We install multi-color lighting, which will be powered from the car cigarette lighter. Professionals consider this installation option to be the simplest, since there is no need to change the electrical wiring inside the car. To work you need to use:
- RGB LED strip, designed for four contacts;
- stranded wire (4-5 m);
- controller with remote control;
- soldering iron;
- 4 terminal clamps;
- transparent silicone sealant.
Before proceeding with installation, it is important to take high-quality measurements of the places where you plan to mount the LED strip. In addition, it is important to measure the perimeter of the cabin along which the tape will be attached. The distance under the instrument panel is measured. Next, the distance between the front car seats is determined.
Advice! Add 40-50 cm of tape to the received figures as a reserve.
After completing all measurements, you will have four pieces of LED strip and 7 pieces of wire.
Connection diagram
The tape is attached, then the wire, then the connector, the next wire, again the connector, again the wire, and a new piece of tape. To attach the individual elements of the circuit into a single unit, an electrical wire is used that runs between the upper connectors. The terminal clamps of the upper pair are installed under the dashboard, and the lower ones are mounted under the front seats.
You can clearly see this in the video:
When buying an LED strip, do not forget that you can only cut it into pieces in certain places using the line that is located between the flat metal contacts.
Also, keep in mind that the controller is rated at 12W, so calculate the maximum wattage of the lamps on the strip before installation.
We clean 1 cm pieces of wire from plastic, solder them to the LED strip, and insulate them using silicone glue.
You can secure the tape and wires to the place you need using double-sided tape. Installation should begin from the place under the glove compartment.
The wires must be passed through the terminal clamp and the controller must be secured to it. Then you need to check that the wires match the color of the controllers. We complete the installation of the lighting under the car pedals.
- Choosing a roof rack for a car
- We reprogram the on-board computer with our own hands
- How to make a speakerphone in a car
- How to galvanize a car body yourself
- Sheinin: “I speak for myself, anyone can cure prostatitis, take the proven Prost...” Read until deleted >>
Among the ways to distinguish a car from the crowd of the same ones and make it more impressive, car interior lighting occupies a special place. Modernization of this kind is ideal for both foreign and domestic cars. Which lighting means are better and how to do the tuning yourself?
1 Choosing lighting for the car interior
What kind of interior lighting is there? The devices can be turned on when the doors are opened or controlled by the driver using a special remote control. But the best option is a combination of devices. If we do the work wisely, we will get neon floor lighting that turns on when the door is opened and diode lighting for the rest of the interior, powered by a switch unit.
- They will protect the chassis and save you money, increasing ground clearance by 3 cm.>>
On the domestic market, there are 2 options for upgrading car interior lighting. The first is the purchase and installation of an LED strip. The main advantage of LED backlighting is the ease of installation yourself.
In addition, it does not require special fasteners, and for installation it is enough to glue the tape included in the kit. A standard LED lamp is very small in size, so it can be mounted anywhere.
It is ideal for illuminating the cigarette lighter and other small parts of the car interior. Another advantage of the diode strip is its excellent impact resistance and tightness. Thanks to this, its service life is much longer than that of other lighting devices.
The LED strip lights up instantly, which makes it possible to use it to achieve various lighting effects.
A way to find out why the CHECK light is on!
Using a universal auto scanner, you can do the diagnostics yourself in 2 minutes and find out why CHECK is on. Suitable for all cars..." >>
You can also make neon interior lighting with your own hands. It is characterized by very bright light, which allows you to illuminate a large space. But neon lamps are quite difficult to install and difficult to operate. In addition, neon lighting often burns out when switched on and off frequently and practically cannot withstand the slightest mechanical damage.
2 Installation of neon lighting in the car interior
As we mentioned above, it is best to use combined interior lighting. Next, we’ll look at installing neon lamps and LED lighting with our own hands.
It is best to start by installing neon lights, which should be located in the lower part of the car interior. For work we will need:
- nylon clamps;
- corner made of durable aluminum;
- neon lamps;
- set of self-tapping screws.
Most neon lights have cigarette lighter sockets. We don't need it, so we need to cut off this part and carefully trim the ends.
Next, you will need to saw off the corner so that its size matches the size of the lamp, and then screw the lamp under the interior dashboard. After this, we attach the lamp to the corner using nylon clamps.
This way the space under the driver’s feet will be illuminated.
The same operation must be done wherever you would like to illuminate the interior space. One caveat - in the area of the rear seats, the corner needs to be screwed with the edge up in order to at least slightly protect the element from damage.
All existing wires must be carefully placed under the mats and stretched to the dashboard near the driver's seat. Connections must be carefully insulated.
Next, we connect the wires to the door opening sensor and to the interior lighting switch. Also, the wires of neon lamps can be connected to the battery.
Before doing this, you need to remove the wipers, and after finishing the work you can put the blades back in place.
IT IS IMPORTANT TO KNOW!
Every motorist should have such a universal device for diagnosing his car. Nowadays you can’t live without a car scanner!
You can read, reset, analyze all sensors and configure the car’s on-board computer yourself using a special scanner...
.. »
One of the LED backlight wires should be connected to the throttle position sensor. This device will notify you about the presence of installed lighting every time you reflash the car's engine ECU. This way, the neon lighting will remain intact and will not burn out during the chip tuning process.
Now when you open the door, the neon lights will work. The resulting effect will amaze not only you, but also passers-by.
3 Installation of LED strips
Install the LED backlight with your own hands according to the standard scheme. We will need a set of wires, heat shrink tubing and LED strip.
Both individual diodes and LED strip can be purchased at any auto store. It is best to purchase a factory model of the tape, since the metric version will have to be modified.
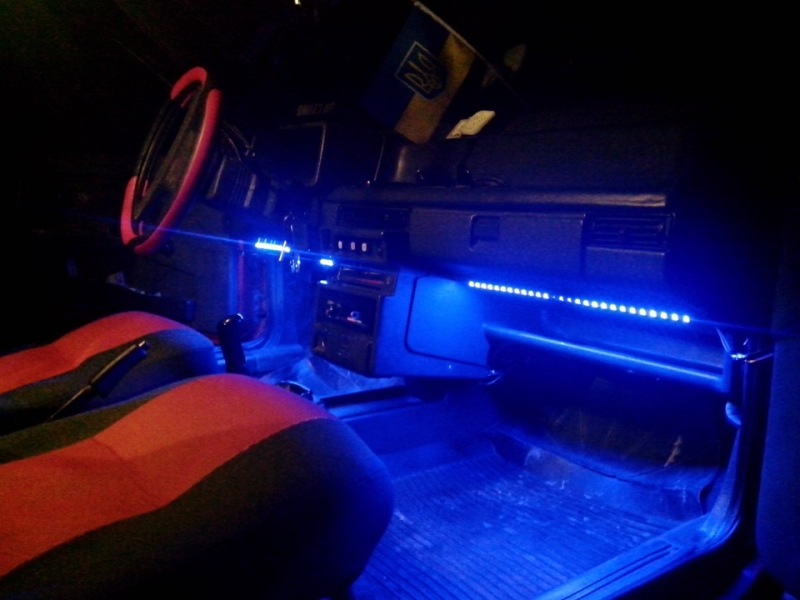
Next, you need to determine the optimal location of the LED backlight. In most cases, it is installed along the entire perimeter of the ceiling parallel to the car body pillars. We apply the LED strip in the same way and measure the required length. The rest can be trimmed.
The places for cutting are easy to determine even for a beginner, since they are marked on the tape with special membranes. After cutting, you need to clean the ends and solder the parts of the LED strip to each other.
You need to put bushings on the connection points and warm them up with a regular household hairdryer.
The diode lighting we received must be connected in the same way as neon lamps. Be careful not to mix up the polarities. They are indicated on the tapes at the cutting points.
As we have seen, upgrading car interior lighting does not take much time and does not require special skills. The only caveat is that you need to be careful and work without haste.
Do you still think that diagnosing a car is difficult?
If you are reading these lines, it means you are interested in doing something yourself in the car and really saving money , because you already know that:
- Service stations charge a lot of money for simple computer diagnostics
- To find out the error you need to go to specialists
- The services use simple impact wrenches, but you can’t find a good specialist
And of course you are tired of throwing money down the drain, and driving around the service station all the time is out of the question, then you need a simple CAR SCANNER ELM327, which connects to any car and through a regular smartphone you will always find the problem, turn off CHECK and save a lot of money! !!
We ourselves tested this scanner on different machines and it showed excellent results, now we recommend it to EVERYONE! To prevent you from falling for a Chinese counterfeit, we publish here a link to the official website of Autoscanner.
Article rating:
Source: https://avtomotoguru.ru/kak-sdelat-podsvetku-v-salone-mashiny-svoimi-rukami/
Illumination of car rims - preparation, instructions + video
Almost any car owner can independently illuminate the rims of a car. This easy-to-perform and affordable operation will give your car a unique look of sparkling, swift beauty - both in motion and in the parking lot.
Wheel backlighting as a tuning method
Craftsmen can illuminate a lot of things in a car - from the rear panoramic glass and headlight washers to curved moldings and exterior mirrors.
Light tuning is completely doable on your own, with minimal familiarity with the basics of electrical work.
It allows the car to sparkle with new colors in the most unique form - of course, with the proper selection of parts, the proper quality of their installation and the optimal technical condition of the car.
It should be remembered that no illumination will help deformed rims or fender rims with traces of rust.
On the contrary, it will only highlight existing defects with all the multi-watt brightness. In the basic configuration of cars, the design of wheels with additional light sources is not provided.
Do-it-yourself illumination of car rims can be done using three different methods:
- Using standard automotive lamps. Which is quite difficult due to the need to place mounting sockets in non-standard places;
- Using compact neon lamps. Optimal for disks with a small number of “slots”, each lamp can be placed individually;
- Through LED strips. Some of the luminous elements may be barely noticeable from the outside, but the installation of such strips is the simplest, and their reliability and durability are higher than that of other lighting methods.
Do-it-yourself illumination of car rims - instructions
The choice of LED strips according to the emitted spectrum is very diverse, and here it is important to choose your own version of bright flashes and calm radiance, taking into account the color of the body and the design of the wheels. Usually, two-color disk backlight options with LED elements similar in spectrum look advantageous. These are white and silver colors, blue-black or yellow-green fill.
LED strips can be attached to the front (that is, driven) disks of a car in various ways:
- To the stationary part of the protective casing (along its outer edge). First, double-sided mounting tape is glued to the edge - it is better to choose the highest quality (that is, sticky) and the optimal width that matches the thickness of the edge of the casing. An LED strip is glued to the tape and secured with plastic clamps every 8-10 cm. It is necessary to drill holes with a diameter of 3-5 cm for the clamps, the total number of mounting holes is from 8 to 12. The twist of the supply wire with the LED strip must be carefully insulated;
- If the car chassis is not equipped with a protective casing, its equivalent is made of thin aluminum plates held together with rivets. In the absence of rivets, bolted fastenings are acceptable. The further installation sequence is described above. Care should be taken when washing such a design - water from Karcher-type devices will sweep away all our lighting at close range.
- Illumination of discs using a special stand. It is made of steel strips and equipped with three “legs” for attaching to the drum from the inside. This is the most expensive, but also the most reliable design.
Connecting the backlight to the battery
Connecting the disc backlight to the car battery is done using standard wiring and soldering. The contact point should be insulated with corrugation; tight detachable connections are acceptable (their likelihood of oxidation and contamination is higher).
Four wire pairs from each wheel are led inside the cabin and connected to the battery through a switch. The switch itself is located in a convenient place so that with one click your wheels will burst into flames with attractive sparkles of unique illumination.
With complex lighting options - in our case, when installing several LED strips on each wheel - it is necessary to install several toggle switches to turn them on. It is important not to confuse the wire pairs, otherwise when you turn on the LED strips, one will sparkle with golden light and the other with green light, which will give the car lighting an incredible originality.
Source: https://carnovato.ru/podsvetka-diskov-avtomobilja-svoimi-rukami/
How to make neon car lights with your own hands
In the era of high technology, when a car becomes available to almost every inhabitant of the planet, the problem of the external indistinguishability of many cars arises.
Therefore, many car owners want to make their car stand out from the crowd using all sorts of styling options - from bright paint to complex body modifications. One of the options for changing the appearance of a car is to install neon lighting.
It will not require huge financial investments from the car owner, but at the same time it will add a special zest to the appearance of the car. Moreover, such lighting can be installed without extraordinary skills, so this task can be handled even at home.
In this article we will talk about the features of neon lamps, provide the necessary information about them, and tell you how to make car lighting with your own hands.
Why install neon lighting?
Neon lighting is very popular among car enthusiasts in many countries around the world. The lights from under the car body will not leave anyone indifferent. Neon lighting on a car is an excellent way of self-expression; it will highlight the individual style of the car owner.
In addition, lamps today are not so expensive, so every car enthusiast can afford them.
In addition to external decoration, such lanterns are suitable for interior lighting - soft, dim light, providing comfort and coziness in the cabin, will surely appeal to both the driver himself and the passengers he places in his car.
However, in most cases, neon lighting is still used to decorate the outside of the car. Remember how impressive vehicles with a luminous bottom of the body look in films. Why is this type of lighting popular for car styling? Now we will list the main advantages of neon lamps for car illumination:
- A bright and soft uniform glow, which is very pleasing to the eye, will not leave indifferent either the owner of the car or passers-by who see it on the street.
- Low cost of lamps, which will allow you to decorate your car not only for wealthy car enthusiasts, but also for middle-class drivers who nevertheless want to make their car stand out from the crowd by making its appearance special.
- The ability to focus light will allow you to produce exactly the desired design, emphasizing the lines of the car, without creating the opposite effect, when the lighting only repels, causing negative emotions.
- Quite simple installation and maintenance of neon lighting will make it easy to care for the installed equipment, and with some skill you can make the lighting even at home in your own garage.
Despite these advantages, neon lamps have a number of disadvantages, for example, compared to another lighting method - LED strips.
Discounts on new cars! Advantageous loan from 9.9%
Installment plan 0%
- LED lamps are still brighter than neon lamps. This is both an advantage and a disadvantage, because too bright lighting sometimes hurts the eyes. Depending on the preferences of the motorist, this item can be considered a disadvantage. But compared to neon, the light from LED lighting cannot be focused, so it is more difficult to create a unique design with it.
- Neon lighting consumes more electricity. It's all about the gas-discharge lamp that is used in these devices. It is much more demanding of electricity than an LED, which means there is a higher risk of being left with a discharged car battery, and the cost of electricity will strain your wallets.
- The resistance to deformation of neon lamps is quite low. LED strips are more impact-resistant, which ensures a longer service life.
- Neon lighting is designed to be kept on at all times. And this, combined with the previous point, makes the service life of such flashlights much lower than LED ones.
- LED lighting is easier to install and maintain. We noted the ease of installation of neon lamps as an advantage, but, in comparison with the installation of LED lighting, it is still more complicated and requires some abilities from the car owner.
Installing neon lights on a car with your own hands
Before installing the backlight on your car, you need to decide on the choice of the mechanism for turning it on. They are of the following types:
- From the button. The simplest and most common option is to turn on the backlight from the switch. This method of switching on has a number of advantages, the main of which is energy saving, since the lamp will turn on only when the car owner wants it. For example, they will not light up during the day when lighting is not required, and it simply will not be visible. Also, during business trips, the brightness of the car’s appearance may be excessive. This is also the simplest and most practical option for installing such equipment.
- When the ignition is turned on. This method of turning on the lamps also exists; it is more comfortable than the previous one, since you do not need to constantly press the button. Turning on the lighting simultaneously with starting the engine looks more impressive than turning it on separately by pressing the switch. However, this method has all the disadvantages that the previous method does not have. The lamps will turn on every time you drive the car, so this mechanism will not be suitable if you often have to travel to official meetings or travel during the day. Moreover, if you can come to terms with the second problem, it’s better to try to avoid the first one.
- When opening the doors/trunk. This method will look extremely impressive when lighting, respectively, the car interior or trunk, but not when decorating the appearance of the car. To install lighting on the underbody, it is better to consider the first two methods of lighting neon lamps.
Now let's move on to the installation itself. It is quite simple, but requires some skill, so you should perform the above steps very carefully:
- Having decided on the choice of mounting locations, attach the lamps to them in order to calculate the optimal length for each wire.
- Select a convenient location for the switch and fuse. The latter will protect the system from all kinds of unforeseen circumstances.
- Connect the switch to the battery and install the fuse.
- Attach the neon lamps under the bottom of the car in the places that you have provided in advance.
- Connect the lighting fixtures with wires to the fuse and switch.
- Connect the entire system to the car's power supply.
After the entire system is installed, check for possible errors (for example, if you mixed up the plus and minus), and then try to turn on the system. Neon lighting is quite vulnerable to impacts, so now you will have to drive your car more carefully so as not to damage the result of such painstaking work.
Write to us if the material was useful to you.
Please indicate how useful this article was to you!!!:
Source: http://CarExtra.ru/tyuning/kak-sdelat-neonovuyu-podsvetku.html
DIY interior lighting. Detailed Guide
Content:
Well-executed interior lighting creates a special aura and contributes to a comfortable time while traveling. Even for automotive beginners, installing an LED cable does not pose any serious difficulties. The article describes the detailed process of installing the system on your own.
Principles of approach to solving the problem
Before starting installation, it is worth understanding the task at hand:
- choose a color scheme for the system that is harmonious in style;
- decide on the areas of space that you plan to attract attention to with the help of lighting;
- familiarize yourself with the interior diagram from the specifications for the car, and then clarify all the details directly on site;
- solve the issue with the principle of connecting the power supply.
Most often, the luminous line is attached to the dashboard, the lower contour of the seats, and on the doors. The entire path where the LED line is planned to be laid, namely: air ducts, armrest cavities, glove compartment, etc., must be examined, checked and cleaned of dirt, rust, and the like.
The laying plan is largely determined by the design of a particular car interior. The most popular LED backlight triggering schemes are:
- at the moment of turning the key in the ignition;
- when opening one of the system elements: hood, doors, trunk, etc.;
- manual control using a button.
The advantage of the first and second options is automation. The disadvantage is that there is no need for lighting during the day.
The LED line is powered by a line running under the floor and through the fuse box.
Organization of the preparatory stage
LED car interior lighting requires the following components:
- terminals with round contacts;
- toggle-type buttons;
- thick contacts for connecting the line to the button;
- square blocks with dimensions of 1 or 1.5 mm for terminals;
- limit switch;
- square acoustic cable (1 mm);
- indicator for network identification - a multimeter (preferably with a buzzer);
- insulating and heat shrink tape (a thin tube version is the most suitable);
- LED cable in silicone sheath.
It is better to take insulated contacts intended for installing a button. If there are none in the store, then elements of a simplified design will do. The need for a limit switch arises when choosing an automatic operation circuit.
According to the laying plan, determine:
- the length of the LED strip and audio cable (this parameter can be easily measured locally);
- number of radio elements: limit switches, toggle switches, etc.
DIY interior lighting: algorithm of actions
The sequence of work consists of the following stages.
1. Cut the LED strip into pieces.
Produced with scissors in accordance with the intended length of sections (according to plan or location). The system cannot be divided everywhere, but only in certain areas. The landmarks of such areas are the yellow-brown rounded elements of the LEDs.
2. Strip the ends of the audio cable and irradiate each of the contacts on the red (“+”) and black (“-”) wires.
3. Connect the positive charge indicated on the light conductor tape to the red wire of the audio cable. Drizzle a mixture of liquefied rosin and tin on top. Do the same with the contacts of the black segment. After a few minutes of waiting, you need to check the strength of the connection.
When working, you need to be careful and watch to avoid errors like:
- polarities were reversed during installation;
- the edge of the spreading solder connected the “+” and “-” wires into a single whole.
4. At this stage of the work, a structure has been created, one end of which is a connection between a wire and an LED strip, and the other two are in a free state.
Next, connect the terminal block to the unused edge of the audio cable line in the traditional way.
5. Tear off the backing from the LED strip and stick it on a previously degreased area intended for installation. Make sure that the direction of the light flux is as planned.
To ensure secure fastening, apply a thin layer of “Moment” to the reverse side of the conductor line.
6. Observing polarity, use terminals to connect pieces of wires of the same color on the audio cable from different parts of the cabin.
7. Mark the installation location of the toggle switch (usually next to the control element for the alarm) and drill a hole.
To connect the button to the on-board power supply, select the necessary wires from the alarm system. Each of them is checked with a multimeter equipped with a sound signal function. Find two of them that trigger the buzzer. The stripped and tinned end of the red wire coming from the button is connected to a thick contact using pliers and then crimped with pliers.
The unused black wire is connected to the fuse box. From the electrical circuit located in the specifications for the car, pads that are not occupied by other devices are found. It is to them that the positively charged wire from the LED system is connected. The second option is to connect 2 wires to 1 contact (a current of 7.5 A is required).
8. Ground the system using the black wire and the round lug attached to it. The corresponding terminal is located next to the device for raising the car hood.
These are the main stages preceding the time when the interior lighting starts working normally.
Source: http://NashiKolesa.ru/svet/podsvetka-salona