Replacing the front wheel stud. Replacement and repair of front wheel studs
It happens that the wheel mounting stud fails, and it is not possible to securely fasten it to the hub. This often happens when the wheel is removed frequently. Damage can be different - this is a breakdown of the threaded part, a broken pin or its bending. Wear occurs due to improper care.
Dirt and sand get in, which in turn plays the role of an abrasive. Wear is also caused by a poorly tightened nut. A part may break due to metal fatigue, a strong impact, or the wheel nut being overtightened. As a result, traveling by car becomes unsafe.
This fact can cause more serious damage and a traffic accident.
If this type of breakdown occurs, it is necessary to replace the front wheel stud. In this case, it is advisable to replace not only the broken part, but the entire set. This is characterized by the fact that if one breaks, the remaining studs could also be damaged, although this may not be visually noticeable.
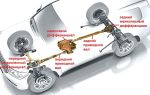
Depending on the make of your vehicle, the replacement process can take place either on the removed hub or directly on the car. This is due to the design features of the machine. But, as a rule, repairs can be made without removing the hub. Almost every motorist can install the stud on his own. It is enough to have the necessary tools and a little experience in repair work.
But what if the hairpin breaks off on the road? In this case, it is almost impossible to eliminate this malfunction.
Due to the fact that the wheel is attached to the hub by a certain number of studs (from four to six, with the exception of “OKA” - three), you can get home or to a service station with the remaining ones.
In this case, you first need to check the degree of tightening of the wheel nuts and move very carefully, avoiding large bumps, and not picking up high speed. Replacing the front wheel hub stud is not a very labor-intensive process, but it does require certain skills and patience.
Below are ways to solve this problem using the example of several “popular” car brands, both domestic and imported. In principle, repair work is not particularly different in its technology, but there are still some differences associated with the structure of the car.
Replacing the front wheel stud – “Toyota”
In this case, the object of repair will be a Toyota Corolla. Immediately before the replacement, you need to decide on purchasing a set of spare studs. The best option would be to purchase original parts, the quality of which is beyond doubt.
Otherwise, there is a risk of purchasing low-quality studs, which can quickly break off, or their threaded part will soon break off. You should also not make a mistake with the location of their installation. The front and rear hubs have different studs.
This advice applies to all cars that require replacing the front wheel hub stud.
Step-by-step replacement process
For the work you will need a standard set of socket wrenches, a hammer, an adapter, a wheel wrench and a jack. The car is placed on a level surface and the parking brake is applied. Next, loosen the wheel nuts and, jacking up the car, remove the wheel.
After the preparatory work, you should begin removing the brake caliper. Using 17-mm sockets, unscrew the bolts securing the caliper and remove it from the disc. It is not necessary to disconnect the brake fluid supply hose, just move the brake housing a little to the side.
On the inside of the hub there is a technological connector for dismantling and installing the stud. We rotate the hub so that the damaged pin is located opposite this connector.
Next, use a hammer to knock out the pin. If it is securely held in its seat, then you need to treat it with WD-40 or diesel fuel and let it dry out a little.
After this, dismantling will be easier; if necessary, you can use the attachment.
After removing the damaged part, we install a new one in its place. Installation is the same as removal.
When the stud is in place, you should tighten it with the wheel nut so that it fits tightly in the brake disc. The replacement of the front wheel stud (including Toyota Camry) was successfully completed.
If it is necessary to replace the remaining studs, the operation occurs in the same sequence.
It is worth noting that it is not advisable to use nuts that were installed on old studs for new bolts, since there is a possibility of damage to their threads. This can ultimately lead to rapid wear of the new set of products.
Repair process on VAZs
Replacing the front wheel stud (Niva as well) is carried out in almost the same way as on the previous car.
The car is jacked up, the wheel, caliper and brake guard are removed. Next, the pin-bolt is knocked out with a hammer, having previously aligned it with the cutout for dismantling. To prevent the wheel hub from turning, you need to engage first gear.
The seat is cleaned of dirt and rust and then a new bolt is installed into it. There are longitudinal slots on the body of the stud and in its seat. Therefore, you need to make sure that they match. Working from the engine side, the stud is driven in with a hammer and then tightened with a nut until it is completely seated.
The entire amount of work takes about one and a half hours.
Replacing the front wheel stud with hub removal
Let's look at an example of replacing a part on Matiz cars. It is impossible to dismantle the damaged part on this car without removing the hub, since the brake disc is in the way.
The first step is to remove the steering knuckle, the brake caliper assembly with pads and move it to the side. The steering rod is unscrewed from the first one. Next, the fastening of the hub to the rack is dismantled, the ball joint is unscrewed and knocked out. Having previously unscrewed the hub nut, remove the hub, and the drive shaft is fixed so that the CV joint does not come out of the gearbox.
Subsequently, the hub is disassembled and access to the studs appears. Replacement of the front wheel stud occurs as standard. The damaged one is pressed out, and a new one is installed in its place. After this, you can begin assembling the suspension mechanism.
Removing and installing studs on a Chevrolet
The first step is to carry out all the preparatory work for unhindered access to damaged parts. The wheel, caliper and brake disc are removed from the hub.
For ease of access to the penultimate mounting bolts, it is necessary to change the position of rotation of the hub with the steering wheel. Replacing the front wheel stud (Aveo 1.6 included) occurs as follows.
The unusable part is pressed out with a hammer using a wooden spacer, and a new pin is mounted in its place. Next, the entire assembly is assembled in the reverse order of removal.
As you can see, dismantling and installing a new set of front wheel hub bolts is quite feasible at home. Replacing the front wheel stud (Lacetti included) occurs in the same way, with the exception of one thing - due to the design of the hub, the brake disc is not removed.
Stud repair
Often, motorists do not recommend repairing bolts. Firstly, this is not always possible to do (broken and distorted). Secondly, the safety of driving a vehicle is reduced. But they can still be restored. We are talking about damaged threads.
Replacing the front wheel mounting stud may not be necessary if the thread is restored. To do this, the stud is removed from the hub. Next, it is clamped in a vice and a chamfer is removed from the end part with a file. Then, using a die of the required size, the damaged area is driven away.
If the part does not have cracks or chips at the base, it can be used in the future.
Care
In order not to encounter such a problem as breaking and replacing the front wheel stud, it is necessary to monitor the degree of tightening of the nuts. When released, the disc hits the studs. This leads to their breakage and wear of the threads.
Before removing the wheel from the car, you need to thoroughly clean the bolts of dirt so that it does not get on the threads of the threaded connection. The same operation should be carried out before screwing on the nut. It is advisable, when unscrewing the wheel, to pre-wet the threads using any type of petroleum product. This will make the nut move easier.
These simple manipulations contribute to the safety of the part and take much less time than the actual replacement and repair of wheel studs.
Additionally, be sure to check the tightness of the nuts and bolts after visiting a tire shop. There is a high probability that in a hurry the service worker may not reach the wheel and this will lead to damage to the studs at best.
Source: http://fb.ru/article/236212/zamena-shpilki-perednego-kolesa-zamena-i-remont-shpilek-perednego-kolesa
Toyota Corolla Forum
Toyota Corolla transmission problems, repairs and spare parts
Alex75 Messages: 6 Registered: June 04, 2014, 16:35 Car: TOYOTA COROLLA E150
#1
Post by Alex75 » June 14, 2014, 6:23 pm
Today, when I tried to remove the front wheel, I couldn’t unscrew the nut - it just wouldn’t go... neither forward nor backward. I tried to swing it, WD40 splashed... in the end I applied force and... broke it. Now the front wheel is secured with 4 nuts. I understand that this is not normal! Tell me - what needs to be done? Is it possible to replace the stud or does it need to be replaced along with the disc? thank you in advance for your help!!!
aleks 69 Honorary Korollov Messages: 5379 Registered: 19 Feb 2013, 20:01 Car: Corolla Elegance 2012 1G3 Reistal automatic transmission, oil XenumX1 5w30 Location: Moscow Thanked: 3 times Thanked: 16 times
#2
Post by aleks 69 » June 14, 2014, 6:26 pm
Buy a new stud and change it...
Do you want your car to run? Do it yourself. Nobody needs it in a car service for 100 years. They need your money!
Alex75 Messages: 6 Registered: June 04, 2014, 16:35 Car: TOYOTA COROLLA E150
#3
Post by Alex75 » June 14, 2014, 6:30 pm
that is, stupidly you can replace the stud?????
I just don’t know the system, how it’s installed...
exxittusHonorary Corolla Messages: 4555 Registered: Jan 18, 2013, 03:46 pm Car: Corolla,2010,6MT 132hp/1ZR-FAE/Valvematic
Avensis,2002, 2L/149hp/1AZ-FSE(D4) Location : Cologne, German Thanked: 7 times
#4
Post by exxittus » June 14, 2014, 6:35 pm
The fragment is knocked out, a new pin is pressed in.
Take a look at the technical document, it clearly shows
Alex75 Messages: 6 Registered: June 04, 2014, 16:35 Car: TOYOTA COROLLA E150
#5
Post by Alex75 » June 14, 2014, 6:37 pm
So! guys, clarify the design for me, please! The pin is screwed in! So? and here? is it pressed in?? so then I won’t be able to replace it on my own??
Do I need to remove the disk completely?
www007 Messages: 28 Registered: Jan 22, 2013, 4:06 pm
#6
Post by www007 » June 14, 2014, 6:48 pm
you take off the wheel, knock out the stud inside, put a new one in, tighten the nut so that the stud sits in place,
unscrew the nut, install the wheel, tighten all the nuts, and rejoice!
Alex75 Messages: 6 Registered: June 04, 2014, 16:35 Car: TOYOTA COROLLA E150
#7
Post by Alex75 » June 14, 2014, 6:53 pm
Thank you!!!! I'll run to the store for a hub bolt (stud) one of these days!!exxittusHonored Korollovod Messages: 4555 Registered: 18 Jan 2013, 15:46 Car: Corolla,2010,6MT 132hp/1ZR-FAE/Valvematic
Avensis,2002,2l/ 149hp/1AZ-FSE(D4) Location: Cologne, Germany Thanked: 7 times
#8
Post by exxittus » June 14, 2014, 07:15 pm
And there was grief...
And how much joy))))
Alex75 Messages: 6 Registered: June 04, 2014, 16:35 Car: TOYOTA COROLLA E150
#9
Post by Alex75 » June 14, 2014, 07:31 pm
buddy! you understand, when such force majeure happens, then probably anyone who does little with their hands, and especially in the crown, then panic sets in involuntarily, so I pulled myself together and turned to you for help, friends!!!
THANK YOU ALL SO MUCH FOR YOUR HELP AND SUPPORT!!!
DyushaHonored Korollovod Messages: 11430 Registered: March 30, 2013, 01:53 pm Car: Corolla, 2011, 4 automatic transmission, 1.6 l petrol diesel, Comfort+, drank more than 9700 l/Ai92, Toebta 0W20 Location: 133, Kovrov Thanks : 7 times Thanked: 24 times
#10
Post by Dyusha » June 14, 2014, 8:56 pm
remove the wheel, knock out the pin inside, remove the entire caliper with the bracket, mark the position of the brake disc relative to the hub, remove the brake disc and insert a new pin, reassemble in reverse order.
http://corolla-club.ru/doc2/rm04f1ru/re ... b002x.
htmlVBIFHonorary Korollov Messages: 779 Registered: 11 Feb 2014, 07:39 Car: Toyota Corolla 1ZR-FE, automatic transmission, 2012
#11
Post by VBIF » Jun 14, 2014, 9:14 pm
Why is this? ALEKS-2Moderator Messages: 925 Registered: 16 Jan 2013, 18:32 Car: November 2007. red. MMT-1.6 Location: Veliky Novgorod Thanked: 35 times Thanked: 34 times
#12
Post by ALEKS-2 » June 14, 2014, 21:31
Probably with this factory setting, the front disc has minimal runout. November 2007.
MMT.krasnaya TechdocvaliduserHonorary Korollov Messages: 6048 Registered: Jan 15, 2013, 2:17 pm Car: Mazda CX-5 Location: Saratov Thanked: 72 times Thanked: 131 times
#13
Post by validuser » Jun 14, 2014, 10:33 pm
well said.
VBIFHonorary Korollov Messages: 779 Registered: 11 Feb 2014, 07:39 Car: Toyota Corolla 1ZR-FE, automatic transmission, 2012
#14
Post by VBIF » Jun 14, 2014, 10:38 pm
Right now I should be genuinely shocked and surprised. And when we ourselves change the brake discs (which, by the way, are a consumable part), there is some kind of “beating”, probably a representative of the plant comes with equipment and eliminates it...
Guys, you seem like adults, huh?
DyushaHonored Korollovod Messages: 11430 Registered: March 30, 2013, 01:53 pm Car: Corolla, 2011, 4 automatic transmission, 1.6 l petrol diesel, Comfort+, drank more than 9700 l/Ai92, Toebta 0W20 Location: 133, Kovrov Thanks : 7 times Thanked: 24 times
#15
Post by Dyusha » June 14, 2014, 10:55 pm
But what does it have to do with adults or children, the point is different, the point is simply setting the mark and everything, so that later you can just take it and put it in its place.
Personally, I always do this and also mark the rims in such situations. VBIF Honorary Corolla Messages: 779 Registered: 11 Feb 2014, 07:39 Car: Toyota Corolla 1ZR-FE, automatic transmission, 2012
#16
Post by VBIF » Jun 14, 2014, 11:03 pm
Yes, I understood this, like underpants... yellow in the front, brown in the back... Only the wheels, why?
I sometimes move the sugar bowl closer to me in the morning, although this doesn’t make the tea any sweeter.
DyushaHonored Korollovod Messages: 11430 Registered: March 30, 2013, 01:53 pm Car: Corolla, 2011, 4 automatic transmission, 1.6 l petrol diesel, Comfort+, drank more than 9700 l/Ai92, Toebta 0W20 Location: 133, Kovrov Thanks : 7 times Thanked: 24 times
#17
Post by Dyusha » June 14, 2014, 11:08 pm
But don't get confused.
And I also write where it was on replaceable seasonal wheels, so as not to get confused during the next replacement. VBIF Honorary Corolla Driver Messages: 779 Registered: February 11, 2014, 07:39 Car: Toyota Corolla 1ZR-FE, automatic transmission, 2012
#18
Post by VBIF » Jun 14, 2014, 11:18 pm
Perhaps this is also part of some magical mystery :-) But! On the drive wheels, if they are studded, you can see where the front wheels are and where the rear wheels are. I change them once a year.
Left-right is nonsense. Although you can get into the weeds where they write about drive shafts of different lengths, etc., this is also nonsense that is unnecessary for the average motorist. IMHO.
DyushaHonored Korollovod Messages: 11430 Registered: March 30, 2013, 01:53 pm Car: Corolla, 2011, 4 automatic transmission, 1.6 l petrol diesel, Comfort+, drank more than 9700 l/Ai92, Toebta 0W20 Location: 133, Kovrov Thanks : 7 times Thanked: 24 times
#19
Post by Dyusha » June 15, 2014, 00:25
There is a catch here too. As a rule, winter is directional, so only on the right or only on the left, and only in front or in the back, this is easier or more difficult, depending on the number of seasons and the front-rear toss. Dyusha Honorary Queen Leader Messages: 11430 Registered: March 30, 2013, 1:53 pm Car: Corolla, 2011, 4 automatic transmission, petrol diesel 1.6 l, Comfort+, drank more than 9700 l/Au92, Toebta 0W20 Location: 133, Kovrov Thanked: 7 times Thanked: 24 times
#20
Post by Dyusha » June 18, 2014, 00:24
I was poking around here today, took a photo, there is plenty of room to replace the stud.
You do not have the necessary permissions to view the attachments in this message.
Go
Source: http://tc-club.ru/viewtopic.php?t=1736
دانلود فیلم، تماشای رایگان
10:04
Over Complicated Life Hacks: Hot Glue Edition
بازدید 421 976 81%
28:24
Brunch at 7-ELEVEN VS LAWSON in Tokyo Japan
بازدید 496 009 97%
5:18
Thai cave rescue: First boys rescued – BBC News
بازدید 777 042 91%
13:19
بازدید 1,120,914 96%
2:49
Drake - Behind Barz | Link Up TV
بازدید 3,994,846 96%
6:00
The Fluffiest Pancakes You'll Ever Eat
بازدید 795 751 98%
9:36
The Try Guys Meet Ned's Baby
بازدید 2,727,183 99%
3:36
Nicki Minaj – “Bed” (feat. Ariana Grande)
بازدید 9 242 452 95%
10:03
The Best of Jim – The Office US
بازدید 349 853 99%
9:38
Thai cave rescue: Window narrows before heavy rains
بازدید 477 509 91%
0:19
Jumping at Pocahontas State Park
بازدید 1,457,241 79%
2:10
Dobre Brothers – Stop That (Music Video)
بازدید 3,577,888 84%
13:53
Habanero Snack Taste Test ft. Sean Evans
بازدید 909 246 96%
4:40
We Tested The Aaliyah MAC Collection
بازدید 210 422 94%
2:51
Russ – Dangerous (Official Audio)
بازدید 636 023 94%
8:28
Former Thai navy SEAL diver dies in Thai cave
بازدید 1,178,514 90%
10:34
We DISCOVERED Ancient Cave Paintings!
بازدید 457 547 97%
3:50
Will This Trick Your Ears? (Audio Illusions)
بازدید 1,327,694 95%
3:55
Jason Mraz – Might As Well Dance [Official Video]
بازدید 416 483 97%
4:27
You're Too Sad to Argue With
بازدید 659 532 98%
10:15
Learn to Slackline || Guest Video
بازدید 319 237 97%
6:41
بازدید 878 352 98%
3:44
HOLLAND – I'm Not Afraid M/V
بازدید 1,807,171 98%
3:24
Casually Explained: How to Read the Stock Market
بازدید 839 008 98%
13:51
بازدید 2,775,665 99%
14:24
Is Ant-Man Secretly the Most Powerful Avenger?
بازدید 339 701 98%
3:38
Ella Mai – Boo'd Up (Remix) ft. Nicki Minaj & Quavo
بازدید 3,602,178 87%
1:30:57
2018 A Capitol Fourth | Full Broadcast | PBS
بازدید 307 271 81%
3:25
Niall Horan – Finally Free (From “Small Foot”/Audio)
بازدید 540 479 100%
9:25
Why the US national anthem is terrible — and perfect
بازدید 862 684 80%
7:04
بازدید 1,538,490 90%
4:03
HIGHLIGHTS: LA Galaxy vs. DC United | July 4, 2018
بازدید 277 557 92%
5:11
I Hate Fireworks. I'm Sorry.
بازدید 1,303,996 95%
5:51
Ping Pong Trick Shots 4 | Dude Perfect
بازدید 27 299 010 98%
4:51
My Netflix and No Chill Story
بازدید 3,838,190 97%
0:19
a brutally honest conversation
بازدید 1,706,081 97%
12:39
MY DOGS PICK MY MAKEUP!! | NikkieTutorials
بازدید 1,784,720 98%
14:03
بازدید 4,096,123 99%
19:43
Trying A Full Face Of Japanese Drugstore Makeup
بازدید 3,420,734 99%
5:34
West Philadelphia, Born and Raised
بازدید 851 900 99%
18:08
NBA 2K19 – Special Announcement
بازدید 397 154 57%
8:07
FORTNITE DANCE CHALLENGE IN REAL LIFE COSPLAY
بازدید 1,253,931 83%
1:31
Skyscraper – Official Trailer 3
بازدید 7,429,669 89%
16:20
The Truth About Jessie Paege Coming Out
بازدید 1,130,812 93%
12:51
8 Tomatoes Gadgets put to the Test
بازدید 1,306,191 92%
3:40
Your 1st crush. (YIAY #424)
بازدید 1,816,616 97%
10:08
بازدید 9 393 303 99%
6:00
XXXTENTACION – SAD! (Official Music Video)
بازدید 61 457 409 97%
11:09
GIANT DART Vs. FRIDGE from 45m!
بازدید 1,786,807 99%
3:54
Rudy Mancuso – Mama (Official Music Video)
بازدید 5 914 936 97%
20:28
I'm ONLY Keeping 20 Highlighters!
بازدید 889 305 97%
22:54
STYLE SWAP ft. JACLYN HILL
بازدید 3,244,907 97%
4:46
بازدید 20 158 114 95%
5:54
10 Things Kyrie Irving Can't Live Without | GQ
بازدید 2,186,319 98%
17:53
SURPRISING MY MOM WITH A BRAND NEW MERCEDES!!!
بازدید 665 785 98%
33:26
بازدید 426 607 99%
7:12
The Baffling Viruses That Infect... Other Viruses
بازدید 369 496 98%
4:57
Ya Burnt: Sunburns, the Pride Parade
بازدید 459 538 83%
23:18
Smile – Liza on Demand (Ep 2)
بازدید 0 98%
4:02
MNEK – Color (Official Video) ft. Hailee Steinfeld
بازدید 4 143 130 97%
3:34
Maddie Poppe – Going Going Gone (Official Video)
بازدید 3,813,928 98%
Source: https://irvid.net/video/%D0%B7%D0%B0%D0%BC%D0%B5%D0%BD%D0%B0-%D1%88%D0%BF%D0%B8% D0%BB%D1%8C%D0%BA%D0%B8-%D0%BA%D0%BE%D0%BB%D0%B5%D1%81%D0%B0-%D1%82%D0%BE% D0%B9%D0%BE%D1%82%D1%8B-%D0%BA%D0%BE%D1%80%D0%BE%D0%BB%D0%BB%D0%B0-2005-HafwHE2aW4Q.html
How to Replace a Toyota Corolla Hub Stud
Replacing a wheel stud on a Toyota Corolla
In almost every driver's life there have been such moments when stud or when you decided to put your car on new rims, but the studs turned out to be small and they were not long enough for the new rims. It happened, didn't it? In such cases, any motorist has only one decent option - replacing the wheel studs.
In this article we will look at replacing wheel studs on a Toyota Corolla; this car is perfect as an experienced standard. The replacement process is not very difficult, and not the most common one, so it will be interesting to dive into this process.
Before talking about replacing studs, you need to talk about which studs to take.
Usually, it is best to purchase unique studs for Toyota; their price will be approximately 80-150 rubles per set for one wheel, but if you feel sorry for such funds and you do not want to waste them, you can purchase duplicates for approximately 50 rubles per set for one wheel and install one, a cheaper option. But I’ll immediately note that you don’t go through them for a long time, because:
- They will break off very quickly;
- There is a high possibility of its thread breaking.
In such cases, you will have to get into the car again and deal with the problem. Agree that this is not the most ideal option. How to check and repair the battery in the key in a Toyota Corolla Verso. If you decide to replace the battery in the key of a Toyota Corolla Verso with your own hands, then it is better to do everything in one of these.
It can take a lot of your energy, time and nerves. About how to replace the door handle on a VAZ-2114. Removing and disassembling the door card. Removing the door handle mechanism. Therefore, let's not be stingy and take unique hairpins for work. Also, do not forget that unique hairpins may differ in appearance.
This will depend on which wheels they will be installed on - front or rear.
Step-by-step replacement of a wheel stud on a Toyota Corolla
So, let's get down to the process of replacing a broken or torn pin and find out what we need for this. To begin with, you should buy a rem. kits for the wheels you are going to work with.
How to replace antifreeze on an Opel Vectra b? Next you will need a set of keys, wrenches and heads, namely for 17, 19 and 21. You will also need a small hammer and a small stool for more comfortable work.
If all this is there, you can specifically begin to replace it.
First, we need to drive the car into the garage, because the process may take some time, especially for someone new to this business. The article talks about the design of the stove on a VAZ-2115 car. About the main reasons for its malfunction and how to remove and replace the stove...
Having done this, be sure to put the car on the handbrake and turn the steering wheel until the wheels point straight ahead. Because the Corolla is pre-wheel drive, you shouldn’t put it in gear. Next we need to slightly rip off all the bolts, then use a jack to lift the side that suits us and remove the wheel.
This completes the preliminary step, let’s move on to the next one.
How to change hub studs on a Toyota Corolla
How to change stud of any car? It's easy enough. How to replace coolant on a Toyota Rav 4. I spent less on it.
Replacing the wheel stud of a Toyota Corolla (2005)
Toyota Corolla replacement of wheel studs , there are certain subtleties that I shared with you, but the main thing is to use it.
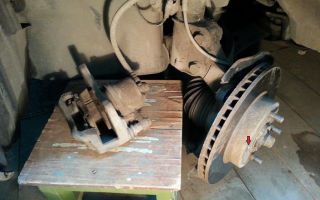
Having prepared the work area, first remove the brake caliper. For this we will need 17mm heads. Since we are a Corolla, we removed the unnecessary stud. How to replace it with it. How to remove and replace the stove on a VAZ-2115. It is secured with only two bolts. In the photo they are indicated by reddish arrows.
There is no need to remove the hose from the caliper anymore. We just throw it to the side, let it hang a little, or put it on a stool. Agree that this is very easy to do. Everything is clearly visible in the photo. The reddish arrow shows the missing pin .
Next, pay attention to the location of the removed caliper. There we will see that the manufacturer has provided a place where the pin can be knocked out. So that nothing interferes with us, we scroll the brake disc until we see the pin we need, after which we simply knock it out with a hammer. As we can see, we don’t need any devices.
So, we removed the hairpin we didn't need. Does Corolla rear hub fit? You can replace it not but how to change the stud to. How to replace a Toyota Avensis heater radiator; how to remove Toyota Avensis headrests; how to remove. We put a new part in its empty place.
You don't have to remove the brake disc, but it's a little more difficult to put it back in place . I had to dent the protection a little. After it is in place , if necessary, you can correct the protection to its original state with a screwdriver. Toyota Corolla 120 and 150 mirror: how to remove and.
The photographs below show how we inserted it into place and what the end result was.
Having inserted it, we need to insert its nut and tighten it in order to seat the stud in its place ; you don’t need to tighten it too much, you don’t need much effort. How to change the wheel stud of probably any car? It's pretty simple. I spent no more than 30 minutes on this. The photographs below document the entire process.
So, the part is installed. In the same way, you can change all the others and not only on the front wheels. After all the replacement work is completed, all we have to do is put the brake caliper in place. If he doesn't get up, we need to separate the pads. Tightening torque 106.8 Nm.
So, the renovation is complete. Everything turned out to be not very difficult. So is it worth spending several thousand on a service station when you can replace them at home? I think you already know the answer.
Source: http://sis26.ru/kak-zamenit-shpilku-na-stupice-tojota-korolla/
How to change a stud on a hub
Home » Repair and service » How to change the stud on the hub
Today, it is difficult to imagine humanity without road transport. Automotive technology has captivated this world for a long time and is not going to give up its position. And they are aimed at creating the most comfortable operating conditions for cars. For this purpose, constant modernization of even the smallest car parts is carried out.
In this article we will talk about such an important, albeit very small detail as the hub stud. Why modernization here? Moreover, hub studs have become an excellent equivalent to simple bolts.
But, like all car parts, they are subject to wear and tear or any kind of damage.
In this article we will try to figure out what advantages hub studs have over bolts, as well as how to correctly and quickly replace a used stud with a new one.
1. Advantages of hub studs
As a rule, many motorists have to “sweat” a lot when installing a wheel on a car. So, thanks to the hub studs, putting on the wheel becomes much more convenient and faster. It is also impossible not to note the excellent bolt pattern when installing the wheel on a vehicle.
The advantages of a wheel stud are also evident in the fact that it is easier to replace a broken wheel stud than to tinker with a hub with broken threads.
The appearance of the hub stud also plays an important role: you have the opportunity to replace the nut with a color that suits your style.
Typically, you can install wheel spacers from 10mm to 20mm, which will allow you to increase the wheel track width, making your car more stable.
2. How to change hub studs correctly
After we have examined the main advantages of hub studs, we can move on to the rules for correctly replacing this part. As a rule, the hub stud is subject to various damages, be it a fracture or oxidation. But most often, motorists resort to replacing the stud only when it is completely used up.
Replacing a hub stud is not a very labor-intensive process, so you do not have to contact specialized technical support centers to do this work. The replacement can be easily done at home, it is only important to follow certain instructions.
So, first, we jack up the car and begin unscrewing the wheel. After removing the wheel, use a 14mm wrench and unscrew the brake cylinder. Also, using the same key, unscrew the caliper. When everything unnecessary has been removed, we begin to remove the brake disc. To do this, we move the handbrake pads apart, using the holes for the 8 bolt.
Of course, you can replace the stud without removing the handbrake block. You can simply rip off the thread of the stud using a handle with a long rod in the case when the car's mileage is high enough and the stud is completely used up.
After removing the old nut, do not forget to treat the thread surface. To do this, carefully remove dirt, rust, etc. from the surface. All this is done to ensure that the new stud fits evenly into the hub and in no case dangles.
After this, tighten the new stud through the spacer with the wheel nut. Congratulations! You got the job done!
Of course, after you have replaced the hub stud, for safety reasons you need to drive a short section of the road to test the car. If you notice any fluctuations, you should have your wheels balanced.
Source: http://autofluids.ru/remont-i-servis/kak-pomenyat-shpilku-na-stupice.html
Replacing rear wheel studs on a Toyota
Replacing wheel studs on a Toyota Corolla is not a very complicated process, however, it takes time and Repairing the rear suspension on a Toyota Corolla: disassembling, replacing springs and struts. Toyota dealers have begun accepting orders for the updated Corolla.
Toyota Mark II Smurf › Logbook › Replacing rear wheel studs. I'll tell you step by step. 1. We put the car in neutral (we put bricks, shoes, three dogs under the wheels in advance, in short, whoever has enough imagination for what) 2. Jack it up.
About the logo. The Toyota logo is a triple oval. Two internal ovals located perpendicularly symbolize the strong relationship between the client and the company. In addition, if you look closely and use your imagination a little, in these ovals you can see an image of all six letters of the brand name T, O, Y, O, T, A.
Instructions for replacing the rear wheel hub stud of a Toyota Corolla with your own hands. Toyota auto parts. Motor. Engine.
In what cases do you need to switch to “L” and “2” when driving. In principle, it is possible without splines, just sharpen five hundred square meters more than the seat for pressing. I managed to do it in such a way that I broke the threads on 3 studs of the rear right wheel, as it happened. I put the pin in place, put the drum on and use a nut to secure it a little on the splines!
Toyota Nadia Forum -> PHOTO REPORT
Unanswered messages Active topics.
This forum is currently being viewed: I tore off the stud on the rear right wheel!!! Shown only to unregistered users Guys today changed the tires to summer ones, when unscrewing the wheel, they tore off the stud.
Maybe someone has encountered such a problem!? How to replace and disassemble the rear hub!? You remove the rear bearing cover, unscrew the nut and knock out the hub. The studs, I think it’s not a problem, they are for sale, I knocked out the broken one and pushed in a new one.
It’s not realistic to knock out the pin; you’ll have to drill it out and turn out the rest with something like this. You can do without removing the hub. The guys changed the tires to summer ones today, and when unscrewing the wheel, they tore off a stud.
On my front wheel I had something like this on two studs, the threads were jammed with old nuts with bad threads when I changed my shoes - after that I force the craftsmen not to tighten them too much until stupid. I took the swords at work and cut the threads on the studs with new ones - that’s how I drive. I bought new nuts and kept them in reserve - they came in handy later, as the threads deteriorate over time. I bought the nuts from a tire store not expensively, regular ones, not chrome-plated, but exactly like the original ones, the same size. Last weekend I rearranged all 20 studs.
Why he rearranged it is a long story. In short, the old owner, the owner of the EPRST, changed the drill bit from 5x to 5x. So, there is nothing complicated about replacing the studs. Remove the brake drum, knock the pin out of its seat, and then turn the hub at about 4 o'clock and remove the pin.
Reassemble in reverse order. Install the contract hub and there are no problems, at the same time there is a bearing in stock. In principle, it is possible without splines, just sharpen five hundred square meters more than the seat for pressing.
Page 1 of 4. Previous topic Next topic. I had a similar problem. The smart book said that there is no need to remove the hub for this repair. You remove the wheel, remove the brake drum; I have disc brakes, but in my opinion, on the drum it’s the same thing; you orient the hub with the broken pin opposite the special hole and dismantle it using a screw puller for ball joints.
Then you just drive in a new pin. Alex-ey, I apologize, but you don’t need to drill or unscrew anything, the studs get hammered into the hub, there’s a splined connection, but it won’t come out, even if it’s drilled, the cap won’t let it.
Clearly, I imagined its design differently. Toyota Prius G touring Selection year.
Alex 67 wrote a: Is it possible to order a pin from a turner I know? How will a turner make the splines? I think that then they are also hardened on the spline side, but maybe not.
I think that then they are also hardened on the spline side, but maybe not. Maybe they are hardened. It just happened like this last winter at a friend’s Pontiac Vibe – at the tire shop they tightened it too much with a gun, and when unscrewing it, the friend broke a stud.
I ordered three pins from a turner for a bubble and made them in an hour and a half. You cannot start topics You cannot reply to messages You cannot edit your messages You cannot delete your messages You cannot add attachments.
Replacement of studs on the rear wheels of SKYWAY-AUTO.RU and other brands. (Popular version)
- RSS subscription
- Share Vkontakte
Source: http://skyway-auto.ru/racing22/zamena-shpilek-zadnego-kolesa-na-toyota.php
Rear wheel stud repair?
-
- 4 messages
The pin on the rear brake drum broke off. The question arose: will the rear hub have to be replaced or will the studs be removable? Tell me, who knows?
-
- 357 messages
-
- 1760 messages
I changed it 2 years ago on the front. 50 rubles hairpin and 200 labor.
I don't know what kind of weapons the Third World War will be fought with, but the Fourth will be fought with sticks and stones. — Letter to US President Harry Truman, 1945 Albert Einstein.
-
- 4 messages
-
- 30 messages
and who changed the thread on the rear one????? And then damn it, I changed my shoes and started unscrewing it and broke the pin.
-
- 4 messages
Same problem, I bought two studs, I’ll try to change them the other day. I skated 200 km on 3 hairpins and nothing. But you still have to bet.
-
- 250 messages
Guys, in order not to break the studs you need to: before tightening the nuts, lubricate them with lithol or oil. And you will be happy.
-
- 4 messages
from lithol, the nuts then do not turn, but the stud breaks when they are overtightened, or when the threads are damaged (by a steel disk, for example)
-
- 250 messages
Listen Denis. I have been driving since 1995 and have moved to my sixth car, and I do all the repairs and maintenance myself.
On all the cars I smeared the nuts and everything came loose SEE...IS. The nuts turn sour when we change the wheels in the off-season (we tighten the wet nuts). This post was modified by Nikola415. at 30.04.13 12:31 -
- 4 messages
Nikolay, I shared my personal experience, I listened to similar advice a year and a half ago, and now I regret it for the 5th time when I changed the wheels to summer ones.
My wife and father-in-law (they also have to change them for me) have nuts that are not coated with anything, they are screwed off.
I encountered studs breaking off on my father-in-law's car (CRV), after a tire service, where they tightened it with a wrench, they overtightened the first stud, but on the second trip they didn't even hit the thread.
-
- 4 messages
By the way, about replacing the studs)
1. remove the wheel, it’s better to fix the car more securely (put it on a storage bin)
2. knock out a piece of the pin (with a hammer, hit it hard and most importantly accurately)
3. insert a new stud (by tightening the nut, pull it into place)
4. put on the wheel and ride on
Depending on the car model, removing the piece and inserting the stud can be a very labor-intensive process (removing the brake drum/disc and even removing the hub). I didn’t change it on the Corolla, but I think on our cars everything is simple)
-
- 30 messages
It’s not so easy to knock it out and it seems like you even have to remove the brake drum! who changed it in the rear))) share your experience
-
- 4 messages
Is it very difficult to remove the brake drum? then it’s better not to go there, go there for a hundred and 200 rubles and give it back
-
- 30 messages
I'm not saying that it's difficult, but that it has to be done! It's not the difficulty, I'm trying to figure out how much time it will take me!
Source: http://AllexRunxClub.ru/forums/topic/1900