Cleaning the radiator, a simple solution – The best videos
1 years ago
As it got colder outside, customers began to contact our car service center with a complaint that the heater was blowing somewhat cool..
6 months ago
Flushing the car engine cooling system with citric acid is especially important before the summer and winter seasons.
Flushing a car's engine cooling system with citric acid is a simple task and there is no need to run to the auto store for flushing fluid.
Flushing a car's engine cooling system with citric acid can be done quickly and efficiently at home. Video created in Sony Vegas Pro 14
3 years ago
Many people, after washing, immediately fill in the oil they will use, this is strictly forbidden. I’ll tell you how to rinse correctly and show you in this video.
2 years ago
Hi all! It’s very hot today, and I’ll show you how to wash radiators on a KIA RIO 2014 car. After washing, engine overheating will be eliminated, the air conditioner freezes as it should, there are no problems. Visit to the OD – 7000 rub. Think for yourself. Playlist: https://goo.gl/JA9coZ VK group: https://vk.com/kiario3remont For advertising: gena19841984@gmail.
com Affiliate program for YouTube: http://join.air.io/botanik Donations and donations: Sberbank Visa Electron card: 4276-8720-1389-8987 Sberbank Visa Electron card: 4276872013898987 Yandex wallet number: 410013965687548 Useful products for KIA RIO 2014: Clear sun visor for side mirrors http://got.
by/1rnqte Transparent sun visor on the side mirrors with the inscription KIA https://goo.gl/AKkaDx PREMIUM nameplate on the trunk lid https://goo.gl/1KnD7c Rubber bands for wipers, hybrid 16 and 26 inches https://goo. gl/TPijLR Protection around door handles, from nails https://goo.
gl/JPwxLn Different spatulas for removing the casing of caps, multimedia devices http://ali.pub/1rnt9h Mini nail puller for removing caps http://got.by/1rntdk Silicone key case 12 colors https://goo.gl/ouv4Mb Leather type cover for keychain http://got.by/1rntlj Wheel covers https://goo.gl/jnctft Voltmeter in the cigarette lighter https://goo.
gl/1v1KoW Trunk light LED 15 cm http://got.by/19wzi4 Gas stop 10 kg http://ali.pub/1bvlab Gas stop 15 kg http://got.by/1rnua8 Stop lamp socket http://got .by/1dxxqz LED interior lighting front and rear http://got.by/1dqxh2 From 12 volts to 5 volts 3 amperes (actually 2 amperes) http://got.
by/1dqy9u From 12 volts to 5 volts 3 amperes (actually 3 amperes) http://got.by/1rnvzh Installation of plastic protection: https://youtu.be/rB8OjASJySs https://youtu.be/dcgcoLjFYLE Cleaning and washing radiators https://youtu.be/AMZEygTMq9Y Rubber bands of hybrid brushes https://youtu.be/brwOJPNxp5w Replacing the rear brake pads of KIA RIO 2013 in detail and clearly https://youtu.
be/b0iCkBpKVCQ Kia Rio replacement of front brake pads 2014 https://youtu.be/XSHCxnsZO_I replacement of the belt tensioner of the generator units KIA RIO 2014 https://youtu.be/iYZnOQyAXBw complete oil change in the automatic transmission of Kia Rio 2014 https://youtu. be/QC3MKDc3Jrc installation of engine protection ABC-Design KIA RIO 2014 https://youtu.
be/rB8OjASJySs installation of plastic protection for the generator Kia Rio 2014 https://youtu.be/0pCy9B5QD5E modification of the gas pedal KIA RIO 2014 gentle gas pedal https://youtu.be/UcSEZgq4H1I modification of the driver's seat for a tall person KIA RIO 2014
2 years ago
Radiator washing. Radiator cleaning
7 months ago
This video continues the topic of cleaning the stove with acid without removing it. Why do some people fail? Stove cleaning in Tomsk. Repair of stoves, dampers and replacement of radiators Toyota Nissan Honda Mersedes, etc. steelpike 94-15-02
4 years ago
Flushing the heater radiator
2 years ago
MY AFFILIATE PROGRAM https://youpartnerwsp.com/join?15609 COME IN AND EARN
1 years ago
The heat came and the engine began to heat up, the reason was that the radiator was clogged. Video about how to remove and wash the radiator with your own hands so that it becomes like new.
2 years ago
Cleaning radiators of Skoda Octavia Scout
3 years ago
After washing, the honeycombs and plates corroded
2 years ago
Contact me +380976787382 Email [email protected] Diagnostics of cooling systems. Flushing stove radiators. replacing stove radiators. The city of Krivoy Rog is welcome) Enjoy watching!
3 years ago
How to quickly clean a car radiator (using the example of a VAZ 2106) / How to clean a car radiator (as a cleanser I use petrol). — If you need to see the condition of the engine valves of your Car (through the spark plug hole, without disassembling the engine), then watch this video: https://youtu.
be/vXDDHvyeO-Y - This video film (or rather video review) is dedicated to the simplest and fastest way to clean a car radiator from dirt, dust, flies, horseflies and mosquitoes stuck to it... The process of cleaning the radiator itself takes no more than five minutes... As a detergent I use gasoline...
With a clean radiator, the engine overheats less, the cooling fan turns on less often, the battery's electrical energy is saved, and, accordingly, gasoline consumption, etc. See the video review for more details. Enjoy watching.
- By the way, if you are interested, you can order Energy Saving LED lamps for car headlights (this is also on the Aliexpress website) here: http://goo.gl/LvooNl - And also, look at the “Last Sales” on Aliexpress (products from China) , there are some pretty interesting things there with discounts of up to 80%. Link here: http://goo.
gl/FNIZhc - ATTENTION: The Aliexpress website (products from China) is giving away money to its partners!!! The link to the affiliate program is here: https://goo.gl/nXftpM THEY REALLY PAY, and only for the fact that you insert their links or banners: in Odnoklassniki, in contact, on Facebook or on your website! (that is, you promote their resource and get your money for it).
The amounts are quite decent. — Also, I invite you to my channel. On my YouTube channel you can watch other equally interesting videos (I’ll clarify so as not to run into bad comments: some are interesting, but some are not).
Initially, my channel was planned exclusively to show reviews (unpackings) of parcels from China purchased on electronic trading platforms such as Aliexpress, Tani-dial, E-bay, etc. However, “life is movement” and I decided to expand the topic your channel. Watch on my channel: LED lamp for the headlights of a VAZ 2106 car.
Parcel from China: https://youtu.be/lwtKAyRMUlg Drill DHID-500 for 314 rubles. I can’t even believe it, but it’s true: http://youtu.be/FvB2a-Gfovc Scales from China - FREE (package with scales number three): http://youtu.be/i4eLI93SD-M All for 40 rubles or my purchases in the Best Price store (Fix price, Fix price, all for 8 hryvnia, etc.): http://youtu.
be/vkqjNBrZOa8 Cool Ashtray made from an aluminum drink can: http://youtu.be/NhatDsdYH-Q Green laser pointer Laser 303 - How to light a match: http://youtu.be/SYXgjrCWjFQ Parcel from China. Conical knife-drill (knife-drill): http://youtu.be/PwX07gza44I How to demagnetize a knife, screwdriver, scissors, etc.: http://youtu.be/TM-sd2EjeAA And much, much more…. I wish you a good viewing! — Link to this video: http://youtu.be/s_RqTxnIh8w — SK-Video (Russia, Moscow) www.youtube.com/skvideo —
2 years ago
Source: https://1-tube.ru/watch/FXbILpUL9bc
How and how to flush a car heater radiator
It has become colder in the car lately, this is especially noticeable in severe frosts. With what it can be connected? The reason for this situation can be two problems - a banal increase in frost or poor heating of the car.
Probably, the stove cannot cope with the increased load, since after a long period of operation the radiator is clogged. Do not worry about this malfunction; it appears in every car sooner or later. Cleaning the stove radiator can help in this case.
It becomes clogged due to low quality antifreeze and longer coolant life. Let's consider the methods of washing and the means intended for this.
Radiator flushing must be performed on every car.
Flushing the heater radiator. Where to begin?
In order to tackle such a complex and time-consuming process as flushing the heater radiator, it is best to first remove it from the car. However, this is not the easiest task.
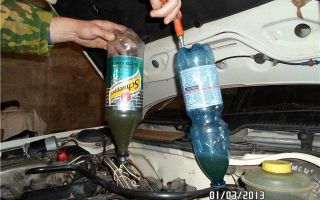
To flush the radiator with your own hands, you need to arm yourself with such simple things as a large 10-liter bucket filled with warm or hot water, a watering can, a mug and several bags of ordinary kitchen citric acid.
The lemon juice must be poured into water and stirred until completely dissolved, then pour the resulting mixture directly into the radiator and leave for 15 minutes. This procedure should be repeated several times, draining the old water and pouring a new solution for the same period of time.
The effect will be better if the water is as hot as possible. You can complete the procedure after the water coming out is almost clean.
Citric and acetic acid
Flushing the radiator with lemon juice and vinegar can thoroughly clean the dirt; however, after it, the device should be thoroughly washed with clean water, otherwise the remaining acid can lead to oxidative processes in the sealed areas over time. Having decided to clean the radiator at home, after washing it needs to be dried and ventilated.
This procedure helps dry and remove large clumps of debris from the inside. Some owners use hydrochloric acid to clean the radiator of their own car, which remains in the device for almost 12 hours. The effect of such flushing will be immediately obvious; the radiator will acquire its original shine and will look like new.
How to clean a radiator if it is not possible to remove it
There are times when it is simply necessary to flush the radiator, but there is no way to remove it from the car. To do this, there are several ways that will help car owners do this procedure with their own hands. It is worth noting that the recommendations described below allow you to flush not only the central element, but also the entire cooling system.
Battery electrolyte
To clean the radiator without removing it, you can use battery electrolyte with a density of 1.27. In a large 10-liter bucket, mix clean water with a liter of this substance, then the resulting solution is poured into the car’s cooling system.
All trips on this day must be made with a filled radiator, which will allow it to be cleaned as much as possible. In the evening, drain the solution and rinse the radiator with clean water.
By the way, if you managed to remove this device, you can even clean it with pure electrolyte.
Discounts on new cars! Advantageous loan from 9.9%
Installment plan 0%
Oxalic acid
To flush the radiator without removing it from the car, oxalic acid is sometimes used, despite the fact that its properties are less reactive (unlike citric acid). It must be diluted in a large amount of water, then the solution must be boiled and poured into the cooling system.
"Dangerous mix
You can try cleaning heavily contaminated cooling elements in one non-standard way.
To begin with, citric acid is poured into a bucket of water, then any soapy substance is added to it, and the resulting mixture is poured into the radiator. After a few minutes, add water and baking soda.
After these steps, the entire cooling system will be well cleaned; even without removal, debris will come out of the radiator, thrown out with foam.
In fact, people have come up with many other ways to flush a radiator without removing it at home. However, it is worth remembering that this must be done very carefully. A radiator that has worked for many years may leak after washing; aggressive acid can corrode the sealed areas of the device.
Flushing the cooling system with removal
The most experienced motorists can afford to clean the stove when it is completely removed from the car.
Despite the fact that such washing is unsafe, the act of cleaning the cooling system itself is greatly simplified, especially since it becomes possible to remove contamination not only from the inside of the device, but also to tidy up the appearance.
In this case, you can flush the cooling system without a pump; you only need a good pressure of hot water supply. Cleaning this device of debris is not so difficult, especially since timely cleaning will get rid of possible problems during the cold season.
In addition, if you clean the radiator without removing it, it will be impossible to know its external condition, which clearly indicates the possibility of normal functioning of the system. There are cases when the radiator has worked for its intended time and has failed, then flushing simply does not make sense; most likely, you will have to change the equipment.
We increase the efficiency of the stove
A dirty radiator is not the only problem that can interfere with the normal functioning of a car heater.
In addition to a clean radiator, which, as discussed above, can be washed without removal, it is worth taking care of washing the hoses operating in the stove.
Poorly supplied fluid will slow down the process of heating the interior and cooling the power unit. You need to remember some more points that help increase the performance of the stove:
- About replacing antifreeze with a better liquid.
- About timely contacting a service station to diagnose the cooling system.
- About flushing air ducts to remove accumulated dust.
- About purging the heater at maximum fan speed.
Despite the fact that all the recommendations are quite simple to follow, few people pay due attention to them. However, by following them, you can significantly increase the performance of heating equipment.
Sometimes it happens that all the measures taken did not improve the functioning of the system; perhaps there were malfunctions in the heating device itself - in the stove.
If such a problem occurs suddenly, you should contact a specialist.
It is better to go to a proven service, where professional technicians will be able to determine the condition of the car and carry out timely work, which will further extend the life of the car.
Conclusion
If there is a need to clean the heating equipment of the car, in particular, to flush the heater radiator without removing it, you can familiarize yourself with all the proposed options, arm yourself with the necessary tools and get to work.
Most car owners carry out this seemingly complex process on their own. It should be remembered that it is necessary to devote some time to cleaning the heating system, and remember the minimum safety rules when handling acids.
If you do not have confidence in your own abilities, it is better, and sometimes safer, to entrust this work to professionals.
Source: http://CarExtra.ru/remont/promyivka-radiatora-pechki.html
How to flush a car radiator at home
It happens that with the onset of another winter, the inside of the car becomes colder than last winter, and it’s not a matter of the weather! However, this is not so bad. It’s worse when, in addition, the frosting of the windows does not go away, and this already impairs the view and poses a danger to driving.
Content
Unfortunately, when something like this happens, the first thing you have to do is blame the interior heater. Clogging of its radiator element is a fairly common occurrence in the operation of modern cars.
And then it becomes necessary to flush the heater radiator without removing it from the car. But why without rent? Yes, because in many cars that are popular today, this unit is built into the system in such a way that it is very difficult to remove it from the car.
The main thing is to determine in advance that the operation is really necessary. This is not difficult to do: it is enough to understand that heating is ineffective with other organs working. To be more specific: with a noisy fan, a working heater valve, a working thermostat of the cooling system, a sufficient level of antifreeze in the expansion tank, and no air pockets.
If all this is observed, then there is a blockage inside the grill unit of the interior heating circuit. And blockages, by the way, happen, among other things, due to banal violations during the operation of the car. Which ones are indicated in the part of the list below:
- untimely replacement of antifreeze;
- bad antifreeze;
- just a long service life of the unit.
Read also about replacing the power steering fluid and replacing the rear crankshaft oil seal.
But all this is not a problem! There are several ways to flush the heater radiator without removing it from the car. In this case, well-known kitchen products can be used as liquids for taking “bath procedures” of the unit:
- domestos;
- mole;
- caustic soda solution;
- lemon acid.
In the most general case, the answer to the question of how to flush the radiator of a car heater without removing it sounds like this.
- It is necessary to disconnect the inlet and outlet pipes of the heater.
- Pour detergent into the unit through the outgoing hose.
- Rinse, drain.
- Pour in citric acid to remove oxides.
- Wait half an hour, drain.
- Thoroughly rinse the entire element with clean water.
- Connect everything back.
However, there is an even more gentle way of cleaning the described organ of the car. This is blowing it out with a compressor. With this method, the compressor hose is connected to the outlet of the heater grill element. All dirt is blown out after turning on the compressor. This method can be combined with liquid cleaning.
Below we will discuss in more detail how to flush a heater radiator, and most importantly, how to flush a car heater core without removing it.
How to do without removing
So, let's consider a method that allows you to flush the radiator of a car heater without removing it. Note that the material of the unit being washed is not aluminum, but copper or brass!
We will need:
- “Mole” cleaning product;
- lemon acid;
- container for draining;
- rubber hoses of suitable diameter, clamps for them;
- FUM tape.
Begin.
- In the engine compartment we find pipes for supplying and discharging antifreeze from the interior heater. Substituting the container, disconnect them.
- We extend these pipes with our hoses, tightening the connections with clamps. It is also worth sealing the connections with FUM plumbing tape.
- We attach the compressor outlet to the outlet hose of the device being cleaned.
- Use a compressor to blow out any remaining antifreeze and large dirt, then turn off the compressor.
- We pour a cleaning agent, for example, “Mole” or “Domestos” through the same tube. We wait half an hour.
- We drain the product and at the same time determine by its condition the degree of cleaning of the unit. (There is another homemade method. You can attach large plastic bottles to the ends of our hoses, one with a cleaning solution and the other empty. Now it’s easy to pump the liquid back and forth by squeezing and unclenching the empty bottle with your hands).
- Next, fill the unit to be cleaned with a solution of citric acid. We also wait about thirty minutes.
- Empty the node.
- We wash the lattice element under pressure with clean water. Pressure can be created by connecting the hose to a regular water supply and opening the tap slightly.
- We repeat points 3 and 4 again.
- We disconnect our hose extensions, perform assembly, that is, we install everything as it was originally.
- We check the operation of the system.
This is such a simple process. The main thing is to exercise extreme caution and accuracy when performing this technology.
Don't forget about safety precautions. All kinds of cleaning alkalis, in contact with the skin of the hands, cause unpleasant irritation. The skin seems to become very smooth, and then cracks. So be sure to wear rubber gloves!
What to do with an aluminum assembly
Now let's look at the case where the grille element of the interior space heater is made of aluminum. The fact is that this material is “afraid” of the effects of alkalis. And then the question immediately arises: how to wash such an aluminum car heater radiator?
Almost all normal alkalis are capable of corroding aluminum walls, which means that such “bath procedures” can bring the final end to the aluminum heat exchanger! “Mole” also belongs to alkalis.
Aluminum is more resistant to acids. So there is an option to wash an aluminum car heater radiator - this is some kind of aqueous solution of acid, say, citric acid.
Or, for example, you can use a solution of orthophosphoric acid.
This acid is found in small quantities in Coca-Cola carbonated water. Yes, yes, the notorious cola is suitable for washing aluminum! Well, the conclusion is this: you can rinse an aluminum radiator with either citric acid or, as paradoxical as it may sound, regular cola.
The operation itself, in fact, is no different from the previous one, except for detergents. So, we will need:
- citric acid or cola;
- hoses, clamps and FUM tape;
- container for draining unnecessary slurry.
The actions are as follows.
- According to the already described scenario, not forgetting to substitute the container, we disconnect the pipes from the aluminum heat exchanger, after which we extend them with our hoses, tightening the connections with clamps and sealing them with FUM tape.
- Having attached the compressor hose to the terminal of our unit, we blow out the remaining coolant along with large dirt.
- Fill in a “soft” acid solution, rinse for about five minutes, and empty the cavities of the slurry.
- Blow with the compressor again.
- We perform reverse assembly.
Well, we have decided how to flush such a radiator. The main thing here is to follow one important rule. If you soak aluminum in aggressive solutions for a short time, nothing will happen. That is why the holding period for citric acid is only five minutes.
In principle, this rule applies even to cases where, say, alkali is used by mistake. If you make the “bath procedure” with alkali for aluminum very short, then nothing bad will happen.
If it doesn't help without removing it
It is possible that after the procedure performed without dismantling our heat exchanger, the heating efficiency did not improve. Then there is only one way out - the device will still have to be removed from the car. In this case, we’ll look at how to wash a removed stove radiator at home.
Here you need to have:
- detergents;
- wrenches and screwdrivers.
What are we doing.
- We completely detach the entire plastic dashboard from the interior.
- We disconnect all the pipes connecting to the heating module.
- If there is an evaporator of the air conditioning system, we also detach the corresponding pipes from it.
- Carefully unscrew the fastenings of the lattice element and remove it.
- Now it will be much easier for us to clean all the insides of the unit. But at the same time, you need to know how to flush a car heater radiator at home. We have already written that if it is copper or brass, even kitchen products such as “Mole” and citric acid will do. The latter is suitable for an aluminum assembly.
- We install the heat exchanger in the reverse order.
A huge plus for this method is that you can do whatever you want with the removed unit. For example, soak it completely in a basin filled with a warm solution of citric acid.
If, after performing all these manipulations, the driver is still cold in his own car, there may be something wrong with the pipes, or a complete reinstallation of the unit with a new spare part is necessary.
A few more words about substances
And now a few more words about how you can wash an ineffective stove radiator. Auto chemical stores now offer a wide variety of products for all occasions in the life of an iron friend.
Among these products there are also special compositions for crushing automobile radiator elements. To avoid suspicion of hidden advertising, we will not list them here. We’ll just give you some advice on how to choose the right product.
However, the advice is obvious: you need to study the label very carefully. What is the composition of the chemical? What metal is it recommended for cleaning? If everything is fine, then the second important requirement is to strictly follow the instructions for use.
There is also some popular advice on what is the best way to flush an old stove radiator. Craftsmen offer such an unusual product as whey. The fact is that it dissolves any scale well.
True, this requires her a lot of time. But on the other hand, whey is ideal for answering the question of how to clean an aluminum radiator.
Here it comes in handy, since it is the least aggressive compared to the previously listed chemical compositions.
Return to top
Let's say one thing, this needs to be done only when there really are problems with the heating of the cabin, and the indicated grille element is definitely to blame for them. In all other cases, it is better not to repeat the procedure.
Now look at replacing the oil seals and repairing the power steering.
Source: http://DaciaClubmd.ru/repair/engine/chem-promyt-radiator-pechki-avtomobilya
Do-it-yourself repair and replacement of a car heater radiator, how to check for clogging, tightness, and leaks
A properly functioning interior heater is the main condition for comfortable driving in the cold season. Despite the relatively simple algorithm for diagnosing and repairing a radiator, it is better to do it in advance.
Purpose and design of the stove radiator
The main function of the stove radiator is to heat the interior during the cold season. A working heating system in frost conditions of -25˚C should maintain a temperature in the cabin of at least 16˚C. In addition, hot air passing through it and directed at the windows prevents them from fogging.
https://www.youtube.com/watch?v=fEZ4_HqknxI
The heater radiator is designed to create a comfortable microclimate in the car interior
Design and location of the stove radiator
The vehicle interior heating system usually consists of a radiator connected to the engine cooling system, a motor with an impeller (fan), air ducts and a number of control and regulating elements. Space under the front panel is usually allocated for installing a radiator.
The stove works as follows. Hot antifreeze from the engine cooling system enters the heater radiator and heats it. The fan blows through the radiator honeycombs and supplies warm air into the cabin through the air duct system. By changing the fan rotation speed and the position of the dampers, you can regulate the temperature in the cabin.
The operation of the interior heater is based on the circulation of coolant through the heater radiator and heat extraction through a fan
Types of stove radiators
Stove radiators are classified according to various criteria. According to the material from which they are made, they are distinguished:
Despite the high heat transfer and the possibility of repair, copper radiators are rarely used. This is due to their high cost relative to aluminum products. Aluminum radiators, in addition to their low price, have less weight. However, when a leak occurs, such radiators most often have to be replaced with new ones.
Radiators are classified according to the shape of the tubes:
- with round tubes;
- with flat tubes.
Based on the density of the tubes, the radiator can be:
Three-row radiators are more efficient because they allow more liquid to pass through, increasing heat transfer.
Signs of a malfunctioning heater radiator
During the operation of a car with a radiator, various problems may arise, as a result of which the heating of the interior usually stops. The most common faults are:
- Air lock in the cooling system. This leads to slightly warm air entering the cabin.
- Blockage in the radiator main channels. In this case, the circulation of antifreeze is disrupted or stopped and cold air begins to flow into the cabin.
- Radiator leak. As a result of mechanical damage (cracks, holes) of the radiator, coolant begins to leak out.
- External contamination of the radiator honeycomb. Contaminated honeycombs significantly reduce the heat transfer of the radiator and the efficiency of the stove.
Air lock in the cooling system
To identify the appearance of an air lock, turn on the heater on a warm engine. If cold air enters the cabin, then most likely the problem is the airing of the system.
Due to the accumulation of air in certain areas of the cooling system, antifreeze cannot circulate normally and leads to disruption of the normal operation of the stove.
Air locks can cause the engine to overheat and seize.
An air lock can also be determined by a rapid increase in the temperature of the power unit due to disruption or cessation of coolant circulation. If such a malfunction is detected, it should be corrected immediately.
Air may enter the cooling system for the following reasons:
- as a result of a violation of the tightness of connections of system elements;
- when replacing or adding antifreeze;
- in case of wear of the water pump or cylinder head gasket;
- if the valve of the expansion tank plug is faulty.
Due to damage to the cylinder head gasket, an air lock may form in the cooling system.
There are three ways to remove an air lock.
- For domestic cars, loosen the clamp and remove the carburetor heating hose. Then unscrew the cap of the expansion tank and begin to blow into its neck. After antifreeze appears from the removed hose, it is immediately put on the fitting and tightened with a clamp.
- The car is installed at an angle so that the front is higher than the rear. You can use a jack. The expansion tank cap is unscrewed, the engine starts and warms up to operating temperature - the thermostat should open. As the engine warms up, the antifreeze level in the tank decreases and is brought to normal. To increase circulation, you can increase the engine speed. If the antifreeze level has dropped very sharply, you need to quickly add coolant to the tank. The procedure is continued until bubbles stop appearing in the expansion tank. Then the car is lowered and antifreeze is added.
- The engine is warmed up to operating temperature, turned off and all elements are removed to dismantle the heating hose of the fitting assembly. Since antifreeze is hot, this should be done with protective gloves. Then disconnect the hose and wait. When antifreeze begins to flow out of it, the hose is put in place.
On domestically produced cars, the air lock in the cooling system can be removed through the expansion tank
Clogged heater radiator channels
Clogged radiator channels can also cause the stove to heat the air poorly. Since the coolant does not pass through the radiator in this case, the inlet pipe will be hot and the outlet pipe will be cold. Clogged channels can occur in the following situations:
- scale formation as a result of long-term operation of the radiator;
- use of low quality coolant;
- poor quality or defective radiator;
- oil, fuel or debris entering the cooling system.
If it is not possible to replace the radiator with a new one, you can try flushing it. For this purpose, special chemically active compounds are sold in car dealerships. In addition, you can use a solution of citric acid (400 g of acid per 4 liters of water).
The heater can become clogged not only from the inside, but also from the outside.
Radiator leak
The appearance of a leak is usually associated with mechanical damage to the radiator or with the use of low-quality antifreeze. Finding the problem is not difficult. Most car owners in this case immediately replace the radiator with a new one, and the feasibility of repair is determined by the extent of the damage.
Leaks in the radiator are usually associated with mechanical damage
Radiator honeycomb contamination
During operation, the radiator honeycombs may become clogged with debris, dust, dirt, etc. In this case, the stove will work less efficiently. To fully clean the radiator, it will need to be dismantled. Cleaning can be done in two ways:
- water under pressure;
- compressed air.
In the first case, you can use a high-pressure washer with a vario attachment. When using the cutter attachment, the radiator honeycombs may bend. The stream of water should be directed from a distance of 30–50 cm at a right angle. You can use compressed air instead of water, but it will be less effective.
Clogged radiator channels are the main reason for reduced heat transfer.
Heater radiator repair
If the radiator is faulty, it needs to be repaired, cleaned or replaced. The last option is the simplest, but also the most expensive. However, quite often you can restore the radiator yourself.
Soldering an aluminum stove radiator
Unlike copper, aluminum radiators are difficult to solder. An oxide film forms on the surface of aluminum, protecting the metal from corrosion, chemical and temperature influences. This film can be removed by mechanical surface treatment and the use of special means.
Before repairs, the heater radiator is removed from the car, after draining the antifreeze. It is then washed with running water and dried. If the location of the damage has already been identified, repairs begin.
If the exact location of the damage is unknown, it is determined using a compressor and a container of water. All holes in the heat exchanger, except the thinnest one, are closed with plugs.
The radiator is immersed in water, filling it through the remaining hole with air from the compressor. The location of the damage is easily determined by the appearance of bubbles.
To solder the radiator you will need a powerful soldering iron.
To solder the radiator you will need:
- powerful soldering iron of at least 250 W;
- special flux (F-59A, F-61A, 34A);
- special solder (TsOP-40, 34-A);
- pliers;
- set of files;
- sandpaper;
- acetone.
Soldering is carried out as follows:
- The damaged area is cleaned with a file and sandpaper and degreased with acetone.
- Flux is applied to the damaged area and heated with a soldering iron. You can use a gas burner for heating, but the flux in this case can quickly burn out. The tip of a hot soldering iron applies flux to the crack.
- Solder (preferably in the form of a wire) is applied to the soldering area and melted with a soldering iron. After it spreads evenly over the crack, it is allowed to cool. Then the procedure is repeated.
- If the resulting seam has irregularities, they are removed with sandpaper.
When soldering a radiator, solder is applied to the damaged area in an even layer
Video: soldering the radiator
Cold welding and other repair methods
Radiator cracks can be repaired using cold welding. To do this, separate a piece of the substance, knead it in your hand and apply it to the damaged area. Once the weld has completely dried and hardened, the leak will disappear.
In addition to cold welding, various liquid or powder sealants are offered on the market to eliminate internal mechanical damage to the radiator. Previously, car enthusiasts used mustard powder for this purpose, pouring it inside the heat exchanger.
A good option for restoring the tightness of the radiator is argon welding.
Epoxy glue can be used to seal cracks at the base of the tubes. The best results are achieved by adding a filler such as aluminum powder to the glue.
After preparing the damaged area, an adhesive composition is applied to it, and to increase the rigidity of the joint, several layers of fiberglass soaked in glue are wound.
After a day, the radiator can be installed in place.
Cleaning a clogged stove radiator without dismantling
If the heater radiator is clogged, you can try to clean it. Dismantling it is usually a rather complicated procedure. However, it is possible to flush the radiator without dismantling it.
To flush a copper or brass stove radiator you will need:
- “Mole” cleaning product;
- lemon acid;
- empty container for draining;
- rubber hoses of suitable diameter and clamps for them;
- FUM tape.
The process itself is performed as follows:
- In the engine compartment we find two heater pipes - inlet and outlet. We place a container under them, remove the clamps and tighten the hoses.
To flush the radiator, you need to remove the outlet and inlet pipes.
- We put pre-prepared hoses on the freed tubes and secure them with clamps. For a tighter connection, it is advisable to use FUM tape.
When flushing, hoses connected to the pump are placed on the radiator tubes.
- We connect the radiator outlet to the compressor and blow it with compressed air.
- Fill the radiator with Domestos or Mole and wait about 30 minutes.
To flush the radiator, you can use Domestos, Krot or similar products
- We drain the liquid from the radiator and assess its contamination. This will allow you to understand how effective the procedure was.
Based on the condition of the liquid after washing, you can evaluate how effective the procedure was.
- Pour citric acid solution into the radiator and wait 30 minutes.
- Drain the solution and rinse the radiator with a stream of clean water. To do this, you can connect the radiator to the water supply and open the tap slightly.
- We repeat points 3 and 4.
After flushing the radiator, the inner surface of the tubes becomes clean
- We remove the hoses and connect the heater to the engine cooling system. Fill with antifreeze and check the functionality of the unit.
It is not recommended to use alkaline solutions to flush an aluminum radiator. Alkali can react chemically with aluminum and damage the walls of the radiator.
In this case, use a solution of citric acid in warm water (100 g of acid per 1 liter of water). The procedure itself is similar to flushing copper radiators.
The efficiency of the process can be increased by circulating detergents using an electric pump. For final rinsing, it is advisable to use distilled water.
Washing efficiency can be increased by circulating detergent using an electric pump
One of the old-fashioned methods of flushing the cooling system is to use serum. The sequence of actions does not change. Some car enthusiasts use Coca-Cola to flush the heater radiator. However, this drink contains a large amount of sugar, which can start the caramelization process and make things very difficult.
Video: flushing the radiator without dismantling
Radiator flushing with dismantling
Sometimes flushing the radiator directly on the car does not give the desired result, and the heater continues to work poorly. In this case, you will need to remove the heat exchanger and clean it better.
The dismantling algorithm is individual for each car model and, as a rule, is quite complicated. The same detergents and cleaning products are used.
If after all the procedures the quality of interior heating has not improved, most likely you will need to replace the heater radiator with a new one.
The dismantled stove radiator can be cleaned and washed more efficiently
Thus, there are many ways to restore the functionality of a stove radiator without dismantling it. Most of them are quite simple. Step-by-step instructions and advice from professionals will allow you to repair a radiator with minimal investment of time and money.
Source: http://pol-z.ru/remont-radiatora-pechki/