Correct adjustment of VAZ 2107 valves
During the operation of the domestic VAZ 2107 car, the need to adjust various components and mechanisms periodically arises, which is usually performed at a service station during scheduled maintenance.
All recommendations for changing oil, filters, gaskets and other equipment are usually written down in the service book, in which you can find useful information about after what mileage certain operations should be performed.
It is important to note that driving and performance characteristics (including fuel consumption, correct engine operating mode, and aerodynamics of the car) are affected by the correct valve clearance, for which it is necessary to periodically adjust them.
This procedure does not have to be carried out at a service station, since if you have the necessary skills and abilities, it is quite possible to do it yourself in your garage.
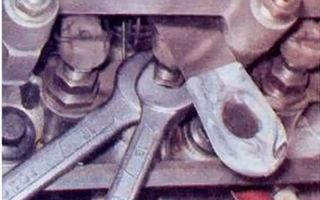
So , the adjustment of the VAZ 2107 valves is carried out on a cold engine using a special probe, as well as two open-end wrenches of 17 and 13 mm.
To get to the valves, we need to first remove the cylinder head cover, as well as the ignition distributor cover. At the same time, you should check the tension of the timing chain and, if necessary, adjust it.
After this, you should set the camshaft to a special top dead center position (ignition stroke on the 4th cylinder), which can be done using a special key, ensuring that the special ones match. marks on the crankshaft sprocket with a protrusion on the bearing housing.
As a result of this, the special mark on the camshaft drive cover will coincide with the mark on its pulley. In this position, we will begin adjusting the clearances of the intake and exhaust valves.
Valve adjustment procedure
- The work begins with adjusting the valves of the 4th cylinder, where the 7th and 8th cams are located, respectively. We insert a 0.15 mm thick feeler gauge into the gap between the cam and the valve lever and begin making adjustments using wrenches, having first loosened the lock nut.
- When performing direct tightening, keep in mind that when tightening the locknut, the adjusting bolt is raised slightly, reducing the required clearance, so some skill is required to perform the procedure correctly. If necessary, repeat the procedure, ensuring that the probe enters with slight pinching.
This is what will indicate its correct position.
- We rotate the crankshaft 360°, causing the ignition distributor slider and the camshaft to rotate 180°.
Using the same principle, we adjust the valves on the VAZ 2107 on the first, second and third cylinders (cams 1-6), performing all the necessary operations very carefully and slowly.
- During the operation, do not forget to rotate the camshaft 180° after adjusting cams 1 and 3, 2 and 5, 4 and 7.
At the end, we carefully check the gap again using a feeler gauge, trying to achieve high accuracy in the work.
- All removed parts should be installed in reverse order, which includes installing the ignition distributor cap, as well as the cylinder head cover in place.
It is important to note that if the cover gasket already looks quite worn, then it is best to replace it with a new one, and do not use unnecessary force when tightening the bolts. You should also ensure that it does not become warped when installing the cylinder head block in place.
It is noteworthy that the frequency of valve adjustment on a VAZ 2107 depends on the intensity of its use, and does not have clearly established deadlines.
The main symptoms of the need for this operation are increased fuel consumption, decreased dynamics and elasticity of the engine, as well as the appearance of slight noise in the operation of the engine.
At the same time, after these signs, an adjustment operation should be performed as early as possible, since this directly affects the correct operating mode of the engine, on which the duration of its useful operation depends.
Source: http://tuning-vaz2106.ru/remont-vaza/pravilnaya-regulirovka-klapanov-vaz-2107.html
Do-it-yourself adjustment of engine valve clearances of a VAZ 2107 car
DIY car repair › Adjusting engine valves ›
Adjusting the VAZ 2107 valve clearances with your own hands is one of the procedures that any car owner should remember.
Every part that is inside a machine is subject to the basic laws of physics. For example, metals have the property of thermal expansion of bodies.
This should take into account not only the adjustment order, but also the process of creating the engine itself.
But few people understand why this is necessary when it comes to adjusting the gap that appears between the cam and the valve lever on the camshaft.
All valve mechanism parts.
1 - valve; 2 - retaining ring; 3 - guide sleeve; 4 — oil deflector cap; 5 — support washer of the outer spring; 6 — support washer of the internal spring; 7 — internal spring; 8 — outer spring; 9 — spring plate; 10 - crackers; 11 — valve drive lever; 12 — lever spring; 13 — adjusting bolt; 14 — lock nut of the adjusting bolt; 15 — bushing of the adjusting bolt;
16 — locking plate of the lever spring.
The valve and other parts become constantly hot during operation. Expansion occurs precisely because the temperature at some point becomes too high. The end of the neck will rest against the pusher part if there is no thermal gap. The nest will remain slightly open, which will lead to a certain decrease in power indicators.
Other serious consequences of this situation: violation of settings in the gas distribution mechanism, excessive fuel consumption. In this case, the carburetor also suffers.
The cylinder for the intake of fuel mixture or exhaust will not open fully due to the valve head if there is too much clearance. Therefore, adjusting the engine valve clearances becomes a necessity. Otherwise, performance characteristics will improve. The minimum change in dimensions is 0.15 millimeters for any part.
Need for adjustment
Technical inspections are often postponed indefinitely, especially by inexperienced owners of the VAZ 21074 and other cars. Usually they refer to the fact that the engine operates stably for a long time. But the temperature is constantly changing, which always affects the parts inside the vehicles.
The need to adjust the valves is determined by the behavior of the VAZ 2107 power unit.
There are several situations when valve maintenance may be necessary:
- Fuel consumption has increased significantly.
- The motor has lost power.
- After the last adjustment, the mileage exceeds 15 thousand kilometers.
- A characteristic noise appeared in the area of the cylinder head cover.
- The timing belt repair is being carried out, even the smallest one.
Many modern cars have a hydraulic compensator, making instructions for adjusting the valves unnecessary. But this rule does not apply to those who drive classic VAZ cars.
Preparatory stage
Preparation is an important step in any job. The procedure for adjusting valves is no exception. Otherwise, it will be impossible to achieve the goal you have set for yourself. Usually preparations consist of two stages:
- Devices and tools are being prepared;
- Then they switch to the car using gas.
Set of tools for adjusting valves of VAZ 2107.
- You need a flat area with good lighting where the machine itself can be placed.
- The rack for adjusting the valve is taken later, first the parking brake is used to fix the position of the wheels.
- Quick valve adjustment requires turning on the ignition, after which the key is removed.
- If the existing lighting is not enough, you need to install the required number of additional sources.
- A 0.15 mm thick probe and a set with wrenches are being prepared.
- Why adjust valves? This has already been discussed earlier. We need to remove the cylinder head cover, as well as the air filter housing.
Adjustment steps
After completing all the preparatory procedures, you can proceed to the main stage - adjustment.
- Alternately, a dipstick must be inserted between the cam and the lever of the 6th and 8th valves. After adjusting the valves, it is removed.
- The gap is within normal limits if a certain force has to be applied to pass the probe.
- The sequence of valve adjustments indicates that other measures must be taken if there are no obstacles to the movement of the tool.
- You need to take the key to “13” to fix the head of the adjusting bolt. The size of the valve adjustment gauge was described above. A key set to “17” will help loosen the locknut. The bolt must be tightened in one direction, depending on whether the gap decreases or increases. Adjustment according to the template also involves a final check.
The process of adjusting the VAZ 2107 valves with your own hands.
This is how the thermal clearances of the valves are adjusted for each part. The crankshaft rotates at least 180 degrees from its original point each time.
The valve adjuster must allow the camshaft to be rotated 90 degrees.
We repair a VAZ 2107 car ourselves:
Source: https://bezsto.ru/regulirovka-klapanov-dvigatelya/regulirovka-klapanov-vaz-2107/
The procedure for adjusting the VAZ 2107 valves (injector and carburetor) with your own hands video
Periodic or extraordinary adjustment of the VAZ 2107 valves is done in order to optimize the operation of the gas distribution mechanism (GRM) of the car, so that fuel is supplied to the cylinders on time and in full, and exhaust gases are removed. The operation is quite simple and is accessible to any owner of a VAZ, if you first study and understand how to adjust the valves on a VAZ 2107.
What is the meaning of the procedure
In more modern cars there is no need to adjust the timing belt, since the issue is solved with the help of hydraulic compensators. In classic Zhiguli models, including the VAZ 2107, valve settings must be done manually.
The purpose of the operation is to ensure that the working part of the pressure lever adheres to the camshaft journal in operating mode at an engine temperature of 90°. But it should be noted that when heated, metal parts increase slightly in size.
Therefore, after adjusting the VAZ 2107 valves, when the engine is cold, the thermal gap should be 0.15 mm.
If the clearance value differs in any direction, this leads to the following results:
- The gap is too big. When the camshaft cam hits the lever, its travel is not enough to open the valve completely.
Less fuel mixture enters the cylinder, engine power decreases, and a characteristic noise in the form of clicking sounds comes from under the valve cover.
- Large gap in the exhaust gas exhaust path.
Some of them penetrate into the crankcase, and from there back into the fuel tract through the breather, the engine begins to “suffocate.” The soundtrack is a similar clicking sound.
- The lever is “clamped” so much that there is no gap at all.
During thermal expansion of the metal during operation, the pressure is constant, and the valve is always slightly open. The cylinder loses its tightness, compression decreases, and it works intermittently, causing the power of the unit to immediately drop by 1/4. The malfunction is insidious because it does not make noise.
Hence the conclusion that the adjustment of the VAZ 2107 valves should be carried out according to the following criteria:
- a drop in power of the power unit, accompanied by a characteristic sound or failure of 1-2 cylinders due to lack of compression;
- after performing repair work, during which the camshaft was removed;
- After 25 thousand kilometers, a preventive check and adjustment of valves 2107 is carried out.
Preparatory stage
It is important to completely cool the engine before making adjustments yourself. To work you will need the following tools and devices:
- 38 mm spanner - for rotating the crankshaft;
- screwdrivers;
- pliers;
- standard set of heads;
- spark plug key;
- adjustment is carried out using open-end wrenches (13 and 17 mm) and a wide feeler gauge 0.15 mm.
To independently adjust the clearances on a VAZ 2107 carburetor engine, you need to remove the air filter housing, having first disconnected all the pipes from it. Then unscrew the carburetor choke cable and remove the rods connected to the gas pedal. The valve cover is removed after unscrewing the 10 nuts holding it to the cylinder head.
Adjusting the valves of the VAZ 2107 injector differs from the carburetor model only in the disassembly procedure. Here, getting to the cover and the crankshaft ratchet is hindered by a throttle cable, 2 vacuum hoses and a breather pipe. You will also have to dismantle the air pipe leading from the filter to the throttle valve.
To make it easier to rotate the crankshaft during operation, it is recommended to unscrew the spark plugs before tuning.
Work order
There is a certain scheme according to which you can correctly adjust the gas distribution of the VAZ 2107 with your own hands. It consists of adjusting the clearances of certain valves at different positions of the crankshaft, rotated through an angle of 180°. The procedure for adjusting the valves of the VAZ “Seven” is as follows:
- By rotating the crankshaft, place the mark on its pulley opposite the protrusion made on the cylinder block. In this case, the round mark on the camshaft gear becomes in the highest position, and the piston in cylinder 4 goes to top dead center.
- Insert the dipstick to check into the gap of valves 6 and 8; it should move there with force. If necessary, adjust the gap. The countdown is carried out similarly to the cylinder numbers - from the radiator.
- Turn the crankshaft clockwise 180° and adjust valves No. 4 and 7, inserting a feeler gauge in the same way into the gap between the camshaft journal and the lever. When turning, it is convenient to navigate by the camshaft gear: the mark on it will rotate 90°.
- At the next 180° turn, adjust valves No. 1 and 3.
- The last 180° turn is valves No. 5 and 2.
The gap is adjusted by turning the support bolt with a 13 mm wrench; you just need to first loosen the 17 mm locking nut.
After making sure that the dipstick moves with some force, tighten the nut again and continue adjusting in the order prescribed by the diagram.
When tightening the nut, take into account this nuance: the support bolt turns after it and the gap decreases. To avoid this, it is necessary to hold this bolt with a wrench when tightening.
Once you've finished setting up, reassemble the engine and other components in reverse order and start it up. The fact that the gaps do not exceed 0.15 mm should be indicated by the absence of noise from under the valve cover. You can make sure that the valves are not pinched by checking the compression in all cylinders.
Simultaneously with making adjustments, while the motor cover is removed, it is recommended to inspect the chain and related elements for wear on the linings. The loose chain should be tightened using a plunger mechanism mounted in the cylinder block to the right of the exhaust manifold.
Be sure to check the condition of the valve cover gasket and replace it if necessary.
Source: http://car-avz.ru/glavnaya/konstruktivnyj-remont/8752-poryadok-regulirovki-klapanov-vaz-2107-inzhektora-i-karbyuratora-svoimi-rukami-video
Adjusting the VAZ 2107 valves - do it yourself and correctly
Owners of cars produced by the Volzhsky Automobile Plant, especially the “classic” series, must definitely master the procedure for carrying out some settings. In particular, every driver should know how to adjust VAZ valves.
Why do you need to adjust VAZ valves?
Adjusting valves on VAZ-21074
The laws of physics certainly apply to every part of a car. Thermal expansion of bodies is a property of metals that must be taken into account when creating a motor. When it comes to adjusting the clearance between the valve lever and the camshaft cam, few people understand why it is needed.
During operation, the valve and other parts become very hot, causing expansion. In the absence of a thermal gap, the end of the neck, resting against the pusher, will leave the socket slightly open, which will lead to loss of power, excessive fuel consumption and disruption of all settings of the gas distribution mechanism.
If the gap is large, the valve head will not be able to fully open the cylinder for exhaust or fuel mixture, which will also degrade performance.
During the research, it was found that the valve neck on the VAZ 2107 and other parts in contact change their size by 0.15 mm.
This is what determines the thickness of the probe that is used for adjustment.
When is mandatory valve adjustment required on a VAZ?
Adjusting valves on a VAZ 2107
Quite often, drivers, especially inexperienced ones, postpone technical inspections and some adjustments, citing the fact that the engine is running stably. All engine parts wear out, they are affected by constant temperature changes, and therefore there is a need to regulate thermal clearances.
You should start adjusting the valves in the following cases: any, even minor, timing belt repair; the appearance of characteristic noise in the area of the cylinder head cover; mileage over 15 thousand km. after the last regulation; loss of engine power and increased fuel consumption.
New domestic and foreign cars deprive their owners of the opportunity to carry out this procedure, thanks to the presence of hydraulic compensators, but everyone who drives a VAZ classic must definitely master the procedure for adjusting the thermal clearances of the valves.
Adjusting the valves of the VAZ 2107 - preparatory stage
Any work in the garage, and especially such an important procedure as adjusting the 2107 valves, must begin with preparation. Performing simple actions, preparing materials and tools - everything is aimed at ensuring that the goal is achieved. Preparations are usually divided into two stages:
- vehicle preparation;
- preparation of tools and devices.
The golden rule of any self-respecting auto mechanic is to wash the car before repairing. In addition to washing the outside of the body, you should definitely clean the engine compartment. It is pleasant to work with a clean machine, and accumulated dirt and dust will not be able to enter the motor cavity when the head cover is opened.
Next you need to do the following:
- the car is installed on a flat, well-lit area;
- the car wheels are secured with the parking brake, the ignition is turned off, the key is removed from the lock;
- in the absence of sufficient natural or standard garage lighting, it is necessary to install additional light sources;
- prepare a set of wrenches, a feeler gauge 0.15 mm thick;
- Remove the air filter housing and cylinder head cover.
The valves 2107 can now be adjusted.
The procedure for adjusting VAZ 2107 valves - step-by-step instructions
When everything is ready, you can begin direct regulation.
Before mastering the procedure, you should understand the structure of the gas distribution mechanism and find out where the thermal gap is located that should be adjusted.
The valves on the VAZ 2107, in fact, like on the vast majority of automobile engines, are located at the top, that is, the valve closes the hole located above the piston.
For each cylinder there are two valves: an inlet for supplying a combustible mixture and an outlet for removing exhaust gases. The clearance in the cylinder head opens due to the action of the camshaft cams.
The camshaft is located above the valves and has its own eccentric cam for each of them, which transmits movement to the valve stem through a special lever.
The gap between the cam (the point opposite the eccentric) and the lever should be adjusted.
Adjusting the valves of the VAZ 21074 does not differ from the adjustment of the “07” model and begins with the piston in the 4th cylinder being set to top dead center (TDC), which corresponds to the compression stroke. At this point both valves will be closed. To do this, using a 38mm wrench, rotate the crankshaft until the mark on the camshaft sprocket meets the mark on the bearing housing.
Now you need to take two open-end wrenches for “13” and “17”, as well as a dipstick. The valves are regulated in accordance with a certain order, for which they are numbered from the front of the engine.
The VAZ 2107 valves are adjusted as follows:
- insert the probe between the cam and the lever of the 8th and 6th valves alternately;
- if the probe passes with little effort, then the gap corresponds to the norm;
- unimpeded passage or sticking of the probe indicates the need for adjustment;
- fix the head of the adjusting bolt with a wrench set to “13”, release the lock nut using a wrench set to “17” and turn the bolt in the desired direction to increase or decrease the gap, tighten the lock nut and check the gap.
It is necessary to proceed in this way with each valve, turning the crankshaft 180° from the previous point each time. This operation corresponds to turning the camshaft by 90°. With each turn it is necessary to adjust the following numbered valves:
- 180° – 4th and 7th;
- 360° – 1st and 3rd;
- 540° – 5th and 2nd.
The procedure for adjusting the valves of the VAZ 2107 must be strictly followed, otherwise the settings of the gas distribution system can be completely disrupted. After each valve has been checked, it is necessary to turn the crankshaft several times and check the clearances again. It is necessary to ensure that the probe enters each of the gaps with absolutely the same force.
Source: http://CarTore.ru/2990-klapana-na-vaz-2107.html
How to adjust the valve on a VAZ 2107 injector
Owners of VAZ 2107 cars know that these cars are available in both carburetor and injection versions.
And if everything is more or less clear with the maintenance of carburetor cars, then questions still arise with the injector on the “sevens”.
For example, is it possible to adjust the valves on this machine with your own hands? And if so, how can I make the adjustment correctly? We will try to answer these questions in this article.
The VAZ 2107 was not always fuel-injected. At first, these cars were equipped with conventional carburetors. And the car began to be equipped with a forced fuel injection system only in 2006.
The reason is simple: the automaker tried to fit its cars to the standard now known as Euro 2, and this required changing a number of characteristics of the car.
The main advantage of replacing the carburetor system with an electronic system was that in the injection version there was no need to fine-tune the injection. That is, there was no “swimming” at idle speed for injection cars.
But there were also disadvantages. For example, increased fuel requirements. The catalyst for the injection “sevens” was located directly under the bottom, which means the ground clearance became lower. Repairing such machines was more difficult because it was difficult to get to some parts.
Valve system of an injection car VAZ 2107
In general, valve adjustment on the VAZ 2107 should be done every 20 thousand kilometers during scheduled maintenance. But sometimes you have to do this earlier. The reasons are stated below:
- Extraneous noise has appeared in the engine (usually very fast, not too loud clicks).
- Increased fuel consumption is observed in the complete absence of visible leaks.
- In addition, timely adjustment helps prevent premature wear of engine parts.
Required Tools
- Set of open-end wrenches for 38, 17, 13 and 10.
- Feeler gauge for measuring gaps (thickness not less than 0.15 mm).
Scheme and procedure
- First of all, you need to turn off the car engine and let it cool down properly.
- Using a 10mm wrench, unscrew the 8 nuts on the cylinder head cover, then remove the cover. As a result, the valve adjustment screws will become visible.
- Before adjusting the screws, the crankshaft must be set to a certain position. The shaft can be turned with a 38mm key. It should be turned until the mark on its gear aligns with the mark on the cylinder block.
The mark on the shaft gear must match the mark on the cylinder block
- You should also pay attention to the crankshaft chain. If this chain is very loose, it needs to be tightened.
- There is a plunger tensioner nut near the exhaust pipe. It should be loosened with a key of 13.
The plunger tensioner nut is loosened with a 13mm wrench
- After this, use a 38 key to turn the crankshaft until it stops. As soon as it becomes impossible to rotate the shaft, you must firmly tighten the tensioner nut. As soon as the crankshaft is set to this position, this means that the piston in cylinder 4 has reached top dead center.
- In this position, you can adjust the intake and exhaust valves on cylinder 4 (that is, cams 7 and 8).
- Adjustment is carried out after checking the valve clearance with a feeler gauge to 0.15 mm. If the probe enters the gap with little force, but moves there freely, this means that there is no need to adjust this valve. If the dipstick dangles freely or, on the contrary, does not fit in, you need to loosen the nut on the valve with a 17 wrench, and then use a 13 wrench to slightly turn the adjusting bolt, thereby setting the required gap. After a secondary check with a feeler gauge, the nut is tightened to 17.
The nut on the valve is loosened with a 17 wrench
- In the above position of the crankshaft, the exhaust valve on cylinder 2 (cam 4) and the intake valve on cylinder 3 (cam 6) are also checked and adjusted.
- Once all the valves listed above have been checked and adjusted, you can move on to others. To do this, use a 38 key to turn the crankshaft 60 degrees.
- In the above position, you need to check (and, if necessary, adjust) the intake and exhaust valves on cylinder 1, the intake valve on cylinder 2 and the exhaust valve on cylinder 3.
Examination
After all the valves have been adjusted, use a 38mm wrench to turn the crankshaft 3-4 full turns and take a control measurement of all clearances using a feeler gauge. If there are no gap violations, you can close the cylinder block cover and try to start the car engine.
Checking valve clearance using a feeler gauge
Video: how to adjust valves on a VAZ 2107 injector with your own hands
Possible mistakes
If the adjustment is made correctly, extraneous clicks in the motor should disappear. If this does not happen, then something was done wrong. The most common mistake is a violation of the sequence of cylinder adjustments if the work is done with your own hands.
It is necessary to set the gap on the injector valves only in the above order and in no other way, there is no need to violate the diagram. If you start with the wrong cylinder, it can completely disrupt the entire timing system, resulting in extraneous noise in the engine that will not go away. And what's more, it can get louder.
There is only one way to correct this error: set cylinder 4 to top dead center in accordance with the mark and set everything up again.
Adjusting valves on a VAZ 2107 is not as difficult a task as it seems at first glance. The main thing is to follow the correct sequence of cylinders given above. In addition, you should not be too zealous when tightening the bolts on the cylinder block cover, as the threads there can easily be stripped.
motorltd.ru
How to independently adjust valves on a VAZ 2107 injector
Adjusting the valves of a VAZ 2107 injector engine with your own hands is a rather complicated procedure in terms of the accuracy of its implementation. Usually it is carried out according to the regulations - every 15-20 thousand km. mileage But if during the operation of a VAZ 2107 car a characteristic regular clattering sound appears in the engine compartment, it means that the valves require unscheduled adjustment.
In addition to eliminating increased noise in the VAZ 2107 engine, the injector also needs to be adjusted to prevent premature wear of engine parts. To do this job you will need the following tool:
- Keys
- on 10;
- 13/17 – 2 pcs.;
- at 38 for the crankshaft;
- Special probe 0.15 mm thick;
There is nothing complicated in the procedure for adjusting the valves on the VAZ 2107 injector engine. The main thing to remember is that all work must be done on a completely cooled engine. First of all, using a 10mm wrench, you need to unscrew the 8 nuts and remove the cylinder head cover.
This will give us access to the valve adjustment screws. Before proceeding with the adjustment, a certain adjustment of the position of the crankshaft is necessary. This is done using a 38mm wrench by turning the crankshaft until the marks on the sprocket and the cylinder head align.
In this case, it is also necessary to check the chain tension and, if it is loose, tighten it.
Adjusting the tension of the VAZ 2107 chain with your own hands is an extremely simple task. Having loosened the plunger tensioner nut located under the exhaust pipe, use a 38mm wrench to turn the crankshaft until maximum resistance appears. Keeping it from arbitrary rotation, use a 13mm wrench to fix the tensioner nut.
This position of the VAZ 2107 injector crankshaft corresponds to the position of the fourth cylinder at top dead center. In this case, the distributor slider will be directed towards the contact corresponding to cylinder 4. In this position the following valves are adjusted:
- Intake and exhaust on the fourth (seventh and eighth cams);
- Graduation on the second (fourth cam);
- Intake on the third (sixth cam) cylinder;
First of all, we check the gap using a feeler gauge or a special device. If the dipstick enters with little force and then moves freely, the gap is normal and does not need adjustment.
Otherwise, it is necessary to loosen the fixing nut using a 17 wrench, after which the adjusting bolt is turned with a 13 wrench and the required gap is set. Having re-checked the correct adjustment of the valves with a feeler gauge, fix the position of the adjusting bolt, holding it from moving and at the same time securing it with a nut.
https://www.youtube.com/watch?v=K699Pc37L_g
Having checked and adjusted all the valves corresponding to the set position, change the order of the cylinders by turning the crankshaft 60 degrees. In this case, the distributor runner should be directed towards the contact of the first cylinder. In this position, you need to adjust the gaps of the remaining valves:
- Inlet and outlet of the first;
- Inlet second;
- Exhaust of the third cylinder.
The procedure for adjusting valve clearances is completely similar to that described earlier. After you have adjusted all the valves, it is recommended to turn the crankshaft 1-2 times with a 38mm wrench and perform a control check.
If everything is fine, you can safely replace the head cover, distributor cap, and start the engine of your VAZ 2107. If the work is done efficiently, the clattering noise should disappear. If this does not happen, then there is another problem.
You can try to diagnose and fix it yourself, or seek help from qualified specialists.
Source: http://autoprivat.ru/remont_avto/kak_na_vaz_2107_inzhektor_otregulirovat_klapana.html
How to adjust valves on an injection VAZ 2107?
Adjusting the valves of a VAZ 2107 injection engine yourself is not a very easy procedure, in terms of the accuracy of its implementation. Usually this procedure is performed every 15-20 thousand km. mileage
Unscheduled valve adjustment is required if, during operation of the vehicle, a regular and characteristic clattering sound appears under the valve cover.
It is also necessary to adjust because this will not only eliminate increased noise in the engine, but also prevent premature wear of parts. To complete this job you will need the following tool:
- Keys
- 13/17 – 2 pcs.;
- on 10;
- at 38 to turn the crankshaft;
- A special probe with a thickness of 0.15 mm (sold in any auto store;
There is nothing complicated about adjusting the valves. The most important thing to remember is that the work must be done on a completely cooled engine. And so let's start, remove the air filter, then use a 10mm wrench to unscrew the 8 nuts and remove the valve cover.
We have access to the valve adjustment screws. Before adjustment, it is necessary to set the crankshaft to a certain position. You can set it using a key to 38, turning the crankshaft until the marks on the cylinder head and on the sprocket align.
We check the chain tension and if it is loose, it needs to be tightened.
Tensioning a chain is a very simple task. Loosen the nut of the plunger tensioner, it is located under the exhaust pipe (manifold), turning the crankshaft 2-3 turns with a 38mm wrench so that the chain is tensioned. Holding the crankshaft so that it does not turn spontaneously, use a 13mm wrench to secure the tensioner nut.
Let's start adjusting the valves
When the marks on the crankshaft sprocket and the block are aligned, the piston of the fourth cylinder is at top dead center. In this case, the ignition distributor slider will be directed towards contact 4 of the cylinder. In this position the following valves are adjusted:
- Exhaust and intake on the fourth cylinder (seventh and eighth cam);
- Exhaust on the second cylinder (fourth cam);
- Intake on the third cylinder (sixth cam);
We check the gap using a feeler gauge or a special device. If the dipstick enters with little effort and then moves freely, the gap between the pusher and the rocker arm is normal and no adjustment is required.
If the dipstick does not fit in or passes freely, then you need to use a 17 wrench to loosen the fixing nut and turn the adjusting bolt with a 13 wrench to set the required gap. After checking the valve clearance with a feeler gauge, if everything is normal, fix the adjusting bolt, holding it from turning and at the same time securing it with a nut.
Having adjusted and checked all the valves, the order of the cylinders changes; to do this, we rotate the crankshaft 60 degrees. In this position, the ignition distributor slider will be directed towards the contact of the first cylinder. In this position, it is necessary to adjust the gaps of the remaining valves:
- Exhaust and intake of the first cylinder;
- Intake of the second cylinder;
- Exhaust of the third cylinder.
After adjusting all the valves, it is recommended to turn the crankshaft 2-3 times with a 38mm wrench and carry out a control measurement of the gaps. If everything is fine, you can replace the valve covers, distributor cap, and start the engine of your car.
If you have done the job efficiently, the clicking and knocking should disappear. If this does not happen, there may be another reason, i.e. not in the valves.
You can diagnose and try to fix the problem yourself, or still seek help from specialists.
Adjusting VAZ valves: Video
Source: https://7-vaz.ru/regulirovka/kak-otregulirovat-klapana-vaz-2107-inzhektor-samostoyatelno.html
Adjusting valves VAZ 2107
To adjust the valves, you will need a 0.15 mm feeler gauge and a pair of keys 13 and 17. If we are talking about a carburetor VAZ 2107, then a key for cranking the crankshaft 38 will also come in handy.
To remove the valve cover on a carburetor “seven”, you need to remove the air filter.
You also need to disconnect the fuel hoses, choke cable and throttle linkage. The carburetor itself should be covered so that nothing gets inside,
On an injection VAZ 2107, you need to pull out the oil dipstick to remove the cylinder head cover.
And remove the three hoses near the air filter.
Unscrew the 8 10 bolts securing the cover, scattered around the perimeter, and remove the cover.
After removing the cover, you should check the chain tension (and tighten if necessary). In order to begin adjusting the valves, the mark on the camshaft must coincide with this protrusion.
If the mark does not coincide with the protrusion, you need to turn the crankshaft until this is corrected.
There is also a mark on the crankshaft (carburetor), it should coincide with the longest line on the camshaft drive cover.
On the injection “seven” these marks are different, but they should also match. If the camshaft marks match, but the crankshaft ring marks are slightly divergent, this may indicate a stretched chain. If the discrepancy is minor, adjustment is permissible.
Table of rotation angles of the crankshaft and TDC of the pistons of various cylinders, where 0 corresponds to the coincidence of the marks on the camshaft and the top dead center of the piston of the 4th cylinder. In this position, the 8th and 6th valves are adjusted, after which you need to rotate the crankshaft 180 degrees (the camshaft will rotate 90), then you can adjust the next pair.
The valves are counted from the camshaft and are adjusted in pairs, with the crankshaft and camshaft turned after adjusting each pair of valves.
The required gap is determined by a feeler gauge 0.15 mm thick. It is inserted between the lever and the camshaft valve cam. If the dipstick does not pass or moves completely freely, adjustment is needed.
To adjust the valve, you need to loosen the locknut with a 17 wrench.
Then turn the adjusting nut in one direction or another, increasing or decreasing the gap.
After making half a turn of the adjusting nut, you should check the gap with a feeler gauge and make adjustments. The probe should move tightly, without play, and be removed with a force of about 2 kg, with small errors allowed. Having achieved the desired result, you need to tighten the locknut and check the gap again.
The second valve (and all the others) are adjusted in the same way.
Having adjusted the first pair of valves (8 and 6), you need to turn the crankshaft 180 and the camshaft 90 degrees. To make it easier to navigate, you can make marks on the camshaft indicating a 90-degree rotation. If the manufacturer's mark coincides with the protrusion on the top, then your mark should be applied near the protrusion of the cylinder head housing on the side.
Here in this place.
Then turn the crankshaft with the key on the carburetor or turn the wheel on the injector.
On an injector, the same result can be achieved by inserting a screwdriver between the teeth of the crankshaft ring and pressing against the crankshaft position sensor bracket from below, turning the ring little by little.
The result should be the same, the camshaft will make a revolution of 90 (as indicated by the applied mark).
The factory mark has moved 90 degrees.
In this way, you should adjust all the valves, then reassemble everything in the reverse order and start the engine. Having warmed up to operating temperature, it should function normally, without any knocking.
Signs of an upcoming VAZ valve adjustment are a drop in engine power at high/low speeds and a characteristic metallic knock. Incorrect valve adjustment reduces the service life, since if the gap is too small, the seat and the valve itself will burn out. And too large gaps provoke the same tapping.
Adjusting valves on a VAZ 2107 is considered a moderate task—novice auto repair workers should trust experienced mechanics.
The adjustment process itself on a VAZ 2107, be it a carburetor or an injector, occurs the same way. The differences lie in how to remove the cylinder head and set the pistons to top dead center - on injection-powered "sevens" you won't be able to get in with a ratchet.
In any case, to adjust the valves on the VAZ 2107 you will need:
- open-end wrenches for 13 and 17;
- probe 0.15 mm thick.
How to adjust valves on a VAZ 2107
Valve adjustment is done when the engine has cooled down to 20 degrees.
- Remove the valve cover (cylinder head cover).
- Check the chain tension and tighten if necessary.
- Set the piston of the 4th cylinder to TDC by turning the crankshaft until the mark on the camshaft and the protrusion on the housing coincide.
- Adjust the 8th and 6th valves by inserting the feeler gauge - if it does not fit between the lever and the valve cam, or moves too freely, you need to loosen the lock nut with a 17 wrench, and use a 13 wrench to turn the adjusting nut, checking the gap with the feeler gauge.
The dipstick should move tightly, without play, and be pulled out with a force of about 2 kg. Minor errors are not critical.
- Having achieved the desired clearance, pull out the feeler gauge and tighten the locknut, then recheck the clearance and proceed to adjust the next valve.
- After adjusting the 8th and 6th valves, you need to turn the crankshaft 180 degrees, the camshaft will turn 90.
- Adjust the 4th and 7th valves.
- Rotate the crankshaft another 180 and the camshaft another 90.
- Adjust the 1st and 3rd valves.
- Rotate the crankshaft another 180 and the camshaft another 90.
- Adjust the 5th and 2nd valves.
- Check the gaps and reassemble everything in reverse order.
- Start the engine and give it time to warm up to operating temperature - it should run normally, without knocking.
Adjusting valves VAZ 2107 (carburetor)
To remove the valve cover, you first need to remove the air filter (10 bolts) and disconnect the fuel hoses. You will also need to disconnect the choke cable and the throttle linkage. After this, you can unscrew the 8 x 10 bolts around the perimeter of the cylinder head cover and remove the cover.
It is better to cover the carburetor so that nothing gets inside during operation.
The crankshaft can be turned using a special 38 wrench. Next, the valves should be adjusted according to the points above.
Adjusting valves VAZ 2107 (injector)
To remove the valve cover, you must first remove the oil dipstick, otherwise it will not allow it to come out. Next, the easiest way is to disconnect the three hoses near the air filter pipe, unscrew all the bolts around the perimeter of the cover, and pull out the cover.
Pulling out the valve cover will be quite inconvenient.
There are several ways to rotate the crankshaft. For example, jack up and hang the rear wheel, shift to 4th or 5th gear to make it easier to turn. Rotate the wheel until the marks match.
Another way is to turn it a little at a time, pressing the blade of a screwdriver between the teeth of the crankshaft ring, and using the DPKV bracket (but not the sensor itself) as a support. Otherwise, the valves are adjusted according to the points above.
Source: https://etlib.ru/report/454-regulirovka-klapanov-na-vaz-2107
Source: http://auted.ru/base/Regulirovka-klapanov-VAZ-2107-446