Cleaning the throttle body, without removing it - logbook Toyota Corolla トヨタ White 1993 on DRIVE2
Friends, good day!
I decided to check the air filter, and at the same time clean the installation site, pipes and throttle valve. As always, I describe the process, maybe it will be useful to someone, and everything is in the photo)
In order to remove the air filter, you need to remove the air duct cover, which is secured with four clamps (for convenience, you can immediately pull out the sensor so as not to accidentally damage it) and from the entrance to the pipe with a clamp, which can only be loosened with a 10″ wrench
We take out the air filter, in my case it’s not too dirty yet, so I shook it, vacuumed it and put it aside (if you have a new one, it’s easier to change it).
A little dust, both fine and coarse, has accumulated in the tray.
I decided to clean it without removing it from its rightful place, using a vacuum cleaner and wet wipes, or a rag, but the napkins were at hand, and you need to go for a rag (laziness sometimes takes over).
Next, we remove the pipe itself, which is also secured with a clamp (a 10″ wrench helps) at the junction with the throttle valve.
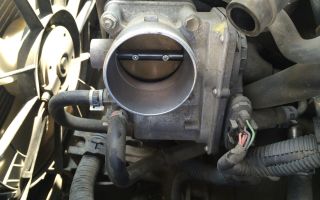
I have already decided to wash the pipes with a rag and water. While everything is drying, we get to the damper; it is in good condition (in my opinion).
Some information on the throttle valve: Designed to allow air to enter the manifold; accordingly, the more the valve is open, the better the air flow.
Air, mixed with fuel, enters the combustion chamber, thereby, the larger the volume of the air-fuel mixture, the higher the power generated.
By pressing the accelerator pedal, the driver controls the process of opening and closing the throttle valve, that is, by adjusting the position of the throttle valve. The gas pedal connects the throttle cable to the throttle valve via a mechanical drive.
The throttle valve is one of those car parts that requires repair less often than others; its service life is equal to the service life of the car itself.
Thus, replacing the throttle valve is required extremely rarely, and only in cases where it has mechanical damage.
But as for contamination, they are expressed in the presence of oil stains and deposits, both on the valve itself and on its body. The causes of such contamination are so-called oil dust and crankcase gases.
The first signs of contamination on the throttle valve are: - the engine starts unstably; - floating speed at idle; - car jerking at low speeds; - dips when idling.
If your car has such symptoms, you should remember that replacing the throttle valve is not required, but cleaning it from dirt is necessary.
Flushing the throttle valve does not require specialized tools or equipment; aerosols and a rag are sufficient. I used Carburetor Cleaner and wipes.
I did not remove the damper and cleaned it on site by applying a cleaner and removing the resulting dirt with napkins (again, you can use a rag). I cleaned the damper on both sides in this way; in order to get to the inside, just pull the cable.
Reassemble in reverse order.
The whole procedure was done, because... Sometimes I noticed a slight floating in idle speed, but now the effect has disappeared.
Thank you for your attention!
Good luck to all!
Source: https://www.drive2.com/l/6183276/
Photo report: cleaning the throttle 1ZZ-FE
I think someone will find the throttle cleaning report useful..
I decided to clean it because the car behaved strangely during warm-up speeds: the speed fluctuated and after some time the car stalled... well, the second reason was simple interest...
I bought carburetor cleaner and WD-40 in advance, I will also need a bunch of rags and a toothbrush (a small brush would be very useful, but I couldn’t find one). The rest - head keys, etc., are always in the car...
Let's start with the procedure for completely flushing the throttle valve and XX valve.
- First, remove the (+) terminal from the battery, then the plastic cover from the unit...
- unscrew the two bolts securing the throttle cable...
- bend the fastening (loosen the cable itself) and pull it out...
- putting it aside...
- Using a socket screwdriver, loosen the air duct clamps on both sides...
- Next, remove the rubber air duct, and towards it...
Pay attention to the iron frame, which is secured with 2 bolts.
Unscrew the bolts and remove the frame...
unscrew the remaining 2 nuts and 1 bolt securing the throttle.
We unclip 2 connectors, the XX sensor and the remote control position sensor.
Carefully (without damaging the rubber sealing gasket) remove the throttle itself from its place.
It remains to remove two hoses (cooling system). The clamps should be removed using pliers, but it’s not very convenient to climb under there. Having tried a bunch of tools, I removed it with a screwdriver (the main thing is not to damage it), a little antifreeze will spill out.
The hoses themselves, if you bend them upward, the antifreeze will not pour out. But so as not to suffer, we screw into them two bolts that we removed from the throttle...
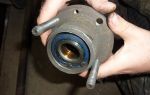
This is what the removed throttle looks like from the reverse side (oil deposits)
from below the XX sensor
Using a Phillips screwdriver, unscrew the three bolts securing the XX sensor.
(everywhere they write that they are difficult to unscrew,... they unscrew normally after soaking with WD-40, the main thing is that the screwdriver fits exactly!!!)...
We also see carbon deposits in the grooves, which also need to be removed...
Before you unscrew it, YOU NEED TO MAKE MARKS!!!
scratch thin lines between the plastic and metal with a knife, I did 3 pieces (preferably more than 4-5). Three is the minimum! (red lines, shown by arrows). To put it in the same position during assembly... Well, then we will need the same cleaner and WD-40, a long-haired brush and cotton swabs.
Inside there is a rod that should rotate freely, on which there is a damper... (IT WAS NOT SPINING AS SUPPOSED).. Next, we clean everything inside without sparing the cleaner... we blow it... we dry it... we treat it with a WD cleaner... and we put everything in place using those the marks that we made before disassembling... I put the plastic on the sealant to make it easier to place the marks...
(one more thing - when we put on the plastic, we make the flap in a half-closed state (you can insert a cotton swab inside to fix it))
Let's start with the actual cleaning, pour plenty of carburetor cleaner into everything...
let it get wet for a couple of minutes...
In the meantime, let’s clean the throttle seat, having first removed the sealing rubber...
We clean everything with a toothbrush, using the same cleaner...
I decided to clean the inside this way (there is also quite a bit of carbon deposits and oil residues there)…
after using cleaner, a toothbrush, a bunch of rags, and a little time.
our throttle takes on this clean look...
then, in reverse order, we put everything back in its original place.
Don’t forget to put on all the hoses, rubber bands and connect the connectors.
useful tools...
OK it's all over Now…. everything is easy and simple...
Source: https://corolla.ws/forum/showthread.php?t=8346
Toyota Corolla Forum
Engine operation (and everything on it), problems, repairs and spare parts
Valero Honorary Corolla Messages: 629 Registered: November 10, 2014, 21:54 Car: Toyota Corolla 1.6 manual transmission 2012 Location: Tver Thanked: 21 times
#1
Post by Valero » 08 Dec 2014, 20:46
Good evening ! I'm interested in the question of training the electric throttle valve - as I understand it, it can be treated by removing the terminals from the battery, or something else?
Valero Honorary Corolla Messages: 629 Registered: November 10, 2014, 21:54 Car: Toyota Corolla 1.6 manual transmission 2012 Location: Tver Thanked: 21 times
#4
Post by Valero » 08 Dec 2014, 21:22
And as far as I understand, it doesn’t matter to the Clem which one is thrown off.
DyushaHonored Korollovod Messages: 11430 Registered: March 30, 2013, 01:53 pm Car: Corolla, 2011, 4 automatic transmission, 1.6 l petrol diesel, Comfort+, drank more than 9700 l/Ai92, Toebta 0W20 Location: 133, Kovrov Thanks : 7 times Thanked: 24 times
#5
Post by Dyusha » 08 Dec 2014, 21:27
Usually we talk about the minus first of all.
Antibiotic Messages: 637 Registered: Nov 14, 2014, 6:14 pm Car: Toyota Corolla 2008, black. Comfort is a plus. Location: Kostroma Banned: Indefinitely
#8
Post by Antibiotic » 08 Dec 2014, 22:54
If I understand correctly, the damper for some reason (most likely dirt) “loses” its, for example, “zero” (fully closed) position.
By conducting “training” she is given a “new zero”?! But in essence, this does not solve the problem!? Studying Honorary Corolla Messages: 6829 Registered: January 21, 2014, 19:09 Car: Toyota Corolla E 150. 2008
Mechanics. 130 t.km. Location: St. Petersburg
#10
Post Studying » 09 Dec 2014, 08:04
There is no complete zero. I understand that when dirt builds up, the ZBU sets a new gap. But exposure has its limits. I'm talking about idle speed.
After cleaning, a large valve gap remains. That is why, when first started after cleaning, the engine keeps high speed. And you don't need to train.
Take care of your health from a young age!
Stranger21Honored Korollov Messages: 14569 Registered: June 17, 2014, 08:44 Car: Like everyone else, mmt Location: Ufa Thanked: 60 times Thanked:
Source: http://tc-club.ru/viewtopic.php?t=2123
Club • View topic – Cleaning the throttle body
Current time: 09 Jul 2018, 18:43
wwr » 07 Mar 2013, 14:19
Greetings to all!
At the next maintenance (50,000), the mechanic advised me to clean the throttle valve. Together we looked at it through the corrugation of the air and saw dirt around the edges.
On the previous car, I cleaned it myself, then “trained” the speed. Would love to replicate this myself on the Verso. But my memory is foggy, I need help with advice and instructions. I believe that my brothers have already done this simple procedure.
Please share your experience. Thank you.
I'LL SING RIGHT NOW...
wwrNewbie Messages: 53 Registered: Jan 17, 2011, 09:16 From: Moscow Thanked: 4 times. Thanked: 11 times. Equipment: Toyota Verso 2010, Prestige
Sergey » March 07, 2013, 17:23
There is nothing to clean. Our engine uses a non-contact throttle position sensor. This sensor is a Hall sensor mounted on the throttle body. And about the mass air flow sensor - in old cars these are contact sensors (resistor). They say and write that they need to be cleaned periodically.
When they came up with the idea of measuring mass air flow in this way, they admired two main advantages of the new air flow sensor: 1. Very high reliability due to the absence of moving elements.2. Constant self-cleaning of the wire, since it is heated and debris falling on it burns.
I don’t know how often the ash needs to be raked out; I haven’t come across any information.
The only thing that may cause the need for cleaning is carbon deposits on the walls that interfere with the free movement of the damper, causing its movement to become stuck.
SergeyGuru Messages: 4748 Registered: April 21, 2011, 16:58 Thanked: 214 times. Thanked: 1243 times. Equipment: Prestige
GET » 08 Mar 2013, 11:32
As I understand it, our damper is open almost all the time, and the amount of air is determined by the height of the valves. And there is absolutely no need to clean it at fifty dollars if the filters are replaced in a timely manner.
GETProfessional Messages: 800 Registered: Mar 14, 2012, 00:14 Thanked: 16 times. Thanked: 70 times. Equipment: Sol
wwr » 12 Mar 2013, 08:16
That's what we're talking about. Along the edges of the damper, as I already wrote, carbon deposits appeared. Remove the pipe from the air to the damper and wipe it carefully with a cloth with carb cleaner, I’ll probably do that for now. But I doubt whether it is necessary to “train” the revolutions after this, and where is the information on training.
I'LL SING RIGHT NOW...
wwrNewbie Messages: 53 Registered: Jan 17, 2011, 09:16 From: Moscow Thanked: 4 times. Thanked: 11 times. Equipment: Toyota Verso 2010, Prestige
Sergey » March 12, 2013, 10:28
After all, you will do it locally, therefore the system should not require any initializations.
In the worst case, if you remove the connector, there will be self-learning during the first hundred km... SergeyGuru Messages: 4748 Registered: April 21, 2011, 16:58 Thanked: 214 times. Thanked: 1243 times. Equipment: Prestige
berl » 03 Jul 2015, 18:51
Hi all. I am attaching a small photo report on cleaning the damper. Engine – 1600, gearbox – manual. Mileage 90,000 km. I didn't discover anything new for myself. A standard procedure that I did on my previous machines. When the damper was dirty, I didn’t take a photo (I immediately wanted to clean it). I took a regular carburetor cleaner, and on the removed choke I just went over it and washed off all the carbon deposits.
That's all. By the way, you need to do this with the battery terminal removed. So that the system can then learn itself. I did this without removing the terminal, so at first the idle speed after releasing the gas and in neutral gear increased abruptly to 3000 rpm. Then it gradually returned to normal. To make work easier, I removed the air filter housing and at the same time shook out any debris from it.
photo
The author of berl was thanked for this message by: 14Andryuxa (26 Aug 2015, 12:21), Sergey62 (03 July 2015, 21:00), Dimane (07 July 2015, 11:44), Driver (07 July 2015, 08:22) , m.roman2567 (15 May 2016, 20:32), mdverso (04 July 2015, 20:30), Oleg-69 (03 July 2015, 19:28), udavkaa73 (15 Jan 2017, 10:28), vibvib (06 July 2015, 09:18), Igor_Voronezh (04 July 2015, 19:59) and more 4berlRegular Messages: 137 Registered: 10 August 2013, 17:46 From: Novokuznetsk Thanked: 30 times. Thanked: 202 times. Equipment: comfort (5 seats)
Sergey1976 » 25 Aug 2015, 15:25
Thanks for the informative report, I also cleaned it, it seemed to me that I was eating less and the speed became more sensitive to the pedal
Sergey1976Newbie Messages: 49 Registered: April 26, 2011, 5:36 pm From: Pavlovsky Posad Thanked: 6 times. Thanked: 4 times. Equipment: prestige
Driver » August 26, 2015, 09:32
They cleaned it for me at TO50. The cost of the service is somewhere around 600 rubles. They warned that the idle speed will fluctuate for some time - the computer will self-learn.
Subjectively, consumption has dropped and the engine has become faster.
DriverSpecialist Messages: 334 Registered: July 31, 2012, 08:20 From: Krasnodar region Thanked: 66 times. Thanked: 61 times. Equipment: Prestige dark gray
VADIAN » April 16, 2016, 11:14
At mileage 60,000, the ignition protection was cleaned. A lot of dirt, 20 minutes of work (in service), 1300 rubles. The procedure is definitely useful. The car drove more vigorously, the throttle response was more sensitive, and it jerked less.
For this message the author VADIAN thanked: John67 (April 16, 2016, 11:57 am) VADIAN Newbie Messages: 38 Registered: Oct 13, 2013, 9:04 pm From: N. Novgorod Thanked: 5 times. Thanked: 2 times. Equipment: ELEGANCE
Skynet » 08 May 2016, 20:52
I didn’t create a separate topic, because there was nothing to talk about... I decided to conduct an audit of the mass air flow sensor. I took it off, looked at it, and put it back. I didn't clean it. After removal, the speed floated, no errors were displayed.
IMG_1296.JPG
IMG_1295.JPG
You do not have the necessary permissions to view the attachments in this message.
Skynet thanked the author for this message: pvsurkov (01 Jun 2016, 13:18) SkynetRegular Messages: 205 Registered: 28 Mar 2015, 14:20 From: Kurgan Thanked: 22 times. Thanked: 132 times. Trim: 1.8 CVT Elegance
Return to Engine
Who's at the conference now?
Currently browsing this forum: no registered users
Source: http://Toyota-Verso.ru/viewtopic.php?t=1558&f=16
The average consumption increased from 8.4 to 11 liters, after cleaning the throttle valve at the OD! – Engine and transmission
Sent 13 May 2013 – 09:10
I ask for help in solving a problem that arose after cleaning the throttle valve from an authorized dealer.
History of the problem:
The car is not under warranty, 2008, 76,000 km., 1.6 (made in Turkey) (MOT completed at 74,000) average consumption SUMMER: 8 l.-max 9.4 l. and WINTER - max 10.4! The climate is always summer! and heating in winter)
After the warranty is removed, the car is not serviced at a TOYOTA station, as it is very expensive! I get service from a nearby Renault (with my own consumables and spare parts, only the original ones are purchased through Exist - because it’s two to three times cheaper to work with, not taking into account the cost of spare parts and oils)
– removed the battery terminal – the engine speed began to fluctuate, dropping to 300-400, based on experience, I turned to the OD (I carry out electricians and specific work at the official dealer). The official dealer was told that it was necessary to clean the Throttle valve or wait 200-250 km.
mileage until it returns to normal (the computer learns), to answer my questions - about the experience of these events and the increase in average consumption???? The answer was received that cleaning would not make it worse, and the speed would stabilize without affecting the increase in average consumption.
What we have - three days have passed (mileage in three days - 250 km) - average consumption is 11.1, how to deal with this, or don’t panic and over time everything will return to normal.
I remind you once again - the climate is always! and not just after cleaning the throttle body!
Sent 13 May 2013 – 09:55
rusanoff , reset the average flow rate by holding the odo button on the average flow rate and let it count again.
Sent 14 May 2013 – 08:12
ON™ , reset!! Now per day - mileage - 50 km, 10.1 l.
Sent May 14, 2013 – 19:03
Before this campaign, I never dropped the fuel consumption at all))))))))))))
Sent May 14, 2013 – 21:32
If the damper was cleaned without removing it from the manifold, then all the dirt (a very aggressive mixture) settled on the spark plugs, oxygen sensors, catalyst...
Naturally, the mixture will ignite differently, the oxygen sensors will measure it differently than before, i.e. and the consumption will be different.
If you also filled in the oil recommended by the service center, and not by the manufacturer, then the consumption will definitely increase.
Sent May 15, 2013 – 07:34
reset the terminal and let it run for 20 minutes without climate control - it should settle down. if not, look for the problem!
Sent May 15, 2013 – 09:10
Grandfather , IN your opinion, how quickly will this mixture “go away..” i.e. “will it fade” or “evaporate” in your experience, or is intervention necessary to eliminate the problem!? and as far as I understand, according to your answer, the entire cleaning procedure at the OD took about thirty minutes, so no one removed the collector and “all the dirt” went on..
Over five days, the average consumption gradually decreases, now around 10.0 liters.
It’s just that all my anxiety stems from the fact that I was going to sell the car in a month, and with such an average consumption it would be “a bit difficult”, after all, Auris has proven itself in terms of consumption of 8-9 liters, and if it is 10.0 then “problem!”
ps I regularly reset the sensors when refueling the car. Average Speed, travel time, average consumption, etc.
I only fill up with 95 gasoline - Belarusian or Baltic, since I live in Ukraine, at OKKO gas stations
marselg , I regularly reset the sensors when refueling the car: average speed, travel time, average consumption, etc.
I only fill up with 95 gasoline, Belarusian or Baltic, since I live in Ukraine (at OKKO gas stations)
Sent May 17, 2013 – 16:35
I had a similar situation here. It wouldn't even start at first after removing the terminal. Hold the gas for 15 minutes without engaging the gear at 3-4-5 thousand rpm, the idle will start working much more stable. If necessary, then repeat for a few more minutes. As a result, the speed stabilizes quite quickly.
Drive along the highway at a stable 120-140 km/h for 50 kilometers so that everything in the cylinders burns out and erodes. It should help.
Carb Cleaner is said to be a very caustic liquid. The rubber of various gaskets corrodes very quickly. But that's what they say. It would be interesting to see for yourself how it really is. Maybe it’s not as dangerous in terms of the throttle valve cleaning procedure as they say.
PS. On the Auris I don’t understand the physics at all, why clean this throttle valve. There is a deposit of soot of tens of microns maximum. Even if we assume that a hundred microns (0.1 mm) will accumulate, what’s the point of cleaning it? How can the revs in the Auris fluctuate due to this? There is such a huge hollow collector there, and no branches, what can these microns do, what can they influence?
P.P.S. The average consumption is average because 50 km is simply nothing for him. You need to drive at least 300 kilometers, and in different modes.
Source: http://taclub.ru/index.php?showtopic=3264
After cleaning the throttle body?
-
- 14 messages
Hello forum users! Engine 1NZ Runx 2003; I decided to clean the throttle valve. Having removed the pipe and unscrewing the valve itself, I discovered that it was covered in black residue.
I cleaned it with a carburetor cleaner in a yellow can for sale, it says something like CARB CLEAR there. In general, after I put everything back together and connected all the wires where they needed to be, I started the car. It worked like a clock, the revolutions did not jump, in general, everything was as it should.
The question is, when I start it in the morning when it’s cold, the revs should rise to somewhere around 1500, but for some reason when I start it they immediately go to 900 and that’s it, as if the car is already warmed up even though it’s cold, when it’s already warmed up a little it starts to rise to 1000 -1100 rises somewhere, but when it warms up again to 900. What could be the reason? Maybe if you don’t understand, ask!
-
- 3292 messages
I think the problem is in the clean throttle))) in general, I wouldn’t worry, soon the throttle will get a little dirty and everything will be as it was))) and by the way, when hot, the speed should be 650, well, 700 maximum, but not 900.
And when the car is factory did this have any effect??? -
It's all about washing the XX valve; if you don't wash it a little, it just jams, and when it warms up a little, free movement appears. Plus, after flushing the throttle body, you need to warm up the car, and set the desired (recommended) idle speed on a hot internal combustion engine.
-
- 467 messages
I get 2-2.3 kilospeeds when cold, then they normally reach 650-700.
-
- 14 messages
I didn’t wash the XX valve myself, only the DZ. But the starting of the car was not affected in any way; everything remained as it was. Previously, when the remote control was dirty, the revolutions jumped, but now they work like a clock. The only thing that worries me is that when starting up on a cold speed, the speed is the same as when it is heated. Can I remove the XX sensor and clean it?
-
Yes, it needs to be removed and cleaned. The valve is located at the bottom, and when flushing the throttle body itself, most of this junk ended up there.
Your valve should rotate 360 degrees (in my opinion this is the type of valve). During normal operation, when the car is started cold, it should operate at 1400-1600 rpm.
When hot, when starting, turn it up to 1200-1400 and lower it to 650-750. I can tell you everything over the phone.
-
- 250 messages
Ivan, tell me where you got the “star” key. I couldn’t find it in the store, I had to saw the cap with a flat-head screwdriver.
-
- 14 messages
Thank you Ivan Grazhdankin, I’ll try to rinse it and then I’ll let you know how it turned out
-
But I don’t have such an asterisk. Just use a flat screwdriver to knock it out of place, then twist it. After all the manipulations, replace the bolts with new ones (crosswise)
-
- 105 messages
where did you get the star key?
You take pliers and unscrew, I did that!
-
- 105 messages
After washing, we do Throttle training on Toyota cars, here I copied it from a parallel forum
Throttle learning on Toyota Runx vehicles
This procedure must be performed after each throttle disengagement.Necessary conditions before starting the procedure. 1. The engine is warmed up to operating temperature. 2. All electronic devices (stove, lights, radio, etc.) are turned off. 3. The car is parked on a level area. 4. The gearshift lever is set to the “neutral” position
Description of the training procedure.
1. Disconnect the battery terminal for 5 minutes. 2. Reconnect the battery terminal. 3. Turn on the ignition (the indicators on the dashboard should light up), but do not start the car. 4. Wait approximately 30 seconds. 5. Without turning off the ignition, remove the battery terminal for 5 minutes. 6. Connect the battery terminal and start the car. 7. Without changing anything, wait about 15 minutes. Step by step the speed will drop to normal.
-
- 105 messages
-
- 105 messages
where did you get the star key?
You take pliers and unscrew, I did that!
I unscrewed it, and there was nothing to clean, I just lost time.
-
There is something to clean there. In the photo, on the right - KXX, tighten the two bolts that remain. then turn the rotor in different directions and you will see what happens
-
- 250 messages
I completely disassembled the idle air valve, it was stuck, although everything was clean. Now everything works amazingly.
-
- 250 messages
Before unscrewing the two bolts on the KXX, I set the marks with an awl so as not to change the factory settings of the KXX (maybe in vain).
-
- 105 messages
There is something to clean there. In the photo, on the right - KXX, tighten the two bolts that remain. then turn the rotor in different directions and you will see what happens
unscrewed 2 bolts, looked (but didn’t take a photo) it was clean and screwed it back
-
- 105 messages
Yes, it needs to be removed and cleaned. The valve is located at the bottom, and when flushing the throttle body itself, most of this junk ended up there.
Your valve should rotate 360 degrees (in my opinion this is the type of valve). During normal operation, when the car is started cold, it should operate at 1400-1600 rpm.
When it’s hot, when starting, turn it up to 1200-1400 and lower it to 650-750 .
-
And what did I write wrong?
-
After all, I’m telling you, you need to twist it, it might jam. wash everything inside.
-
- 105 messages
And what did I write wrong?
Everything is correct, I just supported your words with documents (by cutting out a photo from a book)
-
- 105 messages
You need to twist it, it might get stuck. wash everything inside.
+1
-
- 14 messages
In short, I removed the XX sensor, washed it thoroughly and put it back, but it still keeps the rpm at 900 when cold. Maybe there is some kind of problem in the damper?
-
Maybe. 50/50. If the damper is faulty, replace it as a whole, with all the sensors. IMPORTANT: when starting, does the speed rise above idle by about 300?
-
- 14 messages
when starting it jumps up to 1800 then immediately drops to 900
Source: http://AllexRunxClub.ru/forums/topic/946
Cleaning the throttle body of Toyota Corolla
Do you have a Toyota car and you simply love, sitting behind the steering wheel, “cutting” along the avenues of your city to the envy of ordinary pedestrians? Do you love the sound of air when the Corolla “flies” along the road, carrying the driver into the distance? Are you delighted by the measured rustling of tires, the rustling of which gives rise to an indescribable feeling of “drive” in your soul?
Of course, all this is just wonderful, because driving a car like a Toyota gives a person a special status as a motorist. Unfortunately, if you do not take care of the details of your car, in particular the throttle valve, then the car, no matter how you look at it, will not be able to please its owner, because it will not be “on the move”.
Symptoms due to a dirty throttle body
So, why does your Toyota and its throttle body need to be handled with care, respect and care? First, let’s explain: the damper is an element that is located at the flow section of the Toyota valve and is responsible for the correct “passage” of gas or liquid. As you understand, liquid or gaseous media have small inclusions, for this reason Toyota, like any other car, needs to permanently clean the damper.
The Toyota Corolla will run great if you clean the damper, and how to do this correctly will be discussed and shown below.
So, what happens if the throttle valve is not cleaned? The fact is that if you “start” this important part of the car, its engine speed will begin to “walk” as if “floating”, and Toyota may begin to consume an enormous amount of fuel.
You don’t want your Corolla to be “gluttonous”, and even go to extremes in terms of speed? You don’t want to have a low-power car because of an uncleaned damper? In order to avoid such troubles, cleaning the throttle element is necessary.
What tools might you need to clean the damper? There are a few of them: carburetor cleaner, a brush and rags. You can easily purchase all this at any specialized automotive retail outlet.
Throttle body cleaning process
When you are armed with all the necessary elements for cleaning the Toyota Corolla throttle body, you can safely “drive” it into your garage, lift the hood and, as the first stage of such a cleaning procedure, remove the battery terminals and dismantle the plastic casing.
When the cover is removed, you need to proceed as follows:
- Loosen the clamps and remove the air duct (by moving it), and also unscrew the bolts holding the throttle cable, bend the fasteners.
- Actually, after this procedure you will be able to see the throttle valve itself. Next, remove the crankcase ventilation hose, as well as all connectors.
- Remove all fasteners and very carefully “remove” the throttle; we will make a reservation that this will require you to remove the hoses from the cooling system. Be prepared that this manipulation will cause your Toyota's antifreeze to leak.
- When you dismantle the throttle, “remove” the special sensor attached to 3 bolts: You will need to moisten them with the liquid described above and unscrew the “cross” with a screwdriver.
- After removing the bolts, you will be able to see soot and deposits that need to be cleaned. This is where you will need all the tools we mentioned: a brush, rags and brushes. Clean until all parts shine and have a “metallic” shine.
Both the throttle and the place where it “sits” must be cleaned: to do this, they should be filled with a special carburetor fluid. Let the damper soak in the product for some time, after which you can start cleaning.
Well, when cleaning the Toyota Corolla damper comes to an end, just return everything to normal, making sure that all the fasteners are securely “screwed” into their grooves. Add the antifreeze that leaked out during the dismantling procedure and you can consider that cleaning the throttle and valve has come to an end.
You must learn one truth for yourself: it is the damper, as an important part of the Toyota Corolla, that will give your car strength. If you regularly clean this mechanism, the machine will become extremely economical and will easily obey any of your commands.
As you can understand, the procedure for cleaning the throttle is not that complicated. And you won’t need any “special” and expensive tools for this. It is noteworthy that you can carry out the cleaning “on your own” and not spend extra money on car service services.
How to clean the throttle body on a Toyota Corolla Link to main publication
Source: http://CorollaCar.ru/remont/dvigatel/drosselnaya-zaslonka-tojota-korolla.html
How to Clean the Throttle Body on a Toyota Corolla
Corolla throttle adaptation
The throttle valve is the main element of the engine power system. It regulates the amount of air supplied to the cylinders, which, in turn, affects the idle speed and the number of revolutions.
From time to time, the operating mode of a given part changes, so it needs to be adapted. Moreover, it is necessary to clean the damper first, otherwise all efforts may be useless.
Unfortunately, not every motorist knows how these procedures are carried out, although in fact they are not anything complicated.
Removing the throttle
Before cleaning and training, the throttle . This is quite easy to do on a Toyota Corolla E120 and E150. Since 2002, the manufacturer began installing 1.6-liter power units on all cars in the series, so the dismantling process is the same for them.
The order for the Corolla Fielder is somewhat different, since the station wagon appeared in 2000 as a kind of offshoot from the main series. Nevertheless, the difference is insignificant, and it lies only in the principle of operation of the throttle, which is mechanical, so there is no need to look for an electronic sensor.
On later models, starting with the 2008 Corolla, the systems were unified and all powerplants now feature electronic throttle.
Under the hood, the engine is located openly, so finding the necessary elements is not difficult. Those drivers who are getting acquainted with the engine for the first time and do not know what this or that component looks like can see many photos on the Internet that show in detail all the external features of this or that part.
The first step is to remove the air filter pipe, which is located on the left side of the power unit and on the right of the gas distribution mechanism. To disconnect the throttle itself, just unscrew the four bolts that secure the part to the timing belt.
Now you can start cleaning the throttle body of the Toyota Corolla 150, which will be the same for the 120 models.
Quick cleaning of the throttle body on Toyota - Corolla
This video shows how to clean the throttle valve on a Corolla without removing it using liquid.
How to clean the throttle valve yourself
It is mandatory to join the VK group - .
Cleaning the throttle valve
First of all, to clean the part you need to buy washing liquid for the carburetor. It costs about 200–300 rubles per can, so you don’t need to worry about the cost of the issue. In addition, you will need a dry cloth that should not leave any lint. So how do you clean your throttle body? Everything is very simple.
You need to spray the purchased liquid onto the part and gently wipe it with a rag. It is worth repeating the procedure several times until the dirt and deposits are completely removed.
Many motorists ask the question: “We clean the intake manifold, but engine performance does not improve. What are we doing wrong? The fact is that this part does not need to be touched at all. Of course, extra flushing will not cause harm, but there is no need to waste time on it. The deposits formed in the collector are insignificant, so they do not interfere in any way.
How often should you clean your throttle body? It is impossible to answer this question with an exact number, since it is recommended to carry out this procedure every time the engine oil is changed. Some people do this twice a year, and others once every two years. After how long the lubricant is changed, the same time it needs to be changed.
Throttle valve adaptation
Problems with the air supply in the power system occur as a result of a malfunction of the throttle . This can be corrected by adapting this electronic mechanism.
After the driver has successfully cleaned the part, you need to reassemble the entire mechanism in the reverse order, and then proceed to the main procedure.
Training should only take place if a number of preconditions are met. First, the power unit needs to be warmed up to operating temperature. Then you should turn off all electronics (headlights, DRLs, audio system, etc.). The car must be on a flat surface, since adaptation will require moving the gear lever to neutral.
After the car has been prepared, training should begin. First, you need to disconnect the battery terminal for 5 minutes. After waiting 5 minutes, you need to return it to its place. Next, the ignition is turned, but the engine itself does not need to be started. After all the indicators on the dashboard light up, you need to wait 30 seconds.
Leaving the ignition in place, you should again disconnect the terminal from the battery for the same time, then return it to its place, start the engine and wait 15 minutes.
As a result, the idle speed will be adjusted and the air supply will be normalized.
Conclusion
Cleaning and adapting the throttle valve are necessary conditions for stable and efficient operation of the Toyota Corolla E120 and E150. This procedure must be carried out in a timely manner, since otherwise the performance of the vehicle will begin to decline, and additional problems and malfunctions will appear.
Source: http://sis26.ru/kak-pochistit-drosselnuju-zaslonku-na-tojota/
Toyota corolla 2005 throttle cleaning
- RSS subscription
- Share Vkontakte
- Share on Facebook
- Tweet
The story of the owner of Toyota Corolla () - self-repair. In a previous entry I wrote about cleaning the injectors; I cleaned the throttle block along with them, but I decided to separate the entries; not everyone needs to clean both.
After cleaning the XX, it is necessary to clean the throttle itself, as well as its seat. Toyota Corolla fan site.
About the logo. The Toyota logo is a triple oval. Two internal ovals located perpendicularly symbolize the strong relationship between the client and the company. In addition, if you look closely and use your imagination a little, in these ovals you can see an image of all six letters of the brand name T, O, Y, O, T, A.
Share the site page on a social network! Toyota Corolla manual. Throttle learning. Topic in the “Engine” section, created by Messir, May 18.
Starting the Toyota Corolla engine 1. Who knows, of course I have the wrong body, but the other one, no shamanism is needed. Front right CV joint drive... There you will need to additionally disconnect the throttle cable, the idle speed sensor and also clean it, and it seems that training is not required, that’s all the differences. We also remove and clean the mesh inside, and replace it if necessary.
Instructions - Toyota Corolla. Throttle learning. | Forums http://OUTLANDER-RUSSIA.RU
Cleaning the throttle 1ZZ-FE Photo report: I think someone will find the report on cleaning the throttle useful..
I decided to clean it because the car behaved strangely at warm-up speeds: I bought carburetor cleaner and WD in advance, I also need a bunch of rags and a toothbrush; a small brush would be very useful, but I didn’t find it. The rest - head keys, etc., are always in the car. Let’s get started, procedure for completely flushing the throttle valve and XX valve.
We unscrew the bolts and remove the frame. All that remains is to remove the two hoses of the cooling system. The clamps should be removed using pliers, but it’s not very convenient to climb under there. Having tried a bunch of tools, I removed it with a screwdriver, the main thing is not to damage it, a little antifreeze will spill out. But so as not to suffer, we screw into them two bolts that we removed from the throttle. Before unscrewing it, you NEED TO MAKE MARKS!!!
To put it in the same position during assembly... Well, then we will need the same cleaner and a WD brush with long bristles and cotton swabs.
Inside there is a rod that should rotate freely, on which there is a damper SO IT DIDN’T SPIN AS IT IS SUPPOSED..
Next, we clean everything inside without sparing the Slim cleaner View profile Send a private message to Slim Find more messages from Slim.
Although there were no problems with the XX, I decided to clean the block, since the machine is already 5 years old and the mileage is about a thousand. Everything was filmed down to elementary simplicity. True, the remote control control unit turned out to be electronic, without cables.
The body of the block is on rivets, I did not disassemble it by cutting off the rivets, since there was only a coating of “dirt” without visible coked deposits, the valve “moved” easily.
The sensors for the quantity and temperature of the intake air, well, as they call it, turned out to be almost pristinely clean.
I washed everything that was accessible with ABRO carb cleaner. I haven’t noticed any deterioration. Here’s one: Bismark86 View profile Send a private message to Bismark86 Find more posts by Bismark Cleaning the throttle 1ZZ-FE And here I finally cleaned the throttle body today. I bought the car about a month ago. Thanks to tweezers, I unscrewed the bolts that were not unscrewed with a screwdriver..
Iceteen View profile Send a private message to Iceteen Find more posts by Iceteen. Don’t forget to remove the minus terminal and thus reset the computer’s brain.
Throttle learning on Toyota cars. Yesterday I also cleaned the throttle, mine is electric, so I only cleaned the valve itself, I didn’t notice any improvement. Is this how it should be? Does it close when the engine starts? It’s just that my engine has never started from a “half turn”, only after a second, even when it’s hot.
And in severe frosts, usually the second time. Mine is also slightly open. True, I don’t know if it closes after training, I didn’t look. Topic Options Printable Version Send by Email.
The administration is not responsible for the content. HOME FORUM FAQ PHOTO RULES. Page 1 of 7. Somewhere in the Tyumen region Messages: E 4ZZ manual transmission Reputation: Cleaning the throttle 1ZZ-FE I think someone will need a report on cleaning the throttle.. Send a private message to Slim.
Cleaning the throttle body of Toyota Corolla 150
Source: http://outlander-russia.ru/racing22/toyota-corolla-2005-chistka-drosselya.php