How to change the generator belt tensioner roller, removing, replacing and installing the tensioner roller with your own hands at home
Any friction pairs in a car require periodic replacement, therefore they are considered consumable (non-repairable) parts. The battery only starts the internal combustion engine, after which the generator begins to generate electricity for the on-board system and recharging the battery.
Rice.
1 Replacing the generator belt tension system roller
Therefore, the level of battery recharging depends on the quality of the belt tensioner, which transmits speed to the generator shaft, that is, whether the car will start after stopping the engine next time. The main “consumable” – the generator belt tensioner roller – can be replaced by the car owner on his own if he knows where it is located and what parts need to be removed before doing so.
Purpose of the roller in the generator belt tensioner assembly
Initially, the problem of tensioning the alternator belt in a car was solved by two mounting holes in the body of the electrical device itself. With the advent of air conditioners and other additional devices, it became no longer profitable to put several pulleys on an internal combustion engine shaft to provide individual V-belt transmission to each of them.
Currently, a common V-belt drive is used, and the generator belt tensioner roller as a whole is responsible for the absence of sagging, as in the lower figure.
A single V-belt transmission from the internal combustion engine shaft to several pulleys of auxiliary devices.
Rice.
2 Single V-belt transmission from the internal combustion engine shaft to several pulleys of auxiliary devices
Tensioner pulley design
Thus, on most modern cars the roller is of the following design:
- ball bearing inside
- plastic cover with a working surface for the belt on top
- landing sleeve inside the roller
Rice. 3 Tensioner pulley design
There are eccentric rollers, the adjustment of which is carried out by shifting the axis relative to the mounting bolt, and conventional ones. In the second option, the roller is mounted motionlessly on the tensioner bracket, and for adjustments the bracket itself is shifted relative to the internal combustion engine shaft.
Rice.
4 Eccentric tensioner pulley
Some cars use self-adjusting spring brackets, in which the number of turns and the diameter of the spring wire are designed for a specific force at the factory.
Rice.
5 Self-adjusting spring tensioner using the example of a Mercedes Sprinter
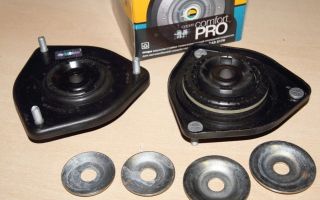
Since there is a bearing inside the structure, the roller is replaced when any of these parts (bearing race or plastic lining) wears out. In addition, when replacing a belt, it is also recommended to install a new roller/bearing set on the tensioner.
An example of the layout of two generators with one tensioner pulley for high-quality car audio
Rice.
6 An example of the layout of two generators with one tensioner pulley for high-quality car audio
To ensure its recharging, the best option is to duplicate the generator, for which a second pulley is mounted on the crankshaft of the internal combustion engine. In this case, you have to service two rollers and a belt of the tension system.
Replacing the roller yourself
In contrast to a V-belt timing drive, replacing a car's alternator belt roller is much simpler. Therefore, if you follow the recommendations below, the car owner will be able to perform the operations on his own, after first making sure that the cause of the malfunction really lies in the wear of this consumable.
Diagnostics
Malfunctions of the tensioner installed on the generator belt drive are diagnosed in 90% of cases by a characteristic sound resembling a whistle. However, the tension may weaken, not only from the wear-out of the roller, but also for other reasons:
- misalignment - in the absence of alignment of the shafts and pulleys of the belt drive, accordingly, the sound arises due to poor contact of the belt in the cross section, one edge wears out intensively, the other remains intact
- ingress of lubricant - in the absence of tightness, oil can get onto the belt, sharply reducing friction, leading to slipping and destruction of the rubber, it is recommended to remove the consumable part, wipe it or replace it entirely, eliminating the cause of the oil leak
- hard belt - usually whistles when starting, then heats up, the sound disappears, this is caused by an increase in loads on the pulleys
- bearing wear - the whistle is slightly different in tone, the cause is the wear of the race, the bearing is removed for replacement
- belt sagging - no need to change anything, tensioner needs to be adjusted
- lack of battery recharging - determined by the instruments on the panel
In other cases, the whistling can be eliminated by removing the roller and replacing it with a new consumable. The shine on the working surface of the belt indicates its frequent slipping, the cord peels off from the oil, but cracks on it under normal belt tension are much more difficult to notice.
Dismantling
Before changing the alternator belt tensioner roller, it is necessary to loosen the V-belt drive:
- the tension roller adjusting bolt is loosened until the belt can be removed
- together with it, 2–3 nuts of the tension bar are loosened (usually 10 and 13)
Installing a new roller
When changing a worn-out generator belt tension roller on your own, you need to take into account the following nuances:
- power is taken from the output shaft of the internal combustion engine to several auxiliary devices of the machine
- on most cars, the V-belt drive is common to all specified consumers
- therefore, the tension force, the maximum permissible belt deflection and the location for measuring this deflection are not the same for machines from different manufacturers and even modifications in their range
Therefore, you should first study the user manual, clarifying these three parameters.
Install the roller in the reverse order of the above instructions:
- the bearing is put on the seat
- the roller is fixed with a bolt
- the rod adjusts the maximum deflection at a certain compression force of the belt in a specific location of the V-belt drive
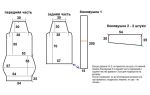
For example, in a Chevy/Niva, the deflection is measured between the generator and pump pulleys; its value must be adjusted to 12 mm with a force of 10 kg. For ZAZ SENS this value is reduced to 8 mm with a force of 7.8 kg. To measure you should use the following diagram:
- the metal ruler is positioned in the desired area
- a steelyard hook clings to its upper edge
- The steelyard is used to adjust the force specified in the instructions for the car.
- The ruler scale allows you to measure vertical movement relative to any part under the hood of the car
Instead of a ruler, you can use, for example, a wooden bead with a tape measure attached to it.
Rice.
8 Measuring the deflection of the generator belt using a steelyard and tape measure
Thus, following the recommendations given, you can diagnose and replace the roller with the bearing of the generator belt tension system yourself. The deflection parameters and the force of pressure on the belt during adjustment should be taken from the operating instructions for the specific car.
Source: https://SwapMotor.ru/tehnicheskoe-obsluzhivanie/kak-pomenyat-rolik-natyazhitelya-remnya-generatora.html
Alternator belt tensioner roller and its replacement
The generator is one of the most important elements of the vehicle's electrical supply system, as it generates electric current to power on-board electrical appliances. It is driven from the crankshaft of the power plant, which ensures constant operation of the generator while the power plant is operating. A belt is used to drive this element.
The main condition for the normal functioning of the generator is the complete transmission of rotation from the motor. In order for this element to generate the required amount of electricity, it must rotate at high speed.
Design features of the generator drive
To ensure proper transmission, the alternator drive belt must be tensioned. If it sag, the belt will slip on the pulleys, and if it is overtightened, this will increase the wear rate of the bearings, generator, working surfaces of the pulley and the belt itself.
Therefore, the belt tension adjustment is designed. Previously, on cars, only one generator was driven from the crankshaft pulley, so the tension was adjusted by the generator itself.
These cars had two mounting points for the generator. This element could rotate relative to one of them, and the second point was an adjustment point.
To tighten the belt, it was enough to loosen the nut of the adjusting mounting point and pull the generator away from the engine, and then tighten the nut.
This ability to adjust the tension is possible due to the fact that the crankshaft is driven only by the generator and the shape of the belt position is not complex in configuration; it is located only between two pulleys.
One of the generator drive circuits
On more modern cars, a number of additional attachments have been added, which are also driven by the crankshaft pulley. Such equipment includes the power steering pump and air conditioning compressor.
And since the drive of these two units, as well as the generator, is carried out by one belt, it will not be possible to adjust the tension of the drive element using the generator.
The configuration of the belt position on such cars is very complex, since the belt runs along four pulleys, while the equipment that it drives is located at different levels in relation to each other.
Video: Tensioner for Lada Granta generator belt
Therefore, in such cars, a special tension roller is used to tension the drive belt. In this type of drive, the generator is no longer movable, and adjustment is performed by moving this roller.
Such a roller is an ordinary bearing, on the outer race of which there is a plastic lining, its surface is a working one - the belt moves along it. There is a landing sleeve inside the roller.
There are two types of rollers by design and they differ in the method of fastening and tension adjustment.
- One of the types is eccentric. This is a very simple design, in which there is nothing except a bearing, a plastic lining and a bushing. The bushing has a through hole, which is offset to the side relative to the center of the roller. Through the hole, the roller is put on a special pin mounted on the engine. To tighten it, just rotate the roller relative to the bolt.
- The second type of roller involves a bracket in the design. This design is somewhat more complicated, but at the same time it is the same in reliability as the eccentric version. The roller is fixedly fixed on this bracket. Fastening to the power plant of this design is carried out using bolts. Tension adjustment is carried out by moving the bracket relative to the engine.
Securing the generator roller using a bracket
Some automakers use a roller with a spring bracket. Such an element is self-regulating, that is, the spring independently regulates the tension.
But often the rollers break before they are replaced.
There are several signs of problems in the operation of this element:
- the generator does not fully charge, or no electricity is supplied to the on-board network at all;
- squeak from the side of the belt;
- increased hum;
- strong vibration of the roller or belt when the power plant is running;
- play in the roller;
- belt wear on one side;
It is worth noting that some symptoms are also inherent in malfunctions with the elements that the roller operates. For example, a hum or squeak can also be the cause of wear on the bearings of the power steering pump, air conditioning compressor and the same generator.
Video: Repairing the generator belt tensioner pulley
Therefore, if any of the symptoms appear, you should also diagnose the condition of all specified elements in order to identify which element is faulty. It is done quite simply:
- First, a visual inspection of the belt and the equipment that it powers is carried out. To do this, it is enough to start the power plant and see if there is vibration in the belt and pulleys and roller;
- Then the tension of the generator belt is checked. With the engine stopped, at the largest span between the pulleys, you need to take the belt and try to turn it clockwise. If, when twisting, you can turn it 90 degrees, then it is tensioned normally. If the rotation angle is greater or less, adjustment is required;
- The next stage is removing the belt, assessing its condition, and checking for play on the pulleys and roller. Removing the belt is very simple - loosen the tension roller nut to relieve the belt tension. Afterwards it is removed from the pulleys. But before that, you need to remember the position of the belt between the pulleys so that it is positioned correctly when installing. There should be no cracks or peeling on the belt, and it should wear evenly. If at least one of these defects is noticed, the belt must be replaced. Particular attention should be paid to one-sided wear. If it is present, it means that the bracket or the roller mounting stud is bent, which is why there is a misalignment. If it is not eliminated, the new belt will not last long.
- Then the play on the pulleys is checked. You should also rotate the roller and make sure there are no jams or wedging of the roller. If there are any, this indicates severe wear of the bearing and the need to replace the roller. It is also worth inspecting the working surface of the plastic lining; it should be smooth without any grooves. Otherwise, the video changes.
- If after changing the belt and roller the hum and squeaking noise remains, the problem lies in one of the elements driven by the belt.
Replacing the alternator belt roller using the example of a Chevrolet Lacetti
For clarity, let’s look at how to replace a belt and roller on a Chevrolet Lacetti. This car has a self-adjusting tension roller with a bracket.
Video: chevrolet lacetti (replacing the accessory belt)
To change the belt and tension element, you will need a set of open-end wrenches and sockets with cranks. The sequence of work is as follows:
- We remove the air filter housing from the engine to provide access to the belt;
- To get to the roller, you need to unscrew the power steering pump. And in order to get to the bolts securing it from the engine, we dismantle the protective screen of the exhaust manifold;
- After removing the screen, unscrew the bolts of the power steering pump and move it to the side to provide access to the roller. After unscrewing, you can remove the belt from its pulley. In this case, the pipes going to the pump do not need to be removed;
- Before unscrewing the roller, it must be moved to the mounting position. To do this, we move the roller. Overcoming the spring force until the locking holes on the bracket body are aligned. Then we lock the roller in this position using a bolt or cotter pin, which is installed in the hole;
- We unscrew the bolts securing the roller bracket and it is removed. The new element must also be moved to the mounting position, then installed on the car and secured with bolts;
- We install and secure the power steering pump and protective screen. After this, we put the belt on the pulleys, ensuring that its position is correct;
- We remove the locking bolt or cotter pin so that the spring tensions the belt;
But still, the work of replacing the tension roller of attachments is not complicated, and even a novice car owner can do it.
Source: http://AvtoMotoProf.ru/svoimi-rukami/rolik-natyazhitelya-remnya-generatora-i-ego-zamena/
Replacing the alternator belt tensioner roller - automobile portal of Ufa and the Republic of Belarus
Even minor breakdowns in a car can not only ruin your mood, but also cause a so-called chain reaction, when the failure of a secondary component of the car will lead to more significant breakdowns and unplanned expenses. For example, a small unit - a generator belt tensioner, it would seem, what is significant in it? Let's look at how it works, what types of inspection exist and possible repair options.
Design principles
Operation of the generator and the units dependent on it: battery, electronic devices is possible only if the belt tension is normal.
Each manufacturer tries to improve the components and design of the models they produce, but the principle of operation and their possible configuration are always the same. The standard components of this unit consist of the following parts:
- a bracket attached to the engine block with several bolts;
- tension roller with internal bearing;
- roller fixing bolt.
There are a couple of simple modifications to this device:
- a tension roller with an offset center, by rotating the eccentric, we achieve the required tension, which is secured with a bolt;
- the roller is mounted on a movable bracket; in this version, the belt is tensioned using a corresponding bolt.
In any of these versions, the main element on which the main load is directed is the roller bearing.
Symptoms of tensioner failure
Signs indicating malfunction or wear of the relevant parts:
- no battery charge indicator;
- a whistle or squeak in the area of the working area of the generator belt, appears when it slips in cases where the tension roller is jammed;
- a hum that sounds when a bearing wears out or fails;
- vibration of the belt or roller when the engine is running indicates wear of the bushing, replacement of which is inevitable;
- the amount of belt deflection exceeds one and a half centimeters, which indicates the need for appropriate adjustment;
- free play in the tension pulley or roller indicates that the bearing is worn out;
- one side of the belt is more stretched and worn, a sign of a bend in the tensioner bracket.
Inspection and assessment of probable faults
Before changing the necessary part, for preventive purposes or making a full repair, it is worth first inspecting and also finding out the probable cause that caused the malfunction:
- assess the conditions under which the entire generator charging chain operated;
- find out the original source of the malfunction: bearing, belt or other components whose malfunction affected the repair;
- check the probable degree of wear of all working parts;
- pay attention to the marks from the belt on the guide and tension rollers; if there are any, it means that the belt displacement was caused by a broken bearing;
- identify probable causes that led to contamination of work surfaces that need to be replaced.
Since even replacing the alternator belt or tensioner pulley will not always bring the desired result, the reason for the failure may lie in something else.
For example, if a removed belt has traces of antifreeze or oil, it is necessary to find the source from which these fluids get onto the belt and carry out the required repairs accordingly.
Replacing the tensioner and tension roller
If during the inspection it is possible to establish the cause of the symptoms described above, you should proceed directly to the repair and replacement of worn-out mechanisms.
The first immutable rule is that during a planned replacement, it is necessary to diagnose the bearing; in normal condition, the tensioner roller rotates quietly, easily, without play or jerking. If it is clear that the life of the roller is exhausted, it is necessary to change this unit.
Actions necessary to independently replace the alternator belt or tensioner, which do not require special devices and tools:
- de-energize the car body by disconnecting the terminals from the battery;
- secure the crankshaft against possible rotation using the necessary devices or a simple pry bar;
- Having unscrewed the bolt responsible for the tension force, loosen the generator belt;
- remove the belt and tensioner pulley, if a bracket is provided, unscrew the bolts securing this mechanism;
- replace failed components and install new components in the reverse order.
The tension force of the newly installed belt after repair should be given special attention. If it turns out to be overtightened, then the load on the bearing will contribute to its rapid wear. The required tension can be checked using a suitable device or manually. In the case of manual testing, the belt should turn ninety degrees without force, with lateral influence.
On some brands of cars, instead of several belts that facilitate operation (hydraulic booster, air conditioning, generator, etc.), there is one installed, the load on which is regulated by an automatic tensioner.
In this case, not only the degree of charging of the generator, but also the operation of the cooling system and the condition of the power steering depend on the condition of the belt and its tension. In this automatic tensioner, the main element is a spring that maintains a certain degree of tension.
When the time comes to change the belt, you should replace the entire automatic tensioner, regardless of the condition of the bearing, since this unit cannot be repaired.
Source: http://v-transport.ru/natjazhitel-remnja-generatora-zamena-rolika-natjazhitelja-remnja-generatora/
Alternator belt tensioner Lada Kalina
The generator is used to generate electricity, which powers the entire on-board network in a moving car, including the Lada Kalina. This implies the need for uninterrupted operation of this node. The battery is also recharged through the generator set. The Lada Kalina generator is driven by a belt that requires proper tension.
Operation implies the presence of situations in which the generator belt tensioner ceases to correspond to the required optimal value. This inevitably provokes interruptions in power generation.
In the modern domestic model Lada Kalina, among the most common causes of malfunctions in this system, there is a malfunction of such a part as the generator belt tensioner (roller).
It is this important element of the practical Lada Kalina that will be discussed further.
How does the tensioner work and what is the principle of its operation?
Only at a certain level of tension in the belt drive does optimal operation of the generator occur, which allows the supply voltage to be supplied to the on-board network with maximum efficiency, otherwise tension is required.
The generator belt tensioner we are considering is used for these purposes. Structurally, this is an ordinary bearing, the upper part of which is protected with a plastic coating. The belt moves along the working surface of this roller.
The internal race of the tensioner is presented in the form of a conventional landing sleeve. Its tension must be certain.
Types of rollers according to design principle:
- Eccentric type. This option is the simplest product, whose design is very ordinary and endowed with enviable reliability. The part includes a bearing, bushing and protective pad.
- Bracket view. Here the adjustment process is carried out by moving the tensioner bracket present on the motor. The tensioner bracket is not difficult to find.
Signs of breakdown and vulnerable spots
In any tension roller design, the weakest point is the bearing. The part is subject to loads of a constant nature, in addition to which temperature differences contribute. Under such conditions, element failure can occur quite often.
Let's take a closer look at the list of main signs, due to the presence of which the roller can be considered faulty:
- The battery no longer receives a full charge;
- the car's energy-intensive current collectors began to show disturbances in their functioning;
- a characteristic hum coming from the area where the generator unit is located;
- presence of play during roller operation;
- The working surface of the generator set drive belt shows signs of uneven wear.
Fault diagnosis methods
When checking the correct operation of the tension device in the Lada Kalina, it is recommended to follow the following algorithm of actions:
- First, we carry out visual observation of the belt and the roller itself. To do this, you need to open the hood and start the LADA Kalina engine. When inspecting rotating components, we evaluate them for the presence of vibration.
- We control the tension force of the belt drive. To do this, stop the engine. We take hold of the belt branch with our hand and try to rotate it 90 degrees relative to the longitudinal axis. Rotate clockwise. If this manipulation is successful, then the tension is correct. When the angle obtained as a result of turning the branch is different from the indicated optimal value, further adjustment is required.
- Now you need to check the tensioner itself. To do this, you need to remove the belt. Before direct dismantling, remember the original location of the consumable element. Loosen the adjusting nut on the roller, after which the belt can be easily removed. We scroll through the video and observe the absence of jamming and noise. We inspect the protective cover and check for the presence of play. We pay special attention to the working surface, which comes into direct contact with the belt. It should be smooth, and the presence of deep ditches or other damage is unacceptable. If any of the indicated signs occur, then such a tensioner must be unconditionally replaced.
How to replace the Kalina generator roller?
Here we need the following tools:
- a screwdriver with a flat tip;
- keys whose standard sizes are: “8”, “19”, “17” and “13”;
- awl.
Process.
How to tension the alternator belt correctly step by step:
- First, by opening the hood of the LADA Kalina, we loosen the tension of the belt drive.
- Now we use a wrench set to “19”, with which we loosen the tightening torque of the nut. Rotate the rod in a clockwise direction until it comes completely out of the seat.
- Next, use an awl to pry up and remove the plastic protective cap present on the roller. A screwdriver with a thin and flat “tip” may be suitable for this purpose.
- We find a bolt that secures the bearing to the bracket. To do this, we “arm ourselves” with the key to “17”.
- Now carefully remove the roller. It comes with a protective washer and bushing.
Let's sum it up
This completes the dismantling procedure. Now you know how to tension the alternator belt. The steps for reinstallation are also very simple, so there is no particular need to comment on them.
Upon completion of the entire list of installation procedures, we check the tension level for compliance with the specified requirements. We start the engine and observe the operation of the unit.
If no side factors are detected, then the work was completed correctly.
Also in LADA Kalina it is possible to remake the tensioning device, which is confirmed by this video:
Source: https://Vaz-Lada-Granta.com/kalina/motor-i-korobka/natyazhitel-remnya-generatora-2.html
Timing belt tensioner roller - do-it-yourself replacement on Kalina?
For some drivers, a car is not only a means of transportation, but also a source of pleasure. However, a pleasant moment from driving a car can only be obtained under one condition - complete serviceability of all elements.
After all, even minor breakdowns can cause a lot of trouble along the way. The same applies to the alternator belt, changing which we still do not get rid of the problem of its whistling and poor battery charge.
Today you will learn how the generator belt tensioner pulley works and how to replace it on Kalina.
Timing tensioner device and fault diagnosis
A belt tensioner is a mechanism that, without creating friction, exerts an influence on the generator belt, making it tense.
The simplest generator belt tensioner consists of the following elements - a roller bearing, a bracket that engages it with the cylinder block, and a connecting bolt.
The principle of its operation is to put the belt on the roller and change the position of the bracket so that the belt is tensioned.
During the operation of the vehicle, the following malfunctions of the tension roller are noticed: noise and vibration. All this can be caused by wear and tear.
The weakest point of the tension roller is its bearing, which experiences heavy loads caused by its constant tension. In addition, the bracket itself may be damaged.
As the roller moves, the bracket bends and changes the belt tension. As a result, the wear of the latter may be uneven, which will lead to its early failure.
To find out about the condition of the tension roller, you need to remove the alternator belt and try to turn the tensioner. If various noises, vibrations and jamming are observed during rotation, then the generator tension roller needs urgent replacement.
Video - Remaking the Lada Kalina belt tensioner
How to replace the Lada Kalina tensioner pulley?
Once you become aware of a faulty alternator belt tensioner, it must be replaced.
Of course, when it comes to replacing the roller, the entire tensioner is changed, since separate repairs of these parts, although possible, are highly not recommended, since no one guarantees repeated damage to the roller if the bracket is bent. However, we will tell you how it is done.
The procedure for replacing the tensioner is as follows:
- Disconnect the negative terminal of the battery to avoid accidental damage to electrical circuits. The fact is that the space in the engine compartment of this car is small, which means there is a risk of easily shorting the positive wires to ground.
- Loosen the belt tension and remove it. This is necessary so that the belt does not get in your way, and if necessary, this is an excellent opportunity to change it.
- Now you can consider two options for replacing the roller. For convenience, the bracket can be removed and the roller can be replaced on the workbench. But if you do not want to remove the mechanism, then the roller can be changed right under the hood, but in this case convenience is not guaranteed. We will consider the option of removing the bracket. To do this, unscrew the two bolts that secure the adjustment bar at the top of the bracket. After this, unscrew the same mounting bolt at the bottom, then remove the bracket from the cylinder block.
- Place the bracket on a workbench and use a flathead screwdriver to pry off the roller protective cover. Under it there will be a 17mm bolt that needs to be unscrewed. Next, the roller is removed, all the bracket seats are processed and a new roller is installed there. After screwing in the mounting bolt, immediately check its operation. It should rotate easily and without resistance. There should also be no vibrations or noise.
- Install the bracket on the cylinder block and put on the alternator belt. Don't forget to tighten the timing belt.
Now you can start the engine and check. If the noise stops and the battery charges normally, it means that replacing the tension roller on Kalina was successful
Source: http://VipWash.ru/elektrika-avtomobilya/rolik-natyazhitelya-grm-zamena-na-kaline-svoimi-rukami
Detailed instructions on how to properly change the alternator belt
The frequency of replacing the electric generator drive belt is indicated in the vehicle maintenance instructions. It should be remembered that the period on the same machine supplied to different markets may differ. This is due to different climatic conditions and dust levels in the air, which additionally destroy the material of the product.
For example, the Volvo company recommends making an initial replacement after 80 thousand km, and each subsequent change is performed after 60 thousand km. At the same time, on cars from the European market, the belt is changed every 180 thousand km. On VAZ cars, the product rarely lasts more than 30 thousand kilometers.
A typical sign of a stretched belt is a whistling sound that occurs when starting the engine or after driving through a puddle. The source of the sound is the strap material sliding along the surface of the pulley. Usually the whistle quickly disappears and appears again when starting the engine or after another puddle. In this case, the owner needs to check the belt tension and try to bring it to the standard.
Worn belt (right)
What affects wear?
Factors influencing the life of the drive belt:
- Product operating conditions. The ingress of dust, abrasives or chemicals will significantly reduce the life of the strap. Long-term use at low air temperatures has a negative effect on the material.
- Condition of pulleys. The appearance of beating or deformation leads to the destruction of the tracks and edges of the belt.
- Tension. If the tension is too low or too high, the belt will wear out at an accelerated rate.
- Belt release date. Rubber is susceptible to aging, so the strap may break down while in packaging in the warehouse. Violations of storage rules have an additional negative impact.
- Belt manufacturer. There are products made by small companies from low-quality materials. Such straps can break after several thousand kilometers.
Signs of belt wear and product replacement are demonstrated in a video filmed by Vladimir Bazekin.
How to check the belt?
The condition of the belt should be checked not only when a whistle appears, but also periodically. Most car manufacturers recommend visually checking the condition of the strap and tension every 6 months or 25 thousand km. It doesn’t matter whether the car is in use or parked.
Approximate check sequence:
- Open the car hood. The drive belt is located on the crankshaft pulley side. It is necessary to check the condition and tension carefully, keeping your hands away from the cooling system fans. This is due to the fact that the fan can start at any time, even on a cold engine.
- The visual condition is checked by turning the inner part of the belt towards the light. Cracks, abrasion and delamination of the product are unacceptable. If damage appears in a small area, the belt is considered unsuitable for further use. The element is pulled by turning the crankshaft behind the central nut.
- The tension is checked by measuring the deflection under a load of 10 kg. When the distance between the pulley axes is up to 300 mm, the deflection should be 6 mm. When the distance between the axles is within 300-450 mm, a deflection of 12 mm is allowed.
You can check the tension of the generator belt by applying the maximum load, i.e. by turning on all energy consumers except the starter. If the whistle does not occur, then the tension is sufficient.
How to tighten a belt
If there are no cracks or tears on the surface of the belt, then you can try to tighten it.
A similar procedure is relevant for Russian-made cars and foreign cars equipped with a mechanical manual tensioner, which is often the generator itself.
The belt is tensioned until it stops slipping along the pulleys. At the same time, the car owner must remember that excessive tension loads the generator bearings and disables them.
If the tension of the strap does not allow for normal operation, the part must be replaced. It is prohibited to install spacers under the tension rollers, which will allow you to select an excessive belt length.
Instructions for replacing the drive belt
Replacing the alternator drive belt does not cause problems for most car enthusiasts. After removing a worn strap, it is recommended to inspect the wear pattern. If there is damage to the edges and contact part, this may indicate misalignment of the pulleys.
In this case, you need to find the damaged element and replace it. Installing a new belt on a damaged pulley is pointless, since the rubber will quickly wear out on sharp edges.
When replacing a belt, you must follow the sequence of steps recommended by the vehicle manufacturer.
When replacing the alternator drive belt, it may be necessary to install a new tension pulley and associated fasteners. Information on the list of parts to be replaced can be found in the vehicle repair and operating instructions.
What will be needed for replacement?
Before changing the alternator belt, you will need to prepare a set of tools and materials (the maximum list is given):
- wrenches and sockets;
- new belt and tension roller;
- rod for fixing the roller;
- mounting blade for removing the belt;
- knife;
- protective gloves;
- a sheet of paper and a pencil for drawing an installation diagram.
A new non-original drive belt may be several millimeters longer than the standard product. The difference in length will be compensated by a tensioning device.
Scheme
Installing the belt on engines with two or three pulleys is not difficult. The situation changes when the belt is installed on a motor equipped with a large number of pulleys. In this case, it is recommended to draw a diagram of the installation of the product. Such an event will speed up the installation process and avoid errors.
Example of belt routing on a Chevrolet Cobalt
Circuit designations:
- 1 — crankshaft pulley;
- 2 — generator pulley;
- 3 - guide roller;
- 4 — air conditioning compressor clutch;
- 5 — pump pulley and additional drive pulley for the amplifier pump;
- 6 — belt;
- 7 - tension roller.
Algorithm of actions
The procedure differs depending on the engine design and the number of attachments. Below are step-by-step instructions for replacing belts on common vehicles. On other vehicles, the operation uses similar technology.
By car VAZ Granta
You can replace the belt on a VAZ Granta car without a tensioner according to the following algorithm:
- Cut off the old strap using a knife.
- Turn the generator mounting bolt from below 3-4 turns.
- Unscrew the top mounting bolt completely and remove it from the hole.
- Push the generator forward until the mounting ear is inserted into the bracket.
- Secure the mechanism with wire or other means.
- Place the belt on the alternator pulley and the top of the crankshaft pulley. Some car owners use an additional device that holds the strap on the device while putting it on.
- Turn the motor shaft with a wrench to fully install the belt.
- Fix the generator in its original place. Check the operation of the components at full load of the generator and at different crankshaft speeds.
Fixing the generator ear and bracket on the engine Belt tension, the auxiliary device is clearly visible
On Kia Sid
You can change the alternator belt as follows:
- Remove the fixing bolt located on the top of the generator.
- Lift the clamp up, removing the bolt from the guide groove.
- Rotate the device relative to the bottom bolt. If the mount is “stuck”, then the generator is turned by light blows with a hammer applied through a wooden block.
- Remove the worn belt and pressure roller.
- After this, you need to mount a new roller and only then can you put on the belt.
- Tension the strap as recommended in the operating instructions. Check the operation of the unit, if a whistle appears, increase the tension slightly.
The tensioning mechanism is located above the generator. The clamp is raised up. New and old belt and roller. New belt is tensioned.
For Volkswagen Polo Sedan
An example of replacing a belt on a Volkswagen Polo Sedan engine equipped with an automatic tensioner:
- Loosen the belt tension by releasing the tension roller fixing bolt. Nut size 16 mm.
- Turn the roller mounting bracket counterclockwise. Turning takes place with effort as the tension spring is compressed.
- Carefully remove the belt from the crankshaft pulleys and drive units.
- Remove the roller using a 16 mm socket inserted into the recess under the generator. If the tension roller does not change, then it is fixed in the spin position using a metal rod inserted into the hole in the housing.
- Place the belt on the pulleys, then carefully release the tension roller. The tensioner automatically adjusts the tension level of the product.
Loosen the rollerTurn the roller to the extreme positionRemove the beltFix the roller in the extreme position
Video “Maintenance and replacement of the alternator belt”
Maintenance and replacement of the alternator belt are shown in a video tutorial filmed by the avto-blogger channel. ru.
Source: http://AvtoZam.com/elektronika/producer/kak-samostoyatelno-pomenyat-remen-generatora/