Replacing antifreeze on a Toyota Corolla
Antifreeze is one of the essential fluids, without which it would be impossible to operate a Toyota car. Its replacement is necessary every 45 thousand km. If the car owner does not have enough money to contact the service center, then he can do it himself.
How to replace antifreeze in a Toyota Corolla with your own hands?
Replacing antifreeze in a Toyota Corolla is a standard procedure that must be performed periodically for high-quality operation of the vehicle.
The main signs that a Toyota Corolla needs to replace antifreeze are:
- a jelly-like mass appears on the top of the expansion tank;
- at the time of frost, the liquid turns into a mushy state and sediment appears;
- the fan responsible for the cooling system operates more often than usual;
- The coolant is noticeably contaminated with foreign substances.
Antifreeze is replaced in Toyota Corolla 150 and 120, following the following instructions:
- The car owner waits until the car engine cools down completely.
- A container is installed under the radiator or engine to drain old antifreeze.
- The expansion tank cap is removed and the stove tap is opened to the maximum level.
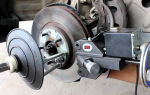
- The next step is to unscrew the drain plug on the cylinder block and radiator.
- The old coolant is drained.
- The plugs are twisted and tightened back.
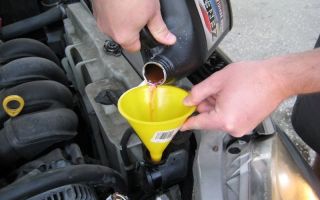
- New antifreeze is poured in, reaching the maximum level.
- The radiator outlet and inlet pipes must be compressed several times. If after this procedure the level of the new fluid drops, then it is necessary to add antifreeze to the required level.
- The expansion tank is screwed on with a lid.
List of required tools
To independently replace antifreeze on a Toyota Corolla, the car owner will need the following tools:
- new coolant;
- container for draining old fluid;
- funnel for filling;
- screwdriver.
The process of draining used liquid
Before adding new antifreeze, the car owner is recommended to drain the old one.
Instructions:
- Unscrew the expansion tank cap and the filler cap located on the radiator.
- A hose with a diameter of at least 8 mm is placed on the drain fitting located at the bottom of the radiator.
- The fitting is unscrewed and the drain plug, which is located near the oil filter, is unscrewed.
- Place a container and drain the old coolant.
Filling with new antifreeze
If a car owner switches to a new type of antifreeze, it is recommended to flush the tank that contained the old type.
To flush, the car owner needs the following parts:
- container for draining old fluid;
- funnel for filling;
- distilled water. To flush one tank, about 6-8 liters are needed.
After the old antifreeze is drained from the Toyota tank and washed, a new one is poured in.
When replacing old fluid with a new one, several technical recommendations should be followed:
- The vehicle engine must be cooled so that the car owner does not get burned when opening the tank cap.
- If the liquid gets into your eyes or hands, rinse it with cold water.
- Using gloves when squeezing the rubber pipes of the system responsible for the cooling system will protect against burns.
- It is not recommended to mix red and pink antifreeze.
Differences in replacing antifreeze in different Toyota models
According to the recommendations of Toyota car manufacturers, antifreeze must be replaced every 45 thousand km.
The fluid replacement process for Toyota Sprinter, Toyota Ist, Toyota Celica and Toyota Aqua is no different. In this situation, it is important to know which type of coolant solution is suitable for a particular Toyota brand.
The official Toyota vehicle developers recommend pouring only original fluid into the reservoir and not mixing several models at once to avoid engine damage.
The original fluids suitable for filling into Toyota cars include the following models:
- LongLifeCoolant (LLC) red;
- Super Long Life Coolant (S LLC) pink.
Source: https://fix-my-car.ru/texnicheskoe-obsluzhivanie/zamena-antifriza/zamena-antifriza-na-toyota-corolla.html
Replacing antifreeze on a Toyota - detailed instructions
Often, drivers use tap or distilled water instead of coolant.
As you know, at temperatures below zero, water freezes, which can lead to rupture of the cylinder head, pipes or radiator, and at a temperature of 100 degrees, water begins to boil, which leads to the formation of scale, which very quickly clogs all surfaces of the engine and the radiator.
As you can see, water is not the most suitable liquid for cooling, especially since there is a special antifreeze, which is a certain concentration of an aqueous monoethylglycol solution.
When choosing what antifreeze to pour into a Toyota, you must remember that using water cooling can lead to engine rupture, which is a serious failure.
Toyota cars should be operated according to all rules. The statement that antifreeze can be mixed is erroneous and leads to various troubles.
At the same time, questions about coolant are relevant both in summer and winter. It is clear that overheating is dangerous in the summer and you will not be able to drive if steam is pouring out from under the hood (the reason is a clogged radiator). In winter, an incorrectly selected antifreeze will create a problem for you in the form of foggy windows (the reason is a heater leak). Because of this, the pump or the block head may fail. To avoid all these problems, you will need the best antifreeze.
Replacing antifreeze on Toyota - frequency
Antifreeze replacement should be carried out as planned. Indeed, during operation, the initial content of additives in the coolant decreases, which means engine corrosion increases.
Such a liquid begins to foam profusely, and the foam transfers heat less well, which leads to overheating of the engine. The frequency of scheduled replacement of antifreeze is every two years or sixty thousand kilometers during intensive use of the vehicle.
By the way, the scheduled replacement of antifreeze with Renault should be carried out at the same frequency.
Antifreeze can also be replaced ahead of schedule if exhaust gases enter the system. Air may enter the system if discontinuities have formed in the pipelines or the head gasket has failed. Signs of the need for early replacement include:
- formation of a jelly-like mass on the inner surface of the expansion tank,
- formation of sediment in the tank at sub-zero (down to -15 degrees) ambient temperatures,
- frequent operation of the radiator fan,
- performing any repair work that involved draining the coolant.
Procedure for replacing antifreeze
So, let's move on to the question - how to fill antifreeze? First of all, work must be carried out only on a cold engine.
You need to make sure that the coolant does not get on your clothes or painted parts of the body during draining. If this does happen, rinse the affected areas with plenty of water.
It is clear that for such work you will need a certain set of tools and actually antifreeze for Toyota.
The work should be carried out in the following sequence:
- it is necessary to remove the cap from the expansion tank,
- a container is installed under the radiator, and a rubber hose is placed on the drainage tip,
- using a large screwdriver, open the drain plug located under the tip and drain the coolant into the container through the hose,
- the container is then installed under the engine cylinder block drain plug. This plug is located on the right front of the block,
- Using a wrench, the drain plug is opened and the coolant is drained.
After the antifreeze has been drained, you need to remove the drain hose and replace the plugs from the cylinder block and radiator.
In addition to periodically replacing the coolant, it is also important to regularly flush the cooling system - this will get rid of contaminants, including corrosion products, that may be present in the elements of this system. As a rule, replacing the coolant yourself is not difficult.
Source: http://autoremka.ru/dvigatel/zamena-antifriza-na-tojote-podrobnaya-instrukciya.html
Replacing coolant Toyota Corolla 150
Toyota Corolla, 1.8 engine.
Radiator cap and expansion tank.
Unscrew the radiator cap (on a cold engine).
Unscrew the coolant expansion tank cap.
Remove the plastic protection latches.
Lower radiator hose.
Place a container for old antifreeze under the hose.
Pull the clamp down.
Pull the hose off the radiator spout.
Drain the coolant into a container.
Shake off the last drops.
The liquid kept oozing out, so it was decided to replace the clamp with a more convenient one.
Installing a new clamp.
Install the funnel into the radiator.
Start the engine and turn on the heater at full power.
Screw on the tank cap.
Bring to operating temperature.
The engine is almost warm.
Fill the expansion tank with antifreeze.
This photo report will show how to replace the coolant in a 9th generation Toyota Corolla by draining and filling the radiator. It is quite possible to change antifreeze on a Corolla with your own hands.
When to change and what antifreeze to fill
The frequency of replacing the coolant is 40,000 km, while every 10,000 km or once a year it is recommended to check the level and top up if necessary.
However, the recommended Toyota Super Long Life Coolant antifreeze can be changed every 80,000 km.
The filling volume of the 1ZZ-FE engine with all-wheel drive (4WD) is 6.5 liters of coolant, with 2WD - 6.3 liters. Concentrated antifreeze is mixed with distilled water 50:50.
How to change coolant
When the engine has cooled down, you need to unscrew the radiator cap and expansion tank. Then remove the latches and remove the plastic engine protection. After this, you can clearly see the thick rubber hose going to the bottom of the radiator on the “passenger” side. Place a container under the place where the hose connects to the radiator.
Next, you need to loosen the clamp on the lower hose, then carefully pull off the hose and drain the liquid into a prepared container. When the antifreeze begins to barely drip from the pipe, you can install it back on the radiator and tighten the clamp.
Now you should install a funnel in the radiator and pour new coolant into the system.
After the antifreeze fills the radiator to the top, start the engine and turn on the heater to maximum and bring it to operating temperature.
The liquid will begin to leak, so it’s worth adding antifreeze to the radiator a little at a time. When the engine warms up and the fluid level stops decreasing, turn off the engine and tighten the cap.
After replacement, it is worth taking a short test drive to check how the cooling system behaves. Coolant tends to evaporate, in addition, the system could grab air during replacement, so for the next couple of months it would be a good idea to check the coolant level in the tank a couple of times.
Source: https://eurasia-avto.ru/zamena-ohlazhdayuschey-zhidkosti-toyota-korolla.html
Replacing antifreeze Toyota Corolla
Replacing antifreeze Toyota Corolla
If you do not know what coolant is needed for, you should carefully understand this matter so that no questions arise when the engine overheats.
It is used to cool the engine and maintain its thermal balance. This balance can be upset for several reasons:
- The outside air temperature is not suitable, that is, in hot weather the engine will most likely overheat and require cooling.
- Intensive engine operation also affects the imbalance, mainly due to the driving style of the motorist, the load on the car interior and trunk, the road surface, pollution and other details.
- In cold weather, with intense heat extraction from the interior heating system, the engine needs to be cooled less than usual.
- When the engine is worn out, it needs more fuel consumption, but at the same time, under the same load, it consumes less than a new engine, and as for heat generation, it increases.
Why do you need to change the coolant?
After some time of using the car, the coolant in it begins to gradually lose its properties, which is why it needs to be replaced. Also, this liquid is called antifreeze due to its property of not freezing in winter.
So, replacing antifreeze on a Corolla will not be difficult and will not take much of your time, so even the most inexperienced driver can carry out this procedure independently.
The main issue remains the quality of the liquid used; the parameters of the antifreeze composition must correspond to the required low temperatures in which the car must always be, even when it is not in use.
If the temperature is not suitable, then this is fraught with certain consequences, for example, if the concentration of coolant is insufficient, it will freeze while the engine is not running, after which all devices will freeze and naturally fail.
Therefore, be careful with your car, especially since replacing antifreeze is not a difficult task.
Cautions when working with antifreeze replacement
- Before removing the radiator tank cap, wait until the car and all its working parts have cooled down, as you may get burned due to the release of hot steam.
- Never use water instead of professional coolant.
- Be careful to turn off the air conditioning system before starting the engine.
- Be sure to set the temperature of your air conditioner to the maximum level “HOT” and set the fan knob to a certain level Lo.
- When squeezing the radiator tube, you must be careful, as they are hot, and also: be sure to wear gloves and do not touch the fan.
Replacing antifreeze
You can find out how to replace antifreeze on a Toyota Corolla by performing the following operations:
- The first step is to drain the old coolant to the last drop. To do this, loosen the radiator valve (drain) plug.
- Now you need to remove the expansion tank cap from the radiator.
- Next, you need to loosen the drain plug on the cylinder block.
- Finally you can move on to adding new liquid.
- To do this, you need to tighten the drain plug at the radiator.
- Using the branded fluid, start pouring it into the radiator neck. The nominal volume is 5.6 liters.
- The next step is to remove the radiator cap and add antifreeze to it strictly up to line “B” in the expansion tank.
- First, squeeze the inlet and outlet pipes a couple of times, and then check the coolant level. If the liquid does not reach the required level, it must be added.
- Now install the valve cover and then warm up the engine.
- Next you need to bleed the air from the cooling system.
- It is necessary to warm up the engine until the thermostat opens. When this happens, you will need to circulate the antifreeze for a couple of minutes.
- After the engine has warmed up, it needs to run for about 7 minutes in the following cycle: 3000 rpm for 5 seconds, while driving - 45 seconds. Repeat 8 times, no less.
- In order to remove air from the system, you need to squeeze the inlet and outlet pipes with your hand a couple of times.
- Now cool the engine and determine the coolant level, it should be between LOW and FULL.
- One of the main details is that you need to check for antifreeze leaks. After the radiator is filled with coolant, attach a device to it to press out the cooling system, as well as to check the radiator plugs.
- Thanks to this device, you can create the required pressure of 108 kPa, and then make sure that the pressure does not drop.
- If the pressure still begins to decrease, it means there is a hose leak somewhere. If not, then just check the heater core, just in case, in addition to it, also the cylinder block and the cylinder head itself.
Read also
Source: http://grandrepairauto.ru/zamena-antifreeza-toyota-corolla.html
Replacing antifreeze or better late than never (photo report)
When was the last time you changed antifreeze? When they asked me this question at the service center, I was honestly surprised, why change it at all? The stove heats up, the engine cools down, why go there if everything works.
I’ve been driving a second-hand Japanese car for the third winter now and have no problems. Of course, after the purchase there was a diagnosis of all systems, including the cooling system. The refractometer in the service showed the freezing point of my antifreeze “-45”. Severe January frosts set in and before a long trip, I still made a follow-up call to the previous owner:
– What kind of antifreeze is in the machine? - Who would know, I never changed it. - And the previous owner?
– No idea, but don’t worry, I skated well last winter!
It turns out that a 10-year-old car has been running on the same antifreeze for at least several years. It is also not known what kind of liquid was poured in, perhaps even original. But after all, each technical fluid has its own service life and it is better to do scheduled maintenance than to break down at the most inopportune moment.
Antifreeze replacement time
Motor oil, dextron and even anti-freeze are well-known technical fluids that need to be constantly changed. Any driver knows about the timing of their replacement, and even if you don’t record the time, you can navigate by the marks on the dipsticks or tanks. Antifreeze is an equally important technical fluid, but not everyone knows how often it needs to be changed.
I called the service station, the master answered the phone:
Quote:
Planned replacement is recommended every 100,000 kilometers or every 18 months, if the refractometer readings are good, then every 3 years.
In addition to the planned ones, there are often cases of early replacement when air gets into the cooling system. Signs that this is necessary may include:
- jelly-like mass on the inner surface of the expansion tank;
- sediment in the tank or a mushy state of antifreeze in light frost (up to -15°C);
- the electric radiator fan of the cooling system operates more often;
- The coolant must be replaced after carrying out any work on the elements of the cooling system and draining the coolant.
The timing of antifreeze replacement is determined not by the antifreeze manufacturer, but by the car manufacturer, based on design features and the results of road tests. On the Internet you can find antifreeze replacement tables for any make of car. While driving a dream, I will talk about the requirements of the Toyota automaker and try to solve the mystery of what was poured into my Toyota at the factory.
So, original Toyota antifreezes come in two types:
- Long Life Coolant – red
- Super Long Life Coolant – pink
“Toyota Super Long Life Coolant.” The advantage of this fluid is the increased replacement interval, which is performed first at a mileage of 160,000 km, then every 80,000 km.
“Toyota Long Life Coolant”.
In this case, replacement is carried out every 40,000 km. Replacement period: depending on the type – 2-3 years. After this period, antifreeze loses its properties.
To change or not to change antifreeze is up to each owner to decide for himself. On the one hand, Toyota officially states that the lifespan of this fluid is 5 years and you can drive safely if the car is new.
But on the other hand, we don’t know how much this liquid was diluted by the previous owner in Japan, or whether he changed it, for example, due to replacing the radiator. Perhaps the car was previously operated in the south of Japan, where antifreeze is diluted by 20-40%, which is clearly risky for our harsh Russian winters.
The color will also say a lot here. If the liquid is completely pink, then most likely it is diluted with water.
About corrosion and mixing
I open the hood and see red liquid in the expansion tank, which means it’s filled with original Toyota antifreeze. A couple of times after the repair I had to add something to this tank, each time something that matched the color. I was lucky that there were no consequences.
Mixing different antifreezes is highly discouraged by the car manufacturer and can lead to a flushing procedure for the entire system. Consequences of mixing: deterioration of engine cooling, increase in freezing temperature to a warmer one, failure of the pump (pump).
As for corrosion: it all depends on the additive package, as well as on its balance.
At first, almost all more or less high-quality antifreezes protect against corrosion, but over time, in cheap products, the additives are used up, decompose, and only a mixture of glycol and water circulates in the cooling system; naturally, there is no talk of any protection.
Therefore, if you fill in TCL and change it every 6-12 months, nothing bad will happen even for Honda engines, but you can buy expensive antifreeze and change it every 5 years.
How not to overpay?
After reading about antifreeze on the Internet, I went to a friend’s auto shop. My theoretical conclusions coincided with the opinion of Roman Meshcheryakov (Angarsk pilot, participant in regional automobile competitions):
Quote:
Unfortunately, many drivers equate antifreeze with antifreeze. Motorsport is my life's passion, so we cannot afford incompetence. Our store “Authorai” presents only items tested by our own experience.
As for the quality of antifreeze, in January we will receive a pH meter , this is a device for measuring the pH value of antifreeze.
Measurements allow us to show the buyer the level of aggressiveness of antifreeze additives to metals, thereby in practice we eliminate the sale of low-quality liquids
– says Roman Meshcheryakov.
Technical expert of the Autoray store, Sergey Ivanov, advised the optimal type of antifreeze replacement:
Quote:
It will be cheaper to buy the fluid in a specialized store and change it at the nearest service station that has a machine. Manual replacement is less effective. In a service station, using a special device with the engine running, the old antifreeze will be replaced by displacement. This prevents air from entering and provides additional flushing of the cooling system.
conclusions
For some reason, many drivers have developed a careless attitude towards coolant, caused by underestimation or misunderstanding of its importance. The harmful consequences of using low-quality coolant, as a rule, do not appear immediately, but a year or two after the start of its use.
Of the 15 liters of Mitasu antifreeze purchased, it took me 12 liters to replace, the remaining 3 are in the trunk for any fireman. The replacement procedure at the service station on the device took about half an hour (see photo report below).
After the replacement, I drove for a week and noticed 2 things: a more dynamic supply of warm air into the cabin and an improvement in engine temperature readings.
That is, earlier, when interrogating the car from the alarm key fob, the temperature sensor showed colder readings, but now the engine has become several degrees warmer. In general, after completely replacing the antifreeze, I felt better about my car.
Guard. Live Angarsk/Auto
Photo report on replacing antifreeze on the device:
Source: http://LiveAngarsk.ru/auto/news/20131223/zamena-antifriz
Toyota Corolla Forum
Toyota Corolla maintenance reports, questions, problems and solutions.
48RONINModerator Messages: 2629 Registered: 07 Jan 2013, 17:42 Car: May 2007
1.6 manual transmission 17 Location: Lipetsk Thanked: 39 times Thanked: 65 times
#1
Post by 48RONIN » 02 Feb 2013, 22:12
Here is what I found from theory on this issue: In total, there are three groups of types of antifreeze: Basic (service life - 2 years or 60 thousand km) Nitrite-free (service life - 3 years or 100 thousand km) Silicate-free (service life - 4 years or 150 thousand
km) Each type has its own chemical composition, as well as the service life of anti-corrosion additives that protect parts from corrosion. Depending on the cooling system and the engine itself, a different type of antifreeze is selected for each car. Most ethylene glycol-based antifreezes are compatible with each other, and you can mix them.
But the mixture obtained as a result of mixing will receive different characteristics, which can then affect the operation of the cooling system. The mixture should be homogeneous. Do not under any circumstances mix silicate-free antifreezes with others, this can lead to the entire mixture coagulating.
Original Toyota antifreezes come in two types: Long Life Coolant (LLC) - red Super Long Life Coolant (S LLC) - pink Mixing these types of antifreezes in the system is highly not recommended. May lead to flushing of the entire system.
I’ll just add that the factory filling is Toyota SUPER Long Life Coolant.
I also read somewhere that SLLC and LLC cannot be mixed, the additives in them are different and supposedly interact with each other and precipitate, and that when switching from one liquid to another, the cooling system must be flushed and dried. So be careful when choosing concentrates.
Another important factor that you need to pay attention to is the presence of Super under number 08889-80070 Toyota SUPER LLC antifreeze red (-37C), 2 l and this is not a concentrate. I don’t know anything about the possibility of its compatibility and use and I wouldn’t risk it.
48RONINModerator Messages: 2629 Registered: 07 Jan 2013, 17:42 Car: May 2007
1.6 manual transmission 17 Location: Lipetsk Thanked: 39 times Thanked: 65 times
#2
Post by 48RONIN » 02 Feb 2013, 22:16
08889-80070 – Toyota SUPER LLC antifreeze red (-37C), 2l.
It’s already diluted to a pour point of -37C and that’s what it says there, it’s also super, but it’s confusing that it’s red, I don’t know, maybe just a translation (pink-red?)
08889-01005 – Toyota SUPER LONG LIFE COOLANT antifreeze, 2l.
This is a concentrate, it needs to be diluted, the name contains exactly the words that are present in the manual. If you dilute it, it turns out to be almost 4 liters, with your frosts there is an option to dilute it more conveniently.
rinat ravilovich
#3
Post by rinat ravilovich » 02 Feb 2013, 22:20
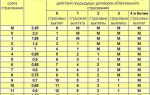
Well, here's a diagram from a can of SLLC antifreeze. What are we doing?
You do not have the necessary permissions to view the attachments in this message.
rinat ravilovich
48RONINModerator Messages: 2629 Registered: 07 Jan 2013, 17:42 Car: May 2007
1.6 manual transmission 17 Location: Lipetsk Thanked: 39 times Thanked: 65 times
#4
Post by 48RONIN » 02 Feb 2013, 22:21
It’s quite simple: the LCC line and the hieroglyph below are percentages, and the hieroglyph means water. The lowest line is the pour point, which is fully confirmed by the graph. As an example, if you mix the contents of a jar and water in proportions of 50%-50%, the mixture will not harden down to -35C. rinat ravilovich
#5
Post by rinat ravilovich » 02 Feb 2013, 22:27
I brought the level to max when cold, added almost 400 ml, it turns out from min to max - about 400 ml
rinat ravilovich
48RONINModerator Messages: 2629 Registered: 07 Jan 2013, 17:42 Car: May 2007
1.6 manual transmission 17 Location: Lipetsk Thanked: 39 times Thanked: 65 times
#6
Post by 48RONIN » 02 Feb 2013, 22:28
Never heard. The norm is to maintain the cold level in the area between MAX and MIN. The service life of the additives is also determined; it is advisable to replace it after the expiration date if you do not want problems with the pump and internal corrosion of the system.
Slavad’s experience is interesting, but we need to somehow bring it down to one unit of measurement. And it is very important for such measurements that the temperature of the measured liquids is the same.
SlavadHonorary member of the club Messages: 129 Registered: Jan 12, 2013, 08:07 Location: Khanty-Mansi Autonomous Okrug Salym
#7
Post by Slavad » 02 Feb 2013, 22:29
The temperature of the liquid was the same, but on the hydrometer the density and temperature were at different heights. Those. the lowest density is 1.1 denser than the temperature -50.
Mazda CX-5 AWD 2.0 2012
48RONINModerator Messages: 2629 Registered: 07 Jan 2013, 17:42 Car: May 2007
1.6 manual transmission 17 Location: Lipetsk Thanked: 39 times Thanked: 65 times
#8
Post by 48RONIN » 02 Feb 2013, 22:37
Okay. Density in the can = 1.14, and how much in the expansion tank?
And what is the conclusion? It is confirmed that the jar contains CONCENTRATE!
SlavadHonorary member of the club Messages: 129 Registered: Jan 12, 2013, 08:07 Location: Khanty-Mansi Autonomous Okrug Salym
#9
Post by Slavad » 02 Feb 2013, 22:38
In the expansion tank the density is much lower than in the bank(
Source: http://tc-club.ru/viewtopic.php?t=224&start=40
How much antifreeze is in the Toyota Corolla Cooling System
To replace antifreeze in a Toyota Corolla, you can use universal products from well-known manufacturers and original Toyota products. You can carry out the replacement work yourself, observing the necessary safety measures.
Antifreeze is a liquid that removes excess heat during the operation of internal combustion engines, thereby preventing them from reaching critical overheating. It also prevents the cooling system from freezing in winter when the car is stationary.
Toyota Corolla does not start in cold weather: why and how to start As a result of vehicle operation, antifreeze gradually loses its useful characteristics and requires periodic replacement. In this article we will talk about why a Toyota Corolla may have difficulty starting or not start at all.
It is important to learn all aspects of choosing and replacing antifreeze in Toyota Corolla cars.
Coolants from different manufacturers differ in composition; in addition, they can be painted in different colors: red, blue, green, etc. As a rule, the color of the liquid does not depend on its composition, and each brand has its own color scheme. Most often, coloring is associated with convenience for the consumer:
- The colored liquid cannot be confused with a drink and should not be drunk.
- For each specific brand, the color is associated with the concentration of the active substance and the chemical type of base. By adding or filling in a compound of the same color from one manufacturer, you can avoid flushing the cooling system.
- Most manufacturers tint the coolant with fluorescent dyes, which allows you to quickly determine where it is leaking.
The only exception to this rule is propylene glycol-based products - they are most often colored red or pink. But the only sure way to determine the composition of a product is to read the label.
Properties of engine cooling fluids
During operation, the coolant heats up to 100 degrees and above, and when the car is parked, it cools down to ambient temperature. The efficiency of the cooling system and the durability of the power plant itself directly depend on the properties of antifreeze . Therefore, it must meet the following requirements:
- high heat capacity and thermal conductivity;
- mobility;
- low expansion coefficient and crystallization temperature;
- the product should not cause corrosion of metal surfaces, destroy rubber parts (seals and pipes) and foam during operation.
Antifreeze classification
All existing coolants can be divided into three groups: basic, nitrate-free and silicate-free. Depending on the base, they are also ethylene glycol and propylene glycol.
Each of these groups is characterized by its individual composition and set of additives used. Most of them cannot be mixed, especially the silicate-free group: at best, the resulting mixture will have other properties that differ from the original ones; in the worst case, the antifreeze coagulates in the pipes of the cooling and it will have to be flushed.
What antifreeze is recommended to fill a car in a Toyota Corolla?
Each automaker has its own requirements for the composition of the coolant, based on the characteristics of the cooling system.
There are a large number of universal products suitable for different brands of cars.
For Corolla, you can use different types of coolants produced on different bases; There is also no evidence that universal products lead to poor performance of their cooling system.
Replacing coolant (antifreeze) on Toyota Corolla
A set of literature on the repair and maintenance of Toyota Corolla from 2013 ================
Flushing with liqui moly cleaner and replacing antifreeze (coolant) Toyota Corolla
Flushing with liqui moly cleaner and replacing antifreeze (coolant) Toyota Corolla .
For optimal engine performance, the automaker recommends using silicate-free fluids with an organic corrosion inhibitor based on propylene glycol. This is due to the operating principle of the cooling system: a more viscous composition is optimal for forced injection of coolant. Original Toyota antifreezes meet these requirements:
- LongLifeCoolant (LLC) is a red liquid.
- Super Long Life Coolant (S LLC) - has a pink color.
Mixing pink and red products in the cooling system is not permissible, as this will make it necessary to flush the system.
In what cases should antifreeze be replaced?
There is a planned replacement of antifreeze, caused by the gradual destruction of the additives included in its composition. As a result, the product begins to foam, the heat exchange process in the engine deteriorates, which can lead to overheating. Also, due to changes in the set of additives, parts in contact with the liquid may be destroyed.
On the packaging of each product there is information about its service life. This is what you should primarily be guided by when drawing up a replacement schedule. If, due to various factors, rapid “aging” of the coolant is observed, then replacement is carried out ahead of schedule.
The main signs that the composition has become unusable:
- a jelly-like mass appears on the surface of the expansion tank;
- in mild frosts, the contents of the expansion tank turn into a mushy state, or some sediment appears in it;
- frequent operation of the cooling system fan;
- contamination of the contents with foreign substances is visually noticeable;
- in case of an emergency, for example, if a hose burst on the road and you had to add water to the system.
Replacing antifreeze with your own hands
Replacing coolant in a Toyota Corolla is not particularly difficult and does not require the use of special tools. Find out what and how much antifreeze to pour into the radiator of your car. If necessary, this work can be easily done with your own hands, without going to a service station.
Step-by-step replacement:
- Place a pan or other container under the radiator and engine to drain the fluid;
- if necessary, wait for the engine to cool completely;
- remove the expansion tank cap;
- open the stove tap to maximum;
- unscrew the drain plugs on the cylinder block and radiator and wait until the contents have completely drained;
After replacement, start and warm up the engine so that the thermostat opens and let the car run for 5-10 minutes.
Press the gas pedal so that the revolutions rise to 3000, and keep the car in this mode for 1 minute. After this, the engine should idle for 30 seconds.
This operation should be repeated 3-5 times so that the new composition is evenly distributed inside the cooling system.
After the engine has cooled, check the antifreeze level in the tank again and add it if necessary.
Safety precautions when replacing engine cooling fluid
When replacing the coolant yourself, you should take the following precautions:
- Do not unscrew the expansion tank cap when the engine is hot, as this may cause burns due to the release of steam or liquid.
- If the composition gets on the body or in the eyes, rinse them as quickly as possible with a large volume of cold water.
- When squeezing the rubber pipes of the cooling system, you need to be careful, as they can be hot - use gloves when performing this work.
- When replacing or topping up, use the same composition that was filled in earlier; when choosing Toyota fluids, do not mix red and pink products. Otherwise, flush the cooling system before filling.
Source: http://autoviber.ru/skolko-antifriza-v-sisteme-ohlazhdenija-tojota/
Replacing Antifreeze Toyota Corolla E12
Replacing antifreeze in Toyota Corolla
Japanese cars are very sensitive to the quality of technical fluids and the frequency of their replacement. Replacing the Toyota Corolla 150 fuel filter. Therefore, following or not following the manufacturer’s advice affects the service life of the main components of the vehicle.
to visually find out what condition the coolant is in and whether it needs to be replaced . Therefore, it is customary to focus on the mileage of the car and the duration of use of the coolant.
Despite the fact that modern coolants, according to the manufacturer, have a service life of 3 to 5 years, the Toyota Corolla always recommends replacing it once every 100,000 km or after 1.5 years of mileage. If the refractometer readings are good, it is allowed to drain antifreeze from the Toyota Corolla after 3 years. Which, in fact, coincides with the advice of the coolant manufacturer.
Choosing antifreeze for Toyota Corolla
The consumer is asked to choose antifreeze based on the year of manufacture of the car. Replacing the oil and oil filter in the u-341e automatic transmission on a Toyota Corolla Fielder; replacing antifreeze in a Toyota Corolla E120.
Replacing the timing belt on a Toyota Corolla car is done in several steps. The belt is changed either due to failure or...
For older models, in the cooling system of which steel, aluminum, brass, and copper were used, inorganic antifreezes are used. They are classified under the index G11. Replacing antifreeze - Toyota Corolla / all about Toyota.
Replacing a Toyota alternator belt will not be possible even for a novice Toyota Corolla driver. The service life of G11 is only 2-3 years. When using this type of antifreeze, a protective film appears on the internal surfaces.
A more modern version of coolant G12, G12, G12. It belongs to organic antifreezes of the “Long Life” type. Waters are based on a completely different principle of protecting internal iron surfaces from corrosion.
Replacing the battery in a Toyota Corolla key is shown in this photo report. How to change the battery in a 2010 Corolla key and the part number for the correct battery. It prevents the formation of oxides and has a longer service life.
This type of antifreeze is not recommended for use in cooling systems containing copper-based metals in the elements.
When choosing, you should not focus only on color, because a mixture with the G11 index can be reddish, greenish, or yellowish. Not everyone knows what kind of antifreeze is best to pour into a Toyota Corolla.
Before 2005, the manufacturer recommended using Long Life Cooliant (LCC) type G11 (replacement interval is 40 thousand km), after 2005 - Super Long Life Cooliant (SLLC) type G12, G12 (replacement interval is 100 thousand km ).
Replacing antifreeze engine and Toyota Corolla / all about Toyota Corolla > repairs and. Connecting G11 and G12 with each other is strictly prohibited.
Replacing coolant (antifreeze) on a Toyota Corolla
A set of literature on the repair and maintenance of Toyota Corolla from 2013.
Flushing with liqui moly cleaner and replacing antifreeze (coolant) Toyota Corolla
Flushing with liqui moly cleaner and replacing antifreeze (coolant) Toyota Corolla .
Coolant volume in Toyota Corolla
Corolla coolant depends on the type of engine and installed gearbox. For the 1ZZ-FE power drive, which was equipped with all-wheel drive versions of the 120 series, 6.5 liters are enough.
Toyota Corolla replacement - corollafan.ru. For the front-wheel drive version - 6.3 liters. Exact information about how many liters of antifreeze is needed in a Toyota Corolla can be found in the car’s operating instructions.
Replacement procedure
If you switch to a new type of antifreeze or if it is impossible to determine what is in the system, experts recommend flushing. To do this, place the car on a level surface and prepare:
- container for waste liquid;
- funnel for filling;
- distilled water at the rate of 6-8 liters per wash.
Then drain the coolant.
- Unscrew the expansion tank cap and the filler cap on the radiator.
- After this, put a hose with a diameter of at least 8 mm onto the drain fitting located at the bottom of the radiator, unscrew the fitting and drain the coolant.
- There is a coolant drain plug located near the oil filter in the engine block.
- Unscrew the drain plug with a 14 mm wrench, first placing a container for technical fluid.
Fill flushing fluid through the filler hole on the radiator. The fluid level should correspond to the Full mark on the expansion tank. Based on the color of the drained liquid, be guided by the number of cycles; check the volume of antifreeze in the Toyota Corolla . - After filling in the flushing fluid, start the engine.
Experienced auto mechanics do not use drain holes specifically designed for this purpose. They disconnect the cooling system pipe located at the bottom of the engine. replacing the fuel filter Toyota Corolla 150 Corolla - replacing the fuel filter. In order to replace the coolant, remove the plastic protection elements.
warm up the engine before draining the coolant in a Toyota Corolla . Replacing Toyota Corolla antifreeze with your own hands. When filling the radiator with coolant, start the engine, while turning the heater to the maximum heating position. Check the opening of the thermostat and, if necessary, add technical fluid to the Full level.
If the material was interesting or useful for you, publish it on your social network page:
Source: http://sis26.ru/zamena-antifriza-tojota-korolla-e12/