Toyota Corolla Forum
Engine operation (and everything on it), problems, repairs and spare parts
Vladimirovich from RnDP Honorary Korollov Messages: 721 Registered: March 28, 2013, 15:53 Car: corolla 2008 1.6 silver manual transmission 5 speed.
Location: Rostov-on-Don Thanked: 32 times Thanked: 22 times
#1
Message from Vladimirovich from RnD » May 30, 2014, 20:17
Good day! Not long ago in one thread here there was information about the problem-free starters of the 150th Corolla! So... it looks like they’ve been jinxed!) The gist of the story is this..., over the past few months it’s happened a couple of times that I get into the car, squeeze the clutch, key to start...
and nothing happens, I thought I just didn’t fully depress the clutch, so I re-depressed the clutch, turned the key and the Toyota started... and this morning I left the parking lot, drove a few kilometers, then turned off the car, walked away for five minutes, returned, as usual, got into the car , pressed the pedal, turned the key.
.. and I clearly heard (since it was earlier in the morning and it was very quiet around) that the starter itself was turning as it went, but there was no engagement with the flywheel and the engine would not start, without releasing the pedal, I turned off the ignition and tried to restart the starter, the same effect, it turns but the crankshaft does not turn, then I released the clutch pedal, turned off the ignition, waited five seconds, tried to start it again, everything started without problems! I'm afraid that in the future, this trick may be repeated more often! I'm leaning towards the bendix dying, but can it die slowly or does it usually die right away? I don't know?
I would be grateful for any opinion on this issue!
DyushaHonored Korollovod Messages: 11430 Registered: March 30, 2013, 01:53 pm Car: Corolla, 2011, 4 automatic transmission, 1.6 l petrol diesel, Comfort+, drank more than 9700 l/Ai92, Toebta 0W20 Location: 133, Kovrov Thanks : 7 times Thanked: 24 times
#2
Post by Dyusha » May 30, 2014, 20:50
I have an opinion and experience, I’ll voice it in the evening.
DyushaHonored Korollovod Messages: 11430 Registered: March 30, 2013, 01:53 pm Car: Corolla, 2011, 4 automatic transmission, 1.6 l petrol diesel, Comfort+, drank more than 9700 l/Ai92, Toebta 0W20 Location: 133, Kovrov Thanks : 7 times Thanked: 24 times
#4
Post by Dyusha » May 30, 2014, 11:07 pm
You will have to remove the starter, disassemble it and check the mobility of the bendix relative to the starter axis.
With a manual transmission, friction dust flies from the clutch disc; in combination with the lubricant on the shaft, it turns into plasticine, on which the bendix stops moving freely.
Disassemble, wash and apply high-temperature grease to the rear of the Bendix.
It manifests itself differently for everyone, for some the bendix works and does not return, and for others it’s the other way around, like yours.
exxittusHonorary Corolla Messages: 4555 Registered: Jan 18, 2013, 03:46 pm Car: Corolla,2010,6MT 132hp/1ZR-FAE/Valvematic
Avensis,2002, 2L/149hp/1AZ-FSE(D4) Location : Cologne, German Thanked: 7 times
#5
Post by exxittus » May 30, 2014, 11:21 pm
How about dry Teflon lubricants for this pair?
Spray dries and a thin layer of Teflon remains
DyushaHonored Korollovod Messages: 11430 Registered: March 30, 2013, 01:53 pm Car: Corolla, 2011, 4 automatic transmission, 1.6 l petrol diesel, Comfort+, drank more than 9700 l/Ai92, Toebta 0W20 Location: 133, Kovrov Thanks : 7 times Thanked: 24 times
#6
Post by Dyusha » May 30, 2014, 11:24 pm
exxittus, is it like the one with a ring on the edge of the throttle valve?
DyushaHonored Korollovod Messages: 11430 Registered: March 30, 2013, 01:53 pm Car: Corolla, 2011, 4 automatic transmission, 1.6 l petrol diesel, Comfort+, drank more than 9700 l/Ai92, Toebta 0W20 Location: 133, Kovrov Thanks : 7 times Thanked: 24 times
#8
Post by Dyusha » May 31, 2014, 00:14
From the description it seems good, but where can I get it? Perhaps there is, but I’m not Copenhagen. Vladimirovich from RnD Honorary Korollovod Messages: 721 Registered: March 28, 2013, 15:53 Car: corolla 2008 1.6 silver manual transmission 5th century.
Location: Rostov-on-Don Thanked: 32 times Thanked: 22 times
#9
Message from Vladimirovich from RnD » May 31, 2014, 07:21
Thank you, in fact, deep down, this is exactly the outcome of events that I am counting on!
If it’s not difficult, post a couple of links to such a lubricant, or to the one you used, so that I don’t take that thread is not suitable. I have a VDshka and some kind of German aerosol...
Holtz or something, which after application thickens slightly and leaves a film, but I think this is not quite right ! /Valvematic
Avensis, 2002, 2l/149hp.
/1AZ-FSE(D4) Location: Cologne, Germany Thanked: 7 times
#10
Post by exxittus » May 31, 2014, 09:08
]Wuerth-Rus offers a lot of chemicals in spray cans in the Russian Federation
http://Www.Wuerth.ru
Ja-ja, everything here is Russian. The work of these Wurth spray cans has a whole battery on the shelf in the experimental room. And it’s about 5 minutes by bike to the Wurth branch.
But for now, pah-pah...
exxittusHonorary Corolla Messages: 4555 Registered: Jan 18, 2013, 03:46 pm Car: Corolla,2010,6MT 132hp/1ZR-FAE/Valvematic
Avensis,2002, 2L/149hp/1AZ-FSE(D4) Location : Cologne, German Thanked: 7 times
#11
Post by exxittus » May 31, 2014, 10:11 am
So I figured... although Teflon does not absorb dust from the clutches, it is not durable and is easily scraped off.
The unit will run dry. Still, high-consistency synthetics and a minimal amount in a place with minimal dust will be optimal.
DyushaHonored Korollovod Messages: 11430 Registered: March 30, 2013, 01:53 pm Car: Corolla, 2011, 4 automatic transmission, 1.6 l petrol diesel, Comfort+, drank more than 9700 l/Ai92, Toebta 0W20 Location: 133, Kovrov Thanks : 7 times Thanked: 24 times
#13
Post by Dyusha » June 01, 2014, 01:39
I recently gave my gramule a masonry, this one for guide supports 08887-80609.
Last year they also smeared it, probably with lithol. It’s better to just wash off the VD and wipe dry.
Vladimirovich from RnDP Honorary Korollov Messages: 721 Registered: March 28, 2013, 15:53 Car: corolla 2008 1.6 silver manual transmission 5 speed.
Location: Rostov-on-Don Thanked: 32 times Thanked: 22 times
#15
Message from Vladimirovich from RnD » June 02, 2014, 09:49
Thank you, I'll see what's in our storage facilities! kantima Honorary Toyota Driver Messages: 3065 Registered: Jan 08, 2013, 03:55 pm Car: Sold Corolla 150, 1.6, 12.2007; RAF4, 2015, 2.0, Comfort, mechanics,
Toyota oil 0W-30
Location: Moscow Thanked: 24 times Thanked: 19 times
#16
Post by kantima » Jun 02, 2014, 11:13 am
I also have a crackling noise when starting up from time to time. In winter it was more often on the cold side, in summer it rarely skips.
I don’t want to take pictures exxittus Honorary Korollov Messages: 4555 Registered: January 18, 2013, 15:46 Car: Corolla, 2010, 6MT 132 hp.
/1ZR-FAE/Valvematic
Avensis,2002, 2l/149hp/1AZ-FSE(D4) Location: Cologne, Germany Thanked: 7 times
#17
Post by exxittus » 02 Jun 2014, 11:31
Rebuilding/replacing Bendix is not so bad. But if a faulty Bendix changes the shape of the tooth on the flywheel, it will be fun.
DyushaHonored Korollovod Messages: 11430 Registered: March 30, 2013, 01:53 pm Car: Corolla, 2011, 4 automatic transmission, 1.6 l petrol diesel, Comfort+, drank more than 9700 l/Ai92, Toebta 0W20 Location: 133, Kovrov Thanks : 7 times Thanked: 24 times
#19
Post by Dyusha » 02 Jun 2014, 14:25
It’s too early to draw conclusions, we don’t know what the reality is yet.
Vladimirovich from RnDP Honorary Korollov Messages: 721 Registered: March 28, 2013, 15:53 Car: corolla 2008 1.6 silver manual transmission 5 speed.
Location: Rostov-on-Don Thanked: 32 times Thanked: 22 times
#20
Message from Vladimirovich from RnD » 02 June 2014, 15:16
Well, depending on your luck... people even drive 150-kilometer Ladas without any problems! Although I’m certainly disappointed in the Toyota, I understand that the Corolla is the car of a Japanese and American student and pensioner, but still!)) If it were the only one jamb...
, I’m already on my third pump, the steering column assembly with the amplifier was replaced, the thermostat was replaced, the drive shaft was replaced twice under warranty, the last time the drive shaft assembly was changed, and still a month ago I had to change the lower crosspiece on the drive shaft!) But completely It was a shock for me when, a week after the purchase, I had to stretch the front hubs and OD suggested that I add lubricant to the CV joints, because the Japanese did not put enough of it there!) And now the campaign will still have to get into not only the starter, but also the gasket under the chain tensioner change it, because it’s snotty in those parts, so it’s good if that’s the case, otherwise it’s as if the gasket under the entire lid didn’t have to be changed!
And my neighbor in the garage has a Karina E Toyota, so in 17 years he has digested the current Glushak!))
Go
Source: http://tc-club.ru/viewtopic.php?t=1714&start=20
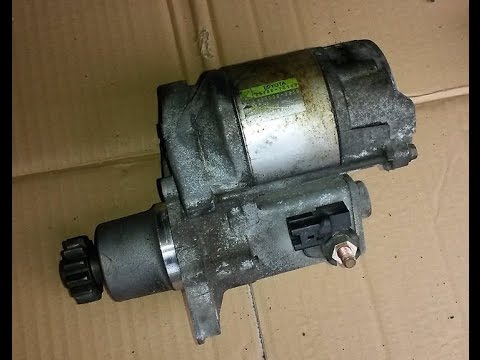
How to remove a Toyota starter
One fine day, when turning the ignition key, I heard the sound of a rotating starter, reminiscent of a grinding sound, but separately without the engine. The second time the car started up fine. Then this problem began to recur more and more often. Over time, I realized that the problem was in Bendix, so I drove all winter, and with the onset of summer I decided to tackle this problem.
It often happens that Toyota Corolla does not want to start the engine. This may be due to reasons such as battery discharge, but most often the starter is to blame. The main causes of the malfunction: the ignition key turns, but the engine does not start. This situation can be corrected by repairing or cleaning the starter.
The starter on a Toyota Corolla, in principle, like on any other car, plays a fairly important role - it starts the power unit. If not everything, then a lot depends on its performance. If this part is faulty, you will not be able to sit comfortably in the car, start it half a turn and go about your business.
It often happens that a car such as a Toyota Corolla stops starting.
This can happen for various reasons: lack of gasoline, engine breakdown, complete battery discharge, however, most often there is a problem with the starter.
The main symptom: the ignition key turns, but the engine does not start. When this happens, the best solution is to remove the starter and read it, or complete repair.
More details: mymirtoyota.ru
Menu Unanswered topics Active topics Search Our team Mobile version ✔ Other Motorhomes Buses Trucks Login Registration Microbe.
ru Japanese minibuses and minivans TOYOTA NOAH TOWNLITE ACE Noah TownLite Ace Noah TownLite Ace. Gas engine. Fuel system, LPG Search Advanced search Search ⇒ Active topics ⇒ New messages ⇒ New forum members Noah TownLite Ace.
Gas engine. Fuel system, HBO ⇒ How to remove the starter Moderator: Karpukha
The starter on a Toyota Corolla, in principle, like on any other car, plays a fairly important role - it starts the power unit. If not everything, then a lot depends on its performance. If this part is faulty, you will not be able to sit comfortably in the car, start it half a turn and go about your business.
A starter is an electromechanical device designed to start an engine. On the Toyota Corolla it is reliable and only fails if the vehicle is used incorrectly. In older versions of cars, problems with this device occur quite often, but repairing or replacing is not so difficult if you follow the instructions below.
It often happens that a car such as a Toyota Corolla stops starting.
This can happen for various reasons: lack of gasoline, engine breakdown, complete battery discharge, however, most often there is a problem with the starter.
The main symptom: the ignition key turns, but the engine does not start. When this happens, the best solution is to remove the starter and read it, or complete repair.
More details: eurasia-avto.ru
The solenoid relay does not operate. I want to remove the starter for repairs. Tell me how to remove the starter on a Corolla E120? First you need to disconnect the negative terminal of the battery.
Then you need to provide yourself with space for removal. To do this, you need to unscrew a couple of bolts securing the radiator and one bolt securing the air conditioning tube. This is necessary to remove the radiator fan shroud.
In this video I show where the starter is located and what needs to be done to remove it. Do you want to help develop the channel? Here you go: Make money on your videos! Follow the link and connect! Advertising your channel (low prices): View more: Subscription: FreeMan256 Everyday life of a driver Everyday life of a driver test drive anti test drive entertainment review unboxing entertainment +100500 exclusive,
Read more: pochinimavto.ruMore on the topic: Toyota latest news
Source: http://www.chsvu.ru/kak-snyat-starter-tojoty/
Replacing the starter bendix - logbook Toyota Corolla e120 1.6 3ZZ-FE VVT-i 2005 on DRIVE2
Hello everyone, somewhere in the summer a problem appeared: the car began to start every once in a while, and since I was far from Moscow, the thought about service disappeared, and then I completely gave up on this problem, but it starts only every once in a while.
But over the last couple of months the car has started very poorly, about the tenth time; It feels like the starter is turning, but it’s as if it’s dying, sometimes the relay even works, but doesn’t turn.
I decided to sign up for the service, I didn’t want to go to the expensive one, I had a problem with finances, but at the cheap, proven one there was a queue for the next two days, but my hands were itching, I had to do it faster))) Well, after reading the forums, I realized that the problem was with the Bendix.
I went to the existential shop, bought a Bendix Bosch (710 ₽), and at the same time consumables (filters and oil), I decided to change everything right away; I waited for the order for a couple of days and was on my way. I’ll say right away that with knowledge of the matter, the work will take a little time and in a day you will finish it calmly, but since I did it for the first time + there was a problem with bolts, it took me two days, well, a day and a half .
So, during the analysis I was guided by this corollafan.ru/obsluzhivan…arter-tojota-korolla.html BUT I did not remove the fan, I removed the engine crankcase protection, everything can be done from below.
Unfortunately there are not enough photos, but I will try to describe in more detail + the link describes it quite well.
First, remove the engine crankcase protection; remove the plastic cover on the fan from the top (it is on plugs); that's all, it's not necessary to remove anything else, of course it's not very easy to get to, but it's quite possible (for ease of removal, a ratchet with an extension and a cardan was assembled).
Next, we remove the starter itself, it is attached to two bolts (I think 14), but first we disconnect two terminals, one black, on a latch, the second I have is gray, with a lid, it is screwed with a nut to the starter).
It’s quite easy to get to the first bolt from above, you can see it, unscrew the second one from below (by the way, you can also see it from above, but it’s easier to get to it from below), it’s better to catch the starter, it may fall)) the starter itself has been removed, we can take it home to disassemble. We’ll equip the workplace , and we begin to disassemble the starter (don’t forget to buy new lubricant.
Litol or oil is recommended; I took a mixture of lithol with copper grease, because copper grease has greater heat resistance, well, maybe you could also use graphite instead of lithol).
We unscrew the two bolts connecting the starter, in theory there are no problems with them, they unscrewed easily; after this, the starter should fall apart into two parts (I had to help him do this a little); Now we disconnect the relay (it is secured with three bolts, with a Torx slot), this is where my problems started; the bolts really stuck, and I licked the slot once, for all three.
At this point I got very upset and went to bed. The next morning, full of hope and confidence in my abilities, I went to Google. Google said to drill out the bolts, my mind said no need, a friend from the forum said to take a small chisel and hammer a new slot under a flat-head screwdriver, I chose the second option. I took a hammer, a chisel and off I went (if the surface of the thing on which, God forbid, you will be hammering a new slot is important to you, then put some kind of board under it, because you may well leave a couple of pretty dents and watch the plastic terminal, you might break it by accident) . It’s better to stuff two people, one holds, the other hits. First fill the bolts with water, generously and several times at intervals of about ten minutes, so that it is saturated. Actually, I first knocked out a small rut with a chisel, and then hammered it in with a screwdriver; everything came loose.
After filling in the new splines
Next, we disconnect the relay, get to the bendix, there’s nothing complicated there. To remove the bendix itself you need to remove the retaining ring, to do this we put the head on 12 and hit it with a hammer a couple of times, then, if it doesn’t come off, we help with a screwdriver or something like that and remove it , don’t forget about the small bushing on the retaining ring, we’ll remove that too. Actually, next we remove the bendix itself.
Next, I decided to disassemble the brush assembly. We unscrew the two bolts (cross slot), remove the metal plate (by the way, for convenience, unscrew the small copper pigtail to disconnect the brush assembly) and remove the brushes (do not lose the washers and the small lock washer after removing the plate).
We take out the brushes very carefully, making sure that the springs and plastic housings of the brushes do not fly apart; Well, we take out the motor, it’s just magnetic inside. So, the starter is disassembled. We begin to clean it of old grease and sand all the terminals. We also clean the housing where the motor is and the motor itself, and brushes if necessary.
We apply new lubricant (we also lubricate the new bendix); THE BRUSH UNIT DOES NOT NEED TO BE LUBRICATE! Only where the washers are, where the metal plate is, the rest is not lubricated, we just clean it.
Now we assemble the starter. I started with the brush assembly.
Here it is almost impossible to keep track of all the brushes, because there are four of them and springs push them out (here I made a big and stupid mistake for the first time; since I had almost no idea about brushes, during assembly I actually did not understand that the graphite rectangles are brushes , and since during disassembly the brushes fell out of the housings, and I didn’t notice this, I didn’t put them in during assembly, as a result of which the starter didn’t work. In general, for suckers like me: graphite rectangles and there are brushes, they need to be put in into plastic cases, having previously inserted the springs, and they need to be inserted with their worn ends towards the center. Here, by the way, pay attention to the condition of the brushes, if they are very worn, then it’s time to replace them). You can use the advice from the link to tie the brushes with threads and then remove them, but there is a more interesting way: insert the brushes and hold them with your fingers (perhaps a friend will help you, it will be easier), now take a 22mm head and insert it between the brushes, bend them with screwdrivers one at a time brushes and put them on the head one by one, voila, the head holds the brushes;
Inserted the head
now we take the motor and carefully push it in place of the head, with some sleight of hand everything should work out))) now the brushes are on the motor, everything is fine; Now let's assemble the rest of the assembly, there shouldn't be any further problems with it, don't forget about the rubber bands and washers. We put the brushes aside and start installing the new bendix.
It was difficult for me to put it on; I had to knock it a little with a hammer (but not too much). Now we put on the bushing and clamp the sash ring (it needs to be put on the groove on which it sat). Squeezing it can be a challenge as it is quite tight. I used a small vice because it is a bit difficult to use pliers.
There is another small problem: the ring compresses easily with a vice, but when you loosen the vice, the ring unclenches again. All in all.
We squeeze the ring with a vice so that the break point is on top, we squeeze it harder, but don’t overdo it, and leave it for a while, then we knock with a hammer in the area where the ring breaks to press it, again, don’t overdo it, now we loosen the vice, the ring will still loosen, but this should be enough; Now the sleeve needs to be pulled onto the ring, using a key (possibly two), as written in the link, it should be easy to put on. Now we assemble the starter in the reverse order, there shouldn’t seem to be any problems. Make sure that the rubber bands do not fall off. Now, if possible, we check the starter for functionality, if not, go ahead and install it. The verification scheme is in the link.
When I installed the starter I made another mistake, don’t try to check it without screwing it into its proper place, because it won’t work, it takes another contact from the engine.
Here you can see what is connected to what
Actually, first we connect the terminals, and then we screw in the starter itself, or whatever is more convenient for you))
That seems to be all, everything should work)))
Price tag: 710 ₽ Mileage 109000 km
Source: https://www.drive2.com/l/9829715/
Toyota Corolla starter: replacement, how to remove, bendix repair
It often happens that Toyota Corolla does not want to start the engine. This may be due to reasons such as battery discharge, but most often the starter is to blame.
The main causes of the malfunction: the ignition key turns, but the engine does not start. This situation can be corrected by repairing or cleaning the starter.
Removing the starter
Before you begin dismantling the starter, you must prepare all the necessary tools. And we will need: a 14mm wrench, small sockets, a ratchet wrench. Without these tools, removing the starter will be quite problematic.
You need to know the location of the starter itself, and it will be located at the rear of the engine. Therefore, this process is best carried out in an inspection hole, because it will be much more convenient.
So, the initial stage of the process:
- To begin, you will need to unscrew the top starter bolt, which is located to the right of the thermostat cover. The thermostat tube will be visible from the cover, so it will not be difficult for you to identify it. Unscrewing the top bolt is quite simple, but very inconvenient.
- To get to the top bolt, you need to remove the radiator tube and the air filter cover.
- The next step is to unscrew the top bolt with a 14 wrench.
- Next, you need to get to the very bottom bolt; this is very difficult to do, due to the fact that it is located in the very thick of all the supports and mechanisms. Disassembling this entire structure is quite problematic. It is advisable to use special equipment, since after spending a lot of time, you may not achieve the desired result.
- After you unscrew all the bolts, you need to remove the nut from the power cable, and only after that the trigger.
This guide to removing the starter from a Toyota Corolla is the first correct step towards the task. After you have removed the starter, it must be disassembled and washed, preferably with gasoline.
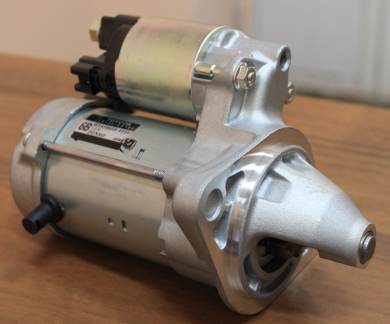
If the starter has become completely unusable, then a reasonable solution would be to buy a new one; this will save your nerves, time, and also money. Remember, the miser pays twice. This will also protect you from unexpected breakdowns, which is also a very unpleasant situation.
Purchasing a new Toyota Corolla starter is easy and can be purchased online or at any auto parts store. In this case, the initial stage of removing the starter was given. If you strictly follow the instructions, then no deviations will arise.
Toyota Corolla starter repair
If your starting problems have not been resolved, then it is necessary to repair the main starting mechanism. It is better to carry out repair work in specialized workshops, but if you are an experienced car enthusiast, you simply must do everything yourself.
The first signs of a malfunction: the engine turns slowly or does not turn at all, the starting mechanism seems to work, but the crankshaft does not move.
Causes of malfunction:
- there is not enough battery charge (which is unlikely);
- the mass on the engine does not work or is completely missing;
- the retractor relay does not work completely, the brushes are worn out, the bendix needs to be replaced, interturn short circuit, bushings are worn out.
The Toyota Corolla needs to be driven to the nearest inspection hole or lift and disconnect the terminals from the battery. Next, remove the two bolts from the mount and completely remove the current supply wire. Carefully pull out the starting mechanism and carefully inspect it. After a thorough inspection and detailed check of the disconnected starter without additional loads, by connecting it to the battery, we identify the main causes of the malfunctions. Let's say in this situation we have a bendix failure. To identify this malfunction, we remove the gearbox. We disassemble everything carefully, in no case confuse the parts and arrange everything in the correct order. Otherwise, everything can be completely confused or, even worse, lost. We remove the two mounting bolts, disassemble the body and take out the overrunning clutch. Before removing the overrunning clutch from the Toyota Corolla, do not under any circumstances lose the support ball, as it will be very difficult to find later. Carefully check the operation of all mechanisms, in particular the bendix. We hold the bendix in one hand, and with the other we need to turn the gear clockwise. It should rotate in any order. If it turns in the other direction, the gear should stay in place. If your Toyota has even a slight movement, then the diagnosis is as follows: the roller seats on the Bendix itself are very worn out or the springs are out of order. Repairing the clutch must be done very carefully; first, we disassemble it from the side where the gear that engages the flywheel is located. Next, carefully move the washer down, which closes the locking ring, and remove it. Where the overrunning clutch shaft is located, use a puller to remove the bearing. Next, remove the bendix itself. Be sure to remember its position so as not to confuse anything later. We remind you that repairing a starter is not an easy task and it is very easy to ruin everything. We carefully examine all the contents of the starter and make the right conclusion about what else can be repaired and what needs to be replaced. As a rule, in such a situation, springs most often fail. We buy new springs and reassemble the overrunning clutch; the bearing itself can not be installed for now. The next step is to do the same thing as described above. One hand turns the gear clockwise - the gear rotates, then we turn it counterclockwise - everything stays in place. From this it follows that the repair of the starter on the Toyota Corolla was carried out correctly, then we assemble the remaining structure. If the gear rotates counterclockwise, then, most likely, the slots for the rollers have failed. To make repairs, in this situation you need to select a drill whose size will be slightly larger than the diameter of the roller itself. Next, we cut the amount we need and put it in the mounting sockets instead of the damaged rollers. And finally, we check the gear spring of the Toyota Corolla; if it is very weakened, then it needs to be replaced. Now we complete the repair of the unit and completely assemble it. After you have assembled the starter and placed it where it should be, we connect all the necessary wires, the main thing is not to confuse anything. We start the Toyota Corolla and enjoy the wonderful moment that you can do at least something yourself. So, in conclusion, you have just seen from your own example that replacing the starter is not an impossible task, everything can be done perfectly well yourself in the garage. Just use your wits more often and never be afraid of your car. If you have the opportunity to make repairs yourself, then take full advantage of this. Well, if you are not confident in your abilities, or after your repair it has become even worse, then you have a direct route to a car service center.
Features of Toyota Corolla starter malfunctions Link to main publication
Source: http://CorollaCar.ru/remont/dvigatel/starter-tojota-korolla.html
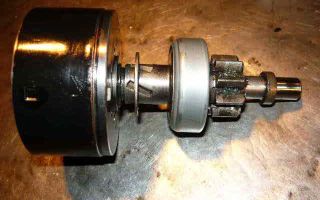
Replacing the bendix on the starter, do it yourself
In the starter, important importance is given to the bendix, if it breaks down it will not be possible to start the engine. And, if a characteristic metallic sound is heard during startup, this indicates an immediate replacement of this part.
Qualified craftsmen are not recommended to even try to repair the Bendix; according to them, it is much more advisable to replace the old worn-out part with a new Bendix. Such a timely replacement of the bendix, rather than repairing it, will prevent imbalance of internal parts with the prospect of increased wear on the starter motor.
Purpose
Bendix is otherwise called an overrunning clutch, which refers to the working body located in the car starter. Torque is transmitted by a gear from the starter motor to the flywheel of the internal combustion engine.
But the gear cannot be in long-term engagement with the flywheel, since the starter should operate for a short time, after which it must cool down.
And in order to protect the starter motor from the effects of the internal combustion engine, Bendix is designed.
Diagnostics
After all, the reason for replacing the Bendix can be not only worn-out teeth of the Bendix gear, it can also be worn-out bushings on which the starter shaft is mounted, or there may also be a common reason - damage to the retractor relay. So, in order to identify the cause of this damaged part, experience is needed. Some technicians carry out diagnostics on special stands under several loads:
- Under load;
- Without load.
And for some, it is enough to move their hand to understand the need to replace the Bendix.
Self-replacement
Replacing a bendix yourself is not as simple as it seems at first glance. To change it, even on the simplest domestic car, you will need to remove the starter, and this work can be accompanied by a number of difficult moments. Still, you can try to make the replacement yourself. So what needs to be done:
- Remove the starter. To do this, open the hood and disconnect the negative cable from the battery. The car must be driven into the inspection hole. Using a wrench, unscrew the fastening of the positive battery cable to the solenoid relay. Then the two terminals are removed, paying attention to the condition of the insulation on the wires. Unscrew the bracket using a hexagon. Then, using a spanner, unscrew the bottom bolt that holds the starter. This process is quite troublesome. After this, the upper mounting bolt is turned out and the bracket is unscrewed, with the help of which the starter is attached to the block. After this work, the starter is carefully removed.
- By unscrewing the studs along the entire starter and those that secure the cover, separate the starter into two parts. After removing the brush assembly and rotor, it is recommended to clean all parts of the starter.
- Then you need to remove the retaining ring from the rotor shaft and remove the worn bendix, replacing it with a new one. Immediately check the condition of the bushings and forks. To remove the plug, you need to carefully remove the rubber plug and remove the required element.
- The bushing is pressed out using a head of a suitable size. If these parts wear out, they should be replaced immediately with new ones. The bushings are driven back using a hammer. It is worth remembering that the blows should not be strong and should be carried out through a special wooden lining.
- The starter is assembled in the reverse order, after which its functionality is checked.
Is it necessary to make repairs?
But what about Bendix repair? In principle, according to professionals, conversations about repairing this part should not even arise.
This is explained by the fact that modern machines have almost the same wear resistance of parts located in a single unit. This means that you can be sure that if one gear wears out, then after it, almost immediately, the next one will deteriorate, and so on. Therefore, it is much more practical to completely change the bendix, and besides, the cost of the part itself is low.
What is the sequence of actions
So, to change the bendix you should do the following:
- Removing the starter;
- Starter disassembly;
- Replacing the old bendix with a new part;
- Reassemble the starter in reverse order.
When starting work on replacing the Bendix, it is advisable to completely remove the battery, since even a short circuit can lead to serious consequences. If you have any questions or doubts, you should seek professional advice.
Source: http://autodont.ru/jelektro/kak-samostoyatelno-provesti-zamenu-bendiksa
Starter Repair for Toyota Corolla
Repairing a starter on a Toyota Corolla is a simple process, but requires the intervention of specialists who understand mechanics. The starter repair instructions are intended to help and at the same time facilitate the repair process for experienced and not very experienced motorists.
The starter on a Toyota Corolla, in principle, like on any other car, plays a fairly important role - it starts the power unit.
Repairing a starter on a Toyota Corolla 120 body - Duration: 5:53 Konstantin Ivanchenko 1,693 views If not everything, then a lot depends on its performance.
If this part is faulty, you will not be able to sit comfortably in the car, start it half a turn and go about your business.
In our case, the starter bendix on a Toyota Coroll broke down - the starter motor does its job, but the bendix does not turn at all. Let's remove the starter step by step and replace the broken part.
It’s worth noting right away that for work you will need a garage and a table on which you can disassemble the starter. So, let's proceed to the procedure for removing the starter.
Step-by-step instructions for removing the starter from a Toyota Corolla
First of all, let's prepare the car. To do this we need to drive it into the garage. The procedure can be lengthy and so that the car is not on the street and does not disturb anyone, this preparation point is very important.
Next, you should lift the hood and, just in case, disconnect the terminal from the battery. Removing and repairing the starter on the SR20DE (Updated) - Nissan logbook.
Toyota Corolla starter repair and sale Disconnecting the terminal is not difficult. Take pliers or a screwdriver and loosen the clamps.
After the car has been completely de-energized, we proceed directly to freeing access to the broken part.
First you need to unscrew and completely remove the front plastic cover above the radiator and remove the fan. It is he who will interfere with the removal of the starter from the engine compartment.
Replacing a low beam lamp on a Toyota Corolla 120 (2000–2006) and 150 (2006–2013) does not require professional knowledge of an electrician.
The photographs show what the car looked like before and after removing the plastic visor.
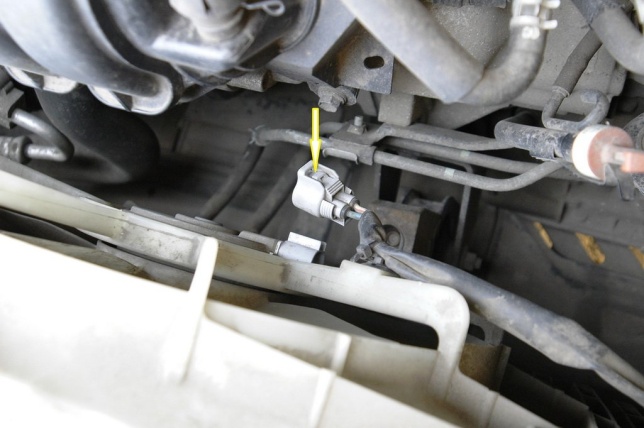
We have gained access to the cooling fan - it needs to be removed. To do this, first disconnect the terminal from the fan. This can be done by simply clicking on the fastener; the arrow in the photo shows its location.
The two tubes that are located between the engine and the radiator are cooling lines that are used to cool the automatic transmission. 16 comments on “Winter, Toyota Corolla will not start:.
Repair of TOYOTA Corolla Starter, sale of TOYOTA Corolla Starter It should be noted that they are not in the manual.
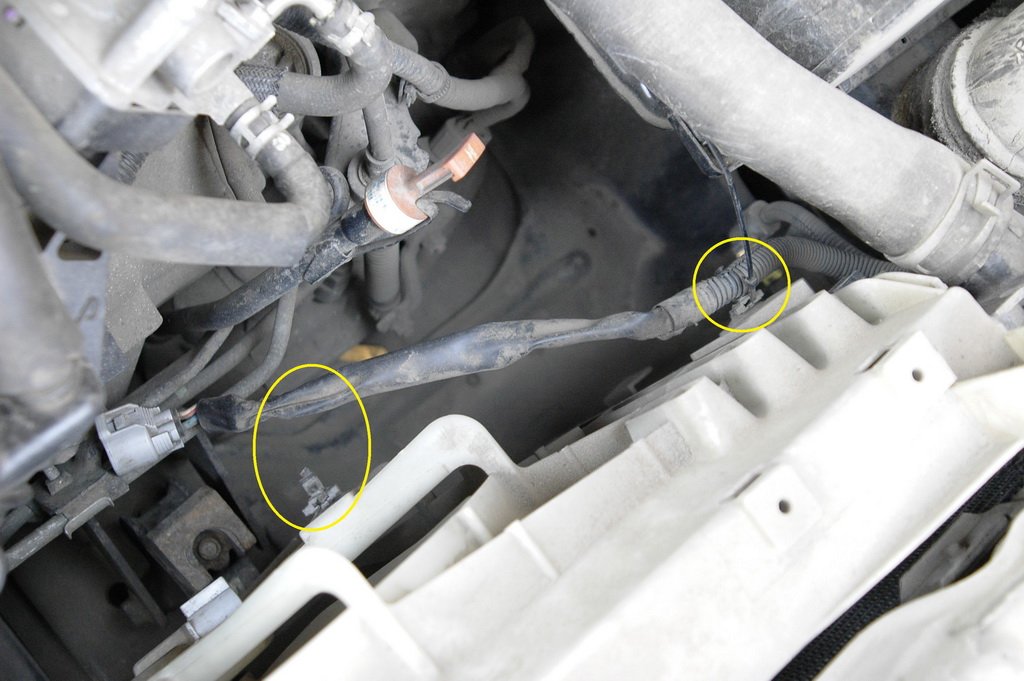
Next, you should disconnect the plastic clamps that hold the cables going to the fan. In the photo they are highlighted with yellow circles. Toyota Corolla E150 steering rack repair In our version of the Corolla there are only two clamps, however, in various modifications there may be more.
After the clamps have been removed, disconnect the tube coming from the expansion tank, press out the fastenings of the fan itself on both sides at the same time and remove it together with the expansion tank. The photo shows the mounting locations for the part.
Toyota starter repair
Toyota starter repair . Diagnostics and repair. Subscribe to the channel and like. Who wants to help the channel...
Corolla starter repair
I encountered a breakdown of the starter of the following nature - it spins perfectly when the engine is cold, but when the engine is hot...
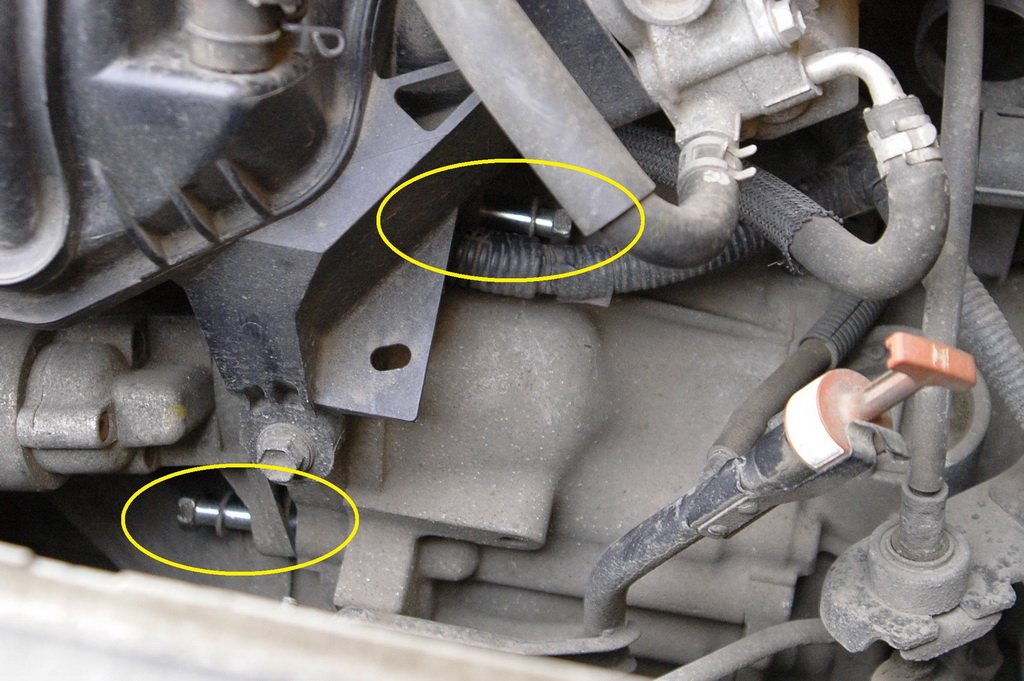
After the workplace has been freed from the parts that interfere with us, we proceed directly to removing the starter .
replacing a low beam lamp on a Toyota Corolla - It is secured with two bolts - they should be completely unscrewed, and only after that can we pull out our broken device.
The photo will indicate the location of the bolts we need.
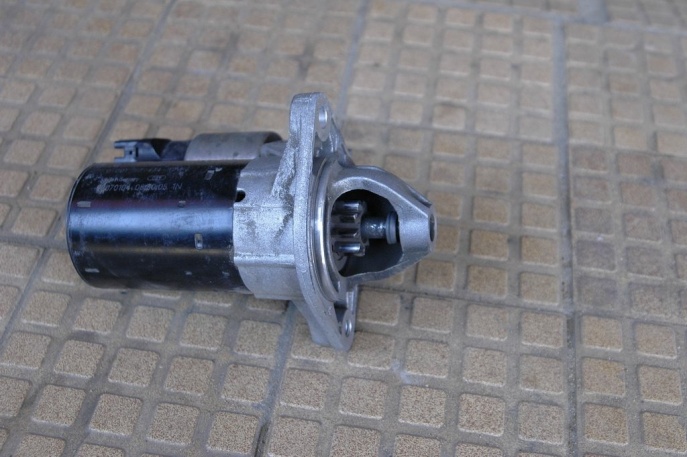
So, the starter has been removed. And ready for immediate repair. This is where the second and most important stage of the repair begins. We take the Corolla starter and move to the table.
We need to disassemble the starter. To do this, we unscrew the two bolts that tighten its body. Toyota Corolla repair: Toyota Corolla starter motor The part will break into two parts. For a visual understanding, look at the photo.
Next, unscrew the three bolts that secure the retractor and first mark all the parts. This approach will greatly facilitate the assembly of the starter. The photo below shows a disassembled starter. If you wish, all parts can be thoroughly cleaned from dust and dirt.
So, we've almost reached the Bendix. In order to remove it, we need to pull out the retaining ring, which is located under a small cone-shaped bushing. It is very easy to remove.
We place the head at 12 on the bushing and knock it down. Toyota Corolla starter repair Let's look at the photos in progress.
By the way, it is best to hit with a hammer on a fixed workbench so that the part does not jump off and is not deformed due to your carelessness.
Next, we need to pick out the retaining ring and lift it up, and then remove the bushing itself and the bendix.
We change the part, pre-lubricate it with heat-resistant grease and put it back. Then we put on the bushing and retaining ring, which we must place in its groove.
From this it follows that the repair of the starter on the Toyota Corolla was carried out correctly, then we assemble the remaining structure. INSTALLING CRUISE CONTROL ON A TOYOTA COROLLA E150 - Duration: 10:10.
Next, we pull the sleeve onto the ring, that is, we return everything to the position it was before. Photos of the assembly process are attached below.
At this point, the replacement of the Bendix stops and, in principle, everything can be put back into place. However, while the part was disassembled, we decided to check everything else. We disassembled the brush assembly of the electric motor. Be sure to clean everything before assembly.
How to change the low beam light bulb on a Toyota Corolla Link to the main publication Our starter has no wear and tear. The rotor is intact. Particular difficulty was caused by the installation of four brushes; they are all spring-loaded and it is impossible to keep track of them. Therefore, we simply fixed them with a thin thread, which was later removed.
List of forums OPERATION, MAINTENANCE and REPAIR OF TOYOTA COROLLA E150. The photo shows how the brushes are tied.
So, everything has been inspected and we begin to reassemble our starter for the Toyota Corolla. First of all, we need to assemble that part of the body that is indicated in the photo below.
And only after it is collected, we take everything else and, checking the marks, put it in its place. Reassembly and installation should not be difficult. Before installation, be sure to check the functionality of the starter. Toyota starter repair - This is very easy to do, you just need to act according to the attached diagram below.
In our case, the test was successful, everything works like a clock. Everything took about 1.5 hours. The job is done, the starter is installed, the car starts perfectly.
Source: http://avto-melvin.ru/remont-startera-na-tojota-korolla/