How to adjust car wheel alignment with your own hands at home
Hardly anyone has seriously thought about the wheel alignment procedure with their own hands and, moreover, with improvised means. But literally a few decades ago, adjusting the “geometry” of the chassis “in Uncle Vasya’s garage” did not cause any surprise among car enthusiasts.
If we mentally draw one line along the vertical plane of the wheel and a second along the plane of its rotation, then we can see the camber angle, which is responsible for the position of the wheels when the car moves in a turn, for the clarity of its passage.
Camber angle
Positive and negative camber angle values
Now let's play with our imagination, looking at the car from above. We draw the lines of the plane of rotation of the wheels and the lines of the direction of its movement. Here we can observe the toe angle of the wheels, which gives our car stability and further predictability.
Toe angle
Positive and negative toe angle values
To understand the full importance of the wheel alignment process, you need to understand that the correct installation of the car’s wheels determines its stability while driving (tendency to rollover and skids), directional stability (controllability and maneuverability), the economic component (increased tire life and fuel economy ).
As the car mechanic’s “manual” says: “...for the domestic fleet of early years of production, the frequency of checking the “geometry” is 10,000...15,000 kilometers...”, but for foreign-made cars, experts recommend carrying out diagnostics every 30,000 kilometers.
For me, this is too vague an indicator that does not at all reflect the realities of modern operating conditions. Agree, it’s hard to bind to these recommendations an off-road enthusiast on a tuned Pajero, which actively “collects” all the bumps and potholes, and a grandfather on a “Seven”, for whom overcoming road unevenness is associated with a complete stop of the car.
Therefore, the following signs can be used to determine the condition of the wheel alignment angles of the front and rear wheels:
- when driving in a straight line, the car steers to the side;
- when the wheels are in a straight position, the steering wheel crossbar is shifted to the side;
- there is no directional stability (the car exhibits unusual behavior, “scouring” around);
- delayed reaction to turning the steering wheel;
- “tight” steering wheel;
- when braking, the car “goes” to the side, turning around (when the braking system is working);
- at maximum turning angles, the radii differ significantly from each other (the wheels can touch the fender liners);
- when exiting a turn, the steering wheel does not return;
- uncharacteristic tire noise while driving;
- uneven tire wear.
In order not to be confused by the last point of this list of “symptoms”, it is necessary to periodically check the air pressure in the tires, as, in principle, the car’s operating instructions say. Normally, tire wear should be caused by the conditions of its operation, and not by the consequences of mechanical faults in the car’s suspension.
Examples and causes of premature wear
In addition, there is also an unscheduled need to check and adjust the wheel alignment angles. As a rule, this procedure should be carried out after:
- strong impacts leading to damage or displacement of suspension parts;
- long-term and aggressive driving on uneven surfaces;
- changes in vehicle clearance (an indirect sign of “fatigue” of struts, shock absorbers and rubber suspension elements);
- removal and installation of racks, beams with levers;
- replacement of suspension elements (ball joints, silent blocks of levers and rods);
- replacement of steering system elements that affect the position of the wheels (steering rack, as well as its tips and rods);
- after auto buffers or other spacer options have been installed on the car.
Adjusting wheel alignment on passenger cars
Let's start with the fact that wheel alignment angles on different brands of cars can differ significantly. This is due both to the design features of the car’s suspension and directly to its purpose.
For example, racing cars for drifting have negative camber, which gives them a small contact patch on a straight line (reduces rolling resistance), but when cornering, the contact patch has a maximum value, which allows you to corner at maximum speed.
And camber naturally changes the values of the toe angles.
This “geometry” is common for drifting
Due to the above, I suggest you get acquainted with the methodology for setting wheel alignment angles using the example of a VAZ 2110 car, and then, if you wish, you can successfully apply it directly on your car.
Tools and prerequisites
- Set of keys, heads;
- Construction plumb or level;
- A roll of wire or strong twine;
- Tape measure or telescopic ruler;
- Two even bars 60 centimeters long;
- Two sliding supports for adjustable wheels;
- Inspection pit with a flat platform.
Camber
Preparation
We install the car on sliding supports (pancakes), checking that they are on the same level, since the curvature of the floor greatly affects the accuracy of measurements.
Level check
I understand your dumb question about the presence of support “pancakes”; I propose to make them from four sheets of metal, having previously lubricated each pair with grease for better sliding.
Homemade example
I draw your attention to this, since when adjusting the wheel alignment angle of one of the wheels, the second one must be stationary.
Diagnostics
At this stage, we have a choice in the method of taking the wheel position values: using a plumb line or a building level.
In order for all measurements to be correct, we need to align the wheels strictly along the line corresponding to linear movement;
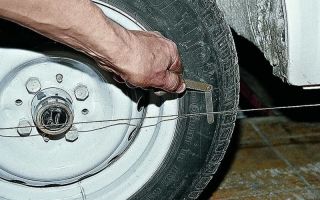
Having attached a plumb line to the wing (for example, with a magnet with a cloth placed under it), measure the distance “A” and “B” on the left and right wheels (the reference point is the wheel rim!), and write down the result;
This is how a vertical plumb line is used
We roll the car so that the measurement line rotates 90°, and take new readings. We repeat the operation again and average the obtained values, thereby leveling out the measurement error associated with the runout of the wheel disk.
For front-wheel drive cars, the average values of camber angles are considered to be 0 ± 1 mm; for rear-wheel drive, the norm is considered to be +1 ± 3 mm (by the way, for wheels of sizes 13 and 14 inches, 1 millimeter of camber is equal to approximately 10 angular minutes).
In our case, the manufacturer recommends setting the camber angle to 0 ± 30′, which is approximately 2…2.5 mm. Which type of camber is preferable to you depends on the load of your car - the greater the gross weight, the greater the negative camber angle in dynamics...
Example of weight distribution on MacPherson type suspension
...and depending on the driving style - the more aggressive the cornering, the more the wheel tends towards positive camber.
The camber angle is very high
We're a little distracted, let's continue.
On the car in question, it was decided to install negative camber and, to facilitate the process, a plate 2.52 millimeters thick was pre-attached to the level.
The measuring plate will help in the work
Adjustment
After all the preparations, all we have to do is apply a level to the wheel rim and adjust its camber angle until the bubble takes a central position.
Use a building level to check
Repeat the above operation for the second wheel. The adjustment process itself consists of unscrewing the bolts.
Adjustment bolt
Eccentric bolt
Adjusting this value on your model may be slightly different, but the meaning of the actions remains the same: tilt the wheel axis perpendicular to the car body.
For example, on front-wheel drive cars with the same type of MacPherson strut suspension, this parameter is also adjusted by the strut mounting bolts.
In one design, the already mentioned upper bolt can play the role of an eccentric, while in another, the stand itself has an oval-shaped adjustment hole.
The photo shows an oval hole for adjustment
In the third case, the manufacturer’s default camber may not be adjustable at all and then, if necessary, you have to either make an oval groove on the strut mount yourself or bore/purchase the upper bolt to an adjustable size.
On rear-wheel drive vehicles, the camber angle is adjusted by adding and subtracting washers of a certain thickness between the lower/upper control arm and the beam.
Adjusting washers are marked in red
The methods may be different.
Adjusting washers are marked with triangles
On GAZ cars this is a completely separate process, as shown below.
1 — adjustment bolt, 2 — adjustment nut, 3 — adjustment plate
Setting toe angles
Preparatory work
So, the car is in its original position, the position of the wheels corresponds to linear motion. We attach pre-prepared bars just below the middle of the wheel rim parallel to the floor.
Installation of bars
In order to measure the distance between the wheels as accurately as possible, we secure the end of a tape measure to one edge of the block using a nail...
Reference point
...on the other wheel we leave the roulette tape free.
Measuring distance
We stretch a strong string from both sides from the rear wheels to the front wheels (strictly in the middle), making sure that it does not touch the wheel (at this point we will check the straight position of the wheels).
Distance between rim and wheel
Since on domestic cars the rear axle is slightly narrower than the front, we need to place objects of the same size on both sides of the rear wheels, for example, plastic bottle caps.
Pull the string away from the wheel
It is necessary to ensure that the string along its entire length does not touch foreign objects: mudguards, tuning elements, etc.
How to check
We measure distances A, B, C and D with a tape measure:
Measurement locations
We get:
- A = 163.7 mm;
- B = 162.6 mm;
- C = 8 mm;
- D = 5 mm.
That is, the difference is 11 mm. We cannot be satisfied with such a result.
First, you need to set the same gap C and D to 1...1.5 millimeters and adjust the distances A and B, and in our case (front-wheel drive car) the toe should be negative.
For what? In the case when the drive wheels are steered, when moving, their front parts tend to move inward; in rear-wheel drive cars, everything happens exactly the opposite - when moving, the wheels tend to move apart, so they try to make the toe-in positive.
Compensation for opposing forces
And although these values are not so great, it is still worth listening to the manufacturer’s recommendations.
DIY adjustment
Adjusting the toe angle on all cars comes down to the fact that when the value is reduced, the steering rods must be tightened, and when the value is increased using a clutch, the length of the rods must be shortened. Changing the distance between the wheel points must be done using both rods. The average distance between measurements A and B is considered to be 1 mm.
MacPherson strut suspension
Using trial and error, we adjust the rods (both in turn, no need to turn just one!), making sure that the boot rotates freely and does not twist (if necessary, loosen the clamp).
Clamp
We get the values:
- A = 163.1 mm;
- B = 163 mm;
- C = 1 mm;
- D = 1 mm.
These figures are quite satisfactory to us. Adjustment of the wheel alignment angles on the VAZ 2110 is considered complete. To complete the picture, a video is provided for your viewing.
How to make adjustments at home using the example of a VAZ 2110: video
Since the issue is considered from a broad perspective, let’s go over the key points using the example of trucks to broaden our horizons.
How does the procedure work on trucks?
Setting camber angles
On cars with a front axle and on trucks with a beam, this parameter is unregulated. The camber angle is set by the position of the kingpin at the factory and can only change due to its wear. We can only check it using a plumb line using the method described above. Eliminating wear and tear is a purely plumbing issue.
Kingpin
Setting toe angles
How to check
To take measurements on trucks, it is better to use a telescopic ruler, since due to the large wheelbase, when measuring with a tape measure, you can get an error due to its deflection.
Most likely, most will have problems finding a telescopic ruler. I offer my solutions to the problem:
- Make a ruler from a bathroom curtain rod;
Curtain rod
- Attach a caliper to the pipe/bar/stick (underline as appropriate);
Calipers
- Or don’t bother at all and ask the schoolchildren for a simple ruler.
Ruler
- We draw a mark line inside the tires parallel to the ground along the entire length of the wheel and take readings with a ruler on both sides of the rim.
- In the case of a telescopic ruler:
- We install a telescopic ruler and take readings from one side, in front;
- After rolling the car half a turn of the wheel, we take readings from the opposite side, from the rear;
- We calculate the difference and, if necessary, adjust the thrust;
- We repeat the steps to avoid errors.
Taking readings
How to adjust
On some cars, in addition to the locknuts, it is often necessary to loosen the bolts of the adjusting clutch, after which turning it in any direction changes the wheel toe value.
Wheel alignment
On trucks, it is necessary to loosen the coupling bolts (1) of the ends (2) and turn the transverse rod (3) with a pipe wrench (4), as indicated in the diagram.
Lateral thrust
Moreover, the average value of the toe angle on trucks is two mm. For those who are interested in more details, the video is below.
How to make adjustments on the front wheels of trucks
Unfortunately, it is impossible to analyze in detail the entire process of adjusting wheel alignment angles for all types of cars; there is too much variety in the technical solutions of the chassis at the moment. In addition, the installation angles differ significantly in each specific model.
Source: http://motorltd.ru/razval-shozhdenie-svoimi-rukami/
How to adjust wheel alignment with your own hands?
Many car owners are interested in how to make wheel alignment with their own hands. You can understand them, since it is not always the case that there is a car service center with the necessary equipment nearby at the right time.<\p>
But before moving on to a description of the procedure that is mandatory for any car, several questions should be clarified:
- What is wheel alignment?
- Why is this adjustment necessary?
- When should you do a wheel alignment?
- What might be required to get the job done?
- Is the algorithm the same for all cars?
- How is the adjustment made?
Only then will it become clear to you whether you can cope with the task on your own.
What is wheel alignment?
Simplified, this term refers to the position of the wheels relative to the longitudinal vertical plane of symmetry of the car.
In fact, everything is somewhat more complicated, since in reality, when calculating the suspension and steering, not two, but three parameters are taken into account:
1. Collapse. This is the deviation of the wheel from the vertical plane of its rotation. In this case, if the upper edge of the tire is rolled inward, closer to the center of the car, the parameter is considered negative, and if outward, it is considered positive. Specific dimensions depend on the device and suspension parameters.
To simplify the design, many modern cars do not provide the ability to adjust the camber.
In this case, the preservation of the geometry of the chassis elements and the supporting frame of the body comes to the fore. If parts are damaged, the adjustment may be outside the permissible limits.
2. Toe-in. In this case, the angle between the longitudinal vertical plane of symmetry and the plane of rotation of the wheel is measured. This parameter most affects the car’s handling, increasing or decreasing its steering. The ability to adjust toe is retained in almost all types of suspension.
3. Caster. This is what is commonly called the angle between the vertical axis of the wheel and the projection of its rotation axis in the longitudinal plane. Most cars are set to positive caster when the top of the axle is tilted back from the direction of travel.
The greater the tilt, the greater the leveling moment on the steering wheel, allowing the wheels to return to the middle position. The ability to adjust this parameter, as well as camber, is not always provided.
There are many nuances that require special areas of knowledge to be analyzed. But for a general understanding of the essence of the issue, this information is enough.
Why is adjustment necessary?
From the above, you can already understand that adjusting the wheel alignment affects the behavior of the car on the road.
If the design parameters are violated, this can seriously affect the behavior of the car on the road. The braking distance will increase. The car will pull to the side.
Depending on the situation, the steering force will decrease or increase. Both deviations are harmful, since with either of them the driver receives incorrect information about the contact of the wheels with the road and may lose control of his vehicle.
In addition, there are other purely technical problems. They are connected:
- With tire wear. The more the specified parameters are violated, the greater the wear will be. In some cases, tires can become completely unusable within a few kilometers of travel.
- With increasing fuel consumption. This is due to the fact that if the adjustment is violated, rolling friction increases.
In any case, measures should be taken to restore the status quo. It is not for nothing that pilots of various racing series spend a lot of time in the pits in order to install the optimal wheel alignment on their cars during tests. This allows them to successfully fight for victory.
Ruler for toe adjustment. Video:
The answer to this question depends on many factors. To begin with, it is advisable to carry out the check regularly, at least once a year. Even if there are no obvious signs of a malfunction, this will make sure that everything is really in order. The need for a procedure is indicated by very specific symptoms:
- On a flat road, when driving with the steering wheel released, the car pulls to the side.
- Humming and extraneous noises that occur at various speeds.
- Tread wear, which can be either uniform or local.
After repairs to the suspension, steering or supporting body frame, adjustments must be performed.
For example, turning the tie rod nut one turn leads to a change in the toe angle by a degree or more, which is no longer acceptable.
What might be required to get the job done?
Ideally, a special stand is required. But since such equipment for wheel alignment is not cheap, the advisability of purchasing it for personal use for the sake of servicing one car is quite questionable.
But even without an adjustment stand, it is possible to set the necessary parameters quite accurately. For this you will need:
- An inspection pit with a flat, level platform. Practice shows that this is the most difficult thing to find. When arranging ordinary inspection pits, it is not customary to achieve a perfectly flat floor.
- A right-angled triangle, preferably large, with a leg length exceeding the distance from the floor to the top edge of the rim.
- Plumb. It is best if it comes with a tripod, since measurements taken using a plumb line that someone is holding in their hands will not provide sufficient accuracy.
- An accurate ruler with millimeter graduations, or better yet, a special ruler for adjusting wheel alignment. Such devices are commercially available and relatively inexpensive.
- Knowledge of the cosine theorem, which allows you to calculate an angle given the lengths of the sides of a triangle. As an alternative, you can use an online calculator, which is available in sufficient quantities on the Internet.
- Technical specification of the car with exact data of adjustment parameters.
- High-quality locksmith tools, the specific choice of which depends on the suspension and steering design of your car.
- A metal brush, an aerosol can with “liquid key” and, of course, patience.
A plumb line with a square can be replaced with a device that has the complex name “shtangen greysmas”. It is perfect for the task at hand. Some craftsmen manage to replace the ruler with a precisely calibrated laser rangefinder.
But we will have to give up goniometers and, especially, protractors. You will not be able to take accurate measurements with them. In any case, it makes sense to get down to business only when everything listed is available.
When should you do a wheel alignment? Video:
The algorithm of actions will depend on the design of the suspension and steering of the car. The most common types of front suspension on modern cars are MacPherson type (swinging spark plug) and rack and pinion steering. We will consider this option first. You must act in the following sequence:
- We install the car in the pit, providing ourselves with unhindered access to the steering rods. While working, do not forget about the safety rules and the fact that you will have to crawl out of the inspection hole and go back down more than once.
- We make sure that all elements of the chassis are in good condition. If faulty levers, silent blocks, rods, ball joints, etc. are found, they should first be replaced. Otherwise, you will only waste your time and effort.
- We check and equalize the pressure in all tires of the car. We make sure that the wheel rims are intact and the tires are the same size.
- We unlock the steering column lock and turn the wheels from one extreme position to the other. After that we install them in the center. This is necessary so that all components fall into place.
- We find and mark the middle point by measuring the distance between the ball joints or suspension pins and dividing it in half.
- We take measurements from the inside of the wheels. We measure wheels, not tires! First, we determine the distance between their leading edges, and then between the rear ones. Using the resulting difference, we calculate the existing camber angle. We compare it with the data in the technical specification.
- If the parameter is violated, then loosen the locknuts on the steering rods and, by rotating the couplings, make adjustments. There is one subtlety here. It is important that the installation angles of the left and right wheels are the same. You can confirm this by taking measurements from the midpoint to each side and repeating the calculations. After this, tighten the locknuts and consider that the toe is adjusted.
- In cases where it is necessary to check and adjust the camber, measurements will have to be taken from the outside of the discs, since structural elements of the car may prevent this from the inside. To do this, you will have to arm yourself with a plumb line or a large triangle, having first constructed a perpendicular to the axis of the wheel.
- We measure and calculate the difference between the upper and lower edges of the disk. Using it we calculate the angle.
- Among the most common options for the camber adjustment device: 1. Rotating eccentrics. 2. Backing plates.
Depending on the situation, by rotating the eccentrics or inserting/placing plates, we achieve the required parameters. To gain unhindered access to the plates and eccentrics, you often have to remove the wheels and then install them back when taking measurements.
Replacing the timing belt from A to Z - here is more useful information.
Since the parts of the adjustment mechanism are often covered with dirt or soured from rust, you will need a wire brush and a “liquid wrench” to free them.
All of the above can also be applied to cars with other types of suspension. However, depending on the design features of a number of elements, there may be significant differences. For example:
- Cars where a gearbox and steering linkage are installed instead of a rack and pinion drive require special attention to the condition of the bushings and the pendulum hinge. Their wear affects the adjustment, and it can often be detected only with a certain position of the parts.
- On machines with a pivot suspension, when adjusting the camber produced by rotating the eccentric, the caster also changes. It will also have to be controlled.
- Some car models provide toe adjustment not only for the front, but also for the rear wheels. In most cases, this parameter changes when the coupling mounted on the transverse link connecting the rear wheels is rotated.
- If the car has all-wheel drive and a continuous front axle is installed, then the design does not provide for camber adjustment.
You can do the job efficiently only if you know all these features.
You will be interested in this article - Do-it-yourself steering rack repair for a VAZ2114 car
Of course, your task will be greatly simplified if you decide to invest in professional equipment. It is not necessary to purchase a complex stand with laser sensors and a computer terminal that processes information, connected to a database that contains all the necessary parameters for hundreds of machine models.
A relatively inexpensive optical stand is quite sufficient. The domestic version of such a device, SKO-1M, can be found in stores at a very reasonable price, within 60,000 rubles. For a used one they ask for even less.
But here everyone must decide for himself whether such an investment is justified or whether it is still more profitable, when the need arises, to go to a service station.
It’s not easy to do a wheel alignment yourself. What looks easy in words, in practice requires serious expenditure of physical and nervous strength. You shouldn’t expect that everything will work out the first time.
You'll have to be patient. Remember that the most advanced wheel alignment equipment will not make you an experienced specialist.
But in the hands of a master, even an ordinary PSK-LG line can work wonders!
Source: https://autoot.ru/kak-otregulirovat-razval-shozhdenie-svoimi-rukami.html
Adjusting the camber. Do-it-yourself alignment. Tips and tricks on how to do wheel alignment yourself
It will not be news to anyone that an incorrectly adjusted wheel alignment can lead not only to a deterioration in the quality of the tire, but also to an increase in fuel consumption. That is why it is worth approaching the camber alignment responsibly.
Setting up the wheel alignment on your own is not at all difficult, as it might seem at first. We will try to consider this issue in detail and give the best advice to new mechanics.
Stabilization of a pair of steering wheels is the most important aspect that affects the stability of the car on the road.
What does it mean? The wheels should move in a straight line and, bypassing the turn, return to their original position.
Following from this, the urgent need for the wheel stabilization procedure is explained very simply. When the car is moving, the wheels, which are not stabilized, move to the side as a result of shocks from the road.
Then the driver must return the wheels to the desired (straight) position. Considering that this happens constantly, the person driving gets more tired. In addition, the steering contacts wear out faster.
And with increasing speed, the growing instability becomes unsafe.
What determines the stabilization of steered wheels? The answer is simple: from their alignment or collapse. alignment can be adjusted in auto repair shops, but it is quite possible to solve this problem yourself .
The first thing to do is determine the need to adjust the camber.
Let's look at this point by point:
- Continuous movement of a car from a given course of straight-line movement in one direction or another.
- Uneven tire wear.
- When inspecting the front wheel tread groove along the axis of rotation, it is necessary to inspect the edges of this groove. The edges are the same - this means there is no cause for concern, but if one of them has some sharpness and the other does not, then you have a problem. But you should pay attention to this only when driving calmly. If you are a fan of fast speed, then this condition can be deceptive.
- Difficulty in controlling maneuvers. The presence of at least one of these symptoms indicates that it is necessary to install a wheel alignment. Drivers who have some experience in repairing cars with their own hands, if they really want to, can perform wheel alignment themselves.
How is wheel alignment adjusted?
For repairs you will need:
- ruler;
- chalk;
- standard set of tools;
- cord with a plumb line;
- flat area with a pit or lift.
First you need to find out how accurately the convergence was performed earlier. Those. Is the steering rack in a “zero” position during straight-line motion? How to do it? We follow further instructions: place the car on a flat surface.
Then turn the steering wheel as far as possible in one direction, making a mark on the top of the steering wheel (in the middle of the circle) and turn the steering wheel all the way in the other direction. In this case, it is necessary to count the number of whole revolutions and parts of a whole circle (shares). When you have calculated, divide the resulting amount by 2 and turn the steering wheel to this position.
If this result coincides with the usual position of the steering wheel, then the “zero” position of the rack is set. If not, you will have to do it yourself.
How to set the “zero” position?
It is necessary to remove the steering wheel; to do this, unscrew the nut. Afterwards, fix it in the “zero” position we calculated (the steering wheel spokes should be positioned symmetrically).
Now we will be guided by this position.
In order to test yourself, you need to alternately rotate the steering wheel left/right - it should turn the same number of revolutions in both directions, so turn the wheel to the sides as far as possible, protecting them.
Next, you need to loosen the tie rod end lock nuts. One rod should be unscrewed a little, and the second should be tightened by the same number of revolutions (this is very important!). This procedure can be done once and no longer change the position of the steering wheel. And in the future - just adjust the convergence.
How to adjust wheel alignment?
After checking straightness, you need to check the degree of vehicle load, tire pressure, whether the suspension and steering mechanism are securely fastened. After this, you can proceed directly to checking and adjusting the toe.
To determine the wheel toe level, you should calculate the difference between points on the rim in front and behind its geometry axis. To do this, you need to use a special chain with a ruler or a tension device.
To measure toe-in, a ruler is placed between the wheels so that the tips of the pipes rest against the side of the tires and the chains touch the ground.
When you set the arrow to the zero position, the car should be rolled forward a little so that the ruler is behind the wheel axle. In this case, the arrow should show the level of convergence.
If there is a discrepancy with the norm, it must be adjusted.
In order to adjust the toe-in of the wheels, you need to rotate the connecting couplings of the side steering rods. When this operation is carried out, the control nuts must be tightened securely.
Adjusting the camber angle
The most difficult process is checking and adjusting wheel camber, but it can also be done on your own. To do this, the car is raised so that the wheels do not touch the ground.
After this, you need to calculate the places of equal runout on the side parts of the tires. With the wheels in a straight line position, hang a weight next to the wheel. Marks are made with chalk around the circumference of the wheel at the top and bottom.
Using a plumb line, calculate the distance from the rim to the cord.
The difference in distances between the weight thread and the top of the rim is the camber level. To accurately perform the procedure, roll the car so that the wheel turns 90?.. Repeat several times and write down the results.
Next, remove the car wheel and loosen the 2 bolts securing the shock absorber strut bracket to the steering knuckle.
Then we move the steering knuckle inward or outward, in which direction and by what distance, depends on the results of your measurements.
This is how you can set the required camber angle. After the procedure, you need to tighten the bolts, install the wheel and take measurements again.
Remember that on cars with rear-wheel drive, the norm for the camber angle of the front wheels is somewhere in the range of +1 - +3 mm, and for cars with front-wheel drive this norm is from -1 to +1 mm.
After completing the entire procedure, do not forget to check the tightness of all those bolts with which you made the adjustment. And after completing the wheel alignment, check the alignment of the car on the road.
When doing wheel alignment yourself, remember that it is necessary to take measurements several times (at least three), and then take the arithmetic average value. If the wheel alignment is adjusted correctly, the vehicle will not pull to the side when driving, and the tire tread will wear evenly.
The entire adjustment procedure is carried out again if, after the work has been carried out, the machine still “moves away” from the trajectory of straight-line motion. Uneven tire wear will also indicate improper camber or toe-in, so tire diagnostics will also be useful.
Carrying out such a difficult procedure on your own will save you a decent amount of money, but remember that for most modern cars, it is recommended to have an alignment performed at a car service center.
Source: https://etlib.ru/blog/134-regulirovka-razvala-shozhdeniya-shod-razval-svoimi-rukami
Do-it-yourself alignment
It can be said with great confidence that among experienced drivers who have just received a “driving license”, there are those who are hearing about this for the first time.
For the majority of car owners who do not service and repair their “iron horses” themselves, there is no need to know about this.
For those who like to tinker and look after their car themselves, this article may be useful.
What is meant by toe-in and camber of the front wheels?
When the camber and toe of the wheels on the car are installed correctly, all recommendations of the vehicle manufacturer are followed, this will ensure good stability when driving on any road. Rubber wear will occur evenly over the entire area of the wheel, control will become easy and reliable.
Camber refers to the position of the wheel in relation to the road. The normal position is considered to be when the top of the wheel is tilted outward.
This value is determined by the factory and has a certain meaning for different car models. It is bad for the car and for the wheel itself when the tilt of its upper part is directed inward.
In this case, you have to forget about good stability and controllability, and tire wear is greatly accelerated.
Toe-in refers to the distance between the front and rear points of the front wheel rims. Wheel camber is measured in degrees, and wheel toe-in, in addition to degrees, can be determined using distances in millimeters.
When is it necessary to check camber and alignment?
Various sources recommend adjustments at approximately 12-15 thousand kilometers, or once a year. Sometimes there are cases when it is necessary to perform such an operation ahead of schedule.
The reason for this in most cases is the condition of our roads. It is enough to “catch” a good pothole once to require checking and adjusting the camber and toe of the front wheels.
If the owner plans to use his car for a long time without any problems, then it is not worth saving on this operation. After each replacement of ball joints, silent blocks, steering rods, shock absorbers, it is necessary to check and adjust the camber and toe of the wheels.
Performing this operation today is quite simple. You just need to go to a service center that performs such an operation, and specialists will quickly and efficiently complete this work. But there are times when such work must be done independently in a garage.
We carry out the camber and alignment ourselves
We will not repeat the importance of this operation. This process is important and must be taken seriously. To perform it you need tools and accessories:
- Availability of inspection hole.
- Plumb.
- Chalk or felt-tip pen.
- A set of keys.
- Sliding ruler with scale.
Carrying out the operation of checking and adjusting camber and toe for cars with front-wheel drive and “classics” have some differences. To perform this operation at home, it is necessary to ensure the presence of a flat, horizontal platform. Checking and adjustment is carried out in several stages:
- The car is installed on the site so that the front wheels are straight. There are two marks on the outside of the tire, one at the top and the other at the bottom.
- Apply a plumb line to the wing so that it is in the plane with the applied marks. Next, use a caliper or other measuring tool to measure the distance from the cord to the wheel disk near the upper and lower marks. If the difference is about 3 millimeters, this is normal.
- Next, you need to turn the wheels, rolling the car forward so that the applied marks are located horizontally.
- Again, measurements are taken from the cord to the wheel disk in the vertical plane.
- To obtain more accurate measurement data, this operation must be performed several times.
The difference in size between the upper and lower marks for cars with front-wheel drive should be no more than 1 mm, and for “classics” – 3 mm. If the obtained measurement results do not fit into these standards, adjustments are made.
For cars with front-wheel drive, the desired result is obtained by moving the strut forward or backward, while for “classics” the shims for the lower control arm of the front suspension are added or removed.
If the “classic” front suspension has a MacPherson strut, the strut is also moved for adjustment.
Wheel alignment is checked using a sliding ruler. To do this, make two marks on the inside of the wheels in front of the car and measure the distance. Next, you need to roll the car so that the marks are at the rear along the direction of the car. The measurement obtained between the marks should be approximately 1 mm larger than the previous one. This can be achieved by turning the steering rods.
I would like to remind you that such independent adjustments are temporary, therefore, do not put off checking the front suspension of your car using special equipment for too long. Good luck on the roads!
Source: http://lada-na-remont.ru/remont/vaz-2109/64-skhod-razval-svoimi-rukami

 (votes: 1, average rating: 4,00 out of 5)