Changing the oil in the Toyota Corolla variator
Toyota Corolla is without a doubt the best-selling Japanese car on the Russian market. The car is in high demand for reasons known to all - good driving characteristics, high reliability and high-quality components.
On the other hand, we must admit that you have to pay dearly for trouble-free operation, and this is quite fair. However, Toyota Corolla owners, due to their human factors, always strive to reduce the cost of servicing their car.
This is very important, for example, if the car’s warranty has expired. Toyota's expensive service is not in high demand, as confirmed by owners of used Toyota Corollas.
However, some procedures can actually be carried out independently - for example, changing the oil in the gearbox. This procedure will be discussed in this article using the example of a Toyota Corolla with a CVT.
Why change the oil
At first glance, the procedure for changing transmission oil will seem complicated, especially to beginners. But in reality it does not require professional skills. The oil needs to be changed after a certain period of time.
The reason for changing the oil is that after several thousand kilometers the oil loses its properties and can no longer effectively cool the transmission components. As a result, overheating and contamination of the insides of the gearbox occurs.
Accumulating dirt deposits negatively affect fuel consumption, noise and vibration, as well as persistent problems with the automatic transmission. It may even lead to complete failure of the variator, and this may lead to breakdowns of other equally important components and assemblies of the Toyota Corolla. For example, an engine.
The variator is a rather complex component in a car, but it does not require professional care. Any inexperienced motorist can handle an oil change. Another thing is how regularly the fluid is replaced.
When to change the oil?
The manufacturer advises changing the oil in the Toyota Corolla CVT every 15-20 thousand kilometers, depending on operating conditions. It may be necessary to reduce the interval if the machine is used in a negative climate environment - for example, in dusty conditions and on poor roads.
Oil change nuances
To fill the variator with oil, 20 minutes is enough. Indeed, you can easily invest such time if you follow all the procedures described below.
Before changing the oil, it is recommended to warm up the engine thoroughly so that the oil heats up to a higher temperature. The fact is that more heated oil will flow out of the filler hole.
A lift can be used for this procedure. Or, as an option, an overpass or inspection hole will do.
As a last resort, you can use a jack and stable supports to keep the car as level as possible.
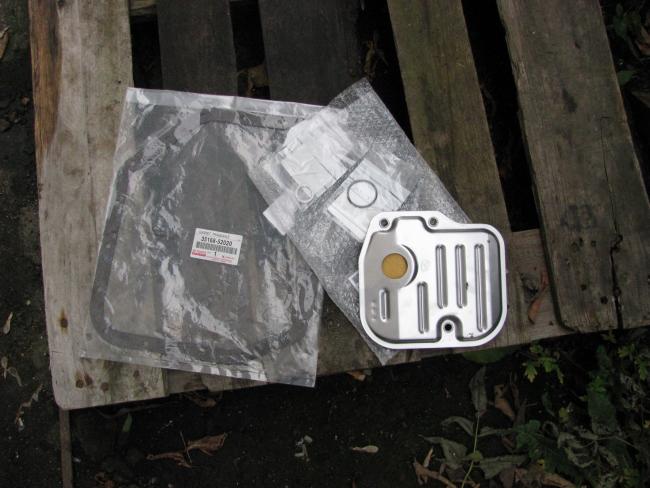
To change the transmission fluid, you will need new oil, a new oil filter, a new O-ring, as well as a set of tools (sockets and open-end wrenches), rags, gloves and a pan for draining the used fluid.
Volume
The volume of oil required for the gearbox is 6-7 liters. In any case, you need to buy a larger canister so that after filling there is still some liquid left. You will need it in case the oil level drops a little after a few days. Please note that only 4-5 liters of oil are required for initial filling.
Sequence of work
- Place the car on the overpass, after warming up the engine
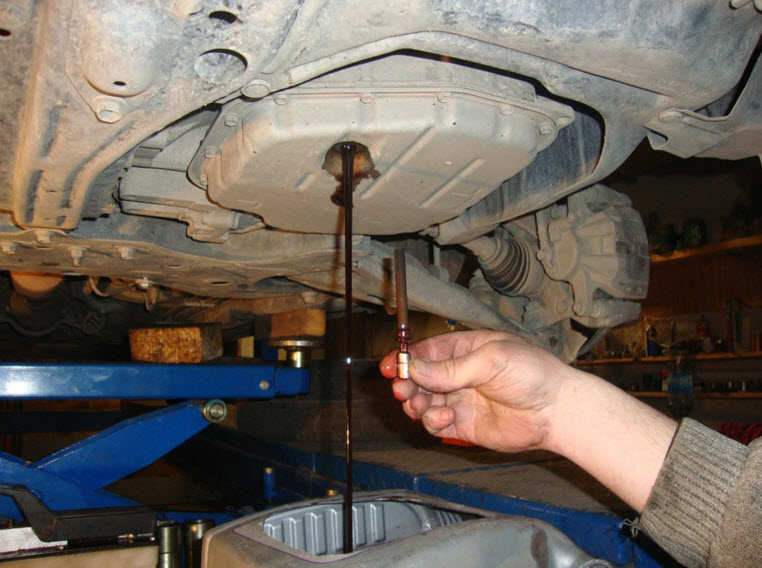
- Unscrew the drain cap, from which old oil will begin to flow into a pre-prepared pan
- Unscrew the measuring tube located nearby.
When you pull it out, you need to be careful, as a large amount of oil will run out from there.
- Let's pay attention to how much old fluid has leaked out. It should be about 4.5-5 liters. This is how much new oil will need to be added
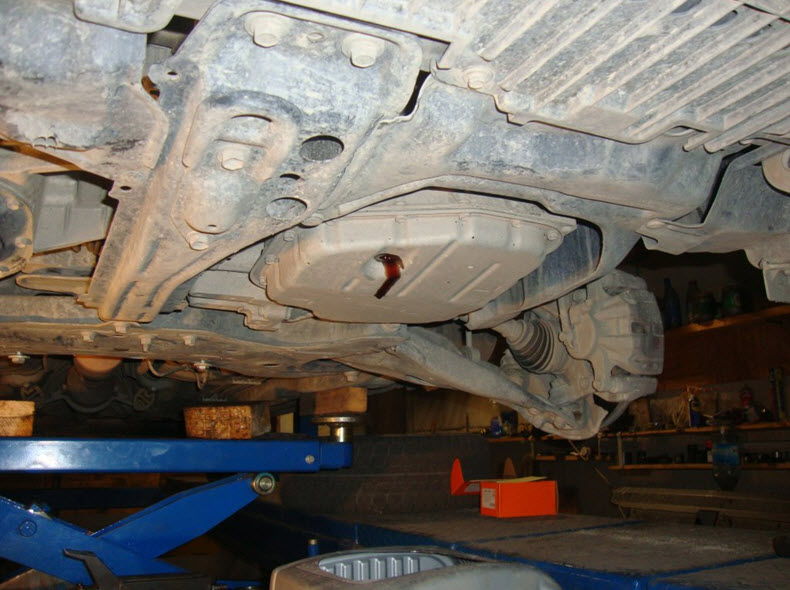
- Unscrew the pan holding the gearbox (in our case, the variator). Dirt may remain on the surface of the tray.
All processing products, including dirt deposits, must be removed, then proceed to replacing the oil filter.
- Along with unscrewing the old filter, it is necessary to remove the sealing ring (gasket). Both parts must be replaced with new ones, as they are considered disposable
- The next step is removing the valve body.
To do this, you need to use a tool to unscrew the 14 long bolts. By the way, two of them are shorter than the rest. It is worth noting that when screwing the valve body back in, all bolts must be tightened in exactly the same way as they were screwed in initially.
- The removed valve body must be disassembled to gain access to the cylindrical filter.
To disassemble the valve body, you will have to remove several bolts (10 pcs), after which the valve body can be divided into two parts. It is advisable not to turn them over, otherwise all the springs may change their location.
- Remove the cylindrical filter from the disassembled valve body and insert a new element in its place.
- The assembly process of the unit is carried out in the same order as during disassembly
- The next step is to fill in fresh transmission oil. Access to the filler hole is located behind the left front wheel of the vehicle.
The process of filling the liquid continues until it is completely filled. In other words, you need to pour in no more than 4.5-5 liters of liquid (exactly as much as was drained)
- After filling the oil, tighten the plug and also check that all screw connections are securely fastened. The process of changing the oil in the Toyota Corolla variator is completed
- The oil level should be checked for several days and fluid should be added as needed.
Video
Source: http://maslospec.ru/zamena-masla-v-variatore-tojoty-korolla.html
Replacing the filter in the variator with your own hands - logbook Toyota Corolla Fielder 1.5 cvt 2009 on DRIVE2
I finally decided to change the oil in the variator because I was starting to behave strangely.
I went to the “Yaposhka” store, as it seemed earlier that they would tell me everything, but as it turned out, they gave me one “big” filter. They assured me that there was only one on this filter and they said I drained it, changed it and filled it up.
Naturally, when I got home, I looked at videos and articles on this topic here and started calling the store with a complaint: “Why are you guys fucking with me with a filter?” They argued for 20 minutes, in short, there is no such filter. Nothing to do, went to get some oil
Zoom
I immediately bought a funnel
Zoom
two oils for 3250 each
Zoom
the filter itself is 1250
I collected everything and went to the garage. I drained the old oil and immediately filled it with new oil and collected it and drove off, it seemed easier, after 2500 km I went back to the garage.
I drained the old oil again, the color was terrible (dark dark red). I screwed up the plug a little, so be careful with the hexagons if you do this. I unscrewed the dipstick with the same hexagon, which is also the oil level, as I understand it.
I removed the pan and didn’t douse myself in oil like many people write) and there’s a kilogram of gray chacha on the magnets and a blackish coating
Zoom
old oil
Zoom
plaque on magnets
Zoom
the dipstick is already clean
Zoom
clean pallet
The carburetor cleaner fixed everything, everything shines) Next, I removed the old filter; everything was dirty there; I didn’t take any photos. Filters compared
Zoom
old and new
Filter numbers are the same, which means everything is OK
I took a picture of where the second magazine filter is located
Zoom
here he is
I cleaned the contents of the box a little with the same carb cleaner. Installed a new filter and checked that the sealing ring was in place under the filter.
Zoom
This is what everything looks like before assembly
I installed the pan, installed a new gasket, everything was ok) I removed the front left wheel, unscrewed the filler plug while holding the ring under it. According to the advice of people here, it gets lost very quickly, especially in a pit), but it was possible without searching. I filled one canister, had a smoke and filled it with another 600 grams. I assembled it, tightened it, and put it on the wheels.
I warmed up the box a little, poked the drawstring here and there, and went down. I unscrewed the drain and oil flowed out in a thin stream, again following the advice here. So it’s normal. I assembled it, warmed it up and immediately went for a test) I’ve been riding for three days now and the impressions are positive.
The box began to behave well without unnecessary twitching and became so smooth) in general, the work done was not in vain)
Price tag: RUB 8,120 Mileage 144,000 km
Source: https://www.drive2.com/l/474381269220720953/
How to Change the Oil in a Toyota Fielder CVT

How to change the oil in a Toyota CVT
How to change the oil in a Toyota ? This question is asked by many Russian car enthusiasts. A variator is a device that transmits torque to an engine.
In addition, it ensures softness and smoothness of changes in the gear ratio in a certain range. An oil change, for example, in a Toyota Fielder variator needs to be done once every seventy thousand kilometers.
general information
Many cars today are equipped with a similar device. Particular attention should be paid to the Toyota Corolla Fielder , which began to be produced before 2013. Like any car, it sometimes needs to be serviced, lubricant and oil filters need to be replaced. This will increase the operating period.
Changing the CVT oil looks simple at first glance. Often the complex design of the variator makes the procedure difficult.
Of course, you can always contact a specialized service, but then you will have to spend a lot of money.
It is much better to try to figure out on your own how the variator , what is the algorithm for changing the oil fluid in it.
Why change CVT oil?
It happens that a car breaks down at the most inopportune time. No driver wants to find himself in such a situation. To avoid this, you need to monitor the technical condition of the car. In particular, you need to monitor the power unit and gearbox.
Car owners often forget about the CVT This is due to the fact that it is little known to drivers. However, if the variator fails, the functioning of other automotive components will be disrupted.
The variator does not require special care. It, like the engine, needs lubrication. If the oil is not changed, this will certainly affect the functioning of the engine. Its wear increases and its service life is reduced. In view of this, it is necessary to replace not only transmission and engine lubrication, but also CVT lubrication.
Original Toyota oil
Toyota Fielder has its own features. According to the automaker's recommendations, synthetics should be poured into it. This is due to the high quality of the car. The more modern the car, the more carefully it should be treated and the better the fuel and oil characteristics should be.
Toyota Corolla Fielder 1.5 2008 COMPLETE oil change with filters in the CVT
Hi all!!! Friends, I would like to share my knowledge and opinion about the Japanese automobile industry, I will be glad to hear.
Secrets of changing oil in a variator
Changing the oil in a variator that does not have a dipstick. How to set the oil in the box.
Ignoring the features of the Toyota Fielder can lead to its rapid breakdown. In view of this, purchase lubricants recommended by the manufacturer.
Replacement procedure
Changing the CVT oil lasts approximately thirty minutes. If you once understand how it is done, then later you will have the opportunity not to contact a car service and not pay money.
Do not work with the variator immediately after turning off the engine. Wait six to seven hours. Also in the Toyota Fielder there is a filter that needs to be changed. You will need gloves and a waste oil basin. The replacement algorithm is as follows:
- Place the vehicle on a viewing ditch/overpass that allows the driver to stand completely. Place a board transversely under the drain, on which place a basin for used motor oil.
- Prepare fresh synthetics. You will need six and a half liters of petroleum product.
- Unscrew the drain plug.
- When the grease stops flowing, unscrew the measuring tube located near the drain. The basin must remain under the drain, as the lubricant will again begin to flow from the hole.
- Unscrew the installed CVT pan.
This is necessary to carry out cleaning, eliminate wear products, contamination, and change the oil filter with lining.
- After cleaning the tray, remove dirt from the magnetic elements.
- Remove the hydraulic unit. To do this, turn off the solenoids located there and unscrew the fourteen bolts. Remember how the bolts are positioned.
- Unscrew the ten valve body bolts. It will split into a couple of parts. Do not turn them over to ensure the springs stay in place. Otherwise, you will have to assemble and install them back for a long time.
- Remove the old filter and replace it with a new one.
- Collect variable speed drive and mount it back.
- When you change the pan lining, install a new oil filter, be sure to make sure that the variator pulley fits exactly into the hydraulic block cylinder. To do this, switch transmission modes when you get into the car. If everything is fine, you can start refueling variable speed drive fresh oily liquid.
- The oil filler neck can be found by unscrewing and dismantling the left front wheel of the car. Pour in as much grease as you drained.
All these actions can be carried out with your own hands in half an hour; it is important to be vigilant when changing the oil. Remember that the variator is considered a fairly significant device that ensures the normal functioning of any vehicle, regardless of its model.
Source: http://avto-melvin.ru/kak-pomenjat-maslo-v-variatore-tojota-filder/
Changing the variator oil - logbook of the 2007 Toyota Corolla Fielder on DRIVE2
Finally, my epic with changing the oil in the box has ended. I’ve never changed any oil before, it was a bit of a bummer to go there, but after monitoring the prices I decided to do it myself).
Although no, first I went to where the minimum price was, about 7 rubles, they climbed into a hole, they say the edges on the cork are torn off (they changed them last time), like we’ll knock it out now, while you’re going to add some salt, you’ll go buy it, I won’t I was a fool at first, I visited all the stores and a bunch of showdowns, there was none, in short, I ordered it and decided to do it myself, out of harm’s way).
Drain plug
I went and bought two cans of oil (RUB 1,720 for a 4L can), took the ordered plugs and gaskets, and went to my friend’s pit!
Oil! you need two cans if you remove the pan
After reading on the Internet, studying all the methods, we came up with a more correct option for ourselves! I had to tinker with the plug, in short, I knocked it in half with grief, oil began to flow, then I unscrewed the plastic dipstick tube with a 6-point hexagon, even more leaked out, and then I removed the pan and drained the remaining oil, for a total of 5 liters.
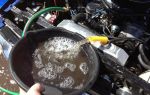
Black and smelly
CVT without pallet
...and without a filter
We started rubbing the tray and magnets with carbocleaner and white spirit, there was a 2-3 millimeter coating of some kind of gray mucus on the magnets, no metal shavings were observed.
Pallet before cleaning! The old gasket was basically normal, but... I bought a new one and replaced it!
Rubbed
Then we put everything in the reverse order, screw the pan into place, screw in the dipstick tube and begin to fill in fresh oil. To get to the filler hole, you need to remove the left wheel and bend the protection, there will be a 24-hole plug with the letters TS, so oil is poured into it!
I pulled the protection with a rope to the lever so that it wouldn’t interfere
We pour the oil until it begins to flow out of the drain hole; as soon as it starts to run, we stop pouring and wait until it starts to drip from the drain hole. We tighten the plug and pour on top the difference between what was drained and what was fresh. In short, 5 leaked out, 5 and filled it with fresh, it turns out. Then you need to adjust the level, the most interesting thing would be!..
The variator must be heated to 36-46 degrees. The temperature can be monitored either with a scanner or by closing the contacts in the diagnostic port. Because
We didn’t have time anymore, we started the car and it ran for a little while, warmed up, switched gears, and left it running, went to check the level, unscrew the drain plug, if it doesn’t run, then top it up until it runs, if it runs, drain it until it starts to leak in a thin stream, then we tighten everything up, put on the wheel and go.
Then you need to travel a little so that the whole thing gets mixed up and make a second replacement. For me it took a little longer for about 500 kilometers) Yesterday I made a second replacement, only without removing the pan and everything was done according to technology, with the level being set according to temperature.
I drained the oil, poured in the same amount and started adjusting. Inserted a jumper into the diagnostic port.
We close 4 and 13
The jumper was made from a paper clip
Then we start the car (before that we turn off all energy consumers), everything on the display starts to blink (this is normal), we press the brake and move from P to D, then within 6 seconds we poke from D to N back and forth (it turns out 4 repetitions), we stop on D and sit and look at the display, after a few seconds D should blink, if it blinks then move the selector to position P and wait (I managed to do this on the third try)) Then D should light up (if it doesn’t light up, it means it’s not heated up, if it’s on, it means everything is humming, if it’s blinking, it means it’s overheated), although the lever is in position P, if it’s on, then we jump into the hole, unscrew the plug and see if it runs, it doesn’t run, just like the first time, in short). When I change it next time, I’ll do it quickly and without any problems, nothing complicated and even a little interesting) The transmission began to shift more smoothly without jerking, in general I’m happy and saved money)
Source: https://www.drive2.ru/l/3863366/
How to change the oil in the variator on a Toyota Fielder

As we all know, a variator is a device that transmits torque and is also capable of softly and smoothly changing the gear ratio within a certain set control range.
Many modern cars, including the Toyota Fielder, are equipped with a CVT and, as a rule, they require periodic maintenance.
In principle, as for the variator, the only thing that is necessary is to occasionally change the lubricating fluids and filters.
Many responsible motorists who want to delve into their car themselves will have a pressing question: how to change the oil in the variator on a Toyota Fielder. But before answering this question in great detail, it is worth talking about why this periodic replacement is necessary.
Why change the oil in the variator?
Sometimes it happens that our cars let us down, and this is especially unpleasant when we really need it.
So, to prevent such situations from arising, you should monitor the technical condition of your vehicle and at least change all the filters on time so that the engine and interior of the car do not become clogged, as well as change the oil - engine or variator.
Not changing the lubricant in time increases engine wear and reduces its service life by several times. Therefore, it is very important to ensure that the oil is changed on time.
Speaking about Fielder, it must be said that for this car it is necessary to use the best synthetic lubricants.
This is due to the fact that the cars are of high quality and the service life of each of its parts is incredibly long. However, if something starts to fail, then this part will destroy the entire mechanism.
Therefore, you should keep everything under control and use only the best oils, the best filters, and the best fuel for your car.
Now that you have learned the reasons why it is necessary to periodically change the fluid, you can move on to the question - “how often does this need to be done?” So, having considered the main general issues regarding changing the oil in a variator, it is worth moving directly to the process of changing the oil.
Read about changing the oil in the automatic transmission of Toyota Corolla.
Instructions for changing the oil in the variator on a Toyota Fielder
As a rule, the procedure for changing the oil in a variator takes no more than 20 minutes of working time. In fact, everything is very simple here.
Let's start with the pit. The hole does not need to be particularly deep, but it is desirable that the person fits in at full height. It must be equipped with a crossbar on which the container will be held. We will pour all the oil into this container.
Secondly, oil. The oil must be at least half synthetic; you should not skimp here, since repairing the variator will cost you much more later. The price of the whole issue, including replacing the filter, will cost you about 7,000 rubles, but this is provided that the oil is of fairly good quality. In total we will need 6.5 liters of new oil.
So, let's start analyzing the step-by-step instructions.
At the first stage, we need to let the car settle so that all the oil flows into the lower pan of the variator. After the car has stood for about 4-5 hours, you can begin to drain the oil. To do this, we first need to unscrew the drain plug. Once you unscrew it, don’t be too surprised that very little oil leaked out.
After waiting for everything to drain from the unscrewed plug, you can unscrew the measuring tube; however, you should not remove the container for the old liquid from the outlet hole, since after you pull out the tube it will flow like a river.
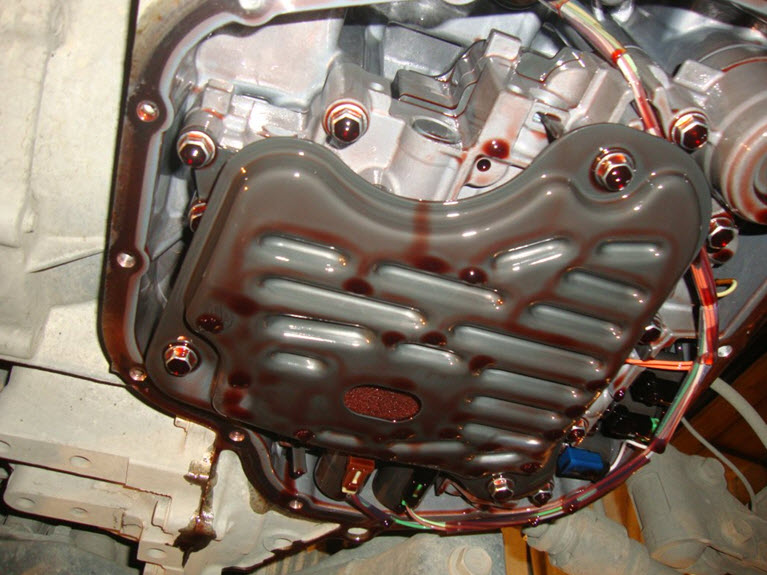
At the end, the amount of waste fluid should be approximately 4.7-4.8 liters. After waiting until the oil almost stops flowing, you can begin to unscrew the variator pan. We need this in order to remove dirt (if any) and replace the filter with the pan gasket. So, having removed the pan, we need to clean it of oil and dirt.
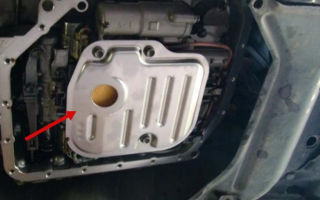
After cleaning the pan, we need to remove the first large filter; be sure to remove any existing deposits on the magnets. The photo below shows the first filter.
After removing the filter and cleaning the magnets, we need to remove the hydraulic unit. To do this, you need to turn off the solenoids and unscrew 14 long bolts, of which 2 are shorter. Therefore, it is very important to install each bolt exactly in its place.
But if it suddenly happened that the bolts got mixed up, in the photo below, a screwdriver shows the holes into which these two short bolts should be screwed.
So, let's finish with the digressions. Having removed the hydraulic unit, we place it in a separate container, in which we then carry out all operations. This is necessary so that all the details remain in sight. We decided to place it in a large basin.
The photo below shows the variator after removing the valve body. The red oval highlights a pulley - or position switch (PRNDSB) that depends on the lever in the Fielder's cabin. It is very important that during assembly it absolutely hits the piston, which is located on the valve body, by the way, it is also highlighted with a red oval, in general you will understand, there is nothing complicated here.
Next, we proceed to disassembling the valve body itself, which contains the second cylindrical filter. In order for us to disassemble it, we need to unscrew 10 long bolts, after which the valve body will split into two parts. Pay special attention to the fact that it is better not to turn both parts over so that all the springs remain in their places.
After the parts have been disconnected from each other, we need to pull out the old cylindrical filter, in the place of which the new one purchased will be installed.
After the filter has been changed. You can begin reassembling the variator. It is worth noting that during disassembly, approximately another 1.7-1.8 liters of used synthetics should drain.
After the pan gasket has been replaced, the external filter and pan have been installed, it is necessary to check whether the variator pulley has correctly entered the valve body cylinder; you can verify this by changing gears from inside the car. If everything is in order, you can start filling in new oil.
The oil fill hole can be found by unscrewing and removing the left front wheel. You need to add exactly as much oil as your glass, neither more nor less. Enjoy using the instructions.
Source: http://corollafan.ru/filder/zamena-masla-v-variatore-tojota.html
General – Toyota Fielder 2010 Changing the Oil in the CVT – My personal blog
The more you read, the more suspicious you become. Like in the book by Jerome K.
There, too, one started honey. The car drives, you just have to enjoy it. And the fact that the revolutions grow disproportionately means the car is not a projectile. In any case, it takes time to accelerate. The laws of physics have not been repealed. Although I haven’t observed this in myself, and I try to drive carefully without sudden braking and acceleration.
In this sense, I have nothing to complain about, when I need to accelerate, when I need to slow down. By the way, I wrote to the Toyota representative office and asked if they would like to look at our cars. So I was just kidding; D1.
September 2.00. 9, 0. I almost got into an accident once because of this. I was standing at an intersection, there was a stream of cars, I saw an empty space between moving cars and on the gas, but no such luck, 5 revolutions. So, the intersection rolled over, my heart sank to my feet!
It is very easy to treat: you just need to release the gas and immediately press it again, the box picks up! I'm telling you what's going on.
It’s not for nothing that the Japs are recalling cars with this defect – it affects safety!!! September 2. 00. 9, 0.
Well, we just have to live with it. But nevertheless, look, it will soon be 7.
D4 and CVT. 1. December 2. 01. 0, 0. De. Xt. Er. I think the problem can be solved by replacing the variator with a simple manual gearbox. And more pleasant and interesting. There was a joke about speeding up somehow.
Once I was driving along a 2-lane lane, I was in a hurry, the truck was barely pushing in front of me, so I turned to the left and pressed the pedal. The pedal is to the floor, but the car is stupid... I took a risk and slipped through, but I will never repeat this again, there is only one life. I can’t imagine what would have happened if I had been confused, everything could have been several times worse.
December 2. 01. 0, 0. Premio 2. 2. What does anyone think about the idea of replacing the variable valve with a manual one? December 2. 01. 0, 0.
Fritz. 71 so it may be so, but I have something else in front of me, a friend of mine has an Avensis D4 + CVT, I’m very happy, but it’s really going to be hard to sell. But nevertheless, look, soon there will be a 7. D4 and a CVT. A friend has an Avensis D4 on the mechanics, he hasn’t been able to sell it since the summer, people, as soon as they find out that it’s a D4, immediately shy away (although the mileage is 6. Boredom will disappear and all sorts of thoughts about marriage!
Who thinks about this? I’m also interested in who thinks how realistic this is? December 2. 01. 0, 0.
This is about the same as buying a new ashtray if your ashtray is full :))) Isn't it easier to replace a small part? Well, with a mechanical mechanism, the car immediately becomes inconvenient and, moreover, loses in price (mechanics are cheaper).. And this is provided that everything works without problems.. December 2. 01. 0, 1.
De. Xt. Er. But, he will be more cheerful, playful, and he won’t be stupid when overtaking, this is a fact :). I think the MCP is always relevant. December 2. 01. 0, 1. I’m wondering if anyone has already replaced this part in the box? Not more energetic, but more powerful - fact!
In order to change something, you need to figure out what to change. As I noticed, the chain simply slips for unknown reasons. I don’t know what they are going to change. Rather, the Japs gathered to finalize the varik. January 2. 01. 1, 2. Dunce.
By the way, on the highway I can easily overtake convoys at any speed (the CVT, in this case, is the best option: good:, you don’t have to switch, which means you don’t waste time on switching and raising the revs constantly, the revs don’t drop, but stay at 6 .
The variator is, on the contrary, a thrill: good: : good: 0.
January 2. 01. 1, 0. Drutchik yes.. I had a brand new Alion.. January 2. 01. 1, 1. Did you sell something? How much? April 2. 01. 1, 1. Well, here it is: Premium 2. Real mileage 4.
A sound uncharacteristic of the normal operation of the variator appeared - a crackling or rustling sound in the box, and the higher the speed, the stronger the sound. Preliminary diagnosis - one of the bearings has fallen apart... It's currently in service.
We are waiting for the auto doctor's verdict. PS: Or maybe this same factory defect made itself felt? April 2. 01. 1, 1. Seryoga. 26. The drivetrain drivers succeeded, and in our Toyota centers, they eliminated the defects and changed the mats. April 2. 01. 1, 1. Continuation of the sad story: we dismantled the weld joint - the problem was revealed - the ball bearing of the secondary shaft was replaced.
In Toyota spare parts catalogs, the variator box is not dismountable. What to do? 1. 0 January 2. Rustle. I'm going to buy Premio 2. How can I find out whether the Jap changed the steel clamp there or not? January 2. 01. 2, 1.
ALEXANDER 2. 7 REGIONIf the service book ends up in the showroom, then there is a chance to find out something. January 2. 01. 2, 1.
Seryoga. 33when purchasing at an auction, there is always a note in the docks about the elimination of this problem.. February 2. 01. 2, 0. Alexander. 19. 81. The fact that the car has already been recalled to eliminate this jamb on the variator. February 2. 01. 2, 0. Alexander. 19. 81. I don’t have such a problem, car 1 was produced.
February 2. 01. 2, 0. January thanks for the clarification)) 2. February 2. 01. 2, 1. Seryoga. 33 about repairing the valve (replacing the clamp) if there is no mark, then it is unlikely that this will appear..
August 2. 01. 3, 1. Tell me who knows when replacing the variator with Ist 2.
There is no other way to disconnect the internal combustion engine (there are some secret bolts on the engine side) - but in another they say that .
Question about Toyota Corolla Fielder Subaru Forester, page 1. What are the pros and cons of a CVT on a Toyota Fielder and how much does it cost to replace the engine? How expensive is the maintenance of a non-turbo Forester and is it true that replacing a timing belt costs on average 5. The questions are not very specific, I would like to hear the answers.
Source: http://chicksoftru.fo.ru/blog/416316_%D0%9E%D0%B1%D1%89%D0%B8%D0%B5/1836570_%D0%A2%D0%BE%D0%B9% D0%BE%D1%82%D0%B0+%D0%A4%D0%B8%D0%BB%D0%B4%D0%B5%D1%80+2010+%D0%97%D0%B0%D0%BC %D0%B5%D0%BD%D0%B0+%D0%9C%D0%B0%D1%81%D0%BB%D0%B0+%D0%92+%D0%92%D0%B0%D1%80% D0%B8%D0%B0%D1%82%D0%BE%D1%80%D0%B5