Photo instructions for repairing the steering rack on Toyota Will VS | Motorist's benefit
Symptoms: knocking in the steering rack, which occurs when driving over small irregularities (a disease of all Corolla-like vehicles with electric power steering). The servicemen's diagnosis is to replace the rack (in practice, it doesn't help for long and costs a lot). Solution: replace everything in the rack that can knock.
And there are only two places for knocking in such racks - the adjustment unit and in the area of the bushing located at the opposite end of the rack (in the case of right-hand drive cars - the left side of the rack). And since nothing needs to be changed in the adjusting unit, the entire repair comes down to replacing the factory bushing with a custom-made one.
Patients: Will VS 2002 1.5L (electric power steering!)
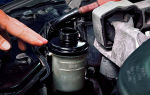
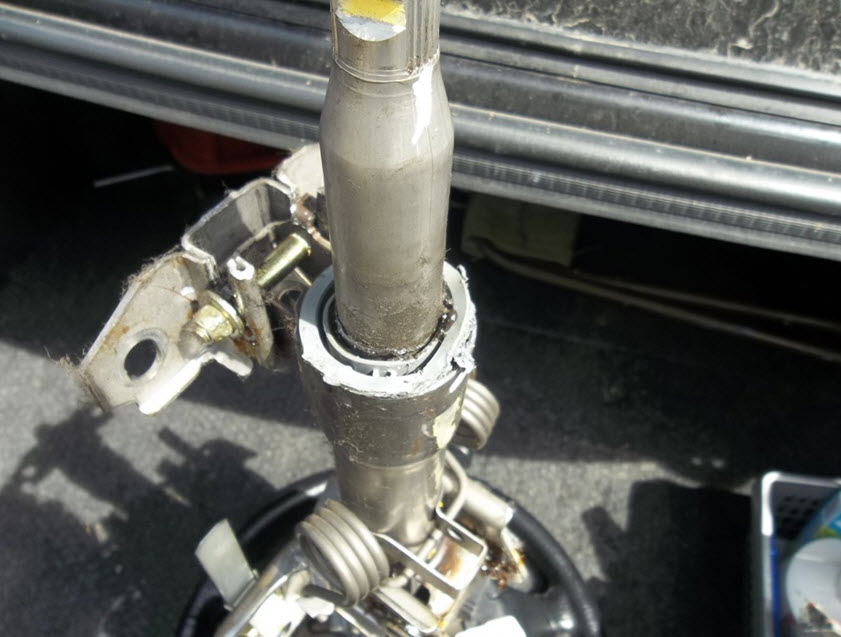
We climb into the pedal assembly and remove the protection from the steering shaft, unscrew it by hand and remove it easily:
We completely unscrew the bolt securing the intermediate shaft to the crosspiece:
IMPORTANT! Place the wheels straight, remove the key from the ignition, and lock the steering wheel. This is done in order to prevent, after removing the rack, the steering wheel from turning by more revolutions than required. Otherwise, a break in the airbag snail wires and a malfunction of the latter is inevitable.
We hang it in front of the car and take off the wheels (the front ones are enough).
Next comes the removal of the steering rack. It has been proven from my own experience that it is possible to unscrew the rack fastenings without additional disassembly, but pulling out the rack is very labor-intensive. Don’t waste time, twist the subframe - you’ll save a lot of time and effort.
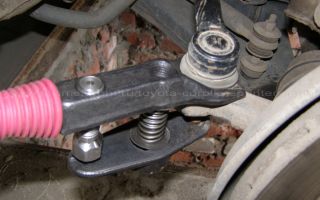
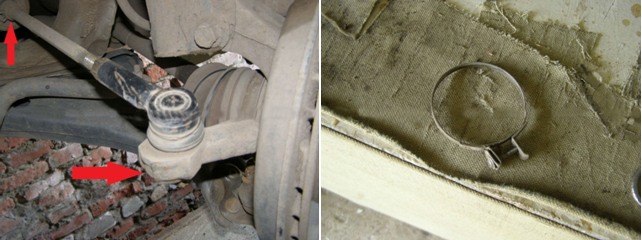
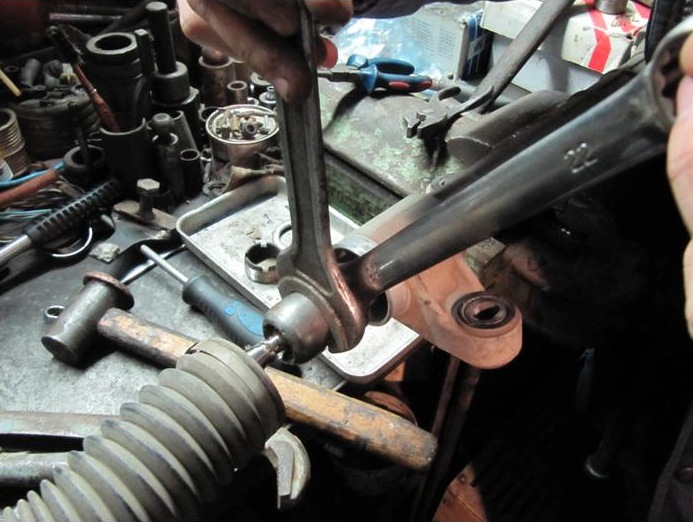
But first, the steering tips: we take out the cotter pin, unscrew the nut, hit the place indicated below with a sharp blow of a hammer, and the pin falls out on its own (we do this on both sides
We unscrew the subframe, 4 bolts to the body, 3 bolts in the area of the rear engine mount and 3 nuts there.
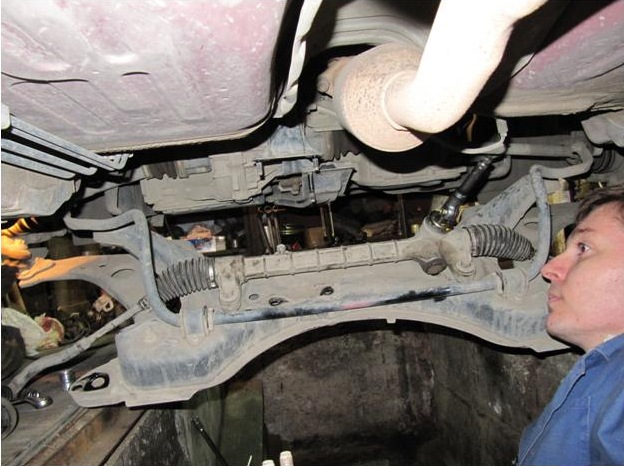
After this, the subframe, together with the rack, gently (if you planned the unscrewing of the last bolt correctly) lowers and hangs on the arms and anti-roll bar. Everything - the rail is in full view: unscrew:
We remove it and take it to the workbench
Let's start disassembling it:
1) Remove the rubber boot.
2) Take a 12mm wrench and unscrew the bolt shown in the photo.
3) Remove the intermediate shaft.
4) Unscrew the lock nut (we used a gas wrench)
5) Unscrew the pressure cup of the rack shaft.
6) Then we put on and secure the intermediate shaft again, then with a light blow on it with a copper hammer we remove the entire shaft with the bearing.
7) Turning the rack over, we disassemble the adjusting unit: use a 41 wrench to unscrew the lock nut
8) Then unscrew the adjusting cup using any flat object, remove the spring and the pressure piston.
9) Remove the left boot, very carefully so as not to tear it (we draw inside around the circumference of the boot with a non-sharp object)
10) Unscrew the left rod from the rack using keys 29 and 22.
11) On the reverse side, loosen the large clamp and unfasten the boot.
12) Remove the rolling pin from the rail and set it aside.
13) We look at the rack from the left end - we see an aluminum pressure washer, behind it is the notorious bushing.
14) Use a hook to hook the washer and knock it out, then remove the sleeve.
Here it is - the bushing that causes all the ailments. )
For left hand drive
We modify the pre-made fluoroplastic sleeve according to the attached drawing.
15) We make a longitudinal cut on the new bushing, which is necessary to compress it and put it in place. We orient the cut towards the direction of movement of the car - in this direction the rack experiences the least load.
16) Lubricate the bushing and carefully straighten the bushing; use the free end of a rolling pin to check the fit of the bushing.
17) Using a suitable head, press in the aluminum washer. We insert the rolling pin into place. We insert the shaft into place; to do this, use a 22mm wrench to swing the rolling pin around its axis and at the same time push the shaft - at a certain moment the gears align and the shaft falls through.
We tighten the shaft pressure cup until it stops and lock it with a lock nut. We assemble the adjusting unit, tighten the adjusting cup as far as it will go and release it 90 degrees, lock it with a lock nut.
Subsequently, the tightening torque can be adjusted on the car after a test drive, if you have some skill; the mechanism should be tightened to the point where, when exiting a turn, the steering wheel itself returns to the straight position. Pull the rod into place, the boots into place, tighten.
Rail for a subframe, subframe for a car. Near the rear (relative to the rear of the car) fastenings of the subframe to the body there are holes on the body and on the subframe, the combination of which prevents caster from slipping. (holes in photo)
Tips to the levers, set the wheels straight, the steering wheel is straight from the very beginning. We pull everything together and climb into the salon. There we weaken the upper crosspiece, move the shaft between the crosspieces upward and place the lower crosspiece on the intermediate shaft. We're tightening everything up. Subsequently, you can similarly align the steering wheel if, when driving straight, the steering wheel points slightly to the side.
Photo report author: x800ep
.
Related publications:
Source: https://sanekua.ru/foto-instrukciya-po-remontu-rulevoj-rejki-na-toyota-will-vs/
Toyota Corolla Forum

Toyota Corolla transmission problems, repairs and spare parts
MOZGHonored Korollovod Messages: 631 Registered: Jan 18, 2013, 1:05 pm Car: Corolla E180 2015 1.6 CVT Location: Chelyabinsk Thanked: 1 time
#1
Post by MOZG » Apr 17, 2013, 9:02 pm
Guys, today, when changing wheels from winter to summer, I discovered that when the left front wheel rocks horizontally, it rattles and plays, but vertically everything is smooth. The play is especially noticeable if you pull the steering rod. What is the preliminary diagnosis?
We don't smoke at work. We are afraid that the fume will detonate.
MOZGHonored Korollovod Messages: 631 Registered: Jan 18, 2013, 1:05 pm Car: Corolla E180 2015 1.6 CVT Location: Chelyabinsk Thanked: 1 time
#3
Post by MOZG » April 18, 2013, 07:44
What's wrong with him? It does not dangle at the joints, but seems to go in and out of the rail. It feels like the left side of the rack is loose.
We don't smoke at work. We are afraid that the fume will detonate.
AlekseichHonored Korolovod Messages: 2080 Registered: Mar 09, 2013, 07:34 pm Thanked: 1 time
#4
Post by Alekseich » April 18, 2013, 12:30
Probably the steering rod itself in the ball was broken, it is not difficult to check this by swinging the wheel horizontally, but as a rule it is necessary to check when the car is on wheels, if the play can disappear on the jack, because the ball will move to a different position where there is no exhaustion. MOZG Honorary Korollovod Messages: 631 Registered: Jan 18, 2013, 1:05 pm Car: Corolla E180 2015 1.6 CVT Location: Chelyabinsk Thanked: 1 time
#5
Post by MOZG » April 18, 2013, 2:00 pm
In which ball? When the car is on wheels, there is no strong play. When hung, it dangles.
It’s as if the tip is hanging in the rail, and not outside.
We don't smoke at work. We are afraid that the fume will detonate.
DyushaHonored Korollovod Messages: 11430 Registered: March 30, 2013, 01:53 pm Car: Corolla, 2011, 4 automatic transmission, 1.6 l petrol diesel, Comfort+, drank more than 9700 l/Ai92, Toebta 0W20 Location: 133, Kovrov Thanks : 7 times Thanked: 24 times
#6
Post by Dyusha » April 18, 2013, 2:45 pm
So there is a rod with a ball joint screwed into the rack, which is located under the cover. MOZG Honorary Korollovod Messages: 631 Registered: January 18, 2013, 13:05 Car: Corolla E180 2015 1.6 variator Location: Chelyabinsk Thanked: 1 time
#7
Post by MOZG » April 18, 2013, 8:47 pm
Damn it! You'll have to take the boot off and take a look. Looks like you'll have to order this rod. Fortunately, you can order it on Exist. But for some reason only Febest.
Why doesn't Toyota sell this part separately?
We don't smoke at work. We are afraid that the fume will detonate.
48RONINModerator Messages: 2629 Registered: 07 Jan 2013, 17:42 Car: May 2007
1.6 manual transmission 17 Location: Lipetsk Thanked: 39 times Thanked: 65 times
#9
Post by 48RONIN » April 18, 2013, 10:54 pm
There is a tie rod end, and there is a tie rod itself connected to the rack. That’s where, under the corrugation, what’s in Dyusha’s photo is located.
But, apparently, the steering rod does not come separately as a part of the repair kit, since the unit is apparently quite complicated to assemble. So it looks like the steering rack assembly is being replaced.
And Exist actually calls the tips rods.
You do not have the necessary permissions to view the attachments in this message.
DyushaHonored Korollovod Messages: 11430 Registered: March 30, 2013, 01:53 pm Car: Corolla, 2011, 4 automatic transmission, 1.6 l petrol diesel, Comfort+, drank more than 9700 l/Ai92, Toebta 0W20 Location: 133, Kovrov Thanks : 7 times Thanked: 24 times
#10
Post by Dyusha » April 18, 2013, 11:01 pm
So quickly on Yandex.
http://www.exist.ru/price.aspx?pcode=4551012360 True, I don’t like the manufacturers, ketai golimy.Last edited by Dyusha on April 18, 2013, 11:04 pm, edited 1 time in total.
DyushaHonored Korollovod Messages: 11430 Registered: March 30, 2013, 01:53 pm Car: Corolla, 2011, 4 automatic transmission, 1.6 l petrol diesel, Comfort+, drank more than 9700 l/Ai92, Toebta 0W20 Location: 133, Kovrov Thanks : 7 times Thanked: 24 times
#12
Post by Dyusha » April 18, 2013, 11:19 pm
I was just driving around on the Internet, they say worthy China.DyushaHonorary Coroller Messages: 11430 Registered: March 30, 2013, 13:53 Car: Corolla, 2011, 4 automatic transmission, petrol diesel 1.6 l, Comfort+, drank more than 9700 l/Ai92, Toebta 0W20 Location: 133, Kovrov Thanked: 7 times Thanked: 24 times
#13
Post by Dyusha » April 18, 2013, 11:22 pm
Now I was looking for rods with rods, tips with tips. MOZG Honorary Korollovod Messages: 631 Registered: January 18, 2013, 13:05 Car: Corolla E180 2015 1.6 variator Location: Chelyabinsk Thanked: 1 time
#14
Post by MOZG » April 18, 2013, 11:59 pm
There are also photos attached - here and here. Obviously not tips
We don't smoke at work. We are afraid that the fume will detonate.
48RONINModerator Messages: 2629 Registered: 07 Jan 2013, 17:42 Car: May 2007
1.6 manual transmission 17 Location: Lipetsk Thanked: 39 times Thanked: 65 times
#15
Post by 48RONIN » April 19, 2013, 00:26
There are no questions, there are separate traction rods, but for clarity, here is a general photo with your permission:
You do not have the necessary permissions to view the attachments in this message.
AlekseichHonored Korolovod Messages: 2080 Registered: Mar 09, 2013, 07:34 pm Thanked: 1 time
#16
Post by Alekseich » April 19, 2013, 2:30 pm
I don’t know how it is on the Corolla, but when I changed it on the Almeria, there is also a difference in the right and left rods, the difference is in the holes on one rod, the threads are drilled at the end and at 90 degrees in the head, i.e.
This is for the release of air, so that the cover does not compress when turning the steering wheel and there are no creaks and grunts because of this, but only on one, the second without holes, apparently on that one there is a passage for air. Febest is made without this hole, i.e. . both are the same and people encountered unpleasant things. In the photo posted by Dyusha above, the hole can be seen if it is a pull rod from a Corolla.
This Chinese product is not particularly high quality, but 50 thousand, as many have written, may be enough, which is absolutely minuscule. In general, when installing, you need to pay attention to these holes.
DyushaHonored Korollovod Messages: 11430 Registered: March 30, 2013, 01:53 pm Car: Corolla, 2011, 4 automatic transmission, 1.6 l petrol diesel, Comfort+, drank more than 9700 l/Ai92, Toebta 0W20 Location: 133, Kovrov Thanks : 7 times Thanked: 24 times
#17
Post by Dyusha » April 19, 2013, 03:38 pm
The traction is not that of a Corolla. It became interesting about the hole, I’ll be in the shed, I’ll definitely look at these rods, I haven’t thrown them out yet. MOZG Honorary Korollovod Messages: 631 Registered: January 18, 2013, 13:05 Car: Corolla E180 2015 1.6 variator Location: Chelyabinsk Thanked by: 1 once
#18
Post by MOZG » April 19, 2013, 8:21 pm
There are no holes. I bought a Febest rod. There is a service next to the Exist store. I asked how much it would cost to replace the rod, they said 650 rubles + 800 rubles. wheel alignment I signed up. I think I’ll still have to do the alignment, but it’s better to pay 650 rubles and not suffer.
Then I’ll write down what and how.
We don't smoke at work. We are afraid that the fume will detonate.
MOZGHonored Korollovod Messages: 631 Registered: Jan 18, 2013, 1:05 pm Car: Corolla E180 2015 1.6 CVT Location: Chelyabinsk Thanked: 1 time
#19
Post by MOZG » April 19, 2013, 8:26 pm
I looked at the photos in the Topic and I can’t understand why there are such holes. Air does not circulate in the rail itself, etc.
We don't smoke at work. We are afraid that the fume will detonate.
AlekseichHonored Korolovod Messages: 2080 Registered: Mar 09, 2013, 07:34 pm Thanked: 1 time
#20
Post by Alekseich » April 19, 2013, 20:33
Did you change it already and what did you replace with your relatives? And don’t forget about the holes, look to see if they are on the original rods or not.
I installed a Febest on an Almera, drove about 40 thousand, then sold the car, there were no holes, unlike the original, and we didn’t see any problems, but a person on the forum complained about the unbearability of driving, I had to buy the required linkage with a hole and change it, plus the toe-in again.
How long do the Corolla's traction last on average? For example, on the Almeria now the family costs 220 thousand and they don't knock.
Go
Source: http://tc-club.ru/viewtopic.php?t=665
Toyota Corolla NZE120, NZE121 steering rack repair; Will VS NZE127. KIT NZE 121-25-ST
Installation of repair kit KIT NZE 121-25-ST.
BUY steering rack repair kit for Toyota Corolla KIT NZE 121-25-ST.
This is what the removed strip looks like.
Check the horizontal shaft for corrosion.
We unscrew the locknut and disassemble the clamping sleeve adjustment mechanism. The photo of the adjusting nut does not match!
We take out the clamping sleeve.
We disassemble the steering shaft assembly.
We take out the steering shaft. If the upper bearing is not rusty, but is loose, this is normal. Both the upper and lower (hereinafter) bearings are angular contact (adjustable tapered).
Next, you can see this picture. The inner race of the lower bearing remains on the steering shaft, and balls in the separator are visible in the body of the rack. The balls should be shiny (not rusty) and the separator intact.
Or you see an option when the bearing is not disassembled. This happens less often. Both cases are a completely normal course of disassembly.
Press out the aluminum retaining ring. This can be done with a reverse hammer with a hook on the end. Or a tool like ours. We hook the device onto the edges of the aluminum bushing and knock it out with a horizontal shaft, like a hammer. We take out the support sleeve.
The steering shaft has already been removed. The horizontal shaft was also taken out.
Attention! The shaft only needs to be ground if there is corrosion or significant dents or scratches.
We sand with sandpaper designated 400 according to the 3M classification. It is not necessary to use finer sandpaper or polishing paste.
We need a certain roughness to retain the lubricant. A smoother surface will not hold grease!
Old and new support bushings.
The new bushing will have to be modified a little. We remove the chamfer from the side opposite the high collar. It is better to make the width of the chamfer maximum - it will be easier to insert a horizontal shaft.
We grind the collar using sandpaper to the diameter of the outer cylindrical part in 4 places. No special care is required. If you under-sharpened or over-sharpened, it’s not a big deal. We get 4 mustaches. This is necessary for easier installation into the rack housing.
We get 4 such protrusions measuring 1-1.5 cm. All this is needed for easier installation into the housing. This makes it easier to compress.
We saw the bushing in 4 places. Between the ledges. It is MANDATORY to saw the bushing! Why to do this is described here.
Three cuts as in the photo from the protrusions to the opposite side. NOT TO THE END!!! It is convenient to cut wood with a hacksaw into a width of 2 cuts (approximately 3 mm.)
We make the fourth cut through.
We remove the burr thoroughly. The bushing is made with a minimum thermal gap. If flash gets on the working surfaces it will cause jamming or heavy movement of the horizontal shaft.
We put on two rubber rings. Don't wear more clothes right away! This can cause the horizontal shaft to be overcompressed and jammed in the bushing. If the horizontal shaft had to be sanded to remove rust, then it may be necessary to install four rings.
The main problem with installing the bushing is pulling the rubber rings through the groove in the housing. Rubber rings catch and tear. For easy installation, cut out a strip from a plastic bottle that is approximately twice the length of the sleeve (approximately 5 cm).
We wrap the strip over the sleeve so that there is no overlap.
Lubricate the seat. We roll it up into a tube and insert it into the body exactly where the seat for the bushing is. Lubricate the bushing from the outside. On this type of flooring, the bushing easily slides into place without damage. Next, hold the sleeve with your finger and pull the strip over the edge with pliers.
Insert the bushing into the body. Lubricate with a thin layer of lubricant. (This is a photo of the repair of another rack).
We hold the bushing shoulder in the groove with our hands and insert the horizontal shaft. Without experience, it may not work out right away - the bushing tends to come out. Take your time and you will succeed! The main thing is not to use brute force and break the bushing. (This is a photo of the repair of another rack).
Checking the tightness of the fit. The lubricated shaft exerts an average breaking force. The breaking force is checked with an outstretched arm. Next, hold the horizontal shaft on the driver’s side with your left hand. With the right hand we swing by the horizontal shaft in all planes. There should be no backlash.
If the pulling force is small, then we put on one more elastic band.
Before final assembly, lubricate the shaft.
We insert the horizontal shaft and press in the aluminum locking ring.
Lubricate the bearing and gear on the steering shaft (worm). We tighten the adjusting plug until the play and looseness of the steering shaft stop (the bearings are tapered), and until force appears on the key. Counter.
The support sleeve requires improvement. For clarity, it was painted black.
We remove chamfers in any way. The places are visible in the photo. The chamfer width is 2.5-3 mm. Some chamfers are needed for better access to lubricant, others to compensate for thermal expansion.
NECESSARILY!!!! We saw as in the photo.
We saw until the two halves are pressed together with your fingers. Why you need to read this here.
Lubricate and insert. Tighten until the play stops in the direction the shaft swings away from you - towards you (apply maximum force). To check, swing the horizontal shaft in a vertical plane.
To be completely convinced, pull all ends (there are three of them - the steering shaft and the right/left end of the horizontal shaft) of the racks and make sure that there is no play under any force or in any direction!
If you have protective boots made of plastic, then we recommend buying a bicycle inner tube. Cut the ring to the appropriate width. And put it on the steering rack seat for better sealing.
ALL!!! We fasten the steering rods and put the rack in place.
PS When adjusting the clamping sleeve, it is better to slightly tighten it. The steering wheel will not return for the first 500-1000 km.
And then the bushing will rub in (this is how it was designed and intended), settle deeper and the steering wheel will begin to return. If, after driving 1000 km, the steering wheel still does not return, then you just need to adjust the car.
The horizontal shaft should not knock or move, the steering wheel should return after turning.
If difficulties arise during the installation of bushings, then read the section “Saving repairs!”
If you were able to assemble the rail, but there was no silence, then read the article “Characteristic repair errors and their elimination.”
Source: http://reika.pro/index.php/remont-rulevykh-reek/50-remont-rulevoj-rejki-toyota-corolla-nze-121
Repair and replacement of steering rods Toyota Corolla 2007-2010
After traveling for two or three seasons, you felt discomfort and stopped enjoying travel as much as before. This began to manifest itself as tapping, rattling, crunching, etc.
in the chassis of your car. Whether you like it or not, you need to do suspension diagnostics.
This can be done in a garage, if you understand auto repair work, or contact a service center.
After troubleshooting, you realized that repair and replacement of Toyota Corolla 2007-2010 steering rods is simply necessary. Let's go back a little. When driving around the city, your car, as always, pleases you with its smooth ride. Nothing rattles, nothing knocks. But as soon as you drive out onto a country road, where there is an ordinary gravel road, extraneous knocks immediately begin to be heard.
What are the consequences of such malfunctions as failure of ball joints, steering ends and steering rods? First of all, this is increased play in the steering wheel, then rapid wear of the tires occurs. When the ball joint is broken, the wheel changes its angle, resulting in rapid wear of the tread.
If the steering rod is broken, then unpleasant knocking noises are felt in the area of the pedals, especially on uneven roads. Broken tie rod ends, in addition to increasing the steering play, also cause the car to wander along the road, and this, as you understand, is already dangerous not only for you, but also for other road users.
The conclusion is simple, the faster the repair and replacement of steering rods of Toyota Corolla 2007-2010 , the faster you will return to normal. Repairing and replacing these parts is not such a complicated procedure, which can be performed both in the garage and in the workshop.
After repairing or replacing these chassis components, it is necessary to do a wheel alignment, since new parts have returned the car to its original condition.
Repair
Before starting work, you need to put the car on the handbrake. If you are changing tie rod ends, you don’t need a pit or a lift, but if you are changing tie rods, then you can’t do without them, of course, it’s possible, but it’s difficult.
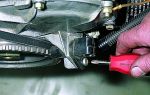
Jack up the car and remove both front wheels. Having loosened the lock nut on the tie rod, unscrew the tie rod end. Next, unscrew the locknut. That's it, our steering rod is free. Using pliers, remove the two clamps securing the tie rod boot.
Then, using a straight screwdriver, we unbend the locking washer to provide access to the surface of the steering rod, by which we will unscrew it.
Using a good open-end wrench, we try to break the traction with a sharp movement. If it goes, then it will continue to spin by hand. We unscrew it and look, if the play is large, then we change it without question, and if it is not significant, then this rod can be restored.
In a special workshop that restores steering rods, they will restore it for you quite quickly. This can be crimping, or filling the free space with hot liquid fluoroplastic, which hardens when cooled, but at the same time does not lose elasticity.
Thus, repair and replacement of steering rods of Toyota Corolla 2007-2010 usually does not last long, the main thing is that everything is at hand.
Installation of this part, whether new or remanufactured, is also simple. We put on a new locking washer, you can, of course, use the old one, but I would put a new one, screw the rod into the steering rack and tighten it well.
Then we bend our washer on both sides. As you guessed, it serves as a retainer. Next, we put on the boot (new) and secure it with clamps. We screw the nut from the steering tip and the steering tip itself onto the rod.
That's it, we collect the car and go to the wrecking yard.
Sergey Demin specially for the Avtoliteratura website
Source: http://myautobook.ru/publ/toyota_remont/toyota_corolla_2007_2010g/remont_i_zamena_rulevykh_tjag_toyota_corolla_2007_2010/8-1-0-46
How to repair a Toyota Corolla steering rack: signs and causes of malfunction
Steering is one of the main mechanisms of a car. The safety of the driver and passengers depends on the serviceability of the unit, so checking and repairing the Toyota steering rack is carried out especially carefully. This article discusses the signs and causes of rack malfunction, as well as how to diagnose and repair the Toyota Corolla 150 steering rack.
Toyota Corolla steering rack - design
A mechanical assembly consisting of a gear is designed to convert the rotation of the steering wheel into horizontal deflection of the vehicle's front wheels. The design itself consists of several elements, the coordinated work of which ensures the movement of the vehicle:
- Frame. Designed to accommodate the component parts of the unit. The body material in modern passenger cars can be made of steel, aluminum or duralumin. The hydraulic cylinder is located either inside or outside the steering rack housing.
- Shaft. For the manufacture of the shaft, high-strength steel is used, the surface layer of which undergoes a cementing procedure. Thanks to the shaft, power is transmitted to the wheels.
- Support bushings. To keep the shaft from distortion, special bushings are used. They fix the device, centering it in the body.
- Distributor. When turning the steering wheel, force must be transmitted in a certain direction. To do this, you need a distributor, through which the flow of hydraulic fluid is directed to the required compartment of the hydraulic cylinder.
- Bearings. The rotation of the elements in the housing is ensured by bearings.
- Pistons. The hydraulic fluid pressure is transmitted to the steering shaft by the pistons.
- Oil seals. Sealing elements are used to retain hydraulic fluid inside the device. They transfer fluid flow to the desired compartment of the hydraulic cylinder, preventing it from moving into other cavities.
- Clamping mechanism. Required to keep the shaft from moving and regulates the force.
- Hydraulic bolts. Fixation of the support bushings and the clamping mechanism is ensured by the presence of locking rings, springs, and hydraulic bolts.
- Rings made of rubber and Teflon. These elements are used to seal all rack units.
Corolla 150 steering rack - signs of mechanism malfunction
The car driver is primarily responsible for monitoring the condition of the steering. Based on some signs, you can determine if the device is faulty and promptly contact a service center to troubleshoot the problem. What you should pay attention to:
- knocking in the front suspension;
- no effort when turning the steering wheel;
- play in the steering rack;
- tight steering wheel rotation;
- increased sensitivity of the car;
- oil leakage;
- noise in the power steering pump;
- spontaneous rotation of the steering wheel;
- decreasing the fluid level in the power steering reservoir on an ongoing basis.
Any disturbance in the operation of the steering mechanism should alert the car owner. To identify the cause of the malfunction, you must immediately contact service.
Toyota Corolla steering rack - the main causes of breakage and wear of the racks
The main reason why car enthusiasts turn to our car service center due to rack wear is the poor quality of the road surface.
Damage to an important component is also affected by proper driving. For example, if the driver does not slow down before potholes on the road, the steering rack will quickly fail, letting you know about the malfunction with a knock.
Hydraulic steering racks deteriorate if the driver is used to leaving his car with the wheels turned out in the winter.
Premature wear is also possible if the hydraulic fluid is changed infrequently.
The tightness of the assembly depends on the integrity of the anthers, so dust and dirt should not be allowed to get inside the rack, which can lead to wear of the seals and leakage.
Violation of vehicle operation rules affects the operating condition of the steering rack. When servicing your car, it is very important to use high-quality components and working fluid, as well as to undergo maintenance on time.
Carrying out diagnostics and repair work at a trusted car service center is a guarantee that the mechanism will not fail due to unqualified repairs.
Another reason for control failure is often a change in the operating functions of the wheels. For example, incorrect tire pressure, bearing wear, balancing.
How to diagnose faults
If you are interested in Toyota Corolla steering rack price, then you have found any signs of malfunction indicating that the rack has failed. But, before you decide to replace or repair the Toyota Corolla rack, you need to diagnose the faults.
Diagnosis of the steering condition is carried out in three stages.
The first includes inspecting the car, eliminating damage to the chassis and checking all auxiliary components and mechanisms. This diagnostic stage is carried out in accordance with a certain sequence in order to identify the malfunction as quickly as possible.
Next, the removed element is diagnosed, knocking and play are determined. This work shows specialists whether the Corolla steering column can be repaired or whether a complete rack replacement is required. The device is clamped in a vice to check the steering rods, the backlash of the support sleeve and other nuances.
The final stage of verification is a detailed inspection. It is carried out after complete disassembly of the mechanism.
Our technicians check every detail to make a final decision about the condition of the device and draw up a list of repairs.
Steering rack Corolla 150 - adjustment
This procedure can only be carried out in a specialized garage with a pit. To operate, you will need a key designed to adjust the unit. The vehicle is securely secured and its wheels are in a straight position.
Using a backlash meter, the gap is measured, which should not exceed ten degrees. The rack is tightened using a screw located in the end cover of the mechanism. The location of the screw is specified in the car's passport.
The rack is adjusted at a leisurely pace. At the same time, the movement of the steering wheel, the amount of play and knocking in the column are constantly checked. After finishing the work, you need to test the chassis. If heavy wheel movement is observed, the adjusting screw is released.
The result of the adjustment should be the complete disappearance of knocking or play. In addition, free rotation of the wheel to the standard central position must be achieved.
Toyota Corolla steering rack repair
Before the troubleshooting procedure, any remaining oil and dirt is removed from the steering rack. This is done using technical fluid. After disassembly, the elements (bushings, rings, power seals) are replaced. Repairs may include turning work, which is performed on a grinding machine. On it the shaft is ground and polished to a mirror finish.
Any repair work is completed by assembly with control of the necessary factory parameters. At a special diagnostic stand, specialists check the characteristics of the unit and then install the rack in its original place. Next, the power steering system is washed, oil is added, and the system is pumped.
Useful tips for Toyota car owners
Some tips from car enthusiasts may be useful to prevent steering rack failure and premature wear:
- you need to monitor the condition of the anthers;
- do not hold the steering wheel in the extreme position for more than five seconds;
- in the winter season, you should not turn the steering wheel immediately after warming up the engine, but should turn it with smooth, short movements. These steps will help warm up the oil in the power steering system;
- It is advisable to personally supervise all work performed at the service station;
- Do not rev the engine if the steering wheel is in the extreme position. This can lead to increased load on the rack parts or wear on the power steering pump.
Since the steering rack is an important part of the machine, repairing the unit must be approached with all responsibility. Every vehicle owner must take care of timely diagnostics of the car, because in the event of a steering malfunction, the driver and passengers are at risk.
In our car service center, replacement of steering mechanisms and their repair is a popular service. We specialize in steering system restoration and have a set of tools to carry out the work.
Thanks to the availability of equipment and the experience of our specialists, our car service center carries out high-quality repairs and provides a guarantee for the work done!
Source: http://gidravto.ru/remont-rejki/toyota-corolla.html
Adjustment – Installing the front wheels – Toyota Corolla Repair Manual (Toyota Corolla)
 1. CHECK TIRES (See page 28-1)2.
MEASURE VEHICLE HEIGHT Measuring points: Ground clearance from the center of the front wheel Ground clearance from the center of the front suspension lower control arm bolt Ground clearance from the center of the cross member mounting bolt Ground clearance from the center of the rear wheel
| Tire size | 175/70R14 | 195/60R15 | 195/55R16 |
| engine's type | 4ZZ-FE | 3ZZ-FE | 2ZZ-FE |
| Front | AB: 88 mm (3.36 in) | AB: 87 mm (3.43 in) | AB: 85 mm (3.35 in) |
| Rear | DC:44 mm (1.73 inches) | DC:44 mm (1.73 inches) | DC:41mm(1.61inch) |
| Tire size | 175/70R14 | 195/55R16 |
| engine's type | 4ZZ-FE | 3ZZ-FE, 4ZZ-FE |
| Front | AB: 69 mm (2.72 in) | AB: 68 mm (2.68 in) |
| Rear | DC:26 mm (1.02 inch) | DC:25 mm (0.98 inch) |
COMMENT:
Before checking the wheel alignment, adjust the vehicle height to standard height.
COMMENT:
If the vehicle height is different from the standard, try to adjust it by pushing the body down or lifting the body
3. CHECK WHEEL ALIGNMENT
| Toe (general) | A+B: 6?±12? (0.1°±0.2°) |
| CD: 1±2mm (0.04±0.08inch) |
4. ADJUST WHEEL TOE
(a) remove the steering rack boot clamps
(b) loosen the tie rod end lock nuts
(c) Turn the left and right ends of the steering rack to the same amount and adjust the wheel toe.
ADVICE:
Try to adjust the convergence value so that it is closer to the center of the standard interval
(d) Check whether the lengths of the left and right ends of the steering rack are the same
(e) Tighten the tie rod lock nuts using a torque wrench.
Torque: 74 Nm (750 kgfcm, 55 lbf)
(f) Place the covers on the jacks and install the clamps
ADVICE:
Check that the covers are not bent.
5. CHECK THE WHEEL STEERING ANGLE
(a) Turn the steering wheel fully and measure the steering angle
| Tire size | 175/70R14 | 195/55R16 |
| engine's type | 4ZZ-FE | 3ZZ-FE, 4ZZ-FE |
| Inner wheel | 39°05?±2° | 39°06?±2° |
| Outer wheel: recommended size | (39,8°±2°) | (39,10°±2°) |
| 33°11? | 33°11? | |
| (33,18°) | (33,18°) |
If the inner angles of the right and left wheels differ from the standard value, check the length of the left and right ends of the steering rack:
6. CHECK THE WHEEL CAMBER, LONGITUDINAL AND TRANSVERSE TILT ANGLES OF THE STEERING AXIS
(a) Install a camber, caster and caster gauge or place the vehicle on a wheel alignment tester
(b) Check the camber and pitch and roll angles of the steering axis.
| Tire type | 175/70R14 | 195/60R15 | 195/55R16 | |
| engine's type | 4ZZ-FE | 3ZZ-FE, 4ZZ-FE | 1CD-FTV | 2ZZ-GE |
| Camber | -0°30' ± 45' | -0°31' ±45' | -0°33' ± 45' | -0°31'±45' |
| (-0.50° ± 0.75°) | (-0.52° ± 0.75°) | (-0.55° ± 0.75°) | (-0.52° ± 0.75°) | |
| Left-right wheel error | 45' (0.75°) or less | 45' (0.75°) or less | 45' (0.75°) or less | 45' (0.75°) or less |
| Error in the longitudinal inclination of the left-right wheel steering axis | 2°51'±45' | 2°53' ± 45' | 2° 46' ± 45' | 2° 52' ± 45' |
| (2.85° ± 0.75°) | (2.88° ± 0.75°) | (2.77° ± 0.75°) | (2.87° ± 0.75°) | |
| 45' (0.75°) or less | 45' (0.75°) or less | 45' (0.75°) or less | 45' (0.75°) or less | |
| Error in the lateral tilt of the left-right steering axis | 11°19' (11.32°) | 11°19'(11.32°) | 11°23'(11.38°) | 11°19' (11.32°) |
| 45' (0.75°) or less | 45' (0.75°) or less | 45' (0.75°) or less | 45' (0.75°) or less |
7. ADJUST CAMBER
COMMENT:
After adjusting the camber, check the toe-in.
(a) Remove the front wheel
(b) Remove the two nuts from the bottom of the shock absorber
If you are reusing bolts or nuts, lubricate the threads of the nuts with engine oil:
(c) Clean the mounting surfaces of the shock absorber and steering knuckle
(d) Tighten both nuts
(e) Adjust the camber by pushing or pulling the bottom of the shock absorber in the direction required to adjust the camber.
(f) Tighten the nuts
Torque: 153 Nm (1560 kgf, 113 lbf)
(g) Install the front wheel
Torque: 103 Nm (1,050 kgf, 76 lbf)
(h) Check the camber
ADVICE:
• Try to adjust the camber angle so that its value lies in the middle of the standard interval • Adjustment value of the installation bolts is 6' - 30' (0.1 ° - 0.5 °) • If the camber is outside the standard interval, use the following table to estimate how much it should be further adjust the camber and select a bolt to adjust the camber.
COMMENT:
When tightening the adjusting bolt, use a washer and a new nut.
(i) Repeat the above steps again. In step (b) replace 1 or 2 matched bolts
ADVICE:
When replacing 2 bolts, replace 1 bolt each time.
Source: http://toyota-omg.ru/26_perednyaya_podveska/ustanovka_perednih_koles/regulirovka.html