How to change tie rods and ends on a car

Steering rod is an element related to steering, the main task of which is to prevent the car from sliding when turning.
The correct operation of this element contributes to the correct rotation of the drive wheels. Consists of middle, right and left rods and levers for the left and right wheels.
Depending on the car model and type of construction, there are many types of traction.
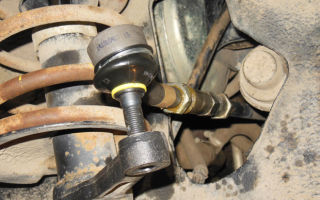
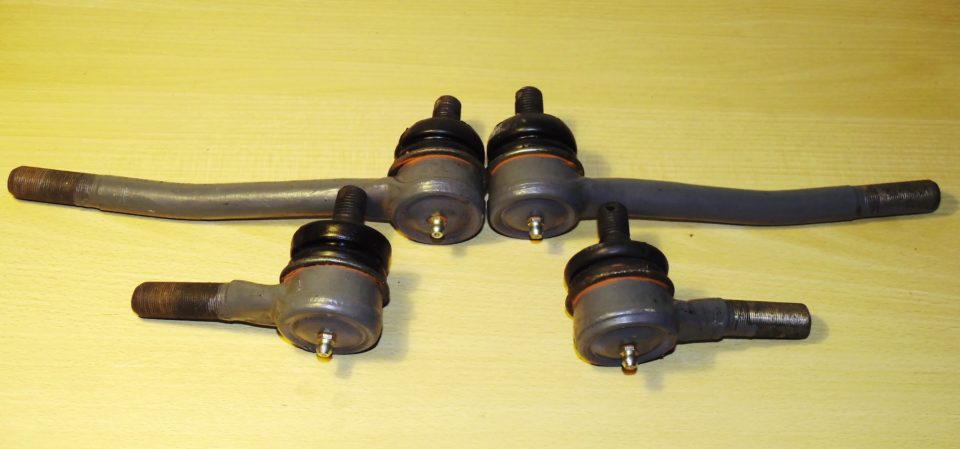
The ends are the final elements that go from the steering rod to the car wheel. They have another name - hinges. These parts are part of the car's steering and an integral part in the operation of steering rods. The hinges look like hemispherical fingers. The main reason for failure is their fragility.
They cannot be partially repaired, since the replacement is carried out entirely.
The tip consists of the following parts: a body with an axis, a threaded pin, a Teflon gasket along which the finger moves, a protective housing (designed to protect the tip from deformation and shock), a plastic cover to protect the steering tip and housing, a silicone ring for protective cover fastenings, spring and nut.
To ensure that the steering rod is not replaced so often, you need to monitor some parameters. The tips should move along the axis of the fingers by no more than one and a half millimeters. If the indicators are slightly different, then the tip must be replaced along with the hinge. The coupling clamp must be firmly attached to the coupling.
Sometimes you need to check how tight it is. It is very important that the tip protection covers are not damaged. Otherwise, the hinges may become unusable due to dust getting on them. If there are some defects and cracks on the protective covers, then it is necessary to make a decision about their urgent replacement.
Timely diagnostics allows you to identify existing problems before they manifest themselves. To perform it, you do not need to purchase a special tool. All you need to do is sit behind the wheel and turn it in different directions.
In this case, you need to listen carefully to the sounds (if there are hints of a breakdown, new sounds may appear). The presence of sounds or a noticeable poor response of the wheels to steering wheel turns is a clear signal to replace parts in the steering; most likely, these parts are the rods and tips. If this happens, then you need to urgently replace them.
One of the main steering failures is considered to be premature wear or partial damage to the tip joint.
How to remove and replace
Replacing the steering linkage and replacing the tie rod ends is a rather difficult task, but this is not a reason to panic and seek help from specialists from the nearest service station. Replacing tie rod ends and the rods themselves is also possible on your own.
All you need for this is the desire to repair your car on your own and the acquisition of spare parts and the necessary tools. The only thing you need to pay attention to is that each car model has corresponding elements, so buy only those.
The steering rod can be replaced together with the ends. That is, if your tips have not yet deteriorated, but you have been using them for a long time, then it is better to replace them too.
This, of course, will not save you money today, but it will not force you to crawl under the car again after a while, only now to change them.
So, let's prepare the necessary tool:
- The jack is the main element when repairing a car;
- Goats for additional insurance;
- Wrenches;
- Pliers;
- A device for removing rods (you will have to buy this device, since without it replacement is inconvenient and time-consuming);
- A flathead and Phillips screwdriver (just in case);
- Liquid for loosening fasteners VD-40 (sometimes you can’t do without it)
After you've got everything ready, it's time to start replacing the tie rods. Let's do it step by step, this will allow us to understand this issue in more detail.
- Of course, it is advisable to drive the car into the inspection hole; this will create full access to parts and more comfortable working conditions. Therefore, we find out where we can use the pit and bring the car.
- After a successful entry into the pit, you need to lock the parking brake and lock the steering wheel. It is also recommended to disconnect the battery.
- We take a jack and install it directly in the area of the intended replacement. Then we raise the car and install additional safety trestles. Since replacing the steering rod occurs in pairs, this action must be duplicated on the other side. Once the car has been raised and secured, the jack can be removed.
- It is advisable, before carrying out work, to process all fasteners that will have to be unscrewed. I recommend using VD-40 for these purposes. This will allow you to loosen the fastening without much effort and speed up the whole process.
- Now you can remove the wheels. The procedure is familiar to everyone. You need to unscrew the lock nuts on the mounting bolts and remove the wheels from them.
- The first step is to unscrew the nut on the rod joint that secures it to the swing arm.
- Next we press out the ball pin. A special tool is needed for this. With its help, this process is more enjoyable. If you don’t have one, then you can’t do without a hammer and a pry bar (I’m not kidding).
- After this, you need to bend the locking plate and unscrew the fastener that secures the tie rods to the steering mechanism. So we removed the steering rod.
- To disconnect the tip, you need to firmly clamp the steering rod in a clamp. Then it is necessary to loosen the fastening of the tip and coupling.
- To correctly install a new tip, when removing the old one, you need to mark its location or count and remember the turns.
- Replacing the boot is a necessary step. To do this, you need to remove the o-ring that holds it in place and remove the boot.
- Now you can begin installing new parts. The tip is installed first. Put on a new boot and screw the tip onto your finger according to the marks made.
- Next, assembly occurs in reverse order.
In fact, replacing the tie rod and ends should not cause you any difficulties. Now you need to check the work performed. If you did everything correctly, you should have the following results:
- There should be no play in the new rods;
- The steering wheel must have a smooth and continuous motion. The number of its revolutions to the right and left should be equal. It must also independently return to its original position after performing the maneuver;
- After a run of 800 kilometers, it is necessary to perform an extraordinary adjustment.
After completing the replacement work, it is advisable to do a wheel alignment. This will avoid buying new tires. Important tips:
- Before you begin removing and installing new equipment, you need to prepare all the necessary tools.
- Also prepare a clean rag and a container of clean water. This will undoubtedly come in handy both for cleaning parts and for pre-washing hands after work.
- It is better to replace it over the repair pit.
- To create increased safety, use hemp or goats. It is not advisable to use the jack for a long time. It only serves to lift the machine.
How to replace a tie rod and how to replace rods is no longer a mystery to you. Now all that remains is to purchase a new set of elements. If you want to change and forget about repairs for a long time, you need to buy only high-quality parts. In this case, saving is not appropriate. I wish you success in learning more about your vehicle as you replace parts.
Video “How to change steering ends on a car”
Video guide for replacing steering wheel ends on VAZ-2110, VAZ-2112, Kalina, Grant and Priore cars. The recording also shows you what tools you need to prepare.
Source: http://MineAvto.ru/remont/rulevoe-upravlenie/kak-pomenyat-rulevye-tyagi-nakonechniki-1980.html
How to replace tie rod ends yourself
Tie rod ends are an important component of driving a car, the condition of which directly affects traffic safety. The slightest wear immediately affects the quality of this safety and indicates that the steering tips need to be replaced.
The tips are hemispherical fingers with threaded connections to the steering rods; they are responsible for the “connection” of the steering wheel with the front wheels of the car and allow the driver to make turns in a given direction.
The first signs of the need to replace steering tips
The main cause of wear and damage to hemispherical pins is poor road conditions. Any hit of wheels in holes, potholes, single stones, bumps and irregularities “hits” the spherical joint, sooner or later leading to a change in the original shape of the “bed” of the tip and the spherical component of the “finger” itself. The appearance of wear makes itself felt in this way:
• when driving, extraneous noise occurs in the form of knocks and extraneous sounds, this is especially noticeable on uneven roads;
• the steering wheel does not turn well, or some “dips” of rotation of the steering wheel occur when turning;
• when driving, a car can independently change the forward direction by a certain angle, you have to constantly “steer”;
• there is increased play in the steering wheel.
Hint: To thoroughly check the quality of the tie rod end, the car is installed on an overpass or above an inspection hole.
The assistant, sitting in the car, evenly rocks the steering wheel in different directions, and you need to grab one of the tips with your hand to track the synchronization of its movement with the hinge of the other rod. Asynchronous movement, even the slightest deviation from synchronism is a reason to replace the steering tips yourself (the gap can be felt by hand).
Replacing tie rod ends with your own hands, instructions
To carry out the operation you need:
• buy new tips (do not forget that they are different for the left and right sides, and that you need to change them on both sides at once, and not just on the one where wear is detected);
• a special puller, but if you don’t have one, you can get by with a hammer and a pry bar;
• 19”, 13” and torque wrenches;
• pliers;
• penetrating lubricant.
Instructions on how to replace tie rod ends yourself
1) Place the car on a jack and unscrew the wheel.
2) Clean the junction of the steering tip with the steering knuckle from dust and dirt (you can use a wire brush) and treat it with penetrating lubricant to facilitate the unscrewing process (brake fluid can be used instead of penetrating lubricant).
3) Using pliers, remove the cotter pin securing the threaded connection of the tip and unscrew the nut.
4) Using a special puller or a mounting tool with a hammer, press the hemispherical pin out of the fist.
5) Unscrew the bolt securing the tip to the rod and unscrew the pin.
Tip: When unscrewing the tip, try to count the number of turns so that when installing a new part, maintain the same distance. This will allow you to avoid the wheel alignment procedure.
Hint: You need to twist your finger clockwise.
1) Screw in a new tip instead of the old one and attach it to the steering rod, insert the hemispherical pin into the fist, tighten it with a nut and secure its position with a cotter pin.
2) Put the wheel in place and lower the car from the jack and carry out the procedure for replacing the steering tip on the other side.
3) After the repair, it is recommended to go to a service station to check whether a wheel alignment is necessary. This is the only way you can avoid possible control problems.
If the procedure for replacing steering wheel ends with your own hands seemed too complicated to you, you do not trust your competence in this matter, or you simply do not have time to do it, entrust this matter to professionals. Do this immediately as safety comes first.
Source: https://stolica-atc.ru/o-nas/blog/kak-samostoyatelno-zamenit-nakonechniki-rulevyh-tyag
Steering rod - how to diagnose and replace? + video

The longitudinal steering rod must be located in such a way that during any movement of the wheels it is subject to minimal axial movement. This is the main rule for a comfortable ride, but what do these words say to a novice motorist, and not to an experienced car mechanic? Let's try to figure it out.
Steering rod - its functions and vulnerabilities
All tie rods perform the following two functions. They transmit forces from the steering mechanism to the rotating arms of the hubs, thanks to which the wheels turn, this happens due to the hinges installed at the ends of the rods.
Also, these elements of the car provide the necessary angle of rotation of the wheels, because during turns the radii along which the wheels move are not the same.
And by adjusting the required rod length using a special thread, you can adjust the angle of the wheels (toe angle).
Most often, the hinges become unusable, or more precisely, the rubber liner; this, by the way, renders the entire control unusable. This happens as a result of long-term use.
Due to the ingress of dust and dirt, the tie rod boot may also deteriorate. The rods themselves become faulty, mainly only after mechanical impact.
This could be a collision of wheels with the edges of deep holes or a direct impact with a stone, etc.
When is it necessary to replace the steering rod?
You can understand that the steering rod needs to be replaced by the following signs:
- extraneous sounds and knocking appear in the controls;
- steering wheel wobble occurs;
- increased steering play. If it occurs during vertical rocking, then it is necessary to replace the ball joint or the hub bearing. In the case of horizontal swaying, there is a malfunction of the steering tip;
- the drive wheel rotates quite tightly;
- While driving, the car tilts to the side (either to the right or to the left).
Of course, it is possible to replace this mechanism yourself, but before taking action, it is worthwhile to diagnose the car. You can determine whether there is backlash as follows.
It is necessary for someone to turn the steering wheel of your car, and in the meantime you would determine the presence of play by eye, or slowly rotate the steering wheel yourself and evaluate its trajectory by touch.
If there is runout, then it is worth changing the tie rod end with the hinge.
Steering rod puller and other features of the replacement process
After a thorough diagnosis, if necessary, you should proceed directly to dismantling the old rod and installing a new one.
Before starting work, be sure to put your car on the hand brake and install thrust bars under the rear wheels.
If you need to dismantle the right link, then the front wheels are turned to the left; when dismantling the left, respectively, to the right.
Next, the front part of the car must be installed on supports. The ball joint is attached to the swing arm using a nut; it should be unscrewed after first removing the lock. For the next step, you will need a steering rod puller; use it to press the ball joint pin out of the strut swing arm.
Use a screwdriver to unscrew the ends of the locking plate, this way you will loosen the bolts that secure the tie rods, then unscrew them altogether.
It is necessary to rotate the connecting plate so that you can disconnect the rod from the steering mechanism. Now you can remove it.
If it is necessary to replace the tie rod end, then it must be clamped by the hexagon of the coupling in a vice and loosen the lock nut of the tip.
When unscrewing the tip itself, do not forget to count the number of revolutions completed. It is best to record this number on paper so as not to forget. When installing a new tip, screw it in exactly the same number of turns.
If it is necessary to replace the cover, you need to remove the old one, then lubricate the surface with sealant, and only then install a new one.
You need to reassemble the steering linkage in exactly the reverse order, so don’t get distracted when you disassemble your car.
Source: https://carnovato.ru/rulevaya-tyaga-zamena-nakonechnika-pyilnik/
How to remove and replace the steering end of a VAZ-2114: photo and video
Many motorists have encountered the fact that the steering tips on the VAZ-2114 failed. Of course, as practice shows, failure does not occur in pairs one at a time. This may be accompanied by natural wear and tear or falling into a pothole, of which there are quite a few on domestic roads.
Video about replacing steering tips on VAZ cars:
The process of replacing tie rod ends
Steering end
Replacing tie rod ends is not an easy procedure and can take a lot of effort and time.
Now, let's move directly to the issue of replacement. First you need to collect the necessary tools. What will be useful in the process: a jack, a set of keys (19, 24, 27), a wheel wrench, a pry bar and a hammer, VD-40. When everything you need has been collected, we buy new tips and move on to the replacement process:
- We put the car on a jack, not forgetting to secure it from rolling back.
The car is jacked up and ready for repairs.
- We dismantle the wheel.
Front wheel removed from car
- We turn the steering wheel as far as possible in the opposite direction from the place of replacement. This will simplify access to the required part.
- We take out the fixing pin.
Remove the cotter pin from the steering end
- Unscrew the fixing nut.
- Now you can press the tip out of its seat on the stand. This can be done using a special puller or pry bar with a hammer.
Pressing out the steering tip
- In order not to go to the wheel alignment, we measure the distance with a bar, as shown in the photo. But, nevertheless, after such repair work, it is recommended to go to the wheel alignment procedure to prevent incorrect wheel alignment and wear.
Measuring the length of the steering tip
- Unscrew the rod fixing nut. This operation is done with two keys.
Unscrew the steering knuckle
- We remove the rod from the seat.
Final dismantling of the tip
- Reassembly is carried out in the reverse order. Install a new tip
Symptoms of a problem
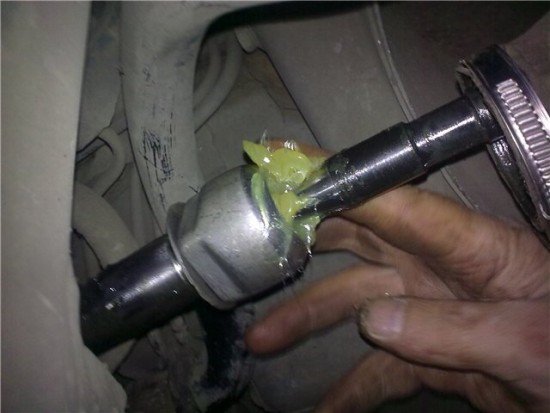
The tip is leaking due to a “leaky” boot
Part selection
Choosing any car part is hard. This question especially concerns the chassis, which is primarily responsible for driving and safety. Therefore, the choice of product should be approached carefully and carefully. So, in addition to the original steering tip, there are a number of analogues that are available and recommended for installation on a car.
Original for VAZ-2114
2108-3414056 and 2108-3414057 are the original catalog numbers of the right and left steering rods, which are produced at the AvtoVAZ plant. They are easily installed in seats and do not require alterations or other upgrades. The average cost is 1,500 rubles per set.
Analogs
A couple of articles of cheap substitutes on Exist
In addition to original spare parts, there are a number of analogues that are recommended for installation and are fully certified. So, in the table below there is a list indicating the names of manufacturers, catalog numbers and prices for steering tips that can be installed on the VAZ-2114.
Manufacturer's nameCatalog numberCost in rubles per piece| Kager | 43-0283 | 240 |
| Mapco | 19090 | 330 |
| SCT | TS 587 | 400 |
| Weber | SS 2108-4057 | 400 |
| Ocap | 0190737 | 450 |
| Lemforder | 15458 01 | 450 |
| Quinton Hazell | QR 2275 S | 450 |
| Fenox | SP31083C2 | 450 |
| Teknorot | L-302 | 450 |
| Bzak | BA08-3414057 | 480 |
| Master-sport | 154570-PR-PCS-MS | 500 |
| As Metal | 17LD1550 | 500 |
| Lex | L-0302 | 550 |
| N.K. | 5032335 | 550 |
| Starmann | ST-2442 | 550 |
| Delphi | TA1519 | 600 |
| Pekar | 2108-3414057 | 600 |
| Ruville | 917211 | 600 |
| Pilenga | TS-P 1144 | 600 |
| Finwhale | FJ-483 | 600 |
| Hola | S122 | 650 |
| ABS | 230188 | 700 |
| LYNXauto | C4049L | 750 |
| Patron | PS1197L | 750 |
| TRACK | TR70-103 | 850 |
| Moog | LA-ES-0061 | 850 |
| TRW | JTE 232 | 900 |
| EGT | 302046EGT | 900 |
Consequences of untimely replacement
Now that all the main processes have been considered, it is also necessary to talk about the issue of the consequences of untimely replacement of the steering tip, as well as the consequences that this can lead to:
- The worst consequence is a traffic accident . As a result, damage can be caused not only to the car, but also to human life and health. This can happen due to the tip pin breaking off. In this case, the car will be uncontrollable. And this is precisely what will lead to a collision with another vehicle, or driving into a ditch.
- Increased wear . In this case, not only the tires will wear out, but also the shock absorber will require replacement. And the most annoying thing is that wear will also affect the second, opposite tip, since the load will not be distributed evenly. This may result in additional costs.
conclusions
Replacing the steering tips on a VAZ-2114 car is quite simple, but the process itself can take a lot of time and effort, since the fixing nut will not always be unscrewed easily.
If the described process seems complicated to the motorist, then you need to contact a car service center, where they will always help with replacement.
Separately, it is worth noting that the chassis parts must be changed on time to avoid the tragic consequences described in the article.
Source: http://carfrance.ru/zamena-rulevyx-nakonechnikov-vaz-2114-svoimi-rukami/
How to change tie rod ends
Operating a car on poor-quality roads leads to rapid wear of the suspension. A complete repair of all components will be quite expensive on any car, but some operations can be performed independently by the driver without the help of service station employees, for example, replacing the steering rod or ends.
Any wheeled vehicle has a steering wheel, which transmits force through a worm or rack and pinion gear to simultaneously turn the drive wheels. Repair kits for popular car brands for this operation are sold in almost every specialized store. All that remains is to prepare the necessary tool, and you can get started.
Before replacing the tie rod, you need to know that the most common suspension components that fail are the ball joints of the tie rod ends. The wear will be noticeable after removal. Noticeable backlashes are formed after partial erasing of the spherical structural element.
When there was a shortage of spare parts, car owners tried to restore these elements on their own in old “classic” VAZs. However, it was not for long. Now replacing tie rod ends takes place without such pain.
A clear knock in the front will alert the driver to a problem with this part of the suspension. There is no point in delaying repairs in such a situation, since if a breakdown occurs while the car is moving, it will be difficult to avoid an accident.
Replacing tie rod ends usually begins with diagnostics. The problem can be identified by the following signs:
- the steering wheel play increases;
- there was a tight rotation of the steering wheel;
- knocking noises are heard in the engine compartment and steering;
- steering wheel wobble occurs;
- If the car moves straight without turning the steering wheel, then spontaneous “wobbling” of the car in different directions may occur.
One of these signs is enough to begin diagnosing the suspension regarding the performance of the tie rod ends.
You can check this node yourself:
- the clamp on the side adjusting rod must be tightly tightened;
- rubber boots must be undamaged so that dirt or dust does not penetrate into the working connection; even small punctures or cracks are not allowed;
- a working displacement along the axis of the finger of 1-1.5 mm is considered acceptable; you can check this yourself when your partner rotates the steering wheel and the driver holds the controlled unit with his hand under the car.
Source: http://btf.su/kak-vse-ustroeno/kak-pomenyat-rulevye-nakonechniki
Replacing steering rods and ends with your own hands is within the power of every driver if desired.
Hello, dear car enthusiasts! There is probably no point in explaining to the driver what the car’s steering is intended for. We are sure that you drive modern cars that have a steering wheel, and not levers like in a tank.
If we build a logical-mechanical chain, we will see: a steering wheel - a worm gear or steering rack - and, finally, a steering gear (trapezoid). The steering drive consists of steering rods, and it is the replacement of the steering rod that is the main issue of today’s material.
It is not a fact that you will use the knowledge you have acquired and will, without exception, begin to replace the tie rods and tie rod ends with your own hands. Not everyone wants or can. However, knowing how to replace a tie rod and when to replace tie rods or ends is essential.
At least so that the very “scrupulous craftsmen” of car services who are sorely short of money do not “hang electrical wiring on your ears.” And they take advantage of the naivety of car enthusiasts. Let the real pro masters not be offended by us.
Diagnostics before changing steering rods
Replacing car steering ends - part 1
Food for thought: you should know that the most common and typical malfunction of the steering drive is failure (wear) of the ball joint of the tie rod ends.
And yet, some “Kulibins”, from old memory, use a repair method such as restoration of steering rods. This is, of course, a personal matter for each driver, but it’s worth counting your money: how long will it take for the restored steering linkage to last, will all factory parameters be met during restoration, and how much money will the restoration cost?
Wouldn't it be easier to buy a factory steering rod, since the time of shortages for spare parts is long over? And replace the steering rod yourself.
How do we know if there is a steering problem? Elementary. Our hands on the steering wheel and our ears will tell us that it’s time to diagnose the steering.
Typical signs of a faulty steering system in general:
- various abnormal knocking noises - glitches in the steering;
- characteristic beating of the steering wheel;
- increased play in the steering wheel: play when the steering wheel is swayed vertically indicates a faulty wheel bearing or ball joint, play when swayed horizontally indicates a faulty steering tip;
- the steering wheel became difficult to rotate;
- The car begins to change its forward direction while driving.
One of these signs is present, which means it’s time to diagnose the steering.
When diagnosing on your own, or making an initial diagnosis, pay attention to the following characteristic points:
- the movement of the steering tips along the axis of the fingers should be no more than 1.5 mm. The assistant turns the steering wheel, and you use your fingers (by touch) to determine the presence of play on the ball joints. There is play or knocking - the tip with the hinge needs to be changed.
- Check the tightness of the adjusting clutch clamp on the side link.
- Check the serviceability (absence of mechanical damage) of the protective covers of the ball joint of the tip. There are cracks and tears, the cover needs to be replaced.
How to remove and replace steering linkage
Replacing tie rod ends - part 2
Let's start with the fact that you must purchase rods complete with tips. It's up to you, but it is advisable to change both tips so that after a while you do not have to return to replacing the old tip that was left behind. Dubious savings.
In order to remove and replace the steering rod, you will need a set of tools and accessories: a jack, “goats” for safety, a steering rod puller (if the puller is a problem, then the craftsmen use a hammer and a small “pry bar”), pliers, wrenches, screwdriver and universal technical fluid WD-40.
So, let's start replacing the steering rod:
- Jack up the car and put the jack up. Remove the front wheel.
- Unscrew the pin nut and unscrew it.
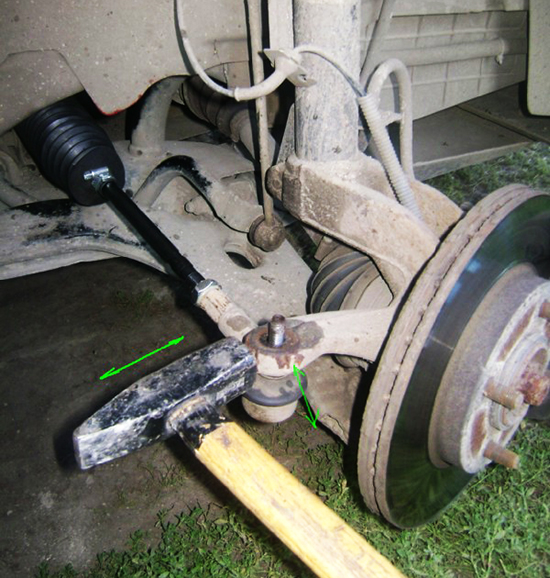
- Install the puller and, having tightened its nut all the way, sharply hit the eye of the swing arm with a hammer. If the finger does not come off, repeat the procedure: tighten the puller nut and hit it with a hammer.
- Completely unscrew the steering linkage from the coupling. WD-40 will come in handy if the threads are rusty.
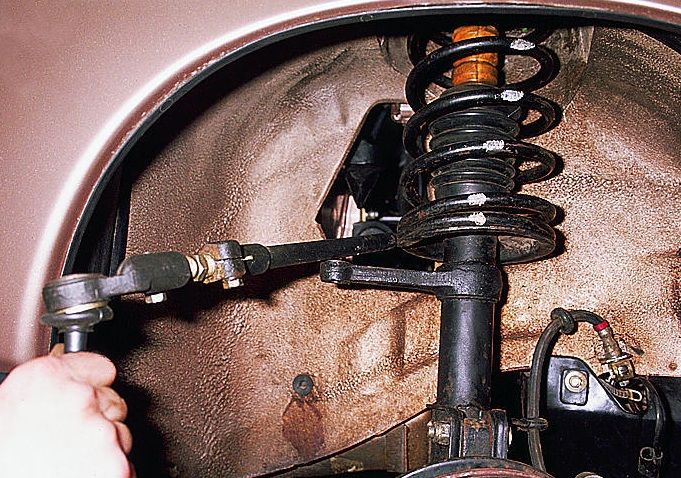
- Remove the boot and unscrew the rod from the steering rack.
- Before installing a new rod, attach it to the removed old one and make a mark along the old mark on the new rod. This is necessary for this. To tighten it to the mark and get to the breaker normally.
- We install the new rod in the reverse order, preferably without a hammer.
It is advisable to lubricate the threaded connections with lithol so that next time you do not use the hammer so actively. And don’t forget to lubricate the ball joint with the grease that comes with the rod.
After replacing the steering rod, you have a straight road to wheel alignment. Some “craftsmen” say that they install new ones according to the marks on the rods and do not need the services of a breaker. We would not recommend conducting such experiments, especially considering today's prices for new tires.
Source: http://CarTore.ru/264-zamena-rulevyh-tyag-i-nakonechnikov-svoimi-rukami-pod-silu-kazhdomu-voditelyu-pri-zhelanii.html
Steering rod: repair, replacement of tips, steering rod fingers
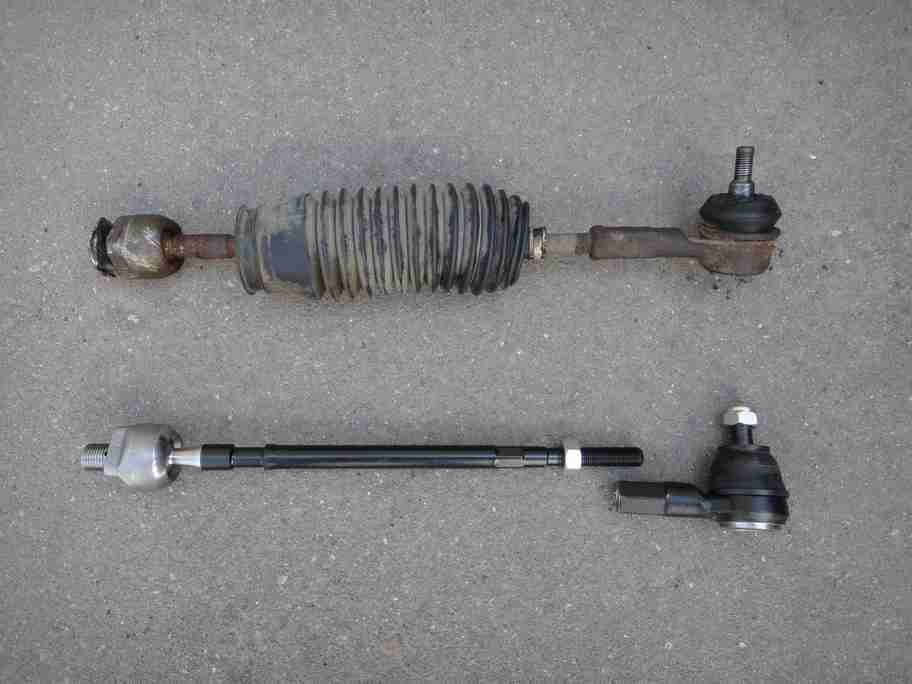
The steering linkage is one of the steering components of a car. Its purpose is to transfer force from the rack or gearbox to the steering knuckle lever to change the position of the steered wheel relative to the longitudinal axis of the car.
Device
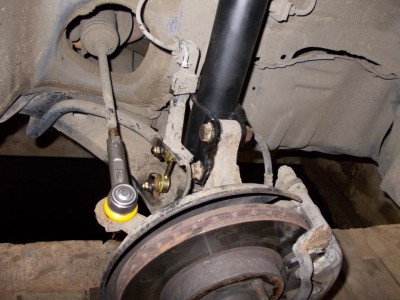
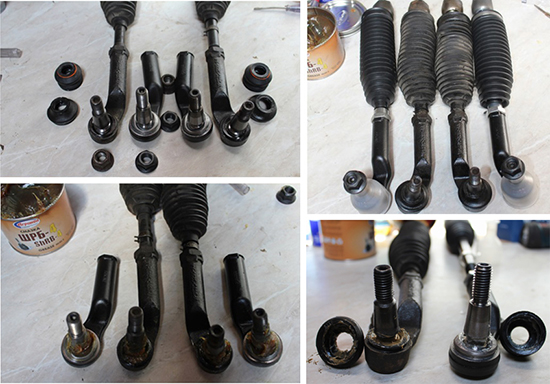
A tie rod usually consists of a metal rod and two ball joints at its ends. Each hinge is protected from dirt by a rubber boot.
Some tie rods may be adjustable in length. This is necessary to adjust the wheel alignment. Sometimes there are designs that have only one ball joint.
Their second hinge is rubber-metal, which does not need protection with a boot.
https://www.youtube.com/watch?v=7tC25wjFKOM
The most popular in the design of front-wheel drive passenger cars is the rack and pinion steering mechanism. Its tie rods are the same on both sides and most often consist of a rod and two ball joints.
The inner hinge is attached coaxially to the rod and is located under the cover of the rack, and the outer one is perpendicular to its axis with its boot. The steering knuckle lever has a tapered hole for attaching a hinge. The surface of the finger mating to it is also made in the shape of a cone.
Therefore, it is quite difficult to disassemble the lever-pin connection without a puller.
Troubleshooting
Some signs of steering failure can be identified visually. Their diagnosis begins with an external examination of the anthers and rod.
- The boots should not have ruptures or cracks, and no grease should leak from underneath. Leaky covers need to be replaced if the wear of the hinge does not exceed the permissible limits. Before installing a new boot, remove dirt from the joint and place a little Litol between the ball and the liner.
- If the rod shows signs of deformation from impact, the steering rod must be replaced.
- When it was not possible to determine the malfunction by external inspection, you need to check the degree of wear of the tips.
To check the hinges without removing the traction, place the car in an inspection pit or on an overpass. Stand under the front of the car. Grab the rod with both hands close to the outer joint and rock it up and down. The body of the outer tip can have a free play along the axis of the pin of no more than 1.5 mm.
This play is due to the mobility of the conical plastic liner along the axis of the pin. It should not be perpendicular to the center line of the finger. You need to have an assistant check the internal rack and pinion steering joint. He should frequently turn the steering wheel from side to side by 15–20 ◦. Meanwhile, by touch, determine the presence of gaps.
If you can feel the play with your fingers, the hinge will not last long - change it.
What is needed for repair
Replacing steering wheels will require you to have the following tools and devices:
- Jack.
- Balloon wrench.
- Steering wheel end remover.
- Set of spanners.
- Pliers.
- Flat thin screwdriver.
- An open-end wrench and a lever for it to unscrew the hinge from the rack. In this case, the lever is needed due to the strong tightening of the assembly.
- Car stands.
- Shoes.
It also doesn’t hurt to have a couple of nuts for fastening the fingers and several cotter pins of suitable size. Be sure to buy the required number of plastic clamps of the appropriate length to secure the steering rack boot. Such clamps can be used in any case, even if your car uses metal ones.
Replacing steering rods
In the event that the diagnostics have revealed signs of malfunction of both rod joints, you need a complete replacement of the steering rod. When only one hinge has symptoms of a malfunction, you can only confine yourself to replacing it.
- Loosen the wheel. On the side opposite to the one chosen for repair, place shoes under the rear wheel.
- Raise the car with a jack. Place it on the stand. Remove the wheel.
- Using a screwdriver and pliers, remove the cotter pin securing the outer tie rod end nut.
- Turn it away. If the cotter pin is rusty and cannot be removed, leave it and unscrew the nut with a socket wrench. She will cut off its protruding ends and remove it. Before assembly, be sure to drill out the remaining parts.
- Measure the length of the pull.
- Press the finger out of the bipod with a puller.
- To remove the rod assembly, remove the clamps from the cover half of the rack and slide it onto the rod. Unscrew the hinge from the rack and remove the rod.
- To remove the short tip, loosen the locknut.
- When assembling, make the length of the new rod as close as possible to the measured value. This will not save you from having to go to the geometry test, but it will improve the handling of your car on the way to the auto repair shop.
- There is no need to use a puller during assembly. The pin is pressed into the bipod when the nut securing it is tightened.
- If you removed the rod completely, be sure to place the boot half on the long end rod before attaching the outer end to it.
- The rest of the assembly is done in the reverse order of disassembly.
The large lever can only be used to loosen the threaded fastener. Because when tightening using a long lever, there is a risk of damaging the threads.
Source: http://AutoLirika.ru/remont/zamena-i-remont-rulevyh-tyag.html
How to change steering tips on a VAZ 2110 yourself
Any car needs maintenance. The condition of mechanisms and parts should be checked periodically. Timely and high-quality repairs extend the life of the car, save money and nerves of the owner. Most diagnostics can be carried out independently. Most often, breakdowns and the need to replace car parts occur while driving.
Every car has weaknesses. For VAZ 2110, this is the tie rod end. This part is an integral part of the car's steering system. The tie rods on the tenth generation VAZ end with tie rod ends. Rods are rarely changed, but tie rod ends must be replaced every 40 thousand kilometers of the car.
But this is an average and approximate figure. The service life of the steering tip depends on the driving style of the car owner and the conditions in which the car is operated.
Any driver of a vehicle can notice a problem with the steering. The main signs of the need to replace steering tips on a VAZ 2010 are as follows:
- difficulty driving, especially when turning;
- strong noise and knocking from one or both sides in the front, more pronounced when turning;
- The tread on the tires wears unevenly.
In the latter case, most likely the problem is not only with the tips. It is necessary to diagnose the front suspension as a whole. Perhaps replacing the tie rod end won't do the trick.
The steering tips in the VAZ 2110 car are a hinged joint. Wear in the tip joint leads to a malfunction in the steering. You can check the steering tips on the VAZ 2110 yourself.
First of all visually. To inspect the tip on the left side of the car, you need to turn the steering wheel all the way to the right; to inspect the right steering tip, turn the steering wheel to the left.
You should pay attention to the rubber boot that protects the tie rod end. If it is torn or cracked, then it is time to replace the tips.
Through the hole in the boot, dust and dirt enter the hinge, which leads to faster wear of the steering tip.
To carry out the second stage of diagnosis, it is necessary to jack up one of the sides of the car so that the wheel is freely suspended in the air.
Tug the tip with your hand, if there is any play, then you need to replace the steering tip. The tips should be changed on both sides.
It is not worth saving and changing one tip; it is better to save on the services of a service station technician and carry out the replacement procedure yourself.
Replacing the steering tips of the “tens” can be done independently or at a service station. After replacing it yourself, you should still go to a service center and get a wheel alignment done. Any replacement of steering rods or steering ends on a VAZ 2110 disrupts the camber. Restoring it is only possible at a car service center at a special stand.
Below are step-by-step instructions for replacing steering tips on a VAZ 2110. A video with a visual representation of the replacement process will make your work much easier.
To successfully replace the steering ends of a VAZ 2110, you will need the following tool:
- pliers;
- three keys for 13″, 19″, 22″;
- a special puller, if you don’t have one, you can use a small crowbar and a hammer, but it will be inconvenient to make a good swing to strike;
- metal brush;
- WD-40, or you can use regular brake fluid.
When all the tools are at hand, we proceed to replacing the steering tips on the VAZ 2110:
1. Raise one side of the car on a jack. We remove the wheel. 2. We clean the place where the steering tip is connected to the steering knuckle. To do this we use a brush. Spray the nut with WD-40 or wet it with brake fluid. This will make the replacement process much easier. 3. Using pliers, remove the cotter pin that secures the threaded connection. 4.
Unscrew the nut. Using a special puller or a crowbar and a hammer, knock out the tip finger from the fist. The steering rod end is released. 5. Use a wrench to unscrew the bolt that secures the tip to the rod. 6. Unscrew the steering tip. Before removing the tip, measure the distance between the squeegee and the central part of the tip.
This is necessary to install the new tip at approximately the same distance. 7. Screw the new tie rod end into place of the old one. We attach it to the steering rod. We insert the hinge pin into the steering knuckle, tighten it with a nut and secure it with a cotter pin. 8. Reinstall the wheel and lower the car from the jack. 9.
We carry out a similar replacement on the other side.
10. After replacing the steering tips, you should go to a service station and have a wheel alignment done. No matter how accurately the distance is measured in step 6, the wheel alignment still gets lost.
In almost any auto parts store you can buy a VAZ 2110 steering end. The price may vary depending on the manufacturer. You can choose an original VAZ 2110 steering tip or take a tip manufactured under license.
Sometimes a contract replacement part is of higher quality than the original. The choice is made by the car owner himself, based on personal experience and recommendations from friends and acquaintances. When purchasing, you should pay attention to the integrity of the rubber boot.
Source: http://avtovx.ru/rulevoe-upravlenie/zamena-rulevyh-nakonechnikov-vaz-2110-24/