Do I need to change springs when replacing shock absorbers? — DRIVE2
In the conditions of our realities and especially the state of the roads, suspension parts are the most susceptible to unpleasant surprises. And the main ones are shock absorbers and springs. In this article we will discuss the question: is it necessary to change the springs when replacing shock absorbers.
First, a little theory - let's figure out what they are intended for. The shock absorber and spring always work in tandem, performing two parts of one big task - ensuring the smoothness of the ride and controllability of the machine.
A spring is an elastic suspension element that softens shocks and shocks from driving on uneven roads. After hitting an obstacle, the wheel lifts off the ground and becomes uncontrollable.
The purpose of the spring is to return it to its place as quickly as possible, but after hitting the road the wheel bounces back, and the softer the spring, the more it can compress and absorb more energy.
And since this energy is spent very slowly (almost only on internal friction), the vibrations will not die out for a long time, fueled by new shocks from unevenness on the road, and the wheel will bounce, constantly losing traction.
Accordingly, to solve this problem, a shock absorber comes to the aid of the springs, which is designed to quickly dampen wheel vibrations by converting vibrations of the body and suspension into heat.
Compared to a spring, a shock absorber is a much more complex device, and in general terms it is a cylinder with a piston, inside of which, by overcoming the resistance of fluid flow inside the shock absorber, work is performed that consumes a large amount of energy. A normally operating shock absorber, after one return by the wheel spring after a shock, should absorb and convert 80% of the impact energy into heat.
Due to its complexity, a shock absorber is a less reliable device, requiring periodic replacement when the quality of its work deteriorates, but here we gradually approach the main question of our article: is it necessary to change the springs when replacing shock absorbers?
We figured out that normal operation of the suspension is possible only with proper interaction and full performance of its functions by both the shock absorber and the spring. While the springs support the weight of the car, their movements are controlled by the shock absorbers - accordingly, they depend on each other.
And if any of the components is “not completed”, then he shifts his part of the work to the “partner”. vk.com/kars.
best If a spring sags, then the shock absorber, which is significantly overloaded with additional work, fails much faster, and a bad shock absorber cannot normally limit the movement of the spring and rocks the car.
Why such a complex device as a shock absorber loses its properties is more or less clear, but why does a spring lose its properties? This is due to:
Metal fatigue depending on the time of operation and its natural wear; Damage to the surface of the spring (friction, stones, full compression of the spring); Frequent overloading of the car or overcoming very uneven sections of the road at speed;
Metal corrosion (high humidity, influence of road salt).
And in the future, road holding, and the degree of negative impact on shock absorbers and tips, and the braking performance of the car depend on the state of the spring - sagging springs cannot sufficiently neutralize the force that occurs during its braking.
After what we have understood about the constant interaction of springs and shock absorber, it is logical to assume that when replacing a shock absorber it is most optimal to also change the springs, but this is quite expensive and does not seem so necessary, given that it is visually difficult and sometimes simply impossible to determine some characteristics of springs, for example the degree of metal fatigue.
But installing new shock absorbers in combination with old springs that sometimes begin to rust means repairing the suspension by half while shortening the service life of the shock absorbers. Article from the public page “Machines”.
And if the shock absorber and spring are simultaneously replaced, the suspension will be restored to its original state, and as an additional bonus, part of the costs will be reimbursed due to longer operation of the entire unit as a whole and savings on double labor costs (the same operation).
The choice is always yours, however, springs ALWAYS change when:
Spring breakage (usually they break in the upper or lower turns); Visible corrosion or damage to the metal; Reduced vehicle height compared to the technical description (it is necessary to measure and compare the distance between the center of the wheel and the edge of the wheel arch on all four wheels); Unevenness of the vehicle horizon ( difference in height between the front and rear of the car);
When replacing shock absorbers in some car models with special suspension (for example, Subaru Forester).
If everything is fine, then it is allowed to change the springs every second time the shock absorbers are replaced. However, if you often drive alone in the car, then when replacing shock absorbers without replacing springs, it is recommended to swap the right and left springs, because the left side is often loaded with the driver’s weight.
Well, finally, it is necessary to remind you that, like shock absorbers, springs are changed in pairs per axle, otherwise, due to the different state of the springs, a suspension imbalance will occur, which will affect the handling of the car.
Source: https://www.drive2.ru/b/1408579/
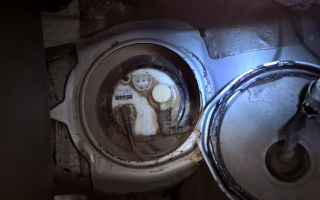
How to replace springs, shock absorbers, dampers in a washing machine
The design of modern washing machines involves the presence of parts that reduce noise and vibration. The tank is damped by a spring damper and a shock absorber. If the machine starts to work too noisily, vibrate and sway when washing, it means that these parts are out of order.
The article will discuss how to change shock absorbers and dampers. We will go through the entire replacement process step by step and give valuable recommendations with photos and videos.
Shock absorbers: functions and structure
Let us immediately note that shock absorbers in different models may have fundamental differences. But in general their design is as follows:
- cylinder;
- piston;
- return spring;
- stock;
- fixing bushings and inserts for shock absorber springs;
- gasket between cylinder and piston.
As we have already said, the task of the shock absorber in the SMA is to dampen the vibrations of the tank. The effect that weakens vibrations is achieved due to the movement of the piston, which is located inside the cylinder.
The gasket is impregnated with lubricant that does not dry out. When the tank vibrates, the piston enters the cylinder, dampening the vibration. And the damper spring brings the piston to its original position.
In addition to the lubricant that impregnates the insert, vibration is dampened by specially designed holes in the piston. Through them, air passes from one part of the piston to another and back.
Replacing shock absorbers
These parts differ from each other in the type of fixation. Some are mounted strictly vertically, others - slightly at an angle. On one side, the shock absorber is attached to the tank, on the other, like the damper, it is attached to the body.
Sometimes these parts are attached with a rod. In this case, in order to replace the faulty part, you need to disassemble the entire washing machine and remove the tank. Here the complexity of the work depends on your SMA model.
As we have already said, shock absorbers cannot be repaired, so if you have disassembled the part and come to the conclusion that the shock absorber spring has burst, you can, of course, change it. But whether you will find it on sale is another question. Moreover, you may need an insert for the shock absorber spring and other parts.
If you decide to replace the shock absorbers, use the information from the video:
Damper: design
In design, it is not much different from the part described above.
As for damping tank vibrations, dampers have much better performance in this area. They are more reliable because the springs that return the piston to its place are located outside. Often a broken damper can be repaired if it breaks, which is not the case with shock absorbers.
They are located in pairs below and perform two functions at once:
- Support the tank.
- They dampen tank vibrations.
In such designs, the tank is fixed on top by two additional springs.
Repair and replacement of damper with pressed liner
These dampers are widespread and used by many manufacturers of washing machines.
The damper dampens vibrations due to the friction of the piston, which is tightly clamped by the liners. The liners are clamped using a bracket, the design of which resembles the letter “P”. The latter is secured inside the SM with a special gasket.
It happens that the adhesion force of such liners noticeably weakens. Vibrations are suppressed more and more poorly, but replacing the damper is not required - repairs will help.
If the vibrations become stronger, you need to tighten the bracket or replace the liners if they are worn:
- Unscrew the 4 fasteners securing the bracket.
- Remove the bracket.
- Unbend the “whiskers” of the part.
- Remove the old liners.
- Install new ones.
- Reassemble the damper.
Replacement features
The dampers have specialized holes to which they are attached.
The fixing elements are most often bolts. Removing such bolts, like any fastener, is not difficult. Having done this, you can easily remove the broken part and install a new one in its place.
In this video, a technician from the UK shows how to change the damper by working through the bottom of the washing machine. If you are the owner of a similar model, then do the same:
Springs: purpose, replacement
The washing machine tank spring is located in pairs with the same spring at the top of the washing machine body. This complex holds the tank and returns it to its original position.
The return spring has two ends, each with a hook. On one side, the spring is attached with a hook to the SMA body, the other hook holds the tank. Spring breakage usually occurs near the fastening. To remove the spring, it is not necessary to follow a strict sequence - you can disconnect it first from the body, and then from the tank, or vice versa - it does not matter.
Before replacing the spring, you need to decide how you will remove the faulty part.
You can remove it through the place where it is attached to the tank. To do this you need:
- Remove the top panel.
- Raise the tank as high as possible and lock it in this position. Wooden blocks can be used for fixation.
- Pull the spring towards the tank.
- Take pliers and unhook the spring from the tank.
- The last thing left to do is to disconnect the part from the machine body.
You can also remove the spring through the top of the machine:
- The first two stages are similar to those listed above.
- Holding the spring with your hand, pry up the fastening hook with a thin screwdriver.
- Unhook the spring from the housing.
- Move it to the side and unhook it from below.
We are often asked how to replace a spring. If you follow science and hope that the machine will work longer, it is better to replace the spring with an original part.
We wish you successful repairs. Successfully replace your springs, dampers or shock absorbers and your car will run as quietly as when you bought it.
Did the article help you?
Not really
Source: https://cosmo-frost.ru/stiralnye-mashiny/remont-i-zamena/kak-zamenit-pruzhiny-amortizatory-dempfery-v-stiralnoj-mashine/
Do-it-yourself replacement of shock absorbers
Convenient and comfortable movement in a car is ensured by proper and proper operation of shock absorbers. It also guarantees safe travel on the roads. A faulty suspension seriously affects the wear and tear of its system and steering components. Such repairs require immediate implementation and replacement of failed parts with new ones.
Replacing shock absorbers can be done by any car enthusiast with experience in repairing his car. At the same time, you will save money on your household budget for visiting a car service center. You will need desire, free time and skills in handling a simple tool. What you need to know and how to replace shock absorbers with your own hands, you will read in this article.
Tool kit for replacing shock absorbers
- Set of wrenches.
- Balloon wrench.
- Jack.
- Screwdriver Set.
- Device for removing suspension springs.
- Wheel stoppers (prevent the car from flying off the jack).
Leak detected
List of malfunctions of the rear and front shock absorbers, which, if detected, require their replacement:
- Oil is leaking from the shock absorber.
- The appearance of traces of corrosion on the shock absorber mounts. There is a risk of the spring plate being torn off while the vehicle is moving.
- Corrosion on the piston rod. This defect can lead to oil seal failure and oil leakage.
- Deformation of the shock absorber body. The piston may be blocked or its movement may slow down.
- The appearance of a knocking sound when turning - the car became less stable, and began to toss while moving.
- Liquid leaks appeared on the shock absorber struts.
Carry out a thorough inspection of the car and decide what action to take. Carry out independent repairs to the shock absorber struts, or install new shock absorbers on the car. When choosing any option, you should remember well: after repairs have been made or new shock absorbers have been purchased, you must bleed the shock absorbers.
When replacing both pairs of shock absorbers, take from the set keys that suit the parameters of your car, couplers and stands for springs - sawhorses, a jack. Many motorists use wheels instead, but for your complete personal safety, use sawhorses. The risk of injury when performing repair work is quite high. Take care of your health.
Dismantle and install shock absorbers in pairs; saving on repairs will worsen the car's handling.
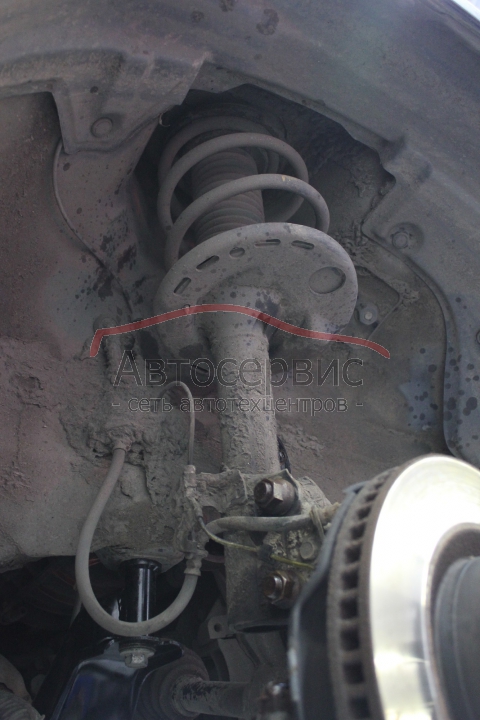
Replacing the front shock absorber
- We hang up the wheel intended for repair and install stops. We unscrew the two bolts securing the shock absorber strut to the steering knuckle. We disconnect the steering tip using a puller; you can use a pry bar.
- Then we disconnect the brake system hose and unscrew the nuts securing the upper shock-absorbing cushion.
- We remove the shock-absorbing strut assembly from the arch.
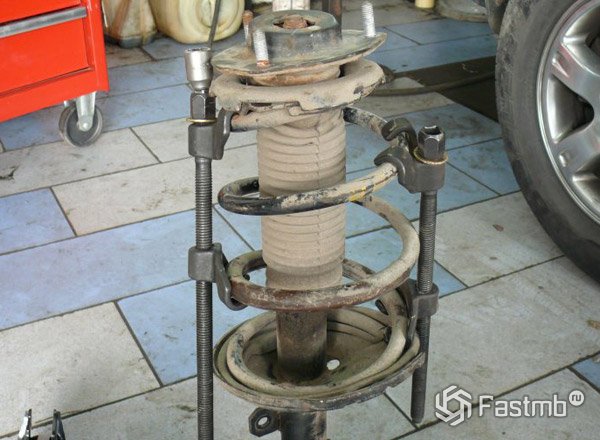
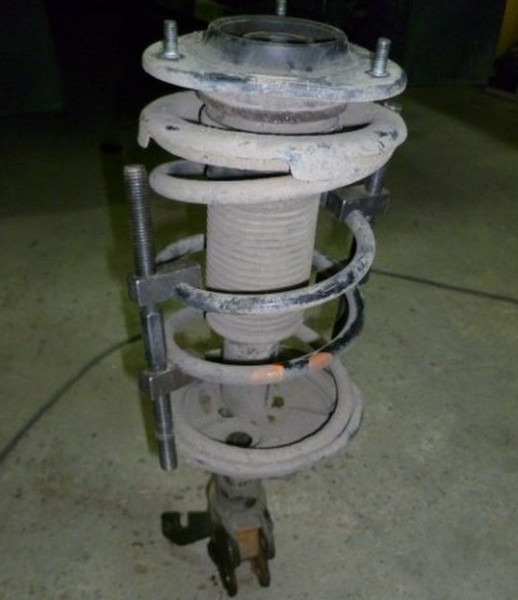
- We tighten the spring until it releases the spring support cup.
- We unscrew the central nut on the shock absorber, remove the dust protector, the shock absorber strut with the spring and the bump stop.
- We inspect the shock absorbers and make a decision: either carry out routine repairs or replace the old shock absorbers with new ones.
Replacing seals or adding fluid will only delay the situation with replacing shock absorbers. Install shock absorbers after repair or replacement in the reverse order.
Unscrew the nuts
Removing the shock absorbing cushion
Front pillar
Removing the shock absorber strut
Installing a new part
Video
Replacing the rear shock absorber
- Before lifting the rear of the car to replace the shock absorber, put it in first gear and place chocks under the front wheels. Raise the rear of the car, support the jack by installing reliable supports next to it.
- Unscrew the bolt securing the lower part of the shock absorber to the bridge, pull out the bushing in which it was located. Remove the shock absorber by first unscrewing the nut that secures it to the body.
- Attach the new shock absorber to the body and adjust the height.
Make sure that the lower part of it is located in the bracket attached to the bridge. Install the bushing into the shock absorber and then secure it.
- Removal and installation of rear shock absorbers is carried out only in pairs.
When replacing one shock absorber, an imbalance in the vehicle's motion will be observed, and this will lead to a significant load on all suspension elements and the axle, which means their operating time will be significantly reduced.
Unscrew the stabilizer link
Here are the nuts we unscrew
Removing the rear strut
We tighten the spring
Correct installation of the support post
Video
Source: http://auto-wiki.ru/zamena-amortizatorov-svoimi-rukami/
Replacing the front suspension spring
 Home » Pendants »
The chassis, like all components and assemblies in a car, needs maintenance and repair: over time, shock absorbers, ball joints, springs, levers, bearings and hubs fail.
Replacing the front suspension springs is a job that requires care and precision and is not particularly difficult, but here you must follow the rules for disassembly and reassembly in a certain order and use a special tool.
In this article we will look at how the front springs (FS) are changed on Ford Focus and Renault Logan cars, and what conditions must be observed. And when replacing these parts, do not forget about precautions; neglect of safety precautions can result in injury or even injury.
How to replace a spring on a car
Many modern cars are equipped with a McPherson type front suspension, consisting of parts:
- shock absorbers (struts);
- hubs and bearings;
- steering knuckles;
- support bearings;
- levers;
- ball joints;
- front beam;
- springs;
- transverse stabilizer;
- stabilizer struts.
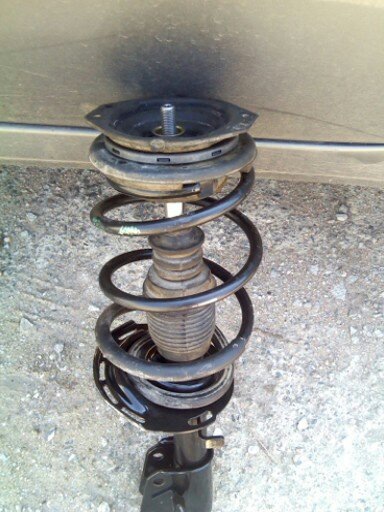
The spring is placed between the upper and lower cup (support) of the shock absorber and is held in place by a tightening nut screwed onto the shock absorber rod.
To remove the PP, it is necessary to dismantle the rack and disassemble it. The suspension on a passenger car can also be multi-link, with a slightly different design, but the principle of disassembling shock absorber struts is the same.
The design of the chassis on the front axle is somewhat different in cars such as the VAZ classic, but independent suspension is also installed here. On rear-wheel drive VAZ cars, the shock absorber is also located in the center of the spring, the PP is pulled together between the upper and lower control arms. Replacing a spring on an old Zhiguli is not very difficult, but the procedure is slightly different.
Causes and signs of failure of the front suspension springs
All car parts fail sooner or later; they have a certain resource. The service life of the front springs, regardless of the car model, is quite long (at least 40,000 km), but parts may require premature replacement for various reasons:
- the machine is often overloaded;
- the vehicle is driven on uneven roads;
- the shock absorber lost its elasticity, the entire load fell on the PP;
- There was a factory defect.
The spring sags over time, loses the necessary elasticity, and quite often the coil breaks on the PP. It is quite simple to determine the malfunction by external signs:
- a car placed on a flat area “falls” on the side where the spring is broken or “folded”;
- the “front” of the car is too low in relation to the rear;
- the breakage of the coil is visible visually, you just need to carefully examine the defect;
- While driving, a click is heard in the area of the front shock absorber (if the coil is broken), and a knocking sound is also present if you try to rock the car up and down in the area of the shock absorber while the car is stationary.
If a defect is detected in the software, the part must be replaced; it cannot be restored.
Replacing the front spring of Renault Logan
Before repairing the front suspension, you need to prepare the necessary tools. To disassemble Logan chassis parts you will definitely need:
- a set of open-end and combination wrenches;
- hexagons and asterisks;
- socket heads and collars;
- set of ties (2 pcs.);
- hammer;
- 21mm spanner wrench with large bend.
On Renault Logan-1, we replace the front spring in the following sequence:
- set the car on a flat surface, put stops under the rear wheels;
- open the hood, use a 6-point hexagon to hold the shock absorber rod, and use a 21-point spanner to unscrew the top nut of the shock absorber strut;
- jack up the car, remove the front wheel on the side where the shock absorber is removed, and place a “goat” under the bottom for insurance;
- unscrew the bolts and nuts securing the shock absorber to the steering axle (18mm wrenches); if the lower bolt rests against the brake cylinder, you will have to loosen the lower caliper fastener and remove the upper one to move the caliper away from the shock absorber;
- remove the bolts, move the steering knuckle towards you (away from the car), dismantle the shock absorber strut assembly with the spring;
- if the spring is broken or sagged, there is no need to tighten it, so simply unscrew the second upper nut on the shock absorber rod;
- We put a new part in place of the broken one, if the PP is of normal size in height, we fasten the ties to the spring coils, gradually tighten the coils, pressing them alternately on one side and the other;
- you don’t need to tighten it much, it is important that the nut on the shock absorber rod can be tightened, then tighten it until it stops;
- We install the rack in place and perform the assembly.
When installing the spring, it is important to get the coils into the grooves of the lower and upper cups, in this case the PP will tighten without problems. On Logan, it is often possible to do without zip ties, compress the spring with your hands and tighten the nut. In the absence of any complications, the work can be completed in two hours if you have metalworking skills; on a lift, replacement can be done even faster.
Replacing the front spring of a Ford Focus-2
To dismantle the PP on a Ford Focus-2 car, you will also need to remove the wheel and jack up the car. Sequence of remaining actions:
- to access the upper bolts of the rack, remove the plastic wiper panel, having first removed the rubber seal;
- remove the front caliper (attached with two 15mm bolts), carefully move it to the side using a hose, dismantle the brake disc (it does not have a mount, it is simply removed);
- disconnect the stabilizer strut from the shock absorber, unscrew the bolt securing the axle to the strut, separate the knuckle and shock absorber from each other;
- from above, unscrew the three bolts of the upper shock absorber support (ratchet with a 13-mm head);
- the bolts on the upper shock absorber cup are located asymmetrically, so during further installation it is necessary to align the holes on the metal plate and in the “glass” under the strut, install the upper cup in the same position in which it was before;
- We fasten the ties to the spring, holding the shock absorber rod with an asterisk hexagon, unscrew the top nut with an 18 mm spanner, tighten the coils, it is better to clamp the stand in a vice;
- We change the spring and reassemble.
If one of the PPs breaks, it is better to change the springs in pairs at once - the coils sag over time, and when replacing the PP on only one side, the front part of the body rises unevenly, the car can “fall” to one side.
Important points when replacing suspension springs
When repairing the front suspension, you need to take into account the specifics of replacing the front springs: if you do not follow some rules, complications may arise in the future, for example, you will have to re-do the work or make another purchase. Characteristic specifics of this repair:
- The front springs should be replaced in pairs and try to match them according to stiffness and height. Almost all parts are marked with a paint mark; it is necessary that the paint color of both springs matches;
- The service life of the spring largely depends on the performance of the bump stop and shock absorber, so the condition of these parts also needs to be monitored. If the bump stop is missing or is in poor condition, it will not be able to soften the impact, for example, if a wheel falls into a hole, the spring may break;
- When purchasing spare parts, you should not buy the cheapest parts; defects often come across here. It's better to spend a little more money, but you won't have to redo the work in the future. The most ideal option is to purchase original spare parts, or if you buy non-original ones, then from a well-known manufacturer with a good reputation;
- When removing and installing a spring, it is necessary to use ties; all traditional methods of tightening spring coils often lead to injury.
Ties must also be purchased of high quality, and it is better to try not to use Chinese tools at all.
With Chinese ties, the threads quickly pull out, and the metal is of such poor quality that the special device may simply not be able to withstand compression of the coils, and the spring will fly off to the side.
What the consequences may be is clear without further ado; you should take care of your health and take care of your safety.
(1
Source: https://avtobrands.ru/zamena-pruzhiny-perednej-podveski/
Replacing shock absorber springs
Replacing springs on cars is required when the ground clearance changes; this happens when there is metal fatigue or poor-quality springs on the car, or when a spring on the car breaks.
There are front and rear springs on cars; when replacing them, you need to place the car on a flat surface and securely secure it in place with chocks under the car's wheels. Raise the part of the car that you decided to repair; before doing this, do not forget to remove the nuts or bolts from the wheel, depending on the design of the car, and remove the wheel.
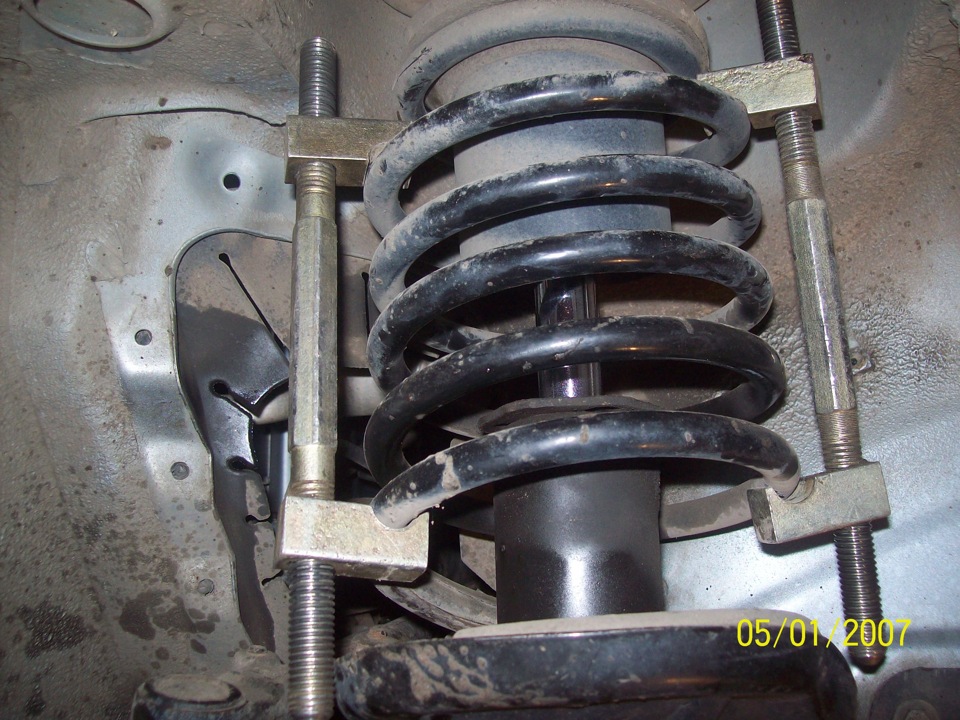
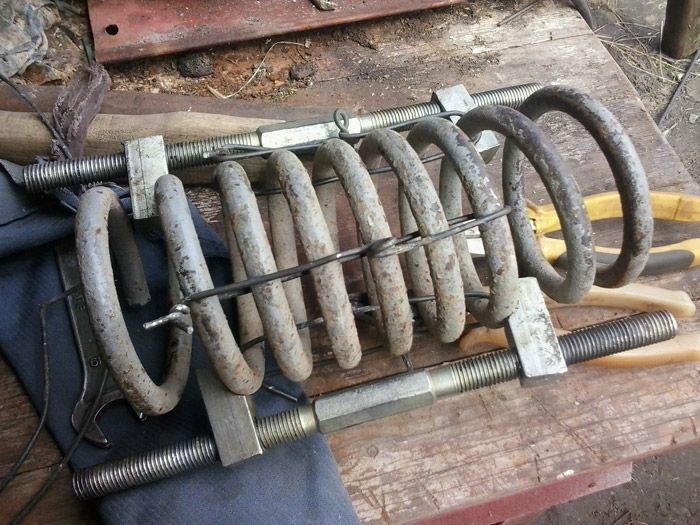
Compress the spring with zip ties and remove the strut and spring together. Or on some car designs, the springs are installed separately from the strut in special mounting locations for springs. Then you need to remove the springs from the spring mounting locations on the car.
Be very careful when working with car springs, they can withstand heavy loads. During vehicle operation, they are very elastic and compressed; they cannot be removed without special devices.
Shock absorbers on cars are installed separately or together with springs. The shock absorber is used to remove vibrations of the car while moving or to prevent rocking on uneven roads.
Shock absorbers assembled in one unit with a spring are removed as an entire assembly and disassembled in a vice with the springs compressed using special spring ties. Be careful when compressing the springs - the ties must be securely fastened to the springs.
Typically, springs are replaced in pairs on one axle of the car. There is such a thing as metal fatigue. Also, springs are produced by manufacturers of different stiffnesses.
So, for example, on the same axle of a car, springs of the same stiffness should be installed on the right and left. If the shock absorbers are in good condition, then the car will handle the road well.
Found a mistake? Select the text with the mouse and press Ctrl+EnterWhen it is necessary to replace the front shock absorbersReplacementInstallation of shock absorbers on a VAZ carAfter removing the shock absorberThe wholesale center of auto parts "Shate-M Plus" announces the launch of the Patron loyalty program, with the help of which the company's wholesale partners in the Republic of BWhen it is necessary to replace the rear shock absorbersInstallation of rear aSachs and Kayaba - two well-known brands for the production of automobile shock absorbers. Bleeding shock absorbers before installation is a necessary operation, since otherwise you risk facing piston repairs. What is a clutch? A clutch is a device for transmitting torque from the engine, ensuring its supply and disengagement, and smoothly Show more
Source: http://vsepoedem.com/story/zamena-pruzhin-amortizatorov
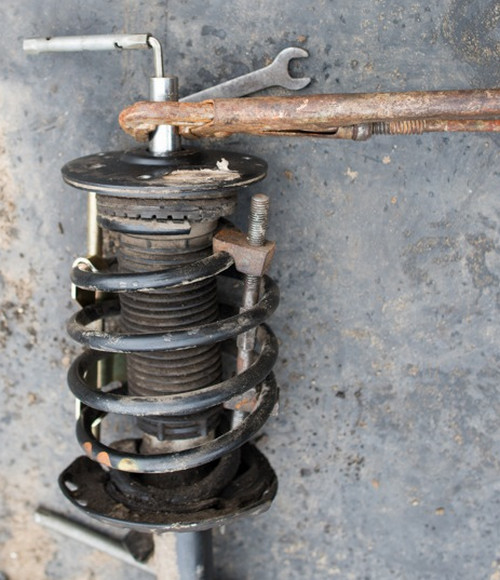
DIY shock absorber spring tie: step-by-step instructions and recommendations
The shock absorber is a unit responsible for a comfortable ride. Often the shock absorber strut requires replacement. For example, it leaked or simply exhausted its resource. In this case, the entire assembly is dismantled. The procedure is labor-intensive, but not complicated. You will need a tool such as a shock absorber spring tie. The device is extremely simple, but at the same time necessary when performing such work.
Universal and branded
Despite the fact that the design of the screed is extremely simple, they come in several types. For example, dealers of some companies use branded tools that are suitable only for a certain brand of car. This also applies to screeds, although in most cases such scrupulousness is not required.
Universal screeds, as the name suggests, are suitable for everything. A spring is a spring everywhere, and the device for working with it is suitable for any make of car. As for the craftsmen who repair cars in their garage, they need a screed. Let's see how to assemble such a tool with your own hands.
To make a screed yourself, you will need a metal rod (reinforcement), two threaded rods (M16), as well as extended nuts and a metal tube with an internal diameter of 16 mm. This will be quite enough to make a full-fledged screed.
It is also advisable to have a grinder on hand for cutting reinforcement and several wrenches for the nuts. The set of tools is minimal; all this can be found in the garage of any motorist. Well, now let's take a closer look at the process of assembling the product.
Making a tie for shock absorber springs with your own hands
Using a grinder, we cut two meter-long pieces from a pre-prepared pipe. We adjust the threaded rods to the required length. Next, we take the reinforcement and mark eight 30 cm sections. We saw it using a grinder and using any bending equipment we try to make hooks from the rod.
Please note that you will also need a welding machine. If you don’t have your own, you can borrow it from a neighbor for a while. We weld 4 pre-cut rods to the nuts, the remaining 4 to the pipe.
In principle, we made ties for the shock absorber springs with our own hands and can use them. Let's look at a few more interesting options that are popular among car enthusiasts.
Shock absorber spring clamp from a jack
There is also an alternative option that does not require special preparation or a large number of tools. To make it, we will need a grinder, a connecting rod from a classic, as well as an old jack from a VAZ (original). The procedure is as follows.
Using a grinder, we cut off the lower support on the jack, as well as the rivets. Next, in the place of the lever for raising/lowering the jack, we mount two ears for the bolts using welding.
In the place where the rivets were removed, we weld a piece of pipe measuring 25x25, we do the same in the place of the welded ears, only we take a 20x20 pipe. You can further strengthen the jack with another piece of pipe, cut to the required length.
In general, this device for tightening shock absorber springs is quite effective, and it can be made quite quickly without much expense.
What you need to know when dismantling
Tightening car springs is a rather dangerous process. If you make a low-quality puller, it may come off. The high pressure puts you at risk of injury. That is why it is necessary to be extremely careful when performing such work.
To prevent anything from happening, you can make a stationary screed. Its design does not differ from that described above. The only change is the rigid attachment to the tabletop. This will ensure that the shock absorber spring tie is securely fixed, which will significantly reduce the risk of injury.
Now let's look at another popular and extremely effective design.
Simple and affordable
We take two rods of equal length. The thread can be any, but it is most convenient to use standard M16 or M18.
The rod must have two threads: on one side - left, on the second - right, or vice versa. It is advisable to firmly fix the elongated nut in the center as a limiter.
There are such commercial rods, so if there is no special machine for cutting threads, we go to the car market.
All that remains is to weld a few hooks onto the nuts - and you can use them. To make the device work more smoothly, it is advisable to lubricate the thread and nut. You can use regular machine oil or grease.
Here it is necessary to achieve smooth operation; almost any lubricant will do. You can also use the drawings and take them to a turner, who will do everything.
A shock absorber spring tie is made in a few hours.
Cost of ties in stores
You don’t have to bother at all and buy the finished product in the store. Abundance can be confusing. There are hydraulic and mechanical shock absorber spring tensioners. The price for them differs significantly.
The cheapest options will cost about 1,500 rubles, while the most expensive ones will cost about 30,000 thousand. Of course, for single jobs it is not at all necessary to purchase an expensive product.
A mechanical coupler for a couple of thousand rubles will be enough for you.
You can purchase hydraulic couplers. It’s more convenient to work with them, but the price tag is twice as high. There are universal zip ties with various attachments, but this is also a fairly significant purchase. Pay attention to high-quality mechanical shock absorber spring tensioners. The price for a normal product will be in the range of 2-3 thousand rubles.
A few more points
So we have figured out that making a screed with your own hands is not so difficult. For this, apart from desire, a small amount of tools and time, you don’t need anything. If there is no tie, but the spring needs to be removed, then it is better not to risk your own health and not to experiment, but to contact a service station.
It will not be possible to tighten the shock absorber spring without zip ties; this has already been said. This does not apply to cases where the product has lost its elasticity and has cracks. Such a spring can no longer be called working. You can find a huge number of options for making homemade zip ties, the most popular of which we have just reviewed.
A homemade shock absorber spring tie is quick and easy to make. The main thing is that the structure is durable and fulfills its main task. Don't forget that if the tie comes off the spring, you can get seriously injured from the impact, so always try to keep the spring away from your face and securely fasten it if possible.
Source: http://fb.ru/article/300859/styajka-dlya-prujin-amortizatora-svoimi-rukami-poshagovaya-instruktsiya-i-rekomendatsii
Car repair: changing the strut springs yourself
 When operating a car, there is an excessive load on the chassis. In such cases, the strut spring breaks, which in the future leads to its complete replacement.
The strut springs of passenger cars act as an elastic element, with the help of which a minimal change in wheel camber is set during the operation of the suspension parts. This is necessary to ensure vehicle stability on the highway.
The design, which involves the use of coil springs, was first put into practice in the 30s of the 20th century and has since been actively used on most cars.
Preface: Let's figure out how the shock absorber strut works.
During constant use of the vehicle, springs under high loads eventually fail.
Upon closer examination of the racks, a malfunction was discovered: the spring broke.
Most often, a coil breaks off in the upper parts of these parts. This negatively affects the stability of the car. In addition, the broken edges of the springs make extraneous sounds when moving, causing irritation to those in the cabin. The malfunction can only be eliminated by replacing the worn part.
We lift the car and remove the wheel. We see the integrity of the spring and strut.
You can check the integrity of the strut springs in a simple way.
Raise the car on a jack and inspect the area where the parts are located. To be more sure of the need for urgent repairs, you can try checking the condition of the springs by touch.
True, not everyone can do this due to the inaccessibility of the place.
It is quite possible to replace the strut springs yourself.
Using these clamps, we compress the coils to relieve tension.
To do this, you will need a set of appropriate tools.
First of all, this is a special clamp, with the help of which the coils of the spring are captured and compressed. It is most convenient to do this in a large vice.
The spring must be compressed to relieve its tension, without which it will not be possible to remove the cup holding it.
To remove the spring, you must dismantle the entire rack. With the removal of all elements adjacent to it.
Disassembling the rack begins with removing the wheel and removing all adjacent elements. After this, the locking nut on the grenade is unscrewed.
After completing the action, nothing prevents you from removing the stand. Next, the spring is directly removed. As mentioned above, using a clamp, its lower and upper edges are fixed, after which the holding part of the bowl is removed and the spring is removed directly.
Assembly is carried out in reverse order.
In what order should assembly work be performed after replacing the spring on the strut?
It is worth noting that replacing strut springs is always done in pairs:
It should be noted that springs can only be replaced in pairs.
It is impossible to change just one spring, because, firstly, the degree of elasticity of the remaining and the new one will be different, because the first one has already been working for some time and metal fatigue will inevitably be felt in it, and secondly, the springs may not match in height , which will affect the vehicle's handling.
When the time comes to assemble the front strut, it is necessary to replace the support bearing, regardless of its condition.
Simultaneously with replacing the springs, it is recommended to install new support bearings, regardless of the degree of wear of the old ones.
Since the procedure described above is considered a serious intervention in the chassis of the car, upon completion it is imperative to adjust the camber and toe of the wheels .
After intervention in the chassis, it is necessary to carry out wheel alignment and alignment.
By the way, it is precisely this circumstance that serves as a convincing argument in favor of carrying out repairs in a car service center, where all the necessary procedures will be done for you right away.
Unfortunately, it is still impossible to adjust the wheel alignment angle without special equipment, but specialists will cope with the task in a couple of tens of minutes.
Source: http://remcars.info/remont-i-texnicheskoe-obsluzhivanie-avtomobilej-svoimi-rukami/remont-avtomobilya-menyaem-pruzhiny-stoek-samostoyatelno.html
Do-it-yourself spring remover in a car suspension
When repairing or adjusting a car's suspension, it becomes necessary to fix the spring in a certain position.
There is a service tool for this work: a spring remover, with which you can remove chassis elements both in a specialized workshop and in a garage.
Various tool concepts:
- Passive: Represents two brackets connected to each other either rigidly or using a threaded rod.
Simply secures the spring, compressed using the weight of the vehicle. After lifting the body with a jack, the elastic element remains in a compressed state.
- Active: The compression mechanism can operate under load when the shock absorber is under operating tension. The position of the body relative to the ground does not matter.
Let's consider the second option in more detail.
How does a spring remover work, and what types are they?
What is a puller used for? It overcomes the straightening force of the springs. The applied force on the puller brackets is commensurate with the weight of the car, but this does not mean that its design is too expensive and high-tech.
There are many options, but they are divided into only two types: mechanical and hydraulic drive.
Mechanical spring remover
Most often it has a threaded drive mechanism.
With a sufficient diameter of the pin (providing a good gear ratio on the thread), and a long handle of the key, you can compress the springs manually without excessive effort.
The technology is as follows: two pullers are symmetrically put on the rack. By turning the threaded rod, you bring the claws to the middle of the spring directly on the shock absorber, compressing it to the required size.
Installing one puller on a spring will cause it to break.
Pullers placed on both sides ensure uniform compression. When working with the suspension of trucks or heavy SUVs, experienced craftsmen install 3 or even 4 pullers.
Correct installation of pullers on the spring
Semi-permanent racks
Service stations often use semi-permanent struts to remove springs from shock absorber struts.
The tool is quite universal and fits most pendants. Thanks to the drive mechanism gearbox, working with it is convenient and safe.
The only drawback is that it is not always possible to compress the spring directly on the car. After all, this is a bench device: the puller works with the suspension removed from the car.
Lever type
Lever type pullers have a similar “problem”. The mechanism is reliable and safe, but its dimensions do not allow it to fit into the space under the wing of the car.
Hydraulic puller
Can be portable or stationary.
It works on the principle of a jack: there is a main and a working cylinder. By pumping liquid using a lever handle, the operator compresses the power brackets, between which there is a spring. A compact two-section puller can also become a helper in a home garage, but a floor-mounted stationary machine is only suitable for a car service center.
The hydraulic system is pressurized using a foot lever. At the same time, the car mechanic’s hands are free, working comfortably and safely.
Of course, there are pullers with compressors, electric drives, and other devices that make life easier when servicing a car. This is all good until you see the price tag.
Sometimes it is more profitable to visit a car service center several times than to purchase an industrial puller for personal use. Which exit? Make your own instrument.
Manufacturing a shock absorber spring remover
Many car enthusiasts use a regular chain: they wind a few turns around the coils of the spring and tighten the chain. After lifting the car with a jack, the shock absorber strut is stretched, but the spring remains compressed. This is a dangerous method: if the chain slips, the spring may spring back and cause serious injury.
How to make a simple puller similar to an industrial one
A mechanical semi-stationary “machine” can be created from a “Volgovsky” jack.
Materials used:
- old jack from Volga-24, Moskvich 412 or other Soviet passenger car = 0 rub.
- old connecting rod from any engine = 0 rub.
- steel corner from a landfill 1 meter = 0 rub.
- a pair of rods from broken shock absorbers = 0 rub.
- a handful of bolts and nuts M12 - M14 = conditionally free.
Drill, grinder, file, welding machine - such a set is either in the garage or available from a neighbor for a couple of beers.
A platform from a corner is assembled to the top of the jack (where the turntable with the gearbox is located). Then a bracket according to the size of the support cup is welded to it. We screw the connecting rod to the standard support arm of the jack; the shock absorber strut will fit into it.
No need to worry about the strength of the structure. The jack lifts the car, the connecting rod also withstands a huge load. And to strengthen the cantilever structure of the bracket, we weld rods from the shock absorber rods. The puller is universal: the length of the shock absorber allows you to service any struts for passenger cars, as well as most SUVs.
The next spring remover, which is easy to make with your own hands, is a tightening type. Suitable for small spring sizes, since it is unrealistic to develop a large force with such a device. The components are even more affordable than in the previous design. A piece of pipe, an angle and a long bolt M14 - M18. You can use a hairpin.
We weld brackets from a corner and sawn pieces of an inch pipe.
The puller consists of two identical ties, so there should be four brackets. Be sure to weld the guide bushings for the stud. Otherwise, when tightening, the brackets will jam. The spring is tightened by synchronously tightening the nuts on the studs.
If you use a set of 2 ties, they should be installed strictly symmetrically.
Homemade spring removers from car struts - video
Homemade portable stand
Wall-mounted
Bottom line:
The cost of homemade spring pullers tends to zero, since they are literally assembled from trash. And without them, it is not possible to service the car’s suspension.
Do-it-yourself spring remover in a car suspension Link to main publication
Source: http://obinstrumente.ru/ruchnoj-instrument/semnik-pruzhin.html