Heated rear window does not work - how to repair
 Home » Autolife » Heated rear window does not work - how to repair
Now, almost all modern cars are equipped with a heated rear window. It is a mesh of wires that is attached to the rear window.
Thanks to this function, with just one click of a button you can get rid of accumulated condensation on the rear window. Like any other equipment, heating can also sometimes fail. To restore its operation, you first need to find out the cause of the breakdown.
Reasons that can cause a breakdown:
- the most popular reason is that the rear window heating is de-energized in some areas, so it works partially (either only on one side, or in separate areas). The current distribution occurs evenly across all threads, which means that individual sections are most likely mechanically damaged;
- the current does not reach the heating. You can check this using a tester. If it turns out that the voltage does not reach the heating contacts, then it’s time to visit an auto electrician;
- burnt fuse.
Recommendations to help you repair the rear window heating filaments yourself
- You should start by going to a car store and buying a special kit that is designed to repair the heated rear window. This kit includes glue, an application brush, and tape. It is recommended to pay attention to the color of the glue. It is better to give preference to mustard, red or red-yellow. These adhesives are of the highest quality.
In addition, in this case it is better not to save money and take a more expensive set, since the quality directly depends on the price.
- This kit always comes with instructions that clearly indicate how many layers of glue need to be applied, as well as how long it takes for complete drying.
- It is necessary to carefully examine the threads and identify damaged areas.
- The damaged area must be degreased using a cotton swab and alcohol.
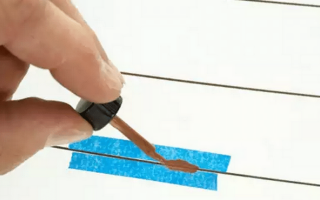
- Now it's time for the jewelry part of the work. You need to take the tape from the kit, cut two strips from it and stick them on the rear window. The distance between the strips of tape should be equal to the thickness of the heating filament - this is important.
- The resulting distance between the strips of tape must be degreased with alcohol.
- After this you can move on to painting. Apply glue to the prepared, grease-free space between the strips of tape using a brush. Application is carried out in as many layers as indicated in the instructions.
- All you have to do is wait for the glue to dry completely.
Most often, this takes about a day, but the instructions should tell you exactly.
- After drying, the tape must be peeled off and the functionality of the heating threads checked.
Heated glass repair video
The main reasons for the breakdown of the heated rear window
When the heated rear window fails for some reason and, as a result, it fogs up heavily or becomes covered with an icy crust, this greatly complicates visibility and leads to reduced safety on the road. To avoid this, it is necessary to eliminate possible breakdowns.
Since such a device does not have moving mechanisms, drives or other complex parts, the causes of malfunctions lie only in the electrics.
In normal cases, the glass heating operates while the engine is running. When the corresponding button is pressed, power goes to the relay control contacts, which turn on the power circuit. Thus, the current is distributed along the heating threads glued to the rear window, which are usually attached to the body in the area of the rear pillars.
Based on the above, the most common reasons for the rear window not heating are the following: a faulty relay, damaged heating filament or wires, or a blown fuse.
The most common problem is a damaged relay, the contact group inside of which tends to burn and, accordingly, stop passing current.
Such a malfunction is detected using a multimeter.
An equally common malfunction is the rupture of heating threads.
Since they are applied to the glass with a fairly thin layer of a substance that conducts current, they are quite easy to damage, for example, when removing a tinted coating.
Usually only a couple of lines fail, making the problem easy to notice. The functioning of damaged threads can be restored through the use of special adhesives.
But in the event of damage to the wires in the electrical circuit, detecting the break area is quite problematic. You will also have to look for it with a multimeter, checking each wire. The fault must be eliminated using terminals or the usual twisting method.
Finally, before you start looking for the cause of the heating failure, you should check the fuse. If it is in full working order, you can check according to the list above.
If the fuse is blown, there may be a short circuit in the vehicle. You will need to replace the element with a new one and check the heating operation.
If the new fuse immediately blows, it is necessary to identify the causes of the short circuit.
These are the main reasons for the rear window heating to break down. There may be more of them in different brands of cars. If you cannot identify the cause yourself, you should contact the service.
Source: http://remontpeugeot.ru/avtozhizn/kak-otremontirovat-obogrev-zadnego-stekla-svoimi-rukami.html
How to restore the rear window heating
Although it is autumn now, we decided to raise the issue of heating the rear window of the car. Some newbies may think it's not used at the moment, but it does indicate that you rarely ride in rainy weather.
What can you do if the rear window heating has disappeared? As a rule, this happens at the most inopportune moment, when the humidity on the street and inside the car increases. This negatively affects visibility, so restoration of heating must be carried out immediately.
Malfunction of the heating system occurs for various reasons, so let’s try to figure out what can be done in such cases.
Finding a Cliff
There are different ways in which you can find the location of the cliff, with the help of which you can do this with a minimum of force and time.
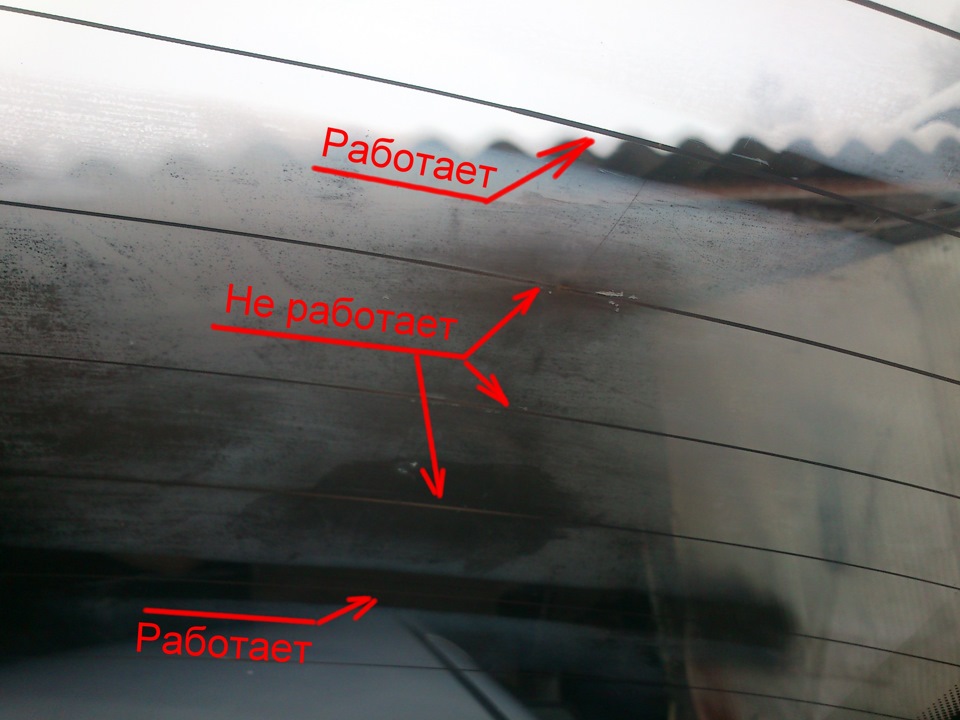
- Visually. After the glass fogs up, you need to turn on the heating. In the place where the break occurred, the glass will fog up, but you will not see a characteristic stripe on the other surface of the damaged thread.
- Using a voltmeter - option 1. Turn on the ignition and heated rear window. Next, we connect one probe to the ground of the car, and wrap the other in foil and bring it to the center of the heating filament. It is necessary that the voltage is about 5V. In the damaged area it will be 0V or 12V.
- Using a voltmeter - option 2. One probe must be connected to the “positive” heating terminal, and the other must be moved along the heating thread from the “minus” terminal. In the area where the voltage is 0V, repair work needs to be carried out.
- Using an ohmmeter. To do this, it is recommended to use not a digital, but an analog device, that is, with an arrow. Select mega or kilo mode. We connect the probes of the device to different terminals of the heating system. We wet the cotton wool in distilled water and move it along the heating thread. Damage is present in the area where the instrument needle begins to react.
Step-by-step instruction
There are many ways to carry out such repairs, as well as the materials that are used for this. First, let's look at a method using a special repair kit for heating repairs. After this, we will consider other methods, which are often called “folk”.
The areas where the wires or threads of the heating system are connected must first be cleaned and degreased if soldering will be used.
- Using a heating thread repair kit (you can buy it at any auto store). Using such kits, you can repair up to 10 cm of damaged heating filament. The kit includes special stencils with threads, as well as polymer thermoactive resin. After the break point is found, the heating must be turned off. Remove the protective film from the template and apply it to the damaged area. Then we apply the compound to the breakage site and carry out a similar procedure at least 2-3 times after drying. After removing the template, heating does not need to be used for 24 hours.
- Use of conductive paste. Conductive paste must be applied to the damaged area, capturing about 20 mm from both ends of the broken thread. The paste dries in about 24 hours, but the process can be accelerated using a hair dryer.
- Traditional methods. The only difference is in the materials used.
- Shavings and paint. To obtain shavings you will need a file and a copper-brass block. We use red paint so that it does not differ from the threads. Paint and shavings must be mixed in equal proportions. To make a template, take tape. After turning on the heating, the mixture must be applied according to the pattern. If everything is done correctly, a slight hiss will appear at the place where the thread is restored.
- Shavings and glue. This method differs from the previous one only in that it is not paint that is used, but glue, for example, BF-2 is suitable. If the break occurs over a large area, a core can be used for better results.
- Soldering the damaged area. For this, zinc chloride and low-tin solder are used, for example, POSS-4-6 or POS-18. You also need to use a copper or silver core wire.
As you can see, there is nothing complicated in this procedure, and it takes relatively little time.
Do not forget that the heated rear window is a very important element that must always be in working order!
Source: http://avtopub.com/remont-obogreva-zadnego-stekla-avtomobilya-svoimi-rukami/
DIY rear window heating repair
We will talk about a car function that is necessary in any season - a heated rear window. If some people think that rear window heating is not needed in summer, it means they haven’t driven in rainy weather.
the humidity rises in the cabin and outside . Consequently, visibility is reduced. Therefore, it is necessary to repair the system responsible for heating the rear window of the car.
The cause of the malfunction can be various factors: unprofessional actions of service workers in the process of tinting windows, children pampering in the seat.
How to find the break point? Can't be determined visually. Any motorist is able to find the place where the threads break. Basic Rules:
1 Initially inspect the mechanism. If the rear window is fogged up, turn on the heating. In the area where the threads break, the glass will immediately begin to fog up, but the rest of the surface will not have characteristic stripes.
2 You can use a voltmeter . Turn on the ignition, start the rear window heating mode. We connect the voltmeter probe to the ground of the car, wrap the other end in foil, and move it to the center of the heating filament. The voltage level must be maintained within 5V. There is a break where the indicator falls.
3 Using a voltmeter, connect one probe to the “positive” heating terminal. We move the end of the second along the heating thread, where the negative terminal is. Repair of the glass heating will be required where the voltage drops.
4 Use an ohmmeter . It is needed for diagnostics; you will need an analog device. Turn on the ohmmeter, mega or kilo mode. We connect the equipment probes to different terminals of this system. Using ordinary cotton wool, which is soaked in distilled water, we carefully move it along the existing heating thread. The reaction of the ohmmeter needle will indicate an open circuit.
Do-it-yourself repair of rear window heating threads
Now regarding work. There are many techniques and materials for performing this operation. Initially, we will consider the possibility of using an industrial repair kit. It must be remembered that the connection points of the threads (wires) are always cleaned and degreased before carrying out the activities.
1 Repair set of glass heating threads allows you to restore up to 10 cm of the damaged area. The set contains stencils (templates) and a container with compound. Having specified the location of the thread break, the heating should be turned off.
Remove the protective film from the stencil and apply the thread to the broken area. Using a brush, apply the compound in place. The procedure is repeated two to three times after drying.
It is necessary to remove the template from the glass, but do not turn off the heated rear window during the day.
2 Apply conductive paste . The product is applied to the area of the break. It is advisable to grab the area where the paste is applied 20 millimeters from the ends of the broken thread. It is necessary to dry the paste for 24 hours.
3 There are also traditional methods for repairing heated glass. The only difference is in the material used. Apply paint and shavings. The chips are formed with a file from a copper-brass bar. Red paint will be more effective.
You need to mix the shavings with paint in a 50:50 ratio until it forms a dough. We create a stencil from ordinary electrical tape. We turn on the heating and apply this mixture using a stencil.
If you recognize “contact” during the reaction at the repair site, you will get a slight hiss.
4 Sometimes glue with chips is used. The result is a conductive mass, but glue is used instead of paint. In a large area of broken conductive thread, you can use a small wire (core).
5 Continue soldering the break point. Here you need a flux - zinc chloride. If a significant area of the thread is damaged, a wire core (copper or silver) is used.
Where to buy heated rear window?
I looked online to see if I could buy a heated rear window instead of having to repair it.
There was little information: mainly either proposals for the manufacture of independent heating elements, or a couple of Ukrainian sites with finished products.
In general, the easiest way is to put up with fogging or buy new glass - if you don’t want to repair it. As an option, I heard you can install computer fans on the sides, blowing on the glass))).
Source: http://diaginfo.ru/remont-obogreva-zadnego-stekla-svoimi-rukami.html
Rear window heating repair
 It has become colder outside and in the morning, more and more often, the first thing you have to do is press the rear window heating button. But HORROR, you turn on the heating and discover that not all the filaments are heating.
What to do? Replacing glass is not a cheap pleasure; the only option is to do the repairs yourself.
Usually recommended methods for repairing rear window heating threads, according to those who have tried, leave much to be desired - the ineffectiveness of inexpensive conductive adhesives, and the high price of proprietary mixtures.
And then, on the Internet, I came across an interesting repair technology; reviews from those who tried it were more than enthusiastic:
Description of technology.
From the reagents you need copper sulfate - better known as copper sulfate (used in crop production and construction), and sulfuric acid - an electrolyte from a battery is quite suitable. From a tool - a piece of copper (preferably copper - not brass.
Several pieces of copper wire folded into a bundle, a tube or rod with a diameter of 6-10 mm and a strip of fabric 20-30 mm wide and about half a meter long are quite suitable.
A strip of fabric half its width should be wound around the end of the rod - you should get something like a tassel.
You need to put a thread bandage on top to prevent the fabric from unwinding.
Preparing the electrolyte - not to be confused with the acca electrolyte - is also not difficult. Add a couple of teaspoons of copper sulfate to half a glass of water and stir until dissolved. If it doesn’t dissolve completely, don’t worry, don’t pay attention.
To the resulting solution you need to add 0.2-0.3% concentrated sulfuric acid or 0.5-1% battery electrolyte - this is about half a teaspoon of electrolyte per half glass. Well, the actual process.
Both terminals of the glass are connected to ground (if the glass is installed in a car and at least one heating thread is intact, nothing needs to be done), and the positive of the battery is connected to the tube with a rag. We wet the positive electrode in the solution and begin to actively and continuously rub the area where the thread breaks for 3-5 minutes.
A current passes through the solution, which transfers copper ions from the electrode to the heating filament. If the thread is slightly damaged, the gap is completely covered with copper; for large gaps, the copper-plated areas should be tinned with a non-overheated soldering iron and a jumper made of thin wire should be soldered.
There is no need to limit the current, because
After a few seconds, the anode becomes passivated and limits the flow of current. We should not forget that the solution contains sulfuric acid - such a concentration is not dangerous for the skin, but after a week or two holes appear on the clothes (Therefore, I do not recommend carrying out the process without removing the glass, although this is quite possible.
A couple more ways......
1st method:
– on fogged glass, turn on the heating and at the place of the break the glass quickly fogs up with a spot, while the entire thread with the break does not fog up.
2nd method: - to detect a break in the rear window defroster conductor, turn on the ignition and turn on the rear window defogger. - connect one voltmeter probe to the vehicle ground, and wrap the second probe in foil and move the foil along the heater conductor. - connect the voltmeter probe in the center of each conductor rear window defogger. If the voltmeter shows a voltage of about 5 V, then the heater conductor is working. If the voltmeter shows a voltage of 0 V or 12 V, then there is a break in the heater conductor.
– to locate the break point in the heater conductor, connect one voltmeter probe to the positive terminal of the heater, and move the second probe along the heater conductor from the negative terminal of the heater. The point at which the voltage indicated by the voltmeter drops from a few volts to zero is where the heater conductor breaks.
3rd method: - ohmmeter, in kilo mode, or better yet mego. One probe clings to one terminal of the heater, the second probe to the other terminal of the heater. Take a piece of cotton wool soaked in distilled water and move it along the threads of the heater, monitor the kilometer readings, the megohmmeter at the point where the break occurs, the arrow will twitch. - It is better to use an analog ohmmeter (with an arrow).
– works if there is a break in one place!
Direct thread repair:
In all the methods listed below, you must first clean the conductive strip from varnish (preferably with a bent steel wire or paper clip) until a metallic sheen appears and degrease it.
1st method (conductive paste): - you can restore a broken conductor of the rear window heater using conductive paste. - before starting the repair, turn off the rear window heating and allow time for the glass to cool. - using caution, strip the heater conductor and wash it with alcohol.- use adhesive tape to mark the area to be repaired. - Apply conductive paste approximately 20mm from each end of the damaged conductor.
– After drying the electrically conductive paste for 24 hours, you can use the rear window defroster. You can dry it at a high temperature, then you can use heating earlier.
2nd method (electrolytic coating): - from the reagents you need copper sulfate - better known as copper sulfate (used in crop production and construction), and sulfuric acid - the electrolyte from the battery is quite suitable. - from the tool - a piece of copper (preferably copper - not brass. Several pieces of copper wire folded into a bundle) a tube or rod with a diameter of 6-10 mm and a strip of fabric 20-30 mm wide and about half a meter long are quite suitable. - a strip of fabric should be wound on the end of the rod half its width - you should get something like a brush. You need to put a bandage of thread on top so that the fabric does not unwind. - Preparing the electrolyte - not to be confused with the battery electrolyte - is also not difficult. Pour a couple of teaspoons of copper sulfate into half a glass of water and stir until dissolved; if it doesn’t dissolve completely, don’t worry, don’t pay attention. To the resulting pp you need to add 0.2-0.3% concentrated sulfuric acid or 0.5-1% battery electrolyte - this is about half a teaspoon of electrolyte for this half glass.
– the process itself. Both terminals of the glass are connected to ground (if the glass is installed in a car and at least one heating thread is intact, nothing needs to be done), and the positive of the battery is connected to the tube with a rag. We wet the positive electrode in the solution and begin to actively and continuously rub the area where the thread broke for 3-5 minutes.
A current passes through the solution, which transfers copper ions from the electrode to the heating filament. In case of slight damage to the thread, the gap is completely covered with copper; in case of large gaps, the copper-plated areas should be tinned with a non-overheated soldering iron and a jumper made of thin wire should be soldered. There is no need to limit the current, because After a few seconds, the anode becomes passivated and limits the flow of current.
Don't forget that the solution contains sulfuric acid!
3rd method (paint with shavings): - take a copper-brass bar (graphite will also do) and use a small file to start making shavings. - paint (can be red, to match the color of the threads) is mixed with the shavings, the proportion is approximately 50/50. You should get a dough-like mixture. - Turn on the heating and apply paint to the thread, having first made a stencil from electrical tape or adhesive tape. During the process of applying the paint, a hissing sound appeared from the point of contact, then it disappeared, but the thread warmed up.
- done. Literally after a minute the composition hardens.
4th method (magnet and glue): - prepare very fine iron filings, a small magnet (from the speaker) and transparent glue (type BF-2) or nitro varnish. - apply the magnet from the outside over the break point, then from the side Sprinkle sawdust on the conductor, gently moving the magnet to achieve electrical contact at the break point (this will be noticeable by the heating of the strip - unless, of course, the break is in one place, otherwise more magnets will be needed). - Apply a drop of glue to the sawdust with a small squirrel brush and let the glue dry. (varnish). - then remove the magnet and remove excess sawdust with a blade. You can reapply another layer of glue (varnish).
- enough for several years.
5th method (special adhesives): - special adhesives for restoring heating filaments, there are also Russian-made ones - reviews are contradictory, some like them, others don’t - instructions for use are included with the glue
– It is recommended to add a little iodine to the glue. In this case, the glue turns out red and matches the color of the other threads
6th method (soldering):
– damaged areas can be soldered with soft low-tin solder POS-18 or POSS-4-6, using zinc chloride as a flux. If a long section is damaged, it is better to solder a thin copper or silver core from the wire.
7th method (sawdust and glue):
– silver filings (for example, an alloy ground off with a file from the contact of an unusable power relay) should be poured into the fold of a piece of paper, and a drop of nitro glue should be added there. Quickly roll a cylinder 2…3 mm long and 1 mm in diameter with the tip of a knife and apply it to the damaged area. Then crush it to tightly compress the sawdust and remove excess.
To implement this idea, I used the 2nd method - electrolytic coating. Here was the gap:
Break location
it was visible to the naked eye, but just in case, I rang this place with a tester...
Then I made a device with which copper ions will be applied:
Electrode
it is done very simply... I took 3 copper wires from a 2.5mm copper wire, soldered them together, put a heat-shrink tube on them, stripped the copper, wrapped a rag about 3 cm wide, secured it all with zip ties.... on the other side I soldered a plug-in contact so that you can connect this device instead of heating.
Next, copper sulfate began to play, fortunately there were old supplies, and I took a little acid from the battery with a syringe... (Copper sulfate can be bought at a store that sells fertilizers). The result was this liquid:
Copper sulfate solution.
Then everything is according to the instructions.... I lowered the electrode into the glass, disconnected the positive wire from the glass heating, connected a homemade electrode to it, turned on the ignition and the heating button - so “+” appeared on the electrode... On the heating strips there is a “-” sign. Just moved it to the place where there was a gap and saw how a coating of copper was forming... I note that this method is most effective for small scratches... To be on the safe side, I also soldered this place, fortunately after such a copper plating procedure everything is soldered with a bang!
In the end, everything worked out and everything works!
Source: http://www.elektrik-avto.ru/publ/remont_obogreva_zadnego_stekla/1-1-0-385
Do-it-yourself rear window heating repair, thread repair video
Freezing and fogging of the rear window lead to a decrease in visibility, which limits control over the road situation. In the article we will consider all heating components, as well as their possible malfunctions. We'll show you how to repair a heated rear window.
How the system works
To easily find a malfunction of the rear window heater, let's look at the design of the system. All elements are presented on a schematic diagram.
- Mounting block.
- Heating switch relay.
- Egnition lock.
- Button on the dashboard. There is a light inside the button that lights up when the heating and ignition are on.
- A corresponding icon on the dashboard that duplicates information about the heating being turned on.
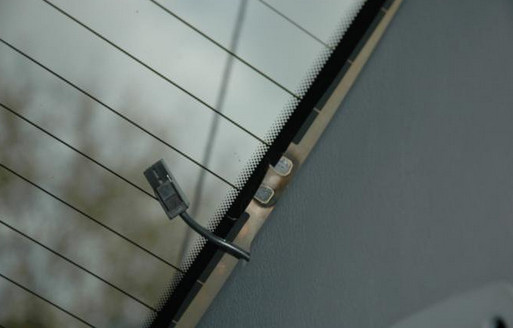
- Conductive threads located on the rear window.
The operating principle of the entire system is the heating effect, which occurs when current passes through the heating element. In the rear window heating system, this is a network of conductive threads. When you turn the ignition to the 3rd position (On), power is supplied to the system power button through the fuse (in our case F7).
After pressing the button, the current, lighting the control light, flows to the corresponding icon on the dashboard and back to the mounting block to the power relay. After closing the corresponding relay contacts, power is supplied (+) to one of the terminals of the system of conductive threads. The second terminal is connected to the car body, corresponding to the negative terminal of the battery.
Thus, current begins to flow through the threads.
Now it’s easier for us to understand how to repair the heated rear window. To successfully repair the heated rear window of a car, it is advisable to be able to read electrical diagrams, since not for all cars you will find elements depicted as clearly as in the diagram we provide.
Malfunctions
- Fuses blown. Repair of the heated rear window will end with the installation of a new fuse of the required rating (information on selecting and replacing fuses);
- broken filaments, which is the second most common cause. Most often, the breakage is caused by inaccurate removal of the tint film. Even the slightest gap will result in no current flowing along the entire length of the filament;
- breakage or chafing of electrical circuits between the components of the heating system;
- malfunction of the relay or power button;
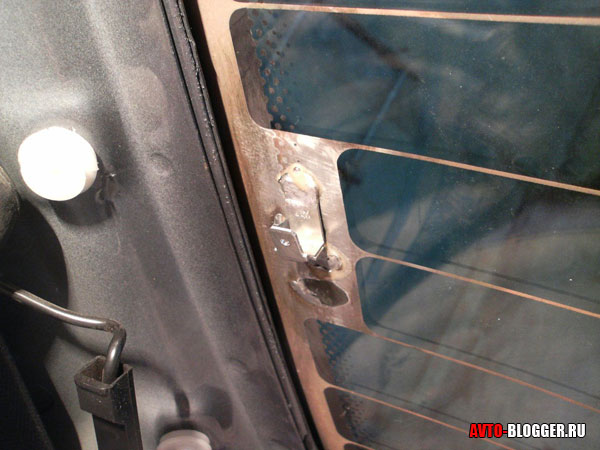
- oxidation of connector contacts, output of a mass of conductive threads, breaking off of rear window contacts (they are glued to a special conductive compound).
How to find the reason
All manipulations to find the cause of the breakdown should be performed after checking the fuse. Also, often the very nature of the breakdown can suggest a path to troubleshooting.
For example, along with the heated rear window, the light in the button stopped working. It is likely that this is just a coincidence, since the light bulb could simply burn out.
But the contiguity indicates the likelihood of a lack of power supplied to the button.
In this case, according to the diagram above, you need to check the circuit from the ignition switch, pins 1 and 9, 2 and 4 on the mounting block, relay contacts 85 and 86, as well as the button itself.
There is no heating of the filaments, but the light in the button works after switching on. In this case, power is definitely supplied to the button, so there is a breakdown in the circuit after the switch. It is necessary to check fuse F4, the heating switch relay and the corresponding terminals in the mounting block, as well as the contacts of the heating filaments.
The glass only partially thaws, which indicates that some of the filaments have broken.
Power check
To diagnose an open circuit, you need to know how to use a multimeter. In DC current (DCV) measurement mode, you need to check sequentially whether voltage is being supplied to certain terminals.
To check the power supplied to the relay, it must be removed from the mounting block. To check, you will need a multimeter (in DC mode, up to 20 V) or a tester. Turn on the heated rear window. If there is current at the 85th and 86th relay terminals, then there is a fault in the relay itself or in subsequent elements of the circuit.
To check the functionality of the relay itself, it must also be removed from the block.
To check the coil located in the relay, connect the probes to pins 85 and 86.
If the multimeter shows infinite resistance, and the red indicator in the control panel does not light up, indicating a short circuit, then the coil has burned out or the contacts have become unsoldered.
For subsequent testing, connect power from the battery to pins 85 and 86. After a click, indicating that the coil is working, contact should appear between pins 30 and 87.
If you do not want to check separately the relay and pins 85, 86 in the mounting block, check if there is voltage at pins 10 (Ш9) and 5 (Ш8). The presence of voltage will be a fact that the relays and tracks of the mounting block are fully operational.
If, when troubleshooting, you find oxidation of the contacts, clean the surface with sandpaper or a file. The heater repair will be completed.
Finding a broken heating element
There are many ways to detect broken conductive threads. To search, you can use a multimeter in resistance measurement mode. You need to measure the resistance at the beginning and end of each thread. The value should be approximately the same.
If the value 1 lights up on the screen, this will indicate a break. You can connect to the terminals of the battery threads. The multimeter must be switched to DC current measurement mode. Attach the positive probe to the positive terminal of the heating element, and apply the negative probe to the middle of each thread.
The value should be equal to half the battery charge.
To localize the location, measure in the same way, starting from the edge of the thread. Place the probes at a distance of, for example, 10 cm and move towards the edge of the thread. To avoid damaging the tinting excessively, you can solder needles to the leads of the probes. This way you can pierce the film unnoticed and not harm the threads themselves.
DIY repair
Repairing the heated rear window is impossible without a special conductive compound. To attach the terminals to the element, you can use special glue. To restore threads, there are special repair compounds.
Their cost is quite affordable, and you can find them in almost every auto supply department. There are also methods for making conductive compounds yourself.
Heater repair occurs as follows:
- remove the tint from the broken area. Use a ruler and a utility knife to carefully cut the film only around the perimeter of the thread break;
- degrease the surface;
- apply masking tape, leaving space inside for the repair compound;
- apply conductive glue;
- tear off the tape. Do not wait for the composition to dry, as there is a possibility that the layer from the repair area will subsequently come off along with it.
Do not apply too thick a layer, as this will reduce the resistance and, as a result, the temperature in the repair area.
A heating element repaired in this way will continue to serve you faithfully.
Source: http://AutoLirika.ru/remont/obogrev-zadnego-stekla-remont.html
How to repair the heated rear window?
You may be surprised by the topic of today’s article, because it’s summer and the weather is replete with sunny, hot days. But this function is relevant at any time of the year. Let's talk about heated rear window. For those who think this is completely unnecessary in the summer, you probably don't get around by car much during the rainy season.
But here’s the problem, Mr. Murphy comes into play with his notorious “laws of meanness.” It’s raining outside, and the heated glass has stopped working, and the humidity in the cabin is increasing and visibility is decreasing.
The car's rear window heating is urgently required to be repaired.
The reasons for such an unexpected trouble can be a variety of actions, from the lack of professionalism of the tinting studio service workers to the pranks of children in the passenger seat.
Rear window defroster: how does it work?
Heated rear car windows do an excellent job of eliminating fogging and do not dry out the air in the cabin.
Regarding thawing glass in winter, the advantages are obvious. The car glass evenly gets rid of icing by the time it needs to be pulled out.
The air from the heater has just begun to warm up, and the rear window is already clean, dry and transparent.
Rear window defroster: what is it and what is it for?
The most effective fighter against fogging of car windows is heating. How does the heated rear window work? The windshield is heated by directed warm air flows.
The rear window is heated using small heating elements powered by electrical energy. Metal tracks with high resistance in the form of multiple thin ribbons are attached to the glass itself from the inside (from the interior). When electrical energy passes through them, heat is generated.
As a result, the glass heats up and the water evaporates. After a few minutes the glass becomes transparent again.
Scheme of work
In order to successfully diagnose malfunctions and repair the heated rear window of a car as professionally as possible, it is necessary to study the electrical diagram for connecting the heating elements and understand its working principle.
The image shows a typical diagram of connecting heating to a car's electrical wiring. Let's figure out together how it works.
Power comes from the “+” terminal of the battery, passes through the ignition switch, fuses and is supplied to the heater controller and the power contact of the relay.
The battery terminal with the “-” sign is connected to the car body, as is one of the terminals of the heating device.
When the heater is turned on, the voltage goes to the winding of the relay, which is triggered, the power contacts are closed and the relay terminals 30 and 87 are interconnected. The current goes to the heater, flowing through parallel-connected threads, and then through the car body again goes to the minus of the battery.
What kind of malfunctions can there be?
Basically, car owners do not bother with what and how this rear window heating device is used until it fogs up or becomes covered with an ice crust.
Here, with the usual movement, the button to turn on the heating power is pressed, five minutes, ten, fifteen pass, but there is no result: the glass has not become any more transparent, or the view has appeared only in some part.
Here, no measuring instruments are needed to understand that the rear window heater of the car requires repair.
Please note that the heater turns on only when the ignition key is turned to the “ON” position. In other cars, the heater turns on only when the engine is running.
This is done in order to avoid premature battery discharge. Depending on the car model, the rear window heater can consume from 10 A to 25 A of electric current.
To give you an idea, two car headlights consume 10 A.
Rear window defroster does not turn on
If the light on the heating button does not light up when it is active, the button itself is most likely faulty or the fuse has blown. If the light is on, but the filaments do not heat up, then the reason lies either in the relay or in the connectors connecting the device to the on-board electrical wiring.
If this case occurs, then using the vehicle documentation you should determine the location where these parts are located and replace the non-working element. It is not always possible to quickly find the location of the relay, but there is one way to check its functionality indirectly.
We'll talk about this a little later.
The rear window is slowly fogging up
Sometimes it happens that after the heater is brought into a state of activity, the glass begins to fog up, but very slowly. If the weather is frosty outside, then the reason may lie in insufficient contact of one of the connectors of the electrical circuit. As a result, contact resistance increases, less current flows, power decreases, and the filaments heat up more slowly.
To check this malfunction, you need to take a multimeter and measure the voltage at the heater and battery input terminals. The difference in results should not exceed one volt.
Horizontal streaks of fog remain on the rear window
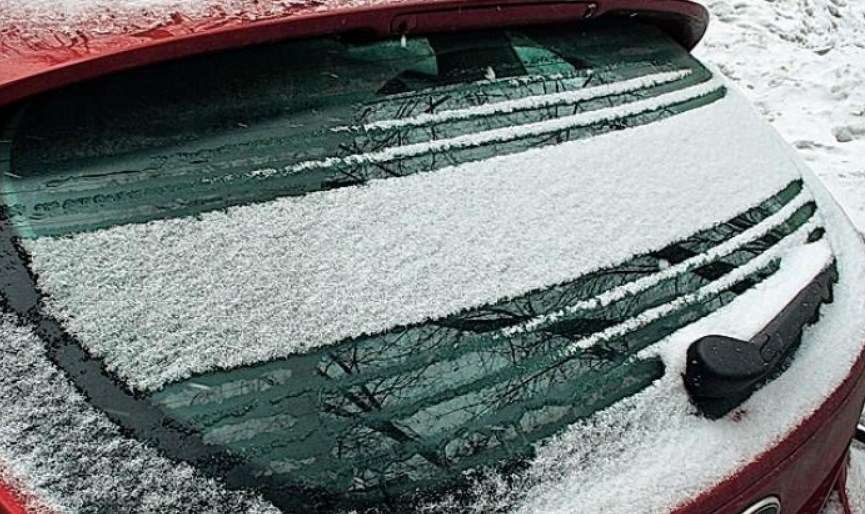
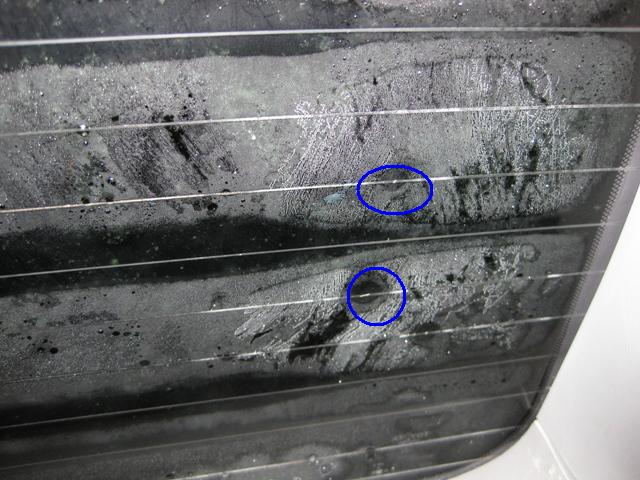
And, perhaps, the most common malfunction of the rear window heating system of a car is the breakage of the threads attached to the glass itself. This malfunction is visible to the naked eye, since at the location of the faulty element the glass is either fogged up or not thawed (depending on the time of year).
Paths carrying current are easily destroyed even with minor mechanical impact. Therefore, you cannot clean the glass with a scraper, only with a soft cloth. Also, if you sometimes transport long or large cargo, they should not rest against the rear window.
Diagnostics and repair
Identifying a damaged heater filament is not difficult, as you already understand. Therefore, before you repair the heated rear window, you need to count all the threads from top to bottom and remember which ones are faulty.
So, with a visual inspection, it will be easier to find the right thread. But sometimes the gaps are simply microscopic. A voltmeter or multimeter will help here.
To quickly find the problematic thread, you need to study the rear window defroster device.
Ways to find a problematic thread
If visual signs of a break are not observed, for example, if a break occurs at the terminals, then you can resort to the good old folk methods. The remarkable thing is that every motorist, with the slightest effort and expense, is able to find the place where the heater filaments break.
• Visual diagnostics. If the rear window is foggy, turn on the defroster. At the point where the threads break, it begins to sweat almost immediately, when the rest of the damaged element does not warm up.
• Using a voltmeter - the first method. Turn on the ignition and then the heated rear window. Place one probe of the device on the ground of the car, wrap the second one in foil and move it to the center of the heating filament. The voltage should be no more than 5 V. Where it drops to zero or jumps to twelve, there is a break.
• Using a voltmeter - the second method. Place one probe on the positive terminal of the heating element, and move the second along the thread from the side of the negative terminal. In a place where the voltage drops to zero, repair of the heated rear window is required.
• Using an ohmmeter. It is better to take an analog device with an arrow. Turn it into kilo mode. Place the probes on the opposite terminals of the system. Soak cotton wool in distilled water and slowly move it along the thread. In the place where the instrument needle twitches, there is a break.
That's it, the diagnostics are done. Now, inspired by your successes, you can take on repairing the heated rear window yourself.
We carry out repairs
There are many options for repairing a rear window defroster. The same can be said about the materials used and the techniques used. In any case, you are free to choose the method of carrying out repair work. There is only one thing to remember: in any case, the connecting points of the heating system must always be cleaned and degreased if soldering is required.
1. How to repair the heated rear window using a repair kit? Many car rear window defroster repair kits have similar features. With their help, you can restore up to ten centimeters of a heating filament that is damaged. The repair kit includes: templates with threads and a cylinder with thermally active polymer resin.
Determine the location of the thread break and turn off the heating device. Remove the protective film from the template and attach the thread to the broken area. Using a brush, apply the polymer material to the area to be repaired. When dry, repeat several more times. Remove the stencil from the glass and do not turn on the heating for 24 hours.
2. How to repair a rear window defroster using conductive paste? It is applied to the places where the threads break. At the same time, grab the torn ends on both sides, 2 cm on each side. The paste should dry for a day. You can use a hair dryer and speed up the drying process.
3. Restoring rear window heating tracks using traditional methods. In principle, they themselves do not differ from each other, only there is a difference in the materials used.
• Paint and chips. The shavings are extracted using a file and a copper-brass block. It is better to take paint to match the color of the heating threads.
Mix the ingredients in a 1:1 ratio until it forms a soft dough. Make a stencil from tape or tape. Turn on the heat and apply the mixture using a stencil.
You will hear about the presence of contact at the repair site by a characteristic light hissing sound. All is ready. You can go straight away and not wait a day.
• Glue and shavings. Here, instead of paint, BF-2 glue is used, as an option.
• Soldering the break point. Here you need to use zinc chloride. Solder should be taken with a low tin content, such as POS-18, POSS-4-6. If a long section of the heating filament is damaged, you can use a silver or copper wire.
Now you should have enough options on how to restore your car's rear window defroster yourself. As you already understand, this will not cause much difficulty, and you don’t need to spend a lot on materials.
Source: https://auto.today/bok/4496-kak-rabotaet-zadniy-obogrev-stekla-delaem-ego-remont.html