How to replace a ball joint with your own hands

It is known that replacing a ball joint is currently a very popular topic that almost all motorists are interested in. In fact, this is a common occurrence, but for many drivers it is unacceptable.
Some perform this operation independently and quickly enough, although they do not have extensive knowledge in the automotive field.
Why is replacing a ball joint a headache for some, while for others the procedure is not at all difficult? Let's try to figure it out.
Replacement of ball joints is carried out on a lift with a special puller. Be sure to arm yourself with the necessary tools, including wrenches 22 and 13. When installing new ball joints, be sure to lubricate them and the boots with nigrol.
It is well said: it is better to see once than to hear a hundred times. So it is here. If a motorist once sees how a ball joint is replaced, he can easily perform all these steps on his own. But you also need to know some secrets and nuances of replacement, which will be discussed in our article.
The ball joint is a suspension element that everyone has heard about, but only a few know where it is located and is it even needed? Of course, this knowledge gap is quickly filled when problems arise with this vehicle's running gear.
The ball joint is such an important part that without it the car will not be able to move. Without it, any car is a pile of motionless metal.
Look at her. This is what it looks like in cross section:
It looks like just a metal finger with a ball on one end and a thread on the other. But this part ensures the driving performance of the car. The ball itself in the picture is visible in cross-section; in fact, it is in a closed housing.
Inside the body there is a special polymer composition in which the ball is able to move in different planes. Since its movement occurs due to the polymer filling, it turns out to be “backlash-free” and, as a rule, does not require regular lubrication on some car models.
A special rubber boot prevents dirt and moisture from entering the space where the ball is located.
Now let's look at the other end of the metal rod. There is a thread here that allows you to attach the ball joint to other suspension parts. It is attached to the lever, thus ensuring the mobility of the two suspension elements due to the movement of the ball.
Also, the ball joint allows you to keep the car wheel in a horizontal position even when it moves vertically when it turns.
The operating principle of the ball joint is based on the rotation and swinging of a cone-shaped pin at small angles. And if this part of the car is subject to significant loads, then it fails. For example, the driver determines a defect in this element when the “knock” of the ball joint is clearly heard, which occurs due to an increase in the gap between the tip and the body.
The video shows an example of replacing ball joints:
To avoid rapid wear of the ball joint, you need to drive correctly. So, it is not recommended to drive quickly over uneven surfaces. It is also necessary to regularly inspect the ball joint boot. After all, if it is torn, it means that soon the service life of the ball joint itself will end, because dirt accelerates the wear process. In such cases, it is enough to simply replace the boot.
You can easily evaluate the performance of the ball as follows: drive onto an overpass and check for play. First, the boot is inspected, which is unlikely to remain intact when the ball joint fails.
You should remember its importance for the car, because it connects the steering knuckle with another suspension arm. And, if the ball joint fails, this connection is broken, and the steering knuckle functions separately, and driving the car becomes impossible.
The first symptom of part wear is the wheel turning outward. This is what it looks like:
It is clear that if the ball joint fails while the car is moving, it threatens a terrible accident, especially if this happens at high speed. Therefore, it is recommended to carefully inspect the unit yourself or use the services of professionals.
Replacement
As mentioned above, the replacement process is not that complicated. You can easily replace the ball joint yourself. You need to start with the following steps:
- we lift the car so that the desired wheel can be suspended (the operation is carried out using a jack and a support);
- remove the wheel;
- take a 22mm wrench and unscrew the nut of the upper ball joint pin.
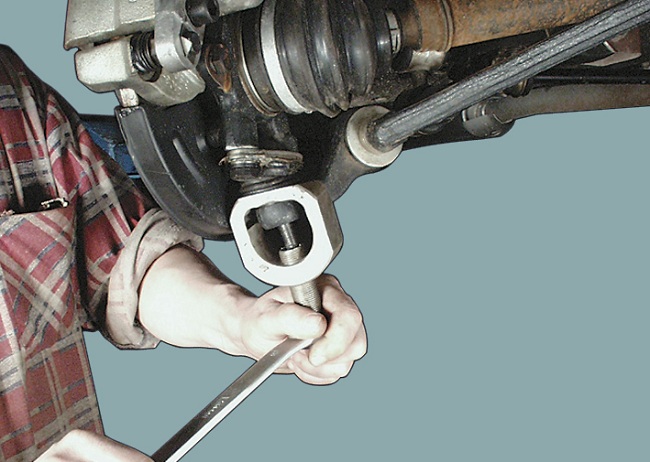
Let's move on, but now we need a special ball joint remover:
With its help you need to press out the ball joint pin. But if it is not possible to find such a puller, you can also use the “old-fashioned” method. But this is a very difficult process and also takes a lot of time. This method involves striking the steering knuckle eye strongly with a hammer while simultaneously pressing the upper arm with a pry bar.
We continue dismantling the ball:
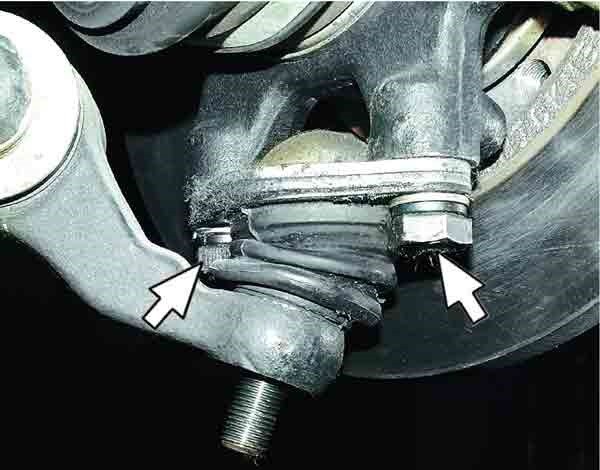
- unscrew the three nuts and bolts that secure the ball joint (for this we use two 13mm wrenches);
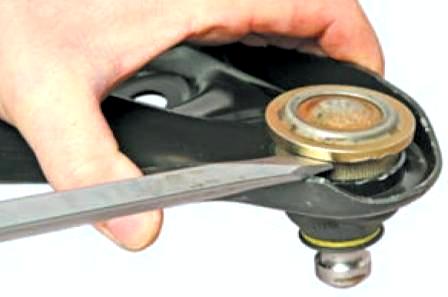
- we find the pressure plate, which is sometimes located on top of the boot (this is what it looks like);
It must be remembered that it will not be possible to unscrew the self-locking nut of the ball joint pin completely in the usual way. It rests against the steering knuckle lever. Therefore, you should do this in two steps. First you need to unscrew it with a 22 key, and then install the puller and press out the pin. After this, you can completely unscrew the nut by lifting the steering knuckle.
We continue the replacement process:
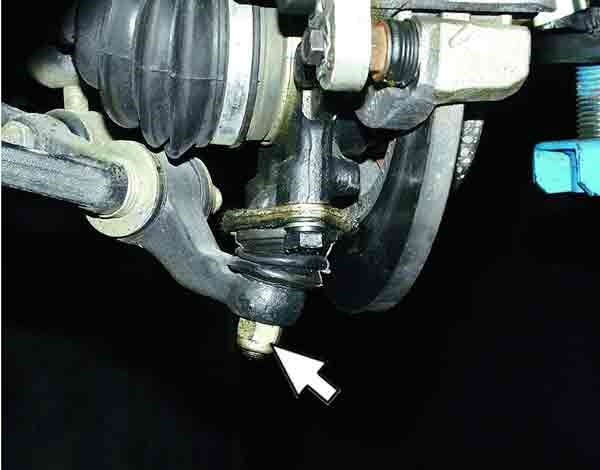
- we find the nuts that secure the ball to the lower arm (the support is attached in this case without a pressure plate);
- unscrew them with keys 13;
- remove the ball joint.
Before replacing it with a new part, it is necessary to lubricate it. You can additionally drop a little nigrol inside the new ball joint. It is also recommended to lubricate the anthers. Although you should not completely fill the boot with oil. This may damage the rubber.
The video shows the replacement of Renault Logan ball joints:
The process of installing a new ball joint is carried out in reverse order. It is also necessary to remember that the ball joint pin rotates during the tightening process. To avoid this, support the support with a pry bar.
Which ball joints to choose
Let's look at the best types of ball joints sold in stores today. As a rule, their largest share in Russia is occupied by manufacturers CJSC Trek, LLC Belebeevsky Plant Avtokomplekt and others. These enterprises mainly produce spare parts and ball joints for VAZ. Although the owners of Chevrolet Niva and other cars also use parts from these manufacturers.
Other manufacturers include Lemforder, HI-DRIVE, and Sachs. For example, for Honda, ball joints of its own production are considered the most suitable. Only they have a significant disadvantage. They are not cheap, their price can reach up to $200 per support.
And therefore, in order to save money, owners often choose parts from other manufacturers. In particular, these are balls 555, CTR, Febest, Masuma, which offer their products at a price two or even three times cheaper than the original ones.
In this case, each choice is made independently.
But you also need to remember that none of the above manufacturers will produce ball joints that can be compared in quality to their originals. This is the reason they are so cheap. Therefore, when replacing, you should, if possible, install high-quality balls so that you do not have to change them regularly.
In particular, the ball joint from Honda has an unambiguous service life, which is comparable to the service life of the boot. It is about 80 thousand km. There were also examples of ball ones that in practice lasted even longer - 150 thousand kilometers. So decide for yourself whether to replace the ball joints with original parts or not.
We got the opinion of experts on this matter. And this is what they told us. It turns out that installing duplicate ball joints instead of the lower standard bearings is not recommended at all. This leads in many cases to rapid wear. Most often, duplicates “die” without even showing any signs, thereby eliminating the possibility of timely replacement.
As for the upper ball joints, duplicates can be installed here. This will not lead to dire consequences, as experts say, since the design of many car suspensions is designed in such a way that this part does not bear a large load.
The video shows how to replace a ball joint on a VAZ 2108–2115:
In conclusion, I would like to note that the replacement of ball joints must be carried out competently. But if you are unsure of your abilities, then you don’t have to immediately go to a car service center. You can use the help of a friend or acquaintance who knows more about this than you. And as they say, one head is good, but two are better.
We hope that this article will help you replace the ball joint yourself, which is not so difficult, as it turned out from the article. Good luck!
Source: http://365cars.ru/remont/zamena-sharovoj-opory.html
How to replace ball joints on a Renault Logan, how to change it on video, tips for diagnosing and carrying out work
If a Renault Logan ball joint malfunctions, there are several options for troubleshooting. You can, as the manufacturer recommends, replace the entire front lower suspension arm assembly. From a security point of view, this is the best option, but not the cheapest. It is cheaper to replace the ball joint separately, but in this case there are several nuances when replacing.
Ball mechanism for Renault Logan: what and how
The ball joint is an important component of the chassis of almost any modern car. Logan's is non-separable, maintenance-free and is officially supplied only with a lever. It consists of a ball pin, which is pressed into a metal body along with a plastic bushing.
Designed to connect the steering wheel hub to the main front suspension arm. If you “run” this unit to a critical state, then the front wheel may spontaneously turn to the side, separately from the other. This situation is dangerous, especially at speeds over 30 km/h.
General view of the front suspension structure: 1 — suspension subframe; 2 — suspension arm with silent blocks and ball joint; 3 — steering knuckle with hub and bearing; 4 — shock-absorbing strut; 5 — anti-roll bar
Diagnostics of supports: repair or replace?
No one can say exactly how long the ball joints on Logan last. The main signs of a faulty ball joint in a Renault Logan are knocking and creaking. If you hear unusual sounds when turning the steering wheel, you should check the suspension.
Knocking on uneven surfaces also indicates a breakdown. But if the suspension “rattles” on a bad road, then do not rush to buy a new ball joint. Be sure to check the stabilizer struts, which fail more often, but knock no less.
For a more accurate “diagnosis” it is necessary to check the absence of play in the ball joint. This is done on a lift or simply by removing the front wheel. Next, you need to place a pry bar between the steering knuckle and the chassis lever and try to unclench them. With a properly functioning suspension, you won't be able to do this. If there is free movement, then the life of the part has been exhausted and replacement is required.
A sure sign of a quick repair is a torn protective boot on the ball joint. If dirt or water gets inside the housing, the part will not last more than 2–3 thousand kilometers.
The boot is not sold as a separate part.
What preparatory work needs to be done
If you decide to change the ball joint separately, then in addition to the spare part itself, you will need additional tools. Since you will have to press the old ball out of the lever with your own hands, ideally you will need a special press (puller).
With its help, it is possible to dismantle the support more accurately, and therefore the new one will be installed more reliably. You can find a press at most service stations, but if you don’t have access to such a tool, you can make do with improvised means. For pressing out, you can use a piece of pipe slightly larger in diameter than the ball.
And for pressing, a head size 34 or 36 is suitable. In addition, you need keys for 13, 16 and 18, as well as a large flat screwdriver.
How to change it yourself: step-by-step instructions
There are two methods for replacing a ball joint on a Renault Logan - with and without removing the lever. In the first case, it is more convenient to dismantle the faulty ball joint, in the second - there is less assembly and disassembly work. In the instructions we consider both options. Basic steps:
- remove the wheel;
- remove the caliper;
- unscrew and knock out the ball joint;
- remove the lever (with the first method);
- press out the old support;
- press in a new one;
- assemble in reverse order.
Let's take a closer look at each point.
- There shouldn't be any problems removing the wheel. But when removing the caliper, you need to unscrew the two 18mm mounting bolts, and then release the brake pads. This can be done using a screwdriver or a small pry bar. To decompress, rest not against the disc, but against the pad. After dismantling, hang the caliper higher on the suspension spring using wire or rope.
Remove the caliper
- Now we have access to the ball joint. It is secured with a bolt and nut. Immediately unscrew the nut and knock out the bolt or gradually unscrew it, pressing from the reverse side. At the mounting point on the steering knuckle there is a special slot into which you need to drive a large screwdriver (like a wedge). After which you can pull out the ball.
Drive a screwdriver into the slot of the steering knuckle and remove the ball
- The next step depends on the replacement method you choose. If you decide to try to pull out the support without removing the lever, then you need to select a suitable piece of pipe or other spacer. The main conditions are that the length allows one end of the device to rest against the ground, and the other end against the suspension arm. And the diameter should be slightly larger than the bottom of the ball, so that when knocked out it will fall inward. If the boot remains intact, it is better to remove it. It may come in handy in the future, since the anthers are not supplied separately (some install them from the Gazelle, but you will have to struggle with installation).
If the old boot is intact, it is better to keep it
- Next, knock out the old part with a hammer. Be sure to check for the presence of a retaining ring on the ball housing. The original supports do not have them, but some “analogs” are included. If any are found, remove the ring and then knock it out.
- To install a new spare part, a 34 or 36 head is suitable. Use it as a spacer, resting it on the lower part of the support. The splines of the ball must match the splines of the lever. There is no need to rush at this stage. If the new support enters the lever at an angle, you will not be able to press it in correctly. What’s worse is that in this case the seat in the lever is deformed, and you will have to buy the lever assembly. Therefore, proceed carefully.
Be careful when working with the ball seat
- The replacement procedure is much more convenient to do with the lever removed. To do this, you will have to unscrew the nut and pull out the bolt securing the lever to the subframe, front and rear silent block. And also unscrew and pull out the connecting rod and stabilizer link.
- We reassemble in reverse order, not forgetting to check the condition of the fastening bolts. If they are damaged (mechanically or by corrosion), be sure to replace them with new ones.
- Don't forget to put the plastic washer that is installed on top of the boot. Without it, the service life of the ball joint is reduced by a third.
How to remove and replace ball joints on a Renault Logan: video
Replacement nuances
- The main disadvantage of replacing the ball joint separately from the arm is the possibility that it may “pop out” of its seat. In this case, the steering wheel turns 30–40 degrees to the side and the ball joint is guaranteed to fail (at least the boot). If this happens, then in most cases the entire lever needs to be replaced. Some mechanics “tighten” the support to the lever by spot welding in several places. With this method, there is a high probability of damaging the boot (it will burn out), and no one will give a guarantee against “crash”. “Analogues” with a locking ring will prevent possible falling out.
- For Renault Logan, the levers are supplied together with two silent blocks. If they are damaged on your car, then it is easier and cheaper to buy the part assembled, since the difference in the cost of the ball and silent blocks separately will be insignificant. Especially when you consider that the silent blocks also need to be pressed out.
- If you changed the ball joint by removing the entire lever or replaced it as an assembly, then you definitely need to do a wheel alignment of the suspension.
The procedure for replacing a ball joint on a Renault Logan is quite simple. Even a novice car enthusiast can handle this if desired.
Although for more accurate work you may need a press. But from the point of view of road safety, it is better to change the entire lever assembly.
Source: https://carnovato.ru/kogda-i-kak-menyat-sharovye-opory-na-logane-sovety-i-instrukcii/
Replacing a ball joint on a VAZ 2110, video on how to change it
The design itself and the installation location of the ball joints imply the most severe operating conditions. Almost the entire load of the vehicle's mass falls on one small point in the form of a finger ball surface.
And if you take into account the weight of luggage and passengers, overloads during aggressive driving and the disgusting quality of roads, it immediately becomes clear why this unit requires such close attention.
Fortunately, on a VAZ 2110 car you can do the replacement yourself.
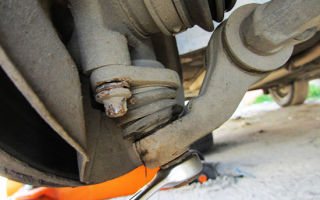
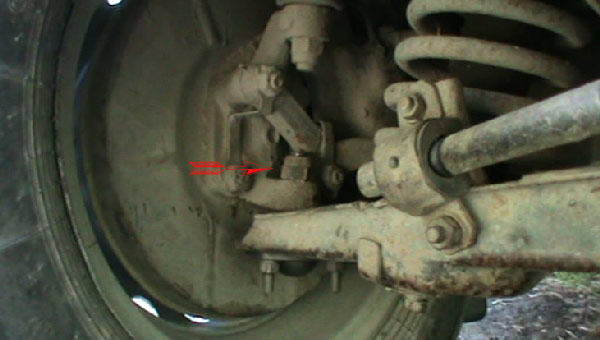
This element is located in the front part of the car's suspension, on the front arms.
Ball joint location
In addition to the fact that during vertical movements of the wheels, the ball joints must ensure their fixed position in the horizontal plane, the support pin must have a certain degree of freedom to rotate in the bowl bushing and at the same time could move at a slight angle to the sides.
Finger movement directions
Symptoms of a problem
While operating the vehicle, it is necessary to periodically “listen” to the operation of its suspension. It is especially worth paying attention to the following symptoms of support failure:
- The steering wheel began to rotate a little tighter or an extraneous sound (creaking) appeared when turning;
- At low speeds, when overcoming minor obstacles (tram tracks, paving stones), a knock is heard in the front of the car;
- Slight runout of the front wheels when moving straight;
- Uneven tread wear, with the side of the tire wearing out more.
Reasons for failure
The root causes of failure are impacts and friction. Factors leading to a sad result:
- Driving through seemingly small obstacles at “indecent” speeds (tram rails, potholes);
- Lack of lubrication. The lubricant simply dries out or freezes, losing its properties;
- Destruction of the support boots and, as a result, water and dirt getting into the gap between the pin and the plastic liner.
Since the ball joint is constantly under load (the weight of the car, pressure from the anti-roll bar and the front arm), to check the condition we will need to unload the car wheel, that is, hang it. Then we take the wheel with both hands by the top and bottom and try to swing it in opposite directions.
Let's listen to the knock
Not every knock indicates that the ball joint needs to be replaced. You should call an assistant and ask him to press the brake pedal - if the knocking noise disappears, it means that the play belongs to a worn wheel bearing.
Then we take a pry bar, insert it between the lever and the longitudinal rod - swing the lever in a vertical plane, listen to the knock, or put your free hand on the support cup and try to record small impacts.
Fix the gap between the finger and the liner
How to replace a ball joint on a VAZ 2110
So, if even a slight play was detected, then the ball joint definitely needs to be replaced. If no extraneous noise or shocks were detected, then you need to make sure that the boot is intact and, if necessary, replace it.
When replacing the boot, you should not fill it with grease more than halfway, otherwise the grease may damage the integrity of the rubber seal, which will lead to rapid wear of the entire assembly.
According to statistics, about 20 million ball joints are sold and bought annually on the Russian auto parts market, a considerable share of which are outright fakes. Therefore, it is best to purchase new spare parts those that are used directly by the manufacturer itself or of a reinforced type.
Original ball
Reinforced ball joint
To replace the ball we need the following tools:
- Heads on “19” and “17”;
- Mount;
- Sledgehammer and hammer;
- Puller;
- New ball joint.
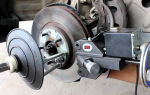
It is better to use not just any puller, but one made specifically for pressing out ball VAZ 2110.
Special puller
If this device is missing, then we have two more ways to press the finger out of the lever:
- Using a jack (we place it under the finger, create tension and push the lever down with jerks);
- Using a sledgehammer and a hammer (using the hammer as a spacer), tap the lever with the sledgehammer.
Places of application of the tool
Removing the support
- Unscrew the pin nut securing it to the lever;
Unscrew the nut
- We unscrew the support itself from the steering knuckle;
Unscrew the support bolts and remove them along with the washers
- We install the puller by first moving the steering knuckle to the side;
We push out our finger
- Carefully, without touching the grenade boot with the pry bar, move the lever down to remove the ball;
We take out the ball joint
Audit
- We carry out a final check of the support by rocking the ball itself in the cage (the maximum play should be no more than 0.7 mm);
swing it relative to the support cup
- If the finger dangles freely under its own weight, it is definitely a replacement;
Moves with slight movement
- If the support is normal, and the dirt cover has visible defects, then it is necessary to replace the lubricant and the cover itself (if water or dirt gets inside the support, it is better to replace the element completely);
Don’t forget to fill the dirt-proof cover with lubricant
Installation
- Install the spacer sleeve all the way;
We put on the pre-lubricated bushing
- Fill the new cap halfway with grease;
Let's not overdo it
- The place where the protective cap fits on the support is treated with sealant;
Sealing the seat
- We assemble in the reverse order, do not forget to check tighten the threaded connections on a fully loaded vehicle.
How to change ball joints on a ten with your own hands: video
The production of ball joints is a high-tech production with a high degree of reliability. Despite this, replacing the element in question is one of the most common types of repairs.
Unfortunately, this situation will not change until the quality of domestic roads changes.
So if you want to save your nerves and money, then look under the car a little more often and adhere to a reasonable driving style.
Source: http://motorltd.ru/zamena-sharovoy-oporyi-vaz-2110/
How to replace upper and lower ball joints at home
Self-replacement of VAZ 2107 ball joints (upper and lower)
Let's get acquainted with the process of replacing ball joints on VAZ 2107 cars.
To replace the ball joint , you will need to put the car on a lift or place it in a viewing hole. In the second case, it is necessary to install wheel chocks under the wheels, tighten the handbrake, and engage second gear. Working on a single jack is dangerous.
Required tools:
- metal brush;
- penetrating fluid WD-40;
- keys to “7”, “22”;
- ball joint remover;
- lubricant for ball joints;
- medical syringe without a needle attached;
- adjustable wrench.
- Remove the wheel.
- Clean the ball joints with a brush.
- Treat the connections with WD-40 (or equivalent).
Self-replacement of VAZ 2107 ball joints (upper and lower)
Self-replacement of VAZ 2107 ball joints (upper and lower)
- Using a “22” wrench, unscrew the nuts of the upper and lower supports by 1.5-2 turns.
Self-replacement of VAZ 2107 ball joints (upper and lower)
Self-replacement of VAZ 2107 ball joints (upper and lower)
Self-replacement of the VAZ 2107 ball joint
Self-replacement of VAZ 2107 ball joints (upper and lower)
- Install a specialized puller for ball joints.
Self-replacement of VAZ 2107 ball joints (upper and lower)
Self-replacement of VAZ 2107 ball joints (upper and lower)
- Usually the ball joints can be removed in one step (first the upper one, then the lower one). If the ball stays in place without applying force, you need to reposition it using a drift and hammer (hit the protrusions of the steering knuckle).
Self-replacement of VAZ 2107 ball joints (upper and lower)
Self-replacement of VAZ 2107 ball joints (upper and lower)
Self-replacement of VAZ 2107 ball joints (upper and lower)
Also check out
- To avoid turning your finger, you need to clamp the lever with a mounting tool.
- Remove the ball joint fasteners to the upper arm.
Self-replacement of VAZ 2107 ball joints (upper and lower)
Self-replacement of VAZ 2107 ball joints (upper and lower)
- Clean the place where the ball joint sits on the lever (there should be no damage or cracks on it).
Self-replacement of VAZ 2107 ball joints (upper and lower)
- Remove the sealing washer from the old ball joint and install it on the new one.
- Before installing the ball joint, you need to lubricate it with ShRB-4 or Litol-24.
Self-replacement of VAZ 2107 ball joints (upper and lower)
- Install the boot and washer.
Self-replacement of VAZ 2107 ball joints (upper and lower)
- Screw the ball onto the lever. Place it in your fist and tighten the nut.
Self-replacement of VAZ 2107 ball joints (upper and lower)
Self-replacement of VAZ 2107 ball joints (upper and lower)
- Unscrew the nut from the lower ball joint. Usually this causes the finger to start scrolling. To avoid this, it is necessary to create a lateral tension at the connection between the fist and the finger, for which a mounting is inserted in the gap between the brake shield and the fist. If there is no result in the gap between the fist and the lower arm, you should install an adjustable pin, and then use it to fix the pin.
Self-replacement of VAZ 2107 ball joints (upper and lower)
- After the nut is unscrewed, you can raise your fist up. Place the key at “22” between the upper cavity of the fist and the lower lever.
Self-replacement of VAZ 2107 ball joints (upper and lower)
- Remove the VAZ 2107 ball joint .
Self-replacement of VAZ 2107 ball joints (upper and lower)
- Remove rust and dirt from the seat.
- Check the presence of lubricant in the lower part of the ball joint by unscrewing the plug with a “7” key. If there is no grease there, fill the ball with grease using a medical syringe without a needle.
- It will be interesting: Instructions for replacing the CV joint on a VAZ 2110 with your own hands
Self-replacement of VAZ 2107 ball joints (upper and lower)
- Place the ball joint in place at the bottom of the lever and screw it to the knuckle.
Self-replacement of VAZ 2107 ball joints (upper and lower)
Self-replacement of VAZ 2107 ball joints (upper and lower)
- After this, we can say that replacing the ball joints with your own hands has been successfully completed.
We recommend reading
Source: http://prostovaz.ru/vaz-2107/kak-zamenit-verxnyuyu-i-nizhnyuyu-sharovye-opory-v-domashnix-usloviyax.html
Replacing the ball joint (or how I ended up replacing silent blocks) — logbook Hyundai Accent “Black Sparrow” 2005 on DRIVE2
It creaked and knocked.
I purchased a ball from CTR, article number CBKH7.
We lift the car, unscrew the wheel and remove the original one! cap. We put the wheel in place, lower the car and unscrew the hub nut with a 32nd head, having first removed the cotter pin.
Unscrew the hub nut with a 32 socket.
We unscrew the tip from the fist and one stabilizer bar from the lever.
Here is the culprit (crack in the boot) of the ball squeak. Unscrew the ball nut
Naturally, the ball didn’t want to come out of the fist. I lift the lever on the second jack and slip a suitable piece of steel between the lever and my fist.
A piece of steel adapter from a tool kit. Yes, the ball boot is torn out so as not to interfere, and I lower the jack on the lever. The ball pops out.
I take out the CV joint and tie it somewhere to the side so that it doesn’t interfere. Next, I began to knock the ball out of the lever, placing a brick and a piece of suitable pipe under it so that the ball could easily fall out of the lever. I didn’t succeed, and I didn’t know if I could press in a new ball joint without removing the lever.
Therefore, the decision was made to unscrew the lever. The front silent block was unscrewed with difficulty; at the end of unscrewing (it was very tight), a portion of oil was sprayed inside the subframe, through the holes, towards the hidden nut. After that, we twist it quietly so as not to tear off the nut inside the subframe.
Problems arose with the rear silent, and it immediately became known that they were fatal.
The bolt rusted inside the steel bushing of the silent and unscrewed along with the central part of the silent, tearing it. There was no other way, I knocked along the axis and tried to screw it back. RUSTED AND ALL.
Having unscrewed from the top nut, this bolt with a piece of silent tape lifted the upper part of the subframe ear where the nut was welded, but did not come out of the silent sleeve. I had to use a small grinder to cut right through, first into the silent body, and then under the very head of the bolt.
Thus, I cut out a piece that prevented me from pulling out the lever.
Here, in fact, is how everything was cut. Trimmed ball so that it is convenient to knock it out of the lever. And the central part of the rear silent.
Here is the second part of the silent block) ) ). Subsequently, the lever was clamped in a vice, a hacksaw blade was threaded through and a cut was made in the holder to remove it from the lever.
A new rear silent was purchased from Korean and pressed into place.
The front silent was alive, but since it got there, it means I’m changing it.
There in the distance you can see the slightly curved ear of the subframe with a nut welded on top for the rear silent. Then I bent it back - it wasn’t difficult. By the way, I lifted the car on a jack, but it was not hanging on it, but on a wheel placed under the spar + wide boards. Safety precautions are written in blood.
I lubricated all the bolts, bought the cut ones new, also original - 20 rubles. ) ) in Korean. It took 5 hours to disassemble and press in. 2 hours for assembly.
Here, by the way, is the article number for the outer boot.
This is the part number for the inner boot. The box is mechanical.
To summarize: the ball joint can be changed without removing the lever. It presses in quite easily. Don't forget to install the retaining ring. Thus, if the silent parts are intact, there is no point in removing the lever. It was +4 in the garage, and I was, well, very hot.
Price tag: 850 ₽ Mileage 156000 km
Source: https://www.drive2.com/l/325605/
Removing a ball joint without a puller - how to do it yourself?
An important part of any car is the suspension. You need to constantly monitor its condition, since failure of even a small part will become a huge nuisance. One of these seemingly insignificant parts is the ball joint.
It, like all machine parts, sometimes needs to be replaced, and in order to install a new mechanism, you need to remove the old one. Let's consider the issue of removing the ball joint using improvised means, that is, without using a special puller.
What is a ball joint?
The ball joint is a vehicle suspension element that provides a rigid and reliable fastening, while maintaining limited mobility of the arms relative to the wheel hub.
When you are driving a car, the front wheels have two functions: to ensure that the car moves along the road, and also to provide the ability to maneuver - turning left and right.
To maneuver and move correctly, the wheels must be positioned correctly relative to the road , that is, they must stand level, roll freely back and forth, be freely controlled by the steering wheel, and also be firmly attached to the axle.
To meet these requirements, a suspension was developed in which ball joints play a very important role. They connect the suspension arms and the steering wheel hub.
Initially, the ball joint was installed only in front-wheel drive cars, thanks to which the wheels could be turned around the vertical. Since the invention of the ball joint some 40 years ago, little has changed in its design.
Thanks to technological progress, changes in the design of the ball joint did occur. Instead of stamped body halves, which are connected by spot welding, they began to make cast and collapsible supports with a threaded cap, also serviceable and unserviceable, with grease nipples. Such changes were justified and bore fruit.
Today, a typical maintenance-free ball joint consists of the following elements: a housing, which has a spherical recess, and a pin, one end of which is shaped like a ball and the other is threaded.
Thanks to the boot, which is put on the finger, dirt and dust do not get into the body, which is filled with a fairly thick special lubricant.
The ball joint mainly ensures that the wheel remains in a fixed position horizontally while it rotates vertically. The ball joint pin can move in a circle in the body, while it will swing at a small angle. That is, the ball joint performs both rotational and limited movements of the finger in the plane where it is fixed.
Often, all elements of the ball joint are made of steel. In order to reduce friction between surfaces that are in contact, the surface of the spherical recess is coated with plastic or other polymer.
But there are also ball joints that are devoid of this polymer coating. Often, such elements are installed in “older” domestic cars.
Such models were equipped with collapsible supports; the gaps in them were removed by tightening the lid.
There are two known ways to install ball joints. The first method is to attach it to the lever using bolts. The second way is to press it into it. If a ball joint secured with bolts breaks, then only it can be replaced.
If the pressed ball joint fails, then it will be necessary to change the suspension arm itself, in which the pressed ball joint will be in good working order.
But the financial expenses in this case will be much greater, since you will have to buy not just a new support, but an entire lever.
Due to its functions, the ball joint experiences significant loads. Most machines rest on a very small surface area of the ball. Considering the total weight of cargo and passengers, poor quality of roads and decent speed, the load on the ball joint increases significantly.
For these reasons, the unit wears out and fails. When you buy a new ball joint, it is better to choose a part from the original manufacturer.
The market is filled with a large number of brands that produce something similar to the original ball joints, but your choice should fall on products only from trusted manufacturers.
The most common option is the front suspension, which has two ball joints, one per wheel.
Most SUVs are equipped with four ball joints in the front suspension, with two of them per wheel. A very rare situation is when there are three balls.
Modern cars with independent multi-link rear suspension also have ball joints on the rear wheels.
How to remove a ball joint without a puller?
Removing and replacing the ball joint is a fairly common task, which, although unpleasant, is doable. It is impossible to change the support on a modern car and on a classic one using the same steps. The reason for this is the different design.
Modern cars have more advanced ball joints. Still, if a problem arises, you must first of all understand the question: “Do I need to repair the ball joint or replace it?”
In order to give the correct answer, you need to diagnose the chassis; you can do this yourself, but only if someone helps you.
First you need to understand what diagnostics are. Method number one is to determine the condition of the support: lift the wheel, grab the bottom and top with both hands, and then try to shake it. This will make it possible to determine whether there is any play.
The second method is more reliable. Use a crowbar or pry bar to try to get under the car. Fix it in the center between the lower lever and the edge of the support, then push it up. This way you can see the play. The third method is the most correct and accurate.
You need to do the following:
1) Dismantle the ball joint and check it in your hands;
2) Clamp it in a vice, and then check the radial and axial play of the pin. Malfunctions will be indicated by the ability to move the finger without much effort. This is a signal that the ball joint needs to be replaced.
The ball joint wears out faster due to:
1) Lack of lubrication;
2) Gusts in the boot;
3) Excessively long operation;
4) There is a defect in one of the parts.
Before you start work, prepare all the necessary tools. You will need:
1) Spanners for “17” and “19”;
2) Mount;
3) Hammer;
4) Rust remover;
5) Metal brush;
6) Lift and stand for the car;
The process of removing a ball joint without a puller
The likelihood that you will cope with the procedure for removing the support yourself without a puller is extremely high, so get down to business quickly so as not to waste time. You need to do the following:
1) Using a jack, lift the car and place it on some stationary object.
2) Put the car on the handbrake or place bricks under the wheels to prevent the car from rolling away.
3) Remove the wheel from the side where the broken ball joint is located.
4) In order to have the best access to the junction of the ball and the lever, you need to turn the steering wheel accordingly.
5) Clean the joints using a metal brush.
6) Coat the ball joint pin with rust preventative and then have a few minutes to rest while it takes effect.
7) Using a wrench set to “19”, unscrew the pin nut and remove it. Next, you would need a puller, but if you don’t have one, proceed as follows.
8) Take a pry bar and secure it so that when you press on one end, it presses on the suspension arm. The mount can be installed in the steering knuckle.
9) If there is a lot of rust on the parts, remove it with a product.
10) After the lever is under the required pressure, try to knock it out with a sharp blow of a hammer at the junction of the lever with the ball.
11) After disconnecting the lever and the ball joint, press the lever with a pry bar and move the steering knuckle away.
12) Using a 17 key, remove the pair of bolts that connect the ball joint and steering knuckle.
13) The ball joint is free.
It's all quite simple, isn't it? Such simple manipulations will allow you to save money, which you can spend on purchasing a new ball joint. Good luck with your suspension repair.
Source: https://auto.today/bok/3313-snyatie-sharovoy-opory-bez-semnika.html