DIY airbrush - design and manufacture
An airbrush is a small hand-held spray gun that sprays paint onto almost any surface. Due to its small size, the spray occurs in a thin strip, so it is convenient to create drawings with fine details. It is usually sold freely and is not very expensive, but you can save money and make an airbrush yourself.
Components and principle of operation
This device works on the principle of pneumatic spraying: an air stream passes through a narrow hole under high pressure, forms a jet and thus sprays the paint. It consists of the following parts:
- containers for paint;
- receiver - a container designed to accumulate air necessary for spraying;
- compressor - an element that increases the air pressure entering the receiver;
- control valve and lever responsible for the movement of paint and air;
- nozzle – paint jet volume regulator;
- needle - regulator of its supply;
- an air valve, which is responsible for the movement of air into the nozzle;
- pens.
Airbrush components
An optional but important addition is a stand.
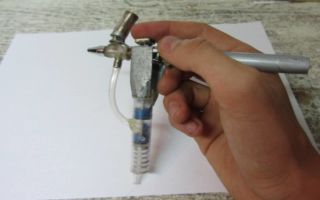
A hand-held airbrush device is similar in appearance to a fountain pen attached to a can. Its mechanism is simple, making it at home is quite possible.
A homemade airbrush can be with or without a spray gun (in this case, you need to blow into the nozzle to spray).
When thinking about the question of how to make an airbrush with your own hands, it is important to remember that the option without a sprayer is easier to make, but with a sprayer it is easier to work with.
How to assemble a device without a sprayer
You will need:
- a disposable syringe from which you need to remove the needle and piston and attach its top to the bottle;
- gel pen refill;
- bottle (capacity 0.5 l);
- the thread is as strong as possible;
- clip;
- scotch.
You need to make it according to the following scheme:
- straighten the paperclip to a straight line and then bend it at an angle of 90°;
- tie one side of a paper clip to a needle;
- tape the second side to the body near the hole for the needle;
- install its tip in the center of the nozzle (mandatory condition).
To use such an airbrush, you need to dilute the paint, lower the needle into a container with it and blow (preferably with great force).
There is another version of such a device (with and without a stand). To make it, you need to additionally take a piece of a ballpoint pen refill cut into a cone and glue. Steps to make this model:
- cut off the end of the needle, and dip the remaining part in glue and stick it into the rod, only making sure that the tip sticks out;
- make holes in the lid to allow air to flow in.
A homemade airbrush can be made using one pen, a wine bottle cap, a small jar or bottle and glue:
- clear the ink from the pen;
- make two cuts in the cork in opposite directions;
- drill a hole for the rod, which will be located there in the center, and another perpendicular one;
- make a nozzle: insert the rod into one hole, the body into the second, make a hole in the lid of the jar along the diameter of the rod and insert the part into it;
- fix with glue or sealant.
To make it automatic, it is recommended to connect the tubes from the dropper to the compressor. For more convenient work, you can get a stand.
Manufacturing with sprayer
Many lovers of homemade devices are wondering how to make an airbrush with a paint sprayer, since it is more convenient. This is somewhat more complicated, but also quite possible. For it you will need:
- 3 ballpoint and 2 gel pens;
- pencil;
- deodorant can;
- wire;
- nipple;
- 2 bolts with a diameter of 3 mm;
- the same number of needles;
- glue.
Making an airbrush of this type includes several stages.
https://www.youtube.com/watch?v=Ux9Tmh6PGNU
Assembling the cartridge and needle clamp:
- Remove the piston from the automatic pen rod and lower the spring.
- Drill a hole in the pen shaft (gel) and insert a small bolt at a 90° angle.
- Make 2 holes in a ballpoint pen.
- Bend the wire until it stops at the trigger and insert it into the body.
- Heat a needle of the same diameter and insert it there.
- Use four pieces of wire (6 cm each), bent at 90°, to secure the structure.
- Insert the housing with the needle into the spray gun (the length of the rod used for this should be such that it rests against the bent wire and the spring is compressed).
- Glue the parts together.
The next stage is making an air valve: using an empty syringe (from which the piston has been removed), a needle, a spring from a pen, a piece of tubing from an air freshener bottle, a nipple. Glue everything together.
For the sprayer, the same parts are taken, but instead of a spring, tube and nipple, the front part of the rod (with a tip) and a hose through which air will be supplied are used. All this should also be firmly connected.
Another option is to do it using a vinyl tube and a compressor:
- Cut the tube and place it on the syringe close to its base, leaving room for pressing the balloon valve.
- Take the paint and attach the cut tube to the container, which will be used as a spray gun.
To avoid getting dirty, you should wear gloves.
Additional detail
A useful addition to an airbrush is always a stand. It can also be done at home.
It is good to use a regular office clip as a stand. There is always the opportunity to modify it or make a new one yourself.
There are different options for improvement. For example, attach aluminum wire, springs and stoppers from medical bottles to the clamp.
The wire must be thick and strong, since the axis of the device is made from it, which is fixed with a nut, a special rocker arm for the airbrush is attached to it on top, and dropper tubes are attached to the points of contact with it . This is a fairly durable device that securely holds even a large device.
One of the most affordable options for making a stand from scratch:
- take brackets from an old meat grinder;
- drill holes in them (2);
- bend knitting needles or from bicycle wheels (it is important that there are threads at the ends);
- tighten the nuts to the end of each thread and solder;
- insert the knitting needles into the drilled holes and screw them with nuts, screw the stand to the table.
It is possible to use lining as the main material:
- cut off a piece (length about 17 cm);
- saw along;
- make holes for bolts and nuts;
- pull the wire, clamp it with pieces of the slats;
- To prevent it from scratching the airbrush, prime and tighten the hose from the dropper.
A self-made or purchased stand must meet certain requirements:
- firmly attached to the table;
- Installation is simple and quick, does not take time away from the painting process itself;
- be low so that you can add paint at any time;
- The airbrush should be easy to install and remove, so that these actions eventually become automatic.
In practice, a homemade airbrush turns out to be no worse than one bought in a store. In addition, there is almost no need to spend money on materials, and the result is almost complete cost savings.
Source: https://kraska.guru/instrumenty/elektro/aerograf-svoimi-rukami.html
How to make an airbrush with your own hands at home?
An airbrush (air brush - translated from English) is a compact spray gun with which paint is sprayed (splashed) in a thin strip onto any surface. In principle, its operation is similar to the action of a spray gun, but there is also a significant difference, one might say fundamental.
This is that with the help of an airbrush you can create beautiful images and apply them to almost any surface. This device is convenient for applying unique images, even with small details.
Despite the fact that you can find various models on sale, many people wonder how to make an airbrush with your own hands at home and how difficult it is and how expensive it is.
Types and classification
All airbrushes are divided into several types, according to the following characteristics:
- A method of mixing air and paint flows. There are external and internal mixing. The first option has a simpler design.
- The method of applying paint and positioning the container. There are models with top, side and bottom feed, in addition, there are devices in which paint is supplied using air under a certain pressure.
- Control type. Single, double and independent action.
What does an airbrush consist of?
The main components of an airbrush:
- Container for paint or varnish;
- Compressor;
- Receiver;
- Nozzle;
- Lever and control valve;
- Air valve;
- Needle;
- Airbrush stand;
- Pen.
Operating principle and design
The principle of operation of all airbrushes is the same and lies in the fact that the air pressure that passes through the tube is greater than that of the external environment. The paint is mixed with air after rising through the tube.
In this case, an even and fairly powerful jet is formed (Bernoulli's principle). The amount of air is adjusted using a trigger (control mechanism).
When pressing on the trigger, paint or varnish is sucked from the container and sprayed in the form of a conical jet.
The design of most models is the same, regardless of the location of the varnish or paint container. And although some details may have certain differences, the principle of operation remains the same.
Fire extinguisher receiver
One of the most optimal options for a receiver is a fire extinguisher for an airbrush with your own hands, especially since you can find such a product without much difficulty.
You can search at enterprises, contact your friends, purchase from firefighters or companies that service fire extinguishers. They usually always have decommissioned fire extinguishers ready for disposal.
It is better to choose specimens with a capacity of 15-20 liters, but only so that they are in decent condition. Rust inside the container is unacceptable.
If there is rust, you can use a special remover, paint stripper, solvent, metal brush or drill with special attachments. It is advisable to treat places where there was rust with a special solution to bind rust. After this, the surface must be treated with a metal primer and painted. This must be done strictly according to the instructions.
Making a compressor for an airbrush with your own hands
Among the many options for making a compressor for an airbrush with your own hands, the most common and popular are a compressor from a refrigerator and a car compressor for inflating wheels.
The main advantages of choosing a compressor from a refrigerator for an airbrush:
- There is no need for additional power sources, as they operate from a standard 220V network;
- Availability;
- Long time of non-stop operation;
- Low noise level.
Flaws:
- Such compressors are designed to work not with air, but with freon;
- Periodic oil changes are required.
Advantages of a car compressor for making your own airbrush:
- Optimal pressure;
- High performance;
- Mobility;
- Easy to install and operate, adapts well to the system.
Minuses:
- Quite a high noise level;
- Continuous operation time is limited.
- Requires a powerful battery.
If you still compare these two options, then an airbrush from a car compressor can be called more preferable. It allows you to obtain sufficient pressure of about 7 atmospheres and high productivity in the range of 70-73 l/min. With a unit from a refrigerator, it is unlikely that you will be able to obtain such indicators.
As an option for a car compressor for a homemade airbrush, you can use the AC 700 model or another similar one, the main thing is that the performance characteristics correspond to the required indicators. The technical characteristics, equipment and price of this model are quite suitable. The work order can be divided into several stages.
First, you need to remove everything unnecessary - scarves, an air duct with a fitting, a handle, rubber feet. All this will be useful in the future, so there is no need to throw anything away.
The second step requires adapting the compressor to the system. This is done using an adapter for pipe threads, depending on the thread itself. Most often it is 1/4 or 1/2 inch.
Insert the air duct tube into the barrel. Pre-saw it in half. If desired, the joint can be soldered from the inside, but this is not necessary, the main thing is that the connection is airtight.
You can use computer power supplies from PS game consoles and others as a power supply. The main thing is that their characteristics correspond to the following parameters - 12 V and 50 A; if necessary, several blocks can be combined.
Assembly of all parts of the compressor is carried out using plumbing fittings and fittings (plumbing).
You will also need to prepare:
- Pressure switch (optional PM/5G);
- Separator;
- Check valve;
- Pressure regulator.
The next stage is adaptation and installation of the cover. Then all that remains is to make a stand for the airbrush. There are many options here. Although some can do quite comfortably without the last element, as practice shows, it is more convenient with a stand.
After this, all that remains is to connect all the electrical elements and complete the assembly. It is very important to pay close attention to the connection of wires.
Especially when multiple power sources are expected to be used. This is due to the fact that different manufacturers use wires of different colors, so there is no single standard.
But there is one nuance here - the location of the wires is identical.
The airbrush is assembled in several stages - assembling the cartridge and manufacturing the air valve. There are many options here.
Alternatively you can use:
- Ballpoint pen;
- Medical syringe;
- Wine bottle stopper;
- A jar, maybe glass.
There are more difficult and simpler options. Therefore, everyone must choose for themselves how to make an airbrush, based on their skills and capabilities. Here we consider one of the simplest and most accessible, both in terms of manufacturing method and cost.
It’s not difficult to make an airbrush at home with your own hands. At the same time, the cost of the device will be several times lower than the factory models, but in terms of characteristics they are unlikely to be inferior.
Source: https://kraskaved.com/instrumenti/aerograf-svoimi-rukami.html
How to make an airbrush at home with your own hands
instrument.guru > DIY > How to make an airbrush at home with your own hands
An airbrush is a small hand-held spray gun that sprays varnish or paint onto almost any material. Due to its small size, it sprays in a narrow band, making it easy to work on small parts. It is usually sold freely and costs little, but why spend money when you can make your own airbrush?
The device will work on the principle of air atomization. Air passing through a narrow nozzle under very high pressure forms a jet and thus sprays the paint.
It consists of these parts:
- Paint reservoir;
- condenser - a container designed to accumulate gas required for spraying;
- compressor - the part that pumps air entering the condenser;
- control valve and lever, the function of which is the flow of varnish and gas;
- barrel – varnish flow volume regulator;
- needle – regulator of its supply;
- a gas valve, which is needed to move gas into the barrel;
A hand-held device for airbrushing is similar in appearance to a ballpoint pen attached to a container. Its mechanism is simple, making it at home is not difficult. A homemade airbrush can be used with or without a spray gun. But it will still work great.
When you are wondering how to make an airbrush with your own hands, you need to remember that a model without a spray gun will be faster to make, but this will later affect the speed of work and convenience.
How to assemble a device without a sprayer
You will need:
- A plastic syringe from which you need to remove the needle and plunger and attach its top to the bottle;
- Oil pen refill;
- Jar;
- Thread made of synthetic material (nylon);
- Wire
- Other tools and materials for fastening.
You need to make it according to the following algorithm:
- Bend the wire at a right angle;
- Use a thread to connect one side of the wire to a needle;
- Use adhesive tape to attach the other part to the body near the hole for the needle; place its tip in the center of the nozzle (a necessary condition).
- In order to use such an airbrush, you need to dilute the paint, lower the needle into the jar with it and exhale (preferably with great effort).
The airbrush from the syringe is ready.
Another version of such a device (with and without a holder)
To make it, you need to additionally take the cone-shaped part of the paste of a regular pen and glue.
It is manufactured according to the following algorithm:
- remove the end of the needle, and dip the remaining part in glue and lower it into the paste, so that the end sticks out strongly;
- punch holes in the lid to allow gas to pass through.
A homemade airbrush can be made using one ballpoint pen, a wine bottle cap, a small jar or bottle and glue:
- clean the paste from paint;
- make two coaxial cuts in the cork;
- a hole for the paste, which will be located in the center, and another perpendicular one;
- make a barrel: insert the rod into one hole, the body into the second, make a hole in the lid of the jar along the diameter of the rod and insert the part into it;
- secure with glue.
For automation, you can connect it to an aquarium compressor. But in general the compressor can be anything. And the choice of compressor for your airbrush with your own hands will determine its effectiveness. Productivity with a car compressor will be higher than with an aquarium compressor.
https://www.youtube.com/watch?v=8lAeoxJcIic
To improve the convenience of work, you can use the holder.
Manufacturing with sprayer
Many people who like to do things with their own hands are wondering how to make an airbrush with a paint sprayer, since it is more comfortable to use. This is a little more difficult, but also anyone can do it.
For this you will need:
- three oil and two capillary pens;
- stylus;
- perfume bottle;
- wire;
- nipple;
- two bolts with a radius of one and a half millimeters;
- two needles;
- glue.
Making an airbrush of this type involves several stages.
Assembling the cartridge and needle clamp:
- Remove the piston from the oil handle rod and lower the spring.
- Make a hole in the handle paste (capillary) and insert a small bolt at a right angle.
- Make two holes in the oil handle.
- Bend the wire to the end of the trigger and install it into the housing.
- Heat a needle of a similar radius and mount it there.
- Use four pieces of wire (six centimeters each), bent at right angles, to secure the structure.
- Mount the body with the needle into the spray gun (the length of the rod used for this should be such that it rests against the bent wire and the spring is compressed).
- Fasten the parts
The next stage is the production of the air valve:
Using an empty sterile medical syringe (remove the plunger in advance), a needle, a spring from a pen, a piece of pipe from a nipple perfume bottle. Connect everything.
An airbrush will require the same parts, but instead of a spring, tube and nipple, it uses the front part of the paste (with the tip) and the tube from the dropper through which the gas will flow. All this also needs to be firmly fastened.
After this, you need to connect it to a compressor or pump and you can paint.
Another way is to do it using a vinyl compressor tube:
Shorten the tube and place it on the syringe near its base, allowing space to press the balloon valve. Scoop up the varnish and attach the shortened tube to the container, which will be used as a sprayer.
Additional detail
A necessary addition to the airbrush will be a holder. You can also make it at home with your own hands. A regular office clip works well as a holder . There is always the possibility of upgrading or remodeling yourself.
There are different options for improvement. For example, attach copper wire, a spring and stoppers from medical bottles to the clamp.
The wire must be good and strong, since the axis of the device is made from it, which is fixed with a nut. It's very simple, you just need to curl it around any cone-shaped object and the stand is ready.
This is a fairly durable design that will firmly hold even the heaviest device.
One of the easiest ways to make a holder from scratch:
- take brackets from an old meat grinder;
- make large through holes in them;
- bend thin wire or mini-rods;
- screw the nuts until the end of each thread and weld;
- insert the wire into the drilled holes and screw them with nuts, screw the holder to the work surface.
You can use wood as a holder material:
- cut a piece (about twenty centimeters long);
- saw along;
- drill holes for bolts and nuts;
- put on the wire, tighten with pieces of the slats; so that she doesn’t scribble the airbrush, paint and pull the hose from the dropper.
A homemade or purchased holder must meet certain standards:
- firmly attached to the work surface;
- Have a simple mount to quickly start painting;
- be able to easily refill the tank with paint;
- Easy to install airbrush.
A homemade airbrush in operation shows results no lower than those of a factory one bought in a store.
A few words about choosing a compressor
The compressor is the most important part in an airbrush , and its choice should be approached with the utmost seriousness!
First you need to decide how much power the compressor will require. It depends on what other purposes you need the compressor for. If the compressor is needed only for airbrushing, you should choose a low-power option.
Source: https://instrument.guru/svoimi-rukami/kak-sdelat-aerograf-v-domashnih-usloviyah.html
How to make a simple airbrush with your own hands?
- 02-03-2015
- 25
- 274
Airbrushing makes you feel like an artist. However, a professional device is expensive. How to make an airbrush with your own hands? Isn't it difficult? No, the proposed instructions are suitable for any high school student. True, with the help of a simple device it is unlikely that you will be able to draw subtle, complex details of drawings, but it is quite suitable for mastering the basics of the art of airbrushing.
Airbrush device diagram.
An airbrush (or spray gun) is designed by analogy with a conventional spray gun and operates on the same principle: liquid from a container under air pressure flows through a tube to a very narrow hole and is sprayed into tiny droplets. The only difference is that the jet from a spray gun has a large diameter, while the jet from an airbrush is very narrow.
This is very significant, since, thanks to the narrow jet of paint, the images are more voluminous and finely drawn. But if you need to apply paint to a large surface, then its width can be adjusted.
In addition, the lines formed with an airbrush are much neater than brush strokes, and it takes much less time.
To work you will need:
- ballpoint pen with refill;
- wine stopper;
- medical syringe with a volume of 10-20 ml³;
- lighter;
- felt-tip pen and ruler;
- stationery knife;
- drill;
- hot glue;
- awl;
- glass bottle with cap.
Operating procedure
Assembly diagram for a homemade airgraph.
So how to make an airbrush? First of all, you need to unscrew a regular plastic fountain pen and remove the refill from it. Then you need to remove the coloring paste from the rod. Before doing this, remove the tip with the ball from the rod.
Then you need to soften (you can use a lighter) the nose of the large syringe on which the needle is placed, and flare it with an awl so that the rod can fit into it.
After this, all that remains is to squeeze the paste out of the rod and rinse its cavity several times with warm water, solvent or alcohol.
Then you need to make a recess 1.5 cm deep in the wine cork. Its horizontal and vertical planes should form a right angle. The width of the notch is approximately 2 cm and the height is 1.5 cm.
Having made markings with a felt-tip pen, cut out unnecessary pieces with a stationery knife. The height of the plug must be reduced by cutting off part of its bottom so that the distance from it to the horizontal plane of the recess is approximately 1 cm.
Now you need to make two holes of different diameters at right angles in the cork. The rod will be threaded through the vertical hole, and the body of the ballpoint pen will be passed through the horizontal hole on the side. First, you can mark and make holes with an awl, and then drill them with a drill.
The hole in the bottom of the pen body is too narrow, so it needs to be widened a little by rubbing it with sandpaper until the diameter is approximately 3 mm.
Then you should pass the handle through the horizontal hole, its tip should slightly protrude from the cork.
And the rod must be passed through a vertical hole, bringing its upper end to the hole of the fountain pen - so that it slightly overlaps it.
Working with a homemade airbrush.
The working unit is ready. Now you need to adjust the length of the rod to the height of the paint container. Under no circumstances should it rest against its bottom. If the rod is longer than the paint bottle, it should be shortened.
Then, in the plastic cap of the bottle, you need to drill a hole corresponding to the diameter of the rod, insert it into this hole and firmly fix it with water-repellent glue.
It is better to take not “Moment”, but hot-melt adhesive, which will firmly glue the parts together and will best ensure the tightness of the connection. That's all, actually.
Making an airbrush with your own hands is really not difficult.
Source: https://moiinstrumenty.ru/stroitelnye/kak-sdelat-aerograf-svoimi-rukami.html
Do-it-yourself airbrush at home: design and manufacture
Well-groomed hands with an attractive manicure for the fairer sex are an indicator of grace.
Professionals use various techniques to apply beautiful designs on nails, and airbrushing has become especially fashionable.
The main tool for doing this is a small paint spray gun, which is not that cheap. This is why many people try to make an airbrush with their own hands at home.
How the device works
This device functions as follows: the air present in the valve is compressed, thereby creating strong pressure and spraying a special dye. Its main advantage is that it allows you to create smooth color transitions on your nails. The patterns drawn by this device always turn out voluminous and realistic.
Types of spray guns
The airbrush for nails can be single or double action. In simple homemade pneumatic guns, you can regulate the supply of coloring liquid. As a rule, such a device is used together with stencils. It produces rich and clear patterns on the nails.
https://www.youtube.com/watch?v=zTlz8YNckoQ
But in double-action devices, not only the paint supply is controlled, but even the air flow. They are adjusted manually using a special valve. This airbrush for nails allows you to create more precise and beautiful designs with subtle elements. By adjusting the air supply, you can change the thickness of the lines.
What does an airbrush consist of?
There are a huge number of varieties of pneumatic sprayers, but their structure is almost the same. A do-it-yourself airbrush at home most often consists of the following parts:
- A needle that controls the supply of dye.
- A nozzle, which is an element at the end of the tool for adjusting the thickness of the jet, with a diameter of at least 0.2-0.3 mm.
- Adjustment lever and valve to control air and fluid levels, creating optimal pressure in the system.
- A reservoir into which varnish or paint is poured for applying designs.
- The handle, however, is not present in all devices.
- An air valve that transfers air to the nozzle.
By the way, a DIY airbrush assembled at home will work more efficiently with a compressor that creates the necessary pressure. Therefore, care should be taken in its manufacture.
How to make an airbrush from a ballpoint pen?
To assemble such a tool, you must prepare in advance:
- a simple pen for writing;
- sealant or glue;
- wine cork;
- an empty 0.5 liter glass jar (preferably with a lid).
First of all, unscrew the body of the ballpoint pen and pull out the refill, from which you will have to blow out all the ink. Then you should rinse it thoroughly using a solvent and dry it. The body of the handle will act as a nozzle, so you shouldn’t throw it away.
If you have problems cleaning the rod, you should try doing it with a syringe. To do this, you need to heat its spout and install it in the rod, flaring it a little, and then pull out the liquid dye.
Then a notch is made in the cork on one side to the middle, after which it should be turned over and cut in the opposite direction. The cut piece can be thrown away; it will not be useful. In the remaining part you need to make a hole to install the rod, which is best placed in the center. Another hole is cut perpendicular to it in the middle of the cut out part.
Then the nozzle of the future airbrush is made. One end of the rod should be rounded with sandpaper and inserted into the first notch. The housing from the handle is installed in the hole located on the side.
You will also have to make a small hole in the lid of the jar for the rod, the excess length of which can be cut off with scissors. Before using the airbrush, you need to secure its position in the upper part of the container using silicone sealant or glue. In this way, it will be possible to balance the air flow pressure inside the system.
In order for the airbrush you assembled from a pen to last as long as possible, it is better to use copper tubes instead of a rod and a writing instrument.
Creating a small compressor from a diaphragm pump
Making such a device will not be difficult. A mini compressor for an airbrush, made with your own hands from a car electric pump, is suitable for creating beautiful designs on your nails. Of course, its coloring quality and power will be inferior to professional devices, but for a do-it-yourself manicure it will do just fine.
In order for the finished ballpoint pen gun to start functioning, you need to connect it directly to the compressor hose. However, the air pulsation created by the pump will not allow the varnish or paint to apply evenly. Therefore, you will also have to add a receiver to the system, at least the simplest one.
For such purposes, you can use an expansion tank from a car or a plastic canister with a volume of 3-5 liters. The advantage of the first option is that there are outlet pipes that facilitate the installation procedure. You just have to put connecting hoses on them, then secure them with clamps, and a simple airbrush compressor, made by yourself, is ready for use.
Homemade airbrush gun from a syringe
Before you begin assembling it, it is advisable to prepare all the necessary tools in advance. To make this tool you will need:
- needle and disposable syringe;
- ballpoint pen refill;
- hot glue;
- plastic or glass bottle with a lid;
- paint tank.
The syringe is fixed onto a prepared glass or plastic container, and a tube with a needle is inserted into the body. Several holes are made in the lid for air access. The optimal distance between the tip of the pen and the needle can be calculated experimentally. The main advantage of such a spray gun is the easy replacement of the tank.
A do-it-yourself airbrush at home from a syringe is created in several stages. First, the tip of the handle is cut off with a cone. Then the working part of the needle is cut off, after which it is dipped into hot glue and inserted into the cut rod. This must be done in such a way that the tip of the medical needle is visible from the metal part of the rod.
Another way to make an airbrush from a syringe
To assemble such a device, you will need the following parts: a disposable syringe with a needle, electrical tape or tape, a paper clip, thread and a container for the dye.
The medical needle should be heated well over a fire so that it can be easily separated from the plastic base, and the plunger should be removed from the syringe. The paperclip must first be straightened, after which it will have to be slightly bent. Then one side of the metal clamp is fastened to the needle with a thread, and the other is fixed to the body with tape. Moreover, the structure must be attached to the top of the medical instrument.
After this, insert the tip of the needle so that it is in the middle of the syringe nozzle. In order for the airbrush made from a syringe to work, you need to add a coloring liquid to the container and dip the needle into it. All that remains is to blow hard into the wide hole.
A do-it-yourself airbrush made in this way at home is popularly called a “rotoblower.” It takes about 15 minutes to assemble.
How to use an airbrush?
Before filling the tank, you need to dilute the paint to the desired consistency. After all, any coloring matter poured into a container should be slightly thicker than water.
A mini-gun for creating a unique manicure will become more convenient if handles are installed on the container with paint. Although the airbrush is lightweight, it often takes several hours to paint, which is why your hands get very tired of holding it.
Anyone can work with such a device if they wish, it is not necessary to be an artist. The main thing in airbrushing is to master the technique. Nail art allows you to create unique designs and unusual graphic compositions on your nails using special stencils and other additional devices.
If your homemade airbrush does not have a compressor, then simply blow into the back of the pen body. It is the force of air pressure that can control the range, as well as the intensity of the ink jet.
Useful tips
Every beginner in this business should first learn how to make simple monochromatic designs, lines and shapes with an airbrush. It is best to take special training courses that will show you how to properly handle such a device. After gaining sufficient experience, you will be able to create even very complex compositions.
A homemade airbrush will not only allow you to do a luxurious and quick manicure at home, but also save money on beauty salons.
Source: http://info-4all.ru/semya-i-dom/domashnij-uyut/aerograf-svoimi-rukami-v-domashnih-usloviyah-konstrukciya-i-izgotovlenie/
How to make an airbrush with your own hands
Making your own airbrush
Some people use spoilers or other tuning body kits to decorate their cars. Some people like installing powerful wheels or decorating the interior with high-quality sound from an audio system. The most noticeable results are found in those cars that have beautiful designs on the hood or doors. The image is applied using airbrush.
To paint a car like this, you will need to buy a special sprayer. Well, craftsmen can make an airbrush with their own hands. Almost all the parts for it are in any apartment.
Types of airbrushes
To understand what kind of device we need as a result, we need to understand what they are. There is a division according to the method of mixing paint and air flows:
- with external mixing, the device allows you to fill large surfaces on the car; Even an old vacuum cleaner will work as a compressor here;
- with internal mixing, the flows swirl inside the housing, which is the spray head.
Divided by thread control method:
- with a single flow, the jet is directed through one of the channels: air or paint, while paint consumption is reduced if the mixture goes through the air channel;
- with the double version, both channels can be adjusted; both dependent (automatic) and independent (manual) operation of the device is allowed;
- With independent feed, you can completely manually control the operation of the airbrush.
Division according to the method of supplying paints and installing the container:
- top supply of working fluid;
- feed from below;
- side installation of the container;
- applying paint material under pressure.
Homemade installation
Now let's figure out how to make an airbrush yourself. Its head part can be assembled even at home. You need to stock up on a few supplies:
- ball pen;
- cortical plug;
- container for paint.
Airbrush assembly diagram
We disassemble the handle and remove the rod (ampoule). We disconnect the metal part from the rod and blow out the ink. We wash the remaining ink with alcohol until the plastic tube is transparent. We form a “corner” from the cork.
We insert the handle body and the rod into the corner so that they form an angle of 90 degrees. We attach air supply hoses to the handle body, possibly from a homemade compressor. We lower the rod into the container with ink. Everything is set up experimentally.
It is advisable to choose a pen body that is more durable and resistant to solvents.
For durability, it can be replaced with copper tubing. You can make a compressor for an airbrush with your own hands using an old refrigerator in which the part of the same name is in working condition.
Airbrush compressor
It is better to disassemble an old foreign-made refrigerator for parts. Although domestic products are also famous for their durability, foreign devices are more economical and have lower noise levels.
The future device will also need a receiver and a pressure switch. Such tricks will help you get rid of the financial costs of welding and turning work.
You need to carefully remove the compressor from the refrigerator. In this case, you should avoid sawing off or biting off the tubes that fit it, so as not to introduce unnecessary metal shavings into the system. Most likely, the device will have a working relay. You will also need it for the airbrush kit.
Receiver selection
You will need to install a receiver into the overall structure. The best option would be a hydraulic accumulator from some kind of pump. The recommended volume for this is about 30 liters.
An emergency release valve and a pressure gauge with a pressure switch can be added to the kit for such a tank. The valve will be needed if the automatic system fails.
You can set the pressure manually. There is a special handle for this.
Option for assembling a homemade airbrush
Installation of such a kit must be carried out using adapters and fittings purchased in advance. Additionally, a check valve must be installed at the inlet of the receiver.
Sealing will be ensured by high-quality clamps and oil-resistant connecting hoses. During operation, gasket sealant and fuel filters will be in demand. It is also advisable to update the oil in the compressor. This is done using a tube, the output sealed end of which must be opened. After replacement, the pipe is again blocked using sealant.
We bolt a receiver tank, a repaired compressor, a starting relay and an oil separator regulator onto a plywood sheet or chipboard board. Filters are installed on the inlet pipe, between the compressor and the receiver. A check valve is also mounted at the inlet, and a relay is placed below to turn it on.
Homemade airbrush settings
There is usually a “native” hole in the body of the pen, through which the metal part of the rod is inserted, for the operation of an airbrush of insufficient diameter. It needs to be carefully expanded using sandpaper. Rub the tip of the pen against the abrasive part until a hole of approximately 3 mm is formed.
After this, we pass the resulting tube into the horizontal hole of the plug so that the outer plane of the body is located above the hole of the rod. In this way, a draft will be created for blowing paint.
The rod lowered into the container with paint should not reach the bottom.
The device will work properly if there is a small gap between the bottom and the pen refill. If necessary, it can be shortened.
For high-quality fixation, the working part can be installed on the lid of the paint container. This is done using water-repellent glue, which ensures tightness and strength at the same time. As a result, the design should be rigid, but adjustable.
Airbrush kit
Working with a homemade airbrush
Paints must be diluted to obtain a more liquid solution. The viscous liquid is difficult to apply, quickly clogs the working tubes and is poorly atomized. The concentration is selected individually for each type of paint.
For more convenient use, the device can be equipped with a handle.
In homemade devices, it is often attached to a container of paint. Although the device is quite lightweight, during prolonged use your hands may get tired, since you have to hold them almost all the time in one position.
A small bypass hole can be made in the top or side of the handle body.
This improvement will help you not to turn off the compressor every time, and simply by covering or opening this additional hole with your finger, you can start or stop the flow of paint in the system.
The operation of a homemade device is unlikely to reach the level of professional devices, but it is very economical and will allow you to learn the basics of airbrushing without large financial costs. Also, all elements can be replaced in case of breakdowns or wear with inexpensive components, which reduces the cost of servicing a home-made device.
Interesting on the topic:
We recommend that you read: http://ktonaavto.ru
Source: http://fix-builder.ru/spravochnaya-informatsiya/arkhitektura/81078-samodelnyj-aerograf-7