Do-it-yourself valve lapping
Almost every owner of an old car, domestic or foreign, prefers to repair it on their own. Including rebuilding the engine. In this regard, quite often it is necessary to grind valves in home-garage conditions. And many people ask a logical question about why this procedure is required and how to properly grind the valves.
A little materiel
For those who are not in the know, it is worth explaining that the valves are located in the cylinder head. There are at least two valves for each cylinder (in most cars). One valve allows the fuel-air mixture to enter the cylinder (combustion chamber) from the intake manifold, and the other releases exhaust gases into the exhaust manifold.
Of course, the valves open one by one. The valves look like a nail. The head, which is also called a plate, is facing the inside of the cylinder. In the closed state, the valve head is in the seat and hermetically closes the combustion chamber, pressing the working chamfer against the seat.
We also recommend reading the article about the timing device. From this article you will learn about the purpose, operating principles and other features of the engine gas distribution mechanism.
Why grind valves?
During operation, carbon deposits form on the valve plates, as well as on the seats. It prevents the intake and exhaust valve from sealing tightly. This is very important for normal engine operation.
After all, after the fuel-air mixture has been drawn into the combustion chamber during the intake stroke, the piston compresses it, rising to its top dead center. The inlet and outlet valves must be closed. The stronger the compression ratio, the more efficient and economical the engine will be.
Of course, if the intake valve is not seated tightly in the seat, maximum compression and efficient combustion of the mixture will no longer occur, with all the ensuing consequences.
As for the loose fit of the exhaust valve, in this case there will be not only a violation of the tightness during the compression stroke, but also a breakthrough of expanding gases from the combustion chamber after the charge is ignited.
Hot gases melt the exhaust valve, the engine loses power, since some of the gases do not push the piston, but fly out into the exhaust. Such consequences are the answer to the question of what will happen if the valves are not ground in.
However, in order to correct the situation, there are no particular difficulties.
More time and effort have to be spent on removing the cylinder head and the valves themselves. In addition, there is a high probability of not having to grind each of them.
How to determine that a valve needs to be ground in
Typically, valves are ground in after an engine overhaul. Or, for example, after replacing the piston rings. So as not to take it apart a second time. The need for the procedure is checked on the removed cylinder head.
It is installed on a flat surface with the valve plates facing up. Then kerosene is poured into the combustion chambers, and if there is none, then gasoline will do.
The level is noted, after which the cylinder head is left in this position for twelve hours.
If the liquid has not left during this time, then everything is in order. If he leaves, it means that there is work to be done.
To determine which of the two valves in the cylinder is leaking, the presence of moisture in the exhaust or intake manifold is a good help. You can check it in another way.
The principle will be the same, but the difference is that the liquid (gasoline or kerosene) is poured into the collectors. The head stands on its side. Naturally, the leak is assessed from the side of the plates.
Valve lapping
In order to grind the valves to the head at home, you will need a drill (preferably with reverse) and a special paste. To carry out this procedure, the valves will have to be dried out and removed. By the way, at the same time you can replace the valve stem seals, if necessary.
- Before work, it is recommended to degrease the valve and seat using a solvent. A small amount of lapping paste is evenly applied to the valve working face. It is very important to ensure that it does not get on the valve stem, because the paste is a strong abrasive (usually diamond). If damage remains on the rod, the oil seals will fail much faster and oil consumption will increase significantly. To prevent this, you can put a piece of felt on the rod.
The valve is installed in its place, and the rod is secured in the drill chuck. Most often, for convenience, this is done using a piece of hose (one end to the rod, the other to the cartridge). Some craftsmen clamp the rod directly into the chuck. Grinding is carried out by rotating at low speeds. In this case, the plate may be pressed against the saddle by something. For example, a thick elastic band. But in most cases they do without additional devices.
- Pressing occurs when the drill is pulled towards you. Rotation must be done both clockwise and in the opposite direction. Usually everything takes no more than two minutes. To understand that the process is complete, you need to know what a ground-in valve looks like. A characteristic matte strip a couple of millimeters wide is formed on its chamfer. By the way, exactly the same strip will be on the chamfer of the saddle. Sometimes after the described procedure, finishing treatment is carried out. It is no different from the lapping process, except that instead of lapping paste, GOI paste diluted with engine oil is used. Before applying, use a cloth to carefully remove the previous rubbing agent.
- You need to check the quality of the grinding not only using the strip mentioned above, but also by pouring kerosene or gasoline into the combustion chamber or into the collectors. Before assembling the cylinder head, all parts must be thoroughly washed with gasoline. After all, if during the work process the abrasive from the paste gets onto other surfaces, then the consequences can be very sad - diamond powder will cause defects.
You should also know in what cases valve lapping may not work.
In the case where there are significant flaws (sinks) on the working chamfers or when the seats have been crookedly bored (cut), it will not be possible to grind the valves.
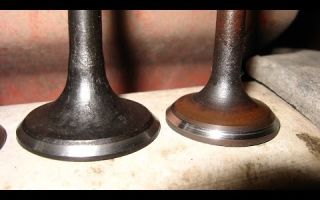
The first sure sign of this is that the matte strip on the chamfer is uneven or completely intermittent. The solution here is simple, although not entirely pleasant - buying new parts. Although, you can try and sharpen them on a machine.
What lapping paste to use
Our grandfathers made their own rubbing agent. They collected dust under sandpaper with a diamond wheel, and then mixed it with oil.
Today, thanks to the progress and development of trade, motorists have a decent selection in specialized stores. Therefore, for beginners, a logical question arises about how to grind the valves, what paste. There is no talk about price.
Here everyone chooses at their own discretion and in accordance with their capabilities. It is much more important to decide on the grain size and composition.
An inexperienced car enthusiast should not use coarse pastes. An error in operation can lead to significant defects in the chamfers of the valve and seat, which will entail additional costs. For this reason, it is better to use medium-grained pastes for basic work and fine-grained ones for grinding.
Very often, two tubes are included in the kit, which makes the task easier for the buyer. In stores you often find FABO paste in stylized (valve-shaped) packaging. By the way, the name is an abbreviation and stands for Finishing Anti-Friction Non-Abrasive Treatment.
This paste should be used as a finishing paste after the valve has been ground in using “Classic” or “Diamond” pastes, sold in the same packaging.
In addition to the above-mentioned paste, ABRO Grinding Paste GP-201 is on sale. In this case, there will be two options in one package: coarse-grained and fine-grained. It costs much less than FABO. In addition, this paste is suitable for removing rust from any metal surface, as well as for straightening cutting tools. In a word, this paste is multifunctional.
You can get medium and fine paste in one package by purchasing Done Deal. The basis here is silicon carbide powder. It is also a universal product that will come in handy around the house. And if there is a possibility and need to work with chrome surfaces, then you should pay attention to PERMATEX paste.
In any case, before purchasing, it is recommended to carefully study the instructions and only then make a choice.
Now let's answer the question of what to do when there is no pasta. Sometimes there are situations when you need to grind the valves if there is no paste. Well, in this case you will have to remember the old-fashioned methods, as already mentioned above, or diversify them a little.
So, if there is no dust from the diamond wheel, then you will need the finest sandpaper. You need to remove the abrasive from it and mix it with motor oil or grease. GOI paste mixed with the same lubricants is used as a finishing paste.
Of course, the quality of processing with such means will be much lower. Especially when there is no relevant experience.
Let's sum it up
So, as can be seen from all of the above, lapping is a responsible, labor-intensive procedure, but extremely necessary for good engine operation, not only after repair, but also after a mileage of over 60,000 kilometers. The only question that remains unclear is whether it is necessary to grind the valves on the new head.
Regarding this case, there are two options: if the head is completely new and was purchased fully equipped, then you don’t have to grind it in. In any case, experts say that this is not necessary.
However, if the head was purchased separately from the valves, then grinding will be necessary.
Again, in any case, before installing it, the tightness of the fit of the plates can always be checked in a well-known way, that is, by pouring gasoline or kerosene into the cylinder head or manifolds.
Source: http://KrutiMotor.ru/pritirka-klapanov/
How to grind valves with your own hands + video of work at home on a VAZ
Every owner of a VAZ car, who prefers to repair his car himself, will sooner or later be faced with the need to grind in the valves of the gas distribution mechanism. The issue is pressing for many and requires careful study, after which it will be quite possible to cope with the task on your own, without resorting to the help of auto repairmen.
Why do you need to grind valves?
The following methods for solving the problem are aimed more at owners of VAZ classics (VAZ 2101–2106), but in the case of VAZ 2108–2109 models the process will not be much different. In many respects it is generally universal.
Most often, the need to grind valves is encountered during engine overhauls. The piston rings and gaskets have been replaced, other important components have been installed, so now is the time to check the valves for leaks: this will reveal the need for their grinding.
It should also be remembered that this procedure will not be superfluous when carrying out other repair work. In particular, those in which the cylinder block is dismantled. It's always better to be safe than sorry.
Why is it important to maintain the correct engine compression levels?
One of the most important quality characteristics of engine operation is the presence in the combustion chambers of the cylinders of the compression level recommended by the manufacturer. This characteristic depends on:
- the degree of wear of the cylinder itself, its piston rings, and the piston;
- the quality and integrity of the sealing gasket located between the cylinder head and the cylinder block itself;
- how tightly the intake valves, and with them the exhaust valves, adhere to their seats in order to avoid the passage of gases through the gaps.
Ideally, compression should be at the same level in all cylinders. And since the wear of the piston group components is almost the same, the fact that compression is detected in the cylinders that differ from each other may indicate poor valve operation.
By the amount of compression you can preliminarily judge the condition of the engine: if it is not the same in the cylinders, it’s time to grind the valves
When is it time to think about grinding in?
Even a novice car enthusiast can notice signs of a malfunction:
- the engine begins to “trouble”;
- The car engine is running unevenly;
- fouling of candles;
- reduced compression level.
The grinding process itself consists in the fact that the working area of the valve on the plate is ground to its seat.
How to check VAZ valves for a tight fit
Experienced auto mechanics recommend checking the tightness of the connection as follows:
- To begin with, the cylinder head is turned over so that the combustion chambers face up.
- Then take a syringe and inject a little diesel fuel or kerosene (preferably kerosene) into each of the chambers.
- If the liquid begins to decrease when the valve is closed, then it is concluded that the valve does not fit tightly enough to its seat.
Basic lapping methods
Valves can be ground in using specialized equipment or auxiliary tools:
- The first option is to use an automated machine. In this case, there is not even any grinding as such: the valve and seat are simply chamfered, which ensures the most rigid alignment and mating accuracy. The result is a high-strength profile that can ensure excellent engine performance.
Automated valve grinding process on a machine
- The valves can be ground in using a manual milling machine. There are many machines, including those designed for engines of certain modifications. Here, too, everything is done quite quickly and accurately. If you have a manual milling machine in the garage, valve grinding can be done efficiently and quickly
- Do-it-yourself valve grinding. This is a popular method, but at the same time the most labor-intensive and time-consuming. All defects and surface irregularities are removed using a special abrasive paste, and the main tool is a special T-shaped device with a hole for inserting the valve stem.
A special wrench for manually grinding valves will simplify manual work
To carry out the work quickly and get a high-quality result, you must follow the following sequence of actions:
- The disassembled cylinder head is installed on a workbench and securely fastened.
- The required valve is placed in its place, and its rod is fixed in the tool.
- A layer of lapping paste is applied to the contact area of the valve with its seat.
- The valve is then placed so that there are no gaps at all.
- Circular movements are made clockwise and counterclockwise.
- After some time, the valve turns over, a new layer of abrasive paste is applied and rotation resumes.
- The grinding process continues until a matte, uniform strip 1.5–2.0 millimeters thick is formed on the valve seat and its plate.
Video: manually grinding valves without tools
The method itself is quite tedious. But it allows you to fully control the grinding process and monitor the result obtained.
We take a screwdriver in our hands
A drill is also often recommended, but its chuck has a significantly higher rotation speed, which may not have the best effect on the final result. So if you still decide on a drill, then you need to take a tool with the ability to adjust the speed and the reverse function. In this case, the valves can be ground in either through the combustion chambers or simply from above.
Grinding in valves from the combustion chamber side
The work is performed in the following sequence:
- The first step is to make small solid washers from metal with a diameter slightly smaller than that of the valve discs. Holes are cut in the center of these washers, as for a flat screwdriver.
- Using molten bitumen (or equivalents), slotted washers are attached to the valve discs.
- The cylinder head is turned over with the combustion chambers facing up, the required valve is put in place and a layer of paste is applied to the area to be ground.
- A rod with an end like a flat-head screwdriver is attached to the drill chuck.
- The flat end of the rod is inserted into the cut of the washer and at low speeds of the drill, grinding of the valve begins.
- The valve is turned in each direction about ten times. It must also be remembered that when changing the direction of rotation, the abrasive paste must be reapplied.
- After the procedure, its spring is attached to the valve.
- You can remove the washer from the valve by heating it.
- The remaining bitumen is removed with solvent, gasoline or similar means.
How to lap valves from above
The entire process is almost identical to the manual method. The main difference here is that the valve is rotated using a tool.
Some people directly attach the valve stem to the drill chuck, but for greater efficiency and safety, it is better to insert a stem with a diameter close to that of the valve stem into the chuck.
Then an approximately 10-centimeter piece of rubber tube is taken and the mentioned rods are connected with its help. For greater reliability, the rubber tube should be clamped at the ends with clamps.
Minimum required tool for grinding valves with a drill
Video: how to grind valves with a drill
Nuances worth knowing about
To an experienced repairman, the tips below may seem unnecessary, but a novice repairman should definitely remember the following:
- It is better not to remove all rockers (cams on the valves) right away. It is necessary that each valve gets its own rocker back. While the engine is running, the camshaft cam and the corresponding rocker grind in and if they are “separated”, unpleasant clicks may appear when the valves operate, despite the fact that they have been properly adjusted before.
- And you also need to understand that each valve must return to its place. Changing them even after grinding in would not be the best idea.
- You can use various abrasive pastes in your work. You can start with the largest and end with the smallest. This will improve the results obtained.
- For a better fit, it is sometimes suggested to use machine oil at the finishing stage.
Valve grinding is carried out using various abrasive pastes
Checking the quality of work performed
You can check how tightly the valves fit, as mentioned at the beginning, using kerosene. This is the most common method.
The valves are assembled, springs are installed on them, then the head block is turned over so that the combustion chambers face up. After this, the cylinder head, where the ground-in valves need to be checked, is filled with kerosene.
If after 10–15 minutes no leaks have occurred, then you can proceed to grinding in the next “clients”.
Using a vacuum tester will be no less reliable. The device is connected to the holes on the side of the intake and exhaust manifolds. If the pressure gauge readings are lower than required, it means that the seal of the valves is insufficient and you need to repeat their grinding.
There is also a method using a pencil. To do this, lines are drawn on the working edge of the valve seat along the entire circumference.
The next step is to install the valve in its place, press it and turn it clockwise a couple of times and back. After this, we take out the valve and look at the marks made with a pencil.
Everything is fine if the lines have disappeared and the surface has been painted over evenly. If there are any irregularities, grinding should be continued.
Visual comparison of lapped and unlapped valves
A short digression about lapping pastes
No matter how you grind the valves, you still need to understand that the car’s engine will still “bring them in.” You can spend a lot of time and effort achieving the ideal result, and after starting the engine (after a few hours), the tightness of the valves will become worse. Or you can do everything casually and quickly, and after a while the tightness of the valves will only improve.
As a result, it turns out that the engine has worked the valves to a certain “comfortable” state. As a result, there is an opinion that fiddling with different pastes and other finishing touches to achieve the ideal result is nothing more than a waste of time.
Timely and correctly performed valve grinding will ensure smooth and precise operation of the engine. During a major overhaul, this procedure is one of the mandatory ones. The task is not particularly difficult, in addition, you can always seek advice from more experienced comrades or masters.
Source: https://carnovato.ru/kak-priteret-klapana/
How to lap valves
In an internal combustion engine, valves regulate the flow of the fuel-air mixture into the cylinder at a certain point in time. For proper engine operation, it is necessary that each valve fits tightly against its seat.
This prevents gas leakage and ensures the necessary compression in the engine during the compression stroke.
Also, the correct mating of the valve and seat ensures reliable operation of the engine, because exhaust gases break through the gaps between the valve and the seat at high temperatures, and since heat from the valves is mainly removed through the valve-seat mating, if the mating is poor, burnout of the valves and melting of the seats is possible .
Intake valves provide access to the combustion chamber for the fuel-air mixture, and exhaust valves remove exhaust gases.
By closing access to the combustion chamber, the valves make it possible to create pressure inside the combustion chamber; in the absence of a tight connection between the valve and the seat, the engine will lose compression on the compression stroke, preventing the engine from starting, but even if the engine starts, the gases that break through the cracks will help the exhaust valve burn out soon.
Heat removal from the valve
When fuel burns, a large amount of heat is released, which is removed from the engine. Valves are the most susceptible to overheating, so it is very important to remove heat from them. Cold air passes through the intake valves, which cools them and protects them from overheating.
Hot gases from the burnt fuel pass through the exhaust valves, and if there is insufficient heat removal from them, the valves melt and burn out. The maximum amount of heat from the valves is removed through the seats, and poor mating will negatively affect the thermal performance.
To avoid negative consequences, it is necessary to ensure the correct geometry of the valve and seat.
Methods for forming mating geometry
The valve and seat can be given the correct shape either manually or on a special machine, but the dimensional accuracy will differ by an order of magnitude. The greatest accuracy is achieved by a machine for processing seats and valves, the least by manually grinding the valve onto the seat using an abrasive lapping paste.
Valves are ground in when replacing valves, and old valves are also ground in during routine repairs when wear is within acceptable limits.
Machine tools.
The machine for lapping valves does not actually rub anything; it is designed to chamfer the seat and valve, allowing for the most accurate mating due to rigid alignment.
This results in a high-precision cut profile that gives maximum quality. After this treatment, no further action is required, just wash and assemble the head.
Hand cutters . In the absence of the opportunity to process parts on high-precision equipment, you can use hand cutters.
They come in different diameters for different engine models. Three chamfers are cut on the saddles - at 30 and 60 degrees, and on top of them - at 45 degrees.
In such cases, new valves are not treated, and if old ones are used, they need to be guided or ground in.
Grinding valves with abrasive paste - do-it-yourself valve grinding tools.
Lapping will only help if the plane of the mating parts - the valve and the seat - coincides and there is no need to adjust anything, but only need to remove some irregularities, otherwise only editing with a milling cutter will help.
In this case, lapping paste is applied to the edge of the valve at the mating points along the entire perimeter. The valve is inserted into its seat. Next, the valve must be simultaneously lightly pressed against the seat and at the same time rotated around its axis, thereby allowing irregularities on the surface to be erased.
Video: grinding in Daewoo Lanos valves
Tool for lapping valves, methods for checking the quality of lapping
There are two types of lapping devices - the first one clamps the valve from above by the rod and is like a continuation of the valve with a convenient handle at the end. The valve just needs to be pulled using this device and rotated by the handles in both directions.
The second device is a suction cup that is attached to the valve plate and has a similar handle. In this case, the valve must be pressed against the plate by pressing it and also rotated in both directions. The result will be the same, only in one case they pull, in the other they push.
You can automate the process a little using a drill or screwdriver.
Standard valve lapping tool kit
- Abrasive or diamond paste for lapping valves, permatex - one of the best manufacturers
- Valve holder - rod retainer or suction cup
- Drill, screwdriver, or pneumatic machine for lapping valves - to speed up the process
- Kerosene
How much to rub?
How can you tell when the valve is ground in? There are several ways
- air check
- kerosene
- pencil
The vacuum tester performed best, which is not surprising, because the principle of operation of the vacuum tester is similar to the processes occurring in the engine. In the engine, gases break through the cracks, which we will check with this test.
The device is connected one by one to all openings on the intake and exhaust manifold sides and a vacuum is created. If the valves are poorly lapped, then there will be insufficient vacuum on the pressure gauge, as air breaks through the valves. This shouldn't happen.
Another test method, which is available in any garage, is the kerosene test. The valves are inserted into place, the head is placed with the combustion chamber facing up, and kerosene is poured on top.
According to legend, if all the kerosene does not leak out overnight (or if it does not leak out at all? There are different opinions), then the valves are ground in correctly.
But the inconsistency is that it makes no difference to the engine whether kerosene spills or not; air can either break through the connections or not, so this verification method can be neglected.
Another simple way is to check for uniform distribution of the marking substance. On the working edge of the valve seat, radial marks are drawn along the entire circumference.
Then they insert the valve, press it and make rotational movements.
Then they take out the valve and see what pattern has formed: if the marks have been erased and the entire surface of the seat is painted evenly, then it’s fine, it can work, if there are any irregularities, we continue grinding in.
Why are hands bad?
The disadvantage of such processing is quality, which significantly affects reliability. Usually, after this type of treatment, the engine travels 10-20,000 km, and then it needs to be repaired again. But even during this mileage the engine will operate unstably; gas breakthrough is inevitable.
This is due to the fact that it is impossible to correctly center the valve relative to the seat during lapping.
Therefore, if you have the opportunity to process a part using professional equipment, you should not look for freebies and do mechanical processing “on your knees”, do not forget - “Krailovo leads to padalovo” (c).
Source: http://kakavto.com/?p=146
How to properly grind valves + video
Valve grinding is a very important stage in the overhaul of a car engine. The motorist must clearly understand how to grind the valves to the cylinder head seats.
Many owners of domestic cars face this problem. Most often we are talking about VAZ cars.
In our article you can find information about why valves are ground in and what methods of performing this procedure are the most effective.
Why do this?
A car's powertrain cannot operate properly if there is not enough compression on the compression stroke. It, in turn, depends on the following factors:
- condition of the cylinder liner, piston and piston rings;
- level of tightness of closing the gaps by the inlet and outlet valves;
- the condition of the gasket seal installed between the cylinder head and the block itself.
The compression level should be almost identical in all cylinders. Since the components of the piston group are subject to approximately the same wear, compression may vary due to the condition of the valves.
The essence of the procedure is to grind the working surface of each valve on the plate to a special seat. This problem must be solved if new valves or cylinder head are installed.
Manual mode
Grinding of valve discs can be done in different ways. The simplest method is manual. At the same time, it is also the most labor-intensive and time-consuming. As a tool for lapping valves, you must use a tube with a T-shaped handle and a hole into which the valve stem can fit.
To prevent the valve from dangling, it is necessary to make a hole in the side of the device, cut the appropriate thread and screw in a bolt to ensure reliable retention of the valve being ground in. We will also need a special paste. It must be applied from time to time to the surfaces of elements that are being ground in.
How to properly grind valves by hand:
- Place the disassembled cylinder head on a workbench and secure it securely.
- Insert the valve into the place intended for it and attach our tool to its end.
- Apply a small amount of lapping paste to the valve in the area where it contacts the seat.
- Move the valve to completely close the lumen using a tool.
- Perform circular movements in different directions.
- After some time, turn the valve 180°, open it, apply wiping paste and continue moving again.
- Grinding should be carried out until a uniform matte 1.5 mm strip appears on the valve seat and its plate.
Of course, this method is quite tedious. At the same time, it allows you to carefully monitor the quality of the result. And the money saved will definitely not be unnecessary for the car enthusiast.
Tool Application
Since not everyone has the opportunity to allocate a lot of time to complete the task, many masters recommend using a different method.
You need to find a screwdriver (there are options using a drill, but it works at higher speeds, so it is not the best choice).
If you were unable to acquire this tool, you can find a drill with reverse rotation and speed adjustment functions. There are two methods for grinding valves - from above or from the side of the combustion chamber.
If you grind from the combustion chamber, the procedure looks like this:
- You will need steel coins, the diameter of which will be smaller than the size of the valve plate. In the center of the nickels you need to make a slot, the same as on the heads of the bolts for a flat-head screwdriver.
- Glue these dimes onto the valve plate using a small amount of melted bitumen.
- Install the cylinder head with the combustion chambers facing upward, install the valve and lubricate the grinding area using a special paste.
- Install a metal rod, the end of which looks like a screwdriver, into the screwdriver (drill) chuck.
- Insert the end of the rod into the appropriate place on the coin and start working, setting low speeds.
- In each direction, the valve should be turned approximately 10 times, and before changing the direction of rotation, do not forget to apply new paste.
- Place the spring on the valve stem to lift it. Resistance should not be significant.
- To remove the metal coin, you will have to heat the valve.
- Remove traces of bitumen using solvent or gasoline.
If you do the work from above, then this method is almost identical to the manual one. True, you need to rotate the valve using a screwdriver.
A rod of approximately the same diameter as the valve stem size is installed in the tool chuck. You also need to find a piece of rubber tubing to connect the valve to the rod.
It is advisable to crimp the ends of the tube using clamps so that the connection is well secured.
Additional nuances
In fact, there is nothing difficult in implementing the task. At any time, you can contact an experienced master and consult on issues that may arise during the work process. We recommend that you watch a video about lapping valves with your own hands.
If you decide to grind the valves yourself, be sure to follow these recommendations:
- each of the valves has its own place, so it is prohibited to swap elements after grinding;
- when performing work, it is advisable to use different pastes - from the largest to the smallest;
- at the end, carefully rinse the valves and cylinder head to get rid of abrasive particles.
Before installing the block head, you must ensure that the valves are tight. To do this, take some kerosene and pour it into the channels. If everything is done correctly, kerosene should not enter the combustion chamber.
Source: http://avtopub.com/kak-pravilno-priteret-klapana-video/
How to grind VAZ valves - independently, competently and efficiently
During engine repair of any of the classic VAZ models, the car owner, who is accustomed to doing everything with his own hands, has a question about how to grind the valves to the cylinder head seats.
This problem is known to owners of other cars developed by the Soviet automobile industry.
New domestic and foreign machines do not allow one to master this process, since the valve seats are either ideally ground in at the factory or are ground in automatically during operation.
Why is valve lapping necessary?
Grinding valves in a simple way
One of the key indicators of stable engine operation is the presence of a sufficient level of compression in the combustion chambers during the compression stroke. This indicator is influenced by the following factors:
- condition of the piston, piston rings and cylinder liner;
- quality of gasket seal between the block and the BC head;
- degree of tightness of the inlet and outlet valves closing the gaps.
In addition to the fact that compression must correspond to certain parameters, its indicator for all cylinders must be the same. The elements of the piston group wear out approximately equally, and the valves can affect the compression difference in the cylinders.
How to properly grind valves - manual grinding
Various valve grinding methods
There are several methods that can be used to grind valve plates. The simplest, most accessible, but very labor-intensive is manual grinding.
To work, you need to acquire a special device in the form of a tube, at one end of which there is a T-shaped handle; the valve rod must fit into the hole on the opposite side.
To hold the valve, a hole is made in the side wall of the tube, a thread is cut and a bolt is screwed in to clamp the rod. Another important component of the process is the lapping paste. This is a mixture of lubricants with fine abrasive, which is applied periodically to the surfaces to be ground.
The procedure for grinding valves manually:
- the disassembled cylinder head is placed on a workbench and secured;
- the valve is inserted into its regular place and a device is secured to its end;
- a small amount of paste is applied to the valve at the point of contact with the seat along the entire circumference;
- holding the device by the handle, pull the valve towards you until the lumen closes and perform circular movements to the right and left, as far as the capabilities of the wrist joint allow;
- after several movements, the valve rotates 180 degrees, opens, the paste is renewed and grinding is repeated;
- It should be rubbed in until a uniform matte strip with a width of at least 1.5 mm appears on the valve plate and seat.
Thus, knowing how to grind the valves yourself, you can save a significant amount on paying for the services of a mechanic. The manual method, although it leads to fatigue, is considered the most correct, since the quality of the grinding is constantly monitored, and a person, through tactile sensations, controls the correctness of the pressure, avoiding jumps and impacts.
How to properly grind valves using mechanical means
For those who want to speed up the valve grinding process, there is a method that allows, with a significant reduction in physical labor, to reduce the work time.
To do this, you need to acquire a mechanical or electric drill, which must meet certain criteria: the ability to reverse rotation; regulation of the number of revolutions of the cartridge.
Using drills, grinding is possible in two ways: from the side of the combustion chamber or from above.
Let's look at how to properly grind the valves using the first method:
- to work, it is necessary to make metal coins smaller in size than the diameter of the valve plate, in the center of which a slot is made, like on the heads of screws for a screwdriver;
- Having melted a little bitumen, the nickels are glued to the valve plate;
- after this, the cylinder head is placed with the combustion chambers facing up, the valve is inserted and the grinding area is lubricated with paste;
- a metal rod is inserted into the drill chuck, which is flattened at the end, like the end of a screwdriver;
- By inserting the end of the rod into the cut of the nickel, we begin to grind the valve, rotating it with a drill. The revolutions should be low;
- after turning about 10 times in one direction, it is necessary to refresh the paste and grind in the opposite direction;
- before installing the valve, a spring is put on its rod, which will lift it, but at the same time its resistance should be insignificant;
- You can remove the penny if you heat the valve;
- bitumen residues are washed off with gasoline or solvent.
The second method is no different in technology from manual grinding, with the only difference being that rotation is also performed with a drill.
To do this, you need to insert a rod into the drill chuck, which is similar in diameter to the diameter of the valve rod, and also select a piece of rubber tube about 10 cm long.
, which can be put on the valve and the rod on the cartridge. For reliability, the ends of the tube are crimped with clamps.
A few secrets of proper valve lapping
Mastering the valve grinding process is not at all difficult. Once the coveted stripe appears on the first valve plate, no more questions will arise. Modern means of communication allow you to turn to specialists for help, because there are thousands of video clips posted on the Internet on how to grind valves.
When starting to repair the cylinder head, in particular the grinding of valves, you must strictly follow certain rules:
- Each valve has its own place; after grinding in, the valves cannot be swapped;
- in your work you should use pastes of different abrasiveness: from the largest to the smallest;
- After grinding in, it is imperative to thoroughly rinse the head and valves to remove abrasive particles.
Before installing the cylinder head, the assembled valves are checked for leaks, for which a small amount of kerosene is poured into the channels, which should not leak into the combustion chamber.
Source: http://CarTore.ru/3011-kak-pravilno-priteret-klapan.html