How to remove the driver's door trim?
Car drivers very often encounter problems with removing, replacing or repairing car trim, especially for domestically produced cars. Most drivers refuse the services of a service station, because it is more economical and does not require the intervention of specialists. In this article, we will tell you how to replace the driver's door trim at home.
1
Upholstery selection
Today there are many interior car upholstery options, the most popular of which are:
- Fabric.
- Vinyl.
- Made from artificial leather.
- Leather.
Before making a choice, let's take a closer look at their advantages and disadvantages.
Fabric upholstery. Made from synthetic fabric. Sold in a variety of colors and patterns. This is the most budget option for the motorist. Minuses:
- difficulty cleaning;
- possibility of allergic reactions to dust;
- wears out quickly.
Vinyl upholstery. Consists of synthetic resin and has high moisture resistance. Available in a wide variety of colors on the market. It is the most purchased by motorists due to the price-quality ratio. Minuses:
- may become sticky and wet at high temperatures;
- Over time it begins to crack.
Faux leather. Used to imitate leather car interiors. During manufacturing, it is stretched and divided into thin layers. To make it look like genuine leather, a special pattern is applied. Minuses:
- rougher quality of material;
- Constant maintenance to prevent cracks.
Genuine Leather . The upholstery is made of durable flexible material that does not crack at high or low temperatures or humidity. Is a premium upholstery for a car. Available in several colors, the most popular of which is black. Minuses:
- high price;
- use of additional cleaning products.
So, after purchasing one of the above types of car interior upholstery, we move on to replacing the driver’s door upholstery itself.
2
Tools you will need
Now, let's prepare the tools we will use to remove the upholstery. To work you need:
- straight and Phillips screwdrivers;
- spare pistons (they are used when fastening the upholstery in place);
- already selected type of upholstery.
You can also use special upholstery removal tool kits. They can be purchased at auto stores or online.
3
Let's start removing the trim on the driver's door.
Before you begin to directly remove the trim on the driver's door, you need to disconnect the negative cable from the battery. Next we perform the following steps:
- Using a thin screwdriver, carefully bend the trim of the window handle and remove it;
- Remove the sockets;
- Now it’s the turn of the armrest. We press the lock of the armrest plug, then unscrew the fastening screws that are located on the reverse side and remove the armrest;
- Afterwards, remove the lock button;
- Next up is the exterior mirror. Unscrew the screw that secures the handle and remove the handle for the mirror;
- To remove the triangular trim, remove all the door fastening pistons around the perimeter;
- And lastly, unscrew the three screws on the back of the door to remove the plastic trim.
One of the main nuances is to remember the location of the 10 pistons, which serve as fastenings for the upholstery on both sides.
To install new upholstery, use these step-by-step instructions in reverse order. If possible, you can also purchase sound insulation, which will increase comfort while driving.
Source: http://SovetClub.ru/kak-snyat-obshivku-voditelskoj-dveri
How to remove the front door trim of a Chevrolet Cruze: photos and videos
Disassembling doors, or more precisely, dismantling door cards on a Chevrolet Cruze can be useful in many cases.
This could be repairing a window lifter or lock, a door latch drive mechanism, installing additional speakers, or covering door panels with new material.
In addition, dismantling the door cards on the Chevrolet Cruze will be necessary to soundproof the interior. How to remove the door trim, what is the difference between removing the front and rear trim in cars of different configurations, we will clarify right now.
Removing the driver's door trim on a Chevrolet Cruze
Driver's door card without trim.
Depending on the configuration, the driver's and front passenger doors may have different fillings - electric mirror corrector, electric window lifter or mechanical, and the presence of these options is not significant, but will affect the complexity and caution of the work.
Door cards.
In principle, any door card on a Cruise is attached to the door frame using eight plastic pistons and several self-tapping screws . Their number and location on the front and rear door trims are different.
Tool
To work you will need:
- Plastic spatula for removing pins from the door frame.
- A screwdriver with interchangeable bits, we will need an asterisk.
- A standard set of tools for further work.
Withdrawal algorithm
It is worth removing the driver's door card only when we know exactly where the screws and clips are located, where the wire harness connectors and the lock release handle rod are located. Here is a diagram indicating the points for attaching the door card with pistons; there should be eight of them.
Scheme of fastening the casing pistons.
Now you can get to work. The procedure for removing the driver's door trim is as follows:
- There is a plastic plug installed on the door card behind the door opening handle. It must be carefully pryed up with a plastic spatula or a flat-head screwdriver and removed from the niche.
We pry off the plug.
- We gain access to the sprocket screw and unscrew it with a suitable size and configuration bit.
Unscrew this self-tapping screw!
- The second self-tapping screw is installed in the armrest niche. To get to it, take out the rubberized cover and unscrew this self-tapping screw with a screwdriver with an attachment for the same star.
Another self-tapping screw.
- We will be hampered by the plastic decorative trim covering the outside rear view mirror mount. Carefully pry up its edges with a flat-head screwdriver or a plastic spatula and remove the trim completely.
Carefully remove the mirror cover.
- Using the location diagram of the locking pistons, carefully pry the door card in the indicated places with a plastic spatula and snap off the pistons around the perimeter. If you thoughtlessly pull the card towards yourself or pry it in the wrong places, you can break at least the pistons, or at most the door card body itself.
Carefully pull the casing.
- We lift the door card and carefully move it to the side - it will be held on the wiring harness from the power window drive, the drive cable and the wires from the speaker, if it is installed in the card.
- Disconnect the power window connector and terminals from the speaker.
Removing power chips.
- We disengage the lock handle drive rod.
- We dismantle the door trim and gain access to all mechanisms.
Removing the rear door trim on a Chevrolet Cruze
Self-tapping screw securing the rear door trim to the body.
The only difference is that in some trim levels the rear windows are lowered using a mechanical manual drive. To remove the rear door card, you need to remove the window roller handle. To do this, just press the trim slightly with your hand until you can insert a flathead screwdriver between the trim and the handle.
The handle is secured with a spring latch, which you need to push out with a screwdriver, after first moving away the plastic washer. Depending on the year of manufacture of the Chevrolet Cruze, the cards can be attached to the rear doors in the same way as to the front ones, but in addition, it will be necessary to unscrew two or three screws in the lower part of the trim.
conclusions
Otherwise, the procedure for removing the trim is identical to the procedure for removing the front door panels. Good luck to everyone and sunny roads!
Source: http://carfrance.ru/demontaj-obshivki-perednej-voditelskoj-dveri-na-chevrolet-cruze/
How to remove the door trim on a VAZ
When operating a machine, especially a Russian-made one, you have to carry out some work yourself. On the one hand, this is not very convenient. On the other hand, taking your car to the service center every time for fifteen minutes of work is also not good.
Fortunately, such work does not require special knowledge or skills, and the tool is also publicly available. After all, it helps to know how to do little things. This saves you time and stress, not to mention money.
A task such as removing the driver's door trim, for example, is not particularly difficult and anyone can do it.
Another question is why to do this. Perhaps you want to get to the speaker or window regulator, or put a rod on the door locking mechanism. Or maybe it’s trivial to clean the drain holes and get rid of the dampness behind the plastic. For all this, you just need to perform the indicated action. We warn you right away: stock up on plastic clips! You will definitely need them.
Let's start with the driver
In Kalina, Priora and Grant the fastening scheme is identical. To remove the driver's door trim, since it is held in place not only by screws, one Phillips screwdriver is not enough. You will need something else sharp and flat. So, first, let's deal with the obvious hardware. The first is at the bottom of the door.
There on all these models there is a plastic pocket, at the bottom of which there are two recessed holes. It is in them that the screw heads are visible. It’s not very convenient to get into it with a screwdriver with a long blade, so if possible, take a short one. Then locate the plastic plug near the door handle.
Pry it with the same sharp object that we mentioned above, and you will find a screw there. Another one is hidden at the base of the opening handle. Bend it to its extreme position and unscrew it. Well, there is another one in the recess on the body.
We think it would be unnecessary to mention that you should put all these screws separately so that you don’t frantically search for them and lose them later. Finally, unscrew the door lock cap.
Before you begin removing the driver's door trim, check that you have the clips. If you couldn’t find them, be very careful, because it’s on them that, in fact, everything rests. Using a knife or flat screwdriver, pry the panel off and snap it away from the door body.
Remember that the clamps are very fragile and break under the slightest load. Then disconnect the speaker chip and move the rod to the side, if it is attached. That's all, now you have a bare door and you can do what it all started for.
By the way, we recommend removing debris and moisture from the door, if possible, and cleaning the drain holes, even if you did not dismantle the door for this purpose.
Discounts on new cars! Advantageous loan from 9.9%
Installment plan 0%
Let's go back
Before removing the rear door trim on a Grant, Kalina or Priora, you need to do a little preparation. We will need the same tool - a Phillips screwdriver and a knife, as well as clips.
The only difference compared to the front door is that the rear door sometimes has a mechanical window lifter rather than an electric one. Actually, there is a special puller for it, but everyone uses a flat-head screwdriver.
So, we pry the plug on the front of the “twist”, pull it out, and then push the handle forward. Now let's move on to the handle. You can remove it from the rear door trim, as well as from the front door, on Kalina and other models by unscrewing the screw at its base.
We bend it to the extreme position, use a Phillips screwdriver to unscrew the screw, and remove it. Nothing complicated. Now pay attention: the body (“holder”) of the rear door has more plugs than there are in front. Remove them all, there is a fastener hidden under them that you must unscrew.
Actually, the further process is no different from that described above. The clips used are exactly the same, and they break just as easily. After removing the rear door trim on a Priora, Kalina or Grant, do not forget to remove the broken clips and replace them with new ones.
Otherwise, it will not fit tightly, and this is bad not only aesthetically: over time, due to constant vibrations, the panel will break and you will have to change it. It's not just a decorative element; it protects the interior from noise and atmospheric influences.
Without it, the rustle of tires on the asphalt will be heard much better, there will be a noticeable draft from the doors, and when it rains, water will also get in.
Let's finish
It is not difficult to remove the door trim on VAZ models. The only caveat is that the fastener clips will, in fact, be consumables in this process, so stock up on them in advance, since the price allows it.
Only two tools are used for the work, there is nothing heavy or difficult to access, that is, it can easily be completed by one person without any particular difficulties. Both the back and front doors will not be a problem in this sense.
So you can, with peace of mind, refuse the services of a car service if you need to check the speaker connection or clean the drains: you can do this completely with your own hands.
Source: http://CarExtra.ru/sovety/kak-snyat-obshivku-s-dverey.html
Removing the driver's door trim – Automotoguru
This type of work requires a minimum of tools and time, and a little care during certain procedures. We will need a Phillips screwdriver with a medium-sized blade. Below we will describe everything in more detail using the driver's door as an example.
A detailed guide to removing the front driver's door trim on a Lada Kalina
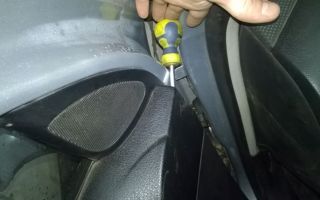
First of all, unscrew the two bolts that are located at the very bottom - in the pockets. The photo below clearly shows:
After this, you need to remove (pry off with a flat screwdriver) the round plastic plug, as shown below, and unscrew and unscrew the screw that is located under it:
Now we move the opening handle to the side and unscrew another bolt:
And the last screw that needs to be removed is located in the very recess on the case, an example in the photo below:
Now you can proceed directly to removing the casing itself. To do this, you must first pry up the casing from one edge with a flat screwdriver and carefully move it to the side, as if pulling it off the fastenings.
It is at this step that you need to be careful, since the plastic clips that secure the upholstery are quite fragile and can break.
The ideal option would be if you buy yourself a lot of these latches in advance; in any case, they will come in handy sooner or later, especially since the cost of these latches is actually pretty cheap.
After all the pistons have snapped off, unscrew the central locking latch:
Now we lift the casing up a little and free it from the traction shown above.
Almost everything is ready, the only thing that will hold the door trim are two plugs from the power window unit and the wires of the front speaker, if you have one connected.
The plug for the power window unit can be removed quite simply; you just need to press the plastic clips on both sides and pull it towards you.
This was the final stage of this repair of our Kalina, as you can see, this simple process will take no more than 15 minutes of your time. If you have any questions about this topic, ask in the comments, we’ll figure it out together.
In this manual, we will examine in detail the procedure for removing and installing decorative front door trim on VAZ 2110-2112 vehicles. I would like to say right away that performing this procedure will not take you more than 10 minutes of time and you will need a minimum number of tools, namely:
- Flat blade screwdriver
- Phillips or shaped screwdriver
A small digression before carrying out repairs. I recommend buying a set of plastic products in the store, which includes all the chips and clips for fastening the trim, carpet and other decorative parts of the interior. It is inexpensive, about 100 rubles, and will never be superfluous. And even more so when removing the casing, since there is a high probability of damaging them.
Source: https://avtomotoguru.ru/snyatie-obshivki-voditel-skoy-dveri/
How to remove the door trim of an Audi 100 C4: driver's door map
Home/100/200/5000/Removing the driver's door trim on an Audi 100 c4
Before removing the trim on the Audi 100 C4, you need to remove the door cards for convenience. Below will be provided sequential lists of work performed when removing the door card and removing the trim with its subsequent replacement.
Procedure for removing the Audi 100 door card
The order of work when removing the door card (panel) on the Audi 100 C4:
- From the two ends of the door, at the very top, two screws (a Phillips screwdriver) are unscrewed;
- There is a hole at the bottom of the door handle; a screwdriver is inserted into it (and pressed vertically upward), at the same time the upper area of the handle is pryed off, then the screws on the handle are unscrewed (thus, it is removed);
- The plastic part on which the upper part of the handle stood is removed by moving towards the central part of the cabin (with the doors open), then (with the same movement) the door opening mechanism is removed, the latch holding the cable on this unit is disconnected (this is also disconnected);
- After removing the door opening mechanism, the last screw (located under it) is unscrewed, then the entire card is moved up and removed.
Replacement of door card trim
Removing the covering material from the card and replacing it with a new one:
- The old material is removed quite easily; they begin to remove it from the center of the panel; in this area there is a ledge from which it is easiest to pry the material off;
- Then the old foam rubber is peeled off onto the rough surface (using a spatula), when most of the foam rubber is removed from the surface, the remnants are also cleaned off with a spatula (after wetting the surface with acetone) and finished with coarse sandpaper;
- Afterwards, the material is cut out with a reserve and, using a flat rounded object (from bottom to top), it is evenly threaded along the boundaries of the covering area (when doing this work, the surface of the fabric is always checked for the absence of folds and irregularities);
- When the material has taken its place, its borders are drawn, the material is removed, and 4-5 cm of fabric is cut from the drawn border;
- The boundaries of the glue application (the entire cleaned surface) are glued with paint paper tape (to avoid contamination of the front parts of the card);
- Apply glue (universal aerosol) to the cleaned surface and to the material. To simplify gluing, the area of the material to be glued is divided into three sections and sequentially, section by section, glued, threaded along the borders quickly (before the glue has time to cover);
- After 30-40 minutes, after the glue has dried, the excess fabric (remaining after threading) is cut off and removed in strips along with paper tape.
Guide to removing trim from an Audi 100 door. Tools for work and procedure.
Source: https://reaudi.ru/100-200-5000/kak-snyat-obshivku-dveri-audi-100-s4-karta-voditelskoj-dveri.html
Body. Do Auto
- How to replace a windshield
It’s strange that they don’t apply glue to the glass at the bottom... there are dotted lines on the glass so that you don’t make a mistake in application... there may be gaps at the joints... and on the glass the “sausage” can be adjusted with a napkin...
more details
-
I recently changed the rear window on my Toyota Corolla - some drug addicts threw a rock at me at night. So, be sure to remove the interior trunk lining. Stock up on an electric knife - an extra cl...
more details
- How to replace a side mirror with your own hands
Mazda has a completely different mounting of the mirror and adjustment drives... The video is completely unsuitable. Hat…..
more details
- Remove the window lifter handle with your own hands
Of all the methods that I have seen, this method is the most ergonomic and harmless to the machine. At one time I tried to do this with a knife or tried to disassemble it, but it was very difficult...
more details
- How to remove an airbag with your own hands
Good day, my name is Ilya. I couldn't remove the airbag for a week until I came across a video. Thank you so much for the instructions, it turned out to be much simpler than I thought. In general, the site has...
more details
- Do-it-yourself front seat removal
Removing the front seat is very easy. But at first, when I tried, nothing worked. It is held on by fairly massive bolts and cannot be unscrewed with a simple wrench. It is best to use...
more details
- Removing the seat trim yourself
Here's how to easily put on the cover where the armrest is attached to the back of the driver's seat, that's a problem)))
more details
- Remove the driver's door trim yourself
Removing the driver's door trim is a somewhat scrupulous process that requires time, patience and, of course, accuracy. The fastening parts of the casing must be removed using a screwdriver if...
more details
- How to remove the gas tank cap with your own hands
I want to say that the gas tank cap is removed differently for different cars. Let’s say the old Foltz Wagen Passat-1, as far as I remember, the cover just pulls off and that’s it. It's very convenient, but...
more details
-
In fact, removing the rear wing is not that easy. I talked with familiar masters, they explained it quite clearly. In short, first you need to inspect the rear wing and try to find the welds so that...
more details
-
I would like to add that often the nuts or bolts (usually the latter) become sour. The main thing here is to do everything carefully. There are many such useful things now as WD-shka. You can use it to…
more details
- How to change a heater tap with your own hands
Unfortunately, I didn’t really understand from the video which car we were talking about. Many of the lucky owners of VAZ classics (with experience) will replace the heater tap, it seems to me, even with...
more details
- How to replace a rear view mirror with your own hands
Thank you everything is clear.
more details
- How to replace a bumper with your own hands
This is not Daewoo Nexia!
more details
- Remove the radiator grill with your own hands
Well, man, what are you talking about, everything is simple here. I recently removed the grill myself to install an aluminum mesh underneath for additional protection from pebbles. If it's warm outside, then you don't have to worry...
more details
-
Good day friends. To remove the headrest, you don’t have to try very hard or bother. You should not immediately take your car to a car service center. If you want to save money, rent it yourself. In fact, to...
more details
-
It is best to start removing the front fender with your own hands by de-energizing the battery, then removing the side turn signal. Then, from below, find the bolt that secures the buffer and loosen...
more details
-
Removing the interior trim is not easy. I don’t know what kind of car you have, but I’ll share my experience with you, the BMW brand. The salon is already old, because... nothing has been changed for a long time. Carefully remove the latch, then well...
more details
-
Most budget cars have fairly simple trim fastenings. To remove the trunk trim yourself, you will need a screwdriver. First you need to find the plugs...
more details
- Removing the rear door trim yourself
how to repair (replace) the rear door (trunk) lock on a Renault Koleos
more details
-
On the Japanese Opel, about which the video was filmed, removing the gas tank is a fairly simple operation, thank God, this car has everything in place, except for the crooked hands of some of our drivers. Naturally, …
more details
- Installing motor protection
During a trip to the dacha, I hit a rock and broke the engine protection. I had to change it to a new one. The replacement itself does not take much time, the most important thing is that there is a lift or a pit, because the house...
more details
- Replace windshield wiper blades yourself
your roller is mixed up, instead of Tiida it is a Citroen, and their wiper blades are different
more details
- How to replace wipers yourself
what kind of idiot was filming?? the old ones are removed 50 cm, the new 60 cm are “about 10 cm”)) approximately!!!))
more details
-
In general, it takes about five minutes to film, well, about twenty minutes at most! You need to have a flat-head screwdriver, a Phillips screwdriver, a ten-point wrench, and torx-type wrenches (asterisk) with you. First of all, take out the plugs...
more details
- How to remove the dashboard
Not long ago I removed the panel on my Lanos, had a lot of trouble, and scoured the Internet looking for advice. In order to do this, of course, you need to disassemble the entire front panel. First I...
more details
- Removing the front door trim
How simple this dude is! It’s immediately obvious that the video is foreign! You don't even have to turn on the sound. He has pullers, all sorts of spatulas... just try, like we do, with one screwdriver and pliers...
more details
- How to remove the instrument panel with your own hands
It’s great that there is a video instruction just for the Mazda Three! I’m just thinking about replacing the standard dashboard, namely the speedometer cover and changing the backlight. I have the same thing as in the video...
more details
- How to remove the headliner
Idiots, it’s glued there and there’s not a single mention of it... I’ll see how you pull it out.
more details
- Remove the gas tank flap with your own hands
For me, there is nothing simpler than removing the gas tank flap. The main thing is to arm yourself with a screwdriver. That's all! This process will take you no more than 15 minutes of your time, sometimes even that...
more details
- Remove the rear seat yourself
Thank you for the concise and clear information about removing the rear seat, which some people find confusing. I asked the so-called Official Dealers of the Skoda Auto Center. in St. Petersburg, Engels Ave. 33...
more details
- Change your seat belt yourself
I predict in advance that my question will cause a lot of discontent on the part of representatives of the stronger half of humanity, but I am in despair and cannot help but ask the question. I have a problem - a torn belt...
more details
-
I’ve been driving for quite a long time, I fixed everything myself and never took the car to a car service center, but I didn’t know that the glove compartment could be changed at all until I encountered this problem: I spilled...
more details
- DIY washer nozzle replacement
I bought a car at a dealership, and for a whole year I just drove and didn’t go anywhere. At one point, water stopped flowing to the windshield. The problem, of course, turned out to be the washer nozzles. We had to change everything...
more details
Source: http://delayauto.ru/kuzov/obshivku_voditelskoj_dveri/