Instructions on how to properly tension and tighten the alternator belt
Before adjusting and tightening the drive belt in a car, it is necessary to check the tension value. This parameter is unique for each individual car, as well as the type and model of the generator set.
You can learn more about the tension value from the information provided in the service documentation for the machine. This data may be indicated in the technical manual for the generator unit or drive belt.
The amount of tension will be influenced by the use of additional electrical equipment installed in the machine. In particular, we are talking about the air conditioning system and the hydraulic power steering system.
In general, we can say that when 10 kg is applied to the strap, its deflection should be about 1 cm. The product should be pressed for the longest period, directly between the pulleys, and the pressure force should be approximately 10 kg.
But this value is only approximate, since in many VAZ models this parameter is 6-10 or 15-15 mm.
Belt tensioning instructions
Tensioner adjustment can be done in a garage. There are several methods of stretching; we will analyze each of them in detail.
Alternator belt tension diagram
Strap tension pattern
Using the adjustment bar
In many machines, the generator set is fixed to the crankcase of the power unit using a special extended bolt. This element allows the device to be moved in different directions. On top there is a special bar made in the form of an arc. There is a slot on it, as well as a nut that fixes the location of the unit relative to the engine.
To tighten the drive belt, do the following:
- Use a wrench to unscrew the nut on the bar.
- Using a pry bar, pry bar, or other similar tool, the generator set is moved away from the engine.
- The nut is tightened on the bar.
- The device strap tension is diagnosed. If necessary, the tensioning procedure is repeated.
Using an adjusting bolt
Bolt adjustment of the drive belt position is considered more convenient to maintain and modified.
The adjustment procedure is performed as follows:
- The nuts are loosened. They are located above and below the generator set, on mounts.
- By turning the adjusting screw clockwise, the unit moves away from the block. When performing this task, it is necessary to simultaneously diagnose the degree of tension of the product.
- When the desired result is achieved, the nuts are tightened back.
The Dromtest channel talked about adjusting the tension force of the drive belt using a bolt using the example of the Honda Civic 7 model.
Using a roller
Regardless of the method used for tensioning, after completing the task, the engine crankshaft must be turned several revolutions.
After this, the tension level is re-diagnosed. A control check can be carried out after the trip, but it should not be long. The adjustment procedure using a roller may differ depending on the car model and have its own characteristics.
To complete the task, you will need a set of wrenches and a tool designed to turn the adjusting bearing. The tool is a key made in the form of two metal rods with a diameter of 4 mm.
If you don’t have a key, you can use curved pliers; the process of adjusting the tension is discussed using the example of a Lada Priora car:
- The hood of the car opens and the generator device is located.
- There is a fixing screw on it, with which the roller is secured. It must be loosened, but not completely unscrewed. To loosen, use a 17mm wrench.
- Then, using the adjustment key, the roller is rotated. Depending on the need (increasing or decreasing the tension value), the roller rotates in one direction or the other.
- Using a wrench after adjustment, the roller is fixed. When setting up, it is important to select the correct tension force.
- When the procedure is completed, a diagnosis of the correctness of the work is performed. To check, the power unit is started and all electrical equipment is activated. You need to turn on the optics, radio, heater or air conditioning system, wipers, heated glass system, etc. If all devices function correctly and the drive belt does not whistle, then the tensioning procedure has been completed correctly.
The Channel of Everything, little by little, presented detailed instructions on how to tighten the drive belt in a Lada Priora car.
Consequences of incorrect tension
If you do not tighten the drive belt in time and it becomes loose, this will lead to a decrease in the battery charging current parameter.
If the charge strength is low, the battery consumes its own resource, as a result of which the service life of the device decreases.
As a result, destruction of the internal plates or a short circuit occurs. If the battery is maintenance-free, then it will have to be replaced; it cannot be repaired.
Too weak a tension will cause voltage surges in the machine’s on-board network. For older cars this problem is not critical.
But in new models equipped with many electronic devices and systems, electrical equipment will fail. In particular, the engine ECU will break, and repairs will be expensive.
An insufficiently tensioned drive belt will jump off the shaft when rotating at high speed, and can sometimes puncture the hood.
With a strong tension, a high load is placed on the rubbing units and components of additional units. The constriction can be indicated by a hum that is uncharacteristic of the functioning of the motor; usually the noise is made by the tension roller.
Sometimes the noise comes from the bearings of the generator set, the air conditioning compressor, or the hydraulic power steering system.
The source of the noise may be the bushing of the water pump device.
Replacing a worn belt
A brief algorithm of actions when replacing a product:
- The battery in the car is disconnected.
- The car owner loosens the nuts securing the fasteners.
- The tension screw is unscrewed. When performing the task, you must simultaneously press the generator device against the power unit.
- The worn-out product is replaced with a new one. The installed belt is tensioned.
- The nuts are being fixed. A test drive is carried out to check that the tension is correct. If necessary, the product is adjusted.
Video “Example of tension on a VAZ 2110”
The In the Garage channel presented detailed instructions on how to carry out the process of tightening the generator drive belt using the “tens” as an example.
Source: http://AvtoZam.com/elektronika/producer/natyanut-remen-generatora/
How to tighten the alternator belt on a VAZ-2114: video with tensioning
Waxing the body or pouring magic additives into the oil or fuel tank does not mean taking care of the condition of your car.
Wax and additives can be not only not useful, but also harmful, and in the case of domestic front-wheel drive VAZs, it is much more useful to check the condition of the brakes and engine before each trip.
However, there is one thing that is often forgotten and then regretted. This is the drive belt of the VAZ-2114 generator. Let's take a closer look at it.
Does it whistle and skid? Diagnosing the alternator belt
As long as the belt works normally and adequately, we do not notice it. The generator operates in normal mode and provides reliable power supply to the on-board electrical network and recharges the battery .
This is evidenced by stable ammeter readings and quiet engine operation. However, one fine day the belt makes itself known with a high-pitched squeal or lack of charging current to the battery. This will be indicated by the ammeter on the instrument panel and the battery charging indicator lamp.
Alternator drive belt
Open the hood and see if the belt is in place at all. Some unfortunate drivers' belts break while on the road, and it is quite difficult to find a replacement.
Not a tricky lever!
To do this, you will need only two keys from the standard set of tools - 10 and 13, but it is more convenient to use heads with a ratchet. And preferably a lever! Everything is ready, you can start working.
How to tighten the alternator belt on a VAZ-2114
The procedure for tightening and adjusting the belt will take about five minutes, but it is important to know a few subtleties that will save you from problems on the road in the future.
The procedure for tightening a belt is simple and even a child can handle it if you follow a simple algorithm and do not break a certain sequence:
Generator drive diagram: 1 - mounting bracket to the engine block; 2 — connection of the generator with the bracket; 3 — tension screw; 4 — generator set pulley; 5 - axial screw; 5 - drive belt; 6 — generator pulley on the crankshaft.
- It is better and easier to tighten the VAZ-2114 generator belt either in a pit, or simply on a flat and dry area, since you will have to dive under the car, several times.
- We install the car on the site and put it on the handbrake or in first gear.
- If crankcase protection is installed, you can try to loosen the generator mounting bolt from under the hood. To do this, you will need a 13mm socket, but if there is no protection, then it is easier to loosen the bolt from under the car with an open-end wrench. Just take off the nut and unscrew it a few turns.
Loosen the lower generator mounting bolt
- Before tightening the alternator belt on the VAZ-2114, loosen the upper fastening nut, which presses the alternator housing to the adjusting bracket. We use the same key for 13.
Loosen the top nut securing the generator
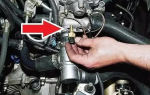
- To tighten the belt, you need to find the tension bolt; it is installed directly perpendicular to the axis of rotation of the generator. By rotating the tensioner bolt clockwise, we will tighten the belt, and counterclockwise, we will loosen it. When the belt is tensioned, the generator housing will move away from the cylinder block. More details about tensioning the timing belt on the VAZ-2114 here.
Tighten the generator belt
- We control the belt tension after tightening. It is quite problematic to do this from above, since the engine mount is in the way. It is easier to do this from below, where the entire belt branch is accessible for inspection. To visually check the tension, some experience is required, but according to VAZ instructions, the belt deflection should not exceed 10-15 mm with an applied force of 10 kg and after several revolutions of the crankshaft for the belt to sit in place.
Checking the belt tension after tightening
- If the belt is tensioned correctly, tighten the lower nut securing the generator, then the upper one, which secures the generator housing to the adjusting bracket.
When is it necessary to tighten?
Actually, the reasons why the belt needs to be tightened are simple - the generator does not produce enough current to operate all consumers on board and cannot charge the battery. The primary sign of weak belt tension will be a whistling sound from under the hood.
Nevertheless, the belt can whistle when water gets in, sometimes when the pulleys become oily, and even less often when the generator bearings fail. If the belt cannot be tensioned or the adjustment rail does not allow the generator to be moved further, the belt must be replaced.
The most common mistake is storing a spare belt under the hood, in one of the niches. Due to constant high temperature, even the best and new belt can become unusable in just a couple of months if it lies as a dead weight under the hood. New or spare belts should be stored either in the garage or in the trunk.
Tightening the alternator belt on a VAZ-2114 is quite simple, the main thing is to do it in moderation and adhering to simple rules and manufacturer’s standards. Then the generator (see “choosing the right generator”) will last longer and there will be fewer troubles on the road. Strong belts and good roads to everyone!
Video on how to tighten or loosen the alternator belt on front-wheel drive VAZ cars
Source: http://carfrance.ru/kak-podtyanut-remen-generatora/
We tighten the VAZ 2110 generator belt with our own hands
Intervention in the operation of the V-belt connection of the generator is mainly required if a whistle is heard. In this case, it is necessary to either replace the VAZ 2110 alternator belt or tighten it. So first let's find out why it whistles.
Installed alternator belt
Reasons for whistling
Let's look at the main reasons why the V-belt connection whistles. They boil down to this:
- The belt has low tension. At the same time, he slips, which is especially noticeable at night, when he whistles with special “zeal.” This is due to the fact that at night the generator is forced to work in increased mode, providing the car with light;
- The destruction has begun. It dries out and literally begins to fall apart. First, cracks appear, then pieces fall off. At the same time, it also whistles due to the fact that the bullies catch the pulley, contributing to slipping. It needs to be changed urgently;
- Moisture ingress occurs quite rarely, and it evaporates during operation. But if at the same time the V-belt connection whistles, this indicates that it is necessary to apply tension;
- Wedge of the generator itself.
Right size
Another reason why the connection whistles may be an incorrectly selected belt size. But this, as a rule, becomes clear immediately after installation. Therefore, you need to know the size before going to the car market or store. In fact, there are quite a lot of sizes, as if the designers selected the length individually for each model.
Timing belt Contitech VAZ 2110 (16kl.)
Here are the main sizes that should fit the “ten”:
- If there is no power steering and air conditioning, take the size 742 mm;
- The VAZ 2110 generator belt with power steering is 1115 mm long;
- With air conditioning, even more – 1125 mm.
It is also possible that the size of Kalina or Priora will suit you.
Belt Contitech VAZ - 1119 Lada Kalina
Tension adjustment
If you discover that the V-belt drive is not yet worn out, but is whistling, you must first check its tension. According to the book, its deflection with a force of 10 kg/cm2 (100 N) should be 10 - 15 mm. To put it simply, you just need to press it approximately in the middle with some force.
If the tension is correct, then the deflection will be 6 - 8 millimeters. If it is more, it needs to be tightened, if less, it needs to be loosened. And it's not just that he whistles. If the tension is weak, then the battery charges less well, and the drive wears out faster. If the tension is too strong, there is a risk of failure of the generator bearings and the belt stretches.
We carry out the necessary adjustments as follows:
- Loosen the generator mounting nuts from the bottom and top;
- By turning the adjusting bolt, we make the adjustment: - To increase the tension, turn the bolt to the right - this moves the generator away from the cylinder block;
— To loosen, turn the bolt to the left - bringing the generator closer;
- Having hooked the key onto the mounting bolt, turn the crankshaft two turns and check the tension again;
- If everything is fine, tighten the fastening nuts.
Replacement
To change the belt, it is better to remove the front right wheel, hang the front part, remove the crankcase protection (standard or installed independently), then:
- Loosen the nuts securing the generator;
- Unscrew the adjusting bolt as much as possible;
- We move the generator as close to the cylinder block as possible;
- We remove the old belt and put on a new one.
Next, we adjust the tension and tighten everything. At this point the repair can be considered complete.
Source: http://VazWeb.ru/desyatka/gena/natyazhka-remnya-generatora.html
How to tension the alternator belt?
How to tension the alternator belt?
The generator belt is a narrow flexible ring made of special technical rubber, reinforced with special fibers for strength. The belt fits onto the crankshaft pulley and the rotor pulley and connects them to each other. Thus, the rotation of the engine is transmitted to the electric generator.
Since the engine shaft rotates at a very high speed, making several thousand revolutions per minute, in order for the generator belt not to slip during rotation, it is necessary that it fits very tightly to the grooves of both pulleys.
The operation of the electric generator largely depends on the degree of belt tension.
Let's talk in more detail about how to properly tension the alternator belt.
Belt tension levels
Correct tension
The optimal value of the alternator belt tension depends on the make of the car and is indicated by the manufacturer in the accompanying documentation.
In most cases, the deflection of the central part of the belt under the influence of a force of 10 kgf applied to it in this place should be 10-15 mm.
With this correct tension, the generator will work without interruption, and the belt will not break and will last its entire duration.
Excessive tension
If the belt deflection is less than the value indicated above, the belt may stretch. But this is not the most serious consequence. Excessive belt tension leads to premature wear and destruction of the generator bearings
Insufficient tension
If the belt is too loose, it may break.
In addition, insufficient tension leads to belt slipping at high speeds, as a result of which the generator’s performance deteriorates and a characteristic nasty whistle begins to be heard from under the hood.
Such a whistle, especially aggravated in damp weather, indicates that the belt urgently needs to be tightened. How this can be done is described in our article How to tighten the alternator belt.
Checking and adjusting belt tension
The tension of the alternator belt should be checked and, if necessary, adjusted every fifteen, or even better, every ten thousand kilometers of the vehicle. Unscheduled adjustment should be carried out if the whistle mentioned above becomes audible.
Checking the tension
- Turn off the engine, put the car on the handbrake, remove the key from the ignition.
- Prepare a set of open-end and box-end wrenches, a pry bar and two rigid steel rulers.
- Lift the hood and disconnect the cable from the negative terminal of the battery.
- Place one straight edge on top of the belt so that its ends rest on the crankshaft and alternator pulleys.
- Press quite firmly on the center of the belt and use a second ruler to measure the distance between the belt and the first ruler.
If the deflection value corresponds to the norm mentioned above (10 -15 mm), the belt tension does not need to be adjusted.
- If the belt bends more than expected, it means it needs to be tightened.
In all Russian cars, the belt tension can be adjusted in two ways, it all depends on the model and year of manufacture.
First method: tensioning the belt using the adjusting bar
This method is suitable for classic VAZ models, in which the electric generator is attached to the crankcase with one long bolt. At the top of the generator there is an arc-shaped adjustment bar, in which there is a small slot and a nut that fixes the position of the generator.
- Unscrew this nut.
- Using a pry bar, press the generator away from the engine to a position in which the belt acquires the desired tension.
- Hold the generator in this position and tighten the nut.
- Check the belt tension. If it is still not sufficient, repeat this entire procedure. If the belt is accidentally overtightened, then when repeating the second point of the instructions, move the generator slightly towards the engine and thereby loosen the tension.
Second method: changing the degree of tension with an adjusting bolt
In this convenient way, you can adjust the belt tension on newer models.
- Slightly loosen the nuts securing the generator at the top and bottom.
- By rotating the adjusting bolt clockwise, gradually move the generator away from the engine until the belt is tensioned to the desired position.
- When the required degree of tension is achieved, stop adjusting and carefully tighten all nuts securing the generator.
For information on how to replace the alternator belt, read our article How to change the alternator belt.
Source: https://elhow.ru/tehnika/avto/remont-avtomobilja/elektrooborudovanie/kak-natjanut-remen-generatora
How to change and tension the alternator belt
A generator is a fairly important component of any car, responsible for providing power to all its devices.
Despite all its reliability and durability, this unit requires periodic inspection and maintenance. This work, despite its apparent complexity, can be done even by an inexperienced car owner.
In our article today, we will try to figure out how to tension the alternator belt with our own hands.
Relevance of tension adjustment
A belt made of special elastic rubber with reinforced inserts is used to transmit rotational motion from the crankshaft to the generator and rotates at a speed of several thousand revolutions/minute. That is why it must fit tightly enough to the pulley, which will avoid slipping and eliminate idle rotations.
Before tightening the alternator belt, you should pay attention to its condition. Depending on the situation, it may be:
- Excessively tense;
- Not tensioned enough;
- Stay in a normal state.
Among the three points above, only the last one is optimal. If the tension is insufficient, the crankshaft makes a large number of idle revolutions, which can cause the belt to overheat and become damaged.
If there is excessive tension, then over time, this will lead to failure of the bearings on the generator itself, which, in this case, will not even work out the time allotted to them.
Optimal tension
When answering the question of how to change the alternator belt, experts advise first of all to measure its tension. The best option is when, with a load of 10 kg, its deflection is 6-10 mm or 10-15 mm, depending on the type and brand of the device.
Stretching methods
So, how to tighten the alternator belt? There are two main ways to carry out this operation:
- By means of an adjusting bolt;
- Using an adjustment bar.
Let's consider each of their methods in more detail. And first, let's figure out how to tighten the alternator belt using the adjusting bolt. All operations should be performed in the following sequence:
- Slightly loosen the nuts securing the generator around the perimeter;
- Using the adjusting bolt, which turns clockwise, push the device back a little bit, periodically checking the belt tension;
- Once the desired result is achieved, tighten the fixing nuts back.
As for the second method, here an arc-shaped bar is used for adjustment, in which there is a small slot and a nut, which actually fixes the position of the device on the engine crankcase. The adjustment operation is performed in the following order:
- First, unscrew the fixing nut;
- The generator is pressed away from the engine using any lever until the desired tension level is achieved;
- The fixing nut is tightened;
- The tension is checked.
Replacing a worn element
But what if the element has become unusable, how to replace the alternator belt? This procedure is quite simple and will not take you very much time. The work consists of the following stages:
- Battery disconnection;
- Loosening the fastening nuts;
- Unscrewing the tension bolt, while simultaneously pressing the generator to the engine;
- Replacing a worn belt with a new one, followed by tensioning;
- Fixing and tightening the fastening nuts.
It is worth remembering here that the new belt, after a short period of use, will stretch slightly, therefore, it is recommended to periodically check the degree of its tension.
Conclusion
That’s probably all, the answer to the question of how to change the alternator belt and adjust it if necessary has been received. We hope that the information presented in the article will help you complete this procedure yourself and with minimal effort.
Source: http://NashiKolesa.ru/pod-kapotom/kak-natyanut-remen-generatora
Secrets and rules for tensioning the alternator belt
The generator device is designed to provide power to the vehicle's electrical system. In addition, when the engine is running at idle speed, it charges the battery. The device operates by rotating the crankshaft, to which it is connected by a belt drive that transmits torque.
The circuit of many modern car models includes an alternator belt tensioner for adjustment. It plays a major role in the mechanism with such a belt drive installation scheme. In this case, the belt and tension roller are replaced simultaneously after approximately 15 thousand kilometers.
New tension roller replacement kit
Possible malfunctions in the electric generator drive and ways to eliminate them
Over time, the electric generator drive wears out and stretches. If consumables are not changed in time, the drive may break, which will lead to the car stopping. In this case, you need to install a new consumable and continue moving.
The procedure for replacing a torn product is simple: just loosen a couple of nuts and install a new part. The most difficult question is how to properly tension the alternator belt. If there is insufficient tension, it can slip, especially in high humidity, which leads to insufficient recharging of the battery.
The following symptoms of malfunction may appear:
- whistling in the area where the drive is located;
- voltage dips;
- dimmer headlights;
- flashing battery charging indicator on the dashboard.
If the tension is excessive, wear on the drive itself, the crankshaft bearings and the generating device increases, and this can also lead to breakage. In order to check the tension, you need to press the strap with a force of 10 kg. The tension will be optimal if it bends by 10-15 cm with the electric generator 37.3701 and by 6-10 cm with the electric generator 9402.3701.
Checking drive tension
Guide on how to tighten or loosen the alternator belt
The order of work depends on the design of the vehicle. Below we consider the adjustment process on VAZ models, where the strap is tensioned by the tensioner bolt. In many modern car systems, an alternator belt tensioner is installed for this purpose. In this case, the order of work is different. This is discussed briefly after detailed instructions for VAZ models.
Sorry, there are no surveys available at this time.
Set of tools
To adjust the tension of the electric generator drive, you need tools, the composition of which depends on the design of the installed drive.
Most often you may need the following tools:
- a set of keys;
- ratchet;
- set of heads;
- knob;
- extension;
- mount.
Sometimes it doesn’t hurt to have an assistant, since nuts and bolts are sometimes difficult to unscrew yourself.
Stages
Adjusting the drive of the generating device consists of the following steps:
- First you need to loosen the nuts securing the electric generator.
- Using a “10” key, turn the screw of the tensioner mechanism, with which the tension is adjusted. In this case, the housing of the electric generator should be shifted toward the front of the car if the strap needs to be tightened, and in the opposite direction if it needs to be loosened.
Drive Tension Adjustment
- By rotating the tensioner screw, you need to control the deflection of the strap. As soon as it meets the standards of the generating device installed on the machine, you need to tighten the nut on the adjusting rail.
- After tightening the fastening nut, you need to turn the crankshaft a couple of turns and check the deflection again. If everything is normal, you should start the engine and listen to how it works. There should be no extraneous sounds. The strap should rotate without deflection or shifting.
These instructions are intended for adjusting the tension on VAZs such as Lada Kalina. On a car with a tension roller installed, the adjustment scheme is slightly different.
Scheme with tension roller
Tensioning and loosening is carried out using a tension roller. Having placed the key on it, you need to turn it clockwise to pull the generator belt tensioner to loosen it. If it is necessary to tighten, then turn the roller counterclockwise.
Adjustment is a simple procedure and can be performed even by a novice driver; you just need to know how to tighten the alternator belt and how to loosen it. If you carry out repairs yourself, this will allow you to save time and money on visiting a car service center. In addition, you gain invaluable experience that will be useful along the way. Unpleasant surprises on the road will not take you by surprise.
Video “Adjusting the tension of the electric generator drive”
This video demonstrates how to tighten an alternator belt.
Source: https://labavto.com/dvigatel/grm-kshm-gbc/natyazhka-remnya-generatora/
How to tighten the alternator belt?
Every car owner treats both the external and internal condition of his iron horse with special trepidation and attention.
And in order to prevent any breakdowns, before leaving, it would not be superfluous to check the condition of the engine, the main components of the chassis, and also check the level of coolant and oil.
But the alternator belt is not checked every time. After all, even if the generator works well, this does not always reflect the true picture.
The alternator belt must be kept under special tension, so the fact that the belt is intact and not damaged does not mean anything. It should be tightly pulled into the pulley groove, and it should not slip.
It is necessary to tighten it at the correct level. Only in this case will the generator work as efficiently as possible without creating any problems. By the way, here is an article about replacing the alternator belt. If you hear any whistling or squeaking noises from under the hood, this will most likely be a consequence of improper tension of the alternator belt.
The tension of the generator belt can be in three states: normal, overtightened, loosened. If the tension is weak, the belt operates at only 50 percent of its actual power.
It follows from this that the efficiency of the generator is reduced by exactly half. In addition, due to high friction, the belt fails faster.
If the tension is too strong, another problem occurs: the bearings (on which the generator shaft rotates) quickly break and fail.
How to understand the correct tension?
To do this, you need to press on the belt in the space between the pulleys. Each model has its own standards that must be adhered to.
Any car has special devices that are aimed at self-tensioning the alternator belt. For example, in a VAZ car, the generator is bolted to the crankcase with a long bolt, and by tightening this bolt, you will adjust the belt tension. A bar in the form of an arc is installed on top, and along this bar you can find a nut and a slot.
How to tighten the alternator belt: procedure
So, first you need to unscrew the nut. Then press the generator away from the engine, tighten the nut, and after clamping, check the tension of the generator belt.
The alternator belt can also be tightened using an adjusting bolt. Nowadays, many car models have this option.
This method is easier and faster. You need to loosen the lower and upper nuts that secure the generator, then, turning the bolt clockwise, press out the generator, at this time check the condition of the belt tension. Then, tighten the nuts back.
After you have checked the generator belt using any of the methods listed above, you must turn the shaft several times to check the operation of the generator. Then you can check the condition of the tension again by making a detour, and then look at the tension again.
That's all. Ride without any breakdowns!
Video (for VAZ 2110, 2114, 2115)
Source: http://autoepoch.ru/remont-i-obsluzhivanie-avto/kak-podtyanut-remen-generatora.html
How to remove a generator belt, replace a torn one or tighten it if it whistles, installing and replacing the drive belt on a pulley with your own hands
The generator belt ensures the transfer of mechanical energy from the shaft to the generator, which converts it into electricity for the on-board system of the machine. The generator belt is installed on pulleys, rotating on which it ensures interaction between the crankshaft and the generator.
The designs of this system have a wide variety, depending on the specific manufacturer, but the principles of operation are the same for all. Problems associated with the alternator belt are also similar in all systems.
Don't panic if you hear a whistle coming from under the hood. You should immediately check the alternator drive belt and pulleys. However, do not forget that in some cars the alternator drive belt also goes to the hydraulic booster. If the belt breaks, then a sudden failure of the power steering will give you several unpleasant seconds or even lead to an accident.
Alternator belt whistling: what is the reason?
- If the belt is old and worn, it will not be possible to tighten it properly.
In this case, the whistling of the alternator belt signals the need to install a new one;
- When using a low-quality belt, squeaks and whistles are possible;
- If oil gets on the belt or pulley, the belt will slip, so you should carefully fill in technical fluids;
- Often a worn out generator bearing can make whistling sounds.
If the alternator belt whistles when cold, and the belt is practically new, the reason is the installation of a low-quality spare part. The belt is too stiff; during use it heats up and softens. Perhaps over time the whistle will disappear, but it is better to replace the belt with a new one.
Diagnostic procedure:
- Visually check the belt for mechanical damage;
- Checking belt tension;
- Checking the belt, shaft and pulleys for the presence of oil or antifreeze that has got on them due to carelessness or leakage;
- Be sure to check the pulleys for displacement.
When to change the alternator belt
If the belt is frayed or has various damages, then it definitely needs to be replaced. It happens that the belt is filled with oil, you can try to clean it, but it is better to also replace it with a new one. The recommended timing for belt replacement should not be ignored. It’s better to play it safe than to worry about what to do later on the road.
Alternator belt size
When choosing an alternator belt, follow the operating instructions. You need to know that an engine with eight valves will have a different belt size from a sixteen-valve engine. The belt length for an engine with 8 valves will be shorter.
How to tighten the alternator belt
The question of how to tension the generator belt can be easily resolved using an adjusting bar and an adjusting bolt. Using a strap, tensioning the alternator belt is not difficult.
- The nut located on the bar is unscrewed;
- The position of the generator is adjusted using a handy object (a pry bar will do);
- The new position of the generator should be secured with a nut.
The belt drive is adjusted using the adjusting bolt according to the following scheme:
- The generator mounts are loosened at the top and bottom;
- The adjusting bolt turns;
- The generator is removed from the block, and the tension is checked at the same time;
- Tighten the generator mount.
More modern and simpler is adjustment with a tension bolt.
Do-it-yourself alternator belt replacement
If your alternator belt breaks, changing it yourself is easy. The main thing is to follow the sequence of actions. To understand how to remove the alternator belt, you will need an installation diagram. You can find it under the hood; many manufacturers place it there.
If there is no diagram for installing the belt, then the manual for your car will help. As a last resort, you just need to remember the location of the belt, how it fits on each pulley. If the belt is intact, but there are noticeable cracks on it, you will also have to install a new one.
When choosing a new belt, it is better to take an old one as a sample, so you will accurately select the size you need.
When changing the belt, be sure to check how each pulley rotates. If they turn with difficulty, they should also be replaced. Before installing a new belt, you need to find out the moment of optimal belt tension by checking the operating instructions for your car.
If you overdo the tension, the belt may break, and if you tighten it too weakly, the question “why the generator belt whistles” will remain open. To check the installation is correct, you need to start the car while it is standing and put a large load on the car's electrical network by turning on and off the radio, headlights and all possible blowers and air conditioners.
If any mistake is made during installation, the belt breaks.
When carrying out work to replace the generator belt, do not forget to check other equipment installed in this unit (pump, generator, rollers and pulleys). If the pump or roller jams, the belt may break and you will have to disassemble the unit again.
Some car models are equipped with alternator belt protection. It is able to protect the belt from accidental mechanical damage and from spilling various technical fluids. Some car enthusiasts make such protection with their own hands.
Now you know how to change the alternator belt with your own hands. The main thing is that when carrying out this work, do not forget to check the condition of other systems associated with this unit, otherwise the new belt will not work for a long time.
Source: https://SwapMotor.ru/ustrojstvo-dvigatelya/remen-generatora.html
How to tighten the alternator belt?
15.07.2013
The tension of the alternator belt is very important. If the belt is loose, then at high speeds it slips and whistles, as a result of which drops in the voltage of the on-board network occur.
It’s also not a good idea to tighten the alternator belt too much. If the belt is too tight, the service life of the generator bearings sharply decreases (How to replace a generator bearing?).
How to determine a loose belt?
A weakly tensioned alternator belt often makes sounds (whistles), and voltage drops occur (headlights light up and blink weakly at night), the red “battery” icon on the instrument panel may blink.
Belt life
The manufacturer recommends changing the alternator belt every 15 thousand km. Also, when inspecting the belt, you should look at it carefully: if the belt peels off or breaks, it must be replaced immediately (How to replace a generator belt?).
What should the tension of the alternator belt be?
The belt should be tensioned neither too tight nor too loose. Optimal tension - the belt is tensioned and bends by 10-15 mm (for generator 37.3701) and 6-10 mm (for generator 9402.3701) when pressed with a force of 10 kg (see figure).
How to tension the alternator belt?
Tensioning the alternator belt is not a difficult task. This operation will take at most 10 minutes. I should immediately note that the VAZ 2114, 2113, 2115 have different engines (1.5 and 1.6 liters), therefore the process of tensioning the belt is different.
For engine 2111 (1.5 l)
- Loosen the tightening of the upper and lower fastenings of the generator (see figure).
- We adjust the belt tension using the adjusting screw (see picture). Clockwise we tighten the belt, counterclockwise we loosen it.
- Having tensioned to the required point, tighten the generator fastenings and check the belt.
For 1.6L engine
Nut securing the generator and tensioner
In this operation, in addition to the keys, we will need a small crowbar.
- We also loosen both generator mounts (see picture).
- Next, take a crowbar and move the generator away from the engine (pull the belt), resting the crowbar on the cylinder block (see picture). If the belt tension needs to be relaxed, then we move the generator towards the engine.
- We tighten the generator mounts and check the belt tension.
If, after adjusting the belt, the problem of voltage sags remains, then look for another problem here, having first checked the generator (How to check the generator?).
Source: http://vaz-2114-lada.ru/2013/07/kak-podtyanut-remen-generatora/