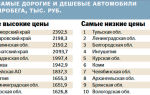
Changing engine oil yourself: what you need to know
It is well known that changing the oil in a car engine is a regular and mandatory procedure.
Not only proper operation, but also the overall service life of any power unit directly depends on the correct selection and timely replacement of lubricant.
Note that the condition of the engine oil is strongly influenced by a number of factors: the quality of the lubricant and the fuel being poured, the serviceability of the engine, the individual characteristics of the operation of a particular vehicle, etc.
In the CIS, it is strongly recommended to change engine oil every 10 thousand kilometers traveled. This statement is true for both gasoline and diesel engines.
In turbocharged engines or units that are constantly exposed to harsh operating conditions, it is recommended to further reduce the specified replacement interval by 20-40%.
Given the importance of the lubricant change procedure, in this article we will look at how to properly change the engine oil yourself.
What is needed to change the engine oil
The process of changing engine oil is not a complicated procedure, especially if you do not additionally plan to flush the engine before such a change. If you decide to service your car yourself, but don’t know how to change the engine oil yourself, you will need to fulfill a number of simple conditions:
- You need to park the car on a level surface and have free access to the lower part of the engine (sump). For these purposes, a garage with a pit is best suited. You can also use an overpass or a lift.
- Next, you need to prepare a container for draining the waste. The volume of such a container will depend on the amount of lubricant in a particular engine.
- The next step is to warm up the engine to operating temperature, after which you need to unscrew the oil filler cap, remove the oil filter and unscrew the drain plug in the oil pan.
- As for removing the filter element, many people use a special oil filter wrench to unscrew it and then install it. You should also take into account in advance that in most cases, to drain the lubricant, you will need to remove the engine crankcase protection (if equipped). For this reason, you should prepare additional tools in advance.
- After unscrewing the drain plug, it is necessary to allow the used lubricant to flow out as much as possible through the drain hole. At the same time, you can assess the condition and degree of contamination, which may be the reason for making a decision about changing the type or manufacturer of the lubricant, additional flushing of the lubrication system, etc. After draining, it is recommended to splash about 0.5 or 1.0 liters of fresh oil, which will wash away the residues, after whereby you can screw the drain plug into the pan with the recommended force, while taking into account that the plug may also have an O-ring. On some vehicles, it is optimal to change the indicated ring at each replacement.
- Now you can install the new oil filter. Before installing it, you need to pour some fresh lubricant inside the filter. This is necessary in order to saturate the filter element with oil. It is also recommended to lubricate the rubber seal on the oil filter with the same oil. These operations allow you to quickly increase the pressure in the lubrication system during the first start of the internal combustion engine (the engine will run dry less, the oil pressure light will go out sooner), and will also ensure a reliable fit of the filter at the point of contact with the sealing rubber.
- The final step is to fill in fresh lubricant through the oil filler neck in the volume required for this type of engine. The oil level must be monitored by the marks on the dipstick. The optimal indicator is considered to be between the “min” and “max” marks. It is best to immediately fill not the entire recommended volume, but a little less, and then allow the lubricant to spread for some time (5-10 minutes) over the surfaces inside the engine and drain into the sump. Then the level is checked and then the lubricant is added to the required level. This approach avoids overflow of lubricant into the engine and saves the owner from additional operations to remove excess lubricant from the internal combustion engine.
- After filling, you must tighten the oil filler cap. The scheduled oil change procedure is considered complete and the engine can be started. After starting, the oil pressure light should go out after a short period of time. The engine is allowed to idle, while simultaneously inspecting the installation site of the drain plug and oil filter for possible oil leaks. If everything is in order, then your car is ready for further use.
- Also, the oil level should be checked after several kilometers of driving, and it is also advisable to re-inspect the plug and oil filter. The fact is that driving at medium and high speeds means that the pressure of the working fluid (lubricant) in the lubrication system increases. In other words, possible leaks or filter defects may appear precisely under such conditions, and not at idle.
Oil change with engine flush
To figure out how to change the oil with an engine flush, you need to clearly understand what kind of flushing agent you intend to use. Among the most common options are:
- quick rinses - five minutes;
- finished flushing oil;
- diesel fuel or a mixture of diesel fuel and oil, etc.;
The washing procedure itself may differ slightly in one way or another. For this reason, we recommend that you read our separate articles on this topic: when and in what cases it is worth using an engine flush before changing the oil, how to flush a diesel engine when changing the oil, and also how to flush the engine when changing the engine oil.
How to change the oil in an engine without a pit
Let's start with the fact that there are several ways to change the oil without a pit. Note that changing the engine oil in the traditional way (that is, by draining the lubricant) under such conditions is quite possible. The main difficulty is that access to the drain plug will be very difficult.
https://www.youtube.com/watch?v=NXnmP23NhaA
In such a situation, most car enthusiasts use a jack, some put the car on blocks or bricks. After jacking up or fixing the raised car in another way, you need to place a flat container under the drain hole to drain the waste, after which you can unscrew the drain plug.
To make the task easier, you can also look for a section of the road where there is a relatively deep rut (for example, country roads). The driver remains to lie under the front of the car and perform all the necessary manipulations.
Taking into account the fact that the car may not be on a level surface, some drivers jack up first one side and then the other while draining the oil. Others advise additionally inserting a strip of clean cloth into the drain hole, along which the remaining oil from the pan will drain more efficiently.
The main thing is not to forget to remove the tissue later.
Another method is the so-called “express change” of engine oil. The essence of this operation is that the lubricant does not pour out of the pan, but is pumped out of it through the hole for the oil dipstick.
To remove waste, you can use special equipment for vacuum pumping or use a regular syringe for pumping out oil.
It is worth noting that this method, provided that special equipment is available, is less effective compared to the traditional replacement, and in the case of a syringe it is considered a completely necessary measure.
For this reason, experienced drivers and auto mechanics strongly advise against frequently using the express oil change service. Vacuum replacement means that a larger amount of used oil remains in the engine compared to replacement by draining through the drain hole in the pan.
As a result, old oil is mixed in large quantities with fresh lubricant, shortening its service life and impairing its useful properties.
Moreover, the risk of undesirable reactions between residues and the new lubricant increases if the type of lubricant and/or manufacturer is changed, flushing compounds are used before replacement, etc.
If you used an express oil change service or carried out this procedure yourself, then the service interval should be reduced by 3-5 thousand kilometers traveled.
Subsequent replacement must be carried out in the traditional way.
Let's sum it up
The decision to change the engine oil on time (every 10 thousand km) or even to make such a change a little ahead of schedule is the key to the cleanliness and proper operation of the power unit.
This is true provided that such actions are performed regularly, and also if the driver uses the same oil.
This operation means that there is no need to additionally flush the engine before replacement.
Let us add that if the replacement period is approaching and you decide to change the type of oil, but there is no possibility or conditions to carry out flushing and replacement efficiently, then it is better to delay such a transition. In other words, it is optimal to change the oil in the field to a similar one without flushing the engine, and then skillfully carry out the next change and other manipulations in a garage or service center.
Source: http://KrutiMotor.ru/kak-nuzhno-menyat-maslo-v-dvigatele-pravilno/
How to change the engine oil yourself - Avtoberloga
If you don't know how to change engine oil, then this article is for you. The process of changing the oil is extremely simple, you just need to follow a certain sequence of work.
Procedure for preparing for work
First of all, you need to choose engine oil (read how to do this here), get a container for draining old oil from the engine (the volume of oil flowing out is 2–5 liters, it depends on the engine size), prepare an adjustable wrench and rags, buy an oil filter .
Then you should take care of where to place the machine. If you cannot slip a container to drain the oil under the engine sump or get close to the oil filter, then you should drive the car onto an overpass or inspection hole.
Now that all the preparations are complete, let's begin the process of changing the engine oil.
- Warm up the engine for 5 minutes to warm up the oil in the crankcase;
- Find the drain plug (it is located at the bottom of the pan), place a container under it to drain the oil;
- Unscrew the drain plug and the oil will begin to run out (the main thing is not to get burned);
- Unscrew the old oil filter and pour out any remaining oil. If you can’t unscrew the filter, then there is one barbaric way - pierce it with a long screwdriver, then use it as a lever (tested, it works, and how);
- Fill the new filter with fresh oil and lubricate its rim;
- Install a new oil filter instead of the old one;
- By this time, the old oil should completely drain from the engine. Now you can screw the oil plug back into the pan;
- Then unscrew the oil filler cap and fill in fresh oil, without adding about half a liter;
- Reinstall the oil filler cap and start the engine (let it idle for 30 seconds, but do not accelerate);
- Check for oil leaks from under the filter and drain plug;
- Turn off the engine and let the car sit for a couple of minutes. Then add oil to the level on the dipstick;
- Drive for about 5 minutes and check the oil level again, top up if necessary.
After the oil change procedure, I advise you to write down the date of oil change and the mileage of the car, and also stick the label from the oil canister on the back of the hood. This is done in order to know when to change the oil next time and what kind of oil is in the engine.
See the pictures below for the location of the oil filter, drain plug and oil filler cap.
For clarity, I have attached photographs (1999 Mitsubishi Lancer, engine model 4G13). The photographs indicate the location of the oil filter (1), oil filler neck (2), and drain plug (3). This is a typical arrangement of such parts in most cars.
A few words about flushing oil
Flushing oil will allow you to clean the insides of the internal combustion engine from toxins and wear products of engine elements.
The engine is flushed during the oil change process. We drained the old oil, added flushing oil, let the engine run for a couple of minutes, drained the flushing oil and continued the replacement process. Do not install a new oil filter before flushing.
I categorically DO NOT recommend using flushing oil, as it is a universal evil! It should be used in the case of a completely “overgrown” engine, as it has a detrimental effect on some engine parts, especially modern ones. If you really want to rinse it, it is better to use fresh motor oil. Expensive, but the engine will last longer.
This concludes the article. I hope you find this information useful.
Source: https://avtoberloga.ru/kak-samomu-zamenit-maslo-v-dvigatele/
Changing engine oil: useful tips
A type of closed passenger car body with a trunk that is structurally separate from the passenger compartment and without a lift-up door in the rear wall.
A type of closed car body with a door in the rear wall and a shortened rear overhang.
A type of closed car body with a door in the rear wall, a trunk combined with the passenger compartment, and a trunk roof extended to the rear clearance.
A type of closed car body that is intermediate between a sedan, station wagon and hatchback. It differs from the hatchback in the longer rear overhang: the liftback has the same length as the sedan. The rear part of the roof can be either sloping or (less often) stepped, reminiscent of a sedan.
A type of closed passenger car body with two doors, one or two rows of seats and a structurally separated trunk, without a door in the rear wall. The volume of the rear passenger compartment usually does not exceed 0.93 m³.
A passenger car body type with a folding soft or hard top and two doors. The number of places is more than two.
Body type of a two-seater sports car without a roof or with a hard roof.
A type of passenger car body, which is a type of sports 2-seater roadster with a rigidly fixed windshield, a roll bar at the rear of the seats, a removable roof and a rear window.
A type of closed passenger car body, with a rigid partition, usually equipped with a roll-up window, between the driver's compartment and the rest of the passenger compartment. The body is elongated to varying degrees compared to a regular sedan.
A type of closed car body made by physically inserting an additional section into the body, located between the front and rear doors, which helps to lengthen the interior.
A type of closed car body with increased cross-country ability and increased clearance.
A type of closed car body that combines the properties of an SUV and a station wagon or hatchback.
A commercial two-seater vehicle body type with an open cargo bed.
A type of closed body of a commercial two-seater vehicle with an enclosed cargo bed (luggage compartment with a door on the rear wall).
A type of closed car body combined with a luggage compartment, usually with three rows of seats. Increased interior volume. The maximum cabin capacity is 8 passengers.
A type of enclosed commercial vehicle that is a small bus with 8 to 16 seats and no standing room.
Source: https://bycars.ru/journal/zamena-masla-v-dvigatele_-poleznie-soveti_2618
How to change engine oil yourself
Sometimes there are situations when we cannot entrust the maintenance of our car to specialists. For example, being far from our “native” service station, we notice that it’s time to change the technological fluids – coolant or engine oil.
At a service station, this operation takes from half an hour to an hour, but most ordinary car owners have no idea how this happens. Experts advise changing the oil and coolant before a long journey - you never know what can happen on the road, but help will come late.
But not everyone adheres to these tips and is worried that missing the deadline for changing technological fluids can harm the car’s engine.
The matter can be helped if you purchase motor oil of the required brand, a new oil filter and a rubber gasket that fits onto the threads of the oil filter from a car dealership.
If you don’t know what brand and viscosity level the oil for your car should be, and you also don’t know which filter is best to use, you can go in three ways. The first is to find out the necessary information in the store where you will purchase the components listed above.
But, as practice shows, a salesperson in a car dealership does not always understand what kind of oil is needed for a particular model, engine type, or what filter can be installed.
Or there is the other side of the coin: maybe the seller understands oils and filters, but wants to sell you what is more expensive, persuading that this particular oil and filter is the best. Therefore, trusting salespeople in auto stores is at your own peril and risk.
The second way is to go online, find thematic forums and read there what kind of oil and filter is used in your car. You can also select a filter and fluid on specialized resources - for example, by searching by car VIN code. Having found out exactly what parts and oil you need, having written down the data, you can go to the store.
The third way is the simplest. You need to open the instruction manual that comes with the car and find the information there. True, while information about the type of oil and its degree of viscosity will be required there, then information on the oil filter and gasket may not be in the “manual”.
In the photo: engine oil, oil, air and cabin filters.
So, having found out all the information and purchased the necessary consumables and fluids, we proceed to changing the oil.
To do this, you will need to find an overpass or a garage with an inspection hole, two keys (for the oil filter and a combined one), a container for draining old oil, a funnel, a flashlight, a clean rag and rubber gloves.
After driving the car onto an overpass and putting it on the parking brake or in parking mode (for cars with automatic transmission), carefully inspect the engine.
The service technician drains the used oil
If the car has a crankcase protection, it will have to be removed - for this you will need a combination key. It is necessary to take into account that protection is heavy, and assistants may be needed in this matter. Having removed the protection, turn on the flashlight and inspect the engine, where you can see the drain neck.
You need to start changing the oil when the car engine has cooled down! However, while you are fiddling with unscrewing the crankcase protection, it will already be at the desired temperature. Now, having illuminated the lower part of the engine, take the key and carefully, counterclockwise, unscrew the plug covering the drain neck. You cannot unscrew it completely, only loosen it.
Then we place a container under the neck to drain the oil (the capacity of the container is depending on the amount of oil poured into the engine of the car plus 0.5 liters) and unscrew the cap further until drops of oil appear on it.
Then, placing the container right under the neck, unscrew the cap with your fingers and sharply remove your hand with it to the side so as not to get dirty with dirty oil.
Engine oil drain
While the used fluid is being drained, we are preparing tools to dismantle the old oil filter, which is usually located next to the drain neck. When all the oil has drained, screw the filler cap back on, clockwise.
Then unscrew the oil filter, helping yourself with the key. If there is no key, you can try to unscrew it by hand, holding the body. After removing the filter, you can get out from under the car, remove the container with used oil and prepare the new filter for installation.
To do this, first lubricate the new gasket with used oil, then attach the filter to the mounting flange, putting it on the thread, and carefully tighten it first only by hand, and at the final stage - using a wrench.
After completing this operation, you need to thoroughly wipe everything with a clean rag, making sure that there are no smudges.
Filling oil
Now we proceed to the final stage - pouring fresh oil. To do this, open the hood, look for the oil filler neck (usually it’s easy to find - it’s a contrasting bright color), unscrew it and carefully pour the required amount of oil through the funnel. We check the level with a dipstick.
When filling is complete, close the filler neck and start the engine, allowing fresh oil to fill the system. We look under the car again and check for leaks from the drain neck or oil filter. If everything is dry, congratulations, you did an excellent job.
If leaks are noticed, turn off the engine, check how tightly the threads of the filter and the cap on the neck are tightened, then start the engine again. Is everything dry? We reinstall the engine protection - the oil change is complete!
Source: https://avtoexperts.ru/article/kak-zamenit-motornoe-maslo-svoimi-rukami/
Correctly changing engine oil: how to do it yourself?
One of the most important procedures when maintaining a car is changing the engine oil. This operation must be performed regularly, contacting a service center or doing everything yourself in a garage that has a pit.
The oil in a car engine works on the principle of blood in the human body: fluid circulates and ensures the efficient operation of all components.
Regular replacement of the lubricant guarantees uninterrupted and long-term operation of the power unit.
to contents ↑
General information about changing engine oil
Hardware oil change
When the time comes to change the engine oil in a car engine (the interval recommended by the car manufacturer is indicated in the operating manual), you can choose one of the options for solving the problem:
- a trip to a service station where professionals will take care of your car;
- Do-it-yourself oil change in your car.
Mechanics who regularly service and repair vehicles do a good job of this basic task, but if you want and have free time, you can save money and do it yourself.
Many car service centers offer a vacuum oil change that involves pumping fluid out of the system. Specialists working in such services talk about the effectiveness of this operation, but in reality it is better to replace it in the traditional way: drain the fluid from the crankcase and pour fresh oil into the neck.
to contents ↑
How often should you change your oil?
The frequency of changing the oil in a car’s engine depends on the car manufacturer’s recommendations, which are indicated in the operating manual for a specific model.
On average, for modern engines filled with synthetics, the recommendation is to change the fluid every 10-15 thousand kilometers.
This interval is indicated for normal conditions, and the more severe they are, the more often it is recommended to change the lubricant. Severe operating conditions include a certain climate:
- frequent temperature changes;
- extreme frosts;
- high humidity;
- dirty ambient air.
Operating a vehicle in city mode is equivalent to particularly difficult conditions. Large traffic jams are especially harmful to engines. In such conditions, it is recommended to change the oil every 8-10 thousand kilometers.
to contents ↑
Do oil filters need to be changed?
What do oil filters look like?
Some motorists are interested in whether it is allowed to change the oil without changing the filter? Theoretically this is of course possible, but in practice it is better not to do this. The filter is inexpensive and replacing it is included in the process of changing the engine fluid.
The operation of an engine with a dirty filter is comparable to operation without a filter element, since the oil passes by the filter part. This is due to the design of the device.
In this regard, along with changing the oil, the filter simply must be changed, since during normal operation it becomes clogged after 10-12 thousand kilometers.
Accordingly, at this moment the bypass valve opens and the oil circulates in the system without filtration. This leads to faster wear of internal engine parts.
Next, we will consider the process of changing the engine oil yourself. Following our instructions, you can replace the fluid in any power unit - the principle is the same for all car models.
to contents ↑
Draining old oil
Draining old oil
Before draining the old lubricating fluid, you need to start the engine and let it run for a few minutes or drive it so that the fluid warms up and drains out of the system more easily. To change the oil, a garage with a pit or an overpass in a garage cooperative is suitable. The main thing is that the car is horizontal when changing the fluid.
Get under the bottom of the car and find the oil pan, into which the drain plug should be screwed - this is a regular bolt with a copper washer. If you decide to change the oil by lifting the car with a jack, when draining the oil, the jack will need to be lowered so that the car takes a horizontal position and all the oil is drained from the engine.
Before unscrewing the plug, place an old basin, cut canister or other container of suitable volume under it (you will find out how much oil is in the system by studying the operating manual). First, carefully tear the bolt with a wrench, and then completely unscrew it by hand. Be careful if the oil is hot. Wait 5-10 minutes for all the liquid to drain out.
to contents ↑
Replacing the filter
When changing the oil in your car, it is important to change the oil filter. It is usually not difficult to find - it looks like a small metal barrel. To unscrew the old filter, use a special wrench. If you don't have a key, you can pierce the filter housing with a screwdriver and use it as a lever. It unscrews counterclockwise - it has a standard thread.
Before installing the filter, you need to lubricate the gasket and threads with oil, and then screw it into place. Do this without a key - clamp it with your hands. If the oil oozes out, you can always tighten it further.
to contents ↑
Filling with new oil
Filling with new oil
The old oil has been drained and the filter has been replaced - it’s time to fill the system with new lubricant. Screw the drain plug into place, unscrew the oil filler cap and start pouring new oil of the appropriate brand and viscosity through a watering can.
Fill in 10-15% less oil than required according to the manual, since some of the oil should have remained in the hidden cavities of the engine in any case. Close the lid and start the engine.
Wait until the oil pressure light on the dashboard goes out and turn off the engine.
Pull out the dipstick under the hood and check the oil level using the marks. This is not difficult to do: just wipe the dipstick with a clean rag or napkin, insert it back and pull it out again after a few seconds. Ideally, the level should be between the minimum and maximum marks. If the level exceeds the max mark, it is better to drain the excess, otherwise the oil may squeeze out the gaskets or seals.
to contents ↑
Is flushing necessary when replacing?
Flushing oil Lukoil
When changing oil, motorists often ask whether it is necessary to flush the engine? There are different ways to solve this problem:
- The use of special flushing oil, which is filled in instead of the old one for 300-400 kilometers. This is a simple mineral oil without additives, which is usually used when changing from one type of oil to another.
- Washing takes five minutes. A special liquid from the store is poured directly into the old oil before draining, after which the engine should idle for several minutes. This option is the most aggressive, so we do not recommend it.
- Using plain oil. You can buy the cheapest regular oil and drive it for several hundred kilometers, and then drain and refill with the required fluid. This is the gentlest flushing, but many experts consider it completely pointless.
Is it necessary to flush the engine before changing the oil? Many motorists ask this question and most of them do not deal with it. But in what cases is flushing necessary? There are certain situations:
- Changing one oil for another. For example, switching from synthetics to semi-synthetics or from mineral water to semi-synthetics. We recommend reading detailed material about the types of motor oils.
- When buying a used car, you won't know for sure what kind of oil is in the engine. In this case, it is better to flush the lubrication system and fill in the oil recommended by the car manufacturer.
- Under harsh operating conditions, when it is necessary to wash off deposits and carbon deposits from the internal walls of the engine.
- When overhauling the engine during a major overhaul.
Now you know everything you need to know about changing engine oil and can do it yourself with some effort and some free time for this work.
Video: Changing the engine oil. How right. Engine resource +40%
Video: Changing engine oil
Video: Changing engine oil How to change it correctly
Video: Changing the oil according to regulations, or how an engine dies from routine maintenance.
Source: http://Driving24.ru/kak-zamenit-maslo-v-dvigatele-mashiny/
How to Properly Change Engine Oil
Almost every car owner often has to think about how often the oil in their car’s engine should be changed, and how to do it correctly to ensure comfortable and safe operation of their car.
There is no definite answer to such questions, because each car requires its own individual oil change plan.
But still, after analyzing certain factors that influence the composition of motor oil, we can draw the appropriate conclusions.
Factors influencing the composition of engine oil
Certain factors influence the composition of the engine oil of each car in a certain way. By considering these factors in relation to a specific car, you can create a schedule for periodic engine oil changes with great accuracy.
These are the factors:
1. The age of the car and the condition of its engine
It’s worth noting right away that if the car is new, then you just need to take into account the recommendations of the manufacturer of this car brand.
It is known that proper running-in of the engine, which means five to seven thousand kilometers, directly affects the further service life of the car. Therefore, during this period it is not recommended to create situations of engine overheating.
And when changing the oil, you cannot skimp on it, as this can negatively affect the operation of the car engine.
If the car has a certain number of kilometers, the approach is slightly different. Even with careful and correct operation of the car, the best option would be to immediately replace the filters and oil, and use a flush.
It would not be superfluous to consult a qualified auto mechanic, who will perform a complete diagnosis of the car’s engine and give appropriate recommendations. Undoubtedly, it is at least stupid to pour excellent quality oil into a faulty engine that is making strange knocking or noise.
If the engine is found to be in good condition after diagnostics, it is recommended to first change the oil more often while observing the engine’s operation. This is a kind of engine test for the subsequent frequency of oil changes. If no deterioration in engine performance is detected, you can increase the oil change time.
Do not forget that in any case the oil must be of high quality.
2. Intensity of machine operation
If the car is idle for a long time, condensation may appear in the engine, leading to a change in the composition of the oil and the formation of an acidic environment, as a result of which the engine gradually deteriorates.
This means that rare use of the car is not the key to its long-term uninterrupted operation.
The best option is a short but constant operating time of the car and a scheduled oil change after a certain number of kilometers. Machine downtime leads to frequent oil changes.
3. Driving method
The more carefully the car is operated, without recklessness, sudden starts and braking, and at high speeds, the less often the engine oil will have to be changed. The oil must be of high quality - semi-synthetic or synthetic based.
This factor implies using summer oil for the warm season and, accordingly, vice versa. It is imperative to take into account the climatic features of the region in which the car is operated.
5. Engine oil quality
When using low-quality mineral motor oil, it is recommended to replace it after 5-7 thousand kilometers. By using high-quality synthetic oil, the mileage is doubled. Therefore, the conclusion is: use high-quality synthetic oil from well-known manufacturers.
6. Quality of gasoline used
It is obvious that low quality gasoline, with various foreign impurities, negatively affects the composition of the oil used. All unburned gasoline impurities enter the oil, polluting the engine. Therefore, it is recommended to use high-quality gasoline at trusted gas stations in order to increase the service life of the car’s engine.
Taking into account all of the above factors, you can determine the required oil change intervals for a particular vehicle. And the car engine, if you follow the recommendations, will work longer.
How to properly change the oil in a car engine
How to change the oil in a car engine
Perhaps every car owner at least once during the operation of his car is faced with the task of changing the oil in the car engine. But the question is not so much how to do it yourself, but how often you need to carry out such a procedure.
Naturally, each car has an individual oil change scheme, which is indicated in the manufacturer’s instructions. Regarding changing the oil on your own, it is not at all difficult to do if you follow our instructions.
Preparing for an oil change
First, you need to open the instructions for your car and carefully study the manufacturer’s recommendations for changing the oil, including which type of oil is optimal for the car’s engine. After this, you need to buy a new fuel filter and the oil itself, and there should be a small supply of it. It is necessary to take into account that the oil reserve should not be much larger than the volume of the car engine.
Now let's move on to the inspection of the car itself. Why is this necessary? This is necessary in order to find out the shape and location of the oil filter.
In addition, you need to check whether you can fit a container for draining used oil under the car, and then also get it and the oil filter.
But in any case, it is recommended to lift the car on lifts or jacks, or better yet, drive to an observation deck or overpass.
It is necessary to have a flashlight with you, as it will be dark under the car. By highlighting it, you can determine the location of the hole for draining old oil from the engine. It is also necessary to inspect the metal oil pan and select a suitable size key for it. Now you can begin to find out the location of the oil filter, and after that, proceed directly to changing the oil.
How to change engine oil
Before you begin the process of changing the oil, you need to collect the entire necessary set of tools that will be needed during the work process. You will need two wrenches, one for the oil filter and one for the combination one, a funnel, a flashlight, a metal or plastic container, rubber gloves, a canister, rags, and a newspaper.
Before changing the engine oil, check that the car is in park mode with an automatic transmission. If not, put the car on the handbrake. Make sure that all wheels are aligned correctly on the overpass, otherwise you will be in danger when you are under the car. Remember that the machine must be on a solid surface.
After the car has been driven to the viewing platform, you need to turn off the engine, as the oil must cool down. After this, wear rubber gloves and remove all covers and hatches that block access to the engine. You also need to prepare all the necessary keys, containers for draining old oil, newspaper and rags.
Once you are under the car, place a container to drain the old oil under the oil pan. Using the appropriate size wrench, loosen the oil pan plug slightly by turning it counterclockwise. At the same time, make sure that the metal or plastic gasket that is on the plug does not fall into the container with old oil or stick to the oil pan.
Now you can carefully unscrew the plug with your hand, while supporting it with your other hand. Because the plug may not be knocked out of the oil pan under oil pressure.
When the plug is completely unscrewed, sharply remove your hand to the side, immediately placing a container to drain the old oil. It is better to place newspaper under the container itself.
Do not forget to ensure that the oil does not scatter to the sides, but flows into the container.
And while the oil is draining into the container, you can once again check where the oil filter is located. Check if there is a small hatch or cover on it that would block access to it.
To make it easier to grasp the outer surface of the box, wipe it with a rag. Try to unscrew the oil filter by hand. If this works, you don’t need to unscrew it right away.
Just turn it 2-3 centimeters and stop.
After all the old oil has drained into the container, you can remove it and install the plug back. At the same time, slide the container under the oil filter. The plug itself must be tightly tightened using a wrench.
You need to install a wrench with a belt around the filter in order to loosen it by half a turn. Now remove the key and unscrew the filter by hand.
You can get out from under the car, first wiping off all oil stains with a rag, and then take out the container with the old oil from there.
Prepare the new oil filter by first covering the rubber gasket that should be on the bottom of the filter with a thin layer of old oil. The new oil filter must be checked for damage on the flange and that the old gasket does not remain on the flange.
After installing the new filter, connect it to the mounting flange and carefully slide it onto the threads, and then secure it. Make sure to remove any oil from everything, but do not use soap or water during cleaning.
And now we have come to the main stage - directly changing the oil in the car engine. To do this, lift the hood of the car and determine the location of the oil filler cap. Then the oil filter cap is unscrewed and new oil is poured in using a funnel. Then the cover is installed in place. Do not forget that you cannot start the car engine until the oil is filled.
Afterwards, remove all rags from under the hood and start the engine, but without increasing the speed. You need to make sure that the oil indicator is in the "normal" position. With the engine running, check to see if there is any oil leakage.
As you can see, the process of changing the oil in a car engine is not that complicated. Now all you have to do is turn off the engine and remove all tools from under the car. After you have left the viewing platform, check the oil level in the car again. If necessary, adjust the engine oil level.
The system considers these topics interesting:
♦ How to choose the right Velcro winter tires.
♦ How to properly inflate car tires.
Now watch this helpful video:
How to change engine oil correctly?
An important factor in the durability of car engine components is timely and correct oil changes. How difficult is it to change the engine oil without involving car service employees? Almost any car owner can do this on their own.
A car enthusiast who independently decides to change the engine oil must have a number of simple skills. The manufacturer's instructions and this article will help fill the knowledge gap.
We buy consumables
Before starting work, carefully read the instructions. Stock up on consumables and the required amount of engine oil. We check the oil marking recommended for this vehicle by the manufacturer from the operating manual.
You should not buy it at random points, as there is a high risk of buying a low-quality product. Pay attention to specialized auto stores, where they can document the quality of their goods. In addition to oil, you will also need an oil filter.
Where to begin?
Changing the oil will be problematic without going to an inspection hole, overpass or lift. You need to stock up on a container suitable for collecting used oil.
To change the oil you will also need:
- Oil filter wrench.
- Wiping materials.
- Rubber gloves.
- Lighting device (lantern, lamp-carrying lamp).
- Drain nut wrench.
On the oil pan we find a hole for draining the oil. A key is prepared according to the size of the nut closing the drain hole. A pre-stored container is placed under the hole.
Draining oil from a car engine
Before starting work, you need to securely secure the car. The car must be parked with the handbrake on or in park (for cars with an automatic transmission). The plane on which the car is installed must be level and strong, preventing the car from sliding to the side.
The car engine turns off. It is worth waiting a while for the oil and engine parts to cool, this will help avoid burns when replacing it. Next, remove the protective panels blocking access to the oil pan. All the necessary tools and a container for draining the “working off” are placed in an accessible place.
The container is then placed directly under the tray. Use a wrench (counterclockwise) to loosen the nut that closes the drain hole. The loosened nut is unscrewed by hand. It is worth checking that the O-ring located on the nut does not fall into the container with oil.
After completely unscrewing the nut, remove it with a quick movement of the hand. Make sure that the oil flows into the container to avoid excessive contamination of your workplace. It is a good idea to use fabric or paper as a bedding for the container.
Removing the oil filter
Find the location of the oil filter. We wipe its body with cleaning material. Manually (if possible) or with a wrench, loosen the filter by turning it a couple of centimeters. We wait until the oil stops flowing. We install the drain plug exactly along the thread (to avoid damage if the plug is placed crookedly), then tighten it tightly.
We unscrew the filter with a wrench, then, as it loosens, remove it by hand. We wipe away the stains with cleaning material. We take a new filter. Having previously checked it for defects in the seating area. Make sure that no o-ring from the old filter remains in the seat.
Before installing a new filter, be sure to fill it with fresh oil. The oil pump needs some time to pump fresh engine oil through the system.
By pouring oil into the filter, you partially do this work for it and reduce the operating time of the engine with insufficient lubrication. The new filter is carefully installed in its seat.
Tighten the filter by hand and then with a wrench. We remove smudges with rags.
Pour engine oil into the engine
We are looking for the filler neck on the engine. Unscrew the cap and fill in engine oil using a funnel. The required amount of oil is indicated in the operating manual for each specific brand of car. Let the oil sit for a while.
We collect all the items under the car. We start the engine at low speed. Using a flashlight or portable lamp, we check the engine for oil leaks. After which the car is carefully removed from the overpass or inspection hole.
You should not check the oil level if the car is parked at an angle, which often happens on overpasses. To correctly display the oil level on the dipstick, you must place the car on a strictly horizontal surface. If the oil level is low, add it to the required level. This is actually the entire procedure for changing the oil in a car engine.
Sources: http://autoremont-nsk.ru/info/zamena-masla-v-dvigatele.html, http://mas-te.ru/avtolyubitelyu/zamena-masla-v-dvigatele-avtomobilya/, http:/ /voditeliauto.ru/sovety-voditelej/kak-zamenit-maslo-v-dvigatele-pravilno.html
No comments yet!
Source: http://www.avtopiligrim.ru/pljusy-i-minusy/kak-pravilno-zamenit-maslo-v-dvigatele.html