How to glue vinyl film to a car?
If you ever want to add some personality to your car, but don’t have enough money for airbrushing, then vinyl film will help. It can be used to change the color of a car or decorate the body with images. In addition, vinyl film acts as additional protection for the paintwork.
Types of vinyl films
By manufacturing method:
- Calendered is a film for quickly wrapping a car. It got its name because of the manufacturing technology in a calendering machine, where special rollers (calenders) convert raw materials into the desired material. The thickness of such a film is 70 microns or more; thinner ones are made to order - from 55 microns. The process of making such a film is reminiscent of preparing pizza dough - when heated, it is elastic and soft, stretches easily, but in the end it narrows to its original size. Therefore, such material is of little use for gluing the entire car, especially on the bends. Calendered film is used for sticking patterns and advertising slogans for 2-3 years. Then the film is changed, it is removed without effort.
- Cast - more suitable for complete car wrapping. Cast films are characterized by increased elasticity and minimal shrinkage even at elevated temperatures. The standard thickness of such a film is 50-65 microns, but it can be 35 microns or 80 microns. It fits well on the curves of the body, so it creates the feeling of a “second skin” of the car. The service life of cast film is five to six years, but it costs more than calendered film.
By interaction with light:
- Reflective - reflects the external light of lanterns, headlights, shop windows and other light sources thanks to the alkyd polymer and glass microbeads in the reflective layer. This film is heavier than regular vinyl. It is used for road signs and advertising structures.
- Light-accumulating - glows in the dark due to the luminescence effect. Even with repeated use, the material does not lose its phosphorescent properties.
| Index | Calendered | Cast |
| Life time | 2-3 years | 5-6 years |
| Minimum thickness | 55 µm | 35 µm |
| Shrinkage | There is | No |
| Temperature resistance | up to 90° | up to 115° |
| Cold stretch | with heat treatment | without heat treatment |
| Adhesion of film to curved base | only with heat treatment | without heat treatment |
By color texture:
- Glossy - rainbow colors with glitter;
- Matte - available in different colors, does not shine, looks very prestigious and elegant;
- Transparent - anti-gravel film without color or tint, designed to protect the paintwork of a car;
- Chameleon - iridescent film depending on the viewing angle;
- Graphic - film with graphic patterns;
- Textured - a film that resembles the texture of materials (wood, gold, leather, this includes carbon).
Choosing vinyl for a car
Also, when choosing vinyl film, pay attention to the adhesive backing. Low-quality glue is applied to cheap film.
The rapid adhesiveness of the film creates inconvenience in that it must be applied correctly right away, because it cannot be peeled off and moved, the film will already be damaged.
Manufacturers eliminated this problem using a special adhesive composition on film in microcapsules. To finally glue the film, you need to lightly press on it, the capsule bursts and glues the film to the surface.
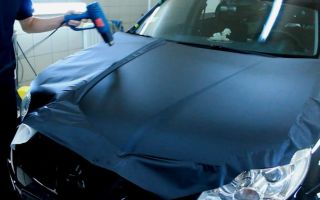
Pasting film on a car
If you have watched videos or watched live film being applied to a car, you will think that it is easy. In fact, it is risky for an inexperienced person to undertake this task; you will ruin more than one piece of film. But if you are determined, then the order of work is as follows:
- Choose a well-lit room, clean and free from drafts, so that dust does not get under the film and bubbles do not form.
- Wash the car, degrease and dry the area under the film
- Prepare your tools (a stationery knife, a dry rag, squeegees, a spray bottle mixed with water and detergent, masking tape and an industrial hair dryer; a regular one will do in a pinch).
- Determine the exact location of the film on the body and make marks using masking tape.
- Next comes the stage of separating the white base, the main thing is that the film does not stick together, so you will need an assistant.
- Now we spray soapy water onto the pasting area using a sprayer; it will help correct unevenness and get rid of air under the film.
- Carefully apply the film to the prepared area with a rubber squeegee, while drying and heating with a hairdryer, just do not overheat. The movements are made as when gluing wallpaper - from the middle to the edges. At this stage, wrinkles may form, try to lightly smooth them out without turning off the hair dryer.
- Dry the film with still hot air and leave for 10-15 minutes. After this, the mounting film is removed at an acute angle.
- Using a felt squeegee, go over the surface of the film, removing any soapy water and bubbles.
- At the last stage, you need to carefully wipe with a rag or dry with a hairdryer.
After all the procedures, leave the car to “rest” for a day in a warm place and only then get behind the wheel. If you want to cover the entire car, and not just part of it, then it is better to seek the help of specialists.
Useful tips when decorating with film:
- You should wash your car after wrapping it a week later, not earlier;
- Use non-abrasive detergents;
- Do not wash your car with Karchers, because the jet can cut off the film;
- Do not visit car washes that are fully automatic (with large brushes); such brushes pick up the edges of the film.
If you value the beauty of your car, then following the recommendations, vinyl film will serve for a long time, emphasizing the individuality of the car and protecting its paintwork from external influences.
Source: https://xn--80aqfgda6as.xn--p1ai/blog/vinyl
How to glue film on a car
By gluing vinyl film to a car, you can solve several problems at once. You can protect the body from negative external influences on the paintwork, protect it from minor scratches and damage. In addition, vinyl pasting perfectly performs a decorative function.
With its help, you can give your car a more attractive appearance, as well as hide pockets of corrosion or other small defects.
Wrapping a car with film is not such a complicated process. If you wish, you can do everything yourself, without resorting to the services of specialists. There are no particular difficulties here.
To successfully perform this operation, you need to have patience and know the technological features of the procedure.
Content
1 Necessary conditions 2 How to prepare the body 3 What you will need 4 Pasting technology
The necessary conditions
Covering a car with film should not be done outdoors. This must be done in a clean room. Any dust is unacceptable.
If it gets under the film, the work may be ruined. Large dust particles will noticeably protrude and everything will have to be redone. To prevent this from happening, you should wet the floor with plain water before starting work.
Room temperature also plays an important role. It should be around 20 degrees.
You can cover small areas of the car with film yourself without much experience.
How to prepare the body
It is necessary to wash the car thoroughly. After complete drying, the paintwork of the body must be degreased using white spirit.
If it is unavailable, you can use other solvents, after making sure that they do not corrode the paint. In order to enhance adhesion on the edges of the film, it is necessary to apply a thin layer of primer to them or use a primer.
What you need
To successfully wrap a car with vinyl, you need to prepare:
tape that will first hold the film in place; marker or bright felt-tip pen; sharp knife. Scissors are no good; spray bottle with soap solution; squeegee to smooth the surface; construction hair dryer; microfiber cloths, but you can limit yourself to any soft rags.
Pasting technology
First you need to make a pattern without removing the protective layer from the film
First of all, you need to make a pattern. The process must be approached with full responsibility, as the material can easily be damaged. The vinyl film on the car is covered with a protective layer on the inside. Without removing it, we lean the vinyl against the place we are going to paste over and mark the surface with a marker.
The pattern needs to be fixed using masking tape. Marks should be placed on it. They will allow you to correctly align the vinyl film when the protective film is removed.
So, how to glue film on a car?
There are two ways: wet and dry. Professionals recommend the wet method as the most reliable. If so, it should be used. Before proceeding directly to pasting, you need to spray a soap solution on the paintwork, which can be prepared by diluting a little detergent in water.
It's time to remove the protective layer. It is best to do this with an assistant so that the vinyl does not touch anything and nothing gets on it. After this, you need to apply the vinyl film to the middle of the surface to be pasted and carefully glue it, smoothing it with a squeegee from the center to the edges. Haste can cause a lot of harm, so you need to work slowly.
Smoothing is necessary to remove air bubbles formed under the film. Where the surface of the body bends, the vinyl is heated with a hairdryer. This is done to make the film more elastic. In places where the vinyl had to be tucked, you also need to work with a hairdryer. Sometimes it makes sense to treat the folded edges with a sealant that dries quickly.
The easiest way to apply film to a car is with an assistant.
Having covered the entire surface to be glued with vinyl, it is necessary to continuously heat this surface. This is necessary to finally get rid of minor defects and more correctly distribute the vinyl in the areas of protrusions and depressions.
Heating is also necessary in order to slightly tighten the vinyl film. Naturally, it is not heat-shrinkable, but a small effect from heating is still noticeable. This completes the work process.
When the pasted surface has cooled, it should be perfectly flat. Don't worry if the first time something doesn't work out the way you would like. If desired, unsuccessfully glued vinyl can be heated again with a hairdryer and re-glued.
It is more difficult to achieve excellent results on a large surface than on a small one, so it is advisable to start with small areas.
If you need to cover the entire body of the car with vinyl film, then you most likely won’t be able to do everything yourself efficiently and the first time.
In this case, it is better to seek the help of professionals. And if you need to stick a film, say, only on the trunk or hood, then this is quite possible for an ordinary car enthusiast. In extreme cases, this will take several attempts.
In addition to vinyl, carbon film for cars is very popular today. They look pretty good in combination with each other. The technology for gluing carbon film is the same as that of vinyl.
We will be glad if the information gleaned from this article will help you successfully wrap your car.
Source: http://asi12.ru/kak-kleit-plenku-na-avto/
We glue the film or car vinyl ourselves
Content:
To apply car vinyl with your own hands, you don’t need to be a car styling guru. In just a few minutes, which you spend reading this article, you can learn the basics of working with film coating.
The acquired knowledge, patience and accuracy will be enough to create a little magic with your own hands and transform your iron horse.
We have also prepared a video for you that will help you understand the issue even better.
Film selection
The protective properties of the film and its thickness are interrelated: the thicker the vinyl, the better your car will be protected from small chips and scratches. The width of car vinyl affects the number of joints between its parts: with a wide material, the number of seams will be minimal. Vinyl is usually divided into four groups depending on appearance and properties:
- The matte finish looks impressive, but the porous structure contributes to its rapid contamination, so you will have to take care of the car more often. The service life of matte vinyl is 5-10 years.
- Carbon coatings are available in two versions. A film with a three-dimensional structure serves both as decoration for the car and as protection against damage, and is relatively expensive; textureless material will be cheaper, but its protective qualities are inferior to the first.
- Glossy. By polishing and painting it is impossible to achieve the shine that wrapping a car with glossy vinyl gives. However, the advantages of the material are not limited to decorative properties: the material will protect the body from rust and mechanical damage. The service life of the coating, depending on the manufacturer, ranges from 3 to 10 years.
- Textured films that imitate natural leather and other coatings are relatively thick, which provides better body protection. The service life of textured car vinyl reaches 10 years.
How to glue car vinyl
To stick car vinyl with your own hands, you will need:
- Stationery knife.
- Dry cloth.
- Rubber and felt spatulas.
- Detergent and water in a ratio of 1:10.
- Masking tape.
- Hairdryer (preferably industrial).
There are several ways to wrap your car with vinyl yourself. We will consider the two most popular and accessible of them:
- Wet. The first experiments on gluing car vinyl are easier and more reliable to carry out using the wet method, which allows you to quickly eliminate defects.
- Dry. A beginner should not use this technology: a lack of skills will almost certainly lead to a bad result, and it will not be possible to correct the shortcomings.
Wet method
Clean the car from dirt and degrease its surface by wiping with white spirit.
Apply the film to the body without separating it from the base, determine the exact position and use masking tape to make marks on the car.
Water the car with soapy water, which, unlike regular water, makes it easier to move the coating and get rid of bubbles. No area should remain dry.
Now separate the vinyl from the base and stick the material onto the car, rolling it with a rubber spatula. You can’t cope here on your own, so be sure to call help. Start rolling from the middle, gradually moving towards the edges. During the rolling process, heat the material with a hairdryer.
During the pasting process, bubbles and other defects may appear, which are easy to eliminate: just separate the vinyl from the body and roll it again, remembering to use a hairdryer. Most often, difficulties arise at transitions, corners and bends. In such places, you just need to warm up the material better. If wrinkles cannot be avoided, carefully cut the film and smooth it with a spatula.
When the body is completely covered, dry the entire surface with a hairdryer and leave for 15 minutes, then use a felt spatula to smooth the coating again, removing bubbles and unevenness. If after this the bubbles do not disappear, warm up the problem areas, pierce them with a needle and smooth the material.
Small bubbles can be left untouched; they will disappear on their own in a couple of weeks. The work is almost finished: all that remains is to get rid of the excess, glue the edges, warm up the car vinyl with a hairdryer again and wipe the surface with a dry cloth.
The next day, carefully inspect the body for defects, go over it with a felt spatula if necessary.
Dry method
In this case, work should also begin with cleaning and degreasing the surface, eliminating irregularities. After measurements, cut the required amount of material, separate it from the base and, pulling it, press it with your hands to the edges of the body.
Using a spatula, smooth out the car vinyl, starting from the center and moving towards the edges. Do not forget to use a hair dryer, which increases the adhesive properties of the glue.
Attention: when working dry, bubbles and folds cannot be removed by piercing or cutting; the material can only be peeled off and re-glued.
When the coating is completely applied to the body, smooth the surface again with a spatula. Before gluing, treat bends and corners with a primer that enhances the adhesion of the coating and the body. Leave the car in a warm room for 6 hours.
Tips for caring for a tuned car
- After wrapping the car, it is not recommended to wash it for a week.
- For the first week you will also have to limit your speed to 60 km/h, otherwise the vinyl may come off.
- The water temperature for washing a car with vinyl coating should not exceed 35°C. In general, it is better to wash a pasted car with your own hands.
- At least 1 month must pass between painting the body and applying the film.
- You can stick car vinyl with your own hands outdoors only in calm weather and an air temperature of +10°C. If you are going to work indoors, make sure there is good ventilation.
- Leave your car in direct sunlight as little as possible. In the sun, car vinyl coating fades quite quickly, regardless of quality.
- Do not clean the body with brushes or abrasives.
And finally, video clips:
Source: http://PokraskaMashin.ru/aerografiya/avtovinil-svoimi-rukami/
How to glue protective film
A protective film for a car (anti-gravel film) protects its body from flying gravel, road debris, the consequences of minor accidents, scratches from branches, exposure to various chemical reagents, etc. In addition, with the help of a protective vinyl film, you can change the color of the car at minimal cost, giving it individuality.
It is not so easy to wrap a car with film yourself, but if you are confident in your abilities and are willing to spend time, you can do it yourself. Before applying the film, wash the car (you can use a degreaser solution). There should be no grease or dirt on the surface of the hood, since the success of the undertaking directly depends on this.
Next, using a sharp utility knife, you need to make patterns for the film (for the hood, doors, trunk, etc.).
To do this, the protective film together with the backing must be applied to the area that needs to be pasted over, and then carefully cut, passing a knife into the gaps at the joints of the body parts (for example, where the door border goes).
If the zones are not delimited by gaps, you can use masking tape glued to the body as marks.
Next, the car begins to be covered with protective film. The cut piece is placed face down on the cleaned surface of the hood, and the paper backing is carefully removed.
During this process, the main thing is to ensure that the protective film does not form wrinkles. To properly apply a film to a car, it is better not to do it alone.
At least one more person is needed in order to stretch the film, preventing its sections from sticking together.
Using a spray bottle, spray the area to be pasted evenly and generously with the water-soap emulsion. To prepare the solution, you can use liquid soap, Fery or another similar product, diluted with water in a ratio of 1:10.
The liquid is necessary so that the protective car film sticks together ahead of time. Place the film so that it takes its exact position in the area allocated for it: the water emulsion will allow you to move it without difficulty.
The next stage of covering a car with protective film is smoothing it with a rubber spatula. Start from the center and move towards the edges. In this case, the car film should be carefully heated with a hair dryer (it is best to use a construction hair dryer).
First, carefully smooth out the center area. If wrinkles have formed, the protective film should be carefully peeled off the body and heated with a hairdryer. Using a felt squeegee, remove liquid and air bubbles using movements from the center to the edges.
If the bubble cannot be removed, pierce it with a needle and smooth out the film. The smallest bubbles can be left: they should disappear after a couple of weeks.
After the anti-gravel film has been glued to the central zone, carefully roll its edges, wipe the pasted area with a dry cloth and leave the car for a day to “set” the protective coating.
Applying a film to a car correctly requires patience and skill. It's better if a professional does this. Even if the cost of applying a film to a car seems high to you, this service will pay for itself in the future. After all, instead of expensive repairs, it will be enough to just change the protective film.
Source: https://100plenok.ru/voprosy-i-otvety/kak-kleit-zashchitnuyu-plenku/
Do-it-yourself car vinyl wrap
Car vinyl is a polymer film that is applied to various elements of the body or interior for protection and creative design. Vinyl wrapping a car:
- Prevents the formation of scratches, corrosion, and fading of the coating;
- Provides a quick and reversible change in shade or texture;
- Used to create art compositions or apply drawings.
Vinyl tuning has become widespread and has the following advantages:
- The coating technology is simple; to cover a car with vinyl yourself, no special equipment is required;
- The vinyl coating is easily removed and does not damage the underlying surfaces, which ensures the reversibility of the process.
- Repainting a car or using airbrushing for tuning is expensive, but using vinyl you can get the same effect.
Types of vinyl films
There are different vinyl and carbon materials:
- Colorless films provide anti-gravel and anti-corrosion protection;
- Glossy and matte color films are an alternative to body painting;
- 2D and 3D carbon film is used for exterior and interior decoration.
Do-it-yourself auto vinyl wrapping technology
The main advantage of vinyl coating is ease of installation and minimal requirements for the surface to be treated. If painting a car with varnish requires multi-stage processing of the body, then this technology requires virtually no preparation of the elements.
For self-gluing, it is advisable to use a special film with channels to remove air, which is glued to a dry surface.
To cover a car with carbon fiber yourself, you first need to thoroughly wash and dry the parts to be glued, degrease them, then:
- Cut out the blanks of the required size (it must be taken into account that the edges of the covering will bend). If the material has a striped texture, it is desirable that the stripes are located at an angle of 45 degrees.
- The film should be glued in one piece, starting with the smallest radius and stretching it over the entire surface. If you have to combine pieces, they need to be glued overlapping.
- After laying the carbon coating, you need to periodically heat it with a hairdryer. The canvas should not be heated above 70 degrees, otherwise it will lose color or begin to collapse.
- The edges of the film (5-10 mm) must be folded onto the back side of the glued element so that dust and moisture do not get under the porous adhesive layer, and the vinyl itself does not slip due to shrinkage when heated.
- If during pasting the carbon fiber sheet stretches or there is air under it, just press this area with a damp cloth and then heat it slightly so that the film shrinks.
- After applying the coating, do not wash the car or drive quickly for about 10 days, as the film will shrink slightly.
Clear vinyl is used to protect the body. Let's consider the process of applying anti-gravel film in a different way (on a wet surface):
- Wash the car and remove all dirt. Typically, pasting begins with the hood, then fenders, mirror housings, and bumpers are processed. The surfaces of the parts must be moistened generously with soapy water.
- Separate the vinyl from the liner, moisten the adhesive side with soapy water and apply it to the part to be glued. Smooth the coating with a soft rubber squeegee so that no water or air bubbles remain underneath.
- When processing curves and complex surfaces, the film must be stretched a little, holding its opposite edge.
- Trim excess vinyl. If there are any uneven edges, you can smooth them out with a hard squeegee wrapped in a towel after sprinkling a little 25% isopropyl alcohol inside.
- If bubbles remain on the surface, you need to pierce the film with an insulin syringe and inject a little alcohol solution into it. Draw out the solution with a syringe and smooth the puncture site with a napkin.
Pasting with colored vinyl films
Vinyl is used to change the color of the body, giving it a stylish matte or spectacular metallic shine. Here's how to imitate a matte finish using vinyl wrap:
- Prepare the body surfaces (wash, remove dirt, dry, degrease). Cut the material and lay it on the surface to be pasted.
- While heating the vinyl with a hairdryer, cover the body parts. Trim off excess material around the edges. Cut holes for windows and other elements.
- All attached parts are glued separately. To make it more convenient, they need to be dismantled.
There is no point in describing how to cover it with carbon fiber yourself.
The technology for applying this material is completely similar.
Do-it-yourself vinyl wrapping of headlights
Covering the optics with vinyl protects the plastic or glass from mechanical damage. Anti-gravel film is used to protect the headlights.
Vinyl coating is applied to the outer part of the car headlight, for this you need:
- Cut a piece of film, heat it with a hairdryer and stretch it onto the surface.
- Trim off excess material with a utility knife.
- If the film is thin (100 microns), the edges can be folded inward; a thick film (200 microns) is cut along the edge of the glass.
Carbon is often used for tuning optics. For example, you can cover the upper parts of the headlight housings, making so-called “eyelashes”.
Do-it-yourself 3D carbon fiber pasting of these parts is done using conventional technology:
- Cut rectangular pieces of film, heat with a hairdryer, apply to the surface and pull forward.
- Trim the material and bend the edges under the headlight housing.
Self-gluing technology for mirrors with carbon fiber
If the car body is covered with carbon fiber, the same coating should be applied to the side mirror housings. This will give the car design a stylistic completeness.
To cover the convex surfaces of mirrors with carbon fiber with your own hands, you need to buy a material with a thickness of at least 200 microns, since it stretches better when heated (by 30-50%).
- To install the coating, you will need to remove the side mirrors and disassemble them. Then you need to wash, clean and dry the cases, and sand the surfaces if necessary.
- Cut out pieces of carbon with a small margin and heat with a hairdryer before applying. The film should be stretched from the convex surface to the edges.
- Trim the coating with a small margin. If the design of the mirror includes any removable elements, you need to carefully cut holes in the film.
- Fold the edges of the cover over to the inside (preferably, there should be no folds). Then assemble and install the mirrors.
Self-covering handles with carbon fiber
The instructions for covering a car with carbon fiber yourself did not mention door handles. They have a complex shape; for pasting it is better to use 3M film or a similar one (not cheap), as it stretches better and has a better adhesive composition.
So, we glue the carbon fiber ourselves:
- Remove the handles, clean and degrease the surfaces.
- Cut the film with a small margin, remove the protective layer, and heat the carbon with a hairdryer.
- Place the film on the handle and smooth out any wrinkles.
- Cut out the remaining material, bend the edges inward.
You can cover the plugs with carbon film. It's much easier, and the result will be no worse.
Vinylography on a car with your own hands
Due to the ability to apply images to vinyl films, they are often used as a relatively inexpensive alternative to airbrushing. It is very simple to make vinylography on the hood, and you can print the desired picture at any advertising agency.
Let's look at how to cover a car with vinyl yourself:
- Wash the car, clean the hood of dirt and degrease.
- Remove the paper backing from the material, moisten it and the surface of the body generously with water, and apply the film.
- Next, remove moisture and air from under the coating with a special scraper.
- Dry the surface of the hood with a hairdryer.
Do-it-yourself vinyl wrapping of car interior
Carbon fiber gives the interior of the car a stylish and respectable look, allows you to cover scratches and abrasions of plastic elements, and protect them from further destruction and burnout.
Let's look at how to cover the inside of a car with carbon fiber yourself using a thick film (200 microns) from 3M:
- Dismantle the plastic parts, thoroughly clean and degrease them. To increase adhesion, it is advisable to apply a special primer to the surfaces being treated, which, unfortunately, increases the cost of wrapping the interior with film.
- Cut out pieces of carbon fiber of the appropriate shape (when cutting, you need to leave a reserve of material), apply them to the parts. Heat the material evenly with a hairdryer until it becomes soft and viscous.
- Gently stretching the film, cover the plastic. Trim the remaining material, bend the edges inward.
- If there are holes in the part, cut them in the carbon fiber with a small margin and bend the edges. Install the dismantled interior plastic.
How to glue carbon fiber to the front panel yourself?
The interior of any car includes many parts that can be covered with vinyl. When finishing the interior with carbon fiber with your own hands, many people first cover the so-called “dashboard” and the center console.
The dashboard of each car has a certain configuration, and the vinyl tuning will differ for different models. Therefore, we will not explain in detail how to make carbon fiber cladding with your own hands.
- All processed elements must be dismantled and each part glued separately. The process is very labor-intensive due to the many holes of different shapes. You should use high-quality vinyl, as it stretches better.
- First you need to clean and degrease the surfaces. Cut the film, remove the protective backing and heat it with a hairdryer. Apply the pieces to the parts to be processed, pressing and stretching the carbon properly.
- Trim off the excess film and fold the edges inward. Cut out all the necessary holes in the film with a small margin, and bend the edges. After processing, you need to assemble the panel and console.
How to cover your steering wheel with carbon fiber yourself?
Carbon fiber is often used for steering wheel tuning. The coating is applied to removable parts, the middle, the steering wheel rim, and the column casing. All these elements have a complex shape, so for pasting you need to use a thick film, and when cutting it, it is advisable to leave a margin. But complete disassembly of the steering wheel is usually not required.
- To cover individual parts with carbon, it is enough to dismantle only them. Cut the film to the size of each element, heat it and apply the material to the surface.
- Having stretched the material, you need to trim the edges and bend them onto the back sides of the overlays so that the parts fit into place normally. After this you can assemble the steering wheel.
- It is much more difficult to cover the rim; to do this, the steering wheel must be removed. Cut a rectangular piece of material, heat it and stretch it onto the surface.
- On the back of the steering wheel, carbon fiber is glued overlapping. The side edges are trimmed and tucked under the leather when covering the part.
There is no point in describing in detail how to glue carbon fiber onto the steering column casing yourself. Installation of the material is carried out in the same way.
Source: http://mv-avto.ru/samostoyatelnaya-okleyka-avtomobilya-vinilom.html
How to cover a car with film or vinyl yourself
Many car enthusiasts still consider the wrapping process to be something incredibly complicated and impossible to repeat in their own garage. We decided to debunk this myth and provide you with a short introductory instruction, following which you can stick the car wrap yourself.
Film selection
In fact, the selection process is purely individual and the decisive factor is the idea of the car owner, his idea of what the car should look like after wrapping.
Modern films provide a truly extensive range that can satisfy almost any customer’s requirements and wishes. It is worth noting that it will be easiest to work with film that has special air channels.
When working with such material, you do not risk leaving air under the film due to inexperience.
The appearance of the film also has some features. Matte surfaces require more careful care, since dust will accumulate in the porous structure of the film surface.
Glossy films do not collect dust on their surface, but if dirty, they require gentler cleaning to avoid scratches that can completely “kill” the shine.
Textured car vinyl, imitating various natural materials (for example, leather), in addition to its spectacular appearance, has another interesting property - film thickness. Due to its greater thickness, this film provides better protection of the body from external influences.
How to glue car vinyl
First of all, you need to acquire the necessary tools. We have no doubt that you can use what is at hand, but the likelihood of defects and the complexity of the process in this case will be significantly higher.
Required tools and materials:
The tools are ready, the film has been purchased, all that remains is to decide how we will glue it. There are two options - dry and wet. If you are trying to paste with film for the first time, it is better to start with a wet one, which will allow you to quickly eliminate defects. Professionals choose the dry method.
Wet vinyl wrapping
- All surfaces to be applied must be thoroughly cleaned of dirt and degreased. Even small particles of dirt will prevent the film from completely sticking to the surface in places of contamination, which will subsequently lead to peeling of the film from the body.
- For convenience and accuracy of positioning, we use the simplest method - we apply the vinyl to the body and use masking tape to make marks along the edges.
- We water the surface with the soap solution we prepared. Unlike plain water, such a solution will allow us to move the film if we suddenly miss its position. An important point - you need to carefully check that not a single area remains dry.
- We separate the vinyl from the base and stick it to the surface of the car. If the surface is large, it will be difficult to cope alone. It's better to call an assistant.
- From the center of the film, using a rubber spatula, roll the film out to the edges. When working on curved surfaces, use a hair dryer, slightly heating the material.
- Use forcing to remove air from under the film. In most cases, gluing defects occur at corners and bends. They deserve special attention. If folds appear in the same place and it is not possible to remove them by forcing, warm this area more thoroughly with a hairdryer.
- After the entire film has been applied and smoothed, we give it 15-20 minutes to deform from tension. After this, we take a soft pad on the squeegee (felt, suede) and finally smooth out the coating.
- The final stage is to remove excess material using a knife. If possible, do not cut the vinyl directly along the edge, leaving a small space for folding and tucking the edge under the elements.
Dry vinyl wrapping
- There are not many fundamental differences from the wet pasting method. Let us remind you that the dry method requires experience and will not forgive you for mistakes.
- Unlike the wet method, the dry method does not use any solutions, as a result of which you will not be able to change the position of the film. The film is applied to a dry, grease-free surface. All smoothing actions exactly repeat the previous option.
- In the case of air bubbles and folds, peel off the film and smooth it again.
- The edges and bends must be treated with a primer for auto vinyl. The primer will significantly enhance the adhesion of the film and the body.
Caring for a car tuned with auto vinyl
- After pasting the body, care will have its own characteristics, which are important to know about so as not to spoil all the previous work.
- In the first 7 days, it is not recommended to wash the car or drive at a speed of more than 60 km/h. This is due to the process of slow drying of the adhesive layer in an environment isolated from air. By neglecting these tips, you can initiate the process of peeling off the film.
- It is necessary to wash a car covered with film with water whose temperature does not exceed 35 degrees. You should warn about this at the car wash. The ideal option is to wash the car yourself.
- If the car body has been painted or primed, then at least 30 days must pass before it is covered with auto vinyl.
- When applying car vinyl, it is necessary to take into account the temperature and weather conditions (if gluing it outdoors). Minimum temperature +10 degrees. The weather is calm.
- Avoid washing and cleaning with brushes and abrasives. Vinyl categorically does not accept such methods.
- Most importantly, try not to leave your car in direct sunlight for long periods of time. Even the most expensive vinyl will gradually fade and lose color.
If it is difficult for you to understand in text form what and how to do, you can watch a detailed video on how to glue car wrap with your own hands.
Source: https://carbonado24.com/kak-okleit-mashinu-plenkoj-ili-avtovinilom-samostoyatelno
How to glue carbon film on a car correctly
External car tuning, also called styling, has always been in high demand among passionate car enthusiasts. Many car owners want to improve the appearance of their car in various ways, installing body kits and spoilers, applying airbrushing or covering body parts with film, including carbon fiber.
Carbon-effect vinyl film is suitable for covering various parts, in particular the hood. With its help, you can significantly transform the appearance of your iron horse, making it completely unrecognizable and unique.
to contents ↑
What is film?
Real carbon is an expensive modern material of heterogeneous structure, which is made by weaving carbon fiber with rubber threads, and epoxy resin acts as a binding component.
Initially, the material was used to create Formula 1 cars in order to lighten the design of cars participating in racing competitions. Carbon fiber replaced protective parts previously made of aluminum. As for the carbon fiber that we see on ordinary cars on city roads, it is most often an ordinary vinyl film with a similar pattern.
Carbon-effect film went on sale relatively recently - in the early 2000s, and initially it was presented in a small assortment.
Everyone bought the same type of vinyl, which was not of good quality. Today you can find carbon-look films on sale for every taste and budget.
For example, today you can buy modern 3D carbon film, which has unique characteristics.
to contents ↑
Types and benefits
Anyone can buy carbon film for car wrapping, choosing from a wide range of types and colors. The greatest demand is for three-dimensional film in black, white, grey, red or steel color. If you try, you can find chrome, graphite or silver.
In terms of characteristics, regular films and 3D films are almost completely similar, with the exception of color solutions and color depth (it is less in 2D films). If you take a closer look and compare the two types of films with each other, you will probably notice the difference.
The three-dimensional appearance of vinyl affects the aesthetics of the coating. Both 2D and 3D films have a number of important advantages:
- Long service life (a good film lasts at least 5 years).
- If you decide to reupholster your car's hood, you can remove the old film without leaving any marks.
- The film adheres well to metal, glass and plastic, so carbon film can be used not only for tuning the hood, but also other elements.
- The film is not afraid of exposure to water, bitumen and salt.
- Carbon-effect vinyl film does not fade in the sun and is not afraid of frost.
to contents ↑
How to choose carbon film?
Before you buy a carbon film for a car hood, you need to consider a number of main features:
- The pattern on the carbon film must be clear.
- On 3D films, three-dimensionality should be clearly visible: do not try to find something on it that simply cannot be on it, that is, the 3D effect is either noticeable or not.
- Ask the seller to cut you a piece of film and try sticking it to the surface. After a day, try to peel it off and make sure that there are no traces of glue left on the base, and that the film does not tear.
- A high-quality film should be easily washed off from dirt and separated from the body when heated, and bubbles should not appear on it.
to contents ↑
Manufacturers of carbon films
On the domestic market today you can buy carbon-look film from many manufacturers, among which the following brands are the most common:
- Japanese film 3M 3D Carbon, 126 cm wide and costing from 2500 to 3000 rubles;
- German Oracal 3D Carbon, 152 cm wide and costing from 3,000 to 3,500 rubles;
- AV 3D Carbon made in China (roll width 122 cm) costs from 1200 to 1700 rubles;
- AV 2D Carbon film from England, 150 cm wide and costing about 3,000 rubles.
3M 3D Carbon
Oracal 3D Carbon
AV 3D Carbon blue
AV 2D Carbon
The first two options, which are almost the same from each other, are best suited for gluing the hood. German Oracal has a higher gloss and is slightly darker, while Japanese 3M has larger cells. The advantages of films from these two manufacturers include the presence of a special notch on the adhesive layer, which prevents the appearance of air bubbles.
If you want something unusual, check out AV 2D Carbon film, which comes in a variety of colors and textures. They have no analogues in the world, and they are distinguished by good physical characteristics and durability. They have a good gloss and are suitable for finishing external body parts and interior elements.
to contents ↑
Preparation and tools for gluing the film
If you decide to stick a carbon-effect film on the hood yourself, find a suitable room for the work. If possible, you can dismantle the part for convenience, but usually this is not necessary. To apply vinyl film to a metal surface, you will need the following materials and tools:
- High-quality carbon fiber film for cars.
- Raquel.
- Microfiber cloths.
- Magnets for fixing the film to the surface of the hood.
- Approximately a liter of solution of water and isopropyl alcohol mixed in a 1 to 1 ratio.
- Felt pen, brush and scissors.
to contents ↑
Cutting out the film
First, you need to take measurements by measuring the length and width of the hood. After this, cut the film with a margin of up to 10-15 cm on each side.
Wash the surface of the part thoroughly and wipe dry, and then degrease with a solution of water and isopropyl alcohol. Use microfiber for this.
Additionally, you can use primer 94 from 3M, with which you need to thoroughly lubricate the hood around the perimeter with a grip of 15-20 mm. The next stage of work is basic and will require sleight of hand and patience.
Place the carbon fiber film on the car and secure it with magnets. Draw the border of the hood on the film with a felt-tip pen, adding 5-7 cm to it. Cut off the excess, and you will get a finished sheet of vinyl of the required size, replicating the hood.
to contents ↑
Gluing process
The work of gluing a carbon-effect film on the hood of a car begins from one edge with a smooth progression to the other. Gradually peel off the protective layer and use a squeegee to smooth it out. For better glide, you can wrap it with microfiber. Make sure that no air gets under the film - this is very important, otherwise bubbles will form.
If air gets in, warm the area with a hair dryer, peel off the film a little and squeeze out the bubble. When you have glued the entire surface, you will need to carefully tuck the edges of the film around the perimeter under the hood and glue it. To better replicate complex shapes and curves, you can heat the coating with a hairdryer.
The process of gluing carbon film to the hood of a car is not very complicated and takes very little time - up to 40-60 minutes. The main thing is to have the desire and all the necessary equipment. Additionally, you can watch how to glue a carbon fiber film on a car video, and understand some of the subtleties using a clear example.
Video: Chrome film. FAQ. Autovinyl
Video: How to glue carbon fiber. Car vinyl. 1st part
Video: How to glue carbon fiber, or rather carbon-look film (Part 2/3)
Video: Autovinyl. China industrial Which films should you trust?! List at the end of the video
Source: http://Driving24.ru/kak-peretyanut-kapot-plenkoj-pod-karbon/