How to check the lambda probe yourself 4 ways

Checking the oxygen sensor may be required when the scanner shows an error related to the lambda probe (for example, a low DC signal level) or fuel consumption has increased.
Modern sensors have a four-wire system, but there are one, two and three-wire lambda probes. The pinout of some sensors can be seen in the pictures below:
For a four-wire sensor, two wires go to the heating circuit (heater), one signal wire and one ground. Lambda probe checks that you can do yourself:
- We can check for voltage in the heating circuit
- Check the serviceability of the heater inside the sensor
- Check for the presence of the so-called “reference voltage”
- In principle, you can check the lambda signal itself, but for this you need an oscilloscope, a motor tester, or at least a dial voltmeter (not digital, but a dial voltmeter, it responds more quickly to changes in readings).
That is, in fact, you can check the sensor almost completely. Let's begin.
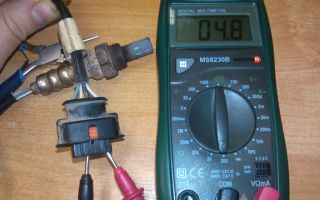
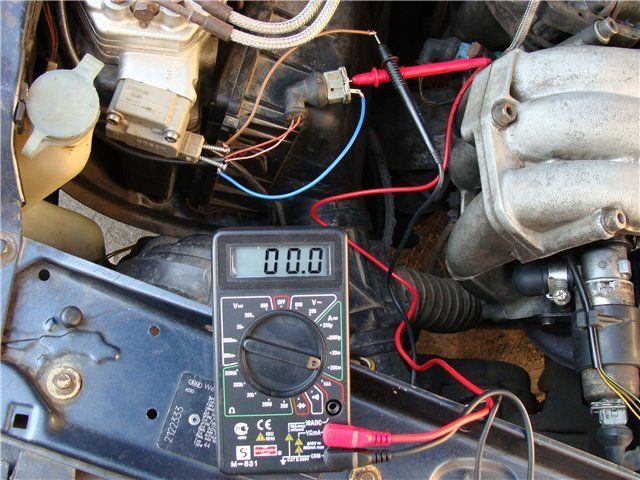
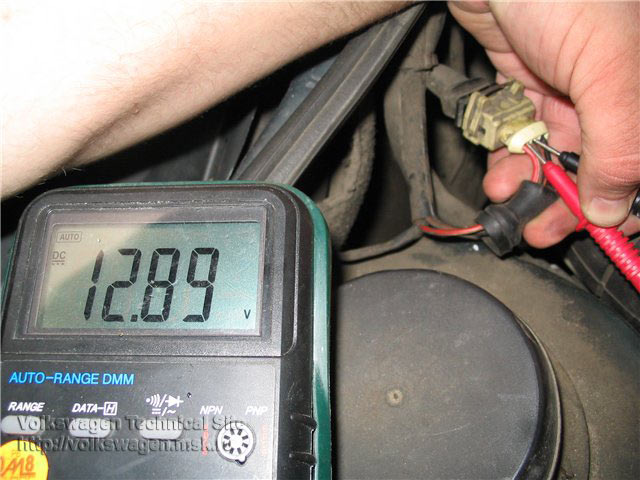
How to check for voltage in the lambda probe heating circuit
We will need any voltmeter, pointer or digital.
- Turn on the ignition; do not disconnect the sensor connector, as the engine control unit may store an error code in the memory: DC heater malfunction.
- Use sharp probes to pierce the wires going to the heater or insert probes into the connector on the side of the wires.
- The voltage on them should be equal to the battery voltage (~12V). When the engine is not running, the minus signal from the control unit may not be supplied, so carefully start the engine.
Plus usually comes to heat directly, through a fuse. And the minus is supplied from the engine control unit (ECU). Therefore, if there is no plus, we look at the circuit: battery-fuse-oxygen (there may also be a relay in this circuit).
And if there is no minus, we look at the circuit to the control unit; perhaps contact has been “lost” in some connector.
How to check the health of the sensor heater
You will need an ohmmeter (tester in resistance measurement mode).
- Disconnect the oxygen sensor connector.
- Measure the resistance between the heater wires (see wire layout diagram).
- Resistance can vary, usually 2-10 ohms.
If there is no resistance at all, then most likely there is a break in the sensor and it needs to be replaced.
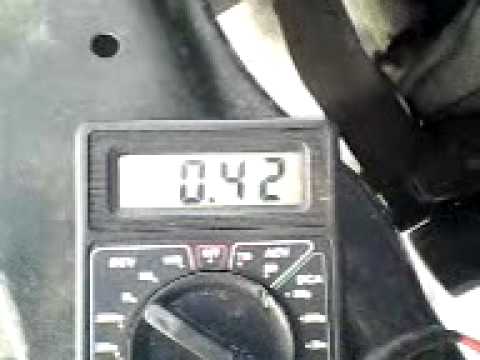
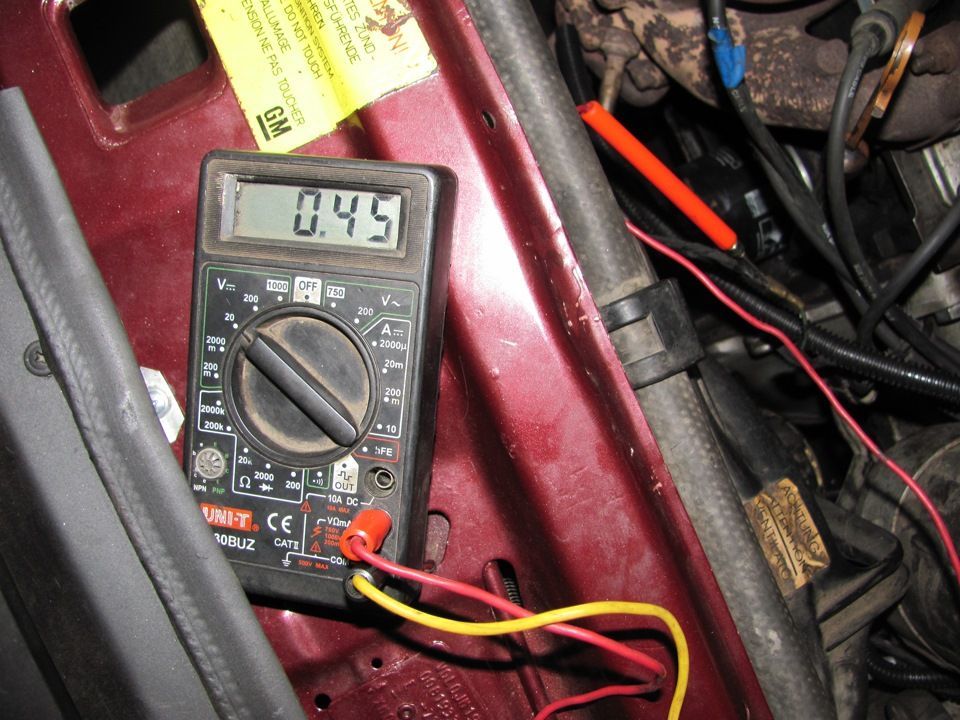
Checking the presence of the lambda probe reference voltage
Everything is simple here, you again need a tester in voltmeter mode.
- Turn on the ignition.
- Measure the voltage between the signal wire and ground.
- In most cars the voltage should be 0.45 volts.
If it differs by more than 0.2, then there is a problem in the sensor signal circuit or poor contact with ground.
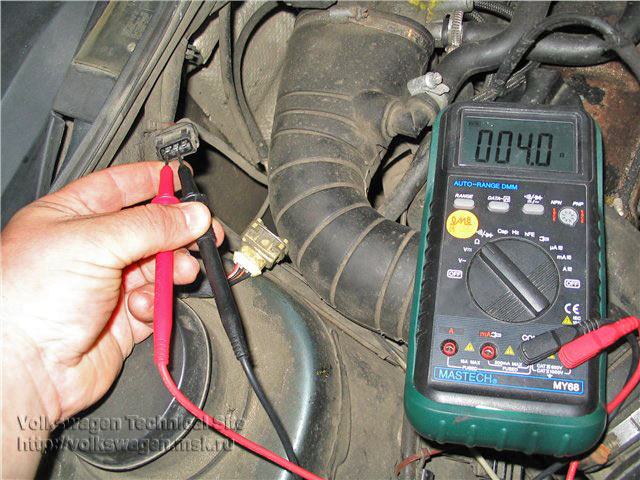
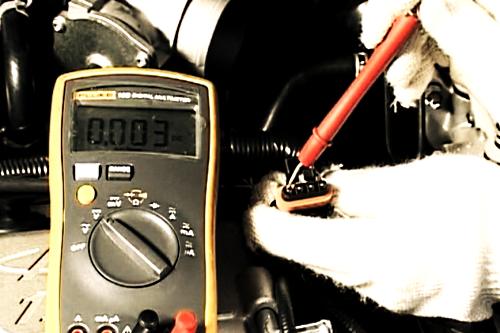
How to check the lambda probe signal
This is the most difficult and responsible point. Here we need either a motor tester, or a dial voltmeter, or an oscilloscope. Oscilloscopes have long existed in the form of programs for PCs and set-top boxes with probes, the price of the issue is from 1,500 rubles and above.
- Start the engine and warm it up to operating temperature. The oxygen sensor will not start working until it warms up.
- Connect the probes between the signal wire and the ground wire.
- Raise the engine speed to approximately 3000 rpm.
- Observe changes in the lambda probe readings.
The video is about nothing) But here you can see what the change in lambda probe readings looks like when checking it with an oscilloscope.
That's all for me about checking the lambda probe. I recommend paying attention to the articles below, you may find something else interesting:
Source: http://www.em-grand.ru/post-proveryaem-i-diagnostiruem-lyambda-zond-samostoyatelno.html
Checking the lambda probe: causes and symptoms of malfunction
 Car service "Ankar"
In order for the fuel combustion process in a car engine to be efficient and the emission of pollutants to be minimal, the fuel must burn in the required proportion with air. If the proportions are balanced, the presence of oxygen in the exhaust gases will be minimal. But these proportions may be violated, and this happens due to improper operation of the lambda probe.
What is a lambda probe? Why does it break? And how to check the lambda probe , and if it is necessary to replace it, we will discuss in the article.
What is a lambda probe?
Lambda probe, in other words, oxygen sensor , is a fairly important element in the design of a car. He is engaged in monitoring the oxygen content in exhaust gases. The indicator of unburnt oxygen is very important. Because
For efficient combustion of the air-fuel mixture, it is necessary to accurately maintain the proportions of fuel and air. After all, science has proven that for absolute combustion of the fuel mixture, an exact ratio of fuel and air is necessary ( 1:14.7).
This ratio is called the stoichiometric mixture.
Of course, this ratio is not constant. It depends significantly on air temperature, atmospheric pressure, and turbine discharge pressure.
The lambda probe, which analyzes the amount of oxygen in the exhaust, is responsible for maintaining this ratio.
Then it gives these parameters to the engine control system, which then makes a decision - to increase or decrease the amount of fuel in the mixture. This analysis is carried out continuously.
If these proportions are violated, the air-fuel mixture will be either lean or enriched. This leads, as usual, to increased fuel consumption and loss of engine power.
Therefore, if the lambda probe (oxygen sensor) malfunctions, it transmits incorrect readings to the engine control system, which generates incorrect mixture parameters. Thus, if a rich mixture is formed, the fuel is simply wasted; if it is poor, then the combustion is unproductive, the engine overheats and loses power.
Causes of oxygen sensor failure
The causes of failure are different, but it is influenced by various factors.
Causes:
- Third-party liquid (antifreeze, etc.) got inside the sensor.
- Low quality fuel occurs when it contains a lot of lead and iron
- There is a malfunction in the sensor heating system. If the heating stops working, the lambda probe will begin to produce incorrect data.
- Overheating of the sensor housing. This happens due to poor fuel quality.
- Silicone-based sealants have a negative effect on the sensor.
- Failures associated with engine malfunction that affect the stable operation of the sensor. This includes: oil in the exhaust gases, violation of the engine compression level, engine gasoline injectors clogged.
Characteristic features of a lambda probe failure:
- Uncertain engine operation. The engine either loses power or returns to normal. It may stall. Drop in idle speed. The engine jerks.
- Fuel consumption increases significantly and the engine overheats.
- More toxic exhaust smell.
- There are problems with the catalyst, it begins to work unstably.
Therefore, if you notice signs of malfunction of the oxygen sensor, you should put it off until later. Ignoring the problem can lead to very bad consequences.
checking the lambda probe occasionally . It is best to do this every 5-10 thousand km; you can combine it, for example, with an oil change, carrying out scheduled maintenance.
This can be done independently and quite simply.
Checking the functionality of the lambda probe
Determining the suitability of a lambda probe for use is carried out using instruments: an oscilloscope, voltmeter, multimeter, but also by visual inspection.
First, we recommend assessing the condition visually , and only then proceeding to check with various instruments.
Visual inspection of the lambda probe
First of all, inspect the connection connectors. The sensor must be securely fixed in them.
Inspect the oxygen sensor itself, there should be no signs:
- Soot. Its occurrence, as usual, occurs during strong heating, or during the combustion of an enriched mixture.
- Shiny deposits. This indicates that the concentration of lead in the fuel is higher than normal. Then it makes no sense to proceed to checking with instruments, because... Lead damages the lambda probe and requires replacement.
- Gray (ashy) and white deposits. This indicates, in most cases, the presence of additives in the fuel and engine oil. The lambda probe needs to be replaced.
Checking the lambda probe with a multimeter
The check consists of the following steps:
- First, warm up the engine to 70-80 degrees.
- Then, pressing the gas pedal, bring the engine speed to 2500-3000, and maintain this value for a couple of minutes. This will allow the sensor to warm up.
- Then fix one probe (negative) on the vehicle's ground, and the second with the sensor output.
- Check the multimeter readings several times. The data must be updated several times per second. , show different values in the range from 0.2 V to 1 V. In this case it is faulty.
- Press hard on the gas and release. The reading should be 1 V and drop sharply to 0. In this case, the sensor is fine. If the values on the multimeter do not jump when you press the pedal, but display about 0.5 V , then this is an obvious sensor failure.
It also happens that there is no tension at all. Indicates that there is a problem with the wiring. In this regard, it is necessary to check all wires from the ignition switch to the relay.
Checking the lambda probe for a lean mixture
To check the lambda probe for a lean mixture, you need to simulate air leaks. This is done using a vacuum tube . If the sensor is working properly, the readings will be around 0.2 V or less. If the result is negative, it is faulty.
Replacing the lambda probe
The sensor is replaced with a cold engine . Don't forget to turn off the ignition. It is worth remembering that the markings of the old and new sensors must match.
Replacement is performed in the following order:
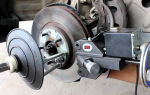
1. Find the lambda probe, it is located before the catalyst.
2. Then, using a special puller, unscrew it with a key.
3. The old sensor is disconnected and a new one is connected to the wires.
4. Screw it back.
5. After installing the sensor, it is necessary to check its functionality .
Finally…
Older cars are more susceptible to wear and tear and require constant maintenance and diagnostics. To avoid the need to check the lambda probe for malfunction, do not skimp on fuel, because low-quality fuel leads to rapid wear of the most important elements of the car.
Source: https://carrepair7.ru/proverka-lyambda-zonda
Lambda Probe (Oxygen Sensor), How to Check for Malfunctions with a Tester, Removal, Replacement or Repair and Installation, How to Clean It Yourself
In view of the constant deterioration of environmental conditions and in order to reduce (unfortunately, the absolute elimination of polluting sources has not yet been achieved) environmental pollution, the governments of many countries around the world have introduced extremely stringent requirements for exhaust gas emissions (i.e., standards for the content of harmful gases have been introduced). substances in automobile exhausts). Therefore, for these purposes, the automotive industry began to use a special device - a catalyst, which is responsible for reducing the concentration of harmful combustion products in exhaust gases.
The catalyst is an important component in the exhaust system. But in order for it to work with maximum efficiency, strict conditions must be observed (constant monitoring of the composition of the supplied fuel mixture and the % air content at the outlet). Without observing them, the catalyst will quickly fail and cease to perform its functions.
It was to maintain optimal operation of the catalyst that engineers developed a solution in the form of a special oxygen sensor, which is also called “Lambda probe” (from the letter of the Greek alphabet “L” - “lambda”, which in the automotive industry denotes the coefficient of excess air in the air-fuel mixture) .
On the one hand, the operating scheme of this device is quite simple.
It consists of measuring oxygen concentrations as they exit the exhaust manifold and then after the exhaust gases pass through the catalyst.
This monitors the operation of the catalyst. But in fact, the principle of operation of oxygen sensors is a little more complicated, and now let’s try to understand how the lambda probe works.
Oxygen concentrations are measured using two special electrodes that react with the air mixture. The results obtained are then converted into electrical impulses, which are transmitted to the electronic engine control unit (ECU).
But, to put it in a more understandable language, when a change occurs in the ratio of the concentration of atmospheric air and the air remaining after fuel combustion, the voltage between the electrodes changes (decreases with increased air content and increases with low).
After the lambda probe measures the voltage between the electrodes, it sends this data to the ECU, which compares the received readings with the standard values stored in its memory. If necessary (if the voltage is outside the norm), the ECU adjusts the composition of the supplied air-fuel mixture.
Oxygen sensors begin to measure air concentration only when the optimum engine temperature is reached.
Therefore, to take the necessary indicators and maintain pollutant emission standards, a special heated oxygen sensor is used (under the body of which there is a heating system directly connected to the vehicle’s electrical system). The lambda probe wires are held tightly thanks to sealing collars and a ceramic insulator.
The first lambda probe is installed in the exhaust manifold. In this case, the probes are connected directly in front of the place where the catalyst is located (to ensure its uninterrupted and long-term operation).
In the engines of some car brands, a second lambda probe is installed at production. The presence of a second lambda probe makes it possible to significantly increase the efficiency of measuring air concentration, obtaining more accurate indicators.
Thanks to this, the catalyst will work much longer and better, and the amount of harmful substances released into the atmosphere will noticeably decrease.
According to their design, oxygen sensors are divided into the following types:
- Wideband lambda probe (WLS). Used as an input sensor.
- Two-point lambda probe (DLZ). Installed both in front and behind the catalyst. Measures the air content in the vehicle exhaust and atmosphere.
As with any part, a malfunction of the lambda probe is only a matter of time.
And, although it may seem to some that the oxygen sensor does not play such an important role in the functioning of the car, this is far from the case.
A broken probe, during further operation of the vehicle, can lead to quite serious damage, up to the engine going into emergency operation mode. Why?
- When driving with a broken oxygen sensor, the ECU begins to regulate the composition of the fuel-air mixture according to those parameters (by the way, quite average) that are stored in the memory of this device. At the same time, the composition of the fuel mixture is very far from standard values.
- Fuel consumption increases (this symptom is one of the key signals about a breakdown of the oxygen sensor). The engine starts to run unsteadily at idle.
- Increased content of harmful emissions.
- Certain car models react rather inadequately when the oxygen sensor breaks down. The ECU begins to pump more and more fuel into the cylinders, as a result of which the fuel supply is used up extremely quickly. The exhaust gases acquire a pronounced black color, and the load on the engine increases significantly.
For further driving, you can turn off the lambda probe, but sooner or later you will still have to contact a car service. One of the simplest and most effective solutions to the problem is to install a lambda probe decoy. They allow you to clear the check on the dashboard and allow the engine control unit to return to normal operation.
https://www.youtube.com/watch?v=9bESuP0IJW0
Before making the necessary repair work, it is necessary to unscrew the oxygen sensor. To do this, in most cases, you need one tool - an adjustable wrench. With its help you can easily unscrew the probe.
But before you unscrew this device, carefully inspect its body for rust. Deposits are most often found where the sensor is attached to the seat.
Therefore, it is better to entrust the removal of a lambda probe, the body of which is partially covered with rust, to experienced professionals in a car service center.
To remove carbon deposits from the oxygen sensor, you can use phosphoric acid at room temperature. Soaking the probe in this substance for 10 minutes helps remove foreign deposits, as well as deposited lead from the rod of the device. But you cannot keep the probe in the acid for too long, as this will damage the platinum electrodes.
For a large number of car enthusiasts, replacing the lambda probe is the best solution to the problem of its malfunctions, since in this case there is no need to waste time on cleaning the lambda probe and carrying out related operations.
Therefore, to maintain optimal performance of the catalyst, it is recommended to replace the oxygen sensor every 2-3 years (keeping the receipt for a possible replacement under warranty).
But, since it may break before the specified period, to prevent this, regular checking of the lambda probe is recommended.
To check the functionality of the oxygen sensor, special reading devices are used - testers (more accurately called “multimeters”), which combine the functions of several measuring instruments.
Before checking the lambda probe with a multimeter, you need to start the car, let the engine warm up and then turn it off.
Then, after inspecting the probe for contamination (which needs to be removed, or if there is none), you need to connect the multimeter to the lambda probe (which is first disconnected from the block). After that you need to start the car and increase the speed to 2500.
If the tester readings do not exceed 0.9 W, then the sensor is working. Otherwise (if the indicator is less than 0.8 W), there is no other way out but to change the lambda probe. In this case, it is necessary to take into account their pinout.
Source: http://ymp3.ru/avtoremont-i-tyuning/lyambda-zond-kislorodnyj-datchik-kak-proverit-neispravnosti-testerom-snyatie-zamena-ili-remont-i-ustanovka-kak-pochistit-svoimi- rukami
How to properly check the oxygen sensor?
A lambda probe is one of the many sensors with which the engine system of a modern car is so rich. It is located in the exhaust manifold, and its readings serve as the basis for mixing oxygen with gasoline in the correct proportions to obtain the most productive combustible mixture.
The correct functioning of this unit has a significant impact on the operation of the entire engine, and to extend its service life, it is recommended to carry out periodic inspection and maintenance of the device.
Today we will talk about how to check the lambda probe, its structure, causes of failure and their consequences.
Lambda probe device
And first, let's find out what this unit consists of. So, it includes the following components:
- Metal body;
- Ceramic insulator;
- Seal, complemented by special cuffs and wiring;
- Protective housing with ventilation system;
- Ceramic tip;
- Conductive type circuit contact;
- Filament coil;
- Protective shield with a hole for gases to escape.
It is worth noting that in the manufacture of such devices, thermally stable materials are used (which is their distinctive feature), which are suitable for the most productive and efficient functioning even at ultra-high temperatures.
Typical breakdowns and their causes
Among the most common causes of loss of oxygen sensor performance, experts identify the following:
- Using unsuitable products to clean the housing;
- Excess lead in gasoline;
- Contact of the casing with brake or coolant;
- Exceeding the maximum permissible temperature on the sensor housing.
- As a rule, the following factors indicate the occurrence of such a problem:
- Problems in the operation of the catalyst;
- Increased fuel consumption;
- The car moves with jerks;
- Increased toxicity;
- Incorrect functioning of the power unit.
Visual inspection of the lambda probe
You can use a variety of methods to check the device, but the simplest of them is visual inspection.
It is worth noting, however, that checking the lambda probe in this way will not give you a definite answer to the question of whether everything is in order with the device, but it will allow you to draw certain conclusions regarding its functioning. So, what you should pay attention to first:
- Soot - This type of formation can cause clogging of the probe, increasing its response time. Among the reasons for such a problem, it is worth noting an excessively saturated combustible mixture or problems with the heater in the sensor itself. In any case, the device must be replaced;
- Deposits - excessive formations of white or gray color may indicate that the fuel or engine oil contains a variety of additives, which, among other things, reduce the sensitivity of the element;
- Lead - if shiny formations occur, their cause is obvious - the fuel contains lead. It negatively affects the exhaust gas converter and the sensor element, interfering with their functioning and reducing efficiency. The problem is solved by replacing the probe and switching to lead-free fuel.
Checking the sensor using a tester
If a visual inspection does not give any specific result, you can proceed to further tests, which are carried out with a multimeter, and their essence is as follows:
- The engine warms up to approximately 75 degrees;
- The crankshaft speed increases to 2.5 - 3 thousand rpm and is maintained at this level for at least three minutes, which allows the sensor to warm up;
- The signal wire is found and “ringed” by the tester (in this case, one of its probes is connected to the vehicle ground). If the device is working properly, the test indicators should vary in the range of 0.2-1 V, turn on and off approximately 9 times/sec and be inconsistent;
- In addition, if you press the accelerator pedal, the working sensor should produce voltage readings of 1 V, with a sharp drop when it is released.
If the signal wire produces a stable voltage of approximately 0.4-0.5 V and does not respond to changes in external conditions, it should be replaced. If there is no voltage on it, you need to check all the wiring going to the ignition switch and relay, and also make sure that the oxygen sensor is connected to ground.
Lean mixture testing and dynamic testing
Checking for a lean mixture is carried out as follows - the vacuum tube simulates air leaks and if in 1 second the tester readings drop by 0.2 V, then everything is in order with the device. If the response is very slow or there is no reaction at all, you need to say goodbye to the old sensor.
To check the probe in dynamics, it is necessary to connect the oxygen regulator to the fuel supply point, installing the tester parallel to it and increasing the engine speed to 1500 rpm. If the device is working properly, the readings should stop at 0.5 V.
Afterword
So, the answer to the question of how to check the lambda probe has been received. The operation can be performed at home, and it will not take much time or effort. Carefully study the recommendations outlined above, try to follow them to the maximum and then luck will be on your side.
Source: http://NashiKolesa.ru/avtosovety/kak-pravilno-proverit-kislorodnyy-datchik
DIY lambda probe repair
DIY lambda probe repair
How to check the oxygen sensor (lambda probe) with your own hands
Welcome, friends, to the DIY car repair website. The lambda probe can be considered one of the most important parts in the operation of the engine and in the exhaust system of a vehicle.
And this is of great interest to most drivers, how can you check the oxygen sensor? How to check the oxygen sensor (lambda probe) Checking the sensor is not at all difficult, which we will try to consider in detail in this article. The lambda probe is a special device, also called an oxygen sensor, located in the exhaust system on the exhaust manifold.
The information that is transmitted from this oxygen device allows the control unit to always maintain the required composition of the fuel mixture. For example, when a very lean or very enriched mixture enters the combustion chamber, the lambda probe signals the electronic system of your vehicle and the computer begins to adjust the necessary parameters.
Lambda probe design and what the oxygen sensor consists of:
- Metal case. Seal ring with wiring and special cuffs. Protective housing, which has a hole to provide ventilation. Current-conducting circuit contact. Filament coil. Protective shield, which has a hole through which gases escape.
The uniqueness of these devices is that they are made from heat-resistant materials and are designed to operate at high temperatures.
Types of devices: Before you start checking the sensor, you need to familiarize yourself with the main reasons that can cause it to fail.
Some causes and malfunctions of the sensor
- Antifreeze and coolant get inside the housing. Incorrect cleaning of the housing with various chemicals that are completely unsuitable for this. Too much lead in gasoline. Overheating of the sensor housing, which occurs due to the ingress of low-quality gasoline.
What happens if the oxygen sensor becomes unusable:
- The car begins to twitch. Uneven engine speed. High accumulation of toxins in gas exhaust.
It is recommended to monitor the operation of the sensor, which must be checked at least once, after each run of 10,000 kilometers. Also, don’t forget to read the article about the idle speed sensor.
Checking the lambda probe yourself
There is a visual inspection, which is the easiest and most straightforward method to start with. First you need to inspect all the connectors to which the wires are connected and they all must be securely and tightly fixed in place.
Visual inspection of the device: The presence of soot usually appears due to a defective sensor heater; it can also be formed due to the combustion of a highly enriched mixture, which ultimately clogs the sensor and it begins to malfunction.
Shiny deposits appear due to high concentrations of lead in gasoline. Usually in these cases it is advisable to replace the device, since the lead may have already damaged the probe and the catalytic converter.
Whitish and grayish deposits also lead to replacing the sensor, because they occur due to various additives used in the fuel, which also leads to malfunction of the device.
Checking the oxygen sensor using instruments
The lambda probe can be checked with a tester, digital voltmeter, or oscilloscope, but many people simply don’t have such a device and not everyone knows how to use it. The first thing you need to do is warm up the engine, then we find the sensor under the hood or underneath the car, depending on the brand of car you need take a good look.
If it is heavily covered with soot or other various substances, then checking is no longer necessary, since the device will have to be replaced. Next, you should make sure that there are no various mechanical damages, and also pay attention to the integrity of the wiring that goes to it.
If everything is normal, you need to start the car engine, but first disconnect the connector from the oxygen sensor and connect it to the voltmeter. Next, press the gas pedal and dial 2500 rpm and release the accelerator. Next is the vacuum tube, which you should try to remove from the fuel pressure regulator.
Now we determine the serviceability of the probe, for which we just need to look at the measurements of the voltmeter; if the readings are 0.8 W or less than at the mark, or are completely absent, then the sensor is faulty. Next, you need to check for a lean mixture, which causes air leaks using a vacuum tube.
The voltmeter should show a mark of 0.2 W or even less, then the oxygen sensor is working. But other results, of course, indicate a faulty sensor and an inevitable replacement.
Self-replacement of the lambda probe
An oxygen sensor must be purchased with identical markings, it is on the sensor itself. The process of replacing the sensor is carried out only when the engine has completely cooled down and the ignition is turned off.
We turn out the unusable part with a wrench, having first disconnected the wiring that goes to it, after which you can screw in a new one in place of the faulty sensor, be careful and count on your strength, otherwise you can accidentally break the thread.
After replacing the lambda probe, you will need to connect the connector with the wires and check the operation of the new sensor. Checking the lambda probe is a fairly simple procedure and is quite within the capabilities of any novice car owner.
That's it, have a good trip and no breakdowns. If you have any additions or tips, write in the comments.
How to clean the lambda probe on a VAZ 2110? DIY oxygen sensor cleaning
04/15/2015 | 1966 | Repair of VAZ 2110 | no comments
The lambda probe or oxygen sensor (oxygen sensor) plays an important role in the “life” of the car.
A lot actually depends on this sensor, the existence of which many people have no idea about, for example: correct and uninterrupted operation of the engine, fuel consumption, power of the power unit, etc.
The harsh operating conditions of this sensor affect its condition over time, so it is not surprising that after several tens of thousands of kilometers, the lambda probe begins to “compost its brains.”
A thick layer of carbon deposits accumulates outside and in the inside of the lambda probe, which actually causes interruptions in its operation. Some motorists, at the first sign of a malfunction, immediately change the oxygen sensor, although, as practice shows, it is enough to simply wash the sensor using a special product.
Read how to check the lambda probe here. In this article you will learn how to clean the lambda probe of a VAZ 2110 with your own hands at home. Step-by-step instructions for cleaning an oxygen sensor will allow you to clean this sensor as quickly and efficiently as possible.
Cleaning the VAZ 2110 oxygen sensor - step-by-step instructions
In order to remove the resulting deposit consisting of soot, soot and other contaminants, we need a special liquid - phosphoric acid.
Under no circumstances try to use sandpaper, a metal brush, a file or other sharp objects to clean the lambda probe; this will lead to the sensor being permanently damaged and all that remains for you is to replace the oxygen sensor.1.
First you need to find orthophosphoric acid. If you are unable to obtain acid, use a rust converter.2. Next, you should remove the lambda probe.3.
Carefully lower the working part (metal tip) into the prepared liquid for 15-20 minutes.4. If the dirt is serious, you can use a toothbrush; with its help, soot and deposits are removed more effectively.5.
There are articles on the Internet about how to clean the lambda probe, in which it is recommended to cut off the tip on the lambda probe for more thorough cleaning, but I recommend doing this only if the usual cleaning of the VAZ 2110 oxygen sensor did not produce any results. After cleaning, the previously cut tip must be welded back.6.
When the surface of the sensor is cleaned and has acquired a characteristic metallic color, rinse the lambda probe in water and let it dry.7. Reinstall the lambda and check the operation. If after cleaning the oxygen sensor nothing has changed and the engine still runs intermittently, replace the oxygen sensor with a new one. That’s all for today, see you again at http://vaz-remont.ru/ .
Therefore, it is customary among VAZ owners to repair the lambda probe with their own hands or turn it off completely (in this case, the car’s brains are simply flashed). The question is reasonable: is it possible to disconnect it from the network (remove the sensor and connect the connector).
In theory, this does not promise anything terrible, but in practice, the electronic engine control unit will set the average parameters for the fuel mixture - the characteristic will jump from rich to lean - the experienced dynamism of the car will disappear and gasoline consumption will increase. So, if you have a need to spend money on the right things, read the manuals on how to repair an oxygen sensor.
Symptoms of a faulty sensor
- Gasoline consumption exceeds 12 liters per hundred square meters. At idle, it feels like the engine is adjusting. When accelerating, failures are possible, the dynamics, in principle, are not stable, the engine power becomes lower
Naturally, all these signs are just guesses, they may indicate a breakdown of other parts of the suspension or engine. To find out for sure whether your oxygen sensor is damaged or not, you need to check the lambda probe, especially since the methods are simple and can be done in a garage .
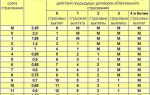
Lambda probe errors
Another important point is the correct reading of the errors, which will be given to you by the board in the event of a lambda malfunction (if it is not there, take the car to a service center, they will definitely help you). Usually, any problem in the car is indicated by a check engine signal, although in a situation with a lambda - the probe may not light up. List of the most common error codes:
- Error P0130 - the signal from the sensor does not receive the infidels or does not acquire P0131 - the signal from the sensor is received by the low -haired P0133 - the response of the lambda itself is very slow p0134 - response is simply inaccuishes P0135 - the heating element of the oxygen sensor P0136 - the landing of the second lambda Taoshka P0137 - second signal level sensor is low. Error P0138 - on the contrary, the signal level on the second device is high. Error P0140 - the sensor itself has broken. Error P0141 - the heating element on the second device has overheated. Error P1102 - the resistance of the information reading device has disappeared or is very low. Error P1115 - a problem in the heating circuit of the sensor itself.
The last error is the most common: if the heating circuit is closed, the lambda probe immediately produces an incorrect signal from the electronic control unit, and all of the above symptoms of a malfunction can be correlated with the lambda.
Factors influencing failure
Reasons influencing the occurrence of malfunctions of the oxygen sensor:
- Low-quality gasoline emits a lot of lead and iron in the exhaust, which clog the contacts of the lambda probe in just a couple of fill-ups. The condition of the oil scraper rings and caps leaves much to be desired; the oil simply gets into the fuel mixture and into the car's exhaust system. If the valves are clamped, then the exhaust system is subject to constant popping noises that destroy the sensor surface. Maybe the fuel mixture is of the wrong quality, the ignition timing is not aligned, there are many internal reasons.
All these reasons can be the impetus for the right thought: how to repair a lambda probe?
How to repair a lambda probe
- If there is a break in the contacts of the heating element circuit.
We need to find the place where this chain broke. At one time, check all the contacts, they may oxidize and will need to be cleaned (as always, the irreplaceable WD-40 will save the world). The problem with the break may be in the electronic control unit. There may simply not be a signal coming from it.
Here you need to check whether the lambda is receiving power.
- If carbon deposits have formed on the working surface of the lambda probe housing.
Cleaning is the most common type of repair, which is associated not only with small reader devices, but also with other parts of the system. You will need to remove all the carbon deposits that always form on the platinum electrodes of the ceramic rod.
Just don't use sandpaper or anything metal! You will erase all the coating on the ceramic surface. You need to take a special product, for example, one that dissolves rust without leaving a residue.
- We clamp it into a cleat and cut off the ceramic cap from it. The same procedure is repeated with the second cap, now you have reached the rod. We lower the lambda into a solution with a rust converter for half an hour, you can help with a brush (for example, for painting with paints), wait for the result .
If the first two cases did not help you, then try heating the rust removing liquid, enhancing its effect. After you have carried out the repairs, you need to patch the sawed holes with camp welding and put the lambda probe in place.
Related Posts
Source: http://legkoe-delo.ru/remont-avtomobilya/automobile/97817-remont-lyambda-zonda-svoimi-rukami
How to check a lambda probe - testing methods
The lambda probe (oxygen sensor) is an oxygen sensor located in the engine exhaust manifold. The readings of this device enable the electronic control system to regulate the correct ratio of air and gasoline in the combustion chambers.
If a lean or, conversely, excessively rich fuel mixture arrives, the electronic unit corrects its structure, taking into account the readings of the lambda probe sensor. The combustion of 1 kg of fuel mixture requires about 14.7 kg of air.
The operation of the lambda probe in the fuel supply system is very important, so its performance directly affects the stable operation of the car engine.
Checking the functionality of the device is very important, but before checking the lambda probe, it is necessary to study its structure and principle of operation, just as before checking the ignition coil.
The oxygen concentration sensor, also called a lambda probe, consists of the following elements:
- Metal case with thread for fastening.
- Sealing ring.
- Electrical signal current collector.
- Ceramic insulator.
- Wiring.
- Cuff for sealing wires.
- Conductive contact of the heating circuit.
- Outer protective shell with hole for air circulation.
- Tank with incandescent coil.
- Ceramic tip.
- Protective shield with exhaust outlet.
All parts of the lambda probe are made of materials that are resistant to high temperatures, since the operating temperature of the sensor is quite high, and they are not afraid of overheating, whereas engine overheating often has disastrous consequences.
Lambda probe sensors can have from one to four wires, and the name, accordingly, is one-, two-, three- and four-wire sensors.
Failure of the oxygen sensor can be caused by improper care of the internal parts of the car and other factors, for example:
- cleaning the case with means not intended for this purpose;
- contact with coolant and brake fluid on the housing;
- excessive lead content in fuel;
- overheating of the sensor housing caused by an uncleaned fuel mixture. The ingress of gasoline with a high concentration of contaminants may be caused by a malfunction of the fuel pressure regulator, coolant temperature sensor, or a clogged fuel filter.
Malfunctions of the lambda probe cause the following tangible problems in the behavior of the car:
- increased fuel demand;
- car jerking;
- unstable engine operation;
- disruption of the catalyst;
- violation of toxicity standards.
That is why the operation of the oxygen sensor in the exhaust gases must be carefully monitored, its condition must be checked at least every 5,000-10,000 km, especially before the exhaust toxicity control procedure.
Lambda probe: check
To check the functionality of the oxygen sensor, you will need: factory instructions that will tell you where the lambda probe is located, an oscilloscope and a digital voltmeter. These are the main supporting tools. The engine should be warmed up while testing the device. How to check the lambda probe yourself? It's as simple as flushing the injector.
- Study the manufacturer's instructions for the basic parameters of the oxygen sensor. Check the indicators that are affected by unstable operation of the lambda probe: on-board voltage, ignition timing, operation of the fuel supply system. Also pay attention to the appearance of the mechanisms, in particular the presence or absence of mechanical damage to the housing and wiring.
- Look in the engine compartment and find the lambda probe. Inspect it for external contamination. If the tip of the lambda probe is covered with a layer of soot, lead or a white-gray coating, then most likely it will need to be replaced. The damage to the device by deposits is caused by poor-quality fuel composition. If the probe tip is clean, continue checking further.
- Disconnect the oxygen sensor from the block and connect it to a digital voltmeter. Start the car and, by pressing the gas pedal, increase the engine speed to 2500 rpm. Using a device for enriching the fuel mixture, reduce the speed to 200 per minute.
- If your vehicle is equipped with an electronically controlled fuel system, remove the vacuum tube from the fuel pressure regulator. Look at the voltmeter reading. If the instrument needle approaches the 0.9 W mark, it means the lambda probe is in working condition. A malfunction of the sensor is indicated by the lack of response from the voltmeter, and its readings are less than 0.8 W.
- Do a lean mixture test. To do this, take a vacuum tube and provoke an air leak. If the oxygen sensor is working properly, the digital voltmeter reading will be at 0.2 W or lower.
- Check the operation of the lambda probe in dynamics. To do this, connect the sensor to the connector of the fuel supply system, and install a voltmeter parallel to it. Increase engine speed to 1500 rpm. The voltmeter readings with a working sensor should be at 0.5 W. Another value indicates a failure of the lambda probe.
Correct dismantling and installation of a new lambda probe sensor
- First, disconnect the sensor wire from the electrical wiring. Carry out the procedure with a cold engine and the ignition off. To replace an old device, use a sensor with the same markings as the previous one.
- Using a suitable wrench, unscrew the old sensor.
It is best to remove the device with the ignition on, and, accordingly, the hot sensor and fuel pipe, otherwise there is a risk of breaking the thread, since in a cold state the metal contracts and must be unscrewed with considerable effort. When steam appears from the holes, you can turn off the engine. It will be easier to unscrew further.
- Screw the new lambda probe as far as it will go to create a good seal.
- Connect the electrical wiring.
- Check the functionality of the new oxygen sensor using an oscilloscope, digital voltmeter, or ohmmeter at an engine temperature of 350 C.
You will learn how to repair the exhaust system in our other article.
Checking the lambda probe: video
Source: http://autoremka.ru/dvigatel/kak-proverit-lyambda-zond-samomu.html