How to check the Citroen generator relay regulator

How to check the voltage regulator of the VALEO alternator in Renault cars. Checking the regulator relay under load - Duration: 6:45 pavel fender 1,544 views.
You can check the relay - generator regulator yourself. How to check the relay - regulator without removing it from the car? It is easy to identify a “lack of charge” or “overcharge” of a battery.
Citroën was founded in 1919 in France. The concern's logo represents a pair of teeth on a chevron wheel.
Few people noticed, but just a few years ago the Citroen emblem was slightly changed, the teeth of the logo became more rounded.
Let me know who has encountered this problem and what they think about it!
There are many things in the world, friend Horatio, that our sages never dreamed of... There is voltage rectified by six diodes. You had all the signs of a dead battery.
View topic – Voltage on the generator relay •ZP-AUTO.RU – The first all-Russian club of Citroen lovers and owners
When the voltage relay breaks down, problems arise in the operation of electrical equipment. There can be many reasons for a failure in the voltage regulator, but the most common of them is boiling off of the electrolyte in the battery. The RN voltage regulator cannot be repaired; it is simply replaced with a new one.
However, before you change it, you need to make sure that it is the one that is faulty. You can check the generator relay regulator yourself. If the voltage does not reach the norm or, on the contrary, exceeds it, electrical appliances will begin to fail, and the battery will shorten its service life due to excess charge.
The relay-regulator acts as a stabilizer of this on-board voltage within specified limits, depending on the electrical load, generator rotor speed and ambient temperature. It passes the permissible voltage into the vehicle’s on-board network, thereby providing it with the required parameters.
What both have in common is that they have non-separable housings; often they are simply filled with sealants or special glue. Since they cannot be repaired, their prices are low. Previously, there was another type - combined with terminals, but it was not widely used, so it is not worth talking about them.
Today's relays are much more durable than their predecessors, but nothing is immune from failures. Factors such as this can contribute to this: When the relay breaks down and recharging occurs, you need to diagnose the problem. There are two ways to check the alternator voltage regulator - one that is not removed from the car or one that is removed.
If there is a shortage, the car will not start, or after inserting the key, the motor will slowly start spinning, sometimes this is accompanied by the lights going out. When overcharging, the same symptoms will appear, only the reason will lie in boiling of the electrolyte.
This can be understood by its quantity in the banks or by the white coating on the battery itself and around it.
But you should make sure for sure by testing the on-board current using a multimeter, which you need to measure the voltage at the battery terminals while the engine is running.
Very often the terminals themselves can be the culprit of the problem, as they can oxidize, so before checking it is necessary to remove any deposits and oxides on the terminals and contacts. We told you how to check the generator voltage regulator with a multimeter; now we begin to check the combined relay-regulator circuit together with the brush assembly, since they are the most popular.
An electronic relay is most often mounted on the surface of the generator next to the generator shaft along which the brushes move, in the area of the generator armature slip rings.
The entire combined unit is covered with a plastic cover. It is removed with a screwdriver, the shape of which can be either a cruciform or a hexagon.
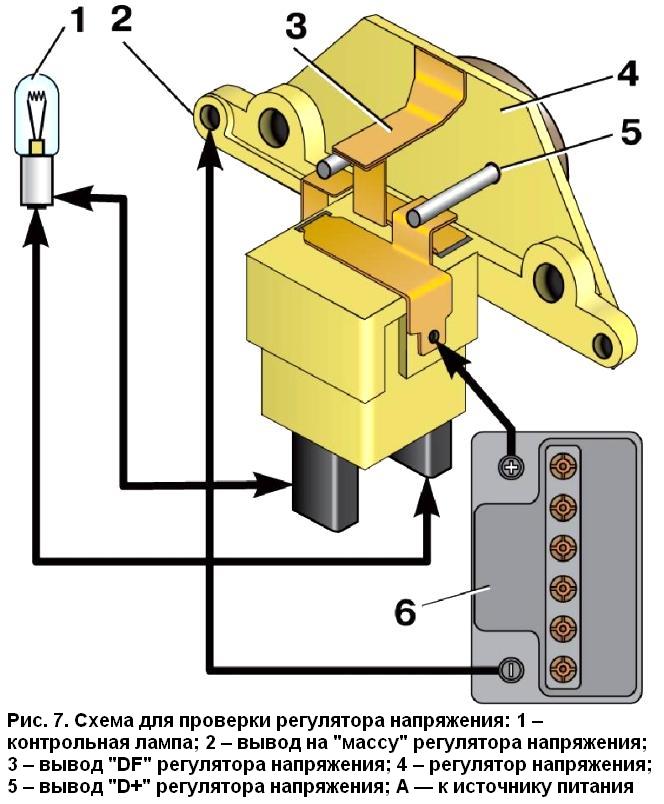
Scheme for checking the relay regulator Using the same principle, you can check a separate type of regulator of a new type.
To do this, you need to disconnect it from the body or cover of the generator and attach it to the circuit. Carry out the check in the same way.
As for the old type of relay-regulator installed on kopecks, you need to check it a little differently. Otherwise the principle is the same. Skip to content Ask a question. Old and new relay regulators.
Checking the voltage without removing the relay regulator. Checking the relay regulator Diagram for checking the relay regulator.
How to check the VALEO alternator voltage regulator in Renault cars
- RSS subscription
- Share Vkontakte
Source: http://zp-auto.ru/automobils5/kak-proverit-rele-regulyator-generatora-sitroen.php
How to check the relay regulator
How to check the relay regulator on a car or motorcycle? This is a question asked by many drivers who have found problems with charging their battery.
A relay regulator is a small but very important device on which the proper operation and durability of the battery depends.
In this article we will take a closer look at how to make sure that the relay regulator has failed, and what you will need for this.
Any working relay regulator maintains the voltage generated by the generator, which is necessary to charge the battery, and the longevity of the battery depends on the proper operation of the regulator relay.
After all, the relay regulator is a precise voltage stabilizer and does not allow it to rise or fall above the required level, and maintains the required voltage regardless of the engine speed (and, accordingly, the generator rotor) and the number of electricity consumers.
In addition, the relay regulator constantly monitors the voltage at the pole pins of the battery and, if necessary, turns on or off the voltage coming to the excitation winding of the alternator.
To begin with, it should be noted that modern integrated relay regulators, if they fail, cannot be repaired, since they have a non-separable housing (filled with compound).
And it’s unlikely that anyone will bother with repairs, even if the relay is of an old type and is collapsible. It is much easier to buy a new relay regulator, since it is inexpensive.
But before you go to the store, you should make sure that the old relay regulator is really faulty.
This article will look at testing several relay regulators of different types, and although these devices come with different markings (for example, on foreign cars), the diagnostic principle for most of these integrated relays is almost the same. You can check the charging of the battery and the relay regulator on the car, or after removing it from the car. Let's consider both options, and when checking, you can use a light bulb and a simple Chinese tester (multimeter).
How to check the relay regulator on a car.
Malfunctions of the regulator relay are usually confirmed by systematic undercharging (or overcharging - a decrease in the electrolyte level due to boiling water) of the battery.
And if your regulator relay burns out and the charger disappears somewhere along the way, and it’s still a long way to go home, then in order not to drain the battery, you can still use an ordinary light bulb that will replace the regulator relay on the way (read more about this in this article).
For the simplest test, we will need a tester set to voltmeter mode to measure direct current in the range from 0 to 20 volts.
We connect the tester probes to the pole pins of the battery and before starting the engine, remember what battery voltage the voltmeter showed (12 - 12.8 volts - depends on the condition of the battery). Next, we start the engine and look at the voltmeter readings - the voltage at the battery pole posts should increase after starting the engine (approximately 13 - 13.8 volts - depends on engine speed).
As the engine speed increases, the voltage should also increase, for example, at medium speeds it is approximately 13.5 - 14 volts, and at maximum speeds 14 - 14.5 volts. If after starting the engine, the voltage does not increase (it remains the same as before starting the engine, approximately 12 - 12.8 volts), then most likely the regulator relay is faulty.
Of course, the battery may not be charging for other reasons, for example, due to generator malfunctions, but to make sure that the relay is faulty, it should be removed from the car for a more accurate check, which will be described below. I also advise you to read the article - “Troubleshooting the generator and regulator relay of a foreign car” - the article is located here.
Checking the regulator relay removed from the car.
If any of the novice drivers do not yet know how to remove the regulator relay from the car (and replace it), then read and look at it in detail here. It also describes how to troubleshoot and replace generator brushes (after all, the brushes of modern generators are combined into one unit with an integrated relay regulator).
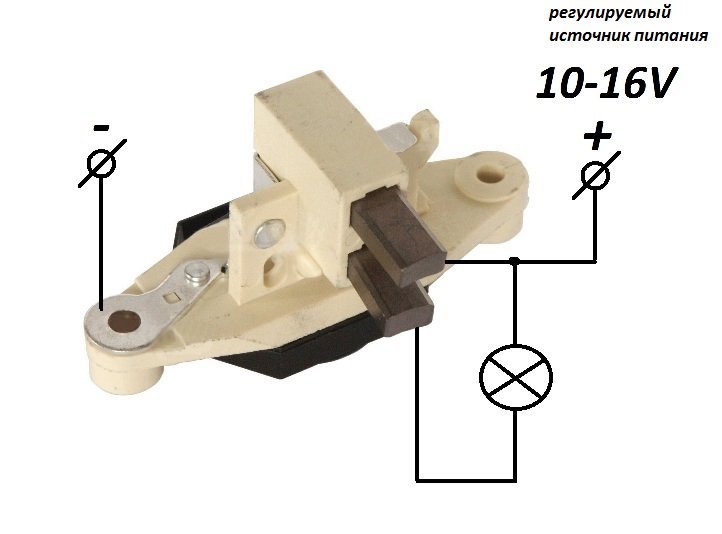
To begin with, I will describe checking an integrated regulator relay of a more modern type (for example, Ya212A, similar relays are installed not only on modern domestic cars, but also on many foreign cars), which is combined into one unit together with a brush holder (see photo on the left).
And since such a relay regulator is also a brush assembly, then of course it is mounted directly on the generator at the back, in the area of the slip rings of the generator armature. Having unscrewed the two screws holding the regulator relay and removed the terminals from it, we remove it from the generator cover window, blow off the coal dust and connect it to the simple circuit shown in the figure on the left.
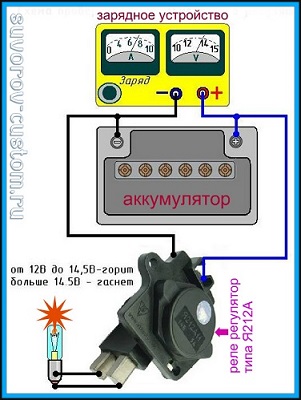
To check, you will again need a tester set to voltmeter mode and a 12-volt light bulb with a socket (for example, from a turn signal), several wires with terminals. You will also need a power supply (from 0 to 20 volts) or a charger with current regulation.
And since some chargers are not power supplies (that is, they do not produce direct current without a load - without a connected battery), you will have to connect the load to the charger - that is, connect the battery (the same as for charging) and connect the wires from the battery, as in the simplest electrical diagram just below.
After connecting the wires and the light bulb, as shown in the diagram on the left (plus to the plus of the relay, and minus to the minus), and turning on the charger, the light bulb will light up and after that we begin to increase the voltage with the current regulator on the charger and observe the readings of the voltmeter and the light bulb ( who does not have a built-in voltmeter in the charger, then connect the probes of the tester, set to voltmeter mode, to the pole pins of the battery).
The lamp should stay lit until the voltmeter reads up to 14.5 volts, but as soon as the voltage exceeds 14.5 volts (as the voltage is increased by the charger regulator), the lamp should go out. If you try to reduce the voltage (less than 14.5 volts), the light should light up again.
If everything described above does not happen, then the relay is faulty. If the light goes out when the voltage reaches more than 14.5 volts (for example, at 14.6 - 15 volts and above), then such a relay should also be replaced, since it will constantly recharge the battery, which will lead to constant boiling of water from the electrolyte (you will have to constantly top up) and this will significantly reduce the battery life.
As a result, if you save a little money on a new relay, then you will have to spend tens of times more on a new battery.
Similarly, we check integrated relay regulators YA112V and similar so-called “chocolate bars” that are installed on older domestic machines.
We connect the relay for testing, as shown in the figure on the left, and also monitor the readings of the voltmeter and the light bulb, which should go out when the voltage at the battery pole pins reaches more than 14.5 volts.
Well, one more circuit that allows you to check the relay regulator of the oldest type (marking 591.3702-01), which is installed not on the generator, but separately on the body of a VAZ classic (many people install the same relay regulators on domestic heavy motorcycles).
By the way, such a remote relay regulator is convenient not only because it is easy to reach, but also because even if the relay burns out somewhere along the way, you can always get home without draining the battery. To do this, we connect a 12-volt light bulb to the wires that come to relay contacts 67 and 15, and you can drive on without fear that the battery will run out.
Well, if you connect a light bulb instead of such a regulator relay (to those wires that went to pins 15 and 67) and remove the terminal from the battery pole pin, and the motor does not stall, then the generator is working.
And the last thing I would like to write.
Often the culprit of problems with battery charging are oxidized contacts (terminals) of the regulator relay (especially contacts marked BV, B3, V, 61, 15 - the marking depends on the type of relay) or wires and their terminals coming to the relay, ignition switch, generator. After all, oxides and dirt on the terminals cause transition resistance and voltage loss.
Sometimes on very neglected machines, instead of a voltage of 12.5 volts at the oxidized terminals, only a measly 10 - 11 volts can be noted with a voltmeter. But once you put the contacts in order (clean them to a shine), everything returns to normal.
It should be noted that before checking the relay, as described above, check the relay contacts and not only the relay (and, if necessary, put them in order), but as mentioned above, especially those relay contacts whose markings are described above.
The voltage at the contacts should be exactly the same as at the pole pins of your battery (no loss).
If the voltage on the contacts is less, then you should definitely clean them and perhaps the relay regulator is quite serviceable and the reason was only due to oxides.
After cleaning the contacts, to prevent problems from recurring, they should be sprayed with a special contact spray (for example, like the one in this article), which will prevent oxidation for a long time.
Well, that seems to be all. I hope many beginners now know how to check the relay regulator on their own, without turning to the services of an auto electrician, good luck to everyone.
Source: http://suvorov-castom.ru/kak-proverit-rele-regulyator/
How to check the voltage regulator
Home » Repair and service » How to check the voltage regulator
When the voltage relay breaks down, problems arise in the operation of electrical equipment.
There can be many reasons for a failure in the voltage regulator, but the most common of them is boiling off of the electrolyte in the battery. The voltage regulator (VR) cannot be repaired; it is simply replaced with a new one.
However, before you change it, you need to make sure that it is the one that is faulty. You can check the generator relay regulator yourself.
The purpose of the current regulator in a car
In a car and other vehicles, a direct current of -13.5–14.5 V is required for the normal functioning of electrical equipment and other systems.
If the voltage does not reach the norm or, on the contrary, exceeds it, electrical appliances will begin to fail, and the battery will shorten its service life due to excess charge.
The relay-regulator acts as a stabilizer of this on-board voltage within specified limits, depending on the electrical load, generator rotor speed and ambient temperature. It passes the permissible voltage into the vehicle’s on-board network, thereby providing it with the required parameters.
Voltage regulator relay
Types of voltage relays and their design
To exaggerate, there are two types of devices and they both work on the same principle:
- individual or contact. Installed on the vehicle body under the hood using brackets. First, the wires come from the generator, and then go to the battery. This type is less common, as it was released about 30 years ago. There are also modified models that are just coming into use. Their key design elements are:
- Two resistance blocks;
- Magnetizing coil;
- Contact Group;
- Metal core.
- combined or electronic with a brush assembly. Mounts directly onto the generator. Location of the relay in the housing with brushes.
What both have in common is that they have non-separable housings; often they are simply filled with sealants or special glue. Since they cannot be repaired, their price is low. Previously, there was another type - combined with terminals, but it was not widely used, so it is not worth talking about them.
Old and new relay regulators
External signs of damage
Signs of a faulty relay may include:
- recharging the battery (there is not enough released charge or the electrolyte boils away);
- the brightness of the headlights (changes during a breakdown, when the shaft speed is 2 thousand/min. The voltage level is higher than normal);
- burning smell inside the cabin.
Source: http://autofluids.ru/remont-i-servis/kak-proverit-regulyator-napryazheniya.html
VAZ 2110 generator voltage regulator - how to check and replace
The electrical circuit of the car includes such a device as the voltage regulator of the VAZ 2110 generator.
Its task is to limit the output voltage of the generator and bring it to optimal values in accordance with the parameters of the on-board equipment.
In this article we will tell you how this device works, what malfunctions are typical for it, how to check and replace. We will also give you detailed recommendations that will allow you to continue driving with a faulty regulator.
What is a generator voltage regulator?
The voltage regulator is a relay that closes and opens the electrical circuit at the right times. In cars, this relay works to limit the output voltage.
The fact is that a generator with a certain rotor speed can produce a specific voltage. Since the rotor speed constantly depends on the crankshaft speed, the voltage changes accordingly.
To maintain a given voltage, a special device was developed that helps create an output voltage within the range of 12 - 14 Volts.
The first voltage relay was made in the form of an electromagnet, which opened with a change in the input value, and closed again when the voltage dropped, thus, the voltage in the electrical circuit of the on-board system was kept within a strictly specified range. This range is necessary for the correct operation of electrical devices. If you increase the voltage to values exceeding the nominal values, the device will simply fail.
Another stage in the development of mechanical relays was the emergence of a semiconductor device, which works much more accurately and reliably. A semiconductor relay has smaller dimensions and a special indicator that indicates whether the device is working or has failed.
The main difference between a mechanical relay and a semiconductor relay is the ability to make adjustments. If the output voltage of the supply circuit has changed, then by changing the position of a special device, you can set new values that will allow the relay to operate for a long time.
Malfunctions and checking regulators on a VAZ
During operation, the voltage regulator may fail. In VAZ 2110 cars of all editions, a semiconductor relay is used, which contains graphite generator brushes. A relay malfunction can lead to the following consequences:
- Failure of all vehicle network devices. Usually, the first thing that happens is that all the lamps in the lighting devices burn out. If this suddenly happened, the relay has failed because the output voltage exceeded the rated values.
- Recharging the battery . Overcharging a galvanic cell is also unacceptable. This can lead to boiling of the electrolyte and subsequent damage to the battery.
- Small charge . As many car enthusiasts say, “undercharging” occurs. A weak battery will not be able to fully ensure reliable engine starting.
In total, there are only two malfunctions of the voltage regulator relay.
These are: failure of the relay (charging does not occur, or the battery is overcharged) and its incorrect operation (the relay works, but passes too little voltage, which is not enough to charge the battery). All relay malfunctions can be identified by many external signs, as well as through diagnostics.
The most reliable way to check the voltage regulator is to measure the electrical value at the battery terminals with the engine running and idling. The normal voltage is considered to be between 13.5 and 14.2 Volts. If the voltage level exceeds these values or is lower, it means that the voltage regulator is faulty and must be replaced.
In addition, there are other signs of a relay failure, after which the device usually begins to be checked:
- The charging indicator light came on while the engine was running. As the speed increases, the lamp goes out.
- Dim headlights when the engine is running. Likewise, as the speed increases, a brighter glow can be observed.
- Too bright headlights and subsequent burnout of the lamps also indicate incorrect operation of the relay.
- If the battery charge is sufficient for a small number of starts, it means that the relay does not fully provide the required charge.
What to do if the voltage relay fails?
It happens that the relay fails at the most inopportune moment, when you still have a drive home and the battery is not charging.
The battery capacity in economical mode can ensure fairly long engine operation, which will allow you to get to the repair site without any problems.
Below we will provide a list of recommendations that will help you drive, as they call it, “on battery power” and not stall.
- If the battery is overcharged, the relay must be disconnected from the circuit. To do this, the contact wires are removed from it and left hanging. In the case of the “ten”, it is enough to unplug the plug with the wire from the generator brush connector. Thus, battery charging is turned off, and further movement will no longer harm the battery.
- Many experts suggest going the other way - turning off the generator excitation winding . To do this, remove the corresponding fuse. However, this can be done if you know where the fuse is located.
- If the battery is weakly charged, then there is practically no reason to panic. To get to your destination, you need to maintain high speeds in order to, at least a little, bring the voltage value to the nominal value. to maintain the speed at 3000 rpm for a few seconds using the gas pedal This will prepare the battery for the next start.
- Avoid using music, power windows, headlights (especially high beams), and other electrical devices unless their use is absolutely necessary. This will save battery power well.
Replacing the generator regulator on a VAZ 2110
After detecting all of the above faults, it is necessary to replace the relay. To do this, you need to know exactly which relay is installed on your car. The fact is that depending on the car model, different generators are used. Modifications of the VAZ 2110 also have different generating devices.
Conventionally, regulators can be divided into two types: for injection cars and carburetor cars. They have few design differences, but the parameters on the basis of which they work may differ.
After determining the type of relay, the exact same new regulator is purchased. Then, disconnect the negative terminal of the battery and remove the plug from the relay connector. Unscrew the two screws securing the relay and unscrew the ground wire nut. Remove the old brushes and install new ones in their place. Installation is carried out in reverse order.
This completes the replacement of the VAZ 2110 voltage regulator.
Source: http://VipWash.ru/elektrika-avtomobilya/regulyator-napryazheniya-generatora-vaz-2110
Generator voltage regulator relay: checking faults of modern and outdated models
A voltage regulator is an electronic device installed on car alternators to stabilize the input voltage to the battery. It should be between 13.2 - 14.5 volts.
Deviations both upward and downward are unacceptable. This will already be a malfunction of the generator. In most cases, the voltage regulator is the culprit of the malfunction.
Although this device is small in size, it protects the battery from premature failure.
How to check the generator relay regulator. The main sign of a deviation in the generator output voltage is difficulty starting the engine. This is especially true during the cold season.
Check the battery. It must be clean and dry. There should be no white discharge on it.
If they are present, then the regulator may have failed and the battery is being recharged, causing the electrolyte to boil.
The car's incandescent light bulbs are too bright. However, they often burn out. There is a smell of burnt wiring in the car interior. It is not uncommon for fuses to blow.
When the headlights are on, the brightness of the light directly depends on the engine speed. All this suggests that the voltage stabilizer may have failed. It's simply a regulator.
By the way, difficulty starting the engine can occur with both excess and insufficient voltage.
Watch the charging current indicator light. It is located on the instrument panel. Lights up red with the battery symbol. It can burn either at full heat or at half heat. When the engine is running, this indicates a generator malfunction.
Electrical failure of the generator can manifest itself in three ways:
- Complete absence of any tension.
- Severely low voltage.
- Extremely high voltage.
If any of the above problems occur, it is first recommended to check the functionality of the generator relay regulator.
Types of existing relay regulators
A century has passed since the advent of automobiles. During this time, the regulators changed their filling and appearance more than once. Let us first consider modern stabilizers, and then outdated ones.
There are two types of regulators today:
- built-in - these are attached directly to the generator housing and are produced combined with the brush assembly;
- separately fixed - attached to the car body.
Both types have non-separable housings and cannot be repaired. If the output voltage on the generator deviates from normal, and there is confidence that the stabilizer is to blame, then in this case we simply replace it with a new one.
Pre-check
To check the generator voltage regulator you will need a multimeter. We start the engine and measure the generator voltage with a multimeter. We connect one probe of the measuring device to terminal 30 of the generator (the same pin on the rear wall of the generator, to which there are usually two, sometimes three wires and secured with a nut). The voltage should be between 12.5 - 12.8 volts.
Then we start the engine and again measure the voltage at the generator terminals. At idle there should be at least 13.2 volts, but not more than 14 volts. Then we increase the engine speed to 3500 rpm, in this case the voltage limits should be within 14.2 - 14.5. The voltage should not exceed 14.8 volts. If it is higher, then the battery is being recharged.
Then we turn on the high beam headlights, heater, hazard warning lights and other devices and again measure the voltage at the generator. It will drop under the load of switched on devices, but the voltage value in this case should not be lower than 13.2 volts. If it is below the minimum - “undercharging”.
In both cases, it is necessary to check the voltage stabilizer.
How to check the generator voltage regulator
A modern regulator, combined with a brush assembly, is used on most foreign and domestic cars. First, let's evaluate access to the generator.
If it is difficult to access and inconvenient, then it would be better to remove it from the car. If access is free, then remove the relay from it without removing the generator.
But before this, you must remove the negative terminal from the battery.
The regulator is attached to the generator from the rear cover side, usually with two bolts. We unscrew them and carefully, so as not to damage the brushes, remove it, having first disconnected the wires from it.
For further testing, we will need either a power supply or a charger, a 12-volt calvania lamp. The main thing is that you can increase and decrease the voltage from 10 to 16 volts. If you use a charger for testing, you will also need a battery. The fact is that many chargers do not work without it.
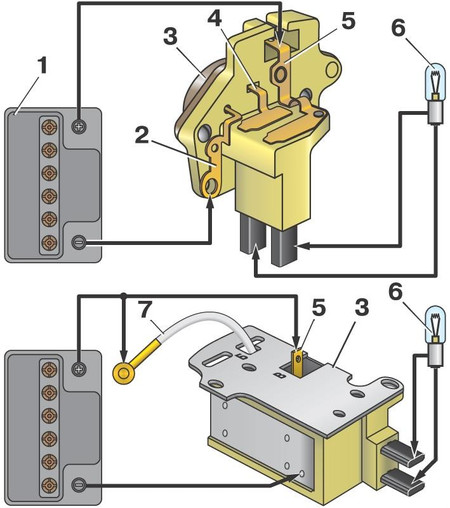
We connect the charger to the battery in normal mode. Additionally, we connect a multimeter and two wires to the battery terminals. One is positive, the other is negative. And we connect them to the relay regulator.
The positive terminal of the regulator is a plug. The downside is a metal plate under one of the mounting holes. We connect the light bulb to the brushes with wires. The stand is ready, you can start testing.
The power supply is connected in the same way, only without the battery.
We connect the charger to an external network and turn it on. The load regulator knob should be at the minimum level. We begin to slowly increase the tension. At the same time, the intensity of the light bulb should gradually increase.
With a load of 12 volts or more, it should burn at full heat. We continue to gradually increase the voltage until the light goes out or the load reaches 15 volts. If the regulator is working properly, the light should go out at a voltage value of 14.2 -14.5.
When the load decreases, the light will light up again.
If the light bulb goes out to 14 volts, or a voltage of more than 14.8 volts is reached, and the light bulb is still on, then such a regulator must be changed.
Checking a separate generator voltage regulator
A free-standing stabilizer is checked in the same way. Basically it is mounted on the body in the engine compartment. But sometimes on the generator cover. In any case, unscrew it and connect it to the stand. Let, for example, it be a Y112 V type stabilizer.
the positive wire to terminals “B” and “C”, and feed the negative wire to the housing. We connect the control lamp to terminals “B” and “W”. Next, we do everything exactly the same as with the combined stabilizer. We gradually raise the load; when it reaches 14.5 volts, a cutoff should occur. If there is no cutoff, then change the regulator.
Checking the outdated 591.3702−01
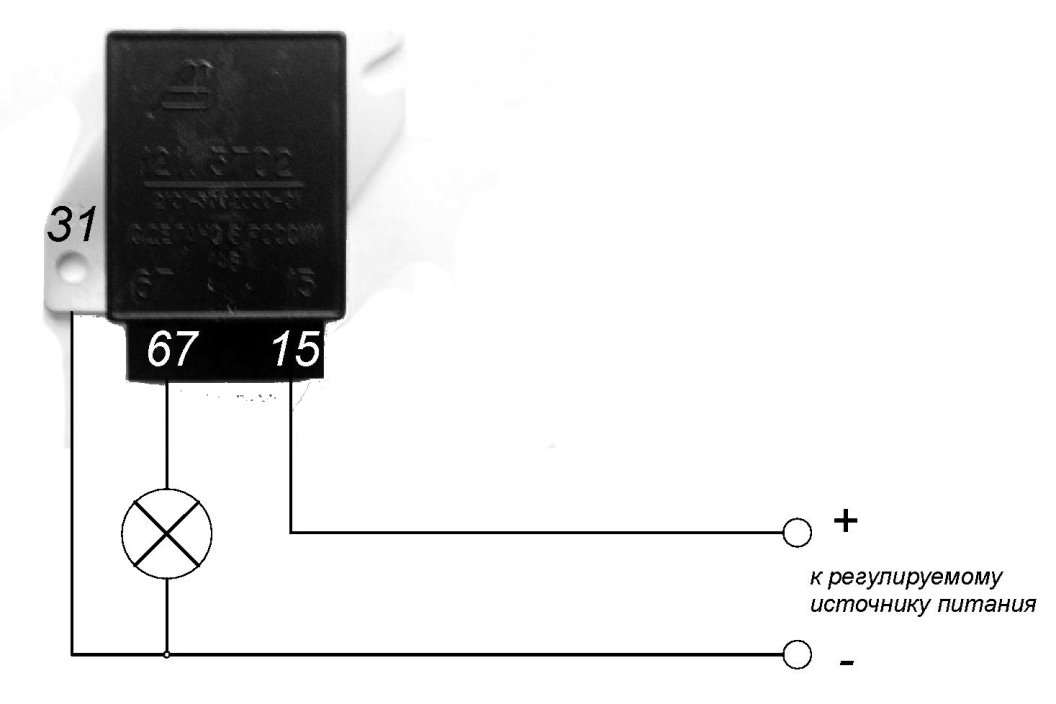
This obsolete type of relay was installed on almost all rear wheel drive vehicles. It is classified as free-standing. Always attached to the body of the engine compartment. The connection diagram for testing is slightly different from that described above. The actions and essence of the check remain the same.
There are only two contacts here. The markings are made with the numbers “67” and “15”. Contact numbered “67” is the negative terminal. Accordingly, “15” is a plus. We fix the negative wire from the charger to the device body. We attach the positive one to terminal 15. We connect the wires of the control light: one on the body, the second to terminal “67”. Our stand is ready for testing.
How to check the k1216en1 regulator with a multimeter
And finally, a few words about the k1216en1 relay. This regulator was installed on rear-wheel drive and front-wheel drive VAZs with injection engines. If we take into account the fact that there are many such cars in use throughout the post-Soviet space, we cannot ignore it.
This regulator belongs to a combined relay with a brush assembly . Its preliminary and main verification is carried out according to the method described above. There are no special differences.
Useful tips
Always try and alternator clean Since contacts often oxidize due to moisture. And this greatly interferes with the normal operation of all electrical equipment.
Often, deviations in the charging current occur precisely from dirt. Once you thoroughly clean the contacts and terminals , the fault disappears on its own, without any replacements or repairs.
Cleanliness is the key to good health not only for a person, but also for a car.
#s3gt_translate_tooltip_mini { display: none !important; }
Source: https://tokar.guru/hochu-vse-znat/kak-proverit-rele-regulyator-napryazheniya-generatora.html
How to check the voltage regulator relay of a car generator
Failure of the relay regulator is the most common cause of malfunction of automobile generators. That is why they usually begin monitoring the performance of generator components by checking the regulator.
In most cases, you can do this yourself even without removing it.
Operating principle of the generator voltage regulator
The generator is one of the most conservative components of cars. Developed in the mid-60s, the circuit has remained virtually unchanged to this day, with the exception of the element base.
Scheme
In general, the circuit of a car generator can be depicted as follows:
It contains the following main components:
- rectifier bridge 5 and 6;
- rectifier bridge for power supply of relay-regulator 7;
- relay-regulator 11;
- excitation winding brushes 10;
- field winding (armature) 9;
- stator winding 8;
- indicator lamp 4;
- battery 3;
- ignition switch contact group 1;
- capacitor 2 (may be missing).
The general principle of operation of alternating current generators was invented by the brilliant Tesla. A direct current through the field winding induces a magnetic field. During the rotation of the field coil (armature) inside the stator winding, an alternating voltage is generated in the latter.
This voltage is converted to constant voltage by a rectifier made on a diode bridge 5 and 6. The rectified voltage charges the battery.
The higher the current in the field winding, the higher the generator voltage will be.
What function does the relay regulator perform? Essentially it is a feedback amplifier. That is, as soon as the voltage increases, its circuit reduces the current through the field winding.
Accordingly, the generator voltage decreases. Then it increases the winding current, the generator voltage increases. And so on ad infinitum. Ultimately, the generator voltage stabilizes at a certain level. This entire stabilization process lasts a fraction of a second.
Kinds
Relay regulators are classified according to their element base :
- relay;
- transistor-relay;
- transistor (in cars before the 90s);
- integral (in modern cars);
- microprocessor-based with program control (Audi, BMW).
By design:
- external, fixed to body elements;
- built-in;
- built-in, combined with brushes.
In modern cars, devices combined with brushes are most often used. This has its drawback: when the brushes wear out, the relay regulator also has to be changed. Conversely, failure of the relay regulator can lead to the replacement of healthy brushes.
Possible causes of malfunction
The main causes of malfunctions of generator voltage relay regulators are:
- interturn short circuit of the excitation winding. The most dangerous cause of malfunction. After replacing the relay regulator, the generator operates without problems for a certain time. But the regulator operates at high currents and after a couple of months it burns out again. In this case, it is necessary to remove the generator and take it for testing;
- failure of the rectifier bridge (diode breakdown). Less dangerous, especially since this malfunction causes overheating of the generator, and the diodes are changed first;
- reversal or reversal of battery poles. In this case, the rectifier diodes also fail;
- destruction of brushes;
- short circuit at the control terminal of the relay regulator;
- natural wear and tear.
The consequences of a faulty relay regulator can be significant:
- Increased generator voltage can lead to failure of the car's electronic components, so do not remove the battery terminals while the engine is running;
- internal short circuit of the relay-regulator leads to overheating of the excitation winding and, ultimately, more expensive repairs;
- destruction of the relay-regulator brushes can cause final breakdown of the generator, its jamming, belt breakage and more serious consequences.
Main symptoms of a malfunction
The very first sign of a malfunction is the absence of a warning light (indicator) on the dashboard when the ignition is turned on.
In older cars, where the battery charging pattern is similar to that shown in the first figure, it is too early for car enthusiasts to panic. Perhaps it was just a burnt-out light bulb or a broken connection, and these cases are quite common.
Car owners remove the generator and take it for testing, but in vain. The second sign is that the “battery” indicator does not go out after starting the engine. This already indicates a violation of the charging process and a possible malfunction of the generator.
Another sign of a malfunction is that the brightness of the low and high beams depends on the engine speed. By the way, it is recommended to carry out such a check regularly. To do this, you need to stop in the dark in a quiet place in front of some building and turn on the high beams in neutral. A change in brightness indicates possible problems with the charging system.
The smell of burnt windings in the cabin is also a sign of a generator malfunction, but you may not notice it.
How to independently check the generator relay regulator with a multimeter or lamp
If you suspect a malfunction of the battery charging system, the check should begin by monitoring the voltage on the battery with the engine running. It should be within 13.3 - 14.5 Volts. A voltage of more than 15 Volts is a sure sign of a faulty relay regulator.
Next, the check should be continued by testing the control wire going to the relay regulator. Typically, one thick wire goes to the generator for +Charge and one thin wire goes to the output of the relay regulator.
Video - how to check a relay regulator without an regulated power source:
Sometimes there is another one to control the tachometer. You should check the control wire to ground. A resistance below 10 ohms will also indicate a malfunction of the relay regulator.
The following checks should be carried out with the relay regulator removed from the generator. In most cases, this can and should be done without dismantling the generator. The relay regulator is usually attached to the generator with two or three bolts or screws.
After this, you need to assemble a simple circuit.
or another version of it
You can use a regular salon lamp as a light bulb. Its glow will indicate the serviceability of the relay regulator. On the removed relay, you should also check the condition of the brushes.
On the Internet you can find test diagrams for almost any type of generator voltage regulator relays.
If the test results are negative, the regulator should be changed. Usually its cost does not exceed 2000 rubles for common brands.
General recommendations for repair and operation
At the slightest suspicion of a malfunction of the battery charging system (change in the brightness of the lamps, blinking of the indicator lamp, difficulty starting the engine, overheating of the device, etc.), you should immediately check the functionality of the generator, especially in the cold season.
To ensure that the generator lasts longer, follow these simple rules:
- do not allow the generator to become excessively dirty (it has technological openings for ventilation, dirt can get there), clean its surface;
- periodically check the belt tension;
- monitor the condition of the stator windings, this can be done through the technological holes, they should not be darkened;
- poor contact of the control wire can lead to failure of the relay regulator;
- To prevent overcharging of the battery and failure of the vehicle's electronic systems, periodically check the voltage on the battery with the engine running (charge voltage).
And may your generator last longer!
Video - how to check the voltage regulator of the VALEO generator in Renault cars:
Source: http://toyota-accessories.ru/kak-proverit-rele-regulyator-napryazheniya-generatora-avtomobilya.html