How to install parking sensors yourself: detailed instructions
Every year thousands of new cars appear on the streets of modern cities. At the same time, the number of parking spaces is growing less actively, and motorists are forced to park more densely, which inevitably leads to an increase in the number of road incidents.
will help you avoid unpleasant situations on the roads - a parking radar that helps the driver park the car safely in any conditions.
This device will be especially useful for beginners and those who have not yet mastered parking a car in difficult urban conditions.
How does the parking sensor work?
There are several types of these devices, and in this article we will look at the most popular of them - ultrasonic. The operating principle of parking sensors is simple: special sensors are installed in the car’s bumper, which transmit and receive acoustic signals.
The device calculates the distance to obstacles based on the time it takes for sound to travel from the sensor to the obstacle and return. This is possible due to the fact that the speed of sound is a constant value.
The driver receives a visual, audio or complex signal. Some types of parking sensors have an LCD display that displays the position of the car relative to obstacles and the distance to them.
As practice shows, it is the sound signal that is best perceived, but this rather depends on habit.
What do we need for installation?
To install parking sensors with your own hands, you do not need any professional skills. An ordinary car enthusiast can cope with this task. All you need to do is drill a few holes evenly and connect the wires correctly. Most of the necessary tools can be found in any driver's garage.
The set of most parking radars consists of:
- sensors (from 2 to 8 pieces)
- connecting cables
- screen
- signal processing unit.
Also included with some models is a cutter for drilling holes for sensors and various useful little things. But if it is not included in the kit, this is not critical - you can measure the diameter of the sensor and purchase a drill at the nearest store. However, it must be taken into account that the diameter of the cutter should be 1-2 mm larger than the diameter of the sensor.
To install and connect the parking sensors we will need:
- the device itself
- cutter for drilling holes for sensors (often included with parking sensors)
- drill (you can also use a screwdriver)
- a set of keys
- pencil, electrical tape or clamps, tape measure and tester.
All cars are different and each case is unique, so you may need other little things, such as pliers, a soldering iron or a car electrical diagram.
Installing parking sensors with your own hands
Before starting installation, we recommend that you make sure that the device is operational. Connect the signal processing unit and sensors with wires and check whether the parking sensors react to obstacles.
This installation scheme is universal and suitable for most cars. Sensors and a camera are mounted in the front and rear bumpers, which are connected by wires to the control unit. The parking sensor display can be installed either on the dashboard or in the rear of the cabin and is also connected to the unit.
Installing rear parking sensors
The installation of the system must begin by drilling holes for the sensors. This is perhaps the most important task and should be approached with special care. On some cars it is not necessary to remove the bumper, but if it is more convenient for you, it is better to remove it.
First, let's mark the places on the bumper where we will install the sensors in the future.
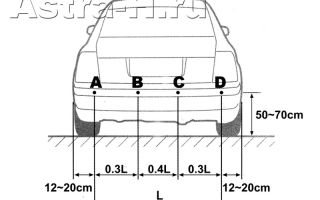
In the instructions for the parking sensors you can find detailed installation requirements, such as the optimal distance between the sensors and from the sensors to the ground.
These requirements are very important, and they must be taken into account when marking holes. Next, we glue mounting tape to the places where we will drill, and mark the centers of the holes with an awl.
Seven times measure cut once! It would be a good idea to check the hole markings again. It will be impossible to correct mistakes made at this stage!
Using a cutter, we drill the previously marked holes for the rear parking sensors in the bumper. It is important that the sensors are directed strictly horizontally after installation, so you need to drill perpendicular to the plane of the bumper.
After this, the sensors are inserted into the holes with the sensors facing out (wires facing in). The bumpers of some cars have a lining under the plastic - a damper. In this case, a piece of wire or a nail will help you insert the wires.
Having previously made a hole in the damper for the wire, tape the cable to the nail with electrical tape and pull it inside.
Next, we insert the sensor into the hole and secure it on the back side with special rings, which should be included in the kit. It is also important to install the sensors in the correct sequence. They are designated by the Latin letters A, B, C and D and must be installed on the bumper in the same order from left to right.
Often the sensors are black or silver and, if necessary, can be repainted to match the color of the body (bumper) . This procedure does not affect their sensitivity and durability in any way, and your car looks more beautiful. You can select paint by eye, or accurately determine the color using computer selection.
Typically, the signal processing unit is installed in the trunk, although it can also be mounted in the inner part of the fender or under the dashboard in the cabin. We will look at an example of the most common solution.
We will work under the bumper and in the trunk. First of all, empty the trunk and remove the trim.
We wind the wires from all sensors together. This can be done using electrical tape, clamps, or running the wires through corrugation, which will also protect them. We run the wires wound together under the bumper into the trunk through the technological hole. If it is missing, we drill a new one and, after pulling the wires, fill it with sealant.
Next, we need to select the location where the signal processing unit will be installed. This place should be relatively safe for the block, since it can be torn off by the cargo that will be transported.
The block itself is attached to any surface using double-sided tape - just tear off the film and attach the block (preferably to a grease-free surface).
Parking sensors are activated the moment reverse gear is engaged . Therefore, after fixing the signal processing unit, it must be powered from the reversing lamps, observing the polarity. The first step is to get to the rear light wires and determine which of them is “plus”. Often this wiring consists of cables with black and red insulation, in which case the red wire is the “plus”. Otherwise, “plus” must be determined using a tester.
There are two ways to connect the wires:
- The “old-fashioned” method is to remove the insulation from both cables and twist them together. Then we wrap the junction tightly with electrical tape. We repeat the procedure with each pair of wires - with “plus” and “minus”.
- The second method is to use special rivets, which, when compressed, create contact between the wires. This method is more convenient, since you do not need to cut anything or remove insulation. In our example, the rivets are supplied as a set, but they can be purchased additionally if necessary.
We put a rivet on the “positive” wire from the reverse lamp. We connect the power supply wire of the unit into the second hole. Then, using pliers, we press in the jumper, which pierces both cables and creates contact between them.
After this, we connect the sensors to the block - each wire from the sensor and each connector in the block are marked accordingly.
Now let's think about where to put the display and install it. Typically, it is installed on the dashboard.
But some people prefer to install the display in the rear of the cabin so that it can be seen through the rearview mirror. The display, like the unit, is attached to a flat surface with double-sided tape.
Whatever location you choose for the display, the next step is to connect it to the signal processing unit.
Important! When installing a display in the rear of the cabin, you must take into account the fact that you will be looking at it through a mirror.
This means that obstacles on it will also be displayed in mirror image, that is, vice versa! To make the display correct for you, you need to change the order of the sensor wires that are connected to the block. That is, change A, B, C, D to D, B, C, A.
Placing the display in the rear has some advantages, as there is no need to run wires across the cabin to the dashboard.
In this case, the wiring is pulled through the technological hole under the seat, then under the trim between the side and roof of the car. In the case of a front-mounted display, the wiring is located under the side skirt trim or under the floor mats.
It is better to secure all wiring with clamps or electrical tape. The same applies to extra pieces of wire that can knock in the pits. It may happen that the car's fender heats up in the sun, and the block attached to the double-sided tape may slide off.
After completing the installation, turn on the ignition, then reverse gear and see if the screen lights up. If it lights up, it means you have installed the rear parking sensors correctly!
Installing front parking sensors
The principle of installing front parking sensors is the same, but there are some differences. In this case, we need to stretch the wiring through the hood and interior of the car to the trunk, where the signal processing unit is installed. On some cars, before installing the front parking sensors, you need to remove the radiator grille and air duct pipe.
Next, follow the instructions - mark and drill holes for the front parking sensors. We use wire to push the wire under the bumper and secure the wiring with electrical tape or clamps. Through the technological hole, the wire is led out into the engine compartment. In some cases, the washer reservoir will interfere with the wiring, so it must be removed.
It is better to run the wire from the front left sensor on the other side of the engine compartment under the battery. In order to stretch the remaining wires, you can use the standard corrugation, if available. The cable is pulled into the cabin through a technological hole.
Now let's decide how we will activate the parking sensors apron. And there are several options here:
- Activate with a separate button. In this case, you will have to connect the front parking sensors to the standard button on the front panel or install a new one. This method is good because it allows you to use it only when necessary.
- Activate when ignition.
This method is a little more convenient, since you do not need to constantly press the button. You need to get to the wires under the steering wheel and find the ignition wire. Carefully open the steering panel. A tester will help us find the ignition wire. First, turn on the ignition and find the wire on which there is a voltage of 12 V. Next, turn off the ignition, and the voltage on the wire we need disappears. In our case, this wire is marked with the letter “K”. Let's power it from this wire and you're done! - We activate the front parking sensors with the brake pedal. In this case, we need to get power from the brake lamp. You can determine the required wire using a tester in the same way as in the previous paragraph.
And finally, we bring out the wiring through the car interior to the place where the signal processing unit is installed. In our case, this is the trunk. We connect the front parking sensor wires according to the instructions, in the same way as with the rear one.
The parking sensors are not working, what should I do?
There are many reasons why parking sensors may fail or not work after installation. Therefore, we will consider two cases:
New parking sensor doesn't work
At the beginning of the article, we recommended checking the functionality of the device before installing it on the car. If it worked before installation, you should check the connections of all main components.
All components must be connected according to the instructions that come with the kit. Check whether you are properly powered by the reverse or ignition lamp.
Also, do not exclude the possibility of a manufacturing defect.
The parking sensors worked, but something went wrong
The fastest and most reliable way to find out the cause of a breakdown is computer diagnostics. Nowadays, many auto repair shops provide this service. If you decide to find the cause of the breakdown yourself, we will try to help you.
Sensors are often the cause of all problems, and they are the ones you should pay attention to first. One of the most common problems is a constant signal.
The reason for this may be a foreign body that “sticks” to the sensor, as well as oxidation of the contacts and short circuit.
The sensors are also sensitive to water and may give false signals during rain or after washing. In this case, drying, for example with compressed air, will help. At sub-zero temperatures, especially in severe frost, the sensors may also lose sensitivity. But this does not affect their further performance.
Finally, before heading out on the road, you should test the parking sensors with different obstacles and in different modes. This will allow you to understand in which situations the system can give a false signal and in which it is real.
Source: https://za-rulem.org/tuning/elektronika/kak-ustanovit-parktronik.html
How to install parking sensors yourself
This is what you get in the store when you buy parking sensors (it may differ from yours).
- Box with device
- Instructions in Russian, 3 year warranty
- Control block
- Indicator “13” with a cable of about 4 meters
- 4 small sensors
- Bumper drill bit
- Power cord with fuse
There are also Velcro for gluing the block and metal. a bracket for particularly stubborn perverts.
The parking sensors will be installed in the trunk, so we will remove the trim. This is where I began to respect Koreans, because... in my RIO there is only one type of caps for everything, and the caps are not breakable and look cultured, but here there are 4 types in the trunk alone! This is a mockery, I'll tell you honestly.
1st type - they secure a piece of plastic on the “loading” side of the trunk, where the locking bracket is. They just carefully pry out with a screwdriver.
These pistons hold the plastic frame of the “hole in the interior” - it will also have to be removed at least on one side, where you will install the parking sensors unit.
They can also be picked out with a screwdriver. Removable with the seats folded down.
Now the most harmful type of pistons are those on the bottom. The top one just unscrews. But others... The core must be carefully pressed inward no more than 2 mm (see arrow)! Then you can pry it out with a screwdriver.
If you overdo it and push it deeper - the pipe is again “in working” condition and cannot be removed. Just squeeze out the core completely and then look for it in the bowels of the machine.
In general, these are the most stupid pistons I have ever seen in cars.
It was decided to install the indicator on the 3rd brake light under the rear window. Why? Yes, because there is nowhere to put it in front and it’s technically more difficult, it’s a pity to drill a torpedo, and when parking you don’t look at the distance, but focus mainly on the sound. To do this, the 3rd brake light must be removed - everything is simple, 2 nuts for 10. The wire is inserted into the finished holes of the brake light.
We drill a hole in the housing so that the indicator connector can fit through. A piece of electrical tape - instead of a ruler.
We glue with an indentation, because The glass is quite flat. On the right side of the indicator you can see the volume switch.
I decided to place the control unit in the left niche, because
There is a standard hole down there to the street for wires. We will use all the possibilities of the hole for the wire for the fog lights. To attach the block, I drilled 2 holes in the piece of iron and secured it with 2 clamps, adding Velcro to prevent it from rattling.
To attach the block, I drilled 2 holes in the piece of iron and secured it with 2 clamps, adding Velcro to prevent it from rattling. In the picture the block is hanging incorrectly, I closed the hole under the piston (marked with arrows). Later I moved it a little lower. The holes were smeared with anticorrosive.
There is a wiring harness running above the block - we will connect to it.
When installing parking sensors, using standard terminals for uninterrupted connection, we “sit down” on the reverse wires... + on brown, body on black. There are 2 black ones, ours is the one that is 0.1 mm thinner.
🙂
In general, the handicraft of some details in the Lancer surprises me. For example, the wiring is all manually wrapped with electrical tape.
I’ll keep silent about the aesthetic pleasure from this spectacle, which I last saw only in Sovkovsky services when installing a car alarm, but there are also concepts about conveyor production, where such work clearly does not fit.
How much do you have to “wind” in order to “wind up” all the wiring! Even Koreans put it in sticky foam. A shame. The electrical tape spreads over time, and the sticky wires come out... Okay, the smoke break is over, let's move on to installing the parking sensors.
I’ll say right away that you don’t need to remove the bumper, everything is accessible from below. I didn't even jack it up. The main thing here is to measure 7 times and then drill. I wrote here how to measure some time ago.
It is better to conduct an experiment at home on the floor or in place to find out the safe height and angles of inclination of the sensors when there are no false alarms. In my case it was 50 cm from the ground, in the center of the PTF.
In order not to spoil the bumper with pencils, I stuck duct tape and drew with it.
Divide the distance between the outer sensors by 3! 🙂 We get 2 more holes.
We measure the horizontal in different ways from everything that is necessary - from the upper bend of the bumper by eye, from the lower edge, by pulling a rope along the PTF with the help of the wife and mother-in-law, for example, from the floor, if it is level and the car is not damaged. We calculate the arithmetic mean - this will be the truth. Check it several times, let others check you. Only then let’s look further... :)
This is where the eyes are afraid, but the hands are doing the work. If your nerves are weak enough and you know how much a new bumper in Rolf costs, it’s better not to do this yourself :)) The cutter must be periodically cleaned of Lancer’s remains. :)
Well, that's it, there's no turning back.
This is a view from below, I'm lying under the car and looking inside the bumper. The sensors fit tightly, but for insurance you can put them on sealant, because... if they dangle, there will be false positives. We collect the wires into a bundle and tie them with clamps to the bumper amplifier.
We bring the flagellum to the left side of the car, there is a hole in the trunk. Having slightly torn the rubber band standing there (similar to Byratino’s cap), we insert the wires, having previously secured each one to a screwdriver with electrical tape to create the “inflexibility” effect.
Then this place must be carefully insulated.
I forgot to take a photo, but everything is clear there. In general, the rear bumper is made terribly. In the same RIO, the void visible in the photo is filled with foam, which softens impacts, eliminating the need for repairs at low speeds. Right there - behind the cover there is emptiness, and the amplifier is only at the very top, thin... If someone catches up even slightly, they will move the wings. Overall horror. I respect MMS less and less.
We bring the wires out from the corner indicated by the arrow, connect everything, and collect the excess wires into bundles. The parking sensor unit was repositioned correctly. The sensors are marked ABCD, and the block is marked accordingly. Stick the sensors into the bumper so that “right” and “left” are in their places on the indicator.
My wife said that the sensors are too small... :)
I decided not to paint the sensors, because... and so it’s normal, there is a difference, but not critical. And so, you can pick up paint for 450 rubles, which will be poured into a spray can - and off you go...
Inside view, distance 20cm. There may be slight differences depending on your car, but the principle remains identical.
It took half a day to do everything, periodically hiding from the rain, marking for a long time. This is how you can install parking sensors yourself. Thank you for your attention, Happy Installation!
Source: http://www.myavto.net/remont-i-tuning/118-ustanovka-parktronika.html
Installing parking sensors on a car with your own hands
The car's parking sensors are an electronic ultrasonic parking radar that allows the driver to estimate the distance between the car's bumper and an obstacle while parking. The presence of parking sensors in a car increases the safety of parking in confined spaces and in poor visibility conditions.
Operating principle and types of parking sensors
The principle of operation of the parking sensors is that the electronic unit processes signals received from wireless transceiver sensors installed on the car’s bumper and presents them on the display in a form convenient for the driver.
In the simplest parking sensors, the information is an intermittent sound signal, the frequency of which increases as the vehicle approaches an obstacle.
In the most common parking sensors, information with an audible signal is supplemented by a monitor or display, on which the distance to the obstacle in meters is displayed in graphical or graphical and digital form.
You can see the structural wiring diagram of such a radar in the photograph.
Expensive models of parking sensors additionally have a video camera, the lens of which has to be constantly wiped clean of dirt, which in practice negates all its advantages.
Distance measurement sensors in parking sensors are used in two types - tape and ultrasonic. Tape sensors are a metal strip attached to the inside of the bumper; they detect an obstacle only at a distance of less than 30 cm and do not work well in a wet environment, so they are practically not used.
There are types of wireless parking radars in which the signal from the electronic unit to the monitor is transmitted using a radio signal.
The price of such parking sensors is an order of magnitude higher, and the apparent ease of installation is deceptive, since it is still necessary to supply the supply voltage to the devices using wires, which practically negates the advertised advantage.
In addition, such a system is susceptible to radio interference, which reduces the stability of the forging radar as a whole. I immediately refused to buy such parking sensors.
Design and principle of operation
of an ultrasonic parking sensor
Ultrasonic parking sensors are unpretentious and can confidently detect any obstacle located at a distance from the car closer than 2 meters. The ultrasonic sensor is similar to a telephone headset, only the speaker and microphone are installed in the same housing.
The sensor works as follows. A burst of pulses with a frequency of 40 kHz is periodically supplied from the electronic unit to the sensor emitter. If an obstacle is encountered along the path of the pulse, it is reflected and picked up by the microphone.
It is then transmitted to an electronic signal processing unit, which measures the time interval between the moment the pulse is emitted and the time it returns from the obstacle. The further away the obstacle is, the longer it takes for the signal to return to the sensor. The distance is determined in this simple way.
The electronic unit can only convert the travel time of the pulse into meters and display the information on the display.
The distance at which the parking sensor can detect an obstacle depends on the power of the emitted pulse and the sensitivity of the microphone.
The angle of radiation of the pulses is limited, therefore, to completely cover the blind spot, at least four ultrasonic sensors must be installed on the bumper.
Which parking sensor to choose and where is it cheaper to buy?
When the car moves forward, all obstacles are clearly visible, so there is no point in installing parking sensors on the front bumper.
Based on the above, for self-installation in my car, I chose parking sensors with four ultrasonic sensors for installation on the rear bumper, with an audible warning and display of graphic and digital information on the display.
After determining the radar configuration that satisfied my requirements and searching for parking sensors on the Internet, I found one that was suitable for price and quality in the Chinese online store AliExpress. As a result, taking into account self-installation and the cost of materials, my costs for installing parking sensors in the car amounted to a little more than $11.
The photo shows a set of components for installing parking sensors in a car. The kit even includes a special cutter for drilling holes in the bumper for installing ultrasonic parking sensors.
Checking the parking sensors before installing them in the car
Before installing parking sensors in a car, to avoid surprises, it is necessary to check its functionality.
To do this, you need, in accordance with the above block diagram, to connect all sensors and a display to the electronic control unit and apply +12 VDC supply voltage to it, observing the polarity, from a power supply designed for a current of at least 0.3 A or a battery.
It is impossible to make a mistake here, since all the connectors are different, with the exception of the connectors for connecting parking sensors. But when checking, the order in which the sensors are connected does not matter, since they are interchangeable.
If the sensors are left lying on the table, then it will be impossible to check the parking sensors in operation. Therefore, you need to simulate their installation on a car bumper.
To do this, you need to drill four holes in a sheet of corrugated cardboard or any other sheet material using the cutter from the kit and install ultrasonic sensors in them, as shown in the photo.
The distance between the holes should be more than 10 cm.
Next, direct the sheet with sensors into a space two meters free from obstacles and turn on the parking sensors. All that remains to check is to walk in front of the sensors and see what is displayed on the monitor. If everything works, then you can begin installing the radar in the car body.
For interest and to evaluate the quality of the parking sensors, I opened the control unit, its printed circuit board is in the photo. The presence of markings of elements, neat installation, high quality soldering and voltage reserve of electrolytic capacitors pleased us.
When parking in reverse, the driver usually looks at the side mirrors and rearview mirror. Taking the parking sensor monitor in my hands and sitting in the driver’s seat of the car, I began to look for the most rational place to install it. As a result, taking into account the need to lay wires to the electronic unit, it was decided to mount the monitor on top of the rear view mirror.
Ultrasonic parking sensors are installed in the rear bumper, and the supply voltage is most easily supplied from the reversing light, since the parking sensors should only work when reverse gear is engaged. Therefore, it was decided to install the electronic unit in close proximity to the sensors - in the luggage compartment.
As a result, the wiring diagram of the ultrasonic parking radar shown in the photograph was created. Now all the questions regarding the installation of parking sensors have been worked out and you can begin installing it in the car.
Each ultrasonic parking sensor, depending on its installation location on the bumper, must be connected to its own connector on the electronic unit. Therefore, the connectors must be marked in advance in accordance with the inscriptions on the body of the electronic unit.
Instructions for installing parking sensors on a car
with your own hands
The technology for installing radar on cars of different manufacturers and models is not much different, and therefore the instructions given for self-installation of parking sensors using the example of a Hyundai Getz car will be useful to the owner of any car.
Laying the wire from the monitor to the electronic unit
It was decided to stretch the cable from the monitor to the electronic parking sensor unit between the ceiling trim and the roof of the car. This is the shortest route and does not require removal of the casing.
The ceiling trim near the rear-view mirror was moved down a couple of centimeters and a piece of foam plastic was inserted into the resulting gap for ease of work.
At the ceiling of the trunk door, the trim was freed from the rubber seal and also moved down a couple of centimeters. Next, an attempt was made to stretch a steel wire with a diameter of about two millimeters through the resulting gaps from the trunk to the rear-view mirror. But, unfortunately, the wire rested on something and despite numerous attempts it was not possible to thread it through.
I solved the problem by pulling the wire in several stages. First, from the rearview mirror into the gap that I made by freeing the headliner at the top of the driver's door from the rubber seal, then through the second gap at the left rear door and then through the gap in the trunk. The rope was first stretched using wire.
To prevent damage to the monitor connector, it was attached to a rope using electrical tape, as in the photo. All that remains is to carefully pull the rope and the wire will easily pass behind the trim to the trunk. I completed this job in a parking lot in the yard of the house in 15 minutes.
Removing plastic panels
To conceal the wiring from the ultrasonic sensors and supply power to the electronic unit, it is necessary to free the left side of the trunk from the plastic panel.
The first step is to recline the rear seats and remove the trunk floor covering. It is secured with several screws and clips. Can be removed without difficulty.
Next you need to remove the plastic panel on the rear wall of the trunk. To do this, all visible screws and bolts are unscrewed, and the panel moves upward with considerable force. It is held on by four clips and can be removed easily.
To begin installing the parking sensors, all that remains is to remove the left side panel of the trunk. Again you need to unscrew all visible screws. Next, from the left door side, pull it away from the car body and when the two clips are released, pull the panel towards you.
Installing ultrasonic parking sensors on the bumper
Radar manufacturers recommend installing rear parking sensors at a height of 50-70 mm from the road surface. Thus, the sensors could be installed on the black molding or on the top of the bumper. I chose the second option.
The photo shows a drawing with recommended installation dimensions for radar sensors. Depending on the width of the car, the dimensions need to be adjusted.
Since the diameter of the sensors was 22 mm, a 40 mm indent was made from the top line of the bumper. The drill hole centers were marked directly on the bumper surfaces using an alcohol marker.
Since the end mill had a drill bit in the center, it was easy to accurately drill the holes using an electric drill. The edges of the holes turned out neat, without burrs. You can also use a cordless screwdriver for drilling.
There was a hole in the rear wall of the trunk through which the wire from the rear fog lamp passed. It was decided to lay wires from the ultrasonic sensors through it. The rubber o-ring was removed and a rope was pulled through the drilled hole next to the fog light using a steel wire.
Next, the wire was threaded through the hole for installing the outermost sensor into the hole for installing the central sensor, and then the rope was pulled.
The sensor connector was attached to the rope using insulating tape, as shown in the photo, and the wire was pulled through it into the trunk. Pulling should be done effortlessly so as not to damage the wires and sensor connectors.
To prevent the sensor wires from rubbing against the steel edges of the car body and to seal it, a slot was made in the O-ring with a knife through which the wires were threaded. Next, the seal was installed in place.
When installing sensors in the bumper, they must be oriented so that the arrow on their housings points upward.
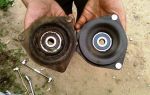
An attempt to mount the ultrasonic sensor in the bumper was unsuccessful the first time. The sensor did not want to hold on. It turned out that the silicone clips were designed for mounting on a thin wall, and the thickness of the bumper was 2.5 mm.
I had to use a knife to remove part of each clamp so that the gap between them and the sensor flange was 2.5 mm. After modification, the sensors were firmly fixed. It was impossible to pull them out with a fingernail. Therefore, no glue was needed.
After attaching the ultrasonic rear sensors to the car's bumper, the wires coming from them were tied together using plastic clamps with the wires coming from the fog lamp.
The installation of the monitor and ultrasonic sensors is complete and all that remains for testing is to connect the power wires to the vehicle’s on-board network.
Since the parking sensors should only turn on when the car is reversing, it is convenient to connect it to the wires that supply power to the reversing lights. They turn on only when the gearshift lever is in position R. The connector for connecting the rear lights was located right next to the planned installation location of the electronic parking sensor control unit.
If the colors of the wire insulation are not known, they can be determined using a multimeter turned on in DC voltage measurement mode. To do this, turn on the ignition and, without starting the engine, set the gear selector lever to the reverse position.
Next, touch the negative probe of the multimeter to the bare body of the car, touch the positive one in turn to the connector terminals until the device shows the presence of a voltage of +12-14 V. Next, leave the positive probe connected to the found contact, and disconnect the negative one from the body, and find it in the connector ground contact. In this case, the device should again show +12-14 V.
After this, you need to remember the colors of the wire insulation, remove the key from the ignition switch and set the lever to the neutral position.
It is best to connect the parking sensor power wires using the soldering method. To do this, you need to heat the insulation in the right places with a soldering iron and remove it. Next, twist the attached wires around the standard ones and solder them with a soldering iron. The photo shows an example of a connection for a Hyundai Getz car. The white wire is positive, and the black wire is negative (ground).
After soldering, the exposed wire sections must be covered with three layers of insulating tape. In order to prevent chafing of the soldered conductors, the wire going to the electronic unit must be tied to the standard harness with electrical tape, as shown in the photo below.
The wiring has been installed and now before installing the panels in place, you need to check the operation of the parking sensors. To do this, connect all connectors to the electronic unit, observing the order in which the sensors are connected. Turn on the ignition and reverse gear. When placing an obstacle in front of the sensors, make sure that the monitor shows the correct distance to the obstacle.
I did not hide the electronic parking sensor unit under the trim, since if the parking sensor malfunctions, it will be impossible to carry out diagnostics and repairs without removing the panels. Therefore, I decided to install it in the trunk pocket. To do this, using an existing cutter, a hole was drilled in the side panel pocket.
Next, the length of the wires ending in connectors was verified and the excess length of cables twisted into rings was secured to the standard harness using plastic clamps, as shown in the photo.
The parking sensor wires were threaded through the hole made in the pocket and the side panel was installed in place. Next, the connectors were inserted into the electronic parking sensor unit.
The electronic unit was glued to the vertical back wall of the pocket using double-sided tape, which was included in the kit.
As you can see in the photo, the presence of ultrasonic parking sensors on the bumper, from my point of view, even improved the appearance of the car.
After installing the parking sensors, I did not immediately glue the monitor to the mirror, but drove around a little. As a result, the most convenient place that did not interfere with the view turned out to be the place to the right of the mirror mounting post to the windshield. The monitor was glued there using double-sided tape supplied by the manufacturer.
As the practice of operating the radar has shown, it lived up to expectations. Reversing, especially in crowded places, has become safer and this makes it much calmer. Now I am not afraid that one of the restless kids will accidentally fall under the wheels of my car.
Source: https://YDoma.info/avtomobil-ustanovka-parktronika.html
Do-it-yourself parking sensor installation, photos and videos
You can find a huge number of devices on the market that make driving a vehicle easier. One of these can be called parking sensors. It is also called parking radar or sonar. The parking sensors are tasked with warning the driver about a possible obstacle in the blind vision zone.
- Sensors installed in the bumper detect interference using ultrasonic waves.
- The wave is reflected from the obstacle and is picked up by the sensor.
- The signal from the sensor is transmitted to the electronic control unit (ECU).
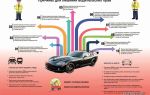
- The electronic control unit processes the information and transmits it to the signaling device. The person driving receives audio, visual or combined signals.
What signal the driver receives depends on the model of the parking radar. Some parking sensors are equipped with a rear view camera, and then the image from the camera can be displayed on a standard or additional LCD screen.
Some modern cars are equipped with factory-installed parking sensors. This option can be ordered when purchasing a new car. But if this is not possible, then any technically knowledgeable car owner can install parking sensors with his own hands on a new or used car.
Before purchasing, it will be useful to study the materials of several automobile forums. They repeatedly discussed various models of parking sensors and the features of their installation on different cars.
After analyzing the information, you can safely go to a store with auto products and select the device you need. When purchasing a parking sonar, pay attention to the complete set.
The installation kit includes:
- 4 or 8 sensors (depending on the radar model);
- electronic control unit (ECU);
- cutter for drilling seats;
- signaling device with an audible or visual signal;
- wiring;
- instructions with connection diagram.
Before buying parking sensors, carefully study the materials of automobile forums
To successfully install parking sensors you will need the following:
- the parking sensor kit itself;
- screwdriver;
- insulating tape;
- knife with replaceable blades;
- nylon clamps.
Installation procedure for parking sensors
- Wash the bumper. It is not necessary to dismantle it. All work can be carried out by car.
- Mark the sensor installation locations with a marker. The two outermost ones should be placed on the bends of the bumper. The rest are placed between them at the same distance.
This is what the process of drilling a bumper with a milling cutter looks like
- Drill holes in the bumper using the included bit. Install sensors on the bumper. To strengthen the fastening, you can use glue or sealant.
Many drivers install the control unit in the luggage compartment
- The control unit is usually located in the luggage compartment. The installation location is chosen by the car owner himself. Typically, the parking sensor ECU is located under the trunk trim on the rear fender.
- Lay the cable from the control unit to the signaling device. It is usually placed on the front panel in front of the driver or slightly to the side.
- Connect power to the control unit from the electrical circuit of the vehicle's rear brake lights. The power supply is usually located near the rear light.
Video example of installing parking sensors
If everything is connected correctly, then the parking radar does not need additional configuration. The only thing that may be needed is fine-tuning the sensor position.
Video: “Important tips for installing parking sensors from professionals”
Some drivers are skeptical about parking sensors and consider them unnecessary devices. But parking radar makes life much easier for the driver, especially if he is a beginner. Good luck parking on city streets.
Source: http://motorltd.ru/kak-ustanovit-parktronik-na-avto/