Tuning and adjusting the carburetor: how to correctly set the idle speed using quality and quantity screws with your own hands
Most modern gasoline cars are equipped with fuel injection systems, but before they gained dominance, all cars were equipped with carburetor systems.
For this system to work correctly, the carburetor settings must be performed flawlessly.
High-quality carburetor adjustment will reduce fuel consumption, make the engine run smoothly at idle, reduce the emission of harmful substances into the atmosphere and increase the overall engine life.
The carburetor is the main component of the fuel system of any carburetor car. This is where air and fuel mix to form a fuel mixture that enters the engine's combustion chambers. A properly adjusted carburetor produces a fuel mixture in the required proportions. Such a mixture will not detonate in the cylinders, which will increase the life of your engine.
How to adjust the carburetor and when to do it
Do-it-yourself carburetor adjustment is done after using low-quality gasoline or when engine operation is no longer stable. For prevention, the manufacturer recommends flushing the carburetor with a special compound every 6-7 thousand kilometers.
Possible malfunctions in the carburetor:
- Fuel leaks on the carburetor. In this case, you need to measure the fuel pressure. This is done using a special pressure gauge. The operating instructions will tell you what the pressure should be. Typically it ranges from 0.2 to 0.3 atmospheres. If the pressure is normal, the problem is in the float chamber and the fuel level needs to be adjusted;
- Carbon deposits on spark plugs with the smell of gasoline. This clearly indicates a problem with adjusting the carburetor floats or a burnt valve;
- Rough engine idling may not only be due to the carburetor. This often happens due to incorrect adjustment of the throttle cable. To check, you need to disconnect the cable and turn the valve manually.
Before you adjust the carburetor correctly, you need to clean it thoroughly. It is recommended to use special liquids for cleaning. The jets cannot be cleaned with toothpicks or needles. Damage to the jets will lead to calibration failure.
If the holes cannot be cleaned with aerosols, you can carefully clean them with a soft wire. When cleaning, do not use rags. Threads can clog the holes, which will lead to malfunction of the carburetor.
If the aerosol does not remove all contaminants the first time, you need to repeat the procedure.
Setting up the float mechanism
The level of the fuel mixture in the float chamber is directly related to its quality. At an increased level, the mixture will turn out to be lean, which will negatively affect gasoline consumption and increase toxicity. Without adjusting the floats, the question of how to adjust the carburetor cannot be solved. The process of adjusting the floats includes the following operations:
- Adjusting the floats in relation to the lid and walls of the fuel chamber. If deformation of the float fixing bracket is noticed, it should be aligned manually;
- We adjust the bracket with the needle valve closed;
- We adjust with the float retracted and the valve open; the distance between the float and the valve should in this case be set to about 15 millimeters.
Setting the fuel mixture supply
The carburetor control screws will help you figure out this setting.
Before performing this procedure, you should know that the screws have a plastic factory press-on that limits the rotation of the screws (from 50 to 70 degrees).
If turning in this range does not bring results, you need to break the press-on and turn the screws as much as necessary. Before setting the position of the screws, you should warm up the car engine to operating temperature.
Adjusting the carburetor draft
Before you begin adjusting the rods, you should remove the air filter cover so that nothing interferes with the process. First, using a caliper, measure the distance between the rod tips. According to factory parameters, it should be 80 millimeters. To adjust the length of the rods, you need to loosen their clamps.
Checking the strainer should be carried out when there is fuel in the float chamber. This will help you see if the shutoff valve is closing completely. After examining the valve, you need to clean and dry it. Problems with loss of power and engine failures occur due to obstructed fuel supply. This is another reason to thoroughly flush the carburetor.
The tightness of the shut-off needle can be checked using a rubber bulb, while listening for air leaks. If they are present, it is time to change the needle.
How to properly adjust a Solex carburetor
There are still many representatives of VAZ classics driving along the roads. Many of these cars have Solex carburetors under the hood.
This carburetor is more economical and is capable of producing a higher quality mixture of fuel and air. For smooth operation of the engine, this carburetor must be properly tuned and adjusted.
The class of carburetor masters is gradually dying out, so many people have to do the carburetor adjustments themselves.
How to set the ideal settings yourself
To work, you will need the usual set of tools that are found in almost every garage. To eliminate fuel overflows, you need to correctly set the float in the chamber. This operation can be done using a special template.
Experts recommend not using this template, since the number and thickness of gaskets in carburetors do not always match. Fans of various improvements often replace factory gaskets with better ones. It happens that the factory settings of the template do not suit everyone.
Although Solex carburetors are the same, the fuel pump can deliver gasoline differently. A lot also depends on whether the return line is plugged, so specialists use a different method.
Verification algorithm:
- The mixture quality adjusting screw is tightened by hand until the end;
- Next, unscrew it back five turns;
- Turn on the engine, remove the choke and use the mixture screw to bring the engine speed to 750 rpm;
- By turning the quality screw, we bring the engine speed to the maximum;
- Using the quantity screw, reduce the speed to 800 rpm;
- We tighten the quality screw a little until instability appears;
- We unscrew the same screw back one turn;
- We turn the quantity screw until the idle speed reaches 800 rpm (in winter they can be raised to 900).
It is worth remembering that adjusting the carburetor not only eliminates floating engine speeds. A well-tuned carburetor will consume a minimum amount of fuel at stable idle speeds.
It happens that when unscrewing the quantity and quality screws, the engine practically does not react. This happens when a large stream of gasoline flows from the idle hole and the screw is unable to influence it. It is possible that the valve is poorly closed or the jet is deformed.
It happens that when replacing jets, they mistakenly choose a larger diameter than required. The plug may be loose. It is worth conducting a thorough inspection of all carburetor elements, this will help avoid such problems.
When cleaning, the jets must not be cleaned using abrasives.
If the solenoid valve malfunctions, unscrew it and check for deformation. The mounting hole may also be deformed. If the thread of the mounting hole is torn off, you will have to replace the carburetor cap with a new one. If no defects are found, simply lubricate the O-ring before screwing in the nozzle.
You can determine whether the carburetor needs adjustment by the engine's response to pressing the gas pedal. An engine receiving a balanced fuel mixture responds to pedal pressure without hesitation, in a split second.
The speed should be smooth at idle. There should be no jerks or failures.
If the engine runs smoothly at idle, but when you press the accelerator it begins to act up, you need to tighten the quality screw, enriching the mixture.
The quality screw directly affects CO emissions into the atmosphere. Drivers are familiar with the situation when, before going for a scheduled inspection, they need to tighten the quality screw.
The emissions become smaller and the car easily passes inspection, after which the position of the quality screw returns to its place.
Some people are perplexed why their neighbor’s car consumes less fuel, although both have identical models. It's all about the settings and adjustments of the quality screw.
Setting up a carburetor is a rather complicated procedure. Don't expect everything to work out the first time. It may take a couple of weeks to complete the full cycle of eliminating all deficiencies.
It is better to listen to the engine, quickly respond to the slightest interruptions in its operation and carry out regular carburetor flushing. The main thing when washing is not to use nameless Chinese-made cleaning products.
And if you refuel with high-quality fuel, the carburetor will thank you for years of trouble-free operation.
Source: https://SwapMotor.ru/ustrojstvo-dvigatelya/regulirovka-karbyuratora.html
Setting it up: how to adjust the carburetor on a VAZ 2106 with your own hands?
The legendary “six”, which was almost the main car in the country, is becoming less and less common on our roads.
Nowadays, few people specialize in the repair and maintenance of VAZ classics, and it is quite difficult to find a specialist to set up its power system.
However, any car owner is able to independently set up a unit for preparing a combustible mixture; it is enough to use the recommendations of experienced drivers.
Briefly about the features and structure of the “six” carburetor unit
Before adjusting the carburetor on a VAZ 2106, it doesn’t hurt to know its design features. After 1980, Ozone and Solex began to be installed on Tolyatti cars.
The purpose of the unit’s operation is to prepare a combustible mixture before feeding it into the car’s cylinders.
Down to the subtleties, this is not a driving school, we will not disassemble the design, it is enough to familiarize yourself with the main components that ensure optimal operation of a carburetor internal combustion engine:
- Fuel dosing system.
- Mechanisms for controlling throttle valves and enriching the mixture.
- Idle system.
- Accelerator pump and econostat.
- Float chamber.
A chamber with a float and a needle valve is responsible for the stability of the fuel level. Next, gasoline, flowing through the spray tube, enters the chamber, where it mixes with air from the inlet pipe. The amount of mixture is adjusted by the throttle valve, which is connected to the accelerator pedal.
Precise adjustment allows you to prepare the correct mixture of gasoline and air in a ratio of 1:15. During long-term operation of the car, the settings get lost and you have to think about how to adjust the carburetor on a VAZ 2106 on your own. The adjustment technology is the same for both Solex and Ozone.
When is adjustment needed?
Adjusting the carburetor unit is no more difficult than adjusting the clutch drive on a VAZ 2107 , since it only involves adjusting the jets.
In some cases, they need to be cleaned of resins and other contaminants; the presence of contaminants is felt by power dips during the process of accelerating.
Many car owners claim that Ozone carburetors are not a very good option and recommend replacing them with Solex.
However, the signs that the device has begun to prepare an enriched mixture and needs to be adjusted are the same for both types of units:
- Increased fuel consumption.
- Frequent overheating of the motor.
- Black smoke from the exhaust pipe and pops.
- Loss of power.
The preparation of a lean mixture is characterized by the following characteristics:
- Popping sounds in the carburetor.
- Loss of power.
- Engine overheating.
Of course, you don’t always need to immediately grab a screwdriver and turn the adjusting screws - perhaps it’s something else.
For example, when the idle speed floats, air may leak through the intake manifold gasket, or there may be a breakdown of the brake booster diaphragm.
But even the reasons listed are not all the options, so specific recipes for eliminating certain problems cannot be given. The issue should be addressed comprehensively, taking into account the connection between vehicle systems.
Full adjustment of the combustible mixture preparation unit requires a systematic approach. The entire cycle consists of the sequential execution of the following steps:
Source: http://autobann.su/kak-otregulirovat-karburator-vaz-2106.html
Do-it-yourself adjustment and repair of chainsaw carburetor malfunctions
The functioning of the internal combustion engine (ICE) of a chainsaw is based on the combustion of a fuel-air-oil mixture.
To mix the gasoline-oil mixture with air and then feed it portionwise into the combustion chamber, a rather complex device in its design is installed on engines - a carburetor.
When purchasing a new chainsaw, the carburetor already has factory settings, but over time they get lost, and the device that controls the fuel supply needs to be adjusted again. Without knowing how the carburetor works and not understanding the operating principle of this module, it will be problematic to configure it correctly.
The design and principle of operation of a chainsaw carburetor
The chainsaw carburetor consists of the following main components:
- one-piece body made of light aluminum alloy;
- a diffuser located at the entrance to the carburetor;
- jets, special valves designed to regulate the supply of a combustible mixture;
- sprayer;
- float chamber.
Below is a diagram of a Walbro carburetor, which is very often equipped with chainsaws. Using this diagram, you can study in more detail the internal structure of the chainsaw carburetor.
The carburetor may have 2 or 3 adjusting screws with springs . The adjusting screws are designed so that there are needles (cones) at their ends. The screws have a right-hand thread, that is, they are tightened clockwise.
The chainsaw carburetor works as follows.
- After starting the engine, the air damper opens.
- In the diffuser (16), where there is a narrowing, the air flow accelerates and mixes with gasoline. The latter enters through jets (15) and (12), and the air purified by the air filter comes through the damper (7) located at the diffuser inlet.
- The damper (8), located behind the diffuser, regulates how much of the prepared mixture enters the combustion chamber.
- The volume of gasoline passing through the nozzles is regulated by screws (17) and (10) - these are, respectively, screws L and H on the chainsaw.
- The volume of the fuel mixture in the float chamber (14) depends on the needle valve (11). The functioning of the needle valve is controlled by a diaphragm (13).
- The membrane (4) controls the flow of the fuel mixture into the combustion chamber, and this depends on the number of revolutions of the internal combustion engine. Gasoline is purified through a filter (6).
When adjustment is needed
As already mentioned, the new chainsaw already has standard fuel supply settings. But for proper break-in, it is recommended to limit the maximum engine speed, and this is done using adjusting screws located on the carburetor body. Also, after running in, you will need to again make more precise adjustments to the supply of the combustible mixture.
In addition, the carburetor will have to be adjusted in the following cases:
- due to strong vibration, the factory settings were lost;
- The internal combustion engine does not start well and stalls immediately;
- The internal combustion engine starts, but the speed does not develop, and it stalls;
- the piston group is worn out - in this case, adjusting the chainsaw carburetor is possible as a temporary measure;
- the engine does not operate at idle speed;
- increased gasoline consumption, which causes the unit to produce a lot of smoke, contaminate the muffler and spark plug with soot, and reduce engine power.
Rules for setting up the carburetor
You should know that the carburetor can be adjusted correctly only if:
- cleaning filters (gasoline and air) are not dirty;
- the jets and the channels leading to them are clean;
- the membranes are not damaged;
- the needle valve is working properly and the required volume of fuel mixture enters the float chamber.
To adjust the carburetor of imported chainsaws, you must adhere to the following rules.
- Before adjustment, if possible, you should warm up the engine at idle or minimum speed for about 10-15 minutes.
- By rotating the “L” regulator, the engine is operated in such a way that it produces one and a half to two thousand revolutions per minute at idle. But you should pay attention to how the engine gains speed. When pressing the accelerator lever, acceleration should proceed quickly and evenly. If a “drop” in speed is detected, the screw should be slightly unscrewed until this phenomenon is eliminated, since it is caused by insufficient enrichment of the fuel mixture.
- When the mixture flow is adjusted at low speed, you should start tightening the screw “T” until you notice the rotation of the saw chain. After this, the screw should be unscrewed by half or a third of a turn, observing the behavior of the clutch mechanism. Normally, the saw should not rotate at idle speed.
Screw “H” compensates for under- or over-revving due to a change in fuel type, change in oil concentration or ambient air humidity.
Without enough experience, it is better not to adjust the “H” screw. If the chainsaw carburetor is adjusted by an incompetent person, there is a great danger that a too lean mixture will enter the combustion chamber at high speeds, especially under load. Such engine operation will inevitably lead to rapid wear of its piston system and failure of the ignition system.
You can start adjusting high speeds if the person who will perform the adjustment has knowledge and skills in adjusting carburetor engines. The adjuster must have at his disposal a special device - a tachometer or a multimeter with an oscilloscope function.
Setting the carburetor of a chainsaw, namely, high engine speeds, follows a simple scheme.
- It is necessary to tighten or unscrew screw “H” until, at maximum gas, the engine develops about 15 thousand revolutions per minute (according to the tachometer) or the value indicated in the manual for this unit.
- When using an oscilloscope, the spark discharge frequency should be between 230 and 250 Hz. Please note that under load the frequency may decrease by approximately 10-15%.
The carburetor of a Chinese chainsaw should be adjusted according to the same principle as described above. There are holes on its body into which you need to insert a flat-head screwdriver to adjust the engine speed. Each hole is signed with one of the three letters. As a rule, you can see the letter “T” near the top hole, and the letters “L” and “H” near the lower ones (shown by arrows).
The Chinese chainsaw Carver (CARVER) also has the same arrangement of screws. The following figure shows what a carburetor from a Chinese chainsaw looks like outside the unit body.
How to troubleshoot carburetor problems
The main malfunctions of a chainsaw carburetor may be as follows.
- The engine starts with difficulty and stalls a few seconds after starting. This is often caused by incorrect low rpm settings. The fuel-air mixture is slightly enriched. It is necessary to unscrew the “L” screw half a turn, after which the adjustment should be completed with the “T” screw.
- Engine power decreases noticeably under load. This means that the carburetor excessively enriches the mixture with oxygen. Therefore, screw “H” needs to be tightened a little, about 1/8 of a turn. If after such actions the engine power is still insufficient, but there has been some improvement in its operation, then the regulator can be tightened a little more.
- The engine at maximum speed and without load begins to “sing”. This malfunction in the operation of the unit is caused by a lean mixture and high speed. The adjustment is made using the same “H” screw.
- No gasoline enters the combustion chamber. Failure can be caused by clogged fuel filter, channels and carburetor jets. To eliminate the malfunction, you need to completely disassemble this chainsaw module and blow out its channels with compressed air (a compressor is required). To properly clean the fuel channels, you can use a special carburetor flushing fluid. Also, the lack of fuel flow into the engine cylinder may be due to incorrect adjustment. How to do this yourself is discussed above.
- Overfills the carburetor. In 90% of cases, fuel overflow is caused by a dried out and roughened membrane, which puts pressure on the rocker arm connected to the needle. To change it, you will need to remove and disassemble the carburetor.
- The engine revs poorly, runs intermittently, and power decreases. These problems are often caused by a clogged air filter. You will need to remove the cover covering the filter and clean it, which involves washing with detergent.
In general, timely adjustment, as well as timely repair of a chainsaw carburetor can significantly extend the life of the entire engine piston system. Therefore, the adjustment of this component of the fuel system must be treated with great attention.
Source: http://Tehnika.expert/dlya-sada/benzopila/ustrojstvo-i-regulirovka-karbyuratora.html
Correct adjustment of the VAZ 2106 carburetor and its settings
The fuel mixture is supplied to the cylinders in cars of the VAZ 2016 family using a mechanism called a carburetor. The mechanism is responsible for stable engine operation and moderate fuel consumption.
It is not uncommon for the VAZ 2106 carburetor setting to fail; in such situations, it requires adjustment and maintenance.
Repairs are carried out at service stations; most owners try to do carburetor maintenance themselves to save money.
The design of the VAZ 2106 carburetor
High-quality independent maintenance of any vehicle system requires a detailed study of the components and mechanisms responsible for its operation.
Before adjusting the carburetor on the VAZ 2106 , you need to consider the main units:
- System for supplying and dosing the combustible mixture;
- Control of mixture enrichment flaps, throttle position;
- The structure of the float chamber and its main purpose;
- Operation of the accelerator pump and idle mechanisms.
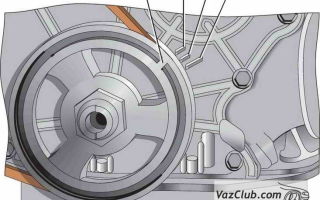
View of the carburetor from the throttle valve drive side: 1 - air damper; 2 — starting device; 3 — air damper control lever; 4 - telescopic rod; 5 — lever for driving the throttle valve of the primary chamber; 6 - lever that limits the opening of the throttle valve of the secondary chamber; 7 - return spring; 8 - rod connecting the throttle valve of the primary chamber with the air damper control lever; 9 — pneumatic drive rod; 10 - pneumatic drive.
The process occurs by filling the float chamber with fuel, which must have a stable level. The fuel is transferred to the spray mechanism, where, in turn, it is mixed with air in proportions of 1 to 15, the quality of the mixture is regulated by the throttle valve.
↑
Preparing to adjust the carburetor
Car repair and maintenance requires prepared tools and space.
Setting up the carburetor of the six is no exception; for fast, competent work you need to carry out the following steps:
- Before work, the car is placed on a flat surface, a place is prepared for disassembling components in the form of a table or a clean area. A container for washing and clean rags will definitely be needed.
- Prepare a set of keys and screwdrivers; without tools, it will not be possible to carry out the work.
- Purchase a repair kit from an auto parts store that contains all the O-rings, gaskets and mechanisms.
- Disassembly and adjustment of the VAZ 2106 carburetor occurs after completing the tool and the necessary materials.
↑
Tuning and adjusting the carburetor VAZ 2106
Before adjusting the carburetor on a VAZ 2106, you need to check the ignition system and fuel supply. The main causes of ozone carburetor malfunctions are a rich or lean mixture, which directly affect the stable operation of the engine.
An enriched mixture manifests itself in the form of increased engine temperature under stable operating conditions and increased fuel consumption. Before adjusting the carburetor on a VAZ 2106 car, you must completely check the adjacent systems and filters.
A lean mixture leads to a loss of power, acceleration dynamics of the car, and loud sounds in the form of pops. You should pay attention to the engine temperature; if the increase occurs too quickly, it is necessary to correctly adjust the amount of mixture. As a preventive measure during car maintenance, it is recommended to check thermal clearances, the condition of the fuel system and filters.
↑
Checking the strainer
The correct amount of fuel is not always supplied to the carburetor. The reason is negligence regarding the frequency of replacement of coarse filters, which has a detrimental effect on the mesh filter, which cleans the fuel before being supplied to the float chamber of the carb.
The filter is dismantled after unscrewing the plug that protects the structure. Cleaning of soot and dirt must be done from the inside by thoroughly blowing the filter with compressed air.
The operation must be performed with extreme caution; if the thin walls of the filter are damaged, it cannot be restored.
When installing, pay attention to the condition of the fuel supply nozzle. If it is possible to visually determine scale or dirt, it is necessary to remove and blow it out.
Before removing the nozzle, the float chamber should be emptied of fuel, because the needle valve may be damaged or the system settings may be lost.
When screwing the plug, it is necessary to visually inspect the gasket; if damaged, replace it with a new sealing ring.
↑
Setting up the float chamber
The float chamber device is responsible for the constant presence of fuel in the system. The camera mechanisms can be adjusted and answer the question of how to adjust the VAZ 2106 carburetor for lower fuel consumption.
The main reason for incorrect float settings may be increased fuel consumption and unstable engine operation during acceleration. Before dismantling, you must make sure that the fuel nozzle is screwed in place, because It is not uncommon for it to twist out of place due to increased vehicle vibrations.
Fuel overflow can also occur due to a low fuel level in the float chamber, which may result in weak engine thrust, popping noises or wet spark plugs.
Setting the float chamber: 1 - carburetor cover; 2 — needle valve seat; 3 - emphasis; 4 - needle valve; 5 — locking needle ball; 6 — valve needle pull-out fork; 7 — float bracket; 8 - tongue; 9 — float; 10 - gasket.
Adjusting the VAZ 2106 carburetor will require removing the cover; in a state where the upper part is horizontal and upside down, the gap should be no more than 6 mm. This position is taken as the maximum level of gasoline in the chamber with the needle-type valve closed.
The float tongue is used to adjust the level of the fuel mixture; after setting the correct position, it is necessary to check the operation of the needle valve. The float axis is dismantled, the valve is removed from the threaded connection.
Visually you can identify mechanical damage, scuffs and scratches.
Checking the work yourself is done as follows:
- The cleaned and configured nodes are mounted in their places;
- Gasoline is pumped through a mesh filter with a rubber bulb; the needle valve should clearly allow fuel to pass through;
- Bleeding the system is repeated with the parts fully installed;
After checking, you need to make sure that the gasket is correctly in its seat, because it can block one of the channels and cause unstable operation. Before the process of adjusting the mixture of the VAZ 2106 carburetor, the engine is completely warmed up, the air suction lever is completely recessed.
↑
Starting system, setup and adjustment
The starting device can be adjusted correctly on a dismantled carburetor in the car.
You can adjust the VAZ 2106 carburetor with your own hands without removing the carburetor; just remove the air filter, pull the choke drive towards you, and take your foot off the gas pedal in the car's interior.
According to the tachometer readings, with the air damper completely closed, the speed should vary from 3200 to 3600 per minute.
Carburetor starting device: 1 - choke drive lever; 2 - air damper; 3 - starting device rod; 4 — starting rod; 5 - adjusting screw; 6 — throttle valve of the primary chamber; 7 — throttle drive rod. B, C - starting gaps of the dampers.
At the next stage of adjustment, you need to force open the air damper by 30 percent of its stroke. Through these actions, the engine speed should be reduced by 300 units; if this does not happen, the rod length is adjusted.
In cases where the carburetor of a VAZ 2106 removed from the car is adjusted, the following instructions must be followed:
- Adjust the distance of the closed air damper;
- The gap should be no more than 5.5 mm, measured from the camera body to the shutter;
- We adjust the gap using the quantity screw; when unscrewing, the gap increases, and in the opposite direction it decreases.
It is important to remember that it is necessary to control the distance between the diffuser and the throttle; it should be no more than 0.8 mm.
↑
Idle speed adjustment
Adjusting the idle is quite simple; for this you need to completely assemble, configure, adjust the carburetor on a VAZ 2106 car, and warm it up to operating temperatures. To adjust the idle speed, there are screws for the quality and quantity of the mixture.
The initial setting is made with the quantity screw, the speed increases to 1100 units per minute. After this, the speed is reduced by a quality screw, which is blocked by a plug. Adjusting the carburetor 2106 involves lowering the speed until the engine runs stable; their approximate number is adjusted around 800 rpm.
Source: https://prokarbyrator.ru/regulirovka-karbyuratora/regulirovka-karbyuratora-vaz-2106.html
How to adjust a VAZ carburetor
Correct adjustment of the carburetor ensures normal operation of the power unit and significantly reduces fuel consumption.
In order to correctly adjust the quality of the mixture and fuel supply, you need to have a good understanding of how the power system works. Unfortunately, there are very few qualified carburetor specialists, so you have to master this procedure yourself.
To do this, first of all, you should have a basic understanding of its structure. Knowing the principle of operation and what the quality of the fuel mixture depends on, you can make adjustments without the involvement of specialists.
In this article we will look at how to adjust a VAZ carburetor with your own hands.
Setting up VAZ classic carburetors
Before adjusting the VAZ-2101 carburetor, it is necessary to configure it, which includes the following measures:
- adjustment of the position of the throttle valves (DZ);
- setting up the starting device (PU);
- monitoring the performance of the accelerator pump (AP);
- control of the tightness of the needle valve (IR).
Correction of the position of the remote control:
- We set the throttle valves to the fully open position by turning the lever and drive counterclockwise to the extreme position.
- We check the maximum opening of the primary chamber remote sensing, which should be equal to 13.0 ±0.5 mm. If necessary, we adjust the opening value by bending the lower tendril of the rod.
- We control the value of the maximum opening of the remote control, which should be 15.0 ±0.5 mm. Adjustment is carried out by unscrewing or tightening the pneumatic actuator rod.
- We check the distance between the upper antenna of the lever of the primary chamber's remote sensing axis and the lever that limits the opening of the secondary chamber's remote sensing. If necessary, by bending or unbending the upper tendril of the first lever, we set the value of this gap to 6.0 ± 0.1 mm.
– Setting up PU . We close the throttle valve of the secondary chamber by turning the lever counterclockwise until the end. In this position, the end of the lever rod, which is rigidly attached to the axis of the primary chamber, should be at the end of the trigger rod. If this is not the case, the desired position is obtained by bending the rod.
– Control of UN performance. To check the operation of the accelerator pump, you need to prepare a beaker and collect in it the fuel that will flow in 10 full strokes of the remote control lever.
Performance is considered normal if the volume of fuel received is in the range from 5.25 to 8.75 cm3.
Before collecting fuel, experts recommend performing a test pumping at least 10 times to fill all pump channels.
– IR tightness control. Leak testing is carried out on a special stand, which allows you to create the necessary fuel pressure. The needle valve is placed in a special control tube. The pressure in the test tube must be maintained at a constant level for at least 10 +5 seconds. If there is a leak, the valve needs to be replaced.
Do-it-yourself carburetor adjustment on a VAZ
Before adjusting the VAZ-2106 carburetor or its equivalent, you should perform the following operations:
- Check the timing valve clearances for correctness:
- eliminate malfunctions of the ignition system, if any;
- clean or replace spark plugs if necessary:
- clean the carburetor;
- adjust the position of the float valve.
Carburetor adjustments are made with the engine preheated. First, with the engine not running, both adjusting screws must be tightened until they stop. After this, unscrew the screw that regulates the amount of fuel mixture three turns. Then we unscrew the screw that regulates the fuel quality by 4-5 turns.
To make further adjustments, start the engine. By rotating the fuel quantity adjustment screw, we set the speed within 800 rpm.
After this, using the screw that ensures quality, we lean the air-fuel mixture (to do this you need to tighten it) until the speed begins to drop.
In this position, fix this screw, and then unscrew it in the opposite direction by 1-0.5 turns, achieving stable operation of the engine in idling mode. It is recommended to revoke the engine and make sure that the engine speed in idle mode is within 800 ±50 rpm.
Video - How to adjust the carburetor yourself
If necessary, the procedure with adjusting the position of the screws can be repeated.
Setting up the carburetor on a VAZ-2107
How to adjust the carburetor of a VAZ-2107? These models are equipped with Ozone series carburetors, which are equipped with an economical fuel consumption system in forced idle mode, the so-called. economizer. Adjusting the carburetor is practically no different from the method described above.
- With the engine running, turn the fuel quantity screw to set the speed within 860 ±40 rpm.
- Using a screw that regulates the quality of the fuel mixture, we achieve a CO2 concentration in the range of 0.5-1.2%.
VAZ-2109 Solex
Before adjusting the VAZ-2109 carburetor, you must first configure it and warm up the engine. Then turn off the engine and tighten the screws for adjusting the quality and quantity of the fuel mixture until it stops. After this, unscrew the quantity screw back three turns and start the engine. The speed in idle mode should be within 1000 ±500 rpm.
1 – air damper2 – starting device3 – adjusting sensor-mixture quantity screw4 – accelerator pump5 – solenoid valve
6 – carburetor cover
By slowly tightening the fuel quality adjustment screw, we bring the engine to an unstable operation mode. Then unscrew the screw in the opposite direction until a stable mode is restored. Using the quantity screw, set the speed to 850 ±50 rpm.
Source: http://VipWash.ru/karbyuratory/kak-otregulirovat-karbyurator-vaz
Do-it-yourself adjustment of the VAZ 2107 carburetor
≡ April 7, 2017 Category: Repair
The VAZ 2107 sedan has been out of production for several years now. However, this circumstance did not reduce its popularity among car enthusiasts.
Currently, many more cars of this family roam the roads of many CIS countries.
A large number of owners repair and maintain the “Seven” on their own, so they will be interested in this article.
What is
The operating principle of internal combustion engines is based on the combustion of fuel, which is used for carburetor engines.
The engine will not work if gasoline is simply poured into the combustion zone.
Its operation is possible only when the fuel mixture enters the combustion chamber, which is formed in a ratio of 15:1 parts of air and gasoline. The carburetor just forms the composition of the fuel mixture.
New cars today are no longer produced with carburetors in the power system; they have been replaced by injectors, but the demand among car enthusiasts has remained.
The production of these devices continues in many countries around the world, including the Russian Federation. During operation, these devices wear out, their adjustments are lost, so they need maintenance, adjustments, and repairs.
Before we start talking about this, we should consider the design of these devices.
Design and principle of operation
Carburetors are available in several types, but the two most widely used are:
- Float models;
- Needle devices.
The most widespread are models with a float chamber, but although rare, bubbler-type products are also found. At different periods of production of the VAZ 2107, devices of different brands were installed, these could be Solex or Ozone carburetors. Let's try to understand the principle of their work.
https://www.youtube.com/watch?v=4qsFG6XQ_zw
The design of these devices is approximately the same, there are only minor differences. The design uses the following components:
- Float chamber for gasoline;
- Throttle valves;
- Damper that regulates air flow;
- Chambers for mixing fuel with air;
- Idle air valve;
- Econostat;
- Compartment for removal of crankcase gases;
- Acceleration pump;
- Jets for supplying air and fuel;
- Tubes for obtaining fuel emulsion.
Also, this device has several systems, such as a system for ensuring the engine starts with its subsequent warming up, and a system for controlling idle speed. System for monitoring the fuel level in the float chamber, accelerator pump assembly. Also, the operation of this device is impossible without a mixing chamber and econostat.
When the pistons move, a vacuum is created in the combustion chamber, which sucks fuel from the float chamber. Gasoline flows through channels into the mixing chamber where it is mixed with air.
The throughput of the jets is selected in such a way that the ratio of the amount of incoming air to the mass of gasoline is approximately 15:1.
This ensures maximum efficiency of the internal combustion engine.
For a variety of reasons, the factory settings of the carburetor may be violated, which will lead to a loss of power of the power unit and an increase in fuel consumption. In this case, many motorists turn to specialists at automotive centers for help in resolving their problems. If you wish, you can easily do this work yourself.
Settings
Before you begin, it is advisable to become more familiar with the type of carburetor used on your car.
This must be done in order to select the correct repair kit for the device if necessary.
There is a plate attached to the body of the middle part of the carburetor indicating its number; it is needed for the correct selection of spare parts. Settings can be made directly on the power unit or after dismantling it.
During vehicle operation, various layers of dust, dirt, and engine oil accumulate on the carburetor body, so it should be thoroughly cleaned.
This procedure will be hampered by the air filter housing, which will need to be removed. First of all, unscrew the three nuts on the cover of the air filter housing with a 10mm wrench.
They are removed along with the washers, after which you can remove the cover along with the air filter. The body itself is held in place with four 8mm nuts.
When the nuts are unscrewed, the housing along with the crankcase gas exhaust hoses is removed. You can start cleaning the carburetor without removing it from the engine. To do this, you can use chemicals for cleaning the engine, kerosene, and other detergents.
The process will go much faster if the engine is hot. Typically, detergents come in aerosol form, making them easier to apply to dirty areas.
If kerosene is used, it is poured into a plastic bottle with a small hole in the cap.
How to adjust the device
Carburetor adjustment is carried out in several stages:
- Checking the functionality of the air damper;
- Measuring the fuel level in the float chamber;
- Checking the performance of the accelerator pump;
- Cleaning fuel and air jets;
- Regulating engine idle speed.
It cannot be said that these are all types of adjustments, there may be others, it depends on the type of carburetor, its service life, and other reasons.
About checking the air damper
This is easy to do yourself. Pull the choke handle towards you as far as it will go and look at the condition of the air damper. It should completely cover the diffuser of the primary carburetor chamber without gaps. Turn the engine crankshaft with the starter for a few seconds; if flashes occur in the cylinders, it should deviate and allow the air mixture to enter.
https://www.youtube.com/watch?v=352UAZNsvOg
Problems with the damper can arise due to incorrect installation of its drive cable, malfunction of the telescopic rod, or oily deposits on the walls of the diffuser.
How to check the fuel level in the float chamber
To perform this operation, you need to remove the top cover of the device. You can check the level in two ways: by measuring the distance from the float to the cover, or using a caliper depth gauge for the fuel level in the carburetor float chamber.
We measure the distances from the float to the lid.
The distance from the float to the cover should be within 6-7 mm, while the needle valve should shut off the fuel supply. This can be easily checked by blowing into the pipe in the top cover.
This distance is set by bending the tongue on the float. If the channel does not close, the needle valve should be replaced. A depth gauge measures the fuel level immediately after stopping the engine; it should be at a level of approximately 17 mm.
It is also installed by bending the float tongue.
Acceleration pump and checking it
This check is carried out with fuel in the carburetor. To do this, you need to make several presses of the gas pedal and at the same time observe the “beak” in the diffuser of the secondary chamber. A stream of gasoline should splash out of it.
Turn the sprayer out.
If a stream does not appear, the sprayer should be unscrewed as shown in the photo, then blown out. If you press the gas pedal again with the nozzle removed, fuel should appear in its channel. The nozzle must be removed carefully so as not to lose the copper gasket. The lack of gasoline in the nozzle channel may be due to a leak in the pump diaphragm.
To check it, unscrew the four screws on the cover with a Phillips screwdriver and remove it from the body. You should also be careful not to lose the spring. The diaphragm does not need to be repaired; it is simply replaced with a new part.
The arrows in the photo show the screws securing the accelerator pump cover.
A little about checking jets
The use of low quality gasoline can lead to clogging of fuel and air nozzles.
Sometimes, when the carburetor top cover is removed, you can see sediment in the float chamber. It can easily get into the fuel channels and block the access of gasoline. Using a tire inflation pump or compressor, you can blow them out.
An aerosol for jets is available for sale. The tube from the aerosol can is inserted one by one into the nozzles and washed. When checking the jets in the float chamber, you cannot swap them, this will lead to increased fuel consumption.
If this does not help or there is no aerosol for cleaning the carburetor, the jets are turned out of their mounting sockets for washing. It is best to use solvents 646 or 647 as a flushing fluid.
If you dip the jets in them for a while, they will dissolve all the layers in the holes of these parts. The carburetor emulsion tubes are subjected to the same procedure.
You can get them out with the handle of a thin needle file or other rod of suitable diameter.
The air jets of the primary and secondary chambers are subjected to the cleaning procedure. To do this, use a flat-blade screwdriver to turn out the bronze screws, which are hollow inside, on the sides. Air jets are inserted into them. They can be easily removed from their seats for purging or washing. They usually have the same calibrated dimensions, so it is impossible to confuse them.
The photo shows one of the two screws with an air jet.
How to regulate idle speed
Most drivers complete the stage of adjustment work with the carburetor with this operation. To do this, there are two screws at the bottom of this device, which regulate the quantity and quality of the fuel mixture.
As a rule, the manufacturer makes adjustments to the device, after which safety bushings are pressed onto these screws. After installing them, the screw can be turned only slightly. These bushings must be removed to make adjustments.
When performing adjustment work at a service station, such bushings are reinstalled after completion of the work. There are two screws to regulate the idle speed.
In the photo, a screwdriver is used to screw in the fuel mixture quality screw, and next to the tubes you can see the mixture quantity screw.
Let's take a closer look at the procedure for setting the required engine idle speed. This operation is performed as follows:
- The screw that regulates the amount of mixture is set on the tachometer at approximately 850 - 900 rpm;
- By rotating the quality screw, maximum engine speed is achieved;
- By rotating the screw, the mixture quantity is reduced to 950 - 1035 rpm;
- Such manipulations with the screws are carried out several times until, when rotating the quality screw, only a decrease in the engine speed occurs;
- The quality screw is used to achieve nominal speed;
- The operation of the engine is checked at idle speed, when the gas pedal is sharply pressed. The operation of the power unit should be smooth, without tripping or failures.
It may happen that by rotating the screws it is not possible to change the engine speed. This may be due to excessive clearance between the diffuser and the throttle body. This gap is set with a screw located next to the fuel mixture quality screw.
Video about carburetor adjustment
What else you should know
A mesh filter is installed in the fuel pipe of the carburetor to clean the incoming gasoline, which should be washed periodically. Some owners install an additional filter before the fuel pump, or between the pump and the carburetor.
Sometimes the idle speed “floats”, this can be caused by “excess” air passing through the gasket in the forced idle economizer, which needs to be replaced. You can use the car for some time if you insert a spring of a suitable diameter between the valve cone and the valve body, and then set the idle speed.
“Loss” of idle speed can occur after a failure of the solenoid valve. Often this can happen after the nozzle of the tip of this valve is clogged; after cleaning it, functionality is restored.
(10 vote, average rating: 4,60
Source: http://asonline.ru/remont/kak-otregulirovat-karbyurator-na-vaz-2107.html