Do-it-yourself car interior reupholstery

Reupholstering the interior of a car yourself is a fairly simple operation, but very scrupulous and time-consuming. The reason for the need to update the interior is most often the age of the car and the desire of its owner to change and improve something.
Very often this idea is prompted by marks on the seats, burned by cigarettes, or consequences of any other origin that cannot be removed either independently or by dry cleaning. And sometimes the owner is simply impressed by how the new interior looks in the cars of his friends.
Today, interior reupholstery is the most important element of tuning the entire car, allowing it to uniquely distinguish it from its peers, as well as simply give it a much more well-groomed and expensive look. The service is in great demand among girls who always enjoy regular changes.
Today, in specialized stores you can find everything you need to begin the process of reupholstering the interior. When doing the work yourself, you can save a significant amount, since ordering this service from specialists will not be cheap.
Necessary materials for reupholstery in the cabin
It is very popular today to use leather materials when replacing old seat upholstery with new ones. However, we will talk about another material that is no less in demand in this area. The optimal solution in terms of aesthetics and practicality is Alcantara. In addition, its cost is much more affordable than leather.
Alcantara is a composite material that has qualities such as durability and high wear resistance. A wide range of colors, which can be considered when choosing a material, will allow you to satisfy almost any of your fantasies. It should be noted that you can also find other materials for upholstery on sale.
Now you need to figure out the tools. You will need: a set of keys, a knife and scissors used for cutting linoleum, a screwdriver, glue and a hair dryer. As an adhesive, you can use a product intended for sound insulation in the cabin.
Constriction technology. Important points
The basic principles of interior reupholstery are the same for any make of car and can only differ in small details.
Seats
Let's start with the seats. Based on the old covers, you need to make a pattern for the new ones, taking into account the shape, size and other points. You can also buy ready-made covers, but the likelihood that you will find suitable ones is low.
Doors
Next is the door trim. Here it will be more convenient to analyze the order of actions point by point:
- Dismantling old material, removing residual adhesive, dirt, dust and other foreign material.
- Cutting out a piece of appropriate shape and size from Alcantara, or other material of your choice. Cutting holes in it for door handles and for other elements, including decorative parts.
- Applying the adhesive mixture to the places where the fabric comes into contact with the door. It is very important to leave allowances of about 10 mm.
Ceiling
The next step is reupholstering the ceiling. Let's also look at it step by step:
Video - Reupholstering the ceiling in the car interior
-
Dismantling linings on racks, removing lighting elements, handles and other parts.
-
Dismantling old casing.
-
Gluing new material to the ceiling.
-
Reinstallation of all elements, carried out in the reverse order than was done in step No. 1.
Armrest
The process is the same as with doors. The old casing is dismantled, a new one is cut out in its likeness and, after removing traces of dirt, a new one is carefully glued along the entire perimeter, taking into account allowances. The latter will be needed to bend them when edging the protruding elements of the armrest.
During operation, you must use a hairdryer. This will help avoid wrinkles by steaming the working material when gluing. It is highly advisable to use a hair dryer when reupholstering all interior elements.
As you can see, there is nothing complicated in this procedure, and with a careful and meticulous approach you will get the expected result.
Source: http://VipWash.ru/tyuning/peretyazhka-salona-avtomobilya-svoimi-rukami
Do-it-yourself interior reupholstery: choice of material, tools and work features
Perhaps, comfort in the cabin is very important for every car owner. Increasingly, manufacturers are offering a more attractive and comfortable interior, however, over time, the interior significantly loses its neat appearance .
Drivers must strictly follow certain rules and recommendations to ensure that the upholstery and other elements last as long as possible.
But it also happens that the material is old and worn out, and the interior can no longer be restored to its former appearance by dry cleaning. In this case, you can reupholster the car interior with your own hands.
There is nothing complicated here , the main thing is desire, time, patience and the ability to work with your hands.
Although such a process can be carried out not only because of the deteriorated condition of the interior. Some car owners simply want to make their interior more interesting and varied.
And interior tuning is quite popular among car enthusiasts. We recently wrote about flocking a car interior and looked at the work process in detail.
Upholstery with flock is a fairly simple way to improve the interior of your car.
Important features of the interior trim
High-quality full upholstery itself requires the dismantling of many interior elements. The bulk of the time will be spent on dismantling and subsequent assembly of the interior . But first of all, you need to make a choice of the cladding material itself, based both on personal preferences and on the ratio of price and quality.
In advance, you can make small planned sketches for yourself, because a full-fledged upholstery includes not only the upholstery of the car seats, but also many other materials are replaced: on the gearshift knob, on the doors, on the covering of the dashboard and other plastic parts.
The new cladding will look beautiful only if all the materials are harmoniously combined with each other. Even if your plans include only ordinary seat reupholstery, the material should also be selected wisely.
Today, materials for reupholstering car interiors are presented in huge quantities on the market, so there should not be any particular difficulties with the choice. However, it is still worth considering some features, namely: ease of processing, price and quality.
List of proven and high-quality materials:
- artificial leather (a wide variety of colors, density and texture - all this makes this material very attractive);
- genuine leather (reupholstering the car interior with leather will require not only high costs, but also high professionalism);
- Alcantara (versatile and durable artificial suede).
Of all the proposed options, Alcantara is the most suitable fabric for upholstering a car interior. However, processing this material is not as easy as some amateurs believe. Before working with Alcantara, you should have an understanding of its behavior on curved surfaces, and also know when to steam or heat it.
In addition to its low cost, Alcantara has other advantages:
- high wear resistance;
- strength;
- uniform stretch and optimal thickness;
- attractive appearance;
- ease of maintenance.
To reupholster individual exclusive elements, you can use more expensive materials: nubuck, leather, suede or denim. That is, everything that can realize your plans.
It is recommended to cover plastic interior products with durable and relatively comfortable carbon fiber, and specialists use special Imeris materials. They can emit carbon, wood or metal and are suitable for any type of coating.
This video shows what Alcantara looks like:
Tools for DIY car interior reupholstery
In fact, you may need more tools, depending on the characteristics of the car. Most of them can be found in any driver's garage. The following tools will be required:
- standard tools for installation and dismantling;
- scissors or knife;
- special glue (you can use the one used for sound insulation);
- industrial dryer.
Items that can be pulled in the machine:
- seats;
- steering wheel and gear knob;
- door envelopes;
- armrests;
- cabin ceiling;
- If desired, you can process the dashboard.
It will be difficult to find new covers, so it will be easier to make a template from the old ones. Reupholstering the dashboard will also be more difficult, because installing and dismantling the dashboard takes a lot of time and has its own characteristics.
Algorithm of actions
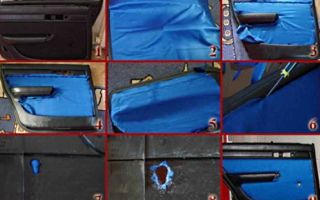
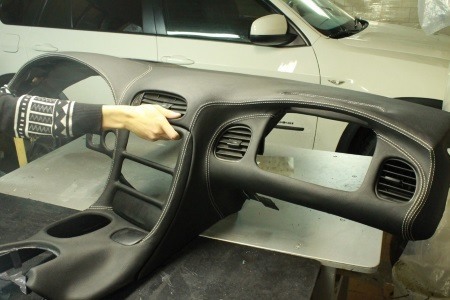
Although the shape of the patterns can be very diverse, there is a general algorithm for performing high-quality reupholstery , which will significantly transform the look of your salon. The photo on the left is a clear example of reupholstering the interior of a BMW car.
Before you begin, make sure that you have all the necessary components (linings, clips, plugs). They are most useful for doors. Step-by-step instruction:
- First you need to dismantle the tightened interior part.
- Then clean the metal parts from all kinds of contaminants.
- To glue the edges, you need to make a small allowance (10 mm) when making patterns.
- The place where the material touches must be thoroughly coated with glue and then allowed to dry.
- Metal and plastic coatings should be degreased.
- It is best to make patterns from thick paper before making a pattern.
- If wrinkles appear, take a hairdryer and steam them.
This video material discusses in detail the process of reupholstering the interior.
Source: https://za-rulem.org/tuning/salon/peretyazhka-salona-svoimi-rukami.html
How to reupholster a car interior with your own hands
Reupholstering a car interior is, although a rather labor-intensive process, but very useful and interesting. And the most important thing is that there is nothing complicated about reupholstering the interior, so absolutely anyone who knows how to work with their hands can handle it.
Most often, reupholstering the car interior is done to repair minor damage, but there are also cases when you just want to reupholster the car interior to refresh the car from the inside.
Whatever the reason for the reupholstery, our tips will help you complete this job quickly and without errors.
Choosing the right material
Despite the fact that ordinary leather is used as a finishing material for car interiors, there are other types of materials that are ideal for upholstery. In most cases, they not only win in price, but are also much better in quality.
Leather will eventually crack and fade in the sun without proper care, and leather seats won't be very comfortable in the hotter months, so let's look at more practical and inexpensive materials. First of all, we will talk about such a material as Alcantara.
Not only is it much cheaper than real leather, but it is also a complex composite material that is resistant to both wear and tear.
Moreover, the choice of different colors of this material is very extensive, so you can choose exactly the shade that you need.
Of course, there are a number of other suitable fabrics and materials for upholstering the interior, but if you are looking for a really inexpensive but convenient option, then it will simply be impossible to find a better option.
Tools
In order for the car to be reupholstered with your own hands as quickly as possible and with minimal effort, you also need to acquire useful tools:
- Screwdriver
- A set of keys of the correct size
- Special glue
- Sharp scissors or knife
- Hair dryer (household or industrial)
- Sewing machine and thread of the desired color
We will dwell on the choice of glue in a little more detail. Regular glue for leather or other similar materials will not work, so you should get a special glue for reupholstering the interior in advance.
If for some reason you cannot find such glue, you can easily replace it with an interior soundproofing agent.
However, we advise you to first try how this or that glue or soundproofing agent will combine on a small piece of the material you have chosen.
Let's start reupholstering the seats
Despite the fact that the technology for reupholstering the interior may vary quite a lot depending on the car model, the general principles are absolutely the same. And it’s better to start by making templates or patterns for those elements that you want to draw.
https://www.youtube.com/watch?v=3lsIVtNz3nE
If you want to reupholster the seats, the easiest way is to cut a pattern in the shape of old covers. To do this, just remove the old covers and cut out exactly the same elements from the purchased material for reupholstery. In shape and size. Next, these elements need to be sewn together using a sewing machine.
It will be easier if, while cutting or marking the material, you mark the parts for their subsequent assembly. In the event that you do not want or cannot sew the parts yourself, then they can be easily sewn for you according to the desired pattern in any studio, and this service will not cost much.
Basically, after this you will only need to put the new seat covers on and the reupholstering process will be complete.
Car dashboard reupholstery
If reupholstering the seats seems not enough to give your car exactly the look you want, we advise you to first pay attention to the dashboard. The thing is.
That it is always before your eyes and it is the reupholstery of this car part that will help you make the car more comfortable and beautiful.
You should also start first by disassembling the dashboard or by separating the elements that you would like to re-tighten.
At the same time, many designers advise combining different colors and shades of upholstery materials to achieve interesting effects, but this is purely a matter of taste.
When the part is removed, it is necessary to remove the old covering, if it was there, and thoroughly degrease the surface. After this, you should attach the cut blank for the part and make sure that it will fit.
If the workpiece is a little larger, do not worry, as you can trim off the excess.
Heat the workpiece directly on the part using a hair dryer and at the same time slightly stretch the workpiece so that it fits the car part more tightly.
When the Alcantar cools, it will take the shape of the part. After this, all that remains is to apply a thin layer of glue to the part and place the workpiece on top and warm it up slightly so that it fits even more tightly. After a few hours, the glue will finally dry and the workpiece can be cut and the updated car interior part can be installed in place.
Some tips and nuances
In fact, these skills are enough to reupholster absolutely any part of a car’s interior, so you can start reupholstering the simplest elements.
Some interesting techniques can be found here: In the same case, if you are not sure that you can handle it, start with straight and even parts.
In the case of curved or round elements, you can use blanks from several parts, but you should either iron the seams or hide them where they will not be visible.
Remember that the glue dries completely within a few hours, but until then the location of the workpiece can either be moved intentionally to align it, or accidentally, which should not be allowed.
Source: http://4gear.ru/kak-peretyanut-salon-avto-svoimi-rukami.html
How to reupholster a car interior with your own hands
Recently, many motorists have been trying to improve their car with their own hands. It is much cheaper and easier than contacting specialists. And also, there is an opportunity to make the car exactly what the driver dreams of.
If you are one of these innovators, this material is written just for you. In this article we will look at how to reupholster a car interior with your own hands.
In order for everything to work out correctly, it is necessary not only to choose the right material, but also to take into account some nuances. What do you need to consider when reupholstering the car interior with your own hands? The most important thing here is:
- car body color. It is not necessary to use this particular color. The main thing is that the shades are compared with each other. For example, if the car is brown, the upholstery can be either olive or beige. Below we will provide you with color schemes that you can use as a guide.
One more thing, it is best not to alter the interior of the car to match the color of its body. Also, don't use colors like green or white. The first one is suitable for decorating a room in an apartment, but not for a salon. The second one will turn out very dirty;
- color combination. If you choose bright green or bright yellow, you will constantly get migraines after long trips;
- number of flowers. It is best to use two primary colors in the interior of a car. Their proportion should be either 50 to 50 or 60 to 40.
If there are three primary colors, they should be compared with each other as 50 30 and 20. In other cases, the interior will turn out to be very contrasting (remember about migraines).
Of course, it is very difficult to find the perfect match of different materials and colors. Therefore, be careful;
- line light. In this matter, try not to go to extremes. For example, if the main interior colors are brown and beige, blue stitching will not work here.
If the interior is black, you can make the firmware orange or blue. Also, contrasting stitching that matches the color of the car looks good.
If you are not sure about the color combination, we recommend choosing threads that match the color of the upholstery.
Choosing materials for reupholstering the car interior with your own hands
We cannot give you advice on what specific fabric should be, because, as they say, it depends on taste and color.
If you want the car interior to be covered with Alcantara, but you simply don’t have enough money for this expensive fabric, we recommend considering options such as faux suede, corduroy, velor, leather or leather substitute.
It is best if the material you choose is natural and high quality. Of course, this choice will be somewhat more expensive, but it will serve you for a long time.
Genuine leather has the most advantages over its analogues. It is strong, durable and can withstand any damage. Genuine leather includes materials such as Monza Dakota and Nappa.
Leather substitute is a budget option, but it will do for reupholstering the interior. If you choose bottom material, we recommend combining several types of it.
Alcantara has recently become very popular not only among motorists, but also among automobile concerns. It has excellent elasticity and wear resistance.
How much material will you need for the interior of your car?
When it comes to the question of how much material is needed to reupholster the interior of your car, we are not your advisor. Stock up on a measuring tape and measure all the elements. Multiply the resulting figure by a factor of 1.2. Do not buy scarce material, because if there is not enough of it, it should always be possible to buy more. Next, the question arises of where to purchase future upholstery.
We do not recommend that you purchase materials online. The fact is that it is best to touch the purchase by touch. You don't have this option online. And when there is only a picture before your eyes, it’s so difficult to make a choice. Moreover, it is impossible to choose a color.
It's best to go to a specialty store. There you will be advised by sellers and managers who are well versed in their product. Alternatively, you can go to furniture stores. But, there they can only sell you furniture materials, not automobile ones. The difference between these two types of fabrics is wear resistance and strength. But, in extreme cases, this will do.
What glue and thread to use
To reupholster the interior with your own hands, the threads must be elastic. They are intended for leather materials and their analogues. Simple, synthetic and nylon threads are not worth buying. After all, they absorb dirt and water.
As for glue, on the Internet you can find out the phone numbers and addresses of organizations that are engaged in reupholstering car interiors in your city, and then methodically call or visit them.
By talking with the craftsmen, you can find out what adhesives they use and whether you can buy the substance. Usually, such material is brought to workshops in barrels.
And some representatives of organizations will agree to the sale.
What should a sewing machine be like?
Having chosen the material for reupholstering the dashboard, you need to decide which sewing machine to sew it on.
In fact, this question is very complex. First, think about what exactly you will sew on such a machine.
https://www.youtube.com/watch?v=-q99sn1VvGE
For leather and thick materials, a regular sewing unit is suitable. There are home and industrial machines. But industrial ones (also called straight stitch) are not intended for hemming thin materials.
You can stitch upholstery on a machine intended for home use. But the result will not be what you hoped for. And also, in this case, you must install a thick needle and the right foot.
How to reupholster the interior without seams
First prepare the surface. Degrease it and wash it off dust. Next, apply glue to the surface. Curved surfaces must be covered with glue in two layers (approximately 20-30 millimeters).
The glue must dry according to the instructions. And keep in mind that it should dry very well. You can use a hairdryer to dry it. Level the material gradually and try to apply it to the entire surface. Use a hairdryer to heat the fabric, and only then begin to press and straighten it.
If the material does not stick, apply a small layer of automotive putty, sand it and apply another layer of glue. When the material is glued, leave about three centimeters for the bend and trim off the rest.
If wrinkles appear, you can peel off the material and repeat the whole procedure from the very beginning, moisten a rag with water and try to smooth out the wrinkles, or leave everything as is.
How to reupholster a torpedo with your own hands
Re-upholstering a torpedo with your own hands is not too different from the process we have already described. Apply glue only on an even part. By the way, it is on the dashboard that folds most often form. They accumulate under the glove compartment and steering wheel. Wrap a damp cloth around the spatula and try to smooth out any uneven areas.
Next, you will have to trim off the excess material and fold it inside out.
Source: http://autolynch.ru/articles/kak-delaetsya-peretyazhka-salona-avtomobilya-svoimi-rukami
Do-it-yourself car interior reupholstery - technology, tools, materials
Reupholstering a car interior with your own hands is a rather labor-intensive, but simple procedure. Reupholstering the interior of a car may be necessary for various reasons, including the long period of use of the car, as well as the owner’s desire to modernize the interior of his car.
In most cases, reupholstery of the car interior is necessary because the driver or passenger inadvertently burned the original upholstery with a cigarette.
Often, various traces of food may also remain, which cannot be removed using chemicals.
Sometimes car owners simply see a beautiful interior in the cars of their friends, and they have a desire to update the interior of their car.
Car interior tuning is an ideal solution for those who want to decorate their car and make it stand out from other cars. In addition, reupholstering the car interior is often popular among the fair sex, who simply like to change something regularly. Of course, independent reupholstery of the car interior in such situations is carried out by a man.
Nowadays, in stores you can find everything you need to reupholster a car interior with your own hands, so you won’t have any problems with this. In addition, doing the work yourself will save a significant amount, since this type of service costs a lot. It's time to start!
Materials for car interior reupholstery
You can often see leather interiors in cars, but in our article we will talk about another material that is most popular today. Alcantara is considered one of the most optimal materials for high-quality upholstery of the interior on your own. Another advantage of this choice is its comparative cheapness.
Alcantara is a composite material that is highly resistant to wear and tear and can be used for a long time. In addition, you can choose the most suitable color and make the interior exactly the way you want. It is worth noting that there are other materials on sale, the choice of which depends only on your preferences.
Tools for reupholstering the car interior with your own hands:
- a set of keys;
- screwdriver;
- glue (you can take a product used for soundproofing the interior);
- knife and scissors for linoleum;
- hairdryer
Car interior reupholstery technology – important details in detail
You need to understand that the technology for reupholstering a car interior may differ slightly depending on the specific model, but the general principles are exactly the same.
Seats. It is necessary to make pattern templates using previous covers, or buy a ready-made solution (it is very difficult to select covers, so most likely you will have to make new ones).
Door trim reupholstery
- dismantling the old casing, removing dust and dirt from the doors;
- cutting Alcantara (or other material) along the contour of the door;
- cutting holes for the door handle and window handle (if there is one);
- applying glue to areas where the fabric comes into contact with the door;
- Be sure to leave allowances (approximately 10 mm).
Ceiling reupholstery
- removal of decorative trims of racks, backlight lamps, handles and plugs;
- dismantling the previous ceiling lining;
- gluing the material selected for reupholstering the car interior, as well as installation in the reverse order.
Armrest reupholstery
- removing the armrest;
- preparing paper patterns for armrest parts;
- cutting fabric according to patterns (leave allowances that will be useful for hemming);
- securing the edge, stretching the fabric and gluing it around the entire perimeter.
It is also worth noting that to remove wrinkles you need to use a hairdryer, steaming the selected material with it.
In the same way, you can reupholster the interior with your own hands in all other parts. Although the procedure is quite scrupulous, there are no significant difficulties in it.
See also the article about reupholstering the steering wheel with leather on our website - link.
Before you start reupholstering the car interior with your own hands, we also recommend that you familiarize yourself with the following video:
Source: http://avtopub.com/peretyazhka-salona-avtomobilya-svoimi-rukami/
How to reupholster a car interior
When using any car, upholstery materials gradually lose their original appearance, fray and become covered with stains that cannot be cleaned. Light-colored interiors are especially susceptible to this problem, when after some time from the moment of purchasing a car, reupholstering the interior becomes almost necessary.
Of course, you can resolve the issue by contacting a specialized workshop, whose workers will completely replace the upholstery of the interior and seats, but you can also try to do it yourself, thus saving a significant amount of money. You will also make the car more elegant and unique.
How to reupholster the interior: choice of materials
Original salon
Everyone will agree with us that leather interior trim is the best option for any car, but this pleasure is not cheap and not everyone can afford it.
Today there are other high-quality materials with which you can restore the interior. These include:
- Carpet. It is the cheapest and most accessible of all. Its non-woven base is often covered with a pile decorative layer. The main advantages of the material include a simple installation process and a wide selection of colors.
- Alcantara. This material is based on fine-fiber threads. The material is produced using technologies from the textile and chemical industries. It has excellent characteristics of durability and strength, and is distinguished by its softness, silky surface and dirt-repellent properties.
- Leatherette. Attractive and inexpensive material with an impressive list of shortcomings. These include an unpleasant odor that persists in the car interior for a long time, high elasticity properties, low resistance to mechanical stress and the ability to absorb unpleasant odors.
Video: Restoration of the BMW E34 interior - reupholstery of the interior (ceiling) with fabric
When purchasing material for reupholstering a car interior with your own hands, you need to pay attention to the quality of the product offered to you. Check the homogeneity of the material structures. If you choose Alcantara, keep in mind that the direction of the grain can play a major role when cutting. It may turn out that on one seat all the details will have different shades.
to contents ↑
Preparing tools
Tools
Since the process of reupholstering a car interior with any material is carried out according to a certain algorithm, you will need certain tools that are sold in stores. So, you will need the following:
- sewing machine;
- scissors;
- several tubes of glue;
- hair dryer;
- soundproofing materials if desired;
- a set of keys and screwdrivers for disassembling the interior.
to contents ↑
Let's start work
It is important to consider that depending on the car model, the sequence of replacing the interior trim may be different. In general terms, the action plan is as follows:
Re-upholstery process
- All fasteners and fittings are dismantled: handles, visors, decorative elements, etc.
- The electrical wiring in the car is disconnected, decorative elements are unfastened, old upholstery is dismantled, and connectors are removed.
- When disassembly is completed, the surface is cleaned of dirt.
- All plastic and metal parts must be degreased.
- The parts of the future upholstery are cut out. To do this, the old parts are applied to a cardboard sheet and cut out. It is recommended to transfer finished patterns to the prepared material when you are sure that everything was done correctly.
- After preparing the new parts, you need to begin installing them, having previously coated the surfaces with an adhesive mixture.
- If necessary, use a hair dryer to smooth out any creases. In addition to steaming, you can lightly beat the seams, giving the products a beautiful, neat look.
- Finally, everything needs to be installed in its place, namely the fasteners.
to contents ↑
Upholstery tips
Do-it-yourself interior trim is not an easy task, but if you do everything according to technology and follow certain tips, you will not have any problems.
to contents ↑
Seats
Upholstered seat
If you decide to replace the seat upholstery instead of buying covers, you first need to rip out the old upholstery at the seams and make a pattern using it. After preparing the individual elements with a sewing machine, everything needs to be assembled into one whole.
to contents ↑
Doors
It is very important to clean all dirt when replacing upholstery. When creating patterns, keep in mind that you need to leave a centimeter allowance on all sides of the part. Carefully make holes for the door handle or window crank. At those points where the upholstery fits tightly to the door, coat it with glue.
to contents ↑
Ceiling
Upholstered ceiling
To replace the headliner, you must first completely dismantle the following elements:
- plugs;
- backlight lamps;
- pens;
- decorative overlays for pillars.
This will allow you to carefully replace the headliner. If you are using leatherette, warm it up before installation, giving the material elasticity. This will allow you to easily cover any surface with material.
to contents ↑
Armrests
To reupholster the armrests, you must first dismantle them, and then make patterns using the old parts, always leaving some reserves of material around the edges. After this, you need to glue the product over the entire area, carefully secure the edges and treat it with a hairdryer.
to contents ↑
Let's sum it up
Video: Car interior reupholstery with leather
In the event that there is a need or desire, before the final installation of the upholstery, foam rubber or insulating material can be laid under the parts.
As you understand, reupholstering the interior yourself is a completely feasible task. Naturally, it requires some investment and time, but the result is worth it. You can be proud of the work you've done, even if it's your first time doing something like this.
Source: http://avtozvuk.info/kak-svoimi-rukami-peretyanut-salon-avtomobilya.html
Do-it-yourself car interior reupholstery
Over the years, every motorist has a need to update their car interior. After all, reupholstering the interior is not only a beautiful look, but above all it is comfort. And comfort for the driver is the most important thing, especially for those who spend a lot of time on the road.
Therefore, if you decide to reupholster the interior of your car, then you need to take this matter responsibly. Since there are quite a lot of finishing materials available at the moment, you can create your own unique style. Of course, most people prefer leather, but you can find cheaper analogues.
In any case, your interior will take on a fresh, aesthetic look and your passengers will be reluctant to leave your car.
In order to update the interior of your car, you don’t have to go to an expensive car service center and shell out a lot of money. You can purchase materials for upholstery of the interior in auto stores or auto markets, which will significantly save you money.
And you can do this work yourself. To do this, consider the stages of work that are provided below.
All work should be done correctly and efficiently so that reupholstering the car interior with your own hands is pleasing to the eye and lasts for decades.
Interior reupholstery
The upholstery of the car interior can be divided into several parts. Namely: re-upholstery of the dashboard, ceiling, doors. Now let's figure out how to do this in order.
Torpedo reupholstery
Reupholstering the interior should begin with the dashboard. Why did you choose a torpedo in the first place? It will take you a lot of time to update this element. Reupholstering a torpedo is considered the most difficult of all jobs.
For high-quality finishing, the dashboard will have to be removed. If you have no experience in this matter, then it is better to turn to specialists. It happens that even an experienced craftsman cannot immediately find the fasteners the first time.
So it’s better to shell out a small amount and seek help from qualified people.
After the dashboard has been removed, you can begin finishing. We cover it with the purchased material (in this case it will be leather):
- First, the entire torpedo needs to be thoroughly degreased. Refined gasoline works well for this. If you don’t have one, you can use a special degreaser, which can be bought at any auto store. We treat the entire surface of the torpedo and wait until it dries completely.
- Next, you need to sand the torpedo in those places where the material will fit and fit tightly. Let's take some coarse sandpaper and go over the surface of the torpedo well. The result is a clean surface, free of debris and remnants of previous material. Then we sweep away the dust resulting from cleaning with an ordinary soft brush.
- Let's move on to the finishing material. Let's put the material on the torpedo. We mark the places where the seams will be located. The design of the torpedo varies depending on the car. And if your dashboard has a minimum number of bends and irregularities, then you can consider yourself very lucky. Mark the material very carefully and slowly.
- To make the work easier and determine exactly where the seams and bends will be located, we will glue “non-woven fabric” onto the surface of the torpedo using rubber glue. And so we make markings on it ourselves.
- Lay out the material on a flat table.
The table must be perfectly level. We check the material for defects; for this we need good lighting. Of course, it is best to do this during the day, in daylight. After the material has passed strict testing, we proceed to the pattern. We put the material and non-woven pattern together. And if all the curves match, we begin cutting. If not, you need to re-mark.
- The finished shape of the pattern is smoothed and pressed to the plane with an iron and special weights with high viscosity. You can also buy weights at the auto market or in a store. Using a pen (preferably gel), the necessary markings are applied to the material in order to establish the boundaries of cutting the flaps. Don’t forget to leave a small margin of 10 mm on all sides, otherwise there will be problems in future stitching.
- We cut the material according to the previously indicated marks. It must be cut into separate pieces. (Use only sharp scissors; dull ones can damage and stretch the material).
- We place the finished pieces on the dashboard and check the ratio of sizes and shapes.
- Then we carefully sew the pieces of material together. This must be done on a special machine. Threads need to be selected of the highest quality (cheap, low-quality threads will lead to rapid unraveling of the material). If you do not have such a machine, you can give this work to any studio.
- On the wrong side of the finished case, you need to trim off all the folded leather, but at the same time so as not to touch or cut the threads.
- Coat the inside of the case with glue (this will be the first layer). We also coat the surface of the torpedo. We wait until it dries completely. And after the glue has dried well, apply a second layer of glue and begin gluing the cover to the torpedo.
- The material is glued with precise placement of stitches along pre-marked lines. All seams should be located at the corners and bends of the torpedo.
- And the last step. We roll out the glued material with a rubber roller and leave it for a day for complete adhesion to the torpedo. A day later we pick up the finished part and install it in place.
Car door reupholstery
The next step in reupholstering the car interior with your own hands is working with the car doors. Everything here, without exception, is much simpler and easier than with a torpedo, so this procedure for updating the doors will not take too much time. Let's get started:
- First, remove the trim from the door and clear it of debris. To do this, just wipe it with a damp cloth.
- We apply the finishing material to the door and measure the required size. Once we have determined the required size, carefully cut off the unnecessary parts. As a result, the material should take the correct shape, exactly following the contours of the door.
- We trace the material around the perimeter with a pen. The resulting line is the cutting location.
- Apply glue around the perimeter of the material. Then the edges need to be pushed into the plastic, a flathead screwdriver is suitable for this. When inserting material into plastic, you need to ensure that the material lies flat without folds.
- Then you need to cut a hole for the handle and window regulator.
- On the back side of the casing, excess material is cut off, and the edges are tightly glued to the surface of the door.
Do-it-yourself car door reupholstery: video
The last step will be reupholstering the ceiling. This process is also not complicated and you can do it yourself without specialists. Let’s consider this work, like the previous ones, step by step:
- We remove the old trim from the ceiling. To do this, it is worth tearing the material in such a way that it is completely detached from the surface of the ceiling together with the foam rubber. And the remains of foam rubber can be easily swept away with a brush or hand.
- After removing the old material, glue may remain on the ceiling in some places. It needs to be cleaned. To do this, you can use a regular solvent. When the ceiling is clean, without glue, its surface needs to be sanded with fine-grained sandpaper. And after that you can start gluing new material.
- You should start gluing the material from the center of the ceiling. From the center, gradually move to the sides. When gluing, special attention should be paid to such places as handles and sun visors.
- When the new material is completely glued, all that remains is to trim off any excess parts that may stick out on the sides. Next, you should replace the handles and other ceiling elements that are present in the car.
Do-it-yourself car ceiling reupholstery: video
As you have seen, reupholstering the interior with your own hands will not be difficult. The entire work can be completed in 2-4 days. After such an update, your car will take on a fresh and beautiful interior look. If you want your salon to remain like this for as long as possible, then don’t forget about dry cleaning. With perseverance and diligence, everything will turn out in the best possible way!
(3 : 5,00 5)
Source: http://vse-provse.com/peretyazhka-salona-avtomobilya-svoimi-rukami